Thrustmaster 2969078 2960634 Manuel utilisateur
- Catégorie
- Commandes de jeu
- Taper
- Manuel utilisateur
Ce manuel convient également à

QUICK INSTALL
THRUSTMASTER
®
U
S
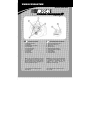
TECHNICAL FEATURES
1. Digital gearshift levers
2. POV button
3. Multi-function (4 in 1) button
4. Action buttons
5. Analog brake pedal
6. Analog gas pedal
7. Clamp screw
8. Pedal cable
9. USB connector
F
CARACTÉRISTIQUES TECHNIQUES
1. Leviers de changement de vitesse
2. Bouton POV (Point de vue)
3. Bouton 4 en 1
4. Boutons d’action
5. Pédale de freinage analogique
6. Pédale d’accélération analogique
7. Vis de serrage
8. Câble du pédalier
9. Connecteur USB
Note: in the event of malfunction during use
due to electrostatic emission, please quit the
game and unplug the unit from the computer.
Resume normal game play by plugging the unit
back in and restarting the game.
Remarque : en cas de mauvais fonctionnemen
t
dû à une émission électrostatique, quittez le jeu
et débranchez le périphérique de votre
ordinateur. Pour rejouer, rebranchez le
périphérique et relancez le jeu.
For PCs (Windows 98 or higher) equipped
with USB ports.
Pour PC (Windows 98 ou supérieur) équipés
d’un port USB.

© Guillemot Corporation 2002. All rights reserved.
Thrustmaster® and Thrustmapper™ are trademarks and/or
registered trademarks of Guillemot Corporation S.A.
NASCAR® is a registered trademark of the National
Association for Stock Car Auto Racing, Inc. Microsoft®
Windows® is a registered trademark of Microsoft Corporation
in the United States and/or other countries. Powered by
Immersion TouchSense™ Technology and protected by one
or more of the following Immersion patents: 5,185,561 /
5,220,260 / UM-108174 / 5,389,865 / 5,414,337 / 5,459,382 /
B1 5,459,382 / 2,122,047 (Canada) / 5,513,100 / 5,559,412 /
5,576,727 / 5,589,854 / 5,629,594 / 5,691,898 / 5,701,140 /
5,721,566 / 5,731,804 / 5,734,373 / 5,739,811 / 2,167,304
(Canada) / 5,754,023 / 5,767,839 / 5,769,640 / 5,805,140 /
5,821,920 / 5,825,308 / 5,828,197 / 5,831,408 / 5,844,392 /
5,872,438 / 5,880,714 / 5,889,670 / 5,889,672 / 5,907,487 /
5,929,607 / 5,929,846 / 5,956,484 / 5,959,613 / 5,999,168 /
6,020,875 / 6,020,876 / 6,024,576 / 6,028,593 / 6,037,927 /
6,046,727 / 6,050,718 / 6,057,828 / 6,061,004.
TouchSense™ and I-FORCE® are trademarks and/or
registered trademarks of Immersion Corporation. All other
trademarks and brand names are hereby acknowledged and
are property of their respective owners. Illustrations not
binding. Contents, designs and specifications are subject to
change without notice and may vary from one country to
another.
U
S
WHEEL SETUP
1. Place the wheel on a table or flat surface.
2. Tighten the clamp screw (7) onto the
underside of the table until the wheel is
firmly fixed into place. Be careful not to
over-tighten the clamp to avoid damaging
either the clamp or the table.
3. Connect the pedals to the wheel using
the pedal cable (8).
F
INSTALLATION DU VOLANT
1. Placez le volant sur une table ou autre
surface plane.
2. Resserrez la vis de serrage (7) sous la
table jusqu’à ce que le volant soi
t
parfaitement stable. Ne serrez pas trop
fort la vis car vous risquez d’endommage
r
le système de fixation ou la table.
3. Reliez le pédalier au volant à l’aide du
câble du pédalier (8).
© Guillemot Corporation 2002. Tous droits réservés.
Thrustmaster® et Thrustmapper™ sont des marques et/ou
des marques déposées de Guillemot Corporation S.A.
NASCAR® est une marque déposée de National Association
for Stock Car Auto Racing, Inc. Microsoft® Windows® est une
marque déposée de Microsoft Corporation aux États-Unis
et/ou dans d’autres pays. Technologie Immersion
TouchSense™ protégée par un ou plusieurs des brevets
Immersion suivants : 5,185,561 / 5,220,260 / UM-108174 /
5,389,865 / 5,414,337 / 5,459,382 / B1 5,459,382 / 2,122,047
(Canada) / 5,513,100 / 5,559,412 / 5,576,727 / 5,589,854 /
5,629,594 / 5,691,898 / 5,701,140 / 5,721,566 / 5,731,804 /
5,734,373 / 5,739,811 / 2,167,304 (Canada) / 5,754,023 /
5,767,839 / 5,769,640 / 5,805,140 / 5,821,920 / 5,825,308 /
5,828,197 / 5,831,408 / 5,844,392 / 5,872,438 / 5,880,714 /
5,889,670 / 5,889,672 / 5,907,487 / 5,929,607 / 5,929,846 /
5,956,484 / 5,959,613 / 5,999,168 / 6,020,875 / 6,020,876 /
6,024,576 / 6,028,593 / 6,037,927 / 6,046,727 / 6,050,718 /
6,057,828 / 6,061,004. TouchSense™ et I-FORCE® sont des
marques et/ou des marques déposées d’Immersion
Corporation. Toutes les autres marques déposées et noms
commerciaux sont reconnus par les présentes et sont la
propriété de leurs propriétaires respectifs. Illustrations non
contractuelles. Le contenu, la conception et les spécifications
sont susceptibles de changer sans préavis et de varier selon
les pays.

U
S
USB INSTALLATION
The USB connector allows you to hot-plug your wheel into your computer.
1. Plug the wheel into the power supply using the power cable provided.
2. Place the switch at the back of the racing wheel into the ON position.
3. Start your computer up and plug the USB connector (9) into one of the USB ports located at the
back of your computer. Windows 98/Me/2000/XP will then automatically detect the ne
w
peripheral device.
Note: if you are connecting a USB peripheral device for the first time, Windows may ask you for the
Windows CD-ROM during installation in order to install the required system files.
• Under Windows 98: the Add New Hardware Wizard will find the appropriate drivers for you. Simpl
y
click on Next and then follow the on-screen instructions to complete the installation.
• Under Windows Me/2000/XP: installation of the drivers is carried out automatically.
F
INSTALLATION USB
Grâce au connecteur USB, vous pouvez brancher votre volant sans éteindre votre ordinateur.
1. Branchez le volant à l’aide du câble d’alimentation fourni.
2. Placez l’interrupteur situé à l’arrière de votre volant en position ON.
3. Démarrez votre ordinateur et reliez le connecteur USB (9) à l’un des ports USB situés au dos de
votre unité centrale. Windows 98/Me/2000/XP détectera alors automatiquement le nouveau
périphérique.
Remarque : si vous branchez un périphérique USB pour la première fois, il est possible que, pendant
l’installation, Windows vous demande d’insérer le CD-ROM Windows afin d’installer les fichiers
système nécessaires.
• Sous Windows 98 : l’Assistant Ajout de nouveau matériel se charge de rechercher pour vous les
pilotes appropriés. Cliquez sur Suivant. Suivez les instructions portées à l’écran pour termine
r
l’installation.
• Sous Windows Me/2000/XP : l’installation des pilotes s’effectue automatiquement.
For use with
PC

U
S
INSTALLATION TEST
1. Click on Start/Settings/Control Panel.
2. Double-click on the Game Controllers icon (or Game Options, depending on your operating
system).
If the wheel has been installed correctly, it will appear in the list of game controllers, with OK status.
3. Click on Properties and select the Test Input tab.
The Test Input tab allows you to view the buttons and axes on your wheel; they light up/become
animated when you test them.
THRUSTMAPPER
The intuitive programming interface, which will enable you to create your own gaming presets, can be
downloaded on the Thrustmaster website (us.thrustmaster.com
).
1. Once you have connected to the site, click on Support.
2. Select Wheels in the products group list, select NASCAR Pro Force Feedback 2 and Utilities.
3. Download the latest version of Thrustmapper.
For details on how to use the application, please refer to the electronic documentation.
www.nascar.com
F
TEST D’INSTALLATION
1. Cliquez sur Démarrer/Paramètres/Panneau de configuration.
2. Double-cliquez sur l’icône Contrôleurs de jeu (ou Options de jeu selon votre système
d’exploitation).
Si votre volant est correctement installé, il apparaît dans la liste des contrôleurs de jeu avec l’état OK.
3. Cliquez sur Propriétés et sélectionnez l’onglet Test Input.
L’onglet Test Input permet de visualiser les boutons et les axes de votre volant ; ils
s’allument/s’animent quand vous les sollicitez.
THRUSTMAPPER
Si vous souhaitez utiliser Thrustmapper – logiciel de programmation avancée permettant de créer des
profils de jeu personnalisés – vous pouvez le télécharger sur le site web de Thrustmaste
r
(us.thrustmaster.com).
1. Une fois sur le site, cliquez sur Support.
2. Sélectionnez Wheels dans la liste des familles de produits, sélectionnez NASCAR Pro Force
Feedback 2 et Utilities.
3. Téléchargez la dernière version de Thrustmapper.
Consultez la documentation électronique pour de plus amples détails sur l’utilisation de
Thrustmapper.
www.nascar.com
Pour PC
-
 1
1
-
 2
2
-
 3
3
-
 4
4


Thrustmaster 2969078 2960634 Manuel utilisateur
- Catégorie
- Commandes de jeu
- Taper
- Manuel utilisateur
- Ce manuel convient également à
dans d''autres langues
Documents connexes
-
TRUSTMASTER FIRESTORM DUAL POWER 3 Le manuel du propriétaire
-
-
-
Thrustmaster eSwap Manuel utilisateur
-
-
-
Autres documents
-
Belkin NOSTROMO N30 Manuel utilisateur
-
 ACT-LABS Force RS Le manuel du propriétaire
-
Excalibur NASCAR 9511-3 Manuel utilisateur
-
Logitech NASCAR RACING WHEEL Le manuel du propriétaire
-
-
Saitek R440 Manuel utilisateur
-
