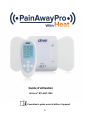
Drive Medical Padded Swivel Seat Cushion Manuel utilisateur
- Taper
- Manuel utilisateur

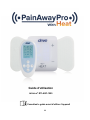
Operating Manual
Item # RTLAGF-1000
Consult instructions for use

i
Table of Contents
Introduction ................................................................................................................................. 1
Indications for Use ...................................................................................................................... 1
Safety Warning ........................................................................................................................... 2
Contraindications ........................................................................................................................ 2
Warnings .................................................................................................................................... 2
Precautions ................................................................................................................................. 3
Adverse Reactions ...................................................................................................................... 4
Symbol and Title ..................................................................................................................... 4, 5
Environmental Condition for Transport and Storage .................................................................... 6
Electromagnetic Compatibility ................................................................................................. 6, 7
How the Device Works .............................................................................................................. 11
Setup ........................................................................................................................................ 12
Operating Instruction ................................................................................................................. 13
Performance Specifications ...................................................................................................... 18
Cleaning and Maintenance ....................................................................................................... 18
Trouble Shooting ...................................................................................................................... 18
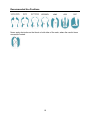
Recommended Use Positions ................................................................................................... 19
Warranty ................................................................................................................................... 20
Contact Information................................................................................................................... 20

1
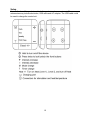
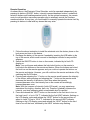
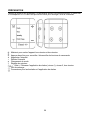
Introduction
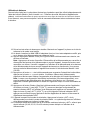
RTLAGF-1000 delivers electric pulses and heat generated to the user’s body areas
such as legs and feet through the electrodes. The portable and compact device has
multiple modes of different pulse frequencies, covering Transcutaneous Electrical Nerve
Stimulation (TENS) and Electrical Muscle Stimulation (EMS). It includes operating
elements of ON/OFF button, intensity increase button, intensity decrease button, mode
button, timer button, heat/temperature button, and could be attached and detached to
electrodes through the magnetic connectors.
Indications for Use:
TENS (Modes 1, 2, 4, 5, 6, 8)
To be used for temporary relief of pain associated with sore and aching muscles in the
shoulders, waist, back, arms and legs, due to strain from exercise or normal household
and work activities.
It is also intended for symptomatic relief and management of chronic, intractable pain
and discomfort associated with arthritis.
EMS (Modes 1, 3, 7)
To stimulate healthy muscles to improve and facilitate muscle performance. To be used
for the improvement of muscle tone and firmness and for strengthening muscles in the
arms, abdomen, legs, and buttocks. Not intended for use in any therapy or for the
treatment of any medical conditions or diseases.
It is also intended to temporarily increase local blood circulation in the healthy muscles
of lower extremities.
Heating Mode
Temporary relief of minor aches and pains.

2
Safety Warning
Caution, consult accompanying documents
Contraindications:
w Do not use this device on persons who have a cardiac pacemaker, implanted
defibrillator, or other implanted metallic or electronic device because this may cause
electric shock, burns, electrical interference or death.
w Do not use this device on persons whose pain syndromes are undiagnosed.
Warnings:
w WARNING: Use carefully. May cause serious burns. Do not use over sensitive skin
areas or in the presence of poor circulation. The unattended use of this device by
children or incapacitated persons may be dangerous. To reduce the risk of burns,
electric shock and fire this device must be used in accordance with the instructions.
w Do not crush the device or its electrode, and avoid sharp folds.
w Carefully examine the device and its electrodes, do not use if they show any sign of
deterioration.
w Do not tamper with this device and its electrodes in any way. There are no user
serviceable parts. If for any reason they do not function satisfactorily, return to the
authorized service dealer where purchased from.
w The long-term effects of chronic electrical stimulation are unknown.
w Stimulation should not be applied over the carotid sinus nerves, particularly in persons
with a known sensitivity to the carotid sinus reflex. Carotid sinus is located on both sides
of the neck (Refer to Page 20 for details).
w Stimulation should not be applied over the front of neck or mouth. Severe spasm of
the laryngeal and pharyngeal muscles may occur and the contractions may be strong
enough to close the airway or cause difficulty in breathing. Stimulation over the neck
can also cause adverse effects on heart rhythm or blood pressure.
w Do not apply stimulation across the patient’s chest because the introduction of
electrical current into the chest may cause rhythm disturbances to the patient’s heart,
which could be lethal.
w Since the effects of stimulation of the brain are unknown, stimulation should not be
applied across the head and electrodes should not be placed on opposite sides of head.
w Stimulation should not be applied over swollen, infected, or inflamed areas or skin
eruptions, e.g., phlebitis, thrombophlebitis, varicose veins, etc.

3
w Stimulation should not be applied over, or in proximity to, cancerous lesions.
Precautions:
w Safety of stimulation use during pregnancy has not been established. Consult with
your physician before use during pregnancy.
w Caution should be used for persons with suspected or diagnosed heart problems.
w Caution should be used for persons with suspected or diagnosed epilepsy.
w Caution should be used if you have any of the following:
• If you have a tendency to bleed internally following an injury.
• If you recently had surgery, or have ever had surgery on your back.
• If areas of skin lack normal sensations, such as skin that is numb.
w Consult with your physician before use over the menstrual uterus.
w You may experience skin irritation or hypersensitivity due to the electrical stimulation
or electrical conductive medium. The irritation can usually be reduced by using an
alternate conductive medium, or alternate electrode placement.
w Do not use this device while driving, operating machinery, or during any activity in
which involuntary muscle contractions may put the user at undue risk of injury.
w Keep this device out of reach of children.
w Do not use this device while sleeping.
w Do not use this device in high humidity areas such as, a bathroom.
w Stop using this device at once if you feel discomfort, dizziness or nausea, and consult
your physician immediately.
w Do not attempt to move the electrodes while the device is operating.
w Do not apply stimulation of this device in the following conditions:
● Across the chest because the introduction of electrical current into the chest may
cause
rhythm disturbances to the heart, which could be lethal.
● Over open wounds or rashes, or over swollen, red, infected, or inflamed areas or
skin
eruptions (e.g., phlebitis, thrombophlebitis, varicose veins).
● In the presence of electronic monitoring equipment (e.g., cardiac monitors, ECG
alarms).

4
● On children or incapacitated persons.
w Be aware of the following:
● Consult with your physician before using this device.
● This device is not effective for pain associated with Central Pain Syndromes, such
as
headaches.
● This device is not a substitute for pain medications and other pain management
therapies;
● This device is a symptomatic treatment and, as such, suppresses the sensation of
pain
that would otherwise serve as a protective mechanism.
● Stop using the device if the device does not provide pain relief.
● Use this device only with the electrodes, and accessories recommended for use by
the
manufacturer.
w Store the device away from high-temperature and direct-sunlight. Storage outside of
stated storage temperature may result in measurement error or device malfunction.
w Do not share the use of the electrodes with others; electrodes are intended for single
person use.
w Do not use the device while it’s charging.
w This device contains a lithium battery. If overheating of the device occurred during the
charging, stop the charging or operation immediately and contact customer support.
w Dispose of this battery-containing device according to the local, state, or federal laws.
w Skin burns may occur, and check the skin under the electrode periodically.
Adverse Reactions
w You may experience skin irritation and burns beneath the stimulation electrodes
applied to the skin; check skin under electrodes frequently.
w You should stop using the device and should consult with your physicians if you
experience adverse reactions from the device.

5
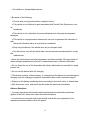
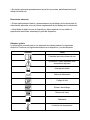
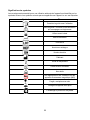
Symbol and Title
Information essential for proper use shall be indicated by using the corresponding
symbols. The following symbols may be seen on the device and labeling.
Symbol
Title
Consult instructions for use
Caution, consult accompanying
documents
Use by date
Date of manufacture
Batch code
Catalog number
Serial number
Manufacturer
Temperature limitation
Humidity limitation
Non-sterile
MR Unsafe - keep away from magnetic
resonance imaging (MRI) equipment
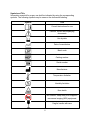
Fragile, handle with care

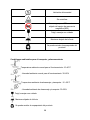
6
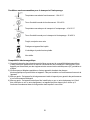
Keep away from rain
Product packaging is able to be recycled
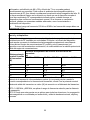
Environmental Condition for Transport and Storage
- Normal working ambient temperature: 10~40°C
- Normal working ambient humidity: 30~85%
- Store and transport ambient temperature: -10 ~50°C
- Store and transport ambient humidity: 30~90%
Fragile; handle with care
Keep away from rain
Product packaging is able to be recycled
Non-sterile
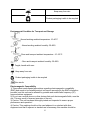
Electromagnetic Compatibility
1) This product needs special precautions regarding electromagnetic compatibility
(EMC) and needs to be installed and put into service according to the EMC information
provided, and this unit can be affected by portable and mobile radio frequency (RF)
communications equipment.
2) Do not use a mobile phone or other devices that emit electromagnetic fields, near the
unit. This may result in incorrect operation of the unit.
3) Caution: This unit has been thoroughly tested and inspected to ensure proper
performance and operation!
4) Caution: This machine should not be used adjacent to or stacked with other
equipment and that if adjacent or stacked use is necessary, this machine should be

7
observed to verify normal operation in the configuration in which it will be used.
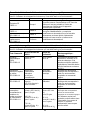
Guidance and manufacture’s declaration – electromagnetic emission
The device is intended for use in the electromagnetic environment specified below. The
customer of the user of the device should ensure that it is used in such an environment.
Emission test
Compliance
Electromagnetic environment – guidance
RF emissions
CISPR 11
Group 1
The device uses RF energy only for its internal
function. Therefore, its RF emissions are very
low and are not likely to cause any interference
in nearby electronic equipment.
RF emission
CISPR 11
Class B
The device is suitable for use in all
establishments, including domestic
establishments and those directly connected to
the public low-voltage power supply network
that supplies buildings used for domestic
purposes.
Harmonic
emissions
IEC 61000-3-2
Class A
Voltage
fluctuations/ flicker
emissions
IEC 61000-3-3
Complies
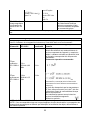
Guidance and manufacture’s declaration – electromagnetic immunity
The device is intended for use in the electromagnetic environment specified below. The
customer or the user of the device should ensure that it is used in such an environment.
Immunity test
IEC 60601 test
level
Compliance
level
Electromagnetic
environment - guidance
Electrostatic
discharge (ESD)
IEC 61000-4-2
±6 kV contact
±8 kV air
±6 kV contact
±8 kV air
Floors should be wood,
concrete or ceramic tile. If
floor are covered with
synthetic material, the
relative humidity should be
at least 30%.
Electrical fast
transient/burst
IEC 61000-4-4
±2 kV for power
supply lines
±1 kV for
input/output lines
±2kV for power
supply lines
Mains power quality should
be that of a typical
commercial or hospital
environment.
Surge
IEC 61000-4-5
± 1 kV line(s) to
line(s)
± 2 kV line(s) to
earth
±1 kV differential
mode
Mains power quality should
be that of a typical
commercial or hospital
environment.
Voltage dips,
short
interruptions and
voltage variations
on power supply
input lines
IEC 61000-4-11
<5% U
T
(>95% dip in U
T
)
for 0.5 cycle
40% U
T
(60% dip in U
T
)
for 5 cycles
<5% U
T
(>95% dip in U
T
)
for 0.5 cycle
40% U
T
(60% dip in U
T
)
for 5 cycles
Mains power quality should
be that of a typical
commercial or hospital
environment. If the user of
the device requires
continued operation during
power mains interruptions, it
is recommended that the

8
70% U
T
(30% dip in U
T
)
for 25 cycles
<5% U
T
(>95% dip in U
T
)
for 5 sec
70% U
T
(30% dip in U
T
)
for 25 cycles
<5% U
T
(>95% dip in U
T
)
for 5 sec
device be powered from an
uninterruptible power supply
or a battery.
Power frequency
(50Hz/60Hz)
magnetic field
IEC 61000-4-8
3 A/m
3 A/m
Power frequency magnetic
fields should be at levels
characteristic of a typical
location in a typical
commercial or hospital
environment.
NOTE U
T
is the a.c. mains voltage prior to application of the test level.

9
Guidance and manufacture’s declaration – electromagnetic immunity
The device is intended for use in the electromagnetic environment specified below. The
customer or the user of the device should ensure that it is used in such an environment.
Immunity
test
IEC 60601 test
level
Complianc
e level
Electromagnetic environment - guidance
Conducted
RF
IEC 61000-
4-6
3 V
rms
150 kHz to 80
MHz
3 Vrms
Portable and mobile RF communications
equipment should be used no closer to any
part of the device, including cables, than the
recommended separation distance
calculated from the equation applicable to
the frequency of the transmitter.
Recommended separation distance
Where P is the maximum output power
rating of the transmitter in watts (W)
according to the transmitter manufacturer
and d is the recommended separation
distance in meters (m).
Field strengths from fixed RF transmitters,
as determined by an electromagnetic site
survey,
a
should be less than the compliance
level in each frequency range.
b
Interference may occur in the vicinity of
equipment marked with the following
symbol:
Radiated
RF
IEC 61000-
4-3
3 V/m
80 MHz to 2.5
GHz
3 V/m
NOTE 1 At 80 MHz and 800 MHz, the higher frequency range applies.
NOTE 2 These guidelines may not apply in all situations. Electromagnetic propagation
is affected by absorption and reflection from structures, objects and people.
a Field strengths from fixed transmitters, such as base stations for radio
(cellular/cordless) telephones and land mobile radios, amateur radio, AM and FM radio
broadcast and TV broadcast cannot be predicted theoretically with accuracy. To assess
the electromagnetic environment due to fixed RF transmitters, an electromagnetic site
survey should be considered. If the measured field strength in the location in which the

10
device is used exceeds the applicable RF compliance level above, the device should be
observed to verify normal operation. If abnormal performance is observed, additional
measures may be necessary, such as re-orienting or relocating the device.
b Over the frequency range 150 kHz to 80 MHz, field strengths should be less than 3
V/m.
Recommended separation distances between portable and mobile RF
communications equipment and the device.
The device is intended for use in an electromagnetic environment in which radiated RF
disturbances are controlled. The customer or the user of the device can help prevent
electromagnetic interference by maintaining a minimum distance between portable and
mobile RF communications equipment (transmitters) and the device as recommended
below, according to the maximum output power of the communications equipment.
Rated maximum
output power of
transmitter
(W)
Separation distance according to frequency of transmitter
(m)
150 KHz to 80 MHz
80 MHz to 800 MHz
800 MHz to 2.5 GHz
0.01
0.12
0.12
0.23
0.1
0.38
0.38
0.73
1
1.2
1.2
2.3
10
3.8
3.8
7.3
100
12
12
23
For transmitters rated at a maximum output power not listed above, the recommended
separation distance d in meters (m) can be estimated using the equation applicable to the
frequency of the transmitter, where P is the maximum output power rating of the transmitter
in watts (W) according to the transmitter manufacturer.
NOTE 1 At 80 MHz and 800 MHz, the separation distance for the higher frequency range
applies.
NOTE 2 These guidelines may not apply in all situations. Electromagnetic propagation is
affected by absorption and reflection from structures, objects and people.

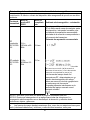
11
How the Device Works
The device has multiple modes, covering TENS and EMS. If you are using the device
for the first time, it is recommended that you start with the default Mode 1, which
combines different pulse frequencies. Some modes are particularly effective for certain
users, but you may need to select both the mode and the electrode position that are the
best for you. You may need to try a few positions and modes before finding the one that
suits you the best. The best choice of modes and positions may vary from one user to
another, in spite of having the same type of symptom.
Program
Pulse frequency (Hz)
Mode 1: TENS and EMS
Combination of the following Mode 2-7
Mode 2: TENS
69
Mode 3: EMS
12.5-55.6
Mode 4: TENS
1.2
Mode 5: TENS
100 (On for 10 seconds and off for 2.5 seconds)
Mode 6: TENS
100 (On for 20 seconds and off for 1 seconds)
Mode 7: EMS
20
Mode 8: TENS
160

12
Setup
Unpack the box of the product, and take the product and accessories out. The
accessories may include electrodes, USB cable and AC adapter. The USB cable could
be used to charge the control unit.

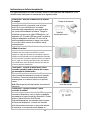
13
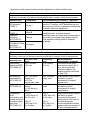
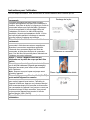
Operating Instruction
The following steps are used to guide the device operation, and the details about each
step are listed in the following table.
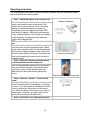
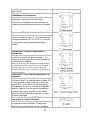
1
st
Step – Check the battery in the control unit
Battery recharging
The control unit comes with a built-in rechargeable
battery, and could be used as received. If the
battery icon on the turned-on control unit keeps
flashing, it means the battery is running out.
Charge the control unit with the enclosed USB
cable and AC adapter. USB cable could connect
to any certified adapters. The battery icon flashes
during charging, and becomes solid when the
control unit is charged fully.
2
nd
Step - Install the electrode onto the control
unit
Electrode installment
Place the enclosed electrode onto the back side of
the control unit using the magnetic snaps. Match
up the silver magnetic snaps on the electrode pad
with the silver magnetic snaps on the control unit,
follow the same steps for the gold. This should be
done before applying the device onto the skin of
treatment areas.
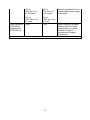
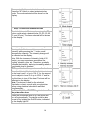
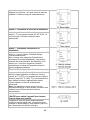
3
rd
Step - Place the electrode-installed device
on the stimulation-needed body area
Place the device on the body area
Place the pad-installed device onto the treatment
area (such as the shoulder). Press down firmly
and ensure a firm contact with the body skin.
Note: Keep the skin clean before placing the
device.
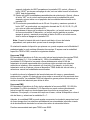
4
th
Step - Press the “ON/OFF” to turn on the
power
Holding the On/Off button could turn on the
device, indicated by the lit-up display on the front
of device. You could press and release the On/Off
button to lock/unlock the buttons on the device
front. When the buttons are locked, you could not
operate them. However, you still could turn the
device off by holding the On/Off button.
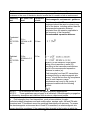
5
th
Step - Select one of the stimulation modes

14
There are totally 8 preset stimulation modes.
Press the “M” button to select a desired pulse
mode. The mode selected will be shown on the
display.
6
th
Step - Choose the stimulation time
The default timer is 30 min, and pressing the “T”
button could select a desired timer (30, 40, 50, 60,
10, and 20 min). The timer selected will be shown
on the display.
7
th
Step - Adjust the stimulation intensity
Pressing the “+” button could increase the
intensity, while pressing the “-” button could
decrease the intensity. The intensity change will
be reflected on the display.
Note: With the increase of intensity (total of 20
levels), you may experience sensations like
tingling, vibration, pain, etc. Therefore, gradually
increase the intensity, and stop increasing when a
comfortable level is reached.
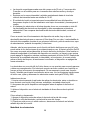
8
th
Step – Use heat/temperature on the device
Press the “Heat +/-” button for the first time to turn
on the heat Level 1 of up to 104
o
F, for the second
time to adjust to Level 2 of up to 109.4
o
F and for
the third time to turn off the heat. The heat will be
reflected on the display.
Note: The device is used for the electrical
stimulation or heat; consult with your physician
before using electrical stimulation and heat
simultaneously.
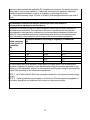
9
th
Step - Hold the “ON/OFF” again to turn off
the power after done
When the countdown timer is up, the device will
turn off automatically. The device could be also
turned off by holding the On/Off button, indicated
by the display light off.

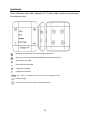
15
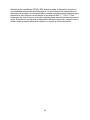
Remote Operation
As shown above, the Electronic Pulse Stimulator could be operated independently by
pressing its buttons (ON/OFF button, intensity increase/decrease buttons, mode/timer
selection buttons and heat/temperature button). As the optional accessory, the remote
control could provide a secondary operation way to wirelessly control the functions
mentioned above. At any time, you could switch to manually operate the device itself by
pressing its buttons to deal with any issues that may arise.
1. Follow the above instruction to install the electrode onto the device, place on the
body area, and turn on the device.
2. Recharge the battery of the remote if needed by inserting the USB cable to the
top of the remote, which could connect to the adapter included or any certified
adapters.
3. Switch the ON/OFF button to turn on the remote, indicated by its first LCD
display on.
Note: You could press and release the lock/unlock button on the remote to
lock/unlock the buttons on the remote and device. When the buttons are locked,
the lock icon on the remote appears, and you could not operate the buttons on
the remote and device. However, you still could turn the remote and device off by
switching the On/Off button.
4. Pressing and releasing the “+” button on the remote would increase the intensity
of the device, while pressing and releasing the “-” button on the remote would
decrease the intensity of the device. Each time when the intensity
increase/decrease once, the intensity bar on the remote will accordingly
increase/decrease once.
Note: With the increase of intensity (total of 20 levels), you may experience
sensations like tingling, vibration, pain, etc. Therefore, gradually increase the
intensity, and stop increasing when a comfortable level is reached.
5. Press and release the “HEAT” button on the remote for the first time to turn on
the heat Level 1 of up to 104
o
F, indicated by the first HEAT indicator flashing on
the LCD display; press and release the “HEAT” button for the second time to
adjust to Level 2 of up to 109.4
o
F, indicated by the second HEAT indicator
flashing on the LCD display; press and release the “HEAT” button for the third
time to turn off the heat, indicated by the HEAT indicator stop flashing.

16
6. There are total of 8 preset stimulation modes. Press and release the “M/T” button
on the remote to select a desired pulse mode, indicated by the flashing of the
selected mode on the LCD display.
7. The default timer is 30 min. Pressing and holding the “M/T” button could select a
desired timer in the order of 30, 40, 50, 60, 10, and 20 min, indicated on the LCD
display.
8. When the countdown timer is up, the remote and device will turn off
automatically. The remote and device could be also turned off by switching the
On/Off button on the remote, indicated by the LCD display off.
Note: When the battery of the remote is running low, its battery icon will flash,
meaning it is time to recharge the battery.
If using the device for the first time, you may start from the default Mode 1, which
combines the different frequencies. If you expect to use the specific TENS or EMS
mode, please refer to the following for details.
Use as TENS
The Electronic Pulse Stimulator with Heat includes the following TENS frequencies,
69Hz (Mode 2), 1.2 Hz (Mode 4), 100Hz (Modes 5 and 6), and 160Hz (Modes 8). The
device could be placed directly on the treatment site where you are experiencing pain
(such as pain associated with sore and aching muscles and pain associated with
arthritis). For example, if the treatment site is on the leg, place the TENS device above
the pain site, and select one of the modes mentioned.
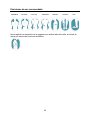
Arthritis involves inflammation on joints of the body, usually producing pain and
stiffness. The electrode is placed on or near the area of the arthritis pain. The TENS
mode of the device generates electrical pulses that are sent via the electrode for pain
relief.
Use as EMS
The Electronic Pulse Stimulator also includes the EMS frequency, 12.5-55.6Hz (Mode
3) and 20Hz (Mode 7). The device could be placed directly on the body area where you
are expecting the muscle firming and strengthening. For example, if the body area is the
arm, place the device on the arm site, and select Mode 3 or 7.
Also, the EMS mode could help temporarily increase local blood circulation in the
healthy muscles of lower extremities through the electrode pad which is positioned on
the lower extremity.
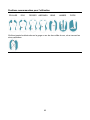
Recommended Practice for Both TENS and EMS:
• Duration suggested for each body area is 30 min and 2 times per day. Consult with
your physician for longer and more frequent uses.
• Start from the lowest intensity and gradually adjust the intensity to a comfortable
level at a scale from 1 to 20.
• Good skin care is important for a comfortable use of device. Be sure the treatment
site is clean of dirt and body lotion.

17
• Keeping the electrode in the storage bag after use will extend its lifespan. The
electrode pad is disposable and should be replaced when it loses the adhesiveness.
To purchase additional electrodes, please contact the seller.
As shown in the above device operation, there is one kind of electrode pad used with
the Pain Away Pro with Heat. The biocompatible electrode pad, consists of electrode
gel, conductive film, heating layer, backing material, and connectors.
In addition, it is worth mentioning the button-lock feature is very practical, which could
prevent any unintended operations during use. Pressing the On/Off button twice could
activate/deactivate the button-lock feature. This feature would not affect the safety or
effectiveness of the subject device, and the user could still turn off the device by holding
the On/Off button. After selecting the appropriate mode, intensity, and timer, the user
could activate the button-lock; when the timer is up, the device will turn off
automatically.
Electrodes with a shelf life of 2 years are intended for single person use, and could be
replaced. If the electrode no longer contacts well with your body skin, it is time to
replace it. If needed, you could use a damp and clean cloth to wipe electrodes between
uses. Please see the following for the Directions for Use, Removal and Storage of the
electrode used for both TENS and EMS.
Directions for Use
1. Clean skin thoroughly prior to each application of electrodes, which will not contact
well if any lotion, make-up, or dirt is left on the body skin.
2. Ensure the device is off before applying the electrode to it.
3. Apply the electrode-installed device firmly to the body skin.
Removal and Storage
1. Turn the device off before removing the electrode from the body skin.
2. Grab the edge of the electrode and remove from the body area.
3. When not in use and/or between each use, store the electrode in the re-sealable bag,
out of direct sunlight.
Heating Mode
In addition to the TENS and EMS modes described above, the device has an additional
mode of heat/temperature. When used in the heating function, the device will couple
with an electronically controlled electrode pad or garment to provide automatic thermal
heat to the skin with a range of 96.8 °F - 109.4 °F. This automatic thermal control
mechanism could also avoid skin from thermal injury. The device is used for the
electrical stimulation or heat; consult with your physician before using electrical
stimulation and heat simultaneously.

18
Performance Specifications
Power Source 3.7V Battery
Number of Output Modes 8 preset modes
Timer Range (minutes) 10-60
Dimensions (mm) [L x W x D] 89 x 77 x 18 mm
Waveform Biphasic
Shape Rectangular
Maximum Output Voltage 46V@500Ω
Maximum Output Current 92mA@500Ω
Maximum Pulse Duration 100µSec
Maximum Frequency 160Hz
Cleaning and Maintenance
Please use a wipe to clean the device first, and then use a dry cloth to wipe it again. The
electrodes coming with the device are disposable and should be replaced when they lose
their adhesiveness. Contact the seller for replacements. Replacement Electrodes, Item#
RTLAGF-1010, comes with 1 small and 1 large electrode.
Trouble Shooting
If your device is not operating properly, please check below for common problems and
suggested solutions. If the recommended action does not solve the problem, please contact the
seller.
Stimulation is weak or non-existent
• Be sure skin is clean and pads are firmly attached to skin.
• The battery is low and needs to be charged.
Devise does not turn on
• Check if battery is low and needs to be charged.
Electrodes are not sticky
• The pads will lose adhesiveness over use. Please contact the distributor or dealer
for replacements.
Skin turns red
• Stop to treat another area.
• If problem persists, contact your physician.
Wireless control not connected
• Restart the device and wireless controller to re-connect automatically.
• Switch to operate the device itself manually.
La page est en cours de chargement...
La page est en cours de chargement...
La page est en cours de chargement...
La page est en cours de chargement...
La page est en cours de chargement...
La page est en cours de chargement...
La page est en cours de chargement...
La page est en cours de chargement...
La page est en cours de chargement...
La page est en cours de chargement...
La page est en cours de chargement...
La page est en cours de chargement...
La page est en cours de chargement...
La page est en cours de chargement...
La page est en cours de chargement...
La page est en cours de chargement...
La page est en cours de chargement...
La page est en cours de chargement...
La page est en cours de chargement...
La page est en cours de chargement...
La page est en cours de chargement...
La page est en cours de chargement...
La page est en cours de chargement...
La page est en cours de chargement...
La page est en cours de chargement...
La page est en cours de chargement...
La page est en cours de chargement...
La page est en cours de chargement...
La page est en cours de chargement...
La page est en cours de chargement...
La page est en cours de chargement...
La page est en cours de chargement...
La page est en cours de chargement...
La page est en cours de chargement...
La page est en cours de chargement...
La page est en cours de chargement...
La page est en cours de chargement...
La page est en cours de chargement...
La page est en cours de chargement...
La page est en cours de chargement...
La page est en cours de chargement...
La page est en cours de chargement...
La page est en cours de chargement...
La page est en cours de chargement...
La page est en cours de chargement...
La page est en cours de chargement...
-
 1
1
-
 2
2
-
 3
3
-
 4
4
-
 5
5
-
 6
6
-
 7
7
-
 8
8
-
 9
9
-
 10
10
-
 11
11
-
 12
12
-
 13
13
-
 14
14
-
 15
15
-
 16
16
-
 17
17
-
 18
18
-
 19
19
-
 20
20
-
 21
21
-
 22
22
-
 23
23
-
 24
24
-
 25
25
-
 26
26
-
 27
27
-
 28
28
-
 29
29
-
 30
30
-
 31
31
-
 32
32
-
 33
33
-
 34
34
-
 35
35
-
 36
36
-
 37
37
-
 38
38
-
 39
39
-
 40
40
-
 41
41
-
 42
42
-
 43
43
-
 44
44
-
 45
45
-
 46
46
-
 47
47
-
 48
48
-
 49
49
-
 50
50
-
 51
51
-
 52
52
-
 53
53
-
 54
54
-
 55
55
-
 56
56
-
 57
57
-
 58
58
-
 59
59
-
 60
60
-
 61
61
-
 62
62
-
 63
63
-
 64
64
-
 65
65
-
 66
66


Drive Medical Padded Swivel Seat Cushion Manuel utilisateur
- Taper
- Manuel utilisateur
dans d''autres langues
Documents connexes
Autres documents
-
 Compex Knee Wrap for Pain Relief Manuel utilisateur
-
Terraillon Trio Care Le manuel du propriétaire
-
-
Beurer EM 44 Le manuel du propriétaire
-
Beurer EM 49 Le manuel du propriétaire
-
-
 NURSAL PL-029U Mode d'emploi
-
Omron PM3032 Manuel utilisateur
-
 PAINGONE 15229690 Mode d'emploi
-


