Philips EX-PERFECTCARE PURE GC7635 Le manuel du propriétaire
- Catégorie
- Fers
- Taper
- Le manuel du propriétaire
Ce manuel convient également à

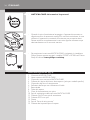
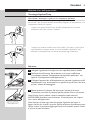
Always here to help you
User manual
Register your product and get support at
www.philips.com/welcome
GC7600 series


1


6
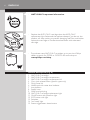
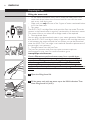
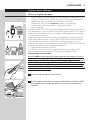
- ANTI-CALC: Important information:
- Replace the ANTI-CALC cartridge when the ANTI-CALC
replacement light ashes and the appliance beeps. If you do not, the
product will stop working to prevent damaging itself. You could either
replace the cartridge or use demineralised water with exhausted
cartridge.
- To purchase more ANTI-CALC cartridges, go to your local Philips
dealer or search for GC002 or GC004 in the online shop at
www.philips.com/shop.
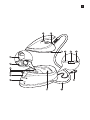
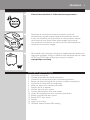
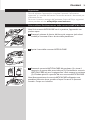
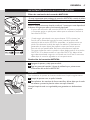
General description (Fig. 4)
1 ANTI-CALC cartridge
2 ANTI-CALC cartridge compartment
3 ANTI-CALC cartridge compartment lid
4 Carry lock release button (specic types only)
5 Filling funnel lid
6 Water tank with water level indicator
7 Iron platform
8 Supply hose
9 Mains cord with plug
10 ANTI-CALC cartridge replacement light
11 On/off button with power-on light
12 ECO button with light
13 Soleplate
14 ’Iron ready’ light
15 Steam trigger/steam boost button
ENGLISH

Important
Read the separate important information leaet and the user manual carefully
before you use the appliance. Save both documents for future reference.
To fully benet from the support that Philips offers, register your product at
www.philips.com/welcome.
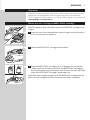
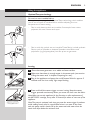
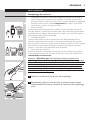
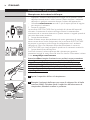
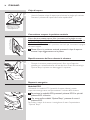
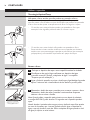
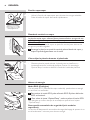
Before rst use - Placing the ANTI-CALC cartridge
Note: The appliance does not produce steam if the ANT-CALC cartridge is not
in place.
1 Pressthecarrylockreleasebutton(specictypesonly)andremove
the iron from the iron platform.
2 Open the ANTI-CALC cartridge compartment.
3 TaketheANTI-CALCcartridgeoutofitspackage(1)andpullthe
rubbercapfromitsbottom(2).PlacetheANTI-CALCcartridgein
thecompartmentandpressitdownuntilitlocksintoplace(3).Then
close the ANTI-CALC cartridge compartment lid.
Note: Some water droplets may fall out of the ANTI-CALC cartridge when you
place it into the compartment. This is normal and the water is harmless.
ENGLISH 7

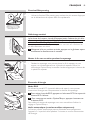
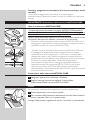
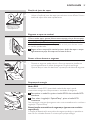
Preparing for use
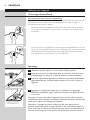
Filling the water tank
- Fill the water tank before every use or when the water level in the
water tank drops below the minimum level. You can rell the water
tank at any time during use.
- Make sure you only use one of the 3 types of water mentioned below
to ll the water tank:
1 Tap water
The ANTI-CALC cartridge lters scale particles from tap water. The scale
content in the ltered water is regularly monitored by an electronic sensor.
This sensor informs you when the cartridge needs to be replaced.
2 Demineralised water
You can safely use demineralised water in your steam generator. Make sure
that the ANTI-CALC cartridge is always in place, as the cartridge serves as
a link between the water tank and the iron. When you use demineralised
water, the ANTI-CALC cartridge is not used and therefore replacement of
the cartridge is not necessary.
3 Descaled water from the IronCare
The IronCare removes scale from tap water to ensure optimum
performance for your iron. For more information, go to
www.philips.com/ironcare.
Caution: Do not use perfumed water, water from a tumble dryer,
rainwater,vinegar,mineralwater,magneticallytreatedwater(Aqua+),
waterfromadrinkingwaterlter,starch,descalingagents,ironing
aids,saltorchemicalsinthewatertank.Thesetypesofwaterhave
beentested.Theyarenotsuitableandmayevencausedamagetothe
appliance. If you use any of these types of water, your guarantee becomes
invalid.
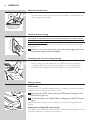
1 Openthellingfunnellid.
2 Fill the water tank with tap water up to the MAX indication. Then
closellingfunnellid(‘click’).
ENGLISH8

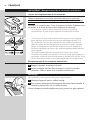
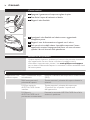
Using the appliance
OptimalTemp technology
Do not iron non-ironable fabrics.
This appliance is equipped with OptimalTemp technology, which enables
you to iron all types of ironable fabrics without adjusting the iron
temperature or steam setting.
- Fabrics with these symbols are ironable, for example linen, cotton,
polyester, silk, wool, viscose and rayon.
- Fabrics with this symbol are not ironable. These fabrics include synthetic
fabrics such as Spandex or elastane, Spandex-mixed fabrics and
polyolens (e.g. polypropylene), but also prints on garments.
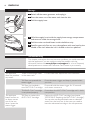
Ironing
1 Placethesteamgeneratoronastableandevensurface.
2 Make sure that there is enough water in the water tank (see section
‘Fillingthewatertank’inchapter‘Preparingforuse’).
3 Plug in the appliance and press the on/off button. Wait for approx. 2
minutesuntilthe‘ironready’lightstopsashing.
4 Press and hold the steam trigger to start ironing. Keep the steam
triggerpressedcontinuouslywhenyoumovetheironoverthefabric.
Note: When you use the appliance for the rst time or after replacement of
the ANTI-CALC cartridge, it may take 10 seconds for steam to come out of the
appliance.
Note: The pump is activated each time you press the steam trigger. It produces
subtle rattling sound, which is normal. When there is no water in the water
tank, the pump sound is louder. Fill up the water tank with water when the
water level drops below the minimum level.
ENGLISH 9

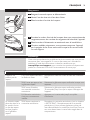
Steam boost function
- Use the steam boost function to remove stubborn creases. Press the
steam trigger twice quickly.
Vertical steam ironing
Hotsteamisemittedfromtheiron.Neverattempttoremovecreases
from a garment that someone is wearing. Do not apply steam near your
orsomeoneelse’shand.
You can use the steam iron in vertical position to remove wrinkles from
hanging fabrics.
1 Holdtheironinverticalposition,pressthesteamtriggerandtouch
the garment lightly with the soleplate.
Putting down the iron during ironing
- During ironing, you can place the iron either on the iron platform
or horizontally on the ironing board. Thanks to the OptimalTemp
technology, the soleplate will not damage the ironing board cover.
Energy saving
ECO mode
By using the ECO mode (reduced amount of steam), you can save energy
without compromising on the ironing result.
1 ToactivatetheECOmode,presstheECObutton.Thelightinthe
ECObuttongoeson.
2 Toswitchbacktothe‘OptimalTemp’setting,presstheECObutton
again.
For the shortest ironing time, we advise you to use the ‘OptimalTemp’
setting.
Safety auto-off (specic types only)
The safety auto-off function automatically switches off the appliance if it has
not been used for 5 minutes, to save energy.
ENGLISH10

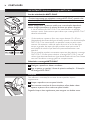
IMPORTANT: Replacing the ANTI-CALC cartridge
ANTI-CALC replacement light
ItisveryimportantthatyoureplacetheANTI-CALCcartridgewhen
theANTI-CALCcartridgereplacementlightstartsashingandthe
appliance starts beeping.
Note: The cartridge lasts 3 months on average, but this depends on the
hardness of the water you use and on how many hours you iron.
- The ANTI-CALC replacement light starts ashing and the appliance
starts beeping to indicate that the ANTI-CALC cartridge needs to be
replaced.
- You can still continue steam ironing for 15-30 min. (depending on
the hardness of the water used) when the ANTI-CALC replacement
light ashes and the appliance beeps. However, the steam output will
diminish and ultimately the steam generator stops producing steam to
prevent scale build-up that would permanently damage your appliance.
- To let the appliance produce steam again, you have to replace the
ANTI-CALC cartridge. If you do not want to replace the ANTI-CALC
cartridge, you have to use demineralised water or descaled water from
the IronCare. In that case, you need to leave the exhausted cartridge in
the compartment.
Replacing the ANTI-CALC cartridge
1 Switch off the appliance and let it cool down.
2 Followthestepsinchapter‘Beforerstuse-PlacingtheANTI-
CALCcartridge’.
Cleaning
To properly maintain your appliance, clean it regularly.
1 Clean the appliance with a moist cloth.
2 Toeasilyandeffectivelyremovestains,letthesoleplateheatupand
movetheironoveramoistcloth.
Tip: Clean the soleplate regularly to ensure smooth gliding.
ENGLISH 11

Storage
1 Switch off the steam generator and unplug it.
2 Pour the water out of the water tank into the sink.
3 Fold the supply hose.
4 Wind the supply hose inside the supply hose storage compartment
and secure it inside the storage hook.
5 Fold the mains cord and fasten it with the Velcro strip.
6 Specictypesonly:Youcancarrytheappliancewithonehandbythe
handle of the iron when the iron is locked on the iron platform.
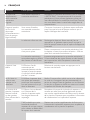
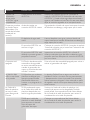
Troubleshooting
This chapter summarises the most common problems you could encounter
with the appliance. If you are unable to solve the problem with the
information below, visit www.philips.com/support for a list of frequently
asked questions or contact the Consumer Care Centre in your country.
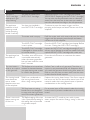
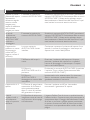
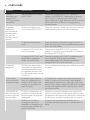
Problem Possible cause Solution
The appliance
does not produce
any steam.
There is not enough water
in the water tank.
Fill the water tank beyond the MIN indication.
You have not pressed the
steam trigger.
Press the steam trigger and keep it pressed when
you iron.
You have just installed a
new ANTI-CALC cartridge.
Press and hold the steam trigger for 10 seconds
until steam comes out.
The ANTI-CALC cartridge
is not placed properly.
Press down the ANTI-CALC cartridge until it locks
into position.
The appliance
beeps and less or
no steam comes
out of the iron
when I press the
steam trigger.
You have to replace the
ANTI-CALC cartridge.
Replace the ANTI-CALC cartridge (see chapter
‘IMPORTANT: Replacing the ANTI-CALC cartridge’).
You can also use demineralised water or descaled
water from the IronCare. In that case, you need to
leave the exhausted cartridge in the compartment.
ENGLISH12

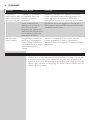
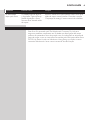
Problem Possible cause Solution
The ‘ANTI-
CALC cartridge
replacement’ light
keeps ashing.
You have to replace the
ANTI-CALC cartridge.
Replace the ANTI-CALC cartridge (see chapter
‘IMPORTANT: Replacing the ANTI-CALC cartridge’).
You can also use demineralised water or descaled
water from the IronCare. In that case, you need to
leave the exhausted cartridge in the compartment.
The appliance
produces a loud
pumping sound
(subtle pumping
sound is normal).
You have just installed a
new ANTI-CALC cartridge.
Continue to press the steam trigger until the
pumping sound stops and steam comes out of the
soleplate.
The water tank is empty. Rell the water tank with water and press the steam
trigger until the pumping sound stops and steam
comes out of the soleplate.
The ANTI-CALC cartridge
is not in place.
Place the ANTI-CALC cartridge (see chapter ‘Before
rst use - Placing the ANTI-CALC cartridge’).
The ANTI-CALC cartridge
is damaged or shows cracks
or hairline cracks.
Inspect the ANTI-CALC cartridge thoroughly. If you
see any sign of damage or cracks, no matter how small,
replace the ANTI-CALC cartridge with a new one.
The appliance has
switched off.
The safety auto-off function
is activated automatically
when the steam generator
has not been used for more
than 5 minutes.
Press the on/off button to reactivate the steam
generator.
The iron leaves a
shine or an imprint
on the garment.
The surface to be ironed was
uneven, for instance because
you were ironing over a seam
or a fold in the garment.
Perfect Care is safe on all garments. The shine or
imprint is not permanent and will disappear when
you wash the garment. Avoid ironing over seams or
folds or you can place a cotton cloth over the area
to be ironed to avoid imprints.
The ironing board
cover becomes
wet or water
droplets come out
of the soleplate.
Steam has condensed on
the ironing board cover
after a long ironing session.
Replace the ironing board cover if the foam material
has worn out. You can also add an extra layer of felt
material under the ironing board cover to prevent
condensation on the ironing board.
You may have an ironing
board that is not designed
to cope with the high steam
rate of the steam generator.
Put an extra layer of felt material under the ironing
board cover to prevent condensation on the ironing
board.
There is too much
steam coming out
of the iron.
The default setting of the iron
is the OptimalTemp setting. In
this setting the iron provides
a high steam output.
Activate the ECO mode to iron with a lower
steam output. See section ‘Energy saving’ in this user
manual.
ENGLISH 13

This iron has been approved by The Woolmark Company Pty Ltd for
the ironing of wool only products provided that the garments are ironed
according to the instructions on the garment label and those issued by the
manufacturer of this iron. R1303. In United Kingdom, Eire, HongKong and
India, the Woolmark trademark is a Certication trademark.
ENGLISH14

15
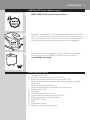
- Cartouche anticalcaire : Informations importantes :
- Remplacez la cartouche anticalcaire lorsque le voyant de
remplacement clignote et que l’appareil émet des bips sonores.
Si vous ne remplacez pas la cartouche, la centrale vapeur cessera
de fonctionner pour éviter d’être endommagée. Vous pouvez
soit remplacer la cartouche, soit utiliser de l’eau déminéralisée en
conservant la cartouche usagée.
- Pour acheter des cartouches anticalcaire supplémentaires, rendez-vous
chez votre revendeur Philips ou effectuez une recherche avec les codes
GC002 ou GC004 dans la Boutique en ligne à l’adresse
www.philips.com/shop.
Description générale (g. 4)
1 Cartouche anticalcaire
2 Compartiment des cartouches anticalcaire
3 Couvercle du compartiment des cartouches anticalcaire
4 Bouton de déverrouillage du fer (certains modèles uniquement)
5 Couvercle de l’entonnoir de remplissage
6 Réservoir d’eau avec indicateur de niveau
7 Support du fer à repasser
8 Cordon d’arrivée de la vapeur
9 Cordon d’alimentation avec che secteur
10 Voyant de remplacement de la cartouche anticalcaire
11 Bouton marche/arrêt avec voyant
12 Bouton ECO avec voyant
13 Semelle
14 Voyant « Fer prêt »
15 Gâchette vapeur/bouton Effet pressing
FRANÇAIS

16
Important
Lisez soigneusement le livret séparé d’informations importantes et le mode
d’emploi avant d’utiliser l’appareil. Conservez les deux documents pour un
usage ultérieur.
Pour bénécier pleinement de l’assistance Philips, enregistrez votre produit
sur le site www.philips.com/welcome.
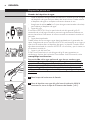
Avant la première utilisation - Mise en place de la cartouche
anticalcaire
Remarque : L’appareil ne produit pas de vapeur si la cartouche anticalcaire
n’est pas en place.
1 Appuyezsurleboutondedéverrouillage(certainsmodèles
uniquement)etdétachezleferdesonsupport.
2 Ouvrezlecompartimentdelacartoucheanticalcaire.
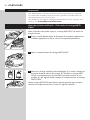
3 Retirezl’emballagedelacartoucheanticalcaire(1)ainsique
l’emboutencaoutchouc(2).Placezlacartoucheanticalcairedansle
compartimentetappuyezdessusjusqu’àcequ’elles’enclenche(3).
Fermezlecouvercleducompartimentdescartouchesanticalcaire.
Remarque : Quelques gouttes d’eau peuvent tomber de la cartouche
anticalcaire lorsque vous la placez dans le compartiment. Ce phénomène est
normal et l’eau est inoffensive.
FRANÇAIS

17
Avant utilisation
Remplissage du réservoir
- Remplissez le réservoir d’eau avant chaque utilisation ou lorsque le
niveau d’eau dans le réservoir est inférieur au niveau minimal. Vous
pouvez remplir le réservoir d’eau à tout moment pendant le repassage.
- Assurez-vous que vous utilisez uniquement l’un des 3 types d’eau
suivants pour remplir le réservoir d’eau :
1 Eau du robinet
La cartouche anticalcaire permet de ltrer les particules de calcaire de
l’eau du robinet. La quantité de calcaire dans l’eau ltrée est régulièrement
contrôlée par un capteur électronique. Ce capteur vous avertit lorsque la
cartouche a besoin d’être remplacée.
2 Eau déminéralisée
Vous pouvez utiliser en toute sécurité de l’eau déminéralisée dans la
centrale vapeur. Assurez-vous que la cartouche anticalcaire est toujours
bien en place, car elle sert de lien entre le réservoir d’eau et le fer. Lorsque
vous utilisez de l’eau déminéralisée, la cartouche anticalcaire n’est pas
utilisée ; il n’est donc pas nécessaire de la remplacer.
3 Eau traitée par IronCare
IronCare enlève les résidus de calcaire de l’eau du robinet pour garantir
le fonctionnement optimal de votre fer. Pour en savoir plus, visitez le site
www.philips.com/ironcare.
Attention : N’utilisez pasd’eauparfumée,d’eauprovenantd’un
sèche-linge,d’eaudepluie,devinaigre,d’eauminérale,d’eaumagnétique
(Aqua+),d’eauprovenantd’unltreàeau,d’amidon,dedétartrants,de
produitsderepassage,deseloud’autresproduitschimiquesdansle
réservoird’eau.Cesliquidesontététestés.Ilsnesontpasadaptésà
l’appareiletrisquentmêmedel’endommager.Votregaranties’annulesi
vousutilisezl’undecesproduits.
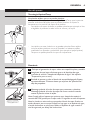
1 Ouvrezlecouvercledel’entonnoirderemplissage.
2 Remplissezleréservoiravecdel’eaudurobinet,jusqu’auniveau
maximal(MAX).Fermezlecouvercledel’entonnoirderemplissage
(clic).
FRANÇAIS 17

18
Utilisation de l’appareil
Technologie OptimalTemp
Ne repassez pas des tissus non repassables.
Cette centrale est dotée de la technologie OptimalTemp, qui vous permet
de repasser tous les types de tissus repassables sans avoir à régler la
température du fer ou la vapeur.
- Les tissus avec les symboles suivants sont repassables. Par exemple, le
lin, le coton, le polyester, la soie, la laine, la viscose et la rayonne (soie
articielle).
- Les tissus avec les symboles suivants ne sont pas repassables. Parmi ces
tissus : les tissus synthétiques tels que l’élasthanne, les tissus comprenant
de l’élasthanne et des polyolénes (par exemple du polypropylène),
mais également les impressions sur les vêtements.
Repassage
1 Placezlacentralevapeursurunesurfacestableetplane.
2 Assurez-vousqu’ilyaassezd’eaudansleréservoir(voirlasection
«Remplissageduréservoir»danslechapitre«Avantutilisation».
3 Branchezl’appareiletappuyezsurleboutonmarche/arrêt.Attendez
approximativement2minutesquelevoyant«Ferprêt»cessede
clignoter.
4 Appuyezsurlagâchettevapeurpourcommencerlerepassage.
Maintenezlagâchettevapeurenfoncéelorsquevousdéplacezlefer
sur le tissu.
Remarque : Lorsque vous utilisez l’appareil pour la première fois ou après le
remplacement de la cartouche anticalcaire, patientez une dizaine de secondes
avant que la vapeur ne s’échappe de l’appareil.
Remarque : La pompe est activée chaque fois que vous appuyez sur la
gâchette vapeur. Elle génère un léger cliquetis, ce qui est normal. Lorsqu’il n’y
a pas d’eau dans le réservoir, le bruit de la pompe est plus fort. Remplissez le
réservoir d’eau lorsque le niveau d’eau passe en-dessous du niveau minimal.
FRANÇAIS18

19
Fonction Effet pressing
- Utilisez la fonction Effet pressing pour enlever les plis tenaces. Appuyez
sur le déclencheur de vapeur deux fois rapidement.
Défroissage vertical
Leferémetdelavapeurchaude.N’essayezjamaisd’enleverlesplisd’un
vêtementportéparquelqu’un.N’appliquezpasdevapeurprèsdevos
mainsoudecellesdequelqu’und’autre.
Vous pouvez utiliser le fer vapeur en position verticale an d’enlever les
plis des vêtements sur cintre.
1 Maintenezleferenpositionverticale,appuyezsurlagâchettevapeur
etefeurezlevêtementaveclasemelle.
Mettre le fer sur son talon pendant le repassage
- Pendant le repassage, vous pouvez placer le fer à repasser sur son
support ou horizontalement sur la planche à repasser. Grâce à la
technologie OptimalTemp, la semelle n’endommagera pas la housse de
la planche à repasser.
Économie d’énergie
Mode ECO
En utilisant le mode ECO (quantité réduite de vapeur), vous pouvez
économiser l’énergie sans compromettre le résultat de repassage.
1 PouractiverlemodeECO,appuyezsurleboutonECO.Levoyantdu
boutonECOs’allume.
2 Pourretourneraumode«OptimalTemp»,appuyezànouveausur
leboutonECO.
Pour réduire le temps de repassage, nous vous conseillons d’utiliser le
réglage « OptimalTemp ».
Arrêt automatique (certains modèles uniquement)
La fonction d’arrêt automatique permet d’éteindre automatiquement
l’appareil s’il n’a pas été utilisé pendant 5 minutes, et ce an d’économiser
de l’énergie.
FRANÇAIS 19

20
IMPORTANT : Remplacement de la cartouche anticalcaire
Voyant de remplacement de la cartouche
Veillezàremplacerlacartoucheanticalcairedèsquelevoyantde
remplacementdelacartoucheclignoteetquel’appareilémetdesbips
sonores.
Remarque : La cartouche dure 3 mois en moyenne. Sa durée d’utilisation varie
en fonction de la dureté de l’eau et de la fréquence du repassage.
- La cartouche a besoin d’être remplacée lorsque le voyant de
remplacement clignote et que l’appareil émet des bips sonores.
- Une fois que le voyant de remplacement clignote et que l’appareil
émet des bips, vous pouvez poursuivre le repassage pendant 15 à
30 minutes (en fonction de la dureté de l’eau utilisée). Toutefois, le
débit de vapeur diminue progressivement jusqu’à ce que la centrale
vapeur ne produise plus du tout de vapeur, et ce pour empêcher la
formation de dépôts de calcaire qui endommageraient dénitivement
votre appareil.
- Pour que l’appareil génère à nouveau de la vapeur, vous devez
remplacer la cartouche anticalcaire. Si vous ne voulez pas remplacer la
cartouche, utilisez de l’eau déminéralisée ou traitée par IronCare. Dans
ce cas, vous devez laisser la cartouche usagée dans le compartiment.
Remplacement de la cartouche anticalcaire
1 Éteignezl’appareiletlaissez-lerefroidir.
2 Suivezlesétapesdécritesdanslechapitre«Avantlapremière
utilisation-Miseenplacedelacartoucheanticalcaire».
Nettoyage
Pour entretenir votre appareil, nettoyez-le régulièrement.
1 Nettoyezl’appareilavecunchiffonhumide.
2 Pourenleverfacilementetefcacementdestâches,faiteschaufferla
semelle et passez le fer sur un chiffon humide.
Conseil : Nettoyez la semelle régulièrement pour garantir une glisse optimale.
FRANÇAIS20
La page charge ...
La page charge ...
La page charge ...
La page charge ...
La page charge ...
La page charge ...
La page charge ...
La page charge ...
La page charge ...
La page charge ...
La page charge ...
La page charge ...
La page charge ...
La page charge ...
La page charge ...
La page charge ...
La page charge ...
La page charge ...
La page charge ...
La page charge ...
La page charge ...
La page charge ...
La page charge ...
La page charge ...
La page charge ...
La page charge ...
La page charge ...
La page charge ...
La page charge ...
La page charge ...
La page charge ...
La page charge ...
La page charge ...
La page charge ...
-
 1
1
-
 2
2
-
 3
3
-
 4
4
-
 5
5
-
 6
6
-
 7
7
-
 8
8
-
 9
9
-
 10
10
-
 11
11
-
 12
12
-
 13
13
-
 14
14
-
 15
15
-
 16
16
-
 17
17
-
 18
18
-
 19
19
-
 20
20
-
 21
21
-
 22
22
-
 23
23
-
 24
24
-
 25
25
-
 26
26
-
 27
27
-
 28
28
-
 29
29
-
 30
30
-
 31
31
-
 32
32
-
 33
33
-
 34
34
-
 35
35
-
 36
36
-
 37
37
-
 38
38
-
 39
39
-
 40
40
-
 41
41
-
 42
42
-
 43
43
-
 44
44
-
 45
45
-
 46
46
-
 47
47
-
 48
48
-
 49
49
-
 50
50
-
 51
51
-
 52
52
-
 53
53
-
 54
54


Philips EX-PERFECTCARE PURE GC7635 Le manuel du propriétaire
- Catégorie
- Fers
- Taper
- Le manuel du propriétaire
- Ce manuel convient également à
dans d''autres langues
Documents connexes
-
Philips GC002/00 Manuel utilisateur
-
Philips PERFECTCARE COMPACT Manuel utilisateur
-
Philips GC2991/36 Manuel utilisateur
-
-
-
Philips GC7039/20 Guide de démarrage rapide
-
-
-
Philips GC6810 / 30 PERFECTCARE COMPACT ESSENTIALGC6802/30GC6833/30 Le manuel du propriétaire
-
Philips GC9955 Manuel utilisateur
