Haier HD90-A3979 I Pro Series 7 Le manuel du propriétaire
- Catégorie
- Sèche-linge
- Taper
- Le manuel du propriétaire
Ce manuel convient également à

GB
HD90-A2979
HD100-A2979
HD80-A3979
HD90-A3979
HD90-A3979S
HD90-A3S979
User manual
Heat-Pump-Dryer

Thank you
EN
2
Disposal
Help protect the environment and human health. Put
the packaging in applicable containers to recycle it.
Help to recycle waste of electrical and electronic ap-
pliances. Do not dispose appliances marked with this
symbol with the household waste. Return the product
to your local recycling facility or contact your municipal
offi ce.
WARNING!
Risk of injury or suff ocation!
Disconnect the appliance from the mains supply. Cut off the mains cable and dispose
of it. Remove the door catch to prevent children and pets to get closed in the appliance.
WARNING!
The appliance must not be supplied through an external switching device, such as a
timer, or connected to a circuit that is regularly switched on and off by a utility.
Legend
Warning! – Important safety information
General information and tips
Environmental information
Thank you for purchasing a Haier Product.
Please read these instructions carefully before using this appliance. The instructions con-
tain important information which will help you get the best out of the appliance and ensure
safe and proper installation, use and maintenance.
Keep this manual in a convenient place so you can always refer to it for the safe and proper
use of the appliance.
If you sell the appliance, give it away, or leave it behind when you move house, make sure
you also pass this manual so that the new owner can become familiar with the appliance
and safety warnings.

EN
Content
3
Safety information ................................................................................................................................. 4
Intended use ............................................................................................................................................7
Product description ............................................................................................................................... 8
Control panel ...........................................................................................................................................9
Programmes..........................................................................................................................................12
Consumption ........................................................................................................................................13
Suggestions and tips ...........................................................................................................................14
Daily use ..................................................................................................................................................16
Care and cleaning ................................................................................................................................. 20
Troubleshooting ...................................................................................................................................22
Installation ..............................................................................................................................................24
Technical data .......................................................................................................................................26
Customer Service ................................................................................................................................30

EN
1-Safety information
4
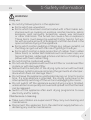
WARNING!
Before fi rst use
▶ Make sure there is no transport damage.
▶ Remove all packaging and keep out of children´s reach.
▶ Handle the appliance always with at least two persons because it
is heavy.
Daily use
▶ This appliance can be used by children aged from 8 years and
above and persons with reduced physical, sensory or mental ca-
pabilities or lack of experience and knowledge if they have been
given supervision or instruction concerning use of the appliance
in a safe way and understand the hazards involved.
▶ Keep away children under 3 years of age from the appliance un-
less they are constantly supervised.
▶ Children shall not play with the appliance.
▶ Do make sure the room is dry and well ventilated. The ambient
temperature should be between 5 °C and 35 °C.
▶ Do not cover any ventilation openings in the base by a carpet or
similar object.
▶ Keep the area around the tumble dryer free of dust and lint.
▶ Do make sure that there is only laundry inside the appliance and
no pets or children before you use it.
▶ Only touch the mains plug with dry hands and do not touch or
use the appliance if you are barefoot or have wet or damp hands
or feet.
▶ Only dry textiles washed in water.
▶ Do make sure not to load more than nominal load.
▶ Remove all items such as lighters and matches from pockets.
▶ Use fabric softeners or similar products as specifi ed by the
manufacturer´s packaging.
▶ Do not use ore store any flammable sprays or fl ammable gas in
close vicinity to the appliance.
▶ Do not place heavy objects or sources of heat or damp on top of
the appliance.
▶ Hold the plug, not the cable, when unplugging the appliance.
▶ Do not touch the rear wall and the drum during operation; they
are hot.

EN
1-Safety information
5
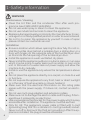
WARNING!
Daily use
▶ Do not dry following items in the appliance:
▶ Items which are unwashed.
▶ Items which have been contaminated with inflammable sub-
stances such as cooking oil, acetone, alcohol, benzine, petrol,
kerosene, spot removers, turpentine, waxes, wax removers
or other chemicals. The fumes can cause a fi re or explosion.
These items must always be washed fi rst by hand in hot wa-
ter with an extra amount of detergent and then be dried in the
open air before drying in the appliance.
▶ Items which contain padding or fillings (e.g. pillows, jackets), as
the filling can get out with the risk of igniting in the dryer.
▶ Items which contain a large proportion of rubber, foam rubber
(latex foam) or rubber like materials such as shower caps, wa-
terproof textiles, rubberised articles and items of clothing and
pillows with foam rubber filling.
▶ Do not drink the condensed water.
▶ Do not use the appliance without the lint filter or condenser fi lter
in place or with damaged filter.
▶ Notice that the last part of the drying cycle occurs without heat
(cool down cycle) to ensure remaining the garments at a temper-
ature which does not damage them.
▶ Do not leave the appliance unattended during run time for some
time. If a long absence is intended, the drying cycle have to be
interrupted by switching off the unit and unplugging the mains.
▶ Do not switch off the appliance except drying cycle is finished,
unless all items are quickly removed and spread out that the heat
can be released.
▶ Switch off the appliance after each drying programme to save
electricity and for safety.
Maintenance / cleaning
▶ Make sure children are supervised if they carry out cleaning and
maintenance.
▶ Disconnect the appliance from the electrical supply before un-
dertaking any routine maintenance.

EN
1-Safety information
6
WARNING!
Maintenance / cleaning
▶ Clean the lint filter and the condenser fi lter after each pro-
gramme (see CARE AND CLEANING).
▶ Do not use water spray or steam to clean the appliance.
▶ Do not use industrial chemicals to clean the appliance.
▶ Replace a damaged supply cord only by the manufacturer, its ser-
vice agent or similarly qualifi ed persons in order to avoid a hazard.
▶ Do not try to repair the appliance by yourself. In case of repair
please contact our customer service.
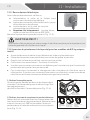
Installation
▶ Ensure a location which allows opening the door fully. Do not in-
stall the tumble dryer behind a lockable door, a sliding door or a
door with hinges on the opposite side of the tumble dryer door
as this limits the full opening of the tumble dryer door.
▶ Install the appliance in a well-ventilated, dry place.
▶ Never install the appliance outdoors in a damp place, or in an area
which may be prone to water leaks such as under or near a sink
unit. In the event of a water leak cut power supply and allow the
machine to dry naturally.
▶ Install or use the appliance only where the temperature is above
5 °C.
▶ Do not place the appliance directly on a carpet, or close to a wall
or furniture.
▶ Do not expose the appliance to any frost, heat or direct sunlight
or in the near of heat sources(e.g. stoves, heaters).
▶ Make sure that the electrical information on the rating plate
agrees with the power supply. If it does not, contact an electri-
cian.
▶ Do not use multi-plug adapters and extension cables.
▶ Make sure not to damage the electric cable and the plug. If dam-
aged have it replaced by an electrician.
▶ Use a separate earthed socket for the power supply which is easy
accessible after installation. The appliance must be earthed.
▶ Only for UK: The appliance’s power cable is fi tted with 3-cord
(grounding) plug that fi ts a standard 3-cord (grounded) socket.
Never cut off or dismount the third pin (grounding). After the ap-
pliance is installed, the plug should be accessible.

EN
2-Intended use
7
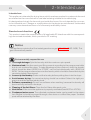
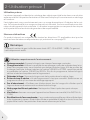
Notice
The appliance contains the fl uorinated greenhouse gas HFC-134a (GWP:1430). This
gas is hermetically sealed.
Intended use
This appliance is intended for drying items which have been washed in a water solution and
are marked on the manufacturer‘s care label as being suitable for tumble drying.
It is designed exclusively for domestic use inside the house. It is not intended for commer-
cial or industrial use. Changes or modifi cations to the device are not allowed. Unintended
use may cause hazards and loss of of all warranty and liability claims.
Standards and directives
This product meets the requirements of all applicable EC directives with the correspond-
ing harmonised standards, which provide for CE marking.
Environmentally responsible use
▶ Thorough drainage: Spin the laundry with the maximum spin speed.
▶ Maximum load: Use the maximum fi lling amount according to the programme table,
but do not overload the dryer. To take advantage of the maximum load, the laundry
which should be dried „READY to STORE“, can be fi rst dried easily with „READY to
IRON“. At the programme end remove the laundry which should be ironed and dry the
remaining laundry then to end.
▶ Loosen up the laundry: Shake out the laundry before putting them into the dryer.
▶ Avoid excess drying: An excessive drying should be avoided. Select the right pro-
gramme and the appropriate dry level.
▶ Softener unnecessary: Do not use softener when washing, because the laundry will
become fl uff y and soft in the dryer .
▶ Cleaning of the lint fi lters: Clean the lint fi lters after each cycle.
▶ Ventilation: Make sure the appliance is properly ventilated (see INSTALLATION).
▶ Condensed water reuse: The collected condensed water can be used for the steam
iron. Before it should be poured through a fi ne sieve or coff ee fi lter paper. Smallest
parts will be retained by the fi lter.

EN
3-Product description
8
DryL evel
Delay
Wrinkle Free
Temp.
A
Childlock i-Refr esh
k
g
9
+
+
+
A
i-REFR
ESH
11 English |
CONTROL PANEL
5
Filters must be cleaned regularly.
See Lint Filter Cleaning or Condenser
Filter Cleaning section of the manual.
Clean filter
indicator
2
Childlock indicator
To activate the Child-lock function after a cycle
has been started, press the Childlock button
for 3 sec. until the indicator icon lights up.
To deactivate press the button for 3 sec. again.
Note: When the cycle ends or the power
supply is interrupted, the function will not be
cancelled automatically.
Note: After each cycle, indicator will flash to
remind cleaning the filters.
DryL evel
Delay
Wrinkle Free
Temp.
Babyca re
Quick Dry
Mix
Cotton
Duvet
Synthetics Towel
Warm Up
Shirt
Wool Timer
BulkyDelicate Sports
k
g
9
A
++
Childlock i-Refresh
kg
9
++
A
i-REFR
E
SH
Delay function for delay start, press the button to
set time (in 1 intervals up to 12 hours).
The appliance shoule be finished in, afterwards
press to start the delayed operation.
1 Delay button
3
Timer indicator
When choose the timer program, It will lights up.
Signal indicator
You can choose signal as you need. To active
the signal function after switching on the dryer,
press
and Temp. for about 3 seconds
until the beep sounds.To deactivate press both
buttons for 3 seconds again until the beep sounds.
4
Note: This function should be set after you
have finished all the options, otherwise when
you turn the knob or press the button, the
function will be delected automatically.
1 3
2
4
5
6
7
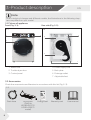
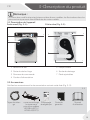
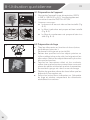
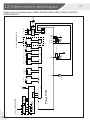
3.1 Picture of appliance
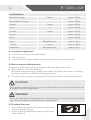
Front (Fig. 3-1): Rear side (Fig. 3-2):
Note:
Due to technical changes and diff erent models, the illustrations in the following chap-
ters may diff er from your model.
3.3
1 Water tank
2 Tumble dryer door
3 Control panel
4 Power supply cord
5 Back plate
6 Drainage outlet
7 Adjustable feet
User manual
Warranty card
Drain hose
Energy labelDrying rack
( Only for
HD100-A2979 /
HD90-A3S979
model)
3.2 Accessories
Check the accessories and literature in accordance with this list (Fig.:3-3):
3-1
3-23-2
3-3

EN
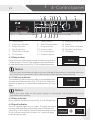
4-Control panel
9
4.1 Delay button
Delay function for delay start, press the button to set time (in
1 intervals up to 12 hours).The appliance should be fi nished
in, afterwards press to start (Fig. 4-2) the delayed operation.
1 Delay button
2 Child-lock indicator
3 Delay indicator
4 Signal indicator
5 Clean fi lter indicator
6 Time button
7 Temp. button
8 Start/Pause button
9 Program knob
10 Power button
11 Dry level button
12 Childlock button
13 Empty tank indicator
14 Display
15 Door unlock indicator
16 Wrinkle Free button
17 i-Refresh
Dry L evel
Delay
Wrinkle F ree
Temp.
Ba byc are
Quic k Dry
Mix
Cotton
Duvet
Synthetic s To wel
Wa rm Up
Shirt
Wool Timer
BulkyDelic ate Sp orts
kg
9
A
+
+
Childl oc k i-Re fr es h
kg
9
++
A
i-REFRE
SH
13
2
14
9
10
1
11
12
6
16
7
5
8
17
15
3
4
4.2 Child lock indicator
To activate the Child-lock function after a cycle has been start-
ed, press the Childlock button (Fig. 4-3) for 3 sec. until the in-
dicator icon lights up. To deactivate press the button for 3 sec.
again.
4.3 Delay indicator
When choose the delay program (Fig. 4-4), It will lights up.
4.4 Signal indicator
You can choose signal as you need. To active the signal
function after switching on the dryer, press i-Refresh and
Temp. (Fig. 4-5) for about 3 seconds until the beep sounds.
To de-activate press both buttons for 3 seconds again
until the beep sounds.
Notice
This function should be set after you have fi nished all the options, otherwise when you
turn the knob or press the button, the function will be delected automatically.
Notice
When the cycle ends or the power supply is interrupted, the function will not be
cancelled automatically.
Wrinkle Free
Temp.
i-Re fres h
Temp.
+
Childloc k
Delay
4-1
4-2
4-3
4-4
4-5

EN
4-Control panel
10
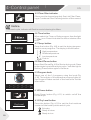
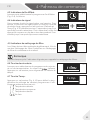
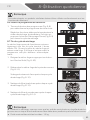
4.8 Start/Pause button
Press Start/Pause (Fig. 4-9) to Start a drying cycle. Press
button again to pause the drying cycle – indicator light is
fl ashing. Press button again to continue.
4.6 Time button
When select the Timer or Delay program, then the light
of is on. Press this button to add or substract the
time.
4.7 Temp. button
Press the button (Fig. 4-8) to set the drying tempera-
ture for some programs. The display is shown below:
High temperature.
Middle temperature.
Low temperature.
Cool air.
Notice
After each cycle, indicator will fl ash to remind cleaning the fi lters.
4.5 Clean fi lter indicator
Filters must be cleaned regularly. See Lint Filter Clean-
ing or Condenser Filter Cleaning section of the manual.
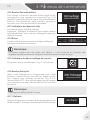
4.9 Program knob
Select one of the 14 programs using the knob (Fig.
4-10). The indictor of the respective program lights up.
See Program Modes section of the manual for further
information.
4.10 Power button
Press Power button (Fig. 4-11) to switch on/off the
tumble dryer.
4.11 Dry Level button
Press the button (Fig. 4-12) to set the fi nal moisture
content of the laundry at the end of cycle.
Extra dry
Ready to store
Ready to iron
Temp.
CONTROL PANEL
Dry Level
Delay
Wrinkle Free
Temp.
Babyc are
Quic k Dry
Mix
Cotton
Duvet
Synthetics Towel
Wa rm Up
Shirt
Wool Timer
BulkyDelic a te Sp orts
k
g
9
A
++
Childl oc k i-Re fres h
kg
9
++
A
i-REFRESH
4-6
4-7
4-8
4-9
4-11
4-10
Dry Level
4-12

EN
4-Control panel
11
Notice
The remaining time is a default value, this time will be re-calculated depending on
additional program settings and the moisture content of the laundry.
Notice
The default time is 1 hour.
4.12 Childlock button
To activate the Child-lock function after a cycle has been
started, press the button (Fig. 4-13) for 3 sec. until the in-
dicator icon lights up. To deactivate press the button for
3 sec. again.
4.13 Empty tank indicator
Water tank must be emptied (Fig. 4-14).
Important: Empty the water tank after each drying cycle.
See Empty the water tank section of the manual.
4.14 Display
The display shows the remaining time, the delay time and
other related information.
4.15 Door unlock indicator
If the door open, this indicator (Fig. 4-16) will light up..
4.16 Wrinkle Free button
After selecting the program with this function, the icon
lights up, anti-wrinkle default open, when we touch this
button (Fig. 4-17) display will show OFF, anti-wrinkle closed,
and touch again display will show ON, anti-wrinkle open.
4.17 i-Refresh
For I-Refresh program option the time and temperature
can be selected. The default time is 30 minutes. The
4-13
4-14
4-15
4-16
4-17
4-18
Childlock
Ba byc are
Quic k Dry
Mix
Cotton
Duvet
Synthetics Towel
Wa rm Up
Shirt
Wool Timer
BulkyDelic a te Sp orts
Wrink le Free
ee
i-Refresh
longest is 50 minutes. not applicable to HD90-A3S979) .
The model HD90-A3S979 includes Ultrasonic technology.
Selecting the ultrasonic program option, it is recommended to clean only one clothes at a time.
There can be 7 programs selected in dependence of the load. Only the program time can be
(
)
adjusted. The ultrasonic devise uses a small amount of the water to produce a mist.

EN
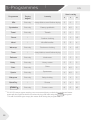
5-Programmes
12
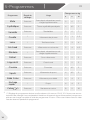
*)
Programme
Drying
degree
Laundry
Max. Load kg
8 9 10
Mix
Extra dry
Heavy fabrics, need further drying
5 6 7
Synthetics
Extra dry
Heavy synthetic
4 4,5 5
Towel
Extra dry
Towels
5 6 7
Duvet
/
Feather clothing
1 1 1,5
Wool
/
Woolfell textiles
3 3 4
Warm up
Extra dry
Cashmere clothing
3 4 4,5
Timer
/
Heavy fabrics, need further drying
- - -
Delicate
Extra dry Underwear 2 2 3
Bulky
Extra dry Heavy cotton 2 2 3
Shirt Extra dry
Shirts
4 4,5 5
Sports
Extra dry
Sportswear
4 4,5 5
Babycare
Extra dry Baby clothing 4 4 5
Quick Dry / Sheets 4 4 5
Cotton
Extra dry Cotton, coats 8 9 10
*)
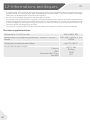
EN 61121 test program setting, we recommend that you drain the condensed water
externally through the drain hose when drying a full load using the Coton program.
This will avoid having to empty the water tank during the programme.

EN
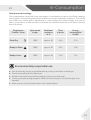
6-Consumption
13
Programme
Drying
degree
Laundry
Max. Load kg
8 9 10
Mix
Extra dry
Heavy fabrics, need further drying
5 6 7
Synthetics
Extra dry
Heavy synthetic
4 4,5 5
Towel **)
Extra dry
Towels
5 6 7
Duvet
/
Feather clothing
1 1 1,5
Wool
/
Woolfell textiles
3 3 4
Warm up
Extra dry
Cashmere clothing
3 4 4,5
Timer
/
Heavy fabrics, need further drying
- - -
Delicate
Extra dry Underwear 2 2 3
Bulky **)
Extra dry Heavy cotton 2 2 3
Shirt Extra dry
Shirts
4 4,5 5
Sports
Extra dry
Sportswear
4 4,5 5
Babycare
Extra dry Baby clothing 4 4 5
Quick Dry / Sheets 4 4 5
Cotton
Extra dry Cotton, coats 8 9 10
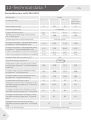
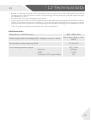
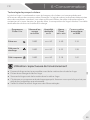
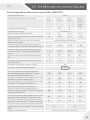
Heat pump technology
The condensation dryer with heat exchanger is outstanding in terms of effi cient energy
consumption. These are guide values determined under standard conditions. The values
may diff er from those given, depending on overvoltage and undervoltage, the type of
fabric, composition of the laundry to be dried, the residual moisture in the fabric and the
size of the load.
Programme
Cotton / Linen
Spin speed
in rpm
Restidual
moisture
in %
Time
in h:min
Energy
consumption
in kWh
Extra Dry
1000 approx. 60 4:40 2.34
Ready to Store
1000 approx. 60 4:29 1.98
Ready to Iron
1000 approx. 60 3:18 1.62
Environmentally responsible use
▶ Spin the laundry as dry as possible before putting it into the tumble dryer.
▶ Avoid overloading the tumble dryer.
▶ Shake the laundry loose before putting it into the tumble dryer.
▶ Choose a proper drying program. Make sure the laundry is not dried longer than
needed.
▶ Make sure to use the tumble dryer with cleaned fi lters.

EN
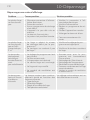
7-Suggestions and tips
14
7.1 Starched laundry
Starched laundry leaves a fi lm of starch in the drum and is not suitable for the dryer.
7.2 Softener
Do not use softener when washing, because the laundry will become soft and fl uff y in the
dryer.
7.3 Soft care cloths
The use of “soft care cloths” can lead to a coating at the lint fi lters. This can cause a block-
age of the fi lters. In such cases, we recommend either to abstain from adding soft care
cloths or to choose a diff erent brand. In any case note the manufacturer’s instructions.
7.4 Small amounts of fi lling
In a quantity of less than 1.0 kg, the “Timer”-programme should be selected because the
automatic scanning of the dry level can be captured only still inaccurate.
7.5 Open door
The door should be left ajar during the non-use, so that the door seal indefi nitely remains
in eff ect.
7.6 Drum interior light
When the appliance is switched on, always the drum interior light lights when door is open .
7.7 Service fl ap
Make sure that the service fl ap is always closed during operation.
7.8 Anti crease protection
If at the end of the programme the laundry is not removed, the drum moves from time to
time to prevent creasing. The anti crease protection phase is approx. 60 minutes.
7.9 Laundry which should be ironed
...should be dried with level READY to IRON . This facilitates ironing by hand or using the
machine.
7.10 Remaining time
The programme duration is infl uenced by the following factors: the type of fabric, the fi lling
quantity, absorptive capacity, the desired dry level, as well as the spin speed of the washing
machine. These factors are registered by the electronics during the programme and the
remaining time will be corrected accordingly.
7.11 AUTO load detection system
When the programme starts, after a few minutes the display will show . This means
the automatic load detection is in progress. Sensors are detecting and estimating the se-
lected programme time to fi nish. Depending on the programme selected, load quantity,
humidity and ambient temperature, the AUTO load detection phase can last a few minutes
for small load, or up to hour for the maximum load or large items, before displaying the ap-
proximate programme time remaining to fi nish the programme.

EN
7-Suggestions and tips
15
7.12 Extra large pieces
... tend to wind up. If therefore the desired dry level could not be reached, loosen up the
laundry and dry again with the time programme (TIMER ).
7.13 Especially delicate fabrics
Textiles which can easily shrink or lose their shape, as well as e.g. silk stockings, lingerie etc.
should not be put in the dryer. Put delicate garments inside a laundry bag and avoid over
drying them.
7.14 Jersey and knitwear
should be dried at READY to IRON to avoid shrinkage. A subsequent stretch or pull into
form should be performed.
7.15 Fluff
The amount of lint in the lint fi lters is not attributable to the wash stress in the dryer; rather,
it is extracted fi bres from the wearing and washing. During drying on the line, the fl uff will
be carried away by the wind. By using a tumble dryer the fl uff will be collected in the fi lters.
7.16 Acoustic signal
An acoustic signal sounds:
▶ when the water tank is full
▶ in case of failures
Additionally the acoustic signal can also be selected for following cases:
▶ at the end of programme
▶ when pressing a button
▶ when turning the programme selector

EN
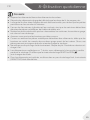
8-Daily use
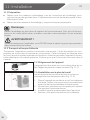
16
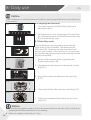
8.2 Preparing the laundry
▶ Sort clothes according to fabric
(cotton,synthetics, wool etc.).
Only dry laundry that has been spun.
▶ Empty pockets of all sharp or fl ammable objects
such as keys, lighters and matches. Remove
harder decorative objects such as brooches.
▶ Close zippers and hooks, make sure the buttons
are sewn on tightly and place small items such as
socks, bras etc. in a wash bag.
▶ Unfold large pieces of fabric such asbed sheets,
table cloth etc.
▶ Follow the instructions on the laundry label and
dry only machine-dryable garments.
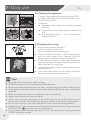
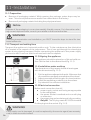
8.1 Preparing the appliance
1. Connect the appliance to a power supply (220V
to 240V~/50Hz) (Fig. 8-1) Please refer also to sec-
tion INSTALLATION.
2. Make sure:
▶ the water tank is empty and properly installed.
(Fig. 8-2).
▶ the lint filter is clean and properly installed. (Fig.
8-3).
▶ the condenser filter is clean and properly
installed (Fig. 8-4).
Tips:
▶ Separate white clothes from coloured ones.
▶ Unfold large items such as bed sheets, table cloths, etc.
▶ Bed linen and pillowcases should be button, so that small parts cannot collect inside.
▶ Close zippers and hooks, and tie loose belts without metal parts, apron strings etc.
together.
▶ Place small items such as socks, belts, bras, etc. in a wash bag.
▶ Make sure all buttons are sewn on tightly .
▶ Sew or remove loose metal parts of garments, such as e.g. metal buttons, bow of
bras before inserting. Otherwise such parts can cause noise and damage the drum.
▶ Do not over-dry easy-care linen. Risk of the crease. Allow fi nal drying at the air.
▶ Knitwear (e.g. T-shirts, underwear) sometimes run up during drying. Only use dry level
READY to IRON and drag in the form afterwards.
▶ For pre-dried, multi-layered garments or for fi nal drying the time-programme
(TIMER
) should be chosen.
kg
9
A
+
+
kg
9
++
A
i-REFR
E
SH
17
8-1
8-3 8-4
8-5
8-6
8-2

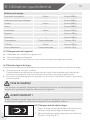
EN
8-Daily use
17
CAUTION!
Non-textile, as well as small, loose or sharp-edged items may cause malfunctions and
damage of clothes and appliance.
8.3 Loading the appliance
▶ Loosen up and insert presorted laundry.
▶ Don‘t overload.
▶ Close the door carefully. Make sure that no pieces of laundry are pinched.
8.4 Removing and adding laundry
WARNING!
Never turn the dryer off before the end of the drying cycle unless all items are quickly
removed and spread out that the heat can be released.
To remove or add laundry the programme can be interrupted at any time:
▶ Open the door. The cycle interrupts.
Be careful when removing or adding the laundry! The Interior of the drum or the laun-
dry itself may be hot, so that there is danger of burns .
▶ To continue the programme, press the “Start/Pause” button after closing the door.
Load Reference
Bed sheet (single) Cotton Approx. 800 g
Blended fabric clothes / Approx. 800 g
Jackets Cotton Approx. 800 g
Jeans / Approx. 800 g
Overalls Cotton Approx. 950 g
Pyjamas / Approx. 200 g
Shirts / Approx. 300 g
Socks Blended fabrics Approx. 50 g
T-Shirts Cotton Approx. 300 g
Underwear Blended fabrics Approx. 70 g
8.5 Loading the dryer
1. Place the laundry evenly in the drum making sure
not to overload the dryer.
2. Switch on the tumble dryer by pressing the Power
button (Fig. 8-7).
8-7

EN
8-Daily use
18
8.6 Set program and start
1. Turn the program knob (Fig. 8-8) to select the
desired program.
2. Set functions such as Temperature, Dry level, De-
lay. Afterwards press theStart/Pause button (Fig.
8-9) to start the dry cycle.
8.7 End of dry cycle
The tumble dryer stops operation automatically
when a dry cycle is complete. The display shows
END about 5S. Open the tumble dryer door and
remove the laundry. If the laundry is not removed
the wrinkle free program starts automatically and the
1. Switch off the tumble dryer by pressing the
Power button (Fig. 8-10).
2. Unplug the tumble dryer from the power socket
(Fig. 8-11).
3. Empty the water tank after each dry cycle (Fig.
8-12) .
4. Clean the lint fi lter after each dry cycle (Fig. 8-13).
5. Clean the condenser fi lter after each dry cycle
(Fig. 8-14).
Notice
Fabric softeners or similar products should be used as specifi ed in the manufacturer’s
instructions.
CONTROL PANEL
Dry Le vel
Delay
Wrink le F ree
Te mp.
Ba byca re
Quic k Dry
Mix
Cott on
Duvet
Sy n thetic s To wel
Wa rm Up
Shi rt
Wool T im er
Bulk yDelic ate Sp orts
k
g
9
A
++
Childl oc k i-Re fres h
kg
9
++
A
i-REFRESH
kg
9
A
++
kg
9
++
A
i-REFR
ESH
D
ry L evel
Delay
Wrink le Fre e
Te mp.
Ba byca re
Quick Dry
Mix
Cotto n
Duvet
Synt hetics To wel
War m Up
Shir t
Wool T ime r
Bulk y
Delic ate Spo rts
Childl ock i-Re fres h
8-8
8-9
8-10
8-11
8-12
8-13
8-14
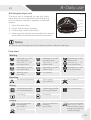
Notice
▶ During drying, please make sure the items are placed on the rack with no risk of en-
tangling the baffl es while the drum is rotating.
▶ Maximum weight of wet items: 1.5 kg.
display shows 0:00 .

EN
8-Daily use
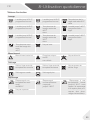
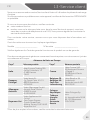
Care chart
Washing
Washable up to 95°C
normal process
Washable up to 60°C
normal process
Washable up to 60°C
mild process
Washable up to 40°C
normal process
Washable up to 40°C
mild process
Washable up to 40°C
very mild process
Washable up to 30°C
normal process
Washable up to 30°C
mild process
Washable up to 30°C
very mild process
Wash by hand
max. 40°C
Do not wash
Bleaching
Any bleaching allowed Only oxygen/
non -chlorine
Do not bleach
Drying
Tumble drying possible
normal temperature
Tumble drying possible
lower temperature
Do not tumble dryr
Line drying Flat drying
Ironing
Iron at a maximum
temperature
up to 200 °C
Iron at a medial tem-
perature
up to 150°C
Iron at a low temper-
ature up to 110 °C;
without steam (steam
ironing may cause irre-
versible damage)
Do not iron
19
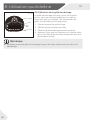
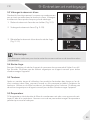
8.8 Using the dryer rack
The dryer rack is designed for use with items
which are not recommended for tumble drying
such as trainers, sneakers, sweaters or delicate
lingerie.
1. Open the dryer door.
2. Check that the drum is empty.
3. Put the dryer rack into the drum.
4. Make sure the catches are inserted in the hole of
the lint fi lter and locked in the hole of rear drum.
YER RACK
4. Make sure the catches are
Drum openings
Drum
Dryer rack
Lint filter
8-15
Notice
▶ Do not use this dryer rack when there are other clothes in the dryer.

EN
9-Care and cleaning
20
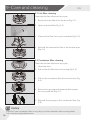
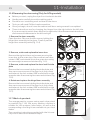
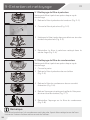
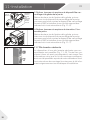
9.1 Lint fi lter cleaning
Clean the lint fi lter after each dry cycle.
1. Remove the lint fi lter from the drum (Fig. 9-1).
2. Open up the lint fi lter (Fig. 9-2).
3. Clean the lint fi lter form any lint residuals (Fig. 9-3).
4. Reinstall the cleaned lint fi lter in the tumble dryer
(Fig. 9-4).
9.2 Condenser fi lter cleaning
Clean the lint fi lter after each dry cycle.
1. Open the door.
2. Pull out the lint fi lter from its housing (Fig. 9-5).
3. Pull out the condenser fi lter from the air duct (Fig.
9-6).
4. Remove the sponge and clean the fi lter screen
form any residuals (Fig. 9-7).
5. Reinstall the sponge to the condenser fi lter (Fig.
9-8).
Notice
If the lint / the condenser fi lter is very dirty, it can be cleaned under running water.
Let it dry thoroughly before use.
2
4
9-1
9-2
9-3
9-4
9-5
9-6
9-7
9-8
La page charge ...
La page charge ...
La page charge ...
La page charge ...
La page charge ...
La page charge ...
La page charge ...
La page charge ...
La page charge ...
La page charge ...
La page charge ...
La page charge ...
La page charge ...
La page charge ...
La page charge ...
La page charge ...
La page charge ...
La page charge ...
La page charge ...
La page charge ...
La page charge ...
La page charge ...
La page charge ...
La page charge ...
La page charge ...
La page charge ...
La page charge ...
La page charge ...
La page charge ...
La page charge ...
La page charge ...
La page charge ...
La page charge ...
La page charge ...
La page charge ...
La page charge ...
La page charge ...
La page charge ...
La page charge ...
La page charge ...
La page charge ...
La page charge ...
La page charge ...
La page charge ...
La page charge ...
La page charge ...
La page charge ...
La page charge ...
-
 1
1
-
 2
2
-
 3
3
-
 4
4
-
 5
5
-
 6
6
-
 7
7
-
 8
8
-
 9
9
-
 10
10
-
 11
11
-
 12
12
-
 13
13
-
 14
14
-
 15
15
-
 16
16
-
 17
17
-
 18
18
-
 19
19
-
 20
20
-
 21
21
-
 22
22
-
 23
23
-
 24
24
-
 25
25
-
 26
26
-
 27
27
-
 28
28
-
 29
29
-
 30
30
-
 31
31
-
 32
32
-
 33
33
-
 34
34
-
 35
35
-
 36
36
-
 37
37
-
 38
38
-
 39
39
-
 40
40
-
 41
41
-
 42
42
-
 43
43
-
 44
44
-
 45
45
-
 46
46
-
 47
47
-
 48
48
-
 49
49
-
 50
50
-
 51
51
-
 52
52
-
 53
53
-
 54
54
-
 55
55
-
 56
56
-
 57
57
-
 58
58
-
 59
59
-
 60
60
-
 61
61
-
 62
62
-
 63
63
-
 64
64
-
 65
65
-
 66
66
-
 67
67
-
 68
68


Haier HD90-A3979 I Pro Series 7 Le manuel du propriétaire
- Catégorie
- Sèche-linge
- Taper
- Le manuel du propriétaire
- Ce manuel convient également à
dans d''autres langues
Documents connexes
-
Haier HD80-A82 Manuel utilisateur
-
Haier HD80-26A-DF Manuel utilisateur
-
-
-
-
Haier HD80-B829 Manuel utilisateur
-
Haier HD80-B636BHD80-B829 Le manuel du propriétaire
-
Haier HD90-A636 Le manuel du propriétaire
-
-
Haier HW120-B14979S Manuel utilisateur