Sena SP107 Manuel utilisateur
- Catégorie
- Casques mobiles
- Taper
- Manuel utilisateur

Manual
1. GETTING STARTED: BUILT-IN BLUETOOTH SYSTEM
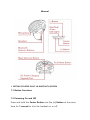
1.1 Button Functions
1.2 Powering On and Off
Press and hold the Center Button and the (+) Button at the same
time for 1 second to turn the headset on or off.

1.3 Charging
The Bluetooth Communication Module can be charged using many
common methods via the supplied USB power & data cable:
1. Plugged into a computer’s USB port.
2. With a USB-equipped AC adapter via a wall-outlet charger.
Note: Please make sure to take off your helmet while charging. The
headset automatically turns off during charging.
Depending upon the charging method, the Bluetooth Module will be
fully charged in about 2.5 hours.
1.4 Checking the Bluetooth Module’s Battery Level
There are two ways to check battery level:
1. Visually, with LEDs when powering on.
Note: Blinking LEDs alternate from blue to red when battery power is
low.
2. Audible method: Press and hold the Center Button and the (+)
Button for 3 more seconds as the headset powers on. A prompt will
announce the remaining battery level.
1.5 Volume Adjustment
You can raise or lower the volume by tapping the (+) Button or the
(-) Button. Volume is set and maintained independently at different
levels for each audio source (i.e., phone, intercom), even when the
headset is rebooted.

1.6 Configuration Menu
The Bluetooth Communication Module can be configured by
following a series of voice prompts. Further details about each of
these settings will be explained on the following pages.
1. To access the Configuration Menu, press and hold the Center
Button for 10 seconds until you hear the voice prompt,
“Configuration menu.
2. Tap the (+) Button or the (-) Button to navigate between the
menus. You will hear voice prompts for each menu item. The list of
functions is shown in the Configuration Menu Chart on page 19.
3. You can enable/disable the feature or execute the command by
tapping the Center Button.
2.1 Mobile Phone
1. Execute Phone Pairing in the Configuration Menu.
2. With your mobile phone in Bluetooth-pairing mode, select Sena R1
in the list of devices detected.
3. If your mobile phone asks for a PIN, enter 0000.
2.2 MOBILE PHONE USAGE
- Answer a Call : Tap the Center Button.
- End/Reject a Call : Press and Holde the Center Button for 2
seconds.

2.3 Speed Dialing
1. Press and hold the (+) Button for 3 seconds to enter into the
Speed Dial menu. You will hear the voice prompt, “Speed dial.”
2. Tap the (+) Button or the (-) Button to navigate between the
Speed Dial Presets.
3. To redial the last number called, tap the Center Button when you
hear the prompt, “Last number redial.”
4. To call one of your Speed Dial Presets, tap the Center Button
when you hear the prompt, “Speed dial (#).”
3. Mesh Intercom
- Mesh Intercom On : Tap the Mesh Intercom Button
- Mesh Intercom Off : Tap the Mesh Intercom Button
4. STEREO MUSIC
1. To play or pause music, press and hold the Center Button for 1
second until you hear a double beep.
2. To adjust the volume, tap the (+) Button or the (-) Button.
3. To track forward or back, press and hold the (+) Button or the (-)
Button for 1 second.
5. LED Taillight
- LED Taillight On : Tap the Center Button
- Change the mode and LED Taillight Off

Tap the Center Button continuously.
LED On and Solid -> Night Flash -> Day Flash -> LED Off
6.4 Temporary Station Preset
The Temporary Preset feature automatically finds and saves the
nearest 10 radio stations without changing your existing preset
stations.
1. Tap the (+) Button three times to automatically find and save 10
stations.
2. The temporary preset stations will be cleared when the Bluetooth
Module reboots.
7. Fault Reset
When the helmet’s Bluetooth Module is not working properly, you
can easily reset the unit:
1. Locate the pinhole reset button below the (+) Button.
2. Gently insert a paper clip into the hole and press and Fault Reset
Button for 1 second with light pressure.
3. The communication module will shut down.
Note: Fault Reset will not restore the Bluetooth Module to factory
default settings.
8. Factory Reset

To erase all of your settings and start fresh, the headset can be
restored to factory default settings using the Factory Reset feature in
the Configuration Menu. Please refer to Section 2.7: “Configuration
Menu” for more details.
Certification and Safety Approvals FCC Compliance Statement
This device complies with part 15 of the FCC rules. Operation is subject to the following two
conditions:
(1) This device may not cause harmful interference, and
(2) This device must accept any interference received, including interference that may cause
undesired operation.
This equipment has been tested and found to comply with the limits for a Class B digital device
pursuant to part 15 of the FCC rules. These limits are designed to provide reasonable protection
against harmful interference in a residential installation. This equipment generates, uses and can
radiate radio frequency energy and, if not installed and used in accordance with the instructions,
may cause harmful interference to radio communications. However, there is no guarantee that
interference will not occur in a particular installation. If this equipment does cause harmful
interference to radio or television reception, which can be determined by turning the equipment
on and off, the user is encouraged to try to correct the interference by one or more of the
following measures:
-Reorient or relocate the receiving antennae
-Increase the separation between the equipment and the receiver
-Connect the equipment into an outlet on a circuit different from that to which the receiver is
connected.
-Consult the dealer or an experienced radio/TV technician for help.
FCC RF Exposure Statement
This equipment complies with FCC radiation exposure limits set forth for an uncontrolled
environment. End users must follow the specific operating instructions for satisfying RF exposure
compliance. The antenna used for this transmitter must not transmit simultaneously with any
other antenna or transmitter, except in accordance with FCC multi-transmitter product procedures.
When equipped, the distance between antenna and one’s head surface is 18mm.

FCC Caution
Any changes or modifications to the equipment not expressly approved by the party responsible
for compliance could void user’s authority to operate the equipment.
Certification et homologation de sécurité Déclaration de conformité FCC
Cet appareil est en conformité avec la partie 15 des règles de la FCC. Son fonctionnement est
soumis aux deux conditions suivantes :
(1) Cet appareil ne doit pas créer d’interférences préjudiciables et
(2) Cet appareil doit accepter toutes les interférences reçues, y compris celles qui pourraient
entraver son bon fonctionnement. Cet équipement a été testé et jugé conforme aux limites pour
un appareil numérique de classe B, conformément à la partie 15 des règles de la FCC. Ces limites
sont conçues pour fournir une protection raisonnable contre les interférences nuisibles dans une
installation résidentielle. Cet équipement génère et utilise de l’énergie radio fréquence et, s’il n’est
pas installé et utilisé conformément. aux instructions, il peut occasionner des interférences
nuisibles au niveau des communications radios. Cependant, il n’existe aucune garantie que ces
interférences ne se produiront pas dans une installation particulière. Si cet équipement génère des
interférences nuisibles à la réception de la radio ou de la télévision (ce qu’il est possible de
déterminer en mettant l’équipement hors tension, puis sous tension), l’utilisateur est invité à
suivre une ou plusieurs des mesures suivantes pour corriger le problème des interférences en
prenant l’une des mesures suivantes :
-Modifier l’emplacement ou l’orientation de l’antenne de réception.
-É loigner l’appareil du récepteur.
-Brancher l’appareil sur une prise située sur un circuit différent de celui du récepteur.
-Consulter le revendeur ou un technicien expérimenté pour obtenir de l’aide.
É noncé FCC sur l’exposition aux radiations RF
Cet équipement est conforme aux réglementations FCC d’exposition aux radiations définies pour
un environnement non contrôlé. Les utilisateurs doivent respecter les instructions d’exploitation
spécifiques pour répondre aux exigences de conformité sur l’exposition aux RF. L’antenne utilisée
pour cet appareil ne doit pas fonctionner en même temps qu’une autre antenne ou émetteur,
sauf s’il y a conformité avec les procédures FCC des produits multi-émetteurs.

Cet appareil est conforme à l'exigence d'exposition aux RF. Lorsque équipé, la distance entre
l’antenne et la surface de la tête est de 18mm. L’EST étant commercialisé sans casque, il doit donc
rester à une distance de 64mm de la surface de la tête.
Précautions FCC
Tout changement ou modification non expressément approuvé par la partie chargée de la mise
en conformité peut annuler le droit de l’utilisateur à utiliser l’équipement.
Industry Canada(IC) Statement
This device complies with Industry Canada license-exempt RSS standard(s). Operation is subject to
the following two conditions:
(1)this device may not cause interference, and
(2)this device must accept any interference, including interference that may cause undesired
operation of the device.
Le present appareil est conforme aux CNR d’Industrie Canada applicables aux appareils radio
exempts de licence. L’exploitation est autorisee aux deux conditions suivantes :
(1) l’appareil ne doit pas produire de brouillage, et
(2) l’utilisateur de l’appareil doit accepter tout brouillage radioelectrique subi, meme si le
brouillage est susceptible d’en compromettre le fonctionnement.
IC RF Exposure Statement
Cet équipement est conforme aux limites d'exposition aux radiations de la FCC définies pour un
environnement non contrôlé. Les utilisateurs finaux doivent suivre les instructions d'utilisation
spécifiques
pour satisfaire à la conformité d'exposition RF. L'antenne utilisée pour cet émetteur ne doit pas
émettre simultanément avec d'autres antennes ou émetteurs, sauf en conformité avec les
procédures FCC relatives aux produits multi-émetteurs.
Lorsque équipé, la distance entre l’antenne et la surface de la tête est de 18mm.
-
 1
1
-
 2
2
-
 3
3
-
 4
4
-
 5
5
-
 6
6
-
 7
7
-
 8
8


Sena SP107 Manuel utilisateur
- Catégorie
- Casques mobiles
- Taper
- Manuel utilisateur
dans d''autres langues
- English: Sena SP107 User manual
Documents connexes
-
Sena 10S Motorcycle Bluetooth Communication System Manuel utilisateur
-
Sena SRL3 Manuel utilisateur
-
Sena Spider RT1 Bluetooth Headset Manuel utilisateur
-
Sena Spider ST1 Bluetooth Headset Manuel utilisateur
-
Sena M1 Manuel utilisateur
-
Sena SP87 Manuel utilisateur
-
Sena SC2 Manuel utilisateur
-
Sena SP114 Headphone Manuel utilisateur
-
Sena 3S Plus Manuel utilisateur
-
