RENNSTALL MOTO RMC-011000 Manuel utilisateur
- Taper
- Manuel utilisateur

Complete Body Kit
for Triumph Speed Twin 1200 (Model Year 2022)
Part number: RMC-011000
Instruction Manual
Version: 1
Date: 21.03.2022
Read and save this manual for future
reference. Before attempting to assemble,
install, operate the products, please
ensure a complete understanding of the
instructions and any other documents
related to the products, including but not
limited to a provided disclaimer. Failure to
comply with instructions in this manual
could result in serious injury, death and/or
property damage. This manual is subject
to change without notice.

Important note
Products of Rennstall Moto or any of its affiliates (collectively, "Rennstall")
are sold "AS IS" without any express or implied warranties. To the fullest
extent permitted by law, Rennstall disclaims any and all warranties.
Installation or usage of Rennstall's products may affect warranties of utilized
vehicles, such as motorcycles.
ANY BUYER OR USER OF PRODUCTS OF RENNSTALL EXPRESSLY AND
VOLUNTARILY ASSUMES ANY AND ALL RISKS INCLUDING, BUT NOT
LIMITED TO, DEATH, DISABILITY, AND/OR SERIOUS PHYSICAL INJURY,
RELATED TO THE INSTALLATION OR USAGE OF SUCH PRODUCTS BY
BUYER, USER OR ANY THIRD PARTY.
Under no circumstances are Rennstall's products to be used on public roads
or any other streets, highways, or off-road areas. Rennstall's products are
solely intended for use on vehicles operated on closed-course facilities,
show events or racetracks, each with appropriate supervision of qualified
individuals to ensure safety of all involved parties.
Always use caution when installing or using Rennstall's products, adhere to
all instructions, only utilize provided hardware or tools, and do not modify
or otherwise alter the products.
Prior to any usage of Rennstall's products, a buyer or user shall inspect and
verify the integrity of the entire vehicle upon which such products are
mounted, installed, or otherwise attached. Vehicles are to be inspected
before each use for evidence of damage, defect, or wear to ensure the
vehicle is fit and ready for operation. Without limiting the generality of the
foregoing, buyer or user shall specifically inspect all bolts after each usage
in excess of Two Hundred (200) kilometers or One Hundred Twenty-Five
(125) miles.
Under no circumstances and under no legal theory whether in tort, contract,
or otherwise shall Rennstall or its employees, agents, representatives,
successors, or assigns, be liable to a buyer, user or any other person for any
direct, indirect, special, incidental, or consequential damages of any kind
arising out of or relating to the installation or usage of the products,
even if Rennstall has been informed of the possibility of such
damages, or for any claim by any other party.

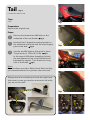
Tail (Fig.1)
Part Number: RMC-011100
Time:
<1h
Preparation:
Remove the original seat
Steps:
Remove the forward two M6 bolts on the
underside of the rear fender.
à
Fig.2
Interlock the C-shaped mounting bracket on
the underside of the tail with the tube-shaped
part on the tank.
à
Fig.3
Use the two M6 bolts to fix the tail in place.
Torque down to 12Nm (8.9 ft·lb).
à
Fig.4
In the case of difficulties threading the bolt,
the two sleeves can be moved forward and
backward by approx. 7mm thanks to a long
hole in the frame.
à
Fig.5
Note:
Pictures shown are with a Raisch Heck Weck tail tidy,
our recommendation for a puristic cafe racer look.
1
2
3
Fig.1
Fig.2
30°
Fig.3
Fig.4
Fig.5
Always store the included tool inside the right-hand
side cover in case you need to remove the tail while
you are on the road!

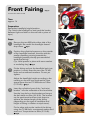
Front Fairing (Fig.1)
Part Number: RMC-011200
Time:
approx. 1h
Preparation:
Remember headlight height/position.
(Tip: Switch the headlight on and mark the border
between light and dark on the wall with a piece of
tape.)
Steps:
Remove the two M8 bolts either side of the
headlight. Be careful the headlight doesn‘t
drop down.
à
Fig.2
Position the cylindrical spacers on the outside
of the headlight brackets, the side with the
smaller diameter pointing towards the
headlight (possibly already pre-assembled
inside the fairing).
(Tip: Hold spacers in place with some sealant
or modeling clay.)
à
Fig.3
Fit the fairing and put the headlight back into
position. Loosely insert the two new TX M8
bolts and countersunk washers. Do not yet
tighten.
Adjust the headlight height according to the
marking on the wall you made earlier. Now
torque down the two TX M8 bolts to 18Nm
(13.3 ft·lb).
à
Fig.1
Insert the cylindrical part of the “anti twist
bracket“ into the underside of the head tube.
Use the long hole on the bracket and torque
the bolt down to 6Nm (4.4 ft·lb). The bracket
can be positioned and bent into shape to
achieve the desired angle of the fairing
(depending on the type of handlebar and
height of fairing in relation to triple trees).
Fix the other side to the inside of the fairing
using the TX M6 bolt, countersunk washer and
tooth nut. Torque down to 8Nm (5.9 ft·lb).
à
Fig.4
1
2
3
4
Fig.1
Fig.2
Fig.3
Fig.4

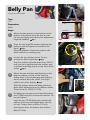
Belly Pan
Part Number: RMC-010300
Time:
<1h
Preparation:
None
Steps:
Mount the two spacers to the latches on the
bottom of the frame using the two tin nuts
(do not yet tighten since some fine adjustment
might be needed).
à
Fig.1
Place the two large M6 washers between the
belly pan and the spacers mounted to the
frame.
à
Fig.1
(Recommendation: Fixate the washers with
some sealant or modeling clay).
Loosen the top radiator mount. Do not
remove the bolt completely!
à
Fig.2
Push the radiator upwards about 5mm (3/16“)
until you get a gap between the radiator and
its bottom mounting points on the frame (blue
arrow).
à
Fig.3
Mount the two stainless steel brackets to the
bottom radiator mounts on the frame by
sliding them in the created gap and pushing
them outwards from the inside. You might
need to turn them slightly.
à
Fig.4
Slide the radiator down and keep pushing it
down while tightening the top radiator mount.
Torque down to 10Nm (7.4 ft·lb).
Put belly pan into place and insert the bottom
two TX M6 bolts plus countersunk washers. Do
not yet tighten.
Insert the two TX M6 bolts plus countersunk
washers at the top and thread them into the
tin nuts. Torque down to 8Nm (5.9 ft·lb).
Now torque down the bottom two bolts to
8Nm (5.9 ft·lb).
1
2
3
4
Fig.1
Frame
Belly Pan
Fig.2
PUSH UP
Fig.3
Fig.4
5
-
 1
1
-
 2
2
-
 3
3
-
 4
4
-
 5
5


RENNSTALL MOTO RMC-011000 Manuel utilisateur
- Taper
- Manuel utilisateur
dans d''autres langues
Documents connexes
Autres documents
-
Ducati 996 Le manuel du propriétaire
-
-
Yamaha WR450F Le manuel du propriétaire
-
Big Ass Fans Powerfoil 8 Guide d'installation
-
-
-
-
-