Velleman CAMCOLD11 Manuel utilisateur
- Catégorie
- Stroboscopes
- Taper
- Manuel utilisateur

CAMCOLD11
MANUAL VARIFOCAL COLOUR DOME CAMERA WITH IR
KLEUREN DOMECAMERA MET MANUELE VARIFOCALLENS EN IR
CAMÉRA DÔME COULEUR IR À OBJECTIF VARIFOCAL
CÁMARA DOMO COLOR CON IR Y ÓPTICA VARIFOCAL MANUAL
DOME-FARBKAMERA MIT MANUELLEM VARIFOKAL-OBJEKTIV UND IR
USER MANUAL 3
GEBRUIKERSHANDLEIDING 6
NOTICE D’EMPLOI 9
MANUAL DEL USUARIO 12
BEDIENUNGSANLEITUNG 15

CAMCOLD11
00 (12/11/2008) 2 Velleman
®
1 vidéo vídeo Video
2 alimentation alimentación Stromversorgung
1 video video
2 power voeding

CAMCOLD11
00 (12/11/2008) 3 Velleman
®
User manual
1. Introduction
To all residents of the European Union
Important environmental information about this product
This symbol on the device or the package indicates that disposal
of the device after its lifecycle could harm the environment.
Do not dispose of the unit (or batteries) as unsorted municipal
waste; it should be taken to a specialized company for recycling.
This device should be returned to your distributor or to a local
recycling service.
Respect the local environmental rules.
If in doubt, contact your local waste disposal authorities.
Thank you for choosing Velleman! Please read the manual thoroughly before
bringing this device into service. If the device was damaged in transit, don't
install or use it and contact your dealer.
2. Safety Instructions
For indoor use only. Keep this device away from rain, moisture,
splashing and dripping liquids.
Keep the device away from children and unauthorised users.
Risk of electric shock when opening the cover.
There are no user-serviceable parts inside the device.
Refer to an authorized dealer for service and/or spare parts.
• Damage caused by disregard of certain guidelines in this manual is not
covered by the warranty and the dealer will not accept responsibility for any
ensuing defects or problems.
• Note that damage caused by user modifications to the device is not covered
by the warranty.
3. General Guidelines
• Protect this device from shocks and abuse. Avoid brute force when
operating.
• Protected the device against extreme heat (e.g. direct sunlight, heater …),
dust and moisture.
• Familiarise yourself with the functions of the device before actually using it.
• All modifications of the device are forbidden for safety reasons.
• Only use the device for its intended purpose. Using the device in an
unauthorised way will void the warranty.

CAMCOLD11
00 (12/11/2008) 4 Velleman
®
4. Features
• vandal-proof IR camera
• manual varifocal lens with adaptive focus and zoom
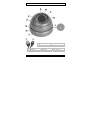
5. Overview
Refer to the illustration on page 2 of this manual
A light sensor F lens enclosure (ball)
B IR night LEDs G positioning ring
C varifocal lens H fixation ring
D manual zoom I mounting plate
E manual focus J hex head screw
6. Installation
• Choose the location for the dome camera, keeping following guidelines in
mind:
• Do not install the camera in locations where extremely high or low
temperatures, high humidity, water vapour or steam, dust or excessive
vibrations may occur.
• Avoid mounting the camera near high electro-magnetic fields as this will
influence image quality.
• Do not aim the camera at the sun or other extremely bright objects or
reflections.
• Release the hex head screw [J] with the included Allen wrench.
• Hold the mounting plate [I] and unscrew the fixation ring [H] by turning it
counter clockwise. Note that the lens enclosure [F] and positioning ring [G]
are also released.
• Use the mounting plate [I] to determine the position of the mounting
holes.
• Guide the power and video cable though one of the cable slots and
mount the mounting plate [I] on the ceiling or wall with the four mounting
screws (included).
• Insert the lens enclosure [F] in the positioning ring [G] and insert both on
the fixation ring [H]. Screw the fixation ring [H] back on the mounting
plate [I]. Do not secure the hex head screw [J] yet.
• Connect the video connector [1] to a monitor (not incl.) or a sequential
switcher/quad splitter (not incl.) when connecting multiple domes.
• Connect the power connector [2] to a 12VDC power supply (not incl.)
• Manually adjust the zoom with screw [D] and the focus with screw [E]. The
location of the screws can be determined by looking at the position of the
light sensor [A].

CAMCOLD11
00 (12/11/2008) 5 Velleman
®
• After setting up the desired field of observation, zoom and focus, screw the
hex head screw [J] in clockwise into the mounting base [I] to secure the
camera’s position.
7. Technical Specification
pick-up element 1/3" Sony colour CCD image sensor
number of pixels 500 x 582 (PAL)
resolution 480 TV lines
min. illumination 0 lux / F1.2
S/N ratio > 48dB (AGC off)
electronic shutter 1/50 to 1/100.000s
lens 4-9mm manual lens
number of LEDs 42
max. distance 40~50m
lens angle 37°~74°
video output 1.0Vpp composite, 75 ohms
IP-rating IP55
power supply 12VDC adaptor (use PS1210R</a> not incl.)
current consumption 500mA (IR LEDs on), 170mA (IR LEDs off)
dimensions Ø120 x 100mm
weight 810g
Use this device with original accessories only. Velleman nv cannot
be held responsible in the event of damage or injury resulted from
(incorrect) use of this device.
For more info concerning this product, please visit our website
www.velleman.eu
.
The information in this manual is subject to change without prior
notice.

CAMCOLD11
00 (12/11/2008) 6 Velleman
®
Gebruikershandleiding
1. Inleiding
Aan alle ingezetenen van de Europese Unie
Belangrijke milieu-informatie betreffende dit product
Dit symbool op het toestel of de verpakking geeft aan dat, als het
na zijn levenscyclus wordt weggeworpen, dit toestel schade kan
toebrengen aan het milieu. Gooi dit toestel (en eventuele
batterijen) niet bij het gewone huishoudelijke afval; het moet bij
een gespecialiseerd bedrijf terechtkomen voor recyclage. U moet
dit toestel naar uw verdeler of naar een lokaal recyclagepunt brengen.
Respecteer de plaatselijke milieuwetgeving.
Hebt u vragen, contacteer dan de plaatselijke autoriteiten inzake
verwijdering.
Dank u voor uw aankoop! Lees deze handleiding grondig voor u het toestel
in gebruik neemt. Werd het toestel beschadigd tijdens het transport,
installeer het dan niet en raadpleeg uw dealer.
2. Veiligheidsinstructies
Enkel voor gebruik binnenshuis. Bescherm deze camera tegen
regen, vochtigheid en opspattende vloeistoffen.
Houd dit toestel uit de buurt van kinderen en onbevoegden.
Elektrocutiegevaar bij het openen van de behuizing.
De gebruiker mag geen onderdelen vervangen. Bestel eventuele
reserveonderdelen bij uw dealer.
• De garantie geldt niet voor schade door het negeren van bepaalde richtlijnen
in deze handleiding en uw dealer zal de verantwoordelijkheid afwijzen voor
defecten of problemen die hier rechtstreeks verband mee houden.
• Schade door wijzigingen die de gebruiker heeft aangebracht aan het
toestel vallen niet onder de garantie.
3. Algemene richtlijnen
• Bescherm dit toestel tegen schokken. Vermijd brute kracht tijdens de
bediening van dit toestel.
• Bescherm dit toestel tegen extreme temperaturen, stof en vochtigheid.
• Leer eerst de functies van het toestel kennen voor u het gaat gebruiken.

CAMCOLD11
00 (12/11/2008) 7 Velleman
®
• Om veiligheidsredenen mag de gebruiker geen wijzigingen aanbrengen aan
het toestel.
• Gebruik het toestel enkel waarvoor het gemaakt is. Bij onoordeelkundig
gebruik vervalt de garantie.
4. Eigenschappen
• robuuste IR-camera
• manuele varifocallens
5. Omschrijving
Raadpleeg de figuur op pagina 2 van deze handleiding.
A sensor F lensbehuizing
B IR-leds G ring
C varifocallens H bevestigingsring
D manuele zoom I montageplaat
E manuele brandpuntsafstand J inbusschroe
f
6. Installatie
• Kies een geschikte montageplaats en houd rekening met volgende punten:
• Installeer de camera nooit in een ruimte met veel temperatuur-
schommelingen, vochtigheid, damp, stof of trillingen.
• Houd de camera weg van elektromagnetische velden.
• Richt de camera niet naar de zon of lichtweerkaatsende objecten toe.
• Schroef de inbusschroef [J] los met behulp van een inbussleutel.
• Houd de montageplaat [I] vast en schroef de bevestigingsring [H] los. De
lensbehuizing [F] en de ring [G] komen vrij.
• Bepaal de montagegaten aan de hand van de montageplaat [I].
• Haal de voeding- en videokabel door een van de kabelgleuven en bevestig
de montageplaat [I] aan het plafond of de muur met behulp van de
meegeleverde schroeven.
• Plaats nu de lensbehuizing [F] in de ring [G] en plaats dit geheel in de
bevestigingsring [H]. Schroef de bevestigingsring [H] op de montageplaat
[I] zonder de inbusschroef [J] vast te schroeven.
• Sluit de videokabel [1] aan een monitor (niet meegelev.) of een aan splitter
(niet meegelev.) indien u verscheidene camera’s wenst te gebruiken.
• Sluit de voedingskabel [2] aan een voeding van 12 VDC (niet meegelev.).
• Regel de zoom via schroef [D] (schroef rechts ten opzichte van sensor [A])
en het brandpunt via schroef [E] (schroef links ten opzichte van sensor
[A]).
• Regel waarnemingsveld, zoom en brandpunt, en schroef de inbusschroef
[J] aan de montageplaat [I] vast.

CAMCOLD11
00 (12/11/2008) 8 Velleman
®
7. Technische specificaties
opneemelement 1/3" Sony
®
kleuren CCD-sensor
pixels 500 x 582 (PAL)
resolutie 480 tv-lijnen
min. verlichting 0 lux / F1,2
S/R-verhouding > 48 dB (AGC uit)
elektronische sluiter 1/50 ~ 1/100.000s
lens 4 - 9 mm manuele lens
aantal leds 42
max. bereik 40 ~ 50 m
lenshoek 37° ~ 74°
uitgang video 1,0 Vpp composiet, 75 Ω
IP-norm IP55
voeding
12VDC adapter (gebruik PS1210R, niet
meegelev.)
verbruik 500 mA (IR-leds aan), 170 mA (IR-leds uit)
afmetingen Ø 120 x 100 mm
gewicht 810 g
Gebruik dit toestel enkel met originele accessoires. Velleman nv is niet
aansprakelijk voor schade of kwetsuren bij (verkeerd) gebruik van dit
toestel. Voor meer informatie omtrent dit product, zie www.velleman.eu.
De informatie in deze handleiding kan te allen tijde worden gewijzigd
zonder voorafgaande kennisgeving.

CAMCOLD11
00 (12/11/2008) 9 Velleman
®
NOTICE D’EMPLOI
1. Introduction
Aux résidents de l'Union européenne
Des informations environnementales importantes concernant ce produit
Ce symbole sur l'appareil ou l'emballage indique que l’élimination
d’un appareil en fin de vie peut polluer l'environnement. Ne pas
jeter un appareil électrique ou électronique (et des piles
éventuelles) parmi les déchets municipaux non sujets au tri
sélectif ; une déchèterie traitera l’appareil en question. Renvoyer
les équipements usagés à votre fournisseur ou à un service de recyclage
local. Il convient de respecter la réglementation locale relative à la
protection de l’environnement.
En cas de questions, contacter les autorités locales pour élimination.
Nous vous remercions de votre achat ! Lire la présente notice attentivement
avant la mise en service de l’appareil. Si l’appareil a été endommagé
pendant le transport, ne pas l’installer et consulter votre revendeur.
2. Prescriptions de sécurité
Pour usage à l’intérieur uniquement. Tenir la caméra à l’écart de
la pluie, de l’humidité et d’éclaboussures.
Garder la caméra hors de la portée de personnes non qualifiées et
de jeunes enfants.
Risque d’électrochoc lors de l’ouverture du boîtier.
Il n’y a aucune pièce maintenable par l’utilisateur. Commander
des pièces de rechange éventuelles chez votre revendeur.
• La garantie ne s’applique pas aux dommages survenus en négligeant
certaines directives de cette notice et votre revendeur déclinera toute
responsabilité pour les problèmes et les défauts qui en résultent.
• Les dommages occasionnés par des modifications à l’appareil par le client
ne tombent pas sous la garantie.
3. Directives générales
• Protéger la caméra contre les chocs et le traiter avec circonspection
pendant l’installation et l’opération.
• Tenir la caméra à l’écart de la poussière, l’humidité et des températures extrêmes.
• Se familiariser avec le fonctionnement de l’appareil avant de l’utiliser.
• Toute modification de l’appareil est interdite pour des raisons de sécurité.
• N’utiliser la caméra qu’à sa fonction prévue. Un usage impropre annule
d'office la garantie.

CAMCOLD11
00 (12/11/2008) 10 Velleman
®
4. Caractéristiques
• caméra IR anti-vandalisme résistante aux chocs
• objectif varifocal manuel
5. Description
Consulter l’illustration à la page 2 de cette notice.
A capteur F boîtier de l’objecti
f
B DEL IR G anneau de positionnement
C objectif varifocal H anneau de fixation
D zoom manuel I plaquette de montage
E focalisation manuelle J vis à empreinte hexagonale
6. Installation
• Choisir un emplacement d’installation en tenant compte des points
suivants :
• Ne pas installer la caméra dans un endroit sujet à des variations de
température, à l’humidité, à des vapeurs d’eau, à la poussière ou à des
vibrations.
• Éviter d’installer la caméra à proximité d’un champ magnétique.
• Ne pas installer la caméra au soleil ou dans l’alignement d’un objet
réfléchissant.
• Desserrer la vis à empreinte hexagonale [J] à l’aide d’une clef Allen.
• Tenir la plaquette de montage [I] et desserrer l’anneau de fixation [H]. Le
boîtier de l’objectif [F] et l’anneau de positionnement [G] sont également
libérés.
• Déterminer l’emplacement des trous de montage à l’aide la plaquette [I].
• Passer les câbles d’alimentation et vidéo par un des trous et fixer la
plaquette de montage [I] au plafond ou à un mur à l’aide des vis incluses.
• Insérer le boîtier de l’objectif [F] dans l’anneau de positionnement [G] et
insérer l’ensemble dans l’anneau de fixation [H]. Visser l’anneau de fixation
[H] sur la plaquette de montage [I]. Ne pas encore serrer la vis à
empreinte hexagonale [J].
• Connecter le câble vidéo [1] à un moniteur (non incl.) ou à un répartiteur
(non incl.) pour obtenir un circuit à plusieurs caméras.
• Connecter le câble d’alimentation [2] à une alimentation 12 VCC (non incl.)
• Ajuster le zoom avec la vis [D] (vis à droite par rapport au capteur [A]) et
la focalisation avec la vis [E] (vis à droite par rapport au capteur [A]).
• Après le réglage du champ de détection, du zoom et de la focalisation,
serrer la vis à empreinte hexagonale [J] dans la plaquette [I] afin de fixer
la caméra.

CAMCOLD11
00 (12/11/2008) 11 Velleman
®
7. Spécifications techniques
capteur d’image CCD couleur 1/3" Sony
®
pixels 500 x 582 (PAL)
résolution 480 lignes TV
Éclairement min. 0 lux / F1.2
rapport S/B > 48 dB (AGC éteint)
obturateur électronique 1/50 ~ 1/100.000s
objectif objectif manuel 4 - 9 mm
nombre de DEL 42
portée max. 40 ~ 50 m
angle de l’objectif 37° ~ 74°
sortie vidéo 1,0 Vpp composite, 75 Ω
indice IP IP55
alimentation
adaptateur secteur 12VCC (utilisez PS1210R, non
incl.)
consommation
500 mA (DEL IR allumées), 170 mA (DEL IR
éteintes)
dimensions Ø 120 x 100 mm
poids 810 g
N’employer cet appareil qu’avec des accessoires d’origine. SA Velleman ne
sera aucunement responsable de dommages ou lésions survenus à un
usage (incorrect) de cet appareil. Pour plus d’information concernant cet
article, visitez notre site web www.velleman.eu. Toutes les informations
présentées dans cette notice peuvent être modifiées sans notification
préalable.

CAMCOLD11
00 (12/11/2008) 12 Velleman
®
MANUAL DEL USUARIO
1. Introducción
A los ciudadanos de la Unión Europea
Importantes informaciones sobre el medio ambiente concerniente a
este producto
Este símbolo en este aparato o el embalaje indica que, si tira las
muestras inservibles, podrían dañar el medio ambiente.
No tire este aparato (ni las pilas, si las hubiera) en la basura
doméstica; debe ir a una empresa especializada en reciclaje.
Devuelva este aparato a su distribuidor o a la unidad de reciclaje local.
Respete las leyes locales en relación con el medio ambiente.
Si tiene dudas, contacte con las autoridades locales para residuos.
¡Gracias por haber comprado la CAMCOLD11! Lea atentamente las
instrucciones del manual antes de usarla. Si el aparato ha sufrido algún
daño en el transporte no lo instale y póngase en contacto con su
distribuidor.
2. Instrucciones de seguridad
Sólo para el uso en interiores. No exponga este equipo a lluvia,
humedad ni a ningún tipo de salpicadura o goteo.
Mantenga el aparato lejos del alcance de personas no capacitadas
y niños.
Riesgo de descarga eléctrica al abrir la cámara.
El usuario no habrá de efectuar el mantenimiento de ninguna
pieza. Contacte con su distribuidor si necesita piezas de recambio.
• Los daños causados por descuido de las instrucciones de seguridad de
este manual invalidarán su garantía y su distribuidor no será responsable
de ningún daño u otros problemas resultantes.
• Los daños causados por modificaciones no autorizadas, no están
cubiertos por la garantía.
3. Normas generales
• No agite el aparato. Evite usar excesiva fuerza durante el manejo y la
instalación.
• No exponga este aparato a polvo, humedad y temperaturas extremas.
• Familiarícese con el funcionamiento del aparato antes de utilizarlo.
• Por razones de seguridad, las modificaciones no autorizadas del aparato
están prohibidas.

CAMCOLD11
00 (12/11/2008) 13 Velleman
®
• Utilice sólo el aparato para las aplicaciones descritas en este manual. Un
uso desautorizado anula la garantía completamente.
4. Características
• cámara IR antivandalismo y resistente a los choques
• óptica varifocal manual
5. Descripción
Véase la figura en la página 2 de este manual del usuario.
A sensor F caja de la óptica
B LED IR G anillo
C óptica varifocal H anillo de fijación
D zoom manual I placa de montaje
E foco manual J tornillo con cabeza hexagonal
6. Instalación
• Elija un lugar de montaje adecuado y asegúrese de que:
• nunca instale la cámara en un lugar donde esté expuesta a temperaturas
extremas y vibraciones.
• nunca instale la cámara cerca de campos electromagnéticos.
• nunca dirija la cámara al sol ni otro objeto reflectante.
• Desatornille el tornillo con cabeza hexagonal [J] con una llave Allen.
• Mantenga la placa de montaje [I] y desatornille el anillo de fijación [H]. La
caja de la óptica [F] y el anillo [G] también están liberados.
• Determine el lugar de los agujeros de montaje con la placa de montaje [I].
• Pase los cables de alimentación y vídeo por uno de los agujeros y fije la
placa de montaje [I] al techo o a una pared con los tornillos incluidos.
• Introduzca la caja de la óptica [F] en el anillo [G] e introduzca el conjunto
en el anillo de fijación [H]. Atornille el anillo de fijación [H] en la placa de
montaje [I]. Todavía no apriete el tornillo con cabeza hexagonal [J].
• Conecte el cable de vídeo [1] a un monitor (no incl.) o un separador (no
incl.) para obtener un circuito con varias cámaras.
• Conecte el cable de alimentación [2] a una alimentación 12 VCC (no incl.)
• Ajuste el zoom con el tornillo [D] (tornillo a la derecha del sensor [A]) y el
foco con el tornillo [E] (tornillo a la izquierda del sensor [A]).
• Después de haber ajustado el campo de detección, el zoom y el foco,
apriete el tornillo con cabeza hexagonal [J] en la placa de montaje [I]
para fijar la cámara.

CAMCOLD11
00 (12/11/2008) 14 Velleman
®
7. Especificaciones
elemento de imagen CCD color 1/3" Sony
®
número de píxeles 500 x 582 (PAL)
resolución 480 líneas TV
iluminación mínima 0 lux / F1.2
relación señal / ruido > 48 dB (AGC desactivado)
shutter electrónico 1/50 ~ 1/100.000s
óptica óptica manual 4 - 9mm
número de LEDs 42
alcance máx. 40 ~ 50m
ángulo de la óptica 37° ~ 74°
salida de vídeo 1,0 Vpp compuesto, 75 Ω
grado de protección IP IP55
alimentación alimentador 12Vdc (utilice PS1210R, no incl.)
consumo
500mA (LEDs IR encendidos), 170mA (LEDs IR
apagados)
dimensiones Ø 120 x 100mm
peso 810 g
Utilice este aparato sólo con los accesorios originales. Velleman Spain SL
no será responsable de daños ni lesiones causados por un uso (indebido)
de este aparato. Para más información sobre este producto, visite nuestra
página web www.velleman.eu. Se pueden modificar las especificaciones y
el contenido de este manual sin previo aviso.

CAMCOLD11
00 (12/11/2008) 15 Velleman
®
BEDIENUNGSANLEITUNG
1. Einführung
An alle Einwohner der Europäischen Union
Wichtige Umweltinformationen über dieses Produkt
Dieses Symbol auf dem Produkt oder der Verpackung zeigt an,
dass die Entsorgung dieses Produktes nach seinem Lebenszyklus
der Umwelt Schaden zufügen kann. Entsorgen Sie die Einheit
(oder verwendeten Batterien) nicht als unsortiertes Hausmüll; die
Einheit oder verwendeten Batterien müssen von einer
spezialisierten Firma zwecks Recycling entsorgt werden. Diese
Einheit muss an den Händler oder ein örtliches Recycling-Unternehmen
retourniert werden. Respektieren Sie die örtlichen Umweltvorschriften.
Falls Zweifel bestehen, wenden Sie sich für Entsorgungsrichtlinien
an Ihre örtliche Behörde.
Wir bedanken uns für den Kauf der CAMCOLD11! Lesen Sie diese
Bedienungsanleitung vor Inbetriebnahme sorgfältig durch. Überprüfen Sie,
ob Transportschäden vorliegen. Sollte dies der Fall sein, verwenden Sie das
Gerät nicht und wenden Sie sich an Ihren Händler.
2. Sicherheitshinweise
Nur für die Anwendung im Innenbereich.
Schützen Sie das Gerät vor Regen und Feuchte. Setzen Sie das Gerät
keiner Flüssigkeit wie z.B. Tropf- oder Spritzwasser, aus.
Halten Sie Kinder und Unbefugte vom Gerät fern.
Stromschlaggefahr beim Öffnen des Gehäuses.
Es gibt keine zu wartenden Teile. Bestellen Sie eventuelle Ersatzteile bei
Ihrem Fachhändler.
• Bei Schäden, die durch Nichtbeachtung der Bedienungsanleitung verursacht
werden, erlischt der Garantieanspruch. Für daraus resultierende Folgeschäden
übernimmt der Hersteller keine Haftung.
• Bei Schäden verursacht durch eigenmächtige Änderungen erlischt der
Garantieanspruch.
3. Allgemeine Richtlinien
• Vermeiden Sie Erschütterungen. Vermeiden Sie rohe Gewalt während der Installation
und Bedienung des Gerätes.
• Schützen Sie das Gerät vor extreme Temperaturen, Staub und Feuchte.
• Nehmen Sie das Gerät erst in Betrieb, nachdem Sie sich mit seinen Funktionen
vertraut gemacht haben.

CAMCOLD11
00 (12/11/2008) 16 Velleman
®
• Eigenmächtige Veränderungen sind aus Sicherheitsgründen verboten.
• Verwenden Sie das Gerät nur für Anwendungen beschrieben in dieser
Bedienungsanleitung sonst kann dies zu Schäden am Produkt führen und
erlischt der Garantieanspruch.
4. Eigenschaften
• robuste IR-Kamera
• manuelles Varifokal-Objektiv
5. Umschreibung
Siehe Abbildung, Seite 2 dieser Bedienungsanleitung.
A Sensor F Objektivgehäuse
B IR-LEDs G Ring
C Varifokal-Objektiv H Befestigungsring
D manuelles Zoom I Montageplatte
E manueller Fokus J Sechskantschraube
6. Installation
• Wählen Sie einen geeigneten Montageort für die Kamera und beachten Sie
Folgendes:
• Achten Sie bei der Wahl des Installationsortes darauf, dass das Gerät
keinen Temperaturschwankungen, keiner Feuchtigkeit, Dampf, Staub
oder Vibrationen.
• Montieren Sie die Kamera nie in der Nähe von elektromagnetischen
Feldern.
• Richten Sie die Kamera nie auf die Sonne oder andere reflektierende
Gegenstände.
• Schrauben Sie die Sechskantschraube [J] los mit einem Inbusschlüssel.
• Halten Sie die Montageplatte [I] fest und schrauben Sie die
Befestigungsring [H] los. Das Objektivgehäuse [F] und den Ring [G]
lösen sich.
• Verwenden Sie die Montageplatte [I] um die Montagelöcher zu bestimmen.
• Leiten Sie das Netz- und Videokabel durch einen der und befestigen Sie die
Montageplatte [I] mit den mitgelieferten Schrauben an der Decke oder der
Wand.
• Legen Sie das Objektivgehäuse [F] in den Ring [G] ein und legen Sie beide
in den Befestigungsring [H] ein. Befestigen Sie den Befestigungsring [H]
an der Montageplatte [I] ohne die Sechskantschraube [J]
festzuschrauben.
• Verbinden Sie das Videokabel [1] mit einem Monitor (nicht mitgeliefert)
oder einem Verteiler (nicht mitgeliefert) wenn Sie verschiedene Kameras
verwenden möchten.

CAMCOLD11
00 (12/11/2008) 17 Velleman
®
• Verbinden Sie das Netzkabel [2] mit einem 12 VDC-Netzteil (nicht
mitgeliefert).
• Regeln Sie das Zoom über Schraube [D] (Schraube rechts in Bezug auf den
Sensor [A]) und den Fokus über Schraube [E] (Schraube links in Bezug auf
den Sensor [A]).
• Regeln Sie den Detektionbereich, das Zoom und den Fokus und befestigen
Sie die Sechskantschraube [J] an der Montageplatte [I].
7. Technische Daten
Aufnahme-Element 1/3" Sony
®
CCD-Farbkamera
Anzahl der Pixel 500 x 582 (PAL)
Auflösung 480 TV-Zeilen
minimale Lichtstärke 0 lux / F1,2
Signal-/Rauschabstand > 48 dB (AGC aus)
elektronischer Verschluss 1/50 ~ 1/100.000s
Objektiv 4 - 9 mm manuelles Objektiv
Anzahl der LEDs 42
max. Bereich 40 ~ 50m
Objektivwinkel 37° ~ 74°
Video-Ausgang 1,0 Vpp komposit, 75 Ω
IP-Schutzart IP55
Stromversorgung
12VDC Universalnetzgerät (verwenden Sie
PS1210R, nicht mitgeliefert)
Stromverbrauch 500 mA (IR-LEDs ein), 170 mA (IR-LEDs aus)
Abmessungen Ø 120 x 100mm
Gewicht 810 g
Verwenden Sie dieses Gerät nur mit originellen Zubehörteilen. Velleman
NV übernimmt keine Haftung für Schaden oder Verletzungen bei
(falscher) Anwendung dieses Gerätes. Für mehr Informationen zu diesem
Produkt, siehe www.velleman.eu
. Alle Änderungen ohne vorherige
Ankündigung vorbehalten.
-
 1
1
-
 2
2
-
 3
3
-
 4
4
-
 5
5
-
 6
6
-
 7
7
-
 8
8
-
 9
9
-
 10
10
-
 11
11
-
 12
12
-
 13
13
-
 14
14
-
 15
15
-
 16
16
-
 17
17


Velleman CAMCOLD11 Manuel utilisateur
- Catégorie
- Stroboscopes
- Taper
- Manuel utilisateur
dans d''autres langues
- English: Velleman CAMCOLD11 User manual
- español: Velleman CAMCOLD11 Manual de usuario
- Deutsch: Velleman CAMCOLD11 Benutzerhandbuch
- Nederlands: Velleman CAMCOLD11 Handleiding
Documents connexes
-
Velleman CAMCOLBUL16 Manuel utilisateur
-
-
-
-
-
-
-
-
-