Aiwa CX-NV20 Le manuel du propriétaire
- Catégorie
- Lecteurs de cassettes
- Taper
- Le manuel du propriétaire

Nsxmv20~
COMPACT DISC STEREO SYSTEM
SISTEMAESTEREOFONICODIEDISCOCOMPACTC)
COMPACT DISC STEREO CASSETTE RECEIVER
RADIOCASSEITE ESTEREO CON DISCO COMPACTC)
CX-NV20 U
SPEAKER SYSTEM
SISTEMA DE ALTAVOCES
SX-NV20
(ilE3ii
DIGITAL AUDI(I

WARNING: TO REDUCE THE RISK OF FIRE
OR ELECTRIC SHOCK, DO NOT
EXPOSE THIS APPLIANCE TO
RAIN OR MOISTURE.
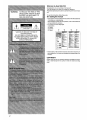
Welcome to Aiwa NSX-V20
Congratulations on your purchase of an Aiwa unit.
This unit belongsto you when you master the operations.
ReadtheseOperating Instructionsto optimizetheperformanceofyour
unit.
To readthe instructions,follow these rules.
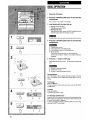
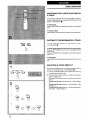
On reading the manual
● Inthis manual,thetextcontainsthe instructionswhilethe illustrations
@ facilitate your understanding.
Whenfollowing thesteps for eachoperation, referto the illustrations
corresponding to the numbers.
● This manual is inthree languages.
@)Illustration
@ English
@ Spanish
@ French
---+l!-
-.m-
~—- . . . .
.— . . . ----
.--.” .R-.
. =--.-:
e
.-------- .=___
. . . . . . . .. .
.&%L------
~—----
~p-?2-=-_-
:~--------
. . .. . ... .
~----------
,-..
-.m-
=—-.., ------
.~L,--
.-,..---
~s-=-::
s.----..-.,
~-.F-
~=-------- ..-
“r~,--_-
-----
-. —_____
-_-_. _,---
z-.=s--:------
M
,,WMK w. mum.. w,
---- $ -...-..
.-. -.—.
. . ,—.-.—-
—.-
.—.-,.-..— :=:-_ .,-
--------- , =--------
:
~-.=:J_&-, .=T.= =___ ,.,
~.-=--= ~:==
-.
%&-_::&-=L._T&.
---.
-”.-,
~gg&.._,-
s?.--.,. ----
.-. -.—. -. —---
___ ,--------
W==.._ -+— -
~=-&—.-—
~==—e ~ E-TY-:Z%=
-.—
~=-_:.-.-=~-
-.-. .-. —
~..__==--.,-. ,
Ln... _—. -
>-”=--=..- .“ .
:==..=
.-.-.. -... —
.~&=._
... .......-
~2~=.,__---_= _,_
~=&.., ~-$----~m
~_;&-.
e----------
~=.._”
,,=,-=,------
~~+r___,-
~T2.__,7____
%=.2-.._..-
-----
---=
=--4-s72==.. ss--.-::.=—-L-
~===>==
g~7&t.~...>_.-_
).
● Some buttons onthis unithave morethan onefunction andname. In
each explanation,the namesare distinguishedcorrespondingto the
functions.
COPYRIGHT
Pleasecheck the laws on copyright relatingto recordingsfrom discs,
radio or external tape for the country in which the machine is being
used.

Bienvenidos a Aiwa NSX-V20
Muchas gracias por su acertada compra del aparato Aiwa.
EsteaparatoIeofrece muchosdeleitessi 10utilizaensudebidaforma.
Sirvase leer este manual de manejo para obtener el mejor
funcionamiento de su aparato.
Observe Iassiguientes reglasen la Iecturade este manual.
Lectura del manual
● Estemanualcontienedescripcioneseilustraciones@parapermitirle
un perfecto entendimiento.
Cuando siga Ios pasos para cada operation, refierase a Ias
ilustraciones correspondientes a Ios ntimeros indicados.
● Este manual se ha editado en tres idiomas.
A .,
w Ilustraclon
@ Ingles
@)Espafiol
@ Frances
OFtmm, wlu .Iu$hnm mum,
:W..=,w-___
_-:
.w--Lr_...-.:
=—.
—”..__
,--. _. —----
-“..”..
,
p,.”.~-.:. -,.”,”,
-----
..-”-.
,
~.,,m.”,. x-----
. . . . . . .
~=..== -,.,
~.-.==:,==~
-,.,.. -..,,.,
c Algunos botones de este aparato tienen mas de una funcion y
nombre, Encada description, Ios nombres se distinguensegtin Ias
funciones.
DERECHOS DE AUTOR
Sir’vaseobservar Ias Ieyes de derecho de autor relacionadas a Ias
grabacionesdeIosdiscos, radioocinta externa parael pa(sdondese
utiliza e] aparato.
Aiwa vous souhaite la blenvenue
Felicitationspour votre achat d’un appareil Aiwa
Lalecturedecemoded’emploivous permettrademaltriser I’utilisation
et d’optimiser Ies performances de votre appareil.
Pour Iire ce mode d’emploi, veuillez suivre Ies recommendations
ci-dessous.
Lecture du manuel
● Dans ce manuel, Ie texte contient Ies instructions, tandis que Ies
illustrations @)facilitent Ieurcomprehension.
Quand on suit Ies etapes pour chaque operation, se reporter aux
illustrationscorrespondent aux numeros.
● Ce manuelest redigeen trois Iangues.
@ Illustration
@ Anglais
@ Espagnol
@)Frangais
● Certaines touches de cet appareil possedent plusieurs noms et
fonctions. Danschaqueexplication, Ienomemployecorrespondala
fonction expliquee.
DROIT D’AUTEUR
Priere de verifier Ies Iois sur la propriete artistique relatives h
I’enregistrementdedisques,de la radiooude cassettes clansIepays
d’utilisation de I’appareil.
3

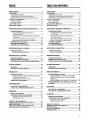
TABLE OF CONTENTS
PRECAUTIONS ....................................................................m...6
CONNECTIONS
........................................................................
8
BASIC CONNECTIONS .......................................................8
CONNECTION WITH OUTDOOR ANTENNA ....................1O
CONNECTION WITH A SUPER WOOFER .......................10
BEFORE OPERATION
...........................................................
12
ON THE MAIN UNIT ..........................................................l2
ON THE REMOTE CONTROL ...........................................12
CLOCK SEITING .................m.................................................l4
SOUND ADJUSTMENT ..........................................................l6
CD PLAYING
...........................................................
18
BASIC OPERATION ..........................................................18
CHANGING DISCS DURING PLAY ..............................2O
SEARCHING FOR A PARTICULAR POINT IN
A TRAcK ....................................................................22
SKIPPING TO THE BEGINNING OF A TRACK ............22
SELECTING A TRACK DIRECTLY ...............................22
RANDOM PLAY
.................................................................
24
REPEAT PLAY ..................................................................24
PROGRAMMED PLAY ......................................................26
TAPE PLAYBACK
...................................................
28
BASIC OPERATION ..........................................................28
CONTINUOUS PLAY ....................................................28
RADIO RECEPTION
................................................
30
BASIC OPERATION ..........................................................3O
PRESETTING STATIONS .................................................30
TUNING INTO A PRESET STATION ...............................32
OTHER SOURCES
..................................................34
CONNECTION
..................m........................................m.......34
LISTENING TO OTHER SOURCES ..................................34
RECORDING ...........................................................36
BASIC RECORDING .........................................................36
RECORDING FROM A CD, RADIO OR CONNECTED
Equipment ..............................................................36
RECORDING FROM TAPE TO TAPE ..........................38
Al EDIT RECORDING ........................................................40
TIMER
......................................................................
44
TIMER SEITING ................................................................44
SLEEP TIMER SETTING ...................................................48
KARAOKE
...............................................................
50
KARAOKE MIXING ................................m..........................50
USEFUL FUNCTIONS FOR KARAOKE
...........................50
VOCAL FADER FUNCTION .........................................52
MULTIPLEX FUNCTION ...............................................52
CARE AND MAINTENANCE
..................................................54
CASSEITE TAPE NOTES
.m.............m.....................m...............54
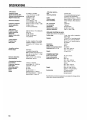
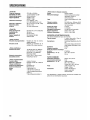
SPECIFICATIONS
..................................................................56
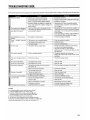
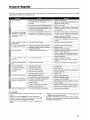
TROUBLESHOOTING GUIDE ................................................59
IDENTIFICATION OF PARTS
.................................................62
4

INDICE
TABLE DES MATIERES
PRECAUCIONES .m...................................................................7
CONEXIONES ..........................................................................9
coNExloNEs BAslcAs .,,,,,,...,,. !.,..,,,,,,,,..,,,,,,.,,,L,,.,,,,,,,,,,,9
CONEXION CON LA ANTENA EXTERIOR
11
CONEXION DE UN ALTAVOZ DE SUPER GRAVE ..........11
ANTES DE LA OPERACION ..................................................13
uNIDADPRINclPAL ..........................................................l3
CONTROL REMOTO .........................................................l3
AJUSTE DEL RELOJ .............................................................l5
AJUSTE DEL SONIDO ...........................................................l7
REPRODUCTION DE DISCOS COMPACTOS .......19
OPERACION BASICA .......................................................19
PARA CAMBIAR DISCOS DURANTE LA
REPRoDuccloN ......................................................2l
BUSQUEDA DE UN DETERMINADO PUNTO DE LA
CANCION ...................................................................23
SALTOAL COMIENZO DE UNA CANCION .................23
SELECCION DIRECTA DE UNA CANCION .................23
REPRODUCTION ALEATORIA ........................................25
REPRODUCTION REPETIDA ...........................................25
REPRODUCTION PROGRAMADA ..................................27
REPRODUCTION DE LA CINTA .............................29
OPERACION BASICA .......................................................29
REPRODUCTION CONTINUA .....................................29
RECEPCION DE LA RADIO ....................................31
OPERACION BASICA
.........m...................1....m....m....m...mm.....3l
MEMORIZATION DE EMISORAS .....................................31
SINTONIZACION DE UNA EMISORA MEMORIZADA .....33
OTRAS FUENTES
...................................................
35
CONEXION ........................................................................35
ESCUCHA DE OTRAS FUENTES ....................................35
GRABACION ...........................................................37
GRABACION BASICA ......................................................37
GRABACION DE UN DISCO COMPACTO, RADIO O
EQUIPOCONECTADO .............................................37
GRABAcloN DEclNTA AclNTA ................................39
GRABACION CON EDICION Al ........................................41
TEMPORIZADOR
....................................................
45
AJUSTE DEL TEMPORIZADOR .......................................45
AJUSTE DEL CRONODESCONECTADOR ......................49
KARAOKE ............................s..................................51
MEZCLA DE KARAOKE
...................................................5l
FUNCIONES UTILES PARA KARAOKE
..........................51
FUNCION DE ATENUACION VOCAL ..........................53
FUNCION MULTIPLE ...................................................53
CUIDADO Y MANTENIMIENTO .............................................55
NOTAS SOBRE LOS CASSETTES DE CINTA .....................55
ESPECIFICACIONES ,,,,,,,,,,,,,,,,,,,,,.,,,,,,,,,,,,,,,,.,,...,,..,,,,.,,,,..,,57
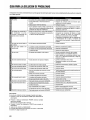
GUIA PARA LA SOLUCION DE PROBLEMAS .....................60
IDENTIFICATION DE LAS PARTES ......................................63
PRECAUTIONS
................... ....................................................7
CONNEXIONS
.............................................. ...........................9
CONNEXIONS DE BASE .......................................................9
CONNEXIC$ND’UNE ANTENNE EXTERIELJR E...............11
CONNEXION D’UN CAISSON DE GRAVEiS ................ ....11
AVANT L’UTILISATION .........................................................13
UNITE PRINCIPAL ..........................................................l3
TELECOMMANDE .............................................................l3
REGLAGE DE L’HORLOGE
..................................................
15
REGLAGE DU SON .............u...................................................l7
LECTURE DE DISQUIES COMPACTS ....................1!9
UTILISATION DE BASE
................................... ,,,..,.,.,....,, 19
CHANGEMENT DE;DISCNJESPENDANT
LA LECTURE .............................................................2l
RECHERCHE DUN POINT PARTICULIER
SUR UNE PLAGE ......................................................23
SAUTJUSQU’AU DEBUT D’UNE PLAGE ....................23
SELECTION DIRECTE D’UNE PLAGE ........................23
LECTURE ALEATOIRE .....................................................25
LECTURE REPETEE
.........................................................
25
LECTURE PROGRAMMED ...............................................27
LECTURE DE CASSETTES
....................................29
UTILISATION DE BA!3E
....................................................
29
LECTURE Continue ..................................................29
RECEPTION RADIO ................................................
3’1
UTILISATION DE BA!;E ....................................................31
MEMORISATION DE STATIONS ......................................
31
ACCORD SUR UNE STATION MEMORISEE ...................33
AUTRES SOURCES
.................................................
3{5
coNNExloN ......................................................................35
ECOUTE D’AUTRES SOLIRCES ......................................35
ENREGISTREMENT ................................................
37
ENREGISTREMENT [)E BASE .........................................37
ENREGISTREMENT A PARTlf< D’UN DISQUE
COMPACT, DE LA RADIO OU DE L’APPAREIL
CONNECTE ..........................
. ......................................37
ENREGISTREMENT DE CASSETTE A CASSETTE ....39
ENREGISTREMENT AVEC MONTAGE ET CALCUL
DU TEMPS .........................................................................4l
MINUTERIE ..............................................................45
REGLAGE DE LA MINUTERIE .........................................45
REGLAGE DE LA MINUTERIE D’ARRET
........................49
KARAOKE
...............................................................5’1
MIXAGE POUR KARAOKE ............m..................................5l
FONCTIONS UTILES POUR KAI%AOKE
..........................51
FONCTION VOCAL FADER .........................................53
FONCTION Multiplex ...............................................53
SOINS ET ENTRETIEN
,,,.,,,.,,,,,,,,,,,,,.....................................55
REMARQUES SUR LES CASSETTES ..................................55
SPECIFICATIONS ..................................................................58
EN CAS DE PROBLEME ........................................................
61
NOMENCLATIJRE ..................................................................63

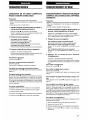
PRECAUTIONS
Fol[ow the advice below for safe and correct operation.
On AC voltage
Before use, check that the rated voltage of your system matches
your local voltage.
On placement
● Do not use the system in places which are extremely hot, cold,
dusty or humid.
● Place the system on a flat, even surlace.
● Be careful not to obstruct the ventilation holes on the rear panel,
as increased internal temperature may affect the electric parts. in
particular, do not place the system in an airtight rack.
● If using the system near television or radio, noise may be heard
from the television, radio or this system. Keep this system away
from the affected television or radio.
On safety
● When connecting and disconnecting the AC cord, grip the plug
and not the cord itself. Pulling the cord may damage it and
thus be hazardous.
● When you are not going to use the system for a long period of
time, disconnect the AC cord. If the cord is plugged in, a small
amount of current keeps on flowing to the system even if the
power switch is not ON.
● If the AC cord is broken or damaged, or if the wires are
exposed, contact your dealer or an Aiwa service station and
have it replaced or repaired immediately.
On condensation
When the room is heated, you sometimes see water drops on your
windows; this is called condensation.
This can occur inside the CD player unit when:
● it is moved from a cold spot to a warm spot.
● it is used in a room where the heating system has just been
turned on.
● it is used in a place with a lot of moisture.
● it is used where it has direct contact with cool air, such as near
an air-conditioner.
When it has condensation inside, the unit may not function nor-
mallv. Let it stand for 1to 2 hours before turning the power on; or,
gradually heat the room and dry the unit befor~ use:
Should any trouble occur, disconnect the AC cord and refer
setvicing to qualified personnel only.
6

PRECAUCIONES
PRECAUTIONS
Para obtener una operation segura y corrects, siga Ios consejos
descritos a continuation.
Voltaje de CA
Antes de emplear el aparato, compruebe si su voltaje nominal
coincide con el voltaje de su Iocalidad.
Colocacion
● No utilice el aparato en lugares extremadamente calidos, fries,
polvorientos o humedos.
● Coloque ei aparato sobre una supetiicie plana.
● Tenga cuidado de no obstrulr Ios orificios de ventilation del panel
posterior, ya que el aumento de la temperature interna podra
afectar Ias piezas internas. En particular, no coloque el aparato
en un armario hermetico.
● Si utiliza el sistema cerca de un televisor o radio, puede oirse
ruido en el televisor, radio o en este sistema. Mantenga este
.%tema alejado del televisor o radio.
Seguridad
● Para conectar y desconectar el cordon de alimentacion CA, tome
el enchufe y no el propio cordon, Si tirase del cordon, podria
daharlo, 10que resultaria peligroso.
● Cuando no vaya a emplear el aparato durante mucho tiempo,
desconecte e[ cordon de alimentacion. Cuando el cordon de
allmentacion este conectado, circulara una pequeha cantidad de
corriente, incluso aunque el interruptor de alimentacion este
desconectado.
● Si elcordon de alimentaclon se rompe odafia, oSIsus hllos estan
al descubierto, pongase inmediatamente en contacto con un
centro de reparaciones Aiwa parasolicitar reparation oreemplazo,
Condensation
Al calentar una sala, a veces pueden verse gottas de agua en Ias
ventanas; esto se denomina condensaclon.
Este fenomeno puede ocurnrtambien en el interior del reproductor
de discos compactos cuando:
● Se traslade de un Iugar fr(o a otro calldo.
● Seempleeen unasaladonde acabade ponerse enfuncionamiento
el sistema de calefaccion.
● Se emplee en un Iugar con mucha humedad,
* Se emplee en un Iugar dlrectamente en contacto con alre frio,
como cerca de un acondicionador de aire.
Cuando se haya producido condensation en el interior, es posible
que el aparato no funcione normalmente. Dejelo en reposo 1 a 2
horas antes de conectar la alimentacion, o caliente gradualmente
la sala y el aparato antes de su utilization.
Si se presenta algtin problems, desconecte el cordon de
allmentaclon de CA y soliclte Ios servicios del personal
cualificado.
Priere de respecter Ies conslgnes suivantes pour une utilisaticm
correcte et en toute securite.
Tension du secteur
Avant I’utilisation, verifier que la tension nominale de la chaine
correspond a celle du secteur.
Emplacement
● Ne pas utiliser lachalne clansdes endroits extr6mement chauds,
froids, pousslereux ou humides.
● Installer la chalne sur une surface plate et Iisse.
● Faire attention a ne pas obsi ruer Iesorifices de ventilation situ~s
sur Ie panneau arriere; une elevation de la temperature interne
risque d’affecter Ies cornposants electriques. En particulier, ne
pas placer la chalne clans un meuble completement ferme.
● Si on utilise la chatne pres d’un tekwiseur (OUd’une radio, des
parasites peuvent appara~tre par Ie televiseur, la radio ou la
chaine, Le cas echeant, eloigner la chalne du televiseur ou de la
radio.
Securite
● Pour brancher ou debrancher Ie cordon secteur, Ie tenir par sa
fiche et non pas par Ie cordon proprernent dlt, Toute traction sur
Ie cordon risque de I’endommager et de creer ainsi un danger.
● Silachaine nedoit pasi%reutiliseependant Iongtemps,debrancher
Iecordon secteur, Si on Iaisse ce cordon branche, un courant de
faible intensite continue de circuler clans la chalne m@mesi
I’interrupteur d’alimentation est sur la position de repos,
● Si Ie cordon secteur est coupe ou endommage, ou si Iesfils sent
exposes, contacter imm6diatement votre revendeurou un centre
de service Aiwa pour Ie faire remplacer ou reparer.
Condensation
Lorsqu’une piece est chauffee, onvoit parfois des gouttes d’eau sw
Ies vitres; c’est ce qu’on appelle la condensation.
De la condensation peut se former a I’intelrieur du Iecteur cle
disques compacts quand:
● il est deplace d’un endroit froid a un endroit chaud.
● ilest utilise clansune piece ou IeIech,auffagevient juste d’@tremls
en marche.
● il est utilise clans un endroit tres hunnide.
● il est utilise clans un endroit expose a un courant d’air froid,
comme pres d’un climatiseur.
S’il y a de la condensation a I’interieur de I’apparell, IIrisque de ne
pas fonctionner normalement. Le cas echeant, Ie Iaisser hors
tension pendant une a deux heures; ou chauffer [a piece
progressivement pour faire sscher I’appareil avant I’utilisation,
L–
En cas de probleme, debrancher Iecordon secteur et contacter
unlquement un techmcmn quahfle
1
7

1
@
lrFM
75 Q
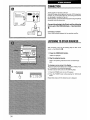
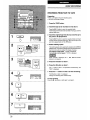
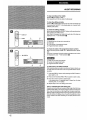
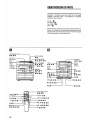
CONNECTIONS
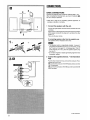
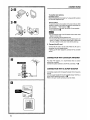
BASIC CONNECTIONS
Connect the equipment and accessories following steps 1 to 3.
After connecting the following items, as shown in illustration
❑ ,
the unit is ready for operation.
● Refer also to page 34 on connecting optional equipment, for
example, a television or turntable.
1
2
Connect the speakers with the unit.
Connect the right speaker to the R’terminal, and the left to the
L terminal.
Open the lever ofthe speaker terminals and insert the conductor
of the speaker cords with the stripe to @and that of the other
cords to ~.
Then, shut the lever to lock.
If connecting speakers other than the supplied ones
Use speakers with an impedance of 6 ohms.
m
● This speaker system is magnetically shielded. However, if
the speaker should affect the color on your TV screen, turn off
the TV and turn it on again 15 – 30 minutes later. If the TV
screen still has poor color, place the speaker system away
from the TV.
● Do not leave magnets or objects generating magnetism near
the speaker system.
Connect the supplied antennas. + See illustration
2-m .
Push the lever of each terminal, and insert the conductor. Then,
release the lever to lock.
FM: Connect the conductor of the FM feeder antenna @to the
FM 75 Q terminals.
AM: Connect the conductor ofthe AM loopantenna (@tothe AM
LOOP terminals.
To be continued.
Q
u

CONEXIONES CONNEXIONS
CONEXIONES BASICAS
Conecte el aparato y Iosaccesorios siguiendo [OSpasos del 1al 3.
Despues de conectar Iossiguientes items, como se muestra en la
ilustracion
❑ , el aparato queda Iisto para el funcionamiento.
. Refierase tambien a lapagina 35 para laconexion de Iosequipos
opcionales, por ejemplo, un televisor o tocadiscos.
1
2
Cortecte 10saltavoces con el aparato.
Conecte el altavoz derecho al terminal R,y el altavoz izquierdo
al terminal L.
Abra la palanquita de [OSterminates de altavoz e inserte el
conductor del cordon rayado a @y ei otro a 8.
Luego, cierre la palanquita y dejela trabada.
En caso de conectar otros altavoces
Utilice altavoces con una impedancia de 6 ohmios.
● Este sistema de altavoces esta magneticamente protegido.
Sin embargo, si el altavoz afecta el color de la pantalla de
su televisor, apague el televisor y vuelvalo a encender 15-
30 minutes despues. Si no mejora el color de la pantalla
del televisor, aleje el sistema de altavoces del televisor.
● No deje imanes u objetos que generan magnetism cerca
del sistema de altavoces.
Conecte Ias antenas suministradas. + Vease la
ilustracion 2-n .
Empuje la palanquita de cada terminal e inserte el conductor.
Luego, suelte la palanquita para dejarlo trabado.
FM: Conecte elconductorde Iaantenade I(neaFMsuministrada
@a Ios terminals FM 75 Q.
AM: Conecte el conductor de la antena de cuadro AM @a Ios
terminals AM LOOP.
CONNEXIONS DE BASE
Connecter Iesappareils et Iesaccessoires en suivant Iesetapes 1
a 3. Apres laconnexion des ek$mentssuivants, comme montre sur
I’illustration
❑ , I’appareil est pr&t pour I’utilisation.
● Pour la connexion d’un appareil optionnel, par exemple, un
televiseur ou un tourne-disque, voir 6galement page 35.
1 Connecter Ies enceirttes a I’appareil.
Connecter I’enceinte droite a laborne R, et lagauche a la borne
L.
Ouvrir Ie levier des bornes d’enceinte et inserer Ie conducteur
raye du cable d’enceinte clans @et I’autre conducteur clans G.
Ensuite, fermer Ie levier pour verrouiller.
Pour la connexion d’enceintes alutres que celle fournies
Utiliser des enceintes d’une impedance de six ohms.
● Lesenceintessont dotbesd’un blinclagema!;netique. Toutefois,
si elles affectent Iescouleurs d’un televiseur, mettre cedernier
hors tension puis de nouveau sous tension au bout de 15a 30
minutes. Si Ies couleurs sent toujours affectees, eloigner Ie:j
enceintes du televiseur.
● Ne pas Iaisser d’aimant ou autre (objetpr’oduisant un champ
magnetique pres des enceintes.
2
Connecter Ies antennes fournies. -+ Voilr
I’illustration 2-~.
Appuyer sur Ielevier de chaque borne et inserer Ieconducteur.
Ensuite, rel~cher Ie levier pour verrouiller,
FM: Connecter Ies conducteurs de I’antenrle FM interieure @
aux bornes FM 75 .(2.
AM: Connecter Ies conducteurs de I’antenne cadre AM @ aux
bornes AM LOOP,
Continua.
A suivre
9

2-H
H
h
‘a
000
0000
000000000000
000000000000000000
0000000000000000
1
H
10
CONNECTIONS
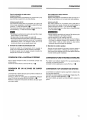
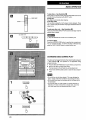
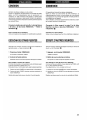
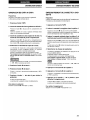
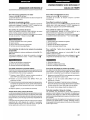
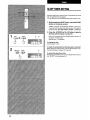
3
To
position each antenna
FM feeder antenna
Extend this antenna horizontally in a T-shape and fix its ends to
the wall with cellophane tape.
AM loop antenna
To stand the antenna on a surface, fix the claw to the slot. After
standing it, position it to find the best direction and position for
radio reception. + See illustration 2-E
To fix the antenna to the wall, use screws@ (not supplied).
+ See illustration 2-• .
● Do not bring the ends of the FM feeder antenna near metal
objects or curtain rails.
● Do not unwind the AM loop antenna wire.
● Do not bring the AM loop antenna near aturntable system, CD
player, TV monitor, or the stereo system itself, or close to the
AC cord or speaker cords, since noise will be picked up.
Connect the AC cord.
Connect the AC cord to an AC outlet. When the AC cord is
connected, the clock display flashes.
If setting up with other equipment, connect the AC cord after
setting.
CONNECTION WITH OUTDOOR ANTENNA
For better FM reception, it is recommended that an outdoor
antenna be connected.
Connect the outdoor antenna to the FM 75$2 terminals. + E
CONNECTION WITH A SUPER WOOFER
Connecting a super woofer increases the realism of low-frequency
sounds.
Connect a super woofer with a built-in amplifier (Aiwa TS-W5 etc.)
to the SUPER WOOFER terminal. + H
Refer to the super woofer operating manual for details.

CONEXIONES
CONNEXIONS
3
Para la colocacion de cada antena
Antena de Iinea FM
Extienda esta antena horizontalmente en una forma de T y fije
sus extremes a la pared con una cinta adhesiva.
Antena de cuadro de AM
Para colocar la antena sobre una superficie, fije la garra a la
ranura. Luego, asegtirela en una direccion y position de mejor
recepcion. + Vease la ilustracion 2-H
Para colocar la antena sobre la pared, utilice Ios tornillos (no
suministrados) @. + Vease la ilustracion 2-•
● No acerque Ios extremes de la antena de Ifnea FM a ningtin
objeto metalico o riel de cortinas.
● No desenrolle el hilo de la antena de cuadro AM.
● Noacerque laantenadecuadro AM aunsistemadetocadiscos,
reproductor de discos compactos, monitor de TV o al sistema
estereofonico mismo, ni la acerque al cordon CA o a Ios
cordones de altavoz, ya que puede causar ruido.
Conecte el cordon de alimentacion CA
Conecte el cordon CA al tomacorriente CA. Al conectar el
cordon CA, la visualization del reloj empieza a parpadear.
Si utiliza el aparato con otro equipo, conecte el cordon CA
despues de la conexion con el equipo.
CONEXEON CON LA ANTENA EXTERIOR
Para la optima recepcion de FM, se recomienda conectar una
antena externa,
Conecte la antena externa al terminal FM 75,Q.+
❑
CONEXION DE UN ALTAVOZ DE SUPER
GRAVE
La conexion de un altavoz de super grave aumenta et realismo de
Ios sonidos a baja frecuencia.
Conecte un altavoz de super grave con amplificador integrado
(Aiwa TS-W5 etc.) al terminal SUPER WOOFER. +
❑
Refierase al manual de instrucciones del altavoz de super grave
para mayor detalle.
3
Pour positioner
chaque antenne
Antenne FM interieure
Deployer cette antenne horizontalernent selon la forme d’un T
et fixer ses extremities A un mur avec de la bande adhesive.
Antenne cadre AM
Pour poser I’antenne ‘sur une surface, fixer la griffe clans la
rainure. Apres I’avoir posee, I’orienter de maniere a obtenir la
meilleure reception possible. + Voir I’illustration 2-E
Pour fixer I’antenne a
unmur, utiliser des vis @ (pas fournies).
+ Voir I’illustration 2- U
~
● Ne pas mettre Ies extremik% de I’antenne FM interieure pres
d’objets metalliques ou de tringles a ridealux.
● Ne pas derouler Iefil de I’antenne cadre AM.
● Ne pas mettre I’antenne cadre AM pres d’un tourne-disque,
d’un Iecteur de disques compacts, d’un tdeviseur ou de la
chalne stereo ni pres du cordon secteur ou des cordons
d’enceinte; elle pourrait capter des parasites.
Brancher k cordon secteur.
Brancher Ie cordon secieur a une prise de courant. Quand on
branche Ie cordon secteur, I’afficha!]e de I’horloge clignote.
Dans Iecas d’une installation avec un autre i~ppareil,brancher
Ie cordon secteur apres I’installation.
CONNEXION D’UNEANTENNE EXTERIEURE
Pour obtenir une meilleure reception FM, il est recommande de
connecter une antenne ext&ieure.
Connecter I’antenne exterieure a la borne FM 75 Q. +
❑
CONNEXION D’(JN CAISSON DE GRAVES
La connexion d’un caisson de graves augmenie Ie realisme des
sons de basse frequence.
Connecter un caisson de graves a amplificateur integre (Aiwa TS-
W5, etc.) a la borne SUPER WOOFER. +
❑
Pour plus de details, se reporter au mode d’emploi du caisson de
graves.

:.=
,
.“”
.’.❑
A
POWER
.
.;,,
,..-
~
~,.
.
.-..
...
.-:
b STANDSY/ON
s“
....
,..
J..
,0
D
“.
.“
.
..:
r.
““..
0
SHIFT
FUNCTION
I
R6 (AA)
4.
... ---
.$
:. . . . ---- “.;”
..
“.
. .
-,
..”.
-.
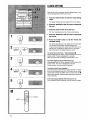
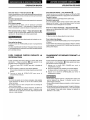
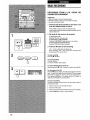
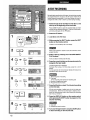
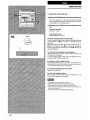
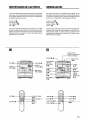
BEFORE OPERATION
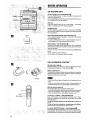
ON THE MAIN UNIT
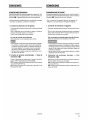
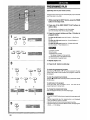
To turn on the unit+ See illustration ❑ .
Press the POWER button. The disc compartment may open and
close for resetting the unit.
For4 seconds afterturning onthe unit, onlythefunction buttons and
the VOLUME control can be operated.
After use
Press the POWER button to turn off the power. The display
indication is faded and only the clock is displayed.
Headphone use
Connect headphones with a 06.3 mml 11,in. plug to the PHONES
jack. When the headphones areconnected, sound cannot be heard
from the speakers.
If the clock display flashes while the power is off
This is caused by a power interruption. The current time needs to
be reset (see page 14).
● If power is interuppted for more than approximately 24 hours, the
preset stations and timer settings need to be reset.
Flash window -+ See illustration E.
The flash window lights upwhile the power isturned on and flashes
when the disc compartment isopened or closed, and while the disc
trays are accessed.
To turn it off, press the CD button while pressing the ■ CLEAR
button.
To turn it back on, repeat the above.
● Do not perform this operation during recording.
ON THE REMOTE
Remote control setting
CONTROL
Detach the battery coveron the rear ofthe remote control and insert
two R6 (size AA) batteries. + See illustration ~.
Battery replacement
The maximum operation distance of the remote control should be
approximately 5 meters (16 feet). When this distance decreases,
replace the batteries with new ones.
Um
● Do not mix different types of batteries, or old batteries with new
ones.
● When you are not going to use the unit for a long period of time,
remove the batteries to prevent possible electrolyte leakage.
Hints for correct operation
The remote control may not operate,correctly when:
● the lineofsight between the remote control and the remote sensor
of the unit is exposed to intense light, such as direct sunlight.
● other remote controls are used nearby (television, etc.).
To use the @) buttons+ See illustration
❑ .
Each of the buttons has two different functions. One of these
functions is indicated on the button top, and the other on the plate
above the button.
To use the function indicated on the button top, just press the
button.
To use the function indicated on the piate above the button,
press the button while pressing the SHIFT button.
To use the FUNCTiON button + See illustration
❑ .
The FUNCTION button substitutes for the function buttons (TAPE,
TUNEFf/BAND, VIDEO/AUX, CD) on the main unit. Each time the
FUNCTION button is pressed, the functions are selected cyclically.
12

ANTES DE LA OPERACION AVANT L“UTILISATION
UNIDAD PRINCIPAL
Para encender el aparato + Vease la ilustracion ❑ .
Presione el boton POWER. El compartimiento del disco quiza se
abra y se cierre para reponer la unidad.
Durante 4 segundos despues de encender el aparato, podran
operarse solo Ios botones de funcion y el control de volumen
VOLUME.
Despues del uso
Presione el boton POWER para desconectar la alimentacion. Se
atentia la indication del visualizador y se visualiza solo el reloj.
Uso de Ios auriculares
Conecte Iosauriculares con clavija de a6,3mm a Iatoma PHONES.
Cuando se conecten Ios auriculares, nose oira ningun sonido de
10saltavoces.
Cuandci la visualization del raloj parpadea durante la
desconexion de la alimentacion
Esto se debe a una interruption electrica. El reloj debe ajustarse
a la hors exacta (vease la pagina 15).
c Si el tiempo de interruption electrica es mas de 24 horas, deben
reponerse nuevamente Ias emisoras y fijarse el temporizador.
Ventanilla desteliante + E.
Laventanilladestellante permanece encendidadurante Iaconexion
de la alimentacion y parpadea en la apertura o cierre del
compartimiento de discos, y tambien durante el acceso a Ias
bandejas de disco.
Paraapagarla, presioneel boton CD mientras mantiene presionado
el boton ❑ CLEAR.
Para volver a encenderla, repita 10mencionado arriba.
● No realice esta operation durante la grabacion.
CONTROL REMOTO
Preparatives del control remoto
Abra la tapa del compartimiento de pilas situado en la trasera del
control remoto e inserte dos pilas R6 (tamafio AA). + Vease la
ilustracion
❑.
Reemplazo de Ias pilas
La distancia maxima de operation entre el control remoto y et
aparatodebe serdeaproximadamente5 metros. Cuandodisminuya
esta distancia, reemplace Ias pilas con Ias nuevas.
m
● No mezcle diferentes tipos de pila, ni pilas viejas con Ias nuevas.
● Cuando no vaya a utilizar el aparato por Iargo tiempo, quite Ias
pilas para evitar posible fuga electrolitica.
Consejos Litiles para la corrects operation
El control remoto tal vez no funcione correctamente cuando:
c la l~neade vision entre el control remoto y el sensor de la Iuz
infrarroja del aparato este expuesta a una potente Iuz,como laIuz
directs del sol.
● se utilicen otros controles remotos en la cercania (televisor, etc.)
Para usar Ios botones Q) + Vease la ilustracion
❑ .
Cada uno de Ios botones tienen dos diferentes funciones. Una de
estas funciones esta indicada en la parte superior del boton, y la
otra en la placa sobre el boton.
Para utilizar lafuncion indicada en la parte superior del boton,
bastapresionarel boton.
Para utilizar la funcion indicada en la placa sobre el boton,
presione el boton mientras mantiene presionado el boton SHIFT.
Para utilizarel boton FUNCTION + Vease la ilustracion
❑ .
El boton FUNCTION substitute Ios botones de funcion (TAPE,
TUNER/t3AND, VIDEO/AUX, CD) de launidad principal. Cadavez
.presione el boton FUNCTION, Ias funciones se seleccionan
ciclicamente.
UNITE PRINCIPAL
Pour mettre la chaine sous tension + Voir I’illustration ❑ .
Appuyer sur la touche POWER. Le compartment a disque peut
s’ouvrir et se fermer du fait de la reinitiidisation de I’appareil.
Pendant Ies quatre secondes qui suivent la mise sous tension de
lachalne, seules Iestouches defonctionlet Iacornmande VOLUME
peuvent 6tre utilisees.
Apres I’utiiisation
Appuyer sur la touche POWER pour coupler I’alimentation.
L’affichage devient sombre et seule I’horloge est affichee.
Utilisation d’un casque
Brancher un casque muni d’une ficha de 6,3 mm o a la prise
PHONES. Quand un casque est branche, Ieson ne peut pas sortir
par Ies enceintes.
Si I’affichage de I’horloge clignote pendant que
I’alimentation est coup~e
Ceciest dti a une interruption d’alimentation. L’heure courante doit
&re reglee de nouveau (voir page 15.)
● Si I’alimentaticm est interrompue pendant plus d’environ 24
heures, il faudra effectuer de nouveau la memorisation de sta-
tions et Ies reglages de minuterie.
Fen6tre clignotante + E.
La fen&re clignotante s’allume Iors de la mise sous tension et
clignote quand Iecomparlirnent a disque est ouvert ou ferme, ainsi
que Iors de I’acces aux plateaux porte-disque.
Pour I’eteindre, appuyer sur la touche CD tout en appuyant sur la
touche ■ CLEAR.
Pour I’allumer de nouveau, repeter I’operation ci-dessus.
● Ne pas effectuer cette operation pendant I’enregistrement.
TELECOMMANDE
Preparation de la telecomrnande
Enlever Iecouvercle des piles du dos de latelecommande et mettre
deux piles R6 (taille AA) en place. + Voir I’illustration
❑,
Replacement des piles
La distance maximale de fonctionnement de latelecommande est
d’environ cinq metres. Lorsque cette dietance diminue, remplacer
Ies piles par des neuves.
~
● Ne pas melanger different types de piles, ni des vieilles piles
avec des neuves.
● Si la telecommande ne doit pas ~tre utilisee pendant Iongtemps,
enlever Ies piles pour eviter tout risque de fuiie d’electrolyte.
Conseils pour un fonctionnement correct
La telecommande risque de ne pas fonctionner correctement
quand:
● I’espace entre la telecommande et k?capteur de I’appareil est
expose a une Iumiere intense, comme Ie soleil.
●d’autrestelecomrnandes (televiseur, etc.)sent uliliseesa proximite.
Pour utiliser Ies touches @ + Voir l’ilkrstration
❑ .
Chacune destouches poss@dedeuxfonctions. Unede cesfonctions
est indiquee sur latouche, et I’autre sur laplaque situee au-dessus
de la touche.
Pour utiliser Iafamction incfiqueesur Iatouche, ilsuffit d’appuyer
sur cette derniere,
Pour utiliser la fonction indiquee a,u-dessus de la touche,
appuyer sur cette derniere tout en appuyant sur la touche SHIFT.
Pour utiliser la touche FUNCTION + Voir I’illustration
❑ .
Latouche FUNCTION se substitue auxtouchesdefonction (TAPE,
TUNER/BAND, VIDEO/AUX, CD) de I’unite principal. A chaque
pression surlatouche FUNCTION, Iesfonctionssont selectionnees
de maniere cyclique.
13

I
$-J
II
SET
u
2[+,
(
M
1
W
DOWN
b
UPPPI
3
9
II
SET
“/l\
!3
Y=
II
..
SET
i
000
000
000
Ooai
aQa
SHIFT
00
000
000
0
L
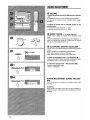
— CLOCK
CLOCK SEllllUG
When the AC cord is connected, the clock display flashes. Carry
out the following steps while the power is off.
1
2
3
4
5
Press the II SET button to enter the clock setting
mode.
The display indication becomes bright and the “hour” flashes.
Press the + DOWN or* UP button to designate
the hour.
Press the II SET button to set the hour.
The “hour stops flashing and the “minute” starts flashing.
Press the < DOWN or* UP button to designate
the minute.
Press the II SET button to set the minute and
complete setting.
The minute stops flashing in the display and the clock starts
from 00 second. The display indication becomes dim.
To get a more accurate time, press the II SET button at the
desired point, as indicated by another clock or time signal.
Each colon flash in the display indicates a second.
To correct the current time+ See illustration
❑ .
While pressing the SHIFT button, press the CLOCK button on the
remote control. The clock is displayed for 4 seconds.
Within this period, start correcting by following steps 1 to 5.
To switch display to clock while power is on
While pressing the SHIFT button, press the CLOCK button on the
remote control. The clock is displayed for
4 seconds.
During recording, the clock cannot be displayed.
To switch to the 24-hour standard
The time display is factoiy-set to the 12-hour standard. To switch
to the 24-hour standard, press the CLOCK button on the remote
control while pressing the SHIFT button and then press the ■
button within 4 seconds. Repeat the same procedure to restore the
12-hour standard.
If the clock display flashes while the power is off
This is caused by power interruption. Set the current time again.

AJUSTE DEL RELOJ
REGLAGE DE L’HORLOGE
Cuando esta conectado el cordon CA, parpadea la visualization
del reloj. Siga Ios pasos descritos a continuation durante la
desconexion de la alimentacion.
1
2
3
4
5
Presione et boton II SET para entrar en el modo de
ajuste del reloj.
La indication del visualizador se oscurece y parpadea “hors”.
Presione el boton 4 DOWN 0- UP para ajustar
la hors.
Presione el boton II SET para fijar la hors.
La indication “hors” deja de parpadear y empieza a parpadear
la indication “minute”.
Presione el boton 4 DOWN o W UP para ajustar
Ios uninutos.
Presione el boton II SET para fijar Ios minutes y
terminar el ajuste del reloj.
La indication de minutes deja de parpadear en ei visualizador
y el reloj se pone en funcionamiento de 00 segundos. Se
oscurece el visualizador.
Para obtener la indication mas exacta del reloj, presione el
boton II SET en ei preciso memento que se de la seiial horaria
oficial.
Cada parpadeo de Ios dos puntos indica un segundo.
Para corregir la indication horaria + Vease la ih.istracion
El.
Mientras mantiene oprimido el boton SHIFT, presione el boton
CLOCKdel control remoto. Sevisualiza elreloj durante4segundos.
Dentro de este per(odo, inicie la correction horaria siguiendo Ios
pasos 1 al 5.
Para cambiar el visualizador a la indication horaria
Mientras mantiene oprimido el bot6n SHIFT, presione el boton
CLOCKdel control remoto. Elreloj sevisualiza durante 4segundos.
Durante la grabacion, no puede visualizarse el reloj.
Para cambiar a la indication del sistema de 24 horas
El reloj esta ajustado en fabrica al sistema de 12 horas. Para
cambiar al sistema de indication de 24 horas, presione el boton
CLOCK del control remoto mientras mantiene oprimido el boton
SHIFT y Iuego oprima el boton ■ dentro de 4 segundos.
Repita el mismo procedimiento para restablecer el reloj a la
indication del sistema de 12 horas.
Si Iavisualizacion del reloj parpadeadurante Iadesconexion
de la alimentacion
Esto se debe a lainterruption electrica. Ajuste nuevamente etreloj.
Quand on branche Ie cordon secteur, I’affichage de I’horloge
clignote. Effectuer Ies op&ations suivantes avec I’alimentation
toupee.
1
2
3
4
5
Appuyer sur Iatouche II SET pour passer au mode
reglage de I’horloge.
L’affichage appara~t et Ies heures clignotent.
Appuyer
sur la touche + DOWN ou PF UP pour
specifier Ies heures.
Appuyer :sur la touche II SET plour regler Ies
heures.
Les heures arr@tentde clignoter et Ies mir]utes se mettent ti
clignoter.
Appuyer sur la touche ++ DIOWN ou * UP pour
specifier Ies minutes.
Appuyer sur la touche II SET pour regler Ies
minutes et terminer Ie r6glage.
Les minutes arr~tent de clignoter sur I’affichage et I’horloge
demarre a 00 seconde. L’affichage devient sombre.
Pour regler I’heure a la seconde pr?!s,appuyer sur la touche II
SET au moment souhaite, indique par une autre horloge ou par
un top horaire.
Chaque clignotement des points $wr I’affichage indique une
seconde.
Pour corriger I’heure courtmte -+ Voir I’illustration
❑ .
Tout en appuyant sur la touche SHll=T, appuyer sur la touche
CLOCK de la telecommande. L’horloge est affichee pendant
quatre secondes.
Pendant cette periode, commencer la correction en suivant [es
etapes 1 a 5.
Pour afficher I’horloge quand la chaine est sous tension
Tout en appuyant sur la touche SHll=T, appuyer sur la touche
CLOCK de la telecommande. L’horloge est affichee pendant
quatre secondes.
Pendant I’enregistrement, I’horloge ne peut
pais 6tre affichee.
Pour passer
au format de 24 heures
L’affichage de I’heure est regle a la fabrique sur Ie format de 12
heures. Pour passer au format de 24 heures, appuyer sur latouche
CLOCK de latelecommande tout en appuyant sur Iatouche SHIFT
puis appuyersur Iatouche S clansIesquatre secondes qui suivent.
Pour revenir au format de 12 heures, proceder de la m~me
maniere.
Si I’affichage de I’horloge clignote quand la cha~neest hors
tension
Ceci est dil a une coupure secteur. Regler de nouveau I’heure
courante.
15

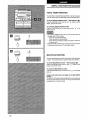
SOUND ADJUSTMENT
❑
✎
m
11[1,111
O T-BASS++
@T-SASS
m
b
GiEclmcEcl
ELECIRONICGFAPHICEOUAU2E.H
J-h
w
E-2
GEclGEEzcI
ELECTRONICQPAPHICECMUZER
b
❑ VOLUME
To adjust the volume with the VOLUME control on the main
unit
To increase the volume, turn the VOLUME control clockwise.
To decrease the volume, turn the VOLUME control counter-
clockwise.
To adjust the volume with the VOLUME buttons on the
remote control
To increase the volume, press the A button.
To decrease the volume, press the v button.
❑ SUPER T-BASS — For louder deep bass
T-BASS makes realistic reproduction at low frequency sound
levels.
Press the T-BASS button so that the indicator@ is displayed. To
cancel theT-BASS effect, press the T-BASS button so that the
indicator @)in the display changes to @.
❑ ELECTRONIC GRAPHIC EQUALIZER
You can enjoy music with the following three different equalization
curves.
ROCK Powerful sound emphasizing treble and bass
POP: More presence of vocals and midrange
JAZZ: Sound enriched with heavy bass and fine treble
To select an equalization mode+ See illustration W-1.
Press one of the ELECTRONIC GRAPHIC EQUALIZER buttons.
The selected mode is surrounded by red in the display.
To cancel the selected mode+ See illustration W-2.
Press the selected button again.
“EQ oFF” is displayed.
SOUND
ING
ADJUSTMENT DURING RECORD-
The VOLUME and tone controls do not affect the level of the
recording.
Monitoring
While recording, the output volume and tone of the speakers or
headphones may be freely varied without affecting the level of the
recording.
16

AJUSTE DEL SONIDO
REGLAGIE DU SON
❑ VC)LUMEN
Para ajustar el volumen con el control de volumen VOL-
UME de la unidad principal
Para aumentar el volumen, gire el control de volumen VOLUME a
la derecha.
Para disminuir e volumen, girelo a la izquierda.
Para ajustar el volumen con Ios botones VOLUME del
control remoto
Para aumentar et volumen, presione el boton A
Para disminuir el volumen, presione el boton v
❑ SUPER T-BASS — para hater rnas intenso IOS
tonos graves profundos
T-BASS intensifica la reproduction a niveles de sonido de bajas
frecuencias,
Presione el boton T-BASS. de manera que se visualice el indicador
0.
Para cancelar el efecto T-BASS, presione el bot6n T-BASS de
manera que el indicador 0 del visualizador cambie a @.
❑ ELECTRONIC GRAPHIC EQUALIZER –
Ecualizador grafico electronic
Usted podra disfrutar de la mtisica con Ias siguientes curvas de
ecualizacion.
ROCK: Sonido potente que acenttia Ios tonos graves y agudos
POP : Con mayor relieve en Ios vocales y en la gama media
JAZZ: Sonido enriquecido con tonos graves intensos y tonos
agudos fines
Para seleccionar el modo de ecualizacion + Vease la
ilustracion E-1.
Presione uno de Ios botones ELECTRONIC GRAPHIC
EQUALIZER.
El modo seleccionado esta rodeado en rojo en el visualizador.
Para calncelar el modo seleccionado + Vease la ilustracion
❑-2.
Presione otra vez el boton seleccionado.
Se visualiza “EQ oFF.
AJUSTE DEL SONIDO DURANTE LA
GRABACION
Los controles de volumen VOLUME y tono no afectan el nivel de
grabacidn,
Monitoreo
Durante la grabacion, el volumen y el tono de salida de Ios
altavoces o auriculares pueden ajustarse Iibremente sin afectar el
nivel de grabacion.
❑ VOLUME
Pour regler Ie volume avec la commande VOLUME de
I’unite principal
Pour monter Ie volume, tourner la cornmande VOLUME vers la
droite.
Pour baisser Ie volume, tourner la cornmande VOLUME vers la
gauche.
Pour regler Ie volume avec Ies touches VOLUME de la
telecommande
Pour monter Ie volume, appuyer sur la touche ~
Pour baisser Ie volume, appuyer sur la touche v .
❑ SUPER T-BASS –- Pourdles basses PIUSgraveseit
profondes
Le systeme T-BASS donne une reproduction r~aliste des sons de
basse frequence.
Appuyer sur la touche T-BASS de maniere que I’indicateur @ soit
affiche. Pour annuler I’effet T-BASS, appuyer sur la touche T-
BASS de maniere que I’indicateur O passe a @ sur I’affichage.
❑ ELECTRONICGRAPHIC IEQUALIZER
—
Egaliseur graphique electrcmique
On peut ecouter la musique avec [es trois coLlrbes d’egalisation
differences suivantes.
ROCK: Son puissant accentuant Ies aigus et Ies graves
POP: Presence accrue des parties vocales et de la gamme
moyenne
JAZZ: Son enrichi par des graves puissants et des aigus fins
Pourselectiormer un mode dl’egalisiation+ Voir I’illustration
❑-l.
Appuyer sur une des touches ELECTRONIC GRAPHIC EQUAL-
IZER.
Le mode selectionne est entoure en rouge sur I’affichage.
Pour annuler Ie mode selectionne + Voir I’illustration
H -2.
Appuyer de nouveau sur la touche selectionnee.
“EQ oFF” est affiche.
REGLAGE DU SON PENDANT
L’ENREGISTREMENT
Les commandes VOLUME et de tonalite n’affectent pas Ie niveau
de I’enregistrement.
Ecoute
Pendant I’enregistrement, on peut faire varier Iilmement Ievolume
de sortie et la tonalite des enceintes ou du casque saris affecter Ie
niveau de I’enregistrement.
,7

1 p-)
b
2 F==q
b
3
@
—
—
b
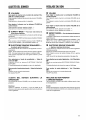
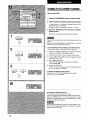
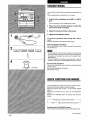
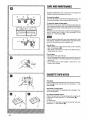
BASIC OPERATION
1
2
3
4
5
Press the CD button.
Press the A OPEN/CLOSE button to open the disc
compartment.
Tray numbers 1 and 2 flash in the display.
Load disc(s) with the label side up.
@ Playing one or two discs
Place discs on trays 1 and 2.
@ Playing three discs
After placing two discs, press the DISC CHANGE button to
rotate the trays. Place the next disc on tray 3.
mm
To load an 8cm (3 in.) disc, put it onto the inner circle of the tray.
Press the A OPEN/CLOSE button to close the disc
compartment.
@
Selected disc number
@ Total playing time of the selected disc
@ Total number of tracks on the selected disc
@ Music calendar
This shows the track numbers on the selected disc.
When a disc contains 21 tracks or more, only 20 tracks are
displayed.
Press the D button to starl play.
Play begins with the disc on tray 1. All the discs are played only
once.
@ Number of track being played
@ Playing time of track
@ Number of track being played flashes.
During playback
A tray which has no disc is skipped and play proceeds to the next
tray. The indicator of the skipped tray number goes out in the
display.
To stop play
Press the ■ button.
To stop and open the tray at the same time, press the A OPEN/
CLOSE button.
To
pause
Press the II button.
To resume play, press it again.
To check the remaining time
Press the DISPLAY button on the remote control while pressing the
SHIFT button during playback. The amount of time remaining until
all tracks finish playing is displayed.
To restore the play time display, press the DISPLAY button while
pressing the SHIFT button again.
18

OPERACION BASICA
UTILISATION DE BASE
1
2
3
4
5
Presione el boton CD.
Presicme el boton A OPEN/CLOSE para abrir el
compartimiento de discos.
Los numeros de bandeja 1 y 2 parpadean en el visualizador.
Coloque disco (s) con su etiqueta hacia arriba.
@
Reproduction de uno o dos discos
Coloque discos sobre Ias bandejas 1 y 2.
@ Reproduction de tres discos
t)espues de colocar dos discos, presione el boton DISC
CHANGE para girar Ias bandejas. Coloque otro disco en la
bandeja 3.
Para colocar un disco de 8cm, pongalo sobre el circulo
interior de la bandeja.
Presione el boton A OPEN/CLOSE para cerrar el
compartimiento de discos.
@ Ntimero del disco seleccionado
@ Tiempo de reproduction total del disco seleccionado
@ Numero total de canciones del disco seleccionado
@ Calendario musical
Muestra Iosnumerosdecancionesen eldisco seleccionado.
Cuando undisco contiene 21canciones omas, sevisualizan
sblo 20 canciones.
Presione el boton D para iniciar la reproduction.
La reproduction inicia con el disco de la bandeja 1,y todos Ios
discos se reproduce solamente una vez.
@)Numero de la cancion en reproduction
@ Tiempo de reproduction de la cancion
@ Parpadea el ntimero de la cancion en reproduction.
Durante la reproduction
Se pasa por alto la bandeja que no contiene disco para proseguir
a la siguiente bandeja. Se apaga el indicador del numero de la
bandeja omitida.
Para cesar la reproduction
Presione et boton ❑.
Para cesar y abrir la bandeja al mismo tiempo, presione el boton
A OPEN/CLOSE.
Para hater una pausa
Presione el boton Il.
Para reanudar la reproduction, presione nuevamente el mismo
boton.
Para verificar el tiempo restante
Presione el boton DISPLAY del control remoto mientras mantiene
oprimido et boton SHIFT durante la reproduction. Se visualiza el
tiemPo We queda hasta que termine la reproduction de todas Ias
canciones.
Para restablecerla indication deltiempo de reproduction, presione
el boton DISPLAY mientras mantiene oprimido el boton SHIFT.
1
2
3
4
5
Appuyer sur la touche CD.
Appuyersurlatouche A OPEN/CLOSE pour ouvrir
Ie compartment a disques.
Les numeros de plateau 1 et 2 clignotent sur I’affichage.
Mettre Ie (s) disque (s) en place avec I’etiquette en
haut.
@
Lecture de un ou deux disques
Mettre Ies disques sur Ies plateaux 1 et 2.
@ Lecture de trois disques
Apres avoir mis deux disques en place, appuyer sur la
touche DISC CHANGE pour faire tourrw Ies plateaux.
Mettre I’autre disque en place sur Ie plateau 3.
m
Pour Iire un disque compact de 8 cm, Ie poser clans Ie
renfoncemelnt circulaire du plateau.
Appuyer sur la touche A OIPEN/CLOSE pour fer-
mer Ie compartment a disques.
1~
@
Numero du disque selectionne
@ Temps de lecture total du disque selectionne
@ Nombre total de plages du disque selectionne
@)Indicateur de plages
Montre Ies numeros de plage dludisque selectionne.
Si un disque contient 2f plages ou plus, seules 20 plages
sent affichees.
Appuyer siurlatouche D polurdemlarrer la lecture.
La lecture commence par Ie disque du plateau 1. Tous Ies
disques sent Ius une fois seulement.
~
@)Numero de la plage en tours de lecture
@ Temps de lecture de la plage
@ Le numero de la plage en tours de IectlJreclignote.
Pendant la lecture
Si un plateau es.tvide, il est saute et la lecture passe au plateau
suivant. L’indicateur du numero du plateau saute disparalt de
I’affichage.
Pour arr&er la lecture
Appuyer sur la touche ❑.
Pour arr&er la lecture et ouvrir Ieplateau en m~me temps, appuyer
sur la touche = OPEN/CLOSE .
Pour mettre en pause
Appuyer sur la touche II.
Pour reprendre la lecture, appuyer de nouvealJ sur la touche.
Pour verifier Ie temps restant
Appuyer sur la touche DISPLAY de la telecommande tout en
appuyant sur latouche SHIFT pendant la lecture. Letemps restant
jusqu’a ce que “toutesIes plages soient Iues est affiche.
Pour retablir I’affichage du temps de lecture, appuyer de nouveau
sur la touche DISPLAY tout en appuyant sur
li~ touche SHIFT.
19

Q
A
R
000
00
DISC SKIP
000
000
000
SHIFT ==
000
000
1
b
2
3
I
BASIC OPERATION
To skip discs+ See illustration ❑ .
Duringplay or inthe stop mode, press the DISC SKIP button on the
remote control while pressing the SHIFT button.
During play:
Play begins automatically after skipping.
In the stop mode:
The next disc is skipped to, but the player remains stopped. Press
the P button to play the next disc. Play begins and all the discs are
played once.
To play one disc only+ See illustration H .
Press one ofthe DISC DIRECT PLAY buttons to start play. Only the
selected disc is played.
O Only the selected disc number is surrounded by red,
To
remove discs
Press the A OPEN/CLOSE button to open the disc compartment.
You can remove two discs. To remove the disc on the back tray,
press the DISC CHANGE button to rotate the disc tray.
CHANGING DISCS DURING PLAY
Two discs can be changed while the other remaining disc isplayed.
+ See illustration E. This operation is not applicable during
programmed play.
1 Press the DISC CHANGE button to open the disc compartment.
2 Remove the discs and place other discs.
The disc placed on the left side tray will be played next.
3 Press the A OPEN/CLOSE button to close the disc compart-
ment.
● Do not tilt the unit with discs loaded. This may dislodge the
discs. Usage under these conditions may damage the discs.
● Do not place more than one compact disc on one disc tray at
the same time.
● If, during CD play, the video image of a nearby television is
distorted, or if static is heard from a nearby radio, move this
unit further away from the affected television or radio.
20
La page est en cours de chargement...
La page est en cours de chargement...
La page est en cours de chargement...
La page est en cours de chargement...
La page est en cours de chargement...
La page est en cours de chargement...
La page est en cours de chargement...
La page est en cours de chargement...
La page est en cours de chargement...
La page est en cours de chargement...
La page est en cours de chargement...
La page est en cours de chargement...
La page est en cours de chargement...
La page est en cours de chargement...
La page est en cours de chargement...
La page est en cours de chargement...
La page est en cours de chargement...
La page est en cours de chargement...
La page est en cours de chargement...
La page est en cours de chargement...
La page est en cours de chargement...
La page est en cours de chargement...
La page est en cours de chargement...
La page est en cours de chargement...
La page est en cours de chargement...
La page est en cours de chargement...
La page est en cours de chargement...
La page est en cours de chargement...
La page est en cours de chargement...
La page est en cours de chargement...
La page est en cours de chargement...
La page est en cours de chargement...
La page est en cours de chargement...
La page est en cours de chargement...
La page est en cours de chargement...
La page est en cours de chargement...
La page est en cours de chargement...
La page est en cours de chargement...
La page est en cours de chargement...
La page est en cours de chargement...
La page est en cours de chargement...
La page est en cours de chargement...
-
 1
1
-
 2
2
-
 3
3
-
 4
4
-
 5
5
-
 6
6
-
 7
7
-
 8
8
-
 9
9
-
 10
10
-
 11
11
-
 12
12
-
 13
13
-
 14
14
-
 15
15
-
 16
16
-
 17
17
-
 18
18
-
 19
19
-
 20
20
-
 21
21
-
 22
22
-
 23
23
-
 24
24
-
 25
25
-
 26
26
-
 27
27
-
 28
28
-
 29
29
-
 30
30
-
 31
31
-
 32
32
-
 33
33
-
 34
34
-
 35
35
-
 36
36
-
 37
37
-
 38
38
-
 39
39
-
 40
40
-
 41
41
-
 42
42
-
 43
43
-
 44
44
-
 45
45
-
 46
46
-
 47
47
-
 48
48
-
 49
49
-
 50
50
-
 51
51
-
 52
52
-
 53
53
-
 54
54
-
 55
55
-
 56
56
-
 57
57
-
 58
58
-
 59
59
-
 60
60
-
 61
61
-
 62
62


Aiwa CX-NV20 Le manuel du propriétaire
- Catégorie
- Lecteurs de cassettes
- Taper
- Le manuel du propriétaire
dans d''autres langues
- English: Aiwa CX-NV20 Owner's manual
- español: Aiwa CX-NV20 El manual del propietario
Documents connexes
-
Aiwa SX-FN4500 Operating Instructions Manual
-
-
-
-
-
-
-
-
-