Philips HD7857/20 Le manuel du propriétaire
- Catégorie
- Cafetières
- Taper
- Le manuel du propriétaire
Ce manuel convient également à


3
1 Introduction
Congratulations on your purchase and welcome
to Philips! To fully benet from the support that
Philips offers, register your product at
www.philips.com/welcome.
1.1 SENSEO
®
coffee system
Make your coffee moments truly special with
SENSEO
®
. This unique system combines the
easy-to-use Philips SENSEO
®
coffee machine
with the specially developed D.E Master Blenders
SENSEO
®
coffee pods, giving you a full, smooth
coffee with a delicious foam layer.
D.E Master Blenders coffee in convenient
SENSEO
®
coffee pods and Philips’ unique new
SENSEO
®
brewing system are perfectly matched
to ensure that the best taste and aroma are
extracted from the coffee. Discover all SENSEO
®
coffee blends at www.senseo.com.
To ensure a smooth and full coffee taste, you
should keep the following things in mind:
Fresh coffee pods
Use the SENSEO
®
coffee pods that have been
specially developed by D.E Master Blenders for
your SENSEO
®
coffee machine for a full, round
taste. D.E Master Blenders SENSEO
®
coffee
pods stay fresh longer if you store them in an
airtight storage container.
Fresh water
Use fresh water every day. If you have not used
the coffee machine for one day, you have to ush
it with fresh water before you use it again.
Table of contents
1 Introduction 3
1.1 SENSEO
®
coffee system 3
2 General description 4
3 Important 4
3.1 Compliance with standards 5
4 Flushing the machine before
rst use 5
5 Brewing black SENSEO
®
coffee 7
6 Brewing a coffee speciality with
fresh milk 8
7 Adjusting the coffee volume 11
7.1 Adjusting the coffee volume to your
personal taste 11
8 Cleaning 11
8.1 Cleaning the milk spout 12
8.2 Cleaning the coffee spout and
the machine 14
9 Descaling 15
9.1 Descaling procedure 15
10 Ordering accessories 17
11 Environment 17
12 Guarantee and support 17
13 Troubleshooting 18
13.1 SENSEO
®
coffee machine 18
ENGLISH

4
• This machine can be used by
children aged from 8 years and
above and by persons with
reduced physical, sensory or
mental capabilities or lack of
experience and knowledge if they
have been given supervision or
instruction concerning use of the
machine in a safe way and if they
understand the hazards involved.
• Cleaning and user maintenance
shall not be made by children
unless they are older than
8 and supervised.
• Keep the machine and its cord out
of the reach of children aged less
than 8 years.
• Children should be supervised to
ensure that they do not play with
the machine.
• Do not use the machine if the
plug, the mains cord or the
machine itself is damaged.
• If the mains cord is damaged, you
must have it replaced by Philips,
a service centre authorised
by Philips or similarly qualied
persons in order to avoid a hazard.
Caution
• Always return the machine to
a service centre authorised by
Philips for examination or repair.
Do not attempt to repair the
machine yourself, otherwise your
guarantee becomes invalid.
• Do not use the machine in
combination with a transformer,
as this could cause hazardous
situations.
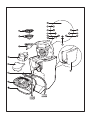
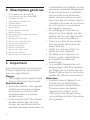
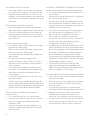
2 General description
1 1-cup pod holder q
2 2-cup pod holder qq
3 Coffee collector
4 Coffee spout
5 Milk spout
6 Milk tube
7 Cup tray
8 Removable drip tray
9 Water reservoir
10 Touch panel with recipe buttons
11 CALC button
12 Café Latte button
13 Latte Macchiato button
14 Cappuccino button
15 Cup indicators
16 On/off button
17 Regular coffee button
18 Strong coffee button
19 Milk only button
3 Important
Read this user manual carefully before
you use the machine and save it for
future reference.
Danger
• Never immerse the machine in
water or any other liquid.
Warning
• Check if the voltage indicated
on the bottom of the machine
corresponds to the local mains
voltage before you connect the
machine.

5
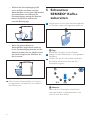
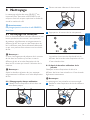
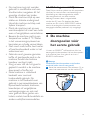
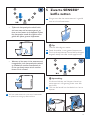
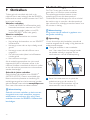
4 Flushing the
machine before rst
use
It is important that you ush your SENSEO
®
coffee
machine before rst use. After the ushing cycle,
the machine is ready for brewing SENSEO
®
coffee.
C
Caution:
Never interrupt the ushing cycle halfway. If you
do, the boiler does not ll itself properly.
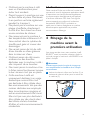
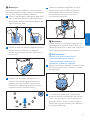
1 Tilt the water reservoir backwards (1) and lift
the water reservoir off the machine (2).
2 Fill the water reservoir.
• Always put the machine on a
at and stable surface. Keep it
in upright position, also during
transport.
• Do not place the machine on a
hotplate, directly next to a hot
oven or similar source of heat.
• Do not keep the machine at
temperatures below 0°. Water left
in the heating system may freeze
and cause damage.
• Never pour milk, coffee, hot water
or carbonated water into the
water reservoir.
• Never put normal ground coffee
or use torn pods in the machine,
as this causes it to become
blocked.
• Never ush the machine or let it
brew coffee when the spout is not
in place.
• This machine is intended for
normal household use only.
It is not intended for use in
environments such as staff
kitchens of shops, ofces, farms
or other work environments.
Nor is it intended to be used by
clients in hotels, motels, bed and
breakfasts and other residential
environments.
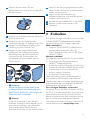
3.1 Compliance with standards
This Philips machine complies with all applicable
standards and regulations regarding exposure to
electromagnetic elds.
The energy consumption of this machine in
off mode is less than 0,5 watt. This means that
this machine complies with European Directive
2009/125/EC, which sets the ecological design
requirements for energy-using products.
ENGLISH

6
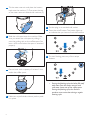
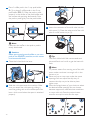
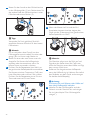
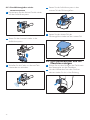
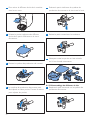
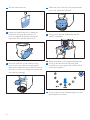
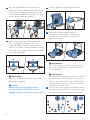
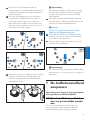
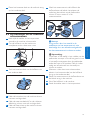
7 Put the plug in an earthed wall socket.
8 Press the on/off button. The button lights up
to indicate that you have to ush the machine.
9 To start ushing, press any of the recipe
buttons.
• During the ushing cycle, the boiler lls itself
with water from the water reservoir and
cold water comes out of the coffee spout.
During the ushing cycle, the machine
produces more noise than during a regular
brewing cycle.
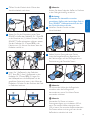
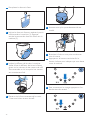
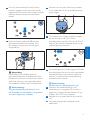
3 Tilt the water reservoir and place the bottom
back onto the machine (1). Then press the top
of the water reservoir towards the machine (2).
4 Slide the milk spout onto the machine. Make
sure you attach the milk spout by sliding it
over the guiding rails on the coffee spout. You
hear a click sound when the spout is attached
properly.
5 Place a bowl with a capacity of at least 1 litre
under the coffee spout.
6 Make sure a pod holder, without pod or pods,
is in place.

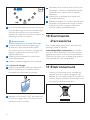
7
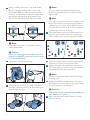
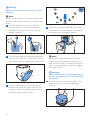
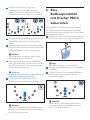
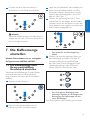
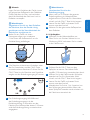
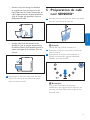
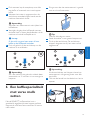
3 Press the on/off button. The on/off button
ashes slowly while the water heats up.
D
Note:
If the on/off button ashes rapidly, the water
reservoir does not contain enough water for
brewing one cup of coffee.
4 Pull the lid lever upwards to open the lid.
5 If you want to make one cup of SENSEO
®
coffee, place the 1-cup pod holder q in the
machine (1). If you want to make two cups,
put the 2-cup pod holder qq in the machine
(2). Make sure the pod holder is clean.
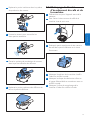
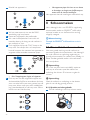
• When all the water in the water reservoir
has been used up, the ushing cycle is
nished and the machine switches off. You
may notice some steam coming from the
machine, this is normal.
10 Fill the water reservoir with fresh tap water
and place it back onto the machine.
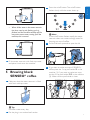
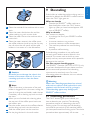
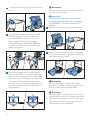
5 Brewing black
SENSEO
®
coffee
1 Make sure that the water reservoir is lled
with fresh cold tap water.
E
Tip:
Use fresh water every day.
2 Put the plug in an earthed wall socket.
ENGLISH

8
D Note:
You can adjust the height of the drip tray
or remove the drip tray to be able to place
higher cups.
D
Note
The cups you use should have a capacity of at
least 150ml when you brew regular coffee or
100ml when you brew strong coffee. Do not
use cups that are too large, as they cause the
coffee to get cold more quickly.
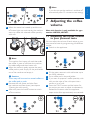
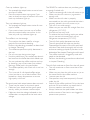
9 Press the button with two coffee beans for a
regular cup of coffee. Press the button with
three coffee beans for a strong cup of coffee.
10 Press the recipe button once for one cup of
coffee or twice for two cups of coffee.
11 When the water has heated up and the on/
off button lights up continuously, the machine
automatically starts brewing coffee.
D
Note:
Do not remove the water reservoir during a
brewing cycle.
12 When the coffee is ready, remove the used
coffee pod or pods. Simply lift the pod holder
out of the machine and empty it.
C
Caution:
There may still be some hot water/coffee on
the coffee pod or pods.
13 After use, press the on/off button to switch
off the machine.
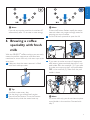
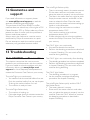
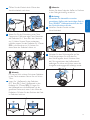
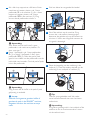
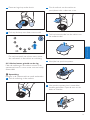
6 Place 1 coffee pod in the 1-cup pod holder
q (1) or place 2 coffee pods in the 2-cup
pod holder qq (2). Place the pod or pods
properly in the centre of the pod holder, with
the convex side pointing downwards. Press
the pod or pods lightly into the pod holder.
D
Note:
Make sure the coffee in the pod or pods is
evenly distributed.
C
Caution:
Never put normal ground coffee or use torn
pods in the SENSEO
®
machine, as this causes
it to become blocked.
7 Close the lid and lock the lever.
8 Place one cup or two cups under the spout
openings. Use the markings on the drip tray to
place the cup or cups.

9
D Note:
If the on/off button ashes rapidly, the water
reservoir does not contain enough water for
brewing one cup of coffee.
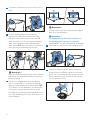
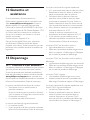
4 Pull the lid lever upwards to open the lid.
5 If you want to make one cup of cappuccino,
café latte or latte macchiato, place the 1-cup
pod holder q in the machine (1). If you want
to make two cups, put the 2-cup pod holder
qq in the machine (2). Make sure the pod
holder is clean.
D
Note:
For warm milk only, you do not have to place
a pod holder in the machine. Proceed with
step 7.
D Note:
If you do not use the machine, it switches off
automatically after 15 minutes to save energy.
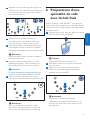
6 Brewing a coffee
speciality with fresh
milk
With the SENSEO
®
coffee machine you can easily
create the perfect cappuccino, café latte, latte
macchiato or warm milk only with two cups at the
same time.
1 Make sure that the water reservoir is lled
with fresh cold tap water.
E
Tip:
Use fresh water every day.
2 Put the plug in an earthed wall socket.
3 Press the on/off button. The on/off button
ashes slowly while the water heats up.
ENGLISH

10
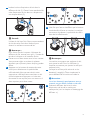
9 Insert the connector of the milk tube into the
milk spout (1). Place the other end of the milk
tube in a milk carton or jar (2).
E
Tip:
Use fresh chilled milk. We recommend semi
skimmed fresh cow’s milk to get the best milk
froth.
D
Note:
To prevent steam from coming out of the milk
spout, make sure there is enough milk in the
carton or jar.
10 Place one cup or two cups under the spout
openings. You can adjust the drip tray or
remove the drip tray to be able to place
higher cups.
11 Press the recipe button of your choice to select
the desired coffee speciality. You can choose
between cappuccino, café latte, latte macchiato
or warm milk only. Press the recipe button
once for one cup or twice for two cups.
6 Place 1 coffee pod in the 1-cup pod holder
q (1) or place 2 coffee pods in the 2-cup
pod holder qq (2). Place the pod or pods
properly in the centre of the pod holder, with
the convex side pointing downwards. Press
the pod or pods lightly into the pod holder.
D
Note:
Make sure the coffee in the pod or pods is
evenly distributed.
C
Caution:
Never put normal ground coffee or use torn
pods in the SENSEO
®
machine, as this causes
it to become blocked.
7 Close the lid and lock the lever.
8 Slide the milk spout onto the machine. Make
sure you attach the milk spout by sliding it
over the guiding rails on the coffee spout. You
hear a click sound when the spout is attached
properly.

11
D Note:
If you do not use the machine, it switches off
automatically after 15 minutes to save energy.
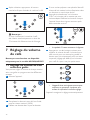
7 Adjusting the coffee
volume
Note: this function is only available for type
number HD7858, HD7857.
7.1 Adjusting the coffee volume
to your personal taste
You can adjust the volume of each recipe to your
own personal taste by programming the different
recipes.
1 Switch on the appliance.
2 Fill the water reservoir with cold water up to
the MAX indication.
3 Put a coffee pod in the pod holder.
4 If you want to prepare a coffee speciality with
milk, put the tube of the milk spout into a
carton or jar of milk.
5 Press the CALC button and the button for
the recipe you want to adjust simultaneously.
Release the buttons when the appliance
beeps twice after approximately two seconds.
12 When the water has heated up and the on/
off button lights up continuously, the machine
starts to create the selected coffee speciality
with milk.
D
Note:
The machine rst brews milk and then adds
the coffee. In case of café latte, the machine
rst adds coffee and then brews milk.
13 When the coffee is ready, remove the used
coffee pod or pods. Simply lift the pod holder
out of the machine and empty it.
C
Caution:
There may still be some hot water/coffee on
the coffee pod or pods.
14 Remove the milk spout and tube from
the machine and clean them (see chapter
‘Cleaning the milk spout’).
15 After use, press the on/off button to switch
off the machine.
ENGLISH

12
D Note:
If you do not plan to froth milk again straight
away, rinse the milk spout and milk tube within 30
minutes after use.
D
Note:
After the last use of the day, clean the milk spout
and milk tube thoroughly.
8.1.1 Rinsing after every use
1 Put the milk tube in a cup of clean water.
2 Place an empty cup under the spout.
3 Press the milk only button.
The machine rinses all milk residues from the
milk spout and milk tube with clean hot water.
• The 1-cup symbol starts to ash.
6 Press one of the following buttons to change
the coffee volume: the regular coffee button
for a larger cup, the milk only button for a
medium cup (default setting) or the strong
coffee button for a smaller cup.
• The appliance beeps three times to conrm
and starts to brew a coffee recipe according
to the new setting.
The appliance saves the setting automatically.
8 Cleaning
Regular cleaning of your SENSEO
®
is important
to ensure that the SENSEO
®
coffee always tastes
optimally and to optimise the lifetime of the
coffee machine.
B
Warning:
Never immerse the SENSEO
®
coffee machine in
water.
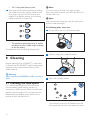
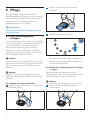
8.1 Cleaning the milk spout
For a reliable performance of the milk spout
and consistently good frothing results, it is
important to clean the milk spout and milk tube
regularly and thoroughly. The milk spout can be
disassembled completely, which allows you to
remove all milk residues from it.

13
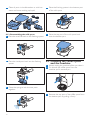
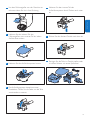
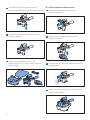
5 The frothing system can be separated into
two parts. Open the spring to separate the
parts.
6 Remove the inside part of the frothing system
by pulling it downwards.
7 Remove the small lid by pulling it upwards.
8.1.2 After the last use of the day
Clean the milk tube and the milk spout in the
dishwasher or in hot water with some washing-up
liquid.
D
Note:
Cleaning in the dishwasher is recommended.
1 Pull the milk tube out of the milk spout.
2 To remove the milk spout from the machine,
pull it towards you.
3 Remove the top part of the milk spout from
the bottom part by pulling it rmly.
4 Take out the frothing system.
ENGLISH

14
4 Place the frothing system in the bottom part
of the milk spout.
5 Place the top part of the milk spout back
onto the bottom part.
8.2 Cleaning the coffee spout
and the machine
1 Always unplug the machine before you clean it.
2 To remove the coffee spout from the
machine, pull it towards you.
3 Remove the top part of the coffee spout from
the bottom part by pulling it rmly.
8 Clean all parts in the dishwasher or with hot
water and some washing-up liquid.
8.1.3 Reassembling the milk spout
1 Place the small lid back on the frothing system.
2 Place the inside part back into the frothing
system.
3 Close the spring to lock the two parts
together.

15
9 Descaling
Scale builds up inside the machine during use. It is
essential to descale the SENSEO
®
coffee machine
when the CALC light goes on.
When to descale
• Descale the SENSEO
®
coffee machine as
described below when the CALC button
lights up (after you have brewed approx. 400
cups of SENSEO
®
coffee).
Why to descale
Your reasons to descale:
• It prolongs the life of your SENSEO
®
coffee
machine
• It ensures maximum cup volume
• It ensures maximum coffee temperature
• The machine produces less sound during
brewing
• It prevents malfunctioning
If the descaling procedure is not performed
correctly, scale residue remains behind in the
machine. This causes scale to build up more
quickly and may cause permanent and irreparable
damage to the machine.
Use the correct descaling agent
Use SENSEO
®
Descaler (HD7012, HD7011) only.
It has been developed to ensure better machine
performance and operation. Each descaling
mixture can be used only once. For more
information about this descaler, visit our website
www.philips.com.
B
Warning:
Never use a descaling agent based on mineral
acids such as sulphuric acid, hydrochloric acid,
sulphamic acid and acetic acid (e.g. vinegar).
These descaling agents may damage your
SENSEO
®
coffee machine.
9.1 Descaling procedure
The CALC button lights up to indicate you
have to descale your machine. The descaling
procedure consists of a descaling cycle and 3
ushing cycles. Do not interrupt the descaling
cycle and do not switch off the machine before
you have performed the ushing cycles. The whole
procedure takes approximately 60 minutes.
4 Clean the outside of the machine with a moist
cloth.
5 Clean the water distribution disc and the
rubber sealing ring with a moist cloth.
6 Clean the water inlet on the machine with a
moist cloth.
7 Clean the water reservoir, the coffee spout,
the coffee collector, the drip tray, the cup tray,
the milk tube, the milk spout and the pod
holders in hot water or in the dishwasher.
C
Caution:
Be careful not to damage the valve in the
bottom of the water reservoir if you use
a washing-up brush to clean the water
reservoir.
D
Note:
Check if the sieve in the centre of the pod
holder is clogged. If this is the case, unclog the
sieve by rinsing the pod holder under the tap.
If necessary, use a washing-up brush to clean
the sieve.
8 When you are nished with cleaning, place
the top part of the coffee spout back onto
the bottom part.
9 Place the water reservoir, the coffee collector
and the drip tray back into the machine.
10 Slide the coffee spout into the machine.
11 Put the plug the back in the wall socket.
ENGLISH

16
4 Place the 1-cup pod holder q with a used
coffee pod in it in the machine. Close the lid
and make sure it is properly locked.
D
Note:
Always put a used coffee pod in the pod
holder when you descale the machine. This
pod serves as a ‘lter’ to prevent the sieve or
hole in the pod holder from getting clogged
with scale residue.
B
Warning:
Make sure the lid is closed properly and the
lid lever is locked before you start descaling
the machine.
5 Put a bowl with a capacity of at least 1 litre
under the spout to collect the descaling
solution.
B Warning:
Make sure you place the milk spout for proper
descaling.
D
Note:
You can always descale your machine before the
appliance indicates it is necessary, follow the steps
below.
1 Mix the descaler with 1 litre of water in
a measuring jug. Stir until the powder has
dissolved. Fill the water reservoir with the
descaling solution.
2 Tilt the water reservoir and place the bottom
back onto the machine (1). Then press the top
of the water reservoir towards the machine (2).
3 Press the on/off button. The on/off button
ashes slowly while the water heats up. The
machine is ready for descaling when the on/
off button lights up continuously.

17
2 Press the CALC button to start the ushing
cycle. The water ows continuously for
approximately 5 minutes.
3 Wait until the machine has completed the
ushing cycle. The on/off button ashes quickly
and the CALC button ashes slowly.
4 Empty the bowl and place it back under the
spout.
5 Repeat steps 1 to 4 twice to complete the
ushing procedure. When the last ushing
cycle is complete, the machine switches off
automatically.
10 Ordering accessories
To buy accessories or spare parts, visit
www.shop.philips.com/service or go to your
Philips dealer. You can also contact the Philips
Consumer Care Centre in your country (see the
worldwide guarantee leaet for contact details).
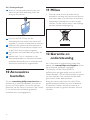
11 Environment
• Do not throw away the machine with the
normal household waste at the end of its life,
but hand it in at an ofcial collection point for
recycling. By doing this, you help to preserve
the environment.
6 The machine is ready for descaling when
the on/off button and CALC button light up
continuously. Press the CALC button until the
machine beeps twice to start the descaling cycle.
7 The descaling cycle is in progress. During the
descaling cycle, the descaling solution comes
out of the machine in intervals. During the
last 5 minutes the descaling solution ows
continuously.
B
Warning:
Do not interrupt the descaling cycle.
8 When all the descaling solution in the water
reservoir has been used up after approximately
50 minutes, the on/off button ashes quickly
and CALC button ashes slowly.
9 Empty the bowl and place it back under the
spout.
10 Remove the used coffee pod from the pod
holder.
9.1.1 Flushing cycles:
1 Rinse and ll the water reservoir with fresh
water until the MAX indication. Place it back
onto the machine.
ENGLISH

18
The on/off light ashes quickly.
• There is not enough water in the water reservoir.
Fill the water reservoir and make sure you
place the reservoir properly into the machine.
• The oat in the water reservoir might be stuck.
Empty the water reservoir and shake it a few
times to release the oat. Clean the water
reservoir with hot water and some washing-up
liquid or in the dishwasher.
• You are using the machine at an ambient
temperature below 10*C.
Only use the machine at an ambient
temperature above 10*C.
• If these solutions do not solve the problem,
contact the Philips Consumer Care Centre in
your country.
The CALC light is on continuously.
• You need to descale the machine.
• Perform the descaling procedure as described
in chapter ‘Descaling’. Do not switch off the
machine during descaling.
The CALC light is on continuously after descaling.
• The descaling procedure has not been completed.
• Perform the descaling procedure as described
in chapter ‘Descaling’. Do not switch off the
machine during descaling.
The CALC light ashes.
• The descaling procedure is in progress.
• Let the machine complete the descaling
procedure. See chapter ‘Descaling’.
The on/off lights ashes quickly and the CALC
light ashes slowly.
• The water reservoir is empty.
• Rinse and ll the water reservoir and make
sure you place the reservoir properly into the
machine. Press the CALC button to continue
the descaling procedure as described in
chapter ‘Descaling’.
12 Guarantee and
support
If you need information or support, please
visit www.philips.com/support or read the
separate worldwide guarantee leaet.
The purchase of the Philips SENSEO
®
coffee
machine does not exhaust any of the rights of D.E.
Master Blenders 1753 or Philips under any of their
patents nor does it confer upon the purchaser a
licence under these patents.
Always return the machine to a service centre
authorised by Philips for examination or repair.
Do not attempt to repair the machine yourself,
otherwise your guarantee becomes invalid.
13 Troubleshooting
13.1 SENSEO
®
coffee machine
This chapter summarises the most common
problems you could encounter with the machine.
If you are unable to solve the problem with the
information below, visit www.philips.com/
support for a list of frequently asked questions or
contact the Consumer Care Centre in your country.
The on/off light is on continuously.
• You need to ush the machine before rst use.
Flush the machine before rst use, see chapter
‘Flushing the machine before rst use’.
• The machine is ready to brew.
The on/off light ashes slowly.
• The machine is heating up.
• If this takes longer than two minutes, contact the
Philips Consumer Care Centre in your country.

19
The SENSEO
®
machine does not produce good
or enough frothed milk.
• There is not enough milk in the milk carton or jar.
• Make sure the milk carton or jug contains
enough milk.
• Make sure the milk tube is properly
connected into the milk spout and the tube is
properly placed in the milk carton or jar.
• The milk is not cold enough.
Make sure you use cold milk straight from the
refrigerator (5°C-8°C).
• You did not use cow’s milk.
To achieve the best frothing results we advise
you to use semi-skimmed cow’s milk at
refrigerator temperature (5°C-8°C).
• The milk froth quality decreases over time.
The milk spout and milk tube may be dirty.
Disassemble all the parts of the milk spout and
milk tube. Clean them thoroughly with a brush
and some washing-up liquid or put them in the
dishwasher. See chapter ‘Cleaning the milk spout’.
• The coffee machine is clogged by scale and
needs to be descaled.
Perform the descaling procedure as described
in chapter ‘Descaling’.
The milk froth continues to ow from the milk spout.
• The milk continues to ow more than a few
seconds.
• Make sure you place the milk carton or jar on
the same level as the coffee machine.
• I cannot open the lid.
• Overpressure may have temporarily formed
under the lid.
• Switch of the coffee machine. Pull up the lever
and wait 24 hours before you open the lid.
You may need to use some force.
• Always make sure the pod holders are clean
and the centre of the sieve is not clogged to
prevent over pressure.
One cup indicator lights up.
• You pressed the recipe button once to brew
one cup of coffee.
• Press the recipe button once more if you
want to brew two cups of coffee. In this case,
both cup indicators light up.
Two cup indicators light up.
• You pressed the recipe button twice for two
cups of coffee.
• If you want to brew just one cup of coffee,
press the recipe button once more. In this
case, only one cup indicator lights up.
The coffee is not hot enough.
• The machine has been used for a longer
period of time without descaling.
Perform the descaling procedure as described
in chapter ‘Descaling’.
• The coffee temperature quickly decreases in
the cup.
• Do not use cups that are too large.
• Use thin-walled cups. Thin-walled cups absorb
less heat from the coffee than thick-walled cups.
• You can preheat the coffee machine and cup
by brewing a cup of hot water rst without
placing a coffee pod in the pod holder.
• The coffee speciality with fresh milk is not hot
enough.
• This is normal. A milk-based coffee recipe
is less hot than a cup of black coffee. Milk is
heated to a lower temperature to ensure
high-quality milk froth.
The touch panel with recipe buttons does not work.
• There may be water on the touch panel.
• Make sure your hands and the touch panel
are dry when you choose a coffee recipe.
• Make sure that the voltage indicated on the
coffeemaker corresponds to the local mains
voltage.
ENGLISH

20
1 Einführung
Herzlichen Glückwunsch zu Ihrem Kauf und
willkommen bei Philips! Um die Unterstützung
von Philips optimal nutzen zu können, registrieren
Sie Ihr Produkt bitte unter www.philips.com/
welcome.
1.1 SENSEO
®
Kaffeesystem
Mit SENSEO
®
erleben Sie einen sensationellen
Kaffeegenuss. Dieses einzigartige System
kombiniert die einfach zu bedienende Philips
SENSEO
®
Kaffeepadmaschine mit den speziell
von D.E Master Blenders SENSEO
®
entwickelten
Kaffeepads: Das Ergebnis ist eine perfekte Tasse
Kaffee mit einem weichen, vollen Aroma und einer
köstlichen Crema.
Kaffee von D.E Master Blenders in praktischen
SENSEO
®
Kaffeepads und das einzigartige
SENSEO
®
Brühsystem von Philips sind perfekt
aufeinander abgestimmt, sodass sich das volle
Aroma des Kaffees entfalten kann. Unter
www.senseo.com nden Sie alle SENSEO
®
Kaffeesorten.
Beachten Sie folgende Tipps, um stets den vollen
und aromatischen Kaffeegeschmack zu erhalten:
Frische Kaffeepads
Verwenden Sie die speziell von D.E Master
Blenders für Ihre SENSEO
®
Kaffeepadmaschine
entwickelten SENSEO
®
Kaffeepads für ein
weiches, volles Aroma. Die D.E Master Blenders
SENSEO
®
Kaffeepads bleiben länger frisch, wenn
Sie sie in einem luftdichten Behälter aufbewahren.
Frisches Wasser
Verwenden Sie täglich frisches Wasser. Wenn
die Kaffeepadmaschine einen Tag lang nicht in
Gebrauch war, lassen Sie vor dem nächsten
Aufbrühen frisches Wasser durchlaufen.
Inhaltsangabe
1 Einführung 20
1.1 SENSEO
®
Kaffeesystem 20
2 Allgemeine Beschreibung 21
3 Wichtig 21
3.1 Normerfüllung 22
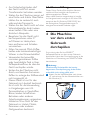
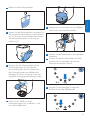
4 Die Maschine vor dem ersten
Gebrauch durchspülen 22
5 Schwarzen SENSEO
®
Kaffee
zubereiten 24
6 Eine Kaffeespezialität mit frischer
Milch zubereiten 26
7 Die Kaffeemenge einstellen 29
7.1 Die Kaffeemenge nach Ihrem
persönlichen Geschmack einstellen 29
8 Pege 30
8.1 Den Milchausgießer reinigen 30
8.2 Den Kaffeeauslauf und die Maschine
reinigen 32
9 Entkalken 33
9.1 Entkalkungsvorgang 34
10 Zubehör bestellen 36
11 Umwelt 36
12 Garantie und Support 36
13 Fehlerbehebung 36
13.1 SENSEO
®
Kaffeepadmaschine 36
DEUTSCH
La page est en cours de chargement...
La page est en cours de chargement...
La page est en cours de chargement...
La page est en cours de chargement...
La page est en cours de chargement...
La page est en cours de chargement...
La page est en cours de chargement...
La page est en cours de chargement...
La page est en cours de chargement...
La page est en cours de chargement...
La page est en cours de chargement...
La page est en cours de chargement...
La page est en cours de chargement...
La page est en cours de chargement...
La page est en cours de chargement...
La page est en cours de chargement...
La page est en cours de chargement...
La page est en cours de chargement...
La page est en cours de chargement...
La page est en cours de chargement...
La page est en cours de chargement...
La page est en cours de chargement...
La page est en cours de chargement...
La page est en cours de chargement...
La page est en cours de chargement...
La page est en cours de chargement...
La page est en cours de chargement...
La page est en cours de chargement...
La page est en cours de chargement...
La page est en cours de chargement...
La page est en cours de chargement...
La page est en cours de chargement...
La page est en cours de chargement...
La page est en cours de chargement...
La page est en cours de chargement...
La page est en cours de chargement...
La page est en cours de chargement...
La page est en cours de chargement...
La page est en cours de chargement...
La page est en cours de chargement...
La page est en cours de chargement...
La page est en cours de chargement...
La page est en cours de chargement...
La page est en cours de chargement...
La page est en cours de chargement...
La page est en cours de chargement...
La page est en cours de chargement...
La page est en cours de chargement...
La page est en cours de chargement...
La page est en cours de chargement...
La page est en cours de chargement...
La page est en cours de chargement...
La page est en cours de chargement...
La page est en cours de chargement...
La page est en cours de chargement...
La page est en cours de chargement...
-
 1
1
-
 2
2
-
 3
3
-
 4
4
-
 5
5
-
 6
6
-
 7
7
-
 8
8
-
 9
9
-
 10
10
-
 11
11
-
 12
12
-
 13
13
-
 14
14
-
 15
15
-
 16
16
-
 17
17
-
 18
18
-
 19
19
-
 20
20
-
 21
21
-
 22
22
-
 23
23
-
 24
24
-
 25
25
-
 26
26
-
 27
27
-
 28
28
-
 29
29
-
 30
30
-
 31
31
-
 32
32
-
 33
33
-
 34
34
-
 35
35
-
 36
36
-
 37
37
-
 38
38
-
 39
39
-
 40
40
-
 41
41
-
 42
42
-
 43
43
-
 44
44
-
 45
45
-
 46
46
-
 47
47
-
 48
48
-
 49
49
-
 50
50
-
 51
51
-
 52
52
-
 53
53
-
 54
54
-
 55
55
-
 56
56
-
 57
57
-
 58
58
-
 59
59
-
 60
60
-
 61
61
-
 62
62
-
 63
63
-
 64
64
-
 65
65
-
 66
66
-
 67
67
-
 68
68
-
 69
69
-
 70
70
-
 71
71
-
 72
72
-
 73
73
-
 74
74
-
 75
75
-
 76
76


Philips HD7857/20 Le manuel du propriétaire
- Catégorie
- Cafetières
- Taper
- Le manuel du propriétaire
- Ce manuel convient également à
dans d''autres langues
- English: Philips HD7857/20 Owner's manual
- Deutsch: Philips HD7857/20 Bedienungsanleitung
- Nederlands: Philips HD7857/20 de handleiding
Documents connexes
-
Philips HD7857/20 Manuel utilisateur
-
-
-
Philips HD7842 Senseo Manuel utilisateur
-
-
Senseo HD7853/60 Manuel utilisateur
-
Senseo HD7854 Manuel utilisateur
-
SENSEO® HD7854/80 Manuel utilisateur
-
SENSEO® HD6591/21 Manuel utilisateur
-