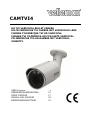
AVTech - Velleman CAMTVI4 Manuel utilisateur
- Catégorie
- Des caméras de sécurité
- Taper
- Manuel utilisateur

CAMTVI4
HD TVI VARIFOCAL BULLET CAMERA
HD CILINDRISCHE TVI CAMERA MET VARIFOCALE LENS
CAMÉRA CYLINDRIQUE TVI HD VARIFOCAL
CÁMARA TVI CILÍNDRICA HD CON LENTE VARIFOCAL
ZYLINDRISCHE TVI-HD-KAMERA MIT VARIFOKAL-
OBJEKTIV
USER MANUAL 3
GEBRUIKERSHANDLEIDING 10
MODE D'EMPLOI 17
MANUAL DEL USUARIO 24
BEDIENUNGSANLEITUNG 31

CAMTVI4
V. 01 – 12/02/2015 2 ©Velleman nv

CAMTVI4
V. 01 – 12/02/2015 3 ©Velleman nv
USER MANUAL
1. Introduction
To all residents of the European Union
Important environmental information about this product
This symbol on the device or the package indicates that disposal of
the device after its lifecycle could harm the environment. Do not
dispose of the unit (or batteries) as unsorted municipal waste; it
should be taken to a specialized company for recycling. This device
should be returned to your distributor or to a local recycling
service. Respect the local environmental rules.
If in doubt, contact your local waste disposal authorities.
Thank you for choosing Velleman! Please read the manual thoroughly before
bringing this device into service. If the device was damaged in transit, do
not install or use it and contact your dealer.
2. Safety Instructions
Keep this device away from children and unauthorized users.
This appliance is not intended for use by persons (including
children) with reduced physical, sensory or mental capabilities, or
lack of experience and knowledge, unless they have been given
supervision or instruction concerning use of the appliance by a
person responsible for their safety.
Children shall be supervised to ensure that they do not play with
the appliance.
Risk of electroshock when opening the cover. Touching live wires
can cause life-threatening electroshocks. Do not disassemble or open
the housing yourself. Have the device repaired by qualified
personnel.
Do not disassemble or open the cover. There are no user-serviceable
parts inside the device. Refer to an authorized dealer for service
and/or spare parts.
3. General Guidelines
Refer to the Velleman® Service and Quality Warranty on the last pages
of this manual.
Keep this device away from dust and extreme temperatures.

CAMTVI4
V. 01 – 12/02/2015 4 ©Velleman nv
Protect this device from shocks and abuse. Avoid brute force
when operating the device.
Familiarise yourself with the functions of the device before actually
using it.
All modifications of the device are forbidden for safety reasons. Damage
caused by user modifications to the device is not covered by the
warranty.
Only use the device for its intended purpose. Using the device in an
unauthorised way will void the warranty.
Damage caused by disregard of certain guidelines in this manual is not
covered by the warranty and the dealer will not accept responsibility for
any ensuing defects or problems.
Due to constant product improvements, the actual product appearance
might differ from the shown images.
Product images are for illustrative purposes only.
Do not use this product to violate privacy laws or perform other illegal
activities.
Do not switch the device on immediately after it has been exposed to
changes in temperature. Protect the device against damage by leaving
it switched off until it has reached room temperature.
Keep this manual for future reference.
4. Features
This HDCCTV or TVI (High Definition Transport Video Interface) camera is
equipped with a CMOS image sensor. The video image quality is 1080P.
The viewing angle is easy to modify via the motorized varifocal lens. The
WDR (Wide Dynamic Range) function allows optimizing an image with
extreme backlight. An IR-cut filter will filter the IR light, so it cannot
distort the colour image. When it gets dark, the camera automatically
switches to night mode. In night mode, the camera enables the IR LEDs and
disables the IR-cut filter. The Solid Light function gives a better over-
exposure prevention (Advanced Smart Light Control).
weatherproof
with B/W night vision (IR LEDs)
1080P video signal
vandal-proof bracket
Solid Light: over-exposure prevention via Advanced Smart Light Control
special functions via On-Screen Display (OSD) set-up menu:
o WDR
o privacy zone
o white balance
o mirror and flip function
o day/night mode

CAMTVI4
V. 01 – 12/02/2015 5 ©Velleman nv
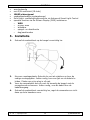
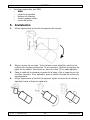
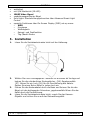
5. Installation
1. Slightly loosen the hex screw on the bracket.
2. Choose your mounting spot. Take the base as a template and drill the
necessary mounting holes. If necessary, drill a hole for routing the
cables. Insert a nylon plug in each hole.
3. Pass the camera cable through the base and fix the bracket using the
included screws. If applicable, pass the cable through the routing hole.
4. Slightly loosen the hex screw, adjust the camera lens and aim it
toward the surveillance area.
5. Tighten the hex screws. Connect and power your camera (see below).
Check the viewing angle on your PC.
6. Connection
1. Connect the power terminal of the camera to a 12 VDC regulated
power supply.
2. Connect the video output of the camera to the video input of your DVR
using a 75 Ω coaxial cable.

CAMTVI4
V. 01 – 12/02/2015 6 ©Velleman nv
Remarks:
Only use a regulated 12 VDC power adapter. Using any other type will
damage this camera.
Protect the connectors against moisture by applying some insulating
tape over the connectors.
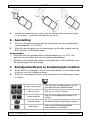
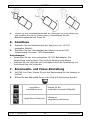
7. Focal Length and Focal Adjustment
1. On the DVR live view, click the camera’s channel to display it in full
screen.
2. Open the control panel by clicking the camera icon.
zoom in/out max.
click to display the image at its
largest/smallest
zoom in/out
click to zoom in/out
focus near/far
click to adjust the focal distance
manual focus
save your personal settings
auto focus
click to adjust automatically the
focal distance
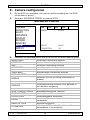
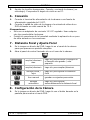
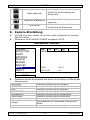
8. Camera Configuration
1. On the DVR live view, right-click in the screen to display the DVR
menu.

CAMTVI4
V. 01 – 12/02/2015 7 ©Velleman nv
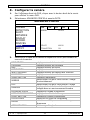
2. Select ADVANCED CONFIG and then DCCS.
ADVANCED CONFIG
CAMERA
CH1
CH2
CH3
CH4
DETECTION
MENU
SETUP
ALERT
NETWORK
DISPLAY
RECORD
DEVICES
DCCS
DEVICE
XXXXX
NOTIFY
CONNECTION
OK
EXIT
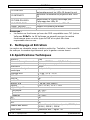
3. Select the camera’s channel and click SETUP to enter the camera’s menu.
BRIGHTNESS
manual brightness adjustment
CONTRAST
manual contrast adjustment
HUE
manual hue adjustment
SATURATION
manual saturation adjustment
WHITE BALANCE
manual colour balance adjustment
SHARPNESS
manual sharpness adjustment
SLOW SHUTTER
shutter adjustment
MIRROR
select ON to rotate image horizontally
FLIP
select ON to flip image
DENOISE
noise reduction adjustment for images in
dark environment
EXPOSURE VALUE
exposure level adjustment
WIDE DYNAMIC RANGE
image detail adjustment
FIXED SHUTTER
shutter speed adjustment
FOCUS MODE
focal mode selection
DEFOG
select ON to improve image with foggy
conditions
ANGLE OF VIEW
viewing angle calibration
IR CONTROL
select AUTO to switch on the IR LEDs at
night automatically
IR INTENSITY
enhance projecting distance of the IR LEDs
IR TURN ON LEVEL
light level selection for IR LEDs to switch on
IR EXTEND TIME
set switch-on delay for IR LEDs
RESET DEFAULT
reset to default values
REBOOT THE SYSTEM
reboot the camera

CAMTVI4
V. 01 – 12/02/2015 8 ©Velleman nv
Remark:
This camera will only work with TVI-compatible DVRs (Velleman
DVRxTx series). Velleman nv does not guarantee this camera will work
with other types of DVRs and can therefore not be held responsible in
this event.
9. Cleaning and Maintenance
The camera does not need any particular maintenance. However, it is
advisable to clean it occasionally to keep it looking like new.
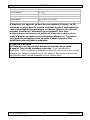
10. Technical Specifications
IP rating
IP66
pick-up element
1/2.8" SONY CMOS image sensor
number of pixels
1936 (H) x 1096 (V)
resolution
1080P
digital signal processor
Techpoint chip
min. illumination
0.1 lux / F1.4 - F2.8
IR LEDs
2x high-power LEDs
IR-cut filter
yes
max. IR projection distance
30 m
S/N ratio
> 48 dB (AGC off)
lens
f2.8 ~ 12 m / F1.4 ~ F2.8
lens angle
horizontal
36°-104°
vertical
20°-56°
diagonal
40°-126°
BLC
yes
WDR
yes
AGC
yes
white balance
automatic / user / push / 8000K / 6000K /
4200K / 3200K
video output
BNC connection - TVI signal
audio
no
power supply
12 VDC
current consumption
max. 500 mA
operating temperature
-20° C to 40° C - RH max. 95 %

CAMTVI4
V. 01 – 12/02/2015 9 ©Velleman nv
dimensions
245 x 86 x 87.6 mm
weight
970 g
Use this device with original accessories only. Velleman nv cannot
be held responsible in the event of damage or injury resulting from
(incorrect) use of this device. For more info concerning this product
and the latest version of this manual, please visit our website
www.velleman.eu. The information in this manual is subject to
change without prior notice.
© COPYRIGHT NOTICE
The copyright to this manual is owned by Velleman nv. All
worldwide rights reserved. No part of this manual may be copied,
reproduced, translated or reduced to any electronic medium or otherwise
without the prior written consent of the copyright holder.

CAMTVI4
V. 01 – 12/02/2015 10 ©Velleman nv
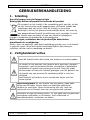
GEBRUIKERSHANDLEIDING
1. Inleiding
Aan alle burgers van de Europese Unie
Belangrijke milieu-informatie betreffende dit product
Dit symbool op het toestel of de verpakking geeft aan dat, als het
na zijn levenscyclus wordt weggeworpen, dit toestel schade kan
toebrengen aan het milieu. Gooi dit toestel (en eventuele
batterijen) niet bij het gewone huishoudelijke afval; het moet bij
een gespecialiseerd bedrijf terechtkomen voor recyclage. U moet
dit toestel naar uw dealer of naar een lokaal recyclagepunt
brengen. Respecteer de plaatselijke milieuwetgeving.
Hebt u vragen, contacteer dan de plaatselijke autoriteiten
betreffende de verwijdering.
Dank u voor uw aankoop! Lees deze handleiding grondig voor u het toestel
in gebruik neemt. Werd het toestel beschadigd tijdens het transport,
installeer het dan niet en raadpleeg uw dealer.
2. Veiligheidsinstructies
Houd dit toestel buiten het bereik van kinderen en onbevoegden.
Dit toestel is niet geschikt voor gebruik door personen (kinderen
inbegrepen) met verminderde fysieke, zintuiglijke of geestelijke
capaciteiten of gebrek aan ervaring en kennis, tenzij zij onder
toezicht staan of instructie hebben gekregen over het gebruik van
het toestel van een persoon die verantwoordelijk is voor hun
veiligheid.
Houd toezicht op kinderen om te voorkomen dat ze met het
toestel spelen.
Elektrocutiegevaar bij het openen van het toestel. Raak geen
kabels aan die onder stroom staan om dodelijke elektrische
schokken te vermijden. Open de behuizing niet zelf. Laat het
onderhoud van het toestel over aan een geschoolde vakman.
Demonteer of open dit toestel NOOIT. Er zijn geen door de gebruiker
vervangbare onderdelen in dit toestel. Voor onderhoud of
reserveonderdelen, contacteer uw dealer.

CAMTVI4
V. 01 – 12/02/2015 11 ©Velleman nv
3. Algemene richtlijnen
Raadpleeg de Velleman® service- en kwaliteitsgarantie achteraan deze
handleiding.
Bescherm het toestel tegen stof en extreme temperaturen.
Bescherm het toestel tegen schokken.
Vermijd brute kracht tijdens de bediening van het toestel.
Leer eerst de functies van het toestel kennen voor u het gaat
gebruiken.
Om veiligheidsredenen mag u geen wijzigingen aanbrengen. Schade
door wijzigingen die de gebruiker heeft aangebracht valt niet onder de
garantie.
Gebruik het toestel enkel waarvoor het gemaakt is. De garantie vervalt
automatisch bij ongeoorloofd gebruik.
De garantie geldt niet voor schade door het negeren van bepaalde
richtlijnen in deze handleiding en uw dealer zal de verantwoordelijkheid
afwijzen voor defecten of problemen die hier rechtstreeks verband mee
houden.
We streven voortdurend naar verbetering van onze producten. Daarom
kan dit product uiterlijk verschillen van de afbeeldingen.
De afbeeldingen van het product zijn enkel ter illustratie.
Installeer en gebruik dit toestel NIET voor illegale praktijken en
respecteer ieders privacy.
Het is beter om het toestel niet onmiddellijk in te schakelen nadat het
werd blootgesteld aan temperatuurschommelingen. Om beschadiging te
vermijden, moet u wachten tot het toestel de kamertemperatuur heeft
bereikt.
Bewaar deze handleiding voor verdere raadpleging.
4. Eigenschappen
Deze HDCCTV of TVI (High Definition Transport Video Interface) camera is
voorzien van een CMOS-beeldsensor en heeft een videokwaliteit van
1080P. De kijkhoek kan gemakkelijk aangepast worden via de
gemotoriseerde varifocale lens. Met de WDR (Wide Dynamic Range)
functie kunnen beelden met veel achtergrondverlichting geoptimaliseerd
worden. De IR-filter filtert het infraroodlicht zodat er geen vervorming van
de kleuren ontstaat. Wanneer het donker wordt, schakelt de camera
automatisch over op nachtzicht. In nachtmodus worden de IR-leds
geactiveerd en de IR-filter uitgeschakeld. De Solid Light-functie zorgt voor
een verbeterde overbelichtingspreventie (Advanced Smart Light
Control).

CAMTVI4
V. 01 – 12/02/2015 12 ©Velleman nv
weerbestendig
met Z/W nachtzicht (IR-leds)
1080P-videosignaal
vandaalbestendige montagebeugel
Solid Light: overbelichtingspreventie via Advanced Smart Light Control
speciale functies via On-Screen Display (OSD) instelmenu:
o WDR
o privacy zone
o witbalans
o spiegel- en draaifunctie
o dag/nachtmodus
5. Installatie
1. Schroef de zeskantbout op de beugel voorzichtig los.
2. Kies een montageplaats. Gebruik de voet als sjabloon en boor de
nodige montagegaten. Indien nodig, boor een gat om de kabels te
leiden. Plaats een nylon plug in elk gat.
3. Voer de camerakabel door de voet en bevestig de beugel met de
meegeleverde schroeven. Indien nodig, voer de kabel door de
kabeldoorgang.
4. Schroef de zeskantbout voorzichtig los, regel de cameralens en richt
deze op de te bewaken zone.

CAMTVI4
V. 01 – 12/02/2015 13 ©Velleman nv
5. Schroef de zeskantbouten vast. Sluit uw camera aan en schakel deze
in (zie onder). Controleer de kijkhoek op uw pc.
6. Aansluiting
1. Sluit de voedingsaansluiting van de camera aan op een gereguleerde
voedingsadapter van 12 VDC.
2. Sluit de video-uitgang van de camera aan op de video-ingang van uw
DVR met een 75 Ωcoaxiale kabel.
Opmerkingen:
Gebruik enkel een gereguleerde voedingsadapter van 12 VDC. Het
gebruik van een ander type kan de camera beschadigen.
Bescherm de aansluitingen tegen vochtigheid door wat isolatietape over
de aansluitingen aan te brengen.
7. Brandpuntsafstand en beeldscherpte instellen
1. Op de DVR live-weergave, klik op het camerakanaal om het beeld weer
te geven over het volledige scherm.
2. Open het controlepaneel door op de camera en de beeldpictogrammen
te klikken.
zoom in/out max.
klik voor een beeldweergave in het
grootste/kleinste beeldformaat
zoom in/out
klik om in-/uit te zoomen
focus near/far
klik om de brandpuntsafstand in te
stellen
manual focus
uw persoonlijke instellingen opslaan
auto focus
klik om de brandpuntsafstand
automatisch in te stellen.

CAMTVI4
V. 01 – 12/02/2015 14 ©Velleman nv
8. Camera configureren
1. Op de DVR live-weergave, klik met de rechtermuisknop om het DVR-
menu weer te geven.
2. Selecteer ADVANCED CONFIG en daarna DCCS.
ADVANCED CONFIG
CAMERA
CH1
CH2
CH3
CH4
DETECTION
MENU
SETUP
ALERT
NETWORK
DISPLAY
RECORD
DEVICES
DCCS
DEVICE
XXXXX
NOTIFY
CONNECTION
OK
EXIT
3. Selecteer het camerakanaal en klik op SETUP om het menu weer te geven.
BRIGHTNESS
helderheid handmatig instellen
CONTRAST
contrast handmatig instellen
HUE
kleurtoon handmatig instellen
SATURATION
verzadiging handmatig instellen
WHITE BALANCE
kleurbalans handmatig instellen
SHARPNESS
beeldscherpte handmatig instellen
SLOW SHUTTER
sluiter instellen
MIRROR
selecteer ON om het beeld horizontaal te
draaien
FLIP
selecteer FLIP om het beeld te spiegelen
DENOISE
ruisonderdrukking instellen voor beelden in
een donkere omgeving
EXPOSURE VALUE
belichtingsniveau instellen
WIDE DYNAMIC RANGE
beeldnauwkeurigheid instellen
FIXED SHUTTER
sluitertijd instellen
FOCUS MODE
scherpstelmodus selecteren
DEFOG
selecteer ON om onscherpe beelden te
verbeteren
ANGLE OF VIEW
kijkhoek kalibreren
IR CONTROL
selecteer AUTO om de IR-leds 's nachts
automatisch in te schakelen

CAMTVI4
V. 01 – 12/02/2015 15 ©Velleman nv
IR INTENSITY
IR-projectie-afstand verbeteren
IR TURN ON LEVEL
verlichtingsniveau selecteren voor het
inschakelen van IR-leds
IR EXTEND TIME
inschakelvertraging voor IR-leds instellen
RESET DEFAULT
de standaardwaarden terugzetten
REBOOT THE SYSTEM
de camera herstarten
Opmerking:
Deze camera werkt enkel met TVI-compatibele DVR's (Velleman
DVRxTx reeksen). Velleman nv biedt geen absolute zekerheid dat deze
camera functioneert met een ander type DVR en kan hierdoor niet
aansprakelijk worden gesteld in dit geval.
9. Reiniging en Onderhoud
De camera vereist geen bijzonder onderhoud. Het is echter aan te raden om
de camera regelmatig te reinigen om ze er als nieuw te laten uitzien.
10. Technische specificaties
IP-norm
IP66
opneemelement
1/2,8" Sony Exmor CMOS-kleurencamera
aantal pixels
1936 (H) x 1096 (V)
resolutie
1080P
digitale signaalprocessor
Techpoint chip
min. verlichting
0.1 lux / F1.4 - F2.8
IR-leds
2x hoogvermogenleds
IR-sperfilter
ja
max. IR-bereik
30 m
S/R-verhouding
> 48 dB (AGC uit)
lens
f2.8 ~ 12 m / F1.4 ~ F2.8
lenshoek
horizontaal
36°-104°
verticaal
20°-56°
diagonaal
40°-126°
BLC
ja
WDR
ja
AGC
ja
witbalans
automatisch / gebruiker / push / 8000K /
6000K / 4200K
video-uitgang
BNC-aansluiting - TVI-signaal
geluid
nee
voeding
12 VDC
stroomverbruik
max. 500 mA

CAMTVI4
V. 01 – 12/02/2015 16 ©Velleman nv
werktemperatuur
-20° C tot 40° C - RH max. 95 %
afmetingen
245 x 86 x 87.6 mm
gewicht
970 g
Gebruik dit toestel enkel met originele accessoires. Velleman nv is
niet aansprakelijk voor schade of kwetsuren bij (verkeerd) gebruik
van dit toestel. Voor meer informatie over dit product en de laatste
versie van deze handleiding, zie www.velleman.eu. De informatie in
deze handleiding kan te allen tijde worden gewijzigd zonder
voorafgaande kennisgeving.
© AUTEURSRECHT
Velleman nv heeft het auteursrecht voor deze handleiding. Alle
wereldwijde rechten voorbehouden. Het is niet toegestaan om deze
handleiding of gedeelten ervan over te nemen, te kopiëren, te vertalen, te
bewerken en op te slaan op een elektronisch medium zonder voorafgaande
schriftelijke toestemming van de rechthebbende.

CAMTVI4
V. 01 – 12/02/2015 17 ©Velleman nv
MODE D'EMPLOI
1. Introduction
Aux résidents de l'Union européenne
Informations environnementales importantes concernant ce produit
Ce symbole sur l'appareil ou l'emballage indique que l’élimination
d’un appareil en fin de vie peut polluer l'environnement. Ne pas
jeter un appareil électrique ou électronique (et des piles
éventuelles) parmi les déchets municipaux non sujets au tri
sélectif ; une déchetterie traitera l’appareil en question. Renvoyer
l'appareil à votre fournisseur ou à un service de recyclage local. Il
convient de respecter la réglementation locale relative à la protection de
l’environnement.
En cas de questions, contacter les autorités locales pour élimination.
Nous vous remercions de votre achat! Lire attentivement le présent mode
d'emploi avant la mise en service de l’appareil. Si l’appareil a été
endommagé pendant le transport, ne pas l’installer et consulter votre
revendeur.
2. Consignes de sécurité
Garder le dispositif hors de la portée des enfants et des personnes
non autorisées.
Cet appareil ne convient pas aux personnes (y compris enfants)
qui possèdent des capacités physiques, sensorielles ou mentales
réduites, ou manquent d’expérience et de connaissances, sauf si
elles ont reçu une supervision ou des instructions concernant
l’utilisation de l’appareil de la part d’une personne responsable de
leur sécurité.
Surveiller les enfants pour s’assurer qu’ils ne jouent pas avec
l’appareil.
Risque d’électrocution lors de l’ouverture du boîtier. Toucher un
câble sous tension peut causer des électrochocs mortels. Ne jamais
démonter ou ouvrir le boîtier soi-même. Confier la réparation de
l'appareil à du personnel qualifié.
NE JAMAIS désassembler ou ouvrir le boîtier. Il n’y a aucune pièce
réparable par l’utilisateur. Commander des pièces de rechange
éventuelles chez votre revendeur.

CAMTVI4
V. 01 – 12/02/2015 18 ©Velleman nv
3. Directives générales
Se référer à la garantie de service et de qualité Velleman® en fin de ce
mode d'emploi.
Protéger contre la poussière et les températures extrêmes.
Protéger l’appareil des chocs et de l'abus.
Traiter l'appareil avec circonspection pendant l’opération.
Se familiariser avec le fonctionnement de l'appareil avant de l'utiliser.
Toute modification est interdite pour des raisons de sécurité. Les
dommages occasionnés par des modifications par le client ne tombent
pas sous la garantie.
N’utiliser l'appareil qu’à sa fonction prévue. Un usage impropre annule
d'office la garantie.
La garantie ne s’applique pas aux dommages survenus en négligeant
certaines directives de cette notice et votre revendeur déclinera toute
responsabilité pour les problèmes et les défauts qui en résultent.
Dans le souci d'une amélioration constante de nos produits, l'apparence
du produit peut différer légèrement des images affichées.
Les images des produits sont à titre indicatif seulement.
Installer et utiliser l'appareil en respectant la législation et la vie privée
des tiers.
Ne pas brancher immédiatement l’appareil après exposition à des
variations de température. Afin d’éviter des dommages, attendre
jusqu’à ce que l’appareil ait atteint la température ambiante.
Garder ce mode d'emploi pour toute référence ultérieure.
4. Caractéristiques
Cette caméra HDCCTV ou TVI (High Definition Transport Video Interface)
dispose d'un capteur d'image CMOS et d'une qualité vidéo de 1080P.
L'angle de vue est facile à modifier via l'objectif varifocal motorisé. La
fonction WDR (Wide Dynamic Range) permet d'optimaliser des images
extrêmement rétroéclairées. Le filtre IR élimine les rayons IR afin d'éviter
la distorsion des images de couleur. Quand il fait sombre, la caméra passe
automatiquement en mode nuit. En mode nuit, la caméra allume les LEDs IR
et désactive le filtre IR. La fonction Solid Light offre une prévention de
surexposition supérieure (Advanced Smart Light Control).
résistante aux intempéries
avec vision nocturne N/B (LEDs IR)
signal vidéo de 1080P
support de caméra antivandalisme

CAMTVI4
V. 01 – 12/02/2015 19 ©Velleman nv
fonction Solid Light : prévention de surexposition supérieure via
Advanced Smart Light Control
fonctions spéciales depuis menu à l'écran (OSD) :
o WDR
o zone privée
o balance des blancs
o fonction miroir et tourner
o mode jour/nuit
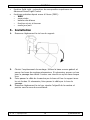
5. Installation
1. Desserrer légèrement la vis hex du support.
2. Choisir l'emplacement de montage. Utiliser la base comme gabarit et
percer les trous de montage nécessaires. Si nécessaire, percer un trou
pour le passage des câbles. Insérer une cheville en nylon dans chaque
trou.
3. Faire passer le câble de la caméra par la base et fixer le support avec
les vis livrées. Si nécessaire, faire passer le câble par le trou de
passage.
4. Desserrer légèrement la vis hex, ajuster l'objectif de la caméra et
pointer vers la zone de surveillance.

CAMTVI4
V. 01 – 12/02/2015 20 ©Velleman nv
5. Serrer les vis hex. Connecter et allumer la caméra (voir ci-dessous).
Vérifier l'angle de vue sur votre PC.
6. Connexion
1. Connecter la borne d'alimentation de la caméra à une alimentation
régulée de 12 VCC.
2. Connecter la sortie vidéo de la caméra à l'entrée vidéo de votre DVR
avec un câble coaxial de 75 Ω.
Remarques :
Utiliser uniquement un adaptateur réseau régulé de 12 VCC. L'usage
d'un autre type peut endommager la caméra.
Protéger les connecteurs contre l'humidité en appliquant du ruban
adhésif isolant sur les connecteurs.
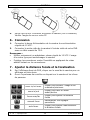
7. Ajuster la distance focale et la focalisation
1. Sur l'affichage direct du DVR, cliquer sur le canal de la caméra pour un
affichage en plein écran.
2. Ouvrir le panneau de contrôle en cliquant sur la caméra et les icônes
de panneau.
zoom in/out max.
cliquer pour afficher l'image à son
maximum/minimum
zoom in/out
cliquer pour faire un zoom
avant/arrière
focus near/far
cliquer pour ajuster la distance
focale
manual focus
sauvegarder vos réglages
personnels
auto focus
cliquer pour ajuster manuellement
la distance focale
La page charge ...
La page charge ...
La page charge ...
La page charge ...
La page charge ...
La page charge ...
La page charge ...
La page charge ...
La page charge ...
La page charge ...
La page charge ...
La page charge ...
La page charge ...
La page charge ...
La page charge ...
La page charge ...
La page charge ...
La page charge ...
La page charge ...
La page charge ...
-
 1
1
-
 2
2
-
 3
3
-
 4
4
-
 5
5
-
 6
6
-
 7
7
-
 8
8
-
 9
9
-
 10
10
-
 11
11
-
 12
12
-
 13
13
-
 14
14
-
 15
15
-
 16
16
-
 17
17
-
 18
18
-
 19
19
-
 20
20
-
 21
21
-
 22
22
-
 23
23
-
 24
24
-
 25
25
-
 26
26
-
 27
27
-
 28
28
-
 29
29
-
 30
30
-
 31
31
-
 32
32
-
 33
33
-
 34
34
-
 35
35
-
 36
36
-
 37
37
-
 38
38
-
 39
39
-
 40
40


AVTech - Velleman CAMTVI4 Manuel utilisateur
- Catégorie
- Des caméras de sécurité
- Taper
- Manuel utilisateur
dans d''autres langues
- español: AVTech - Velleman CAMTVI4 Manual de usuario
- Deutsch: AVTech - Velleman CAMTVI4 Benutzerhandbuch
- Nederlands: AVTech - Velleman CAMTVI4 Handleiding
Documents connexes
Autres documents
-
Teleco RETROCAMERA TRCL CMOS Manuel utilisateur
-
Velleman CCTVPROM14 Guide d'installation
-
-
CAME XTTVI20MV Guide d'installation
-
Outspot Elegante Manuel utilisateur
-
ZOSI 1AC-2612C-W-N Manuel utilisateur
-
-
Velleman CAMCOLD11 Manuel utilisateur
-
-