Dynascan DS552LT5-1 Manuel utilisateur
- Catégorie
- Téléviseurs
- Taper
- Manuel utilisateur

55” Clean Back Digital Signage
64426 | V2.00

0
Contents
Material Contents Declaration ................................................................................................................ 1
Recycling and Energy Information ......................................................................................................... 1
Declaration of Conformity ....................................................................................................................... 2
Déclaration de conformité....................................................................................................................... 3
Safety Precautions ................................................................................................................................. 4
Précautions relatives à la sécurité .......................................................................................................... 5
Important Safety Information .................................................................................................................. 6
Informations importantes relatives à la sécurité ..................................................................................... 7
Getting Started ....................................................................................................................................... 8
Contents ............................................................................................................................................. 8
Installing and Replacing Remote Control Batteries ............................................................................ 8
Bien débuter ........................................................................................................................................... 9
Contenu .............................................................................................................................................. 9
Mise en place et remplacement des piles de la télécommande......................................................... 9
Installation............................................................................................................................................. 10
Mounting ........................................................................................................................................... 10
Wall Mounting ................................................................................................................................... 13
Connecting to a Power Source ......................................................................................................... 13
Connecting an External Video Source ............................................................................................. 14
Input / Output Terminals ................................................................................................................... 15
Operating Instructions .......................................................................................................................... 16
Powering On/Off the Display ............................................................................................................ 16
Using the Remote Control ................................................................................................................ 17
Using the built-in keypad .................................................................................................................. 19
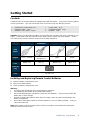
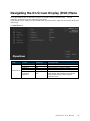
Navigating the On Screen Display (OSD) Menu .................................................................................. 20
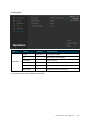
Specifications ....................................................................................................................................... 27
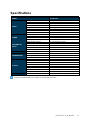
Input Mode ............................................................................................................................................ 28
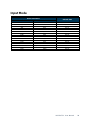
Pin Assignments ................................................................................................................................... 29
RS-232 Input .................................................................................................................................... 29
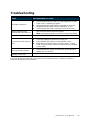
Troubleshooting .................................................................................................................................... 30
About DSM365 ..................................................................................................................................... 31

DS552LT5-1 User Manual 1
Material Contents Declaration
Part Name
Hazardous Substances
Lead
Mercury
Cadmium
Hexavalent
Chromium
Polybrominated
Biphenyls
Polybromodiphenyl
Ethers
Pb
Hg
Cd
Cr6+
PBB
PBDE
PCBA
O
O
O
O
O
O
CHASSIS
O
O
O
O
O
O
ACCESSORY
O
O
O
O
O
O
PACKAGE
O
O
O
O
O
O
“O” indicates that the level of the specified chemical substance is less than the threshold level
specified in the standards of SJ/T-11363-2006 and EU 2005/618/EC.
“” indicates that the level of the specified chemical substance exceeds the threshold level specified
in the standards of SJ/T-11363-2006 and EU 2005/618/EC.
Recycling and Energy Information
DynaScan is firmly committed to its environmental protection efforts and we believe that reducing our
products’ impact on the environment is of the utmost importance. We are dedicated to meet the
latest environmental protection regulations.
Energy usage
Mode
Energy Consumption
Normal
Max. 400 W
Standby
< 1 W
Disposal
Do not dispose of electrical appliances as unsorted municipal waste, use separate collection facilities.
Contact your local government for information regarding the collection systems available. If electrical
appliances are disposed of in landfills or dumps, hazardous substances can leak into the groundwater
and get into the food chain, damaging your health and well-being. When replacing old appliances
with new one, the retailer is legally obligated to take back your old appliances for disposal at least for
free of charge.

DS552LT5-1 User Manual 2
Declaration of Conformity
FCC
This device complies with Part 15 of the FCC Rules. Operation is subject to the following two
conditions: (1) this device may not cause harmful interference, and (2) this device must accept any
interference received, including interference that may cause undesired operation.
FEDERAL COMMUNICATIONS COMMISSION INTERFERENCE STATEMENT
This equipment has been tested and found to comply with the limits for a Class A digital device,
pursuant to part 15 of the FCC Rules. These limits are designed to provide reasonable protection
against harmful interference when the equipment is operated in a commercial environment. This
equipment generates, uses, and can radiate radio frequency energy and, if not installed and used in
accordance with the instruction manual, may cause harmful interference to radio communications.
Operation of this equipment in a residential area is likely to cause harmful interference in which case
the user will be required to correct the interference at his own expense.
CAUTION:
Any changes or modifications not expressly approved by the grantee of this device could void the
user's authority to operate the equipment.
RF exposure warning
This equipment must be installed and operated in accordance with provided instructions and the
antenna(s) used for this transmitter must be installed to provide a separation distance of at least 20 cm
from all persons and must not be co-located or operating in conjunction with any other antenna or
transmitter. End-users and installers must be provide with antenna installation instructions and
transmitter operating conditions for satisfying RF exposure compliance.
Manufacturer Name
DynaScan Technology Corp.
Manufacturer Address
6F, No. 88 Wenmao Rd., Guishan Dist, Taoyuan City 333001,Taiwan
This device complies with Directive 2014/53/EU issued by the Commission of the European
Community.
Article 3.1(a)
EN 62368-1
IEC 62368-1
Article 3.2
EN 300 328
EN 62311
Article 3.1
EN 55032
EN 61000-3-2
EN 61000-3-3
EN 55035
EN 301 489-1
EN 301 489-17
- Frequency bands and Powers
a. WIFI 2.4G-2412~2462MHz.
b. Maximum radio-frequency power transmitted in the 2.4GHz is 50mW.

DS552LT5-1 User Manual 3
Déclaration de conformité
FCC
Cet appareil est conforme à la section 15 de la réglementation FCC. Son utilisation est sujette aux
deux conditions suivantes : (1) cet appareil ne doit pas causer d'interférence nuisible, et (2) cet
appareil doit accepter toute interférence reçue, y compris celles qui peuvent causer un fonctionnement
non souhaité.
DÉCLARATION DE LA COMMISSION FÉDÉRALE DES COMMUNICATIONS
Cet équipement a été testé et déclaré conforme aux limites d'un appareil numérique de classe A,
conformément à la partie 15 des règles FCC. Ces limites sont conçues pour fournir une protection
raisonnable contre les interférences nuisibles lorsque l'équipement est utilisé dans un environnement
commercial. Ce l'équipement génère, utilise et peut émettre de l'énergie radiofréquence et, s'il n'est
pas installé et utilisé conformément au manuel d'instructions, peut provoquer des interférences
nuisibles aux communications radio.
Le fonctionnement de cet équipement dans une zone résidentielle est susceptible de provoquer des
interférences nuisibles, auquel cas l'utilisateur devra corriger les interférences à ses propres frais.
ATTENTION :
Tout changement ou modification, non expressément approuvé par le responsable de la conformité,
peut révoquer l’autorité de l'utilisateur à employer l'appareil en question.
Avertissement relatif aux expositions RF
Cet appareil doit être installé et utilisé en accord avec les instructions fournies et les antennes utilisées
pour cet émetteur doivent être installées de façon à fournir une distance de séparation d'au moins 20
cm par rapport à toute personne, et elles ne doivent pas être co-localisées ni opérées en conjonction
avec d'autres antennes ou émetteurs. Les utilisateurs finaux et les installateurs doivent recevoir les
instructions d'installation des antennes et les conditions d'utilisation de l'émetteur pour satisfaire à la
conformité aux expositions RF.
Nom du fabricant
DynaScan Technology Corp.
Adresse du fabricant
6F, No. 88 Wenmao Rd., Guishan Dist, Taoyuan City 333001,Taiwan
Cet appareil est conforme à la directive 2014/53/UE émise par la Commission de la Communauté
européenne.
L’rticle 3.1(a)
EN 62368-1
IEC 62368-1
L’rticle 3.2
EN 300 328
EN 62311
L’rticle 3.1
EN 55032
EN 61000-3-2
EN 61000-3-3
EN 55035
EN 301 489-1
EN 301 489-17
- Bandes de fréquences et puissances
a. WIFI 2,4G-2412~2462MHz.
b. La puissance radiofréquence maximale transmise dans la bande 2,4 GHz est de 50 mW

DS552LT5-1 User Manual 4
Safety Precautions
CAUTION
Do not install near flammable material or any heat sources.
Do not defeat the safety purpose of the grounding-type plug.
Do not disassemble the display to avoid electrical shock or burn.
Normal operating condition considers installation at an altitude below 2000m;
some abnormalities may be experienced when installed at an altitude above
2000m.
WARNING
Please power off the LCD and the video source before plugging in the DP or
HDMI cable.
Please installed the display in well-ventilated place, do not install in a confined
space.
Suitable for mounting on concrete or other non-combustible surface only.
If it gives off smoke, strange smell, or unusual noise, or when it gets too hot to
touch, immediately unplug the display and contact the dealer.
Clean only with soft, dry cloth but not use chemical liquids, and unplug while
cleaning.
Do not use extreme force or any sharp or pointed objects to touch the display.
Do not drop or allow any object to fall to the display.
Do not operate the display with wet hands to avoid electric shock.
Do not discard this product with general household waste. Please be sure to
comply with the local waste regulations.
This device uses, generates and radiated radio frequency energy. The radio
frequency energy produced by this device is well below the maximum exposure
allows by Federal Communications Commission (FCC).
When a stationary or fixed image is displayed on the screen for a long time, the
image may be permanently imprinted on the screen. This phenomenon is
known as image burn-in and is not covered by the manufacturer's warranty.
In order to avoid burn-in, avoid prolonged display of static or fixed images on the
screen.
Power supply cord must not be attached to the building surface, nor run through
walls, ceilings, floors and similar openings in the building structure.
Power cord shall be connected to a socket-outlet with earthing connection.

DS552LT5-1 User Manual 5
Précautions relatives à la sécurité
PRÉCAUTIONS
N'installez pas installer à proximité de matériaux inflammables ou de sources de
chaleur.
Ne pas compromettre la sécurité de la fiche de mise à la terre.
Pour éviter tout choc électrique ou la brûlure, ne démontez pas l'écran.
Le produit peut normalement être utilisé à une altitude inférieure à 2000 m. Des
anomalies peuvent survenir lors de l’installation de l’appareil à une altitude
supérieure à 2000 m.
AVERTISSEMENT
Veuillez éteindre l'écran LCD et la source vidéo avant de brancher le câble DP ou
HDMI.
Veuillez installer l'écran dans un endroit bien ventilé, pas dans un espace
confiné.
Convient pour le montage sur du béton ou autre surface non combustible
uniquement.
S'il dégage de la fumée, une odeur étrange ou un bruit inhabituel, ou s'il est trop
chaud au toucher, débranchez immédiatement l'écran et contactez le revendeur.
Nettoyez uniquement avec un chiffon doux et sec, sans utiliser de produits
chimiques, et débranchez-le pendant le nettoyage.
N'exercez pas une force excessive et n’utilisez pas d'objets tranchants ou pointus
pour toucher l'écran.
Ne laissez pas tomber l’écran et ne laissez aucun objet tomber dessus.
Afin d’éviter tout choc électrique, n'utilisez pas l'écran avec les mains mouillées.
Ne jetez pas ce produit avec les déchets ménagers. Assurez-vous de respecter
les réglementations locales en matière de déchets.
Cet appareil utilise, génère et rayonne de l’énergie radiofréquence. L'énergie de
radiofréquence produite par cet appareil est bien inférieure à l'exposition
maximale autorisée par la FCC (Federal Communications Commission).
Lorsqu'une image immobile ou fixe est affichée sur l'écran pendant une longue
période, l'image peut être imprimée de manière permanente sur l'écran. Ce
phénomène est connu sous le nom d'image rémanente et n'est pas couvert par la
garantie du fabricant.
Afin d'éviter toute détérioration, évitez l'affichage prolongé d'images statiques ou
fixes sur l'écran.
Le cordon d'alimentation ne doit pas être connecté à la surface du bâtiment, ni
traverser les murs, les plafonds, les planchers et les ouvertures similaires du
bâtiment.
Le cordon d'alimentation doit être connecté à une prise électrique mise à la terre

DS552LT5-1 User Manual 6
Important Safety Information
Disassembling the LCD is strictly prohibited. Opening the cover may expose the user to electric
shock or other hazards. Please contact DynaScan certified service professionals for all
maintenance requirements.
Do not allow any liquid to enter the LCD. Also avoid placing the LCD close to water sources.
Do not place heavy objects on the power cord. A damaged power cord might cause electric
shock or fire.
Do not bend, twist, or damage the power cord.
The power cord must comply with the local safety regulations.
Do not damage or modify the prongs/pins and the ground contact on the power cord plug.
Do not place the LCD on an unleveled surface or an unstable vehicle. The LCD could fall over
and cause substantial damage.
Do not cover the vents and/or the heat sink.
Do not install the LCD beside radiators or other heat sources. The installation site should have
sufficient ventilation so the heat generated by the LCD can be dissipated.
Do not use the Signage in a hot, humid, dusty, or fumy environment.
Handle the LCD with care. Save the packaging materials for transport later.
Clean the LCD backside at least once a month for dust and other particles.
Unplug the LCD immediately and contact a DynaScan certified service professional as soon as
possible when any of the following situations occurs:
Damaged power cord or power plug.
If liquid or foreign object has entered the LCD.
If the LCD has been exposed to rain or water.
If the LCD has been dropped or the casing has become damaged.
If any structural damage such as cracks or unnatural vibration is found.
If the LCD cannot be operated following the steps outlined in this manual.
If the LCD emits smoke or other odors, or generates strange noises.
Operating Suggestions
Avoid displaying a stationary image for a long period of time in order to prevent image sticking.
Cleaning the Panel
Use a soft, lint-free cloth to gently wipe the dust off from the screen panel.
Do not use any hard material to wipe the panel.
Do not poke the panel with your hand or any sharp object (such as a pen or a nail) or exert
excessive pressure on the panel to prevent any damage.
Do not use any cleaning solutions on the panel as it might cause discoloration.
Cleaning the Casing
Unplug the power cord.
Gently wipe the casing with a soft cloth.
Attention
Do not use any of the following solutions to clean the casing as they may damage the paint and
cause it to crack or peel: benzene solution, alkaline solution, alcohol-based cleaning solution,
glass cleaner, wax, polisher, or detergent.

DS552LT5-1 User Manual 7
Informations importantes relatives à la sécurité
Le démontage de l'écran LCD est strictement interdit. L'ouverture du capot peut exposer
l'utilisateur à un choc électrique ou à d'autres dangers. Veuillez contacter des professionnels de
service certifiés DynaScan pour tous les besoins de maintenance.
Ne laissez aucun liquide pénétrer dans l'écran LCD. Évitez également de placer l’écran LCD à
proximité de sources d’eau.
Ne placez aucun objet lourd sur le cordon d'alimentation. Un cordon d'alimentation endommagé
peut provoquer un choc électrique ou un incendie.
Ne pliez pas, ne tordez pas et n'endommagez pas le cordon d'alimentation.
Le cordon d'alimentation doit être conforme aux réglementations locales de sécurité.
Veillez à ne pas endommager ni modifier les broches ou le contact de terre sur la fiche du cordon
d'alimentation.
Ne placez pas l'écran LCD sur une surface qui n’est pas de niveau ou sur un véhicule instable.
L’écran LCD pourrait tomber et causer des dégâts importants.
Ne couvrez pas les orifices de ventilation et / ou le dissipateur de chaleur.
N'installez pas l'écran LCD à côté de radiateurs ou d'autres sources de chaleur. Le site
d'installation doit disposer d'une ventilation suffisante pour que la chaleur générée par l'écran
LCD puisse être dissipée.
N'utilisez pas l'affichage signalétique dans un environnement chaud, humide, poussiéreux ou
enfumé.
Manipulez l’écran LCD avec soin. Conservez les matériaux d'emballage pour tout transport
ultérieur.
Nettoyez l’arrière de l’écran LCD au moins une fois par mois afin d’éliminer la poussière et autres
particules.
Débranchez immédiatement l'écran LCD et contactez un réparateur professionnel certifié
DynaScan dès que possible lorsque l'une des situations suivantes se produit :
Cordon d'alimentation ou fiche d'alimentation endommagé.
Si du liquide ou un corps étranger est entré dans l'écran LCD.
Si l’écran LCD a été exposé à la pluie ou à l'eau.
Si l’écran LCD est tombé ou si le boîtier a été endommagé.
Si vous constatez des dommages structurels comme des fissures ou des vibrations non
naturelles.
Si l’écran LCD ne peut pas être utilisé en suivant les étapes décrites dans le présent manuel.
Si l'écran LCD émet de la fumée ou d'autres odeurs, ou génère des bruits étranges.
Suggestions d’utilisation
Évitez d'afficher une image immobile pendant une période prolongée afin d'éviter que la
rémanence d’image.
Nettoyage du panneau
Utilisez un chiffon doux non pelucheux pour essuyer délicatement la poussière du panneau de
l'écran.
N'utilisez aucun matériau dur pour essuyer le panneau.
Afin d’éviter tout dommage, n’appuyez pas sur le panneau avec votre main ou un objet pointu
(comme un stylo ou un ongle) et n'exercez pas de pression excessive sur le panneau.
N'utilisez aucune solution de nettoyage sur le panneau car cela pourrait provoquer une
décoloration.
«Danger de stabilité» ou libellé équivalent;
«Le moniteur peut tomber, entraînant des blessures graves ou mortelles» ou texte équivalent;
Le texte suivant ou équivalent:
Pour éviter les blessures, ce moniteur doit être solidement fixé au sol / mur conformément aux
instructions d'installation.

DS552LT5-1 User Manual 8
Getting Started
Contents
Confirm that the accessories below are shipped along with the display. If any item is missing, please
contact your dealer. The color and shape of the accessories may vary with the products.
DS552LT5-1 Professional LCD.
Remote Control x 1 pc.
Batteries (1.5V / AAA) x2 pcs.
Power cable x1 pc.
Quick Start Guide x1 pc.
ESK302 x1 pc.
Attention: Please use the following table to check whether the included power cord is suitable for your
region. If the power cord does not match your region, please contact your local supplier. Please
use matching AC socket in order to meet your local safety regulations.
Plug Type
North America
European
Continental
Japan
Taiwan
Plug
Shape
Region
U.S.A. / Canada
EU
(Except U.K.)
Japan
Taiwan
Voltage
120V
230V
100V
110V
NEMA
TYPE
NEMA 5-15
CEE 7/7
NEMA 1-15
NEMA 5-15
IEC Display
Plug
IEC Plug
TYPE
IEC320 C13
Installing and Replacing Remote Control Batteries
1. Open the battery compartment cover.
2. Insert 2 new AAA batteries.
3. Close the battery compartment cover.
Warning:
Incorrect usage of batteries may cause leakage or explosion.
Pay attention to the polarity when installing the batteries.
Do not mix different types of batteries or new and used batteries. Doing so may shorten the
battery life or cause leakage.
Remove or replace the batteries when they are empty in order to prevent acid leaking in the
battery compartment.
Do not touch the leaked substance from the batteries in case of a battery leakage. Doing so
may hurt human skin.
Note: If the remote control is not going to be used for a long time, we recommend removing the
batteries from the remote control.

DS552LT5-1 User Manual 9
Bien débuter
Contenu
Vérifiez que les accessoires ci-dessous sont fournis avec l’écran. Si l'un d'eux est manquant, veuillez
contacter immédiatement votre revendeur. La couleur et la forme des accessoires peuvent varier
selon les produits.
Écran LCD DS552LT5-1 Professional.
Télécommande x 1
Piles (1,5V / AAA) x 2
Câble d'alimentation x 1
Guide de démarrage rapide x 1
ESK302 x1 pc.
Attention : Veuillez utiliser le tableau suivant afin de vérifier que le cordon d’alimentation fourni est
adapté à votre région. Si le cordon d'alimentation ne correspond pas à votre région, veuillez
contacter votre fournisseur local. Veuillez utiliser la prise secteur correspondante afin de respecter
les réglementations locales de sécurité.
Type de
fiche
Amérique du
Nord
Europe
continentale
Japon
Taïwan
Forme de
la fiche
Région
États-Unis /
Canada
UE
(Hors R.-U.)
Japon
Taïwan
Tension
120V
230V
100V
110V
TYPE
NEMA
NEMA 5-15
CEE 7/7
NEMA 1-15
NEMA 5-15
Fiche
d’affichage
CEI
TYPE fiche
CEI
IEC320 C13
Mise en place et remplacement des piles de la télécommande
1. Ouvrez le couvercle du logement à piles.
2. Insérez 2 nouvelles piles AAA.
3. Fermez le couvercle du logement à piles.
Avertissement :
Une mauvaise utilisation des piles peut provoquer des fuites ou une explosion.
Faites attention à la polarité lors de l'installation des piles.
Ne mélangez pas différents types de piles ou des piles neuves et usagées. Cela pourrait
raccourcir la durée de vie des piles ou causer des fuites.
Retirez ou remplacez les piles lorsqu'elles sont vides afin d'éviter toute fuite d'acide dans le
logement à piles.
Ne touchez pas la substance qui s’écoule des piles en cas de fuite. Cela pourrait blesser la
peau.
Remarque : Si la télécommande ne doit pas être utilisée pendant une période prolongée, nous vous
recommandons d’en retirer les piles.

DS552LT5-1 User Manual 10
Installation
The LCD must be properly installed using a wall mount. Incorrect installation may cause injury or
damage the equipment. Product warranty does not cover the damage caused by improper
installation and DynaScan shall not be held responsible in such incident. Refer to the mount
manufacturer’s instructions for proper installation.
Mounting
We recommend for at least four people to handle and mount the display.
Mounting the Professional LCD on the wall is the responsibility of the user. Not all walls provide
enough strength to support the LCD. The LCD may drop and cause serious injury if it is
mounted on a slanted wall. Product warranty does not cover improper installation, modification,
or damage caused by natural disasters. DynaScan recommends having certified professionals
to evaluate the installation site and perform the mounting operation.
Do not to cover the vent and/or the heat sink in order to ensure proper heat dissipation.
Refer to the installation guide provided by the manufacturer for proper mounting.
When mounting on a wall
A wall mount is not included in the accessory. Please purchase a VESA Standard wall mount to
secure the LCD. DynaScan is not responsible for the damage caused by using non-standard
wall mounts.
Verify that the mounting location can support the weight of the LCD before installation.
The installation angle must be within 15 degrees of the vertical axis.
Do not install the wall mount while the power is turned on as it may cause serious injury due to
electrical shock.
Model Number
VESA (mm)
Screw
Specification
Screw Length
Number
DS552LT5-1
(A * B)
400 * 400
M6
Greater than 10mm
Smaller than 12mm
(not including wall
mount thickness)
4

DS552LT5-1 User Manual 11
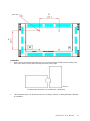
Orientation
When used in the portrait orientation, the LCD should be rotated clockwise when looking at the
front of the display such that the left edge becomes the top edge.
<Front>
Portrait mode: Rotate the set clockwise 90° (mandatory)
The orientation sticker can be found on the rear of display, which is for distinguishing the direction
of installation.
A
B
Unit: mm

DS552LT5-1 User Manual 12
Installation Location
The wall and mount must have enough strength to support the LCD and its accessories.
Do not install in a location with strong vibrations or dusty.
Do not install near the building’s main electric panel.
Ensure the LCD is secured in such a manner that it cannot be easily removed by the general
public.
Leave clearance around the outer edge of the LCD (or video wall matrix) from other objects to
ensure proper ventilation.
For installations with screens inset into the wall, refer to section: Enclosures for cooling and
ventilation considerations.
Single display
Maintenance
Inspect the fasteners regularly for signs of loosening or deformation. Please perform
appropriate corrective measures when a problem is identified. Neglecting the problem may
worsen the situation.
Increase the inspection frequency on areas where previous maintenance had occurred to ensure
the problems do not occur again.

DS552LT5-1 User Manual 13
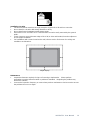
Wall Mounting
A wall mount is not included. Please purchase a VESA Standard wall mount to secure the LCD.
DynaScan is not responsible for damages caused by using non-standard wall mounts.
Verify that the mounting location can support the weight of the LCD before installation.
The installation angle must be within 15 degrees of the vertical axis.
Do not install the wall mount while the power is turned on as it may cause serious injury from
electrical shock.
Connecting to a Power Source
Using the power cable provided, plug it in the power inlet on the back of the display shown in the
diagram below. Connect the power cable to a 100-240 volt, 50 / 60Hz AC power outlet.
Insert the plug completely into the socket. A loose power connection may cause damage
to the display and/or lead to a fire hazard.
15∘

DS552LT5-1 User Manual 14
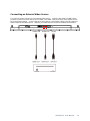
Connecting an External Video Source
Turn OFF the power of both LCD and external video device. Using the DP cable (or HDMI cable)
provided, insert one end into the DP-IN (or HDMI 1-IN, HDMI 2-IN) on the back of the display shown
the in the diagram below. Connect the other end of the DP cable (HDMI cable) to the DP output (or
HDMI output) of the video source. Refer to your video device’s manual for additional information.

DS552LT5-1 User Manual 15
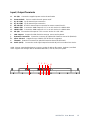
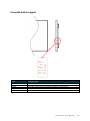
Input / Output Terminals
A. AC (IN): Connect the supplied power cord to the wall outlet.
B. Power Switch: Press to switch the main power on/off.
C. RJ-45 1 (IN): RJ45 network input connection.
D. RJ-45 2 (IN): RJ45 network input connection.
E. RS-232 (IN): RS232C network input connection for remote control from PC.
F. HDMI 1 (IN): Connect the HDMI output of a PC or an AV device via a HDMI cable.
G. HDMI 2 (IN): Connect the HDMI output of a PC or an AV device via a HDMI cable.
H. DP (IN): Connect the DP output of a PC or an AV device via a DP cable.
I. USB 3.0 port: Support for USB flash drive storage, mouse and keyboard.
J. Extension Connector: Extension Connector for optional IR Extension sensor kit (ESK302).
K. Micro SD card: Support for up to 128GB, FAT32 format is supported.
L. Thermal: Extension Connector for optional Extension thermal kit (ETK203).
M. Audio (OUT): Connect the audio signal output from Audio IN jack to an external AV device.
*USB 3.0 port: A standardized port to connect a variety of devices like mouse, keyboard, and flash
drive. Support USB storage devices formatted with NTFS, FAT32 (32G) file system.
A
B
C
D
G
E
J
I
M
H
L
K
F

DS552LT5-1 User Manual 16
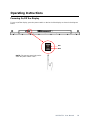
Operating Instructions
Powering On/Off the Display
To turn on/off the display, press the power switch on the back of the display as shown in the diagram
below.
NOTE: The remote control only works
when the power switch is ON.
OFF
ON

DS552LT5-1 User Manual 17
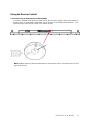
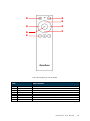
Using the Remote Control
Connection using an External Sensor Kit (ESK302)
Connect the ESK302 cable to the mini USB port on the side of the display, and aim the remote at
the IR receiver as shown below. Meanwhile, the IR receiver on the display will be disabled. The
operating range of the remote control is 2.5 meters (8 feet).
NOTE: Ambient light may affect the performance of the remote control. Avoid fluorescent or neon
lights in the vicinity.

DS552LT5-1 User Manual 18
*Color and shape may vary by model.
ITEM
DESCRIPTION
POWER
Power On / Off
MENU
OSD On / Off
UP
Move the cursor up or change the setting of selected item.
LEFT
Exit the current selection.
RIGHT
Select the highlighted item.
DOWN
Move the cursor down or change the setting of selected item.
OK
Enter (for DSM365 only)
BACK
Return to the last page. (for DSM365 only)
La page est en cours de chargement...
La page est en cours de chargement...
La page est en cours de chargement...
La page est en cours de chargement...
La page est en cours de chargement...
La page est en cours de chargement...
La page est en cours de chargement...
La page est en cours de chargement...
La page est en cours de chargement...
La page est en cours de chargement...
La page est en cours de chargement...
La page est en cours de chargement...
La page est en cours de chargement...
La page est en cours de chargement...
-
 1
1
-
 2
2
-
 3
3
-
 4
4
-
 5
5
-
 6
6
-
 7
7
-
 8
8
-
 9
9
-
 10
10
-
 11
11
-
 12
12
-
 13
13
-
 14
14
-
 15
15
-
 16
16
-
 17
17
-
 18
18
-
 19
19
-
 20
20
-
 21
21
-
 22
22
-
 23
23
-
 24
24
-
 25
25
-
 26
26
-
 27
27
-
 28
28
-
 29
29
-
 30
30
-
 31
31
-
 32
32
-
 33
33
-
 34
34


Dynascan DS552LT5-1 Manuel utilisateur
- Catégorie
- Téléviseurs
- Taper
- Manuel utilisateur
dans d''autres langues
- English: Dynascan DS552LT5-1 User manual
Documents connexes
Autres documents
-
NEC E461 Manuel utilisateur
-
NEC E421 Manuel utilisateur
-
Haier HL32D1 Le manuel du propriétaire
-
Asus - Google Meet hardware kit Manuel utilisateur
-
Insignia NS-LCD26-09 Manuel utilisateur
-
NEC M40B-AV Manuel utilisateur
-
NEC M40 Le manuel du propriétaire
-
NEC SC40 Manuel utilisateur
-
-
LG 55LD650 Le manuel du propriétaire