Joie i-Spin Grow Signature Enhanced Child Restraint Manuel utilisateur
- Catégorie
- Sièges de voiture
- Taper
- Manuel utilisateur

i-Spin Grow
enhanced child restraint
ECE R129/03: i-Size
ECE R129/03
Rearward Facing:
Child height 40cm-105cm/ Child weight 18.5kg;
Booster:
Child height 100cm-125cm/ Child weight 25kg;
GB Instruction Manual
PT Manual de instruções
ES Manual de instrucciones
FR Manuel d'instructions
NL Instructiehandleiding
IT Manuale di istruzioni
enhanced child restraint
i-Spin™ Grow signature
ECE R129/03: i-Size
Rearward Facing: Child height 40cm-105cm/ Child weight≦18.5kg;
Booster: Child height 100cm-125cm/ Child weight≦25kg;

1 2
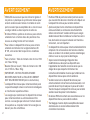
Welcome to Joie™
Congratulations on becoming part of the Joie family! We are so excited
to be part of your journey with your little one. While traveling with the
i-Spin™ Grow enhanced child restraint you are using a high quality, fully
certified safety i-Size enhanced child restraint. Please carefully read this
manual and follow each step to ensure a comfortable ride and best pro-
tection for your child.
To use this Joie enhanced child restraint with the i-Size ISOFIX
connections according to the ECE R129 Regulation, your child must
meet the following requirements.
Rearward Facing: Child height 40cm-105cm/ max. 18.5kg;
Booster: Child height 100cm-125cm/ max. 25kg;
Base
Please read all the instructions in this manual before installing and
using the product.
! IMPORTANT: KEEP FOR FUTURE REFERENCE.
PLEASE READ CAREFULLY.
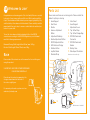
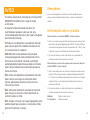
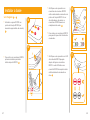
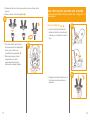
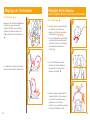
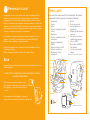
Please keep the instruction manual in the
storage compartment at the back of
the seat as right figure.
For warranty information, please visit our
website at joiebaby.com
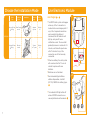
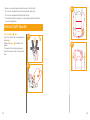
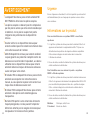
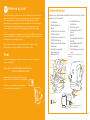
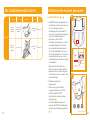
Parts List
1 Head Support
2 Seat Cover
3 Buckle
4 Harness Adjustment
Button
5 Adjustment Webbing
6 Recline Adjustment Button
7 ISOFIX Adjuster Button
8 LED Electronic Display
9 Rotation Button
10 Lap Belt Guide
11 Shoulder Strap
12 Infant Insert
13 Head Support
Adjustment Lever
14 Top Tether Strap
15 Top Tether Storage Bag
16 ISOFIX Attachments
Connector
17 ISOFIX Attachments
Guides
18 Battery Case
19 Side Impact Protection
*must use on door side only
Please make sure there are no missing parts. Please contact the
retailer if anything is missing.
GB
1
2
3
4
5
13
7
6
8
9
11
12
17
16
10
18
19
15
14
*Batteries are not included

3 4
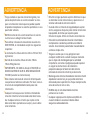
WARNING
! BE cautious that the rigid items and plastic parts of
the enhanced child restraint system shall be so
located and installed that they are not liable to
become trapped by a movable seat or in the door of
the vehicle.
! DO NOT use the rearward facing enhanced child
restraint systems in seating positions where there is
an active frontal airbag installed.
! To use this enhanced child restraint according to the
UN Regulation No.129, your child must meet the
following requirements.
! Rearward Facing: Child height 40cm -105cm / max.
18.5kg
! Booster (Forward Facing): Child height 100cm -
125cm / max. 25kg
! IMPORTANT - DO NOT USE IT AS BOOSTER MODE
BEFORE THE CHILD’S HEIGHT MORE THAN 100CM
(Refer to instructions).
! The enhanced child restraint may not fit in all
approved vehicles. Please refer to the fitting list
included for more details.
! Any straps holding the enhanced child restraint to the
vehicle should be tight. Any straps restraining the
child should be adjusted to the child’s body, and
straps should not be twisted.
WARNING
! DO NOT use any load bearing contact points other
than those described in the instructions and marked
on the enhanced child restraint.
! After your child is placed in this enhanced child
restraint, the safety belt must be used correctly.
Ensure that any lap strap is worn low down, so that
the pelvis is firmly engaged, shall be stressed.
! This enhanced child restraint should be replaced
when it has been subject to violent stresses in an
accident. An accident can cause damage to it that
you cannot see.
! Consider the danger of making any alterations or
additions to the device without approval of the
adequate authority, and the danger of not following
closely to the installation instructions provided by the
enhanced child restraint manufacturer.
! Please keep this enhanced child restraint away from
sunlight, otherwise it may be too hot for child’s skin.
Always touch the enhanced child restraint before
placing child in it.
! DO NOT leave your child unattended in the enhanced
child restraint system.
! Any luggage or other objects liable to cause injuries
in the event of a collision shall be properly secured.

5 6
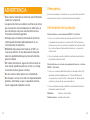
WARNING
! The enhanced child restraint system shall NOT BE
USED without the soft goods.
! The soft goods should not be replaced with any other
than the one recommended by the manufacturer,
because the soft goods constitutes an integral part
of the restraint performance.
! Please check if this enhanced child restraint can be
installed properly in your vehicle before you purchase
it.
! NO enhanced child restraint can guarantee full
protection from injury in an accident. However,
proper use of this enhanced child restraint will
reduce the risk of serious injury or death to your
child.
! DO NOT install this enhanced child restraint without
following the instructions in this manual or you may
put your child at serious risk of injury or death.
! DO NOT use this enhanced child restraint if it has
damaged or missing parts.
! DO NOT have your child in large/oversized clothes
because this may prevent your child from being,
properly and securely fastened by the shoulder
harness straps and the crotch strap between the
legs.
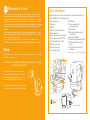
Emergency
In case of emergency or accidents, it is most important to have your
child taken care of with first aid and medical treatment immediately.
Product Information
For installation with ISOFIX system + Top Tether
1. This is an i-Size Enhanced Child Restraint System. It is approved
according to UN Regulation No.129, for use in, i-Size compatible
vehicle seating positions as indicated by vehicle manufacturers in
the vehicle users’ manual.
2. If in doubt, consult either the Enhanced Child Restraint System
manufacturer or the retailer.
For installation with 3-point belt + ISOFIX system + Top Tether
1. This is an i-Size booster seat Enhanced Child Restraint System. It is
approved according to UN Regulation No.129, for use primarily in
“i-Size seating positions ” as indicated by vehicle manufacturers in
the vehicle user’s manual.
2. If in doubt, consult either the Enhanced Child Restraint System
manufacturer or the retailer.
Materials Plastics, metal, fabrics
Patent No. Patents pending

7 8
Installation
Mode InstallationReference
Age
Recline
Position
Approx
4 years
ECE R129
40cm-105cm/
18.5kg
<
Child's
Size
Rear Facing
mode
Booster
mode
Position
1-6
Position
1-6
3 years
to 7 years
100cm-125cm/
25kg
<
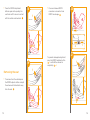
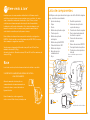
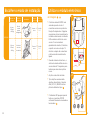
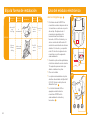
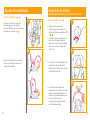
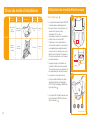
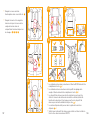
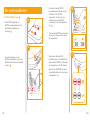
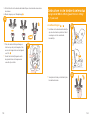
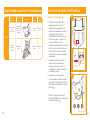
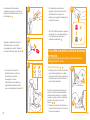
Choose the Installation Mode Use Electronic Module
see images 1 - 2
! The ISOFIX alert system will engage
when any of the 3 connectors is
hooked onto an anchorage point. If
any of the 3 required connections
are incorrectly installed and
tensioned, the LED indicator will
light up and you will hear a
notification sound. The sound will
gradually increase in volume for 3.5
minutes, and then will repeat once
after 15 minutes if any of the
connectors are still not securely
connected.
! When low battery, the alert system
will sound and last for 15 secs to
remind to replace with new
batteries.
! Batteries are not included.
! Recommended type batteries-
alkaline disposables, size AAA
(2X1.5V). NEVER mix battery types.
1
! The indicator LED light will be off
when all ISOFIX connectors are
securely attached and tensioned. 2
1
2

910
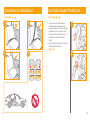
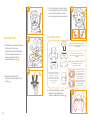
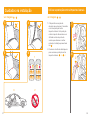
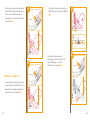
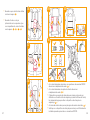
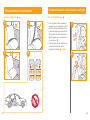
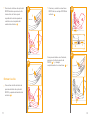
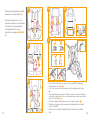
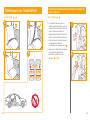
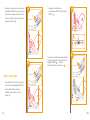
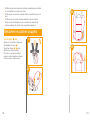
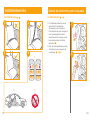
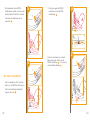
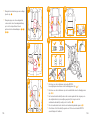
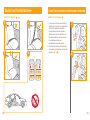
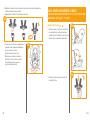
Concerns on Installation
see images 3 - 6see images 7 - 8
1. The enhanced child restraint is
delivered with removable side
impact protection. This side impact
protection must be used on the
door side of the vehicle for best
protection. Installation shown
in
7.
2. Press the release button to remove
Side Impact Protection.
8 -1& 8 -2
Use Side Impact Protection
1
24
3
57
6
1
24
3
57
6
1
23
A
I
R
B
A
G
6
5
7
8
2
1
4
3

11 12
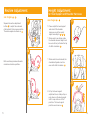
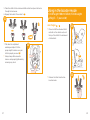
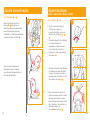
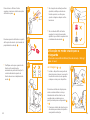
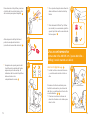
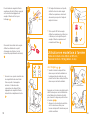
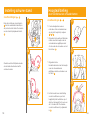
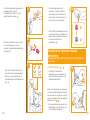
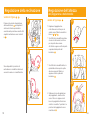
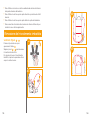
see images 9 - 10
Squeeze the recline adjustment
button 9, to adjust the enhanced
child restraint to the proper position.
The recline angles are shown as 10 .
Both rear facing mode and booster
mode have 6 recline positions.
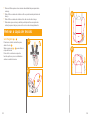
Recline Adjustment Height Adjustment
for Head Support and Shoulder Harnesses
see images 11 - 13
1. Please adjust the head support
and check if the shoulder
harnesses are at the correct
height according to 11 &12 &13
! When used in rear facing mode,
the shoulder harness height must
be even with or just below the top
of child’s shoulders. 11
! When used in booster mode, the
shoulder belt guides must be
even with child’s shoulders. 12
2. Lift up the head support
adjustment lever, while pull up or
push down on the head support
until it snaps into one of the 7
positions. The head support
positions are shown as 13 .
9
10
11
12
1
2
13

13 14
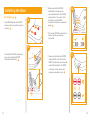
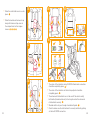
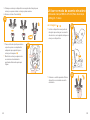
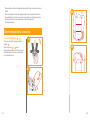
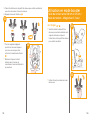
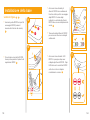
Installing the Base
see images 14 - 25
! Insert ISOFIX guides into ISOFIX
anchor points (see vehicle owner's
manual). 14
! To extend the ISOFIX connectors,
press in and hold the ISOFIX
adjustment button first. 15
! Make sure that both ISOFIX
attachments connectors are
securely attached to their ISOFIX
anchor points. The colors of the
indicators on both ISOFIX
connectors should be completely
green. 16
! Pull on both ISOFIX connectors to
make sure they are securely
connected.
! Make sure that both two ISOFIX
indicator LEDs turn off after the
ISOFIX connectors are connected.
each LED indicates if the ISOFIX
connector on the same side is
properly connected or not. 17
15
1
2
16
1
14
17

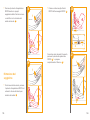
15 16
! Press and release ISOFIX
connectors connectors from
ISOFIX anchorage. 20
To prevent damage during transit,
press the ISOFIX adjuster button
21 -1 and fold the connector
completely. 21 -2
! Press the ISOFIX adjustment
buttons again while pushing the
seat back until it comes in contact
with the vehicle seat backrest. 18
Removing the seat
! To remove from the vehicle press
the ISOFIX adjuster button and pull
the enhanced child restraint away
from the seat. 19
18
1
2
19
1
2
1
2
20
1
2
21

17 18
To extend top tether for use, press
the button on tether adjuster and
pull to lengthen. 22
Connect the tether hook securely to
vehicle's anchorage point. (see
vehicle owner's manual). 23
! Make sure that tether hook is
securely attached to the anchorage
point. The color of the indicator on
tether strap adjuster should be
completely green. 24
! If recline angle is adjusted, check
the tension on the top tether, or
loosen to adjust angle then
re-tension.
! The top tether indicator LED (in the
middle) does not light up means the
top tether is securely connected. 25
Using in the rear facing mode
(Child height 40cm-105cm/Child weight
18.5kg/infant - 4 years old)
22
1
2
23
25
26
1
2
1
2
see images 26 - 33
! Please install the enhanced child
restraint on the rear vehicle seat
and then put the child in the
enhanced child restraint.
Press the rotating button to rotate
for easier side loading/unloading of
the child, then rotate the seat to the
rear facing position. 26 &27
! Press the rotating button on either
side to rotate the enhanced child
restraint.
24

19 20
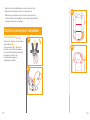
Securing Child
1. To lengthen the shoulder harness
belts, press the harness
adjustment button while pulling
out the shoulder harnesses to
loosen. (grab the both two
shoulder pads to pull). 28
2. Unlock the buckle of the
harnesses by pressing the red
button. 29
1
2
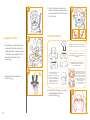
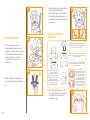
Remove the head support portion of the
infant insert when the child’s head no longer
fits comfortably.
Remove the mat of the infant insert
when the infant’s shoulders no longer fit
comfortably.
Remove the infant insert
cushion by detaching
the snaps to allow more
space when the infant does
not fit comfortably. The
cushion can be used
separately without being
attached to the infant insert
to bolster the infant's
back for more comfort.
We recommend using the full
infant insert while the baby
is under 60cm and can be
used until they outgrow the
infant insert. The infant insert
increases side impact
protection.
Remove the body portion of the infant insert
when the infant’s shoulders no
longer fit comfortably.
Use Infant Insert
4. If the child outgrows and no
longer fit comfortably then
remove toddler side cushion. 31
3. Fix the buckles on the both sides
of seat where the buckle markings
are to make placing the child in
rear facing mode more convenient.
27
28
29
30
31

21 22
7. Pull down the adjustment
webbing and adjust it to the
proper length to make sure your
child is properly secured. 33
! Always keep child secured in
harness and properly tightened by
removing any slack.
5. Place the child into the enhanced child restraint and pass both arms
through the harnesses.
6. Engage the buckle. Please refer to 32
Using in the booster mode
(Child height 100cm-125cm/Child weight
25kg/3 - 7 years old)
see images 34 - 41
! Please install the enhanced child
restraint on the vehicle seat, and
then put the child in the enhanced
child restraint.
! Remove the infant insert when
booster mode.
33
1
2
35
34
32

23 24
! The colors of the indicators on both ISOFIX attachments connectors
should be completely green. 41 -1
! The colors of the indicators on tether strap adjuster should be
completely green. 41 -2
! The enhanced child restraint can not be used if the vehicle safety
belt buckle (female buckle end) is too long to anchor the enhanced
child restraint securely. 41 -3
! Shoulder belt must pass through shoulder belt guide. 41 -4
! Check to make sure the child restraint is securely installed by pulling
on the both ISOFIX connectors.
! Store the crotch belt cover in a safe
place.
36
! Store the buckle and harness strap
along with harness strap cover in
the compartment as the images
shown.
37 &38 &39 &40
14
2
38
39
37
41
36
3
40

25 26
! Never use a vehicle waist-only belt across front of child.
! Do not use shoulder belt loose or positioned under arm.
! Do not use shoulder belt behind child’s back.
! Do not allow child to slide down in the enhanced child restraint in
case of strangulation.
see images 42 - 45
Press the red button to disengage the
buckle. 42
Follow steps 43 - 45 to detach soft
goods.
To re-attach the soft goods please
repeat the above steps in the reverse
step.
Detach Soft Goods
44
45
43
42

27
! Please wash the seat cover and inner padding with cold water under
30°C.
! Do not iron the soft goods.
! Do not bleach or dry clean the soft goods.
! Do not use undiluted detergents gasoline or other organic solvent to
wash the enhanced child restraint or base. It may cause damage to
the enhanced child restraint.
! Do not wring out the seat cover and inner padding to dry. It may
leave the seat cover and inner padding with wrinkles.
! Please hang dry the seat cover and inner padding in the shade.
! Please remove the enhanced child restraint and base from the
vehicle seat if not in use for a long period of time. Put the enhanced
child restraint in a cool, dry place where your child cannot access it.
! Do not tamper with the harness connectors during cleaning.
Care and Maintenance NOTE

29 30
Bem-vindo à Joie™
Parabéns por se tornar membro da família Joie! Estamos muito
satisfeitos por participar na sua aventura com o seu bebé. Ao viajar
com o dispositivo avançado de retenção i-Spin™ Grow, estará
a utilizar um sistema avançado de retenção de alta qualidade,
totalmente certificado de tamanho i-Size. Leia atentamente este
manual e execute todos os passos para garantir uma utilização
confortável e a melhor proteção para a criança.
Para utilizar este dispositivo avançado de retenção com ligações
ISOFIX i-Size de acordo com a Regulamentação CEE R129, a criança
deve cumprir os seguintes requisitos.
Virado para a retaguarda: Altura da criança 40 cm-105 cm/Peso
máximo da criança 18,5 kg;
Assento elevatório: Altura da criança 100 cm-125 cm/Peso máximo da
criança 25 kg;
Base
Leia todas as instruções deste manual antes de utilizar o produto.
! IMPORTANTE: GUARDAR PARA CONSULTA FUTURA.
LEIA ATENTAMENTE.
Guarde o manual de instruções no
compartimento de armazenamento na
traseira do banco, como indicado na
figura à direita.
Para informações sobre a garantia,
visite o nosso Web site em joiebaby.com
Lista de componentes
1 Apoio de cabeça
2 Capa
3 Fivela
4 Botão de ajuste das alças
5 Tira de ajuste
6 Botão de ajuste de
reclinação
7 Botão de ajuste ISOFIX
8 Painel eletrónico LED
9 Botão de rotação
10 Guia da correia
subabdominal
11 Alça
12 Redutor para bebé
13 Alavanca de ajuste do
apoio de cabeça
14 Precinta do tirante superior
15 Saco de armazenamento
do tirante superior
16 Conector de encaixes
ISOFIX
17 Guias de encaixes ISOFIX
18 Compartimento das pilhas
19 Proteção contra impactos
laterais
Certifique-se de que não existem peças em falta. Se faltar alguma
peça, contacte o revendedor.
PT
1
2
3
4
5
13
7
6
8
9
11
12
17
16
10
18
19
15
14
*As pilhas não estão incluídas
*deve ser utilizado apenas no lado
da porta

31 32
AVISO
! TENHA atenção ao facto de as peças rígidas e
plásticas do dispositivo avançado de retenção para
crianças deverem estar localizadas e instaladas de
forma a não ficarem presas num assento móvel ou
na porta do veículo.
! NÃO utilize dispositivos de retenção para crianças
virados para a retaguarda em lugares sentados
onde esteja instalado um airbag frontal ativo.
! Para utilizar este dispositivo avançado de retenção
para crianças de acordo com a Regulamentação UN
N.º 129, a criança deve cumprir os seguintes
requisitos.
! Virado para a retaguarda: Altura da criança 40
cm-105 cm/Peso máximo da criança 18,5 kg
! Assento elevatório (virado para a frente): Altura da
criança 100 cm - 125 cm/Peso máximo da criança 25
kg
! IMPORTANTE - NÃO UTILIZE O DISPOSITIVO NO
MODO DE ASSENTO ELEVATÓRIO SE A ALTURA DA
CRIANÇA FOR INFERIOR A 100 cm (consulte as
instruções).
! O dispositivo avançado de retenção para crianças
poderá não caber em todos os veículos aprovados
quando for utilizado numa destas posições.
! Todas as correias do dispositivo avançado de
retenção que fixam o dispositivo ao veículo devem
estar apertadas. Todas as correias que seguram a
criança devem estar ajustadas ao corpo da criança
e não devem estar torcidas.
AVISO
! NÃO utilize quaisquer pontos de contacto de supor-
te de carga diferentes dos descritos nas instruções
e marcados no dispositivo avançado de retenção
para crianças.
! Após a colocação da criança no dispositivo
avançado de retenção, o cinto de segurança deve
ser utilizado corretamente. Certifique-se de que a
correia subabdominal está o mais baixo possível
para que a cintura esteja bem segura.
! Este dispositivo avançado de retenção para
crianças deve ser substituído caso tenha sido
sujeito a esforços violentos num acidente. Um
acidente pode causar danos não visíveis.
! Não devem ser efetuadas alterações ou adições ao
dispositivo sem a aprovação de uma autoridade
competente e devem ser seguidas as instruções de
instalação fornecidas pelo fabricante do dispositivo
avançado de retenção para crianças.
! Mantenha este dispositivo avançado de retenção
para crianças afastado de luz solar direta, caso
contrário, este poderá atingir temperaturas
demasiado elevadas para a pele da criança. Toque
sempre no dispositivo avançado de retenção para
crianças antes de colocar a criança.
! NÃO deixe a criança sem supervisão no sistema
avançado de retenção para crianças.
! Todas as bagagens ou outros objetos que possam
causar ferimentos em caso de colisão, devem estar
corretamente fixos.

33 34
AVISO
! O sistema avançado de retenção para crianças NÃO
DEVE SER UTILIZADO sem a capa de tecido
acolchoado.
! A capa de tecido acolchoado não deve ser
substituída por qualquer outra que não seja
recomendada pelo fabricante, pois é parte integrante
do sistema de retenção.
! Verifique se este dispositivo avançado de retenção
para crianças pode ser instalado corretamente no
seu veículo antes de o adquirir.
! NENHUM sistema avançado de retenção para
crianças pode garantir uma proteção total contra
ferimentos num acidente. Contudo, a utilização
apropriada deste dispositivo avançado de retenção
para crianças reduzirá o risco de lesões graves ou
morte da criança.
! NÃO instale este dispositivo avançado de retenção
para crianças sem seguir as instruções deste
manual, pois poderá sujeitar a criança a riscos
ferimentos ou morte.
! NÃO utilize este dispositivo avançado de retenção
para crianças se o mesmo estiver danificado ou
existirem peças em falta.
! NÃO coloque a criança com roupa larga/grande, pois
poderá impedir que as alças e a correia das virilhas
apertem firmemente a criança.
Emergência
Em caso de emergência ou acidente, é muito importante que a
criança receba imediatamente primeiros socorros e tratamento
médico.
Informações sobre o produto
Para instalação com sistema ISOFIX + tirante superior
1. Este é um sistema avançado i-Size de retenção para crianças. Está
aprovado ao abrigo da Regulamentação UN Nº.129 para utilização
em veículos com lugares sentados compatíveis com "i-Size", como
indicado no manual do utilizador do fabricante do veículo.
2. Em caso de dúvida, consulte o fabricante ou o revendedor do
sistema avançado de retenção para crianças.
Para instalação com cinto de segurança de 3 pontos de fixação +
sistema ISOFIX + tirante superior
1. Esta é uma cadeira auto com sistema avançado de retenção para
crianças i-Size. Está aprovado ao abrigo da Regulamentação UN
N.º 129 para ser utilizado principalmente em veículos com “lugares
sentados i-Size”, como indicado pelo fabricante do veículo no
manual do utilizador.
2. Em caso de dúvida, consulte o fabricante ou o revendedor do
sistema avançado de retenção para crianças.
Materiais Plástico, metal, tecido
N.º de patente Patente pendente

35 36
ECE R129
Escolher o modo de instalação
40cm-
105cm/
≤18,5kg
Modo
virado
para a
retaguarda
Modo de
assento
elevatório
100cm-
125cm/
≤25kg
Aprox. 4
anos
Posição
1-6
Posição
1-6
3 anos a 7
anos
Tamanho da
criança
Modo de
instalação Instalação Idade de
referência
Posição de
reclinação
Utilizar o módulo eletrónico
ver imagens 1 - 2
! O sistema de alerta ISOFIX será
acionado quando um dos 3
conectores encaixar no ponto de
fixação. Se alguma das 3 ligações
necessárias estiver incorretamente
instalada e tensionada, o indicador
LED acenderá e emitirá um aviso
sonoro. O som aumentará
gradualmente durante 3,5 minutos,
e repetir-se-á uma vez após 15
minutos se algum dos conectores
continuar ainda incorretamente
ligado.
! Quando a bateria estiver fraca, o
sistema de alerta emitirá um aviso
sonoro durante 15 segundos para
lembrar que deve colocar pilhas
novas.
! As pilhas não estão incluídas.
! Tipo de pilhas recomendado-
alcalinas descartáveis, tamanho
AAA (2X1,5 V). NUNCA misture
pilhas de diferentes tipos. 1
! O indicador LED apagará quando
todos os conectores ISOFIX
estiverem firmemente encaixados e
tensionados. 2
1
2

37 38
Cuidados na instalação
ver imagens 3 - 6ver imagens 7 - 8
1. O dispositivo avançado de
retenção para crianças é fornecido
com uma proteção contra
impactos laterais. Esta proteção
contra impactos laterais deve ser
utilizada no lado da porta do
veículo para oferecer a melhor
proteção. Instalação apresentada
em 7.
2. Pressione o botão de desbloqueio
para remover a proteção contra
impactos laterais. 8 -1 e 8 -2
Utilizar a proteção contra impactos laterais
1
24
3
57
6
1
24
3
57
6
1
23
A
I
R
B
A
G
6
5
7
8
2
1
4
3
La page est en cours de chargement...
La page est en cours de chargement...
La page est en cours de chargement...
La page est en cours de chargement...
La page est en cours de chargement...
La page est en cours de chargement...
La page est en cours de chargement...
La page est en cours de chargement...
La page est en cours de chargement...
La page est en cours de chargement...
La page est en cours de chargement...
La page est en cours de chargement...
La page est en cours de chargement...
La page est en cours de chargement...
La page est en cours de chargement...
La page est en cours de chargement...
La page est en cours de chargement...
La page est en cours de chargement...
La page est en cours de chargement...
La page est en cours de chargement...
La page est en cours de chargement...
La page est en cours de chargement...
La page est en cours de chargement...
La page est en cours de chargement...
La page est en cours de chargement...
La page est en cours de chargement...
La page est en cours de chargement...
La page est en cours de chargement...
La page est en cours de chargement...
La page est en cours de chargement...
La page est en cours de chargement...
La page est en cours de chargement...
La page est en cours de chargement...
La page est en cours de chargement...
La page est en cours de chargement...
La page est en cours de chargement...
La page est en cours de chargement...
La page est en cours de chargement...
La page est en cours de chargement...
La page est en cours de chargement...
La page est en cours de chargement...
La page est en cours de chargement...
La page est en cours de chargement...
La page est en cours de chargement...
La page est en cours de chargement...
La page est en cours de chargement...
La page est en cours de chargement...
La page est en cours de chargement...
La page est en cours de chargement...
La page est en cours de chargement...
La page est en cours de chargement...
La page est en cours de chargement...
La page est en cours de chargement...
La page est en cours de chargement...
La page est en cours de chargement...
La page est en cours de chargement...
La page est en cours de chargement...
La page est en cours de chargement...
La page est en cours de chargement...
La page est en cours de chargement...
La page est en cours de chargement...
La page est en cours de chargement...
La page est en cours de chargement...
La page est en cours de chargement...
La page est en cours de chargement...
La page est en cours de chargement...
-
 1
1
-
 2
2
-
 3
3
-
 4
4
-
 5
5
-
 6
6
-
 7
7
-
 8
8
-
 9
9
-
 10
10
-
 11
11
-
 12
12
-
 13
13
-
 14
14
-
 15
15
-
 16
16
-
 17
17
-
 18
18
-
 19
19
-
 20
20
-
 21
21
-
 22
22
-
 23
23
-
 24
24
-
 25
25
-
 26
26
-
 27
27
-
 28
28
-
 29
29
-
 30
30
-
 31
31
-
 32
32
-
 33
33
-
 34
34
-
 35
35
-
 36
36
-
 37
37
-
 38
38
-
 39
39
-
 40
40
-
 41
41
-
 42
42
-
 43
43
-
 44
44
-
 45
45
-
 46
46
-
 47
47
-
 48
48
-
 49
49
-
 50
50
-
 51
51
-
 52
52
-
 53
53
-
 54
54
-
 55
55
-
 56
56
-
 57
57
-
 58
58
-
 59
59
-
 60
60
-
 61
61
-
 62
62
-
 63
63
-
 64
64
-
 65
65
-
 66
66
-
 67
67
-
 68
68
-
 69
69
-
 70
70
-
 71
71
-
 72
72
-
 73
73
-
 74
74
-
 75
75
-
 76
76
-
 77
77
-
 78
78
-
 79
79
-
 80
80
-
 81
81
-
 82
82
-
 83
83
-
 84
84
-
 85
85
-
 86
86


Joie i-Spin Grow Signature Enhanced Child Restraint Manuel utilisateur
- Catégorie
- Sièges de voiture
- Taper
- Manuel utilisateur
dans d''autres langues
- italiano: Joie i-Spin Grow Signature Enhanced Child Restraint Manuale utente
- español: Joie i-Spin Grow Signature Enhanced Child Restraint Manual de usuario
- Nederlands: Joie i-Spin Grow Signature Enhanced Child Restraint Handleiding
- português: Joie i-Spin Grow Signature Enhanced Child Restraint Manual do usuário
Documents connexes
-
Joie i-Harbour Manuel utilisateur
-
Joie Signature i-Plenti Manuel utilisateur
-
Joie i-Venture Group 0+/1 Car Seat Manuel utilisateur
-
Joie ECE R129 Manuel utilisateur
-
Joie ECE R129-03 i-Spin Safe Enhanced Child Restraint Manuel utilisateur
-
Joie i-Prodigi Manuel utilisateur
-
Joie Spin 360 GTi Manuel utilisateur
-
Joie spin 360 GT Manuel utilisateur
-
-
Autres documents
-
Graco SNUGESSENTIALS Le manuel du propriétaire
-
 Jole i-Harbour™ Manuel utilisateur
-
 Jole every stage™ R129 Manuel utilisateur
-
Jole i-Snug™ 2 Manuel utilisateur
-
Graco GC2117ABIRO000 Manuel utilisateur
-
 Jole calmi™ R129 Manuel utilisateur
-
BEBE CONFORT Marble Le manuel du propriétaire
-
 ickle bubba Radial 360 Car Seat Mode d'emploi


