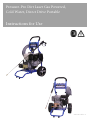
Pressure-Pro PP3225H Manuel utilisateur
- Catégorie
- Nettoyeurs haute pression
- Taper
- Manuel utilisateur

Pressure-Pro Dirt Laser Gas
Powered,
Cold Water, Direct Drive Portable
Instructions for Use
DOC0033 REV A

2
Contents
1 Important safety instructions .......................................................................................................3
2 Description .....................................................................................................................................4
2.1 Purpose ....................................................................................................................................4
3 Before starting the machine..........................................................................................................5
3.1
Fill up fuel tank .........................................................................................................................5
3.2 Connecting the high pressure hose ..........................................................................................5
3.3 Connecting the water supply ....................................................................................................5
4 Control / Operation ........................................................................................................................5
4.1 Connections..............................................................................................................................5
4.2 Switching on the cleaner ..........................................................................................................5
4.3 Using cleaning agents ..............................................................................................................6
5
Applications and methods .............................................................................................................6
5.1 Techniques ...............................................................................................................................6
5.2 Some typical cleaning tasks ..................................................................................................7-8
6
After using the cleaner .................................................................................................................9
6.1 Switching off the cleaner .........................................................................................................9
6.2 Storing / frost protection ..........................................................................................................9
7
Maintenance .................................................................................................................................10
7.1 Maintenance Schedule ...........................................................................................................10
7.2 Maintenance work ..................................................................................................................10
8
Troubleshooting ...........................................................................................................................11
8.1
Other faults ..
............................................................................................................................11
9
9.1 Recycling the machine ............................................................................................................11
9.2 Warranty .............................................................................................................................12-13
8.2 Technical Specification..........................................................................................................11
Further information.......................................................................................................................11

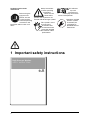
3
Symbols used to mark
instructions
Before using the
high-pressure
cleaner, be sure
to also read the
enclosed operating
instructions and
keep them within reach at all
times.
Safety instructions
in these operating
instructions
which must be
observed to
prevent risks to persons are
marked with this danger symbol.
This symbol is used
to mark safety
instructions that
must be observed
to prevent damage
to the machine and its
performance.
This indicates
tips and
instructions to
simplify work and to
ensure safe operation.
Operations marked
with this symbol
should only be
carried out by
Qualified Service
Technicians.
1 Important safety instructions
High Pressure Washer -
SAFETY INSTRUCTIONS

4
2 Description
2.1 Purpose
This high-pressure cleaner has
been designed for professional
use in
- Agriculture Industry
- Transport Industry
-
Automotive
- Municipal Facilities
- Janitorial
- Construction
- Food Industry
Section 5 describes the use of
the high-pressure cleaner for
various cleaning jobs.
Always use the cleaner as
described in these operating
instructions. Any other use may
damage the cleaner or the
surface to be cleaned or may
result in severe injury to
persons.
WARNING! Do not use combustion engine powered machines indoors unless adequate ventilation is
assessed by national labor authorities.
WARNING! Ensure that any exhaust emissions are not in a vicinity of air intakes.
WARNING! Incorrect fuels shall not be used as they may prove hazardous.

5
3
Before starting the machine
3.1
Fill up fuel tank
With the machine cold and turned off:
1. Fill engine tank from a clean container with fresh gas.
Use clean fuel only, free of
moisture and contamination.
Contact your dealer for fuel source
and type recommendations.
Maximum storage time in high pressure
cleaner tank: 1 month.
Fuel stored externally for more than 6
months is not allowed to be filled into high
pressure cleaners.
3.2
3.3 Connecting the water
Connecting the pressure hose
1. Connect the high pressure hose quick connector to the high pressure nipple.
1. Attach garden hose to water
supply.
2. Flush the garden hose
briefly in order to prevent
sand and other dirt particles
entering into the machine.
3. Attach garden hose coupling
to inlet.
4. Open water supply faucet.
NOTE!
In the case of poor water quality
(sand, etc.), it is recommended
that an inlet water filter be
installed.
Water supply hose should be a
reinforced hose and have a
minimum inside diameter of
3/4" (19 mm).
4 Control / Operation
4.1 Connections
4.1.1 Connecting the spray nozzle to wand
Insert spray nozzle into wand quick connect.
NOTE!
Always remove any dirt from
the nipple before connecting
the nozzle to the spray gun.
4.2 Switching on the cleaner
4.2.1 Cold water operation
Before starting up the engine, you must
carefully read through the instructions for
use of the engine. In the instructions for use
the operation and service of the engine is
described.
When the engine has been started, the high
pressure washer can be used for cleaning
with cold water.

6
4.2.2 Cold water operation
1. Turn the engine switch to the
on position, as well
as the fuel valve (if supplied with) and adjust
choke as needed then start engine with the recoil
rope.
2. Unlock the spray handle and squeeze the trigger.
3. High pressure water is sprayed.
4. Release the trigger and lock the spray handle
when not in use.
4.3 Using cleaning agents
The machine comes with a built-
in injector which requires the
soap nozzle to be installed.
CAUTION!
Never allow cleaning agent
to dry on the surface to be
cleaned. The surface may be
damaged.
Efficient high pressure c
leaning is achieved by following a few
guidelines, combined with your own personal experience of specific
cleaning tasks. Accessories and detergents, when correctly chosen,
can increase the efficiency of your pressure washer. Here is some
basic information about cleaning.
Encrusted or thick layers of dirt can be loosened or softened up by a
period of soaking. This is for example an ideal method within
agriculture – for example, within pig sties. The ideal soaking method
can be achieved by using foam or simple alkaline detergent. Let the
product lie on the dirty surfaces for about 30 minutes before pressure
washing. The result will be a much quicker high pressure cleaning
process.
Foam or detergent should be applied onto dry surfaces so that the
chemical product is in direct contact with the dirt. Detergents are
applied from bottom to top, for example on a automobile bodywork, in
order to avoid “super clean” areas, where the detergent may collect in
higher concentrations and streams downwards. Let the detergent work
for several minutes before rinsing and never let it dry on the surface
being cleaned.
Detergents are more effective at higher temperatures. Greases, oils and
fats can be broken down more effectively at higher tempera-tures also.
Proteins can be cleaned at temperatures of around 60°C (140°F). Oils
and traffic film around 70°C (158°F), and grease can be cleaned at
80°-90°C (176-194°F).
In order to break down tough layers of dirt, additional mechanical effect
may be required. Special lances and rotary or wash brushes offer this
supplementary effect that cuts through dirt.
High pressure is not always the best solution and may also damage
surfaces. The cleaning effect also depends upon water flow. Pressure
levels of around 100 bar (1450 psi) may be sufficient for vehicle
cleaning (in association with hot water) and higher fl ow levels give the
ability to rinse and flush away large amounts of dirt easily.
5 Applications and M
ethods
5.1 Techniques
5.1.1 Soaking
5.1.2 Detergent and Foam
5.1.3 Temperature
5.1.4 Mechanical Effect
5.1.5 High Water Flow or
High Pressure

7
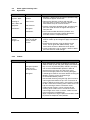
5.2 Some typical cleaning tasks
5.2.1 Agriculture
Task Accessories Method
Stables
Pig Pens, Sties
Cleaning of
walls, floors and
equipment
Disinfectant
Chemical Foam
Injectors
Foam Lance
Floor Cleaner
Detergents
Disinfectant
1.
2.
3.
4.
Soaking – apply foam to all surfaces (bottom to top)
and wait for approx. 30 minutes.
Remove the dirt from surfaces with the high
pressure lance or chosen accessory. Again, clean
from bottom to top on vertical surfaces.
To fl ush away large quantities of dirt, change to low
pressure mode and use the higher fl ow to push
away the dirt.
Use recommended disinfectant products and
methods to ensure hygiene. Apply disinfectant
once the surfaces are perfectly clean.
Machinery
Tractors
Ploughs etc.
Detergent injection
lances and under
chassis washer
brushes
1. Apply detergent to vehicle or equipment surfaces in
order to soften up dirt and grime. Apply from bottom
to top.
2. Proceed with cleaning using the high pressure
lance. Clean again from bottom to top. Use
accessories to clean in difficult to reach places.
3. Clean fragile areas such as motors, rubber at lower
pressure levels to avoid damage.
5.2.2 Vehicle
Task Accessories Method
Vehicle bodywork
Standard lance
Detergent injection
under chassis
washers brushes
Detergents
1. Apply detergent to vehicle or equipment surfaces in
order to soften up dirt and grime. Apply from bottom to
top. In cases of particularly dirty vehicles, pre-spray
with a recommended dealer product in order to
remove traces of insects etc, then rinse at low
pressure and apply normal car cleaning detergent.
Let detergents settle for 5 minutes before cleaning off.
Metallic surfaces can be cleaned using a
recommended dealer product.
2. Proceed with cleaning using the high pressure lance.
Clean again from bottom to top. Use accessories to
clean in difficult to reach places. Use brushes in order
to add a mechanical cleaning effect. Short lances can
help for cleaning of motors and wheel arches.
Undercarriage washers can be valuable for the
cleaning of car under chassis and wheel arches.
3. Clean fragile areas such as motors, rubber at lower
pressure levels to avoid damage.
4. Apply a liquid wax using the pressure washer in order
to protect the bodywork from pollution.

8
5.2.3 Buildings and Equipment
Task Accessories Method
General surfaces
Metallic equipment
Foam injectors
Standard lance
Tank cleaning
head
Disinfectant
1. Apply thick foam over the surfaces to be cleaned.
Apply on dry surfaces. Apply from top to bottom on
vertical surfaces. Let the foam act for up to 30
minutes for the optimal effect.
2. Proceed with cleaning using the high pressure
lance. Use applicable accessories. Use high
pressure to dislodge large amounts of encrusted dirt
or grime. Use lower pressure and high water volume
in order to rapidly flush away loose dirt and rinse
surfaces.
3. Apply disinfectant once the surfaces are perfectly
clean.
Areas covered by amounts of loose dirt, such as animal
remains in slaughterhouses, can be removed by using
high water flow to flush away the dirt to evacuation pits
or drains.
Tank cleaning heads can be used to clean barrels, vats,
mixing tanks etc. Cleaning heads may be
hydraulically
or electrically powered and give the possibility for
automatic cleaning without a constant user.
T
hese are merely several examples of cleaning tasks that can be solved by a pressure washer in association with
accessories and detergents. Each cleaning task is different. Please consult your local dealer or qualified representative
in order to discuss the best solution for your own cleaning tasks.

9
6 After using the cleaner
6.1 Switching off the cleaner
1. Turn the engine switch to "OFF" position.
2. Close water tap.
3. Activate spray handle until the
washer is depressurized.
4. Lock the safety catch on the spray handle.
6.2
Storing / frost protection
1.
2.
3.
Disconnect the water inlet
hose. Remove the nozzle and
empty it of water.
Start the machine allowing it
to run with the spray handle
opened until it is empty of
water.
Place a suction hose in a
bucket with 6-8 liters (1.5-2
gallons) anti-freeze.
4. Place the spray handle
(without spray
nozzle) above
the
bucket, activate the spray
handle so that the anti-freeze
can circulate.
5. Place the spray handle above
the opening of the anti-freeze
container and allow the
machine to pump all of the
solu-tion back into the
anti-freeze container. The anti-
freeze can be reused, but
keep in mind that it is slightly
diluted with water each time
this is done.
It is advisable to store the
machine in a frost proof place
between operations. If this is
not possible the machine
should be protected in the
following way:
Important:
To avoid damage always ensure
that the washer, the hoses and
the spray lance are unfrozen
before restarting. Place the
washer and the accessories in
a warm environment for some
time before starting up.

10
7.1 Maintenance Shedule
7 Maintenance
1. Remove garden hose and filter at
inlet and thoroughly clean.
Weekly
After the first 50
operating hours
Every six
months or
500 operating
hours
As
required
7.2.1 Water fi lters
Service on engine: See attached user instructions for engine.
7.2
Maintenance
Work
7.2.1
Water filters
7.2.2 Checking the pump oil quality
1. The pump is sealed (no vent).
2. Check color of pump oil through the sight glass (if
provided).
If the oil has a gray or white shade, change the oil
(see section 7.2.3)
3. Top off oil level with fresh oil if necessary.
Oil type
7.2.3 Change of oil
1. Unscrew the oil drain plug and drain oil into a suitable container.
2. Check that the drain plug gasket is in place and reinstall drain plug.
3. Fill pump with proper grade and amount of oil.
Oil grade and capacity
7.2.2 Checking the pump oil quality
Note:
Change engine oil per specific engine manual

11
8.1
Other Faults
Fault Cause Remedy
>
>
Engine not started
Engine RPM too low
• Start engine.
Adjust RPM on the speed
control to max.
Pressure too low
> High pressure nozzle worn
out
• Replace nozzle
8 Troubleshooting
8.2 Technical Specifications
9 Further information
9.1 Recycling the machine
Make the old cleaner
unusable immediately.
The pressure washer contains valuable
materials that should be recycled.
Contact your local waste disposal site. If
you have any quetions, please contact
your local authorities or your nearest
dealer.

1. Normal wear items such as discharge hose, guns,
wands, spray arms, nozzles, quick couplers, o-rings, motor &
generator brushes,
filters, fuses, belts, & tires.
2. Cost of regular maintenance/adjustments, damage from
lack of maintenance or correct operation
3. Damage due to freezing, abrasive fluids, chemical
deterioration, scale build-up, rust, corrosion, thermal
expansion or water ingress.
4. Damage from fluctuation in electrical or water supply.
5. Any product or part that has been altered, modified, over
pressurized, misused, or has been in an accident.
6. Dealer installation or damage from improper installation
of the machine or alteration by a dealer or promise of
additional warranty from dealer. The manufacturer warranty
is not transferable from the dealer to the retail purchaser on
used or rented equipment.
7. Labor is not paid if the dealer that serviced your machine
is not an authorized service center.
8. Labor is not paid on added accessories such as surface
cleaners, hose reels, wastewater recovery, water heaters,
and filtration.
WARRANTY PROVIDED BY OTHERS: Gasoline and diesel
engines, electric motors, and pumps are warranted by the
manufacturer of the component and their warranty is
provided through the manufacturer’s service centers.
Contact your authorized distributor for the closest repair
center. Additional extended warranties may be provided by
engine or pump manufacturer.
GENERAL CONDITIONS: Manufacturer’s responsibility
with respect to claims is limited to making the required repairs
or replacements to the original retail purchaser, and no claim
of breach of warranty shall be cause for any cancellation or
rescission of the contract of sale of any Pressure-Pro
product. Manufacturer reserves the right to change or
improve the design of any of its products or illustrations
without assuming any obligation to modify any
product previously manufactured.
This supersedes any and all previous warranty statements
for products purchased after June 2017. Manufacturer is not
liable for indirect, incidental or consequential damages
including any cost of substitute equipment, loss of revenue,
pecuniary expense or loss, or inability to use a Pressure-
Pro product. Manufacturer disclaims all implied
warranties, including those of merchantability and fitness for
use for a particular purpose. Some states do not allow
exclusions or limitations on how long an implied warranty
lasts, so the above exclusions may not apply to you. It
is the buyer’s responsibility to ensure installation and use
of products conforms to local codes.
Statement of Warranty 2/1/2017
13
13
THANK YOU: The employees and management thank you
for selecting the Pressure-Pro brand product line. The
production and quality assurance team have taken the
greatest care to ensure that your new pressure washer
exceeds the standards set by you, the customer.
YOUR RESPONSIBILITY: An operator’s manual was
compiled for your benefit. By studying and following the
safety, installation, operation, maintenance, and
troubleshooting information contained within, you can look
forward to many years of trouble-free service from your
equipment. Every person who will operate the equipment
must read and follow the safety warning and operating
instruction sections of the owner’s manual prior to use. You
are responsible for operating the product properly and safely.
You are also responsible to follow the maintenance schedule
on the back page of the manual to keep your warranty active.
FREIGHT DAMAGE: If delivered by a trucking company,
please inspect for any concealed freight damage and note
this on the paperwork from the trucking company before
signing. Should you find damage has occurred during
shipping, do not return the damaged merchandise to
manufacturer, but file a claim immediately with the freight
carrier involved.
QUESTIONS: Help us provide you with the fastest service.
Please locate the warranty registration card enclosed and
return it to manufacturer to register your machine.
If problems occur, contact the dealer you bought your
machine from, a local authorized Pressure-Pro service
center, or call manufacturer at 1-(772) 461-4486 and ask for
technical services.
GETTING STARTED: If your dealer has not prepared the
machine for startup, you may need to connect the hose to the
pressure outlet on the washer and connect the other end of
the hose that swivels to the trigger gun inlet and tighten.
Engine powered pressure washers are shipped from the
manufacturer with the fuel tanks empty. Follow the operation
instructions for starting. Electric motor powered pressure
washers will require an appropriate electric outlet or
disconnect box and an electric plug that is rated for your
machine’s voltage and amperage and matches to your
electrical socket. Smaller machines are equipped with a
ground fault interrupter on the electrical cord and you will
need to press the reset button after it is plugged in.
ONE YEAR PARTS: Manufacturer promises to repair
branded pressure washers if defective in materials or
workmanship for one year from the date of original retail
purchase including the cost of PARTS and LABOR,
excluding transportation/shipping costs and travel time.
ONE YEAR PARTS WARRANTY: Manufacturer will provide
replacement parts on accessories and on all other product
brands including Hydro Twisters, Hydro Vacuum systems
and Hydro Loop.(Labor is not included)
TWO YEAR EVAPORATIVE EMISSIONS CONTROL
SYSTEM WARRANTY: Manufacturer will repair or replace a
defective evaporative emission control system (EECS) part
on your pressure washer for a period of two years. (more
information on next page)
12
Items and Conditions Not Covered:

INTERNATIONAL END USERS: Warranty is furnished
by authorized Pressure-Pro dealers or distributors only;
and the warranty may vary depending on the dealer or
distributor and may be different from Pressure-Pro's
warranty; please consult distributor for details.
HOW TO OBTAIN WARRANTY SERVICE:
1. Contact your local service dealer and return the Pressure-
Pro washer or part within the warranty period along with
your sales receipt. To locate service, call customer
service at (772)461-4486 or go to
www.pressure-pro.com.
2. You also have the option to obtain a return goods
authorization and ship the questionable part freight prepaid
directly to the manufacturer. The part will be evaluated upon
receipt. If found defective, manufacturer will repair or replace
part under the conditions of warranty and return to you.
3. If the defective component is an engine or motor made
by another manufacturer, we, or your authorized Pressure-
Pro dealer, can help you obtain warranty service through
the specific manufacturer’s local authorized service center.
4. If you are unable to resolve the warranty claim, write to
Pressure-Pro, 7300 Commercial Circle, Fort Pierce, FL
34951 USA, Attn.: Technical Services. Please enclose a
copy of the dated purchase receipt and explain the nature
of the defect.
EVAPORATIVE EMISSION CONTROL STATEMENT The
U.S. Environmental Protection Agency and Pressure-Pro
are pleased to explain the evaporative emission
control system (EECS warranty on your 2017 model year
or newer pressure washer. New equipment that uses small
off-road engines must be designed, built, and equipped to
meet California anti-smog and also U.S. EPA standards.
must warrant the EECS on your pressure washer for the
period of time listed below provided there has been no
abuse, tampering, neglect or improper maintenance. Your
EECS may include parts such as the carburetor, fuel
injection system, the ignition system, catalytic converter, fuel
tanks, fuel lines, fuel caps, valves, canisters, filters, vapor
hoses, clamps, connectors, and other associated emission-
related components.
MANUFACTURER’S WARRANTY COVERAGE:
This evaporative emission control system is warranted for
two years. Where a EECS component is defective and a
warrantable condition exists, Pressure-Pro will repair your
pressure washer at no cost to you including diagnosis,
parts and labor.
GENERAL EMISSIONS WARRANTY COVERAGE: Subject
to certain conditions and exclusions as stated below, the
warranty on emission-related parts is as follows:
(1) Any warranted part that is not scheduled for replacement
as required maintenance in the written instructions supplied,
is warranted for the warranty period stated above. If the part
fails during the period of warranty coverage, the part will be
repaired or replaced by Pressure-Pro, according to
subsection (4)below. Any such part repaired or replaced
under warranty will be warranted for the remainder of the
period.
(2) Any warranted part that is scheduled only for regular
inspection in the written instructions supplied is warranted for
the warranty period stated above. Any such part repaired or
replaced under warranty will be warranted for the remaining
warranty period.
(3) Any warranted part that is scheduled for replacement as
required maintenance in the written instructions supplied is
warranted for the period of time before the first scheduled
replacement date for that part. If the part fails before the first
scheduled replacement, the part will be repaired or replaced
by Pressure-Pro according to subsection (4) below. Any
such part repaired or replaced under warranty will be
warranted for the remainder of the period prior to the first
scheduled replacement point for the part.
(4) Repair or replacement of any warranted part under the
warranty provisions herein must be performed at a warranty
station at no charge to the owner.
(5) Not withstanding the provisions herein, warranty services
or repairs will be provided at all of our distribution centers that
are franchised to service the subject engines or equipment.
(6) The Pressure Washer owner will not be charged for
diagnostic labor that is directly associated with diagnosis of
a defective, emission-related warranted part, provided that
such diagnostic work is performed at a warranty station.
(7) Pressure-Pro is liable for damages to other engine or
equipment components proximately caused by a failure
under warranty of any warranted part.
(8) Throughout the Pressure Washer warranty period stated,
Pressure-Pro will maintain a supply of warranted parts
sufficient
to meet the expected demand for such parts.
(9) Any replacement part may be used in the performance of
any warranty maintenance or
repairs and must be provided
without charge to the owner. Such use will not reduce the
warranty obligations of Pressure-Pro.
(10) Add-on or modified parts that are not exempted by
the Air Resources Board or U.S. EPA may not be used. The
use of any non-exempted add-on or modified parts by
the ultimate purchaser will be grounds for disallowing a
warranty claims. Pressure-Pro will not be liable to warrant
failures of warranted parts caused by the use of a non-
exempted add-on or modified part.
WARRANTED PARTS:
The following emission warranty parts list are covered (use
portions of this list applicable to your pressure washer: Fuel
Tank, Fuel Cap, Fuel Line, Fuel Line Fittings, Clamps,
Canister Mounting Brackets, Carbon Canister, Vapor Hoses,
Vapor Hose Clamps
USE ONLY PRESSURE PRO CERTIFIED
ORIGINAL EQUIPMENT REPLACEMENT
PARTS, FAILURE TO DO SO COULD LEAD TO
WARRANTY EXCLUSION AND SEVERE
BODILY INJURY
13


2
Table des matière
1
Consignes de sécurité importantes ..................................................................................... 3
2
Description .............................................................................................................................. 4
2.1
Objectif.............................................................................................................................. 4
3
Avant de démarrer la machine. ............................................................................................. 5
3.1
Remplir les réservoirs de carburant ................................................................................. 5
3.2
Raccordement du tuyau haute pression ........................................................................... 5
3.3
Raccordement de l'eau ..................................................................................................... 5
4
Contrôle / Fonctionnement ................................................................................................... 5
4.1
Raccordements. ............................................................................................................... 5
4.2
Mise sous tension du nettoyeur ........................................................................................ 5
4.3
Utilisation des produits de nettoyage ............................................................................... 6
5
Applications et méthodes ...................................................................................................... 6
5.1
Techniques ....................................................................................................................... 6
5.2
Quelques tâches de nettoyage typiques ....................................................................... 7-8
6
Après avoir utilisé le nettoyeur ............................................................................................. 9
6.1
Mise hors tension du nettoyeur ........................................................................................ 9
6.2
Stockage / protection contre le gel ................................................................................... 9
7
Entretien ................................................................................................................................ 10
7.1
Programme d'entretien ................................................................................................... 10
7.2
Travail d'entretien ........................................................................................................... 10
8
Dépannage ............................................................................................................................ 11
8.1
Autres défauts ................................................................................................................ 11
8.2
Spécifications techniques ............................................................................................... 11
9
Informations complémentaires ........................................................................................... 11
9.1
Recyclage de la machine ............................................................................................... 11
9.2
Garantie ..................................................................................................................... 12-13
AVERTISSEMENT : Ce produit peut vous exposer à des produits chimiques,
notamment le toluène et le benzène, qui est connu dans l'État de Californie comme
causant le cancer et des malformations congénitales ou d'autres problèmes de
reproduction. Pour plus d'informations, allez sur www.P65Warnings.ca.gov.

3
Symboles utilisés
pour marquer des
instructions
Avant d'utiliser
le nettoyeur
haute pression,
assurez-vous de
lire également
les instructions
d'utilisation ci-
jointes et de les
garder à portée
de main en tout
temps.
Les consignes de
sécurité dans ce
mode d'emploi qui
doivent être
respectées pour
éviter les risques
pour les personnes
sont signalées par
ce symbole de
danger.
Ce symbole est
utilisé pour marquer
les consignes de
sécurité qui doivent
être respectées
pour éviter
d’endommager la
machine et ses
performances
Ceci indique des
conseils et des
instructions pour
simplifier le travail
et pour assurer un
fonctionnement sûr.
Les opérations
marquées par ce
symbole ne
doivent être
effectuées par
des techniciens
d'entretien
qualifiés.
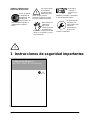
1
Consignes de sécurité importantes
Nettoyeur haute pression -
CONSIGNES DE SÉCURITÉ

4
2
Description
2.1
Objectif Ce nettoyeur haute pression a
été conçu pour une utilisation
professionnelle dans le
-
secteur agricole
-
Industrie des transports
-
Automobile
-
équipements municipaux
-
entretien ménager
-
Construction
-
Industrie alimentaire
La section 5 décrit l'utilisation
du nettoyeur à haute pression
pour divers travaux de
nettoyage.
Toujours utiliser le nettoyeur
comme décrit dans ce mode
d'emploi. Toute autre utilisation
peut endommager le nettoyeur
ou la surface à nettoyer ou peut
entraîner des blessures graves
aux personnes.
AVERTISSEMENT! Ne pas utiliser des machines alimentées par moteur à combustion à l'intérieur à
moins que la ventilation soit jugée adéquate par les autorités nationales du travail.
AVERTISSEMENT! S'assurer que les gaz d'échappement ne sont pas émis à
proximité d'une prise d'air de ventilation.
A
VERTISSEMENT ! Ne pas utiliser de carburants inappropriés car ils peuvent s'avérer dangereux.

5
3
Avant de démarrer la machine
3.1
Remplir les réservoirs de carburant
Avec le froid de la machine et mis hors tension:
1. Remplir le réservoir du moteur à partir d'un récipient propre avec du gaz frais.
Utiliser du carburant propre
uniquement, exempt d'humidité et
de la contamination. Contactez
votre concessionnaire pour avoir
une recommandation sur la source
et le type de carburant.
Durée de stockage maximale dans le
réservoir du nettoyeur haute pression : 1
mois
Le carburant stocké à l'extérieur pendant
plus de 6 mois ne doit pas être rempli dans
des nettoyeurs à haute pression.
3.2
Raccordement du tuyau haute pression
1. Raccordez le raccord rapide du tuyau haute pression au raccord haute pression.
3.3
Raccordement de l'eau
1. Attachez le tuyau de jardin à
l'approvisionnement en eau.
2. Rincer brièvement le tuyau de jardin
afin d'éviter que du sable et d'autres
particules de saleté ne pénètrent dans
la machine.
3. Fixez le raccord de tuyau de jardin à
l'entrée.
4. Ouvrez le robinet d'alimentation en eau.
REM
ARQUE !
En cas de mauvaise qualité de
l'eau (sable, etc.), il est
recommandé d'installer un filtre
à eau d'entrée.
Le tuyau d'alimentation en eau
doit être un tuyau renforcé et
avoir un diamètre intérieur
minimum de 3/4 "(19 mm).
4
Contrôle / Fonctionnement
4.1
Raccordements
4.1.1 Raccordement de la buse de pulvérisation à la baguette
Insérer la buse de pulvérisation dans le raccordement rapide de la baguette.
4.2
Mise sous tension du nettoyeur
4.2.1
Fonctionnement à eau froide
Avant de démarrer le moteur, vous devez
lire attentivement les instructions
d'utilisation du moteur. Dans les instructions
d'utilisation, le fonctionnement et l'entretien
du moteur sont décrits.
Lorsque le moteur a démarré, le nettoyeur
à haute pression peut être utilisé pour le
nettoyage à l'eau froide.
REM
ARQUE !
Enlevez toujours la saleté
de l'embout avant de
raccorder la buse au
pistolet pulvérisateur

6
4.2.2
Fonctionnement à eau froide
1. Mettez l'interrupteur du moteur en position on, ainsi que le robinet de
carburant (si fourni) et réglez le starter au besoin, puis démarrez le
moteur avec
le câble de recul.
2. Déverrouillez la poignée de pulvérisation et appuyez sur la gâchette.
3. L'eau à haute pression est pulvérisée.
4. Relâchez la gâchette et verrouillez la
poignée de pulvérisation lorsqu'elle n'est pas
utilisée.
4.3
Utilisation d'agents de
nettoyage
La machine est livré avec un
injecteur intégré qui nécessite la
buse de savon pour être installé.
Rincer après utilisation.
MI
SE EN GARDE !
Ne laissez jamais l'agent de nettoyage
sécher sur la surface à nettoyer. La
surface peut être endommagée.
5 Applications et méthodes
5.1
Techniques
5.1.1 Trempage
5.1.2 Détergent et
mousse
5.1.3 Température
5.1.4 Effet mécanique
5.1.5 Débit d'eau élevé
ou haute pression
Un nettoyage efficace à haute pression est obtenu en suivant quelques
directives, combinées avec votre expérience personnelle de tâches de
nettoyage spécifiques. Les accessoires et les détergents, lorsqu'ils sont
correctement choisis, peuvent augmenter l'efficacité de votre nettoyeur
haute pression. Voici quelques informations de base sur le nettoyage.
Des couches de saleté incrustées ou épaisses peuvent être desserrées ou
ramollies après une période de trempage. C'est par exemple une méthode
idéale dans l'agriculture - par exemple, dans les porcheries. La méthode
de trempage idéale peut être obtenue en utilisant de la mousse ou un
détergent alcalin simple. Laissez le produit reposer sur les surfaces sales
pendant environ 30 minutes avant de laver sous pression. Le résultat sera
un processus de nettoyage à haute pression beaucoup plus rapide.
La mousse ou le détergent doivent être appliqués sur des surfaces sèches
afin que le produit chimique soit en contact direct avec la saleté. Les
détergents sont appliqués de bas en haut, par exemple sur une carrosserie
automobile, afin d'éviter les zones « super propres », où le détergent peut
s'accumuler à des concentrations plus élevées et s'écouler vers le bas.
Laissez agir le détergent pendant plusieurs minutes avant de le rincer et ne
le laissez jamais sécher sur la surface à nettoyer.
Les détergents sont plus efficaces à des températures plus élevées. Les
huiles, les corps gras et les graisses peuvent être décomposés plus
efficacement à des températures plus élevées. Les protéines peuvent être
nettoyées à des températures d'environ 60° C (140 °F). Les huiles et le film
statiue sont à environ 70 ° C (158 ° F) et la graisse peut être nettoyée à 80-
90 ° C (176-194 ° F).
Afin de casser les couches de saleté tenaces, un effet mécanique
supplémentaire peut être nécessaire. Des lances spéciales et des brosses
rotatives ou de lavage offrent cet effet supplémentaire qui élimine la saleté.
La haute pression n'est pas toujours la meilleure solution et peut également
endommager les surfaces. L'effet de nettoyage dépend également du débit
d'eau. Des niveaux de pression d'environ 100 bar (1450 psi) peuvent être
suffisants pour le nettoyage du véhicule (en association avec l'eau chaude)
et des niveaux d'écoulement plus élevés donnent la possibilité de rincer et
d'éliminer facilement de grandes quantités de saleté.

7
5.2
Quelques tâches de nettoyage typiques
5.
2.1 Agriculture
Tâche
Accessoires
Méthode
Écuries
Mousse gazeuse
1.
Trempage - appliquer de la mousse sur toutes les
surfaces (du bas vers le haut) et attendre env. 30
minutes.
2.
E
nlever la saleté des surfaces avec la lance haut
e
pr
ession ou l'accessoire choisi. Encore une fois,
nettoyer de bas en haut sur des surfaces verticales.
3.
P
our rincer de grandes quantités de saleté, passez e
n
m
ode basse pression et utilisez le débit le plus élev
é
pour
repousser la saleté.
4.
U
tiliser les produits et méthodes de désinfectio
n
r
ecommandés pour assurer une bonne hygiène.
Appliquer le désinfectant une fois que les
surfaces sont parfaitement propres.
Porcheries
Injecteurs
Nettoyage des
murs, planchers et
équipements
Lance mousses
Nettoyeur de
plancher
Désinfectant
Détergents
Désinfectant
Machinerie
Injection de
détergent
1. Appliquez du détergent sur les surfaces du véhicule ou
de l'équipement afin d'adoucir la saleté et la crasse.
Appliquer de bas en haut.
2. P
rocéder au nettoyage à l'aide de la lance haut
e
pr
ession. Nettoyer à nouveau de bas en haut.
Utilisez des accessoires pour nettoyer dans les
endroits difficiles d'accès.
3. N
ettoyez les zones fragiles telles que les moteurs et l
e
caoutchouc à des niveaux de pression inférieurs pour
éviter les dommages.
Tracteurs
lances et sous les
Charrues etc.
laveuse de chassis
brosses
5.2.2 Véhicle
Tâche
Accessoires
Méthode
Superstructure de
véhicule
Lance standard
Injection de
détergent sous
les brosses des
lave-châssis
Détergents
1.
Appliquez du détergent sur les surfaces du véhicule ou de
l'équipement afin d'adoucir la saleté et la crasse.
Appliquer de bas en haut. Dans le cas de véhicules
particulièrement sales, pré-vaporiser avec un produit d
u
r
evendeur recommandé afin d'enlever les traces
d'insectes, etc., puis rincer à basse pression et appliquer
un détergent de nettoyage de voiture normal. Laissez les
détergents se déposer pendant 5 minutes avant de les
nettoyer. Les surfaces métalliques peu
vent être nettoyées
à l'aide d'un produit de revendeur recommandé.
2.
Procéder au nettoyage à l'aide de la lance haute
pr
ession. Nettoyer à nouveau de bas en haut. Utilisez
des accessoires pour nettoyer dans les endroits difficiles
d'accès. Utilisez des pinceaux pour ajouter un effet
de
net
toyage mécanique. Les lances courtes peuvent aider
au nettoyage des moteurs et des passages de roues. Les
rondelles de train d'atterrissage peuvent être utiles pour
le nettoyage des sous-châssis et des passages de roues.
3. Nettoyez les zones fragiles telles que les moteurs et le
c
aoutchouc à des niveaux de pression inférieurs pour
éviter les dommages.
4.
Appliquez une cire liquide en utilisant le nettoyeur haute
pression afin de protéger la carrosserie contre la
pollution.
La page charge ...
La page charge ...
La page charge ...
La page charge ...
La page charge ...
La page charge ...
La page charge ...
La page charge ...
La page charge ...
La page charge ...
La page charge ...
La page charge ...
La page charge ...
La page charge ...
La page charge ...
La page charge ...
La page charge ...
La page charge ...
La page charge ...
La page charge ...
-
 1
1
-
 2
2
-
 3
3
-
 4
4
-
 5
5
-
 6
6
-
 7
7
-
 8
8
-
 9
9
-
 10
10
-
 11
11
-
 12
12
-
 13
13
-
 14
14
-
 15
15
-
 16
16
-
 17
17
-
 18
18
-
 19
19
-
 20
20
-
 21
21
-
 22
22
-
 23
23
-
 24
24
-
 25
25
-
 26
26
-
 27
27
-
 28
28
-
 29
29
-
 30
30
-
 31
31
-
 32
32
-
 33
33
-
 34
34
-
 35
35
-
 36
36
-
 37
37
-
 38
38
-
 39
39
-
 40
40


Pressure-Pro PP3225H Manuel utilisateur
- Catégorie
- Nettoyeurs haute pression
- Taper
- Manuel utilisateur
dans d''autres langues
- English: Pressure-Pro PP3225H User manual
- español: Pressure-Pro PP3225H Manual de usuario
Autres documents
-
 Mi-T-M HS Series Le manuel du propriétaire
-
Powermate PW0952750 Manuel utilisateur
-
Simplicity 020249- Manuel utilisateur
-
-
Craftsman 580.676660 Le manuel du propriétaire
-
Homelite ut80522f Le manuel du propriétaire
-
-
-
Generac 3000 PSI 0059931 Manuel utilisateur
-
 JBM 54392 Mode d'emploi

