Lifetime 60058 Le manuel du propriétaire
- Taper
- Le manuel du propriétaire

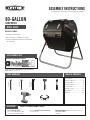
TOOLS REQUIRED TABLE OF CONTENTS
Icon Legend...............................4
Warnings y Notices.....................5
Parts Identifi er............................6
Frame Assembly..........................7
Bin Assembly............................11
Cleaning y Care........................31
Registration.........................32
Warranty..............................33
7/16" (11 mm)
1/2" (13 mm)
3/4" (19 mm)
3/4" (19 mm)
CONTACT LIFETIME CUSTOMER SERVICE:
Call: 1-800-225-3865
7:00 am–5:00 pm (Monday–Friday) MST
and 9:00 am–1:00 pm Saturday MST
Live Chat: www.lifetime.com/customerservice
(click on “LIVE CHAT” tab)
QUESTIONS?
MODEL# AND PRODUCT ID (you will need both when contacting us)
Model Number: 60058
Product ID:
Pour le français, voir la page 2. Para el español, ver la página 3.
ASSEMBLY INSTRUCTIONS
80-GALLON
COMPOSTER
MODEL 60058
BEFORE ASSEMBLY:
• Assemble on a level surface
• At least 2 people recommended for setup
• Ensure all hardware and parts are included and
free of damage.
For Customer Service in the United Kingdom and mainland Europe:
E-mail: [email protected]
GET ASSEMBLY HELP
WATCH THE INSTRUCTIONAL VIDEOS ON YOUTUBE.
Scan the code, or search http://go.lifetime.com/80gallonplaylist

Légende des icônes.....................4
Avertissements et avis.................5
Identifi cateur de pièces................6
Assemblage de la charpente.........7
Assemblage du bac...................11
Nettoyage et entretien...............31
Enregistrement....................32
Garantie..............................34
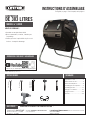
OUTILS REQUIS SOMMAIRE
7/16 po (11 mm)
1/2 po (13 mm)
3/4 po (19 mm)
3/4 po (19 mm)
CONTACTER LES SERVICES À LA CLIENTÈLE LIFETIME
®
:
Composer le 1-800-225-3865
Du lundi au vendredi 7 h – 17 h (HNR)
et samedi 9 h – 13 h (HNR)
Live Chat: www.lifetime.com/customerservice
(click on “LIVE CHAT” tab)
QUESTIONS ?
N° DE MODÈLE ET RÉFÉRENCE DU PRODUIT (il faut avoir les deux au moment de nous contacter)
N° de modèle : 60058
Référence du produit :
For English, see page 1. Para el español, ver la página 3.
INSTRUCTIONS D’ASSEMBLAGE
COMPOSTEUR
DE 303 LITRES
MODÈLE n° 60058
AVANT L’ASSEMBLAGE :
• Assembler sur une plate-forme nivelée
• Nous recommandons, au moins, 2 adultes pour
l’assemblage
• Vérifier que toutes la quincaillerie et pièces sont
incluses et exempt de dommages.
Pour les services à la clientèle au Royaume-Uni et du continent européen :
É-mail: [email protected]
OBTENIR DE L’AIDE AVEC L’ASSEMBLAGE
REGARDER DES VIDÉOS INSTRUCTIVES SUR YOUTUBE.
Scanner le code, ou chercher http://go.lifetime.com/80gallonplaylist

INSTRUMENTAL REQUERIDO ÍNDICE
Leyenda de íconos.......................4
Advertencias y avis......................5
Identifi cador de piezas.................6
Ensamble del armazón................7
Ensamble del barril...................11
Limpieza y cuidado...................31
Registro.............................32
Garantía..............................35
7/16 in (11 mm)
1/2 in (13 mm)
3/4 in (19 mm)
3/4 in (19 mm)
PONERSE EN CONTACTO CON LOS SERVICIOS DE CLIENTES LIFETIME
®
:
Marcar : 1-800-225-3865
De lunes hasta viernes 7:00 h–17:00 h (MST)
y sábado 9:00 h–13:00 h (MST)
¿PREGUNTAS?
MODEL E ID DEL PRODUCTO (se necesitan los dos al contactarnos)
Número de modelo: 60058
ID del producto:
For English, see page 1. Pour le français, voir la page 2.
INSTRUCCIONES DE ENSAMBLE
COMPOSTERO
DE 303 LITROS
MODELO n° 60058
ANTES DEL ENSAMBLE:
• Ensamblar sobre una superfi cie nivelada
• Recomendamos, al menos, 2 adultos para el ensamble
• Asegurarse que el herraje y las piezas son incluidos y
libre de daños.
Para el servicio a clientes en el Reino Unido y en el continente europeo:
Correo electrónico: [email protected]
OBTENER AYUDA CON EL ENSAMBLE
VER LOS VÍDEOS INSTRUCTIVOS EN YOUTUBE.
Escanear el código, o buscar http://go.lifetime.com/80gallonplaylist
t’Chat en direct: www.lifetime.com/customerservice
(cliquer sur la languette « LIVE CHAT »)

4
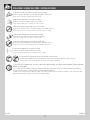
• Indicates the parts to be used for a section.
• Indique les pièces à utiliser pour une section.
• Indica las piezas que se usarán en una sección.
• Indicates special heed should be taken when reading.
• Indique qu’une attention spéciale doit être portée à la lecture.
• Indica que uno debe prestar atención al leer.
• Indicates the hardware to be used for a section.
• Indique la quincaillerie à utiliser pour une section.
• Indica el herraje que se usará en una sección.
• Indicates the tools to be used for a section.
• Indique les outils à utiliser pour une section.
• Indica el instrumental que se usará en una sección.
• Indicates no hardware required for a specifi c page.
• Indique qu’aucun matériel n’est requis pour une page précise.
• Indica que no se necesita herraje en una página específi ca.
• Indicates no parts required for a specifi c section.
• Indique qu’aucune pièce n’est requise pour une section précise.
• Indica que no se necesitan partes en una sección específi ca.
• Indicates to use/not to use an electric drill for a specifi c step.
• Indique quand utiliser ou ne pas utiliser une perceuse électrique pour une étape précise.
• Indica usar o no usar un taladro eléctrico en un paso específi co.
ICON LEGEND / LÉGENDE DES ICÔNES / LEYENDA DE ÍCONOS
• These nuts are centerlock nuts. They are designed to be tight; therefore, they will be harder to tighten. Tighten until fl ush
with the metal or plastic.
• Ces écrous sont des écrous de blocage central. Ils sont conçus pour être serrés; de ce fait, ils seront plus diffi ciles à
resserrer. Serrer jusqu’à ce qu’ils soient au ras du métal ou du plastique.
• Estas tuercas son tuercas de bloqueo central. Ellas son diseñadas para ser apretadas; entonces, ellas serán más difícil
ajustar. Apretar hasta que ellas estén al ras del metal o plástico.
1201167
5/14/2019

5
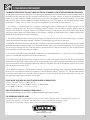
English:
• Failure to follow these warnings may result in serious injury or property damage and will void warranty.
• To ensure safety, do not attempt to assemble this product without following the instructions carefully.
• Assemble on a level surface.
• Be aware that plastic pieces can be damaged by overtightening the screws. To avoid damage, we strongly recommend
the use of a drill with a low torque setting. A #2 Phillips screwdriver may also be used.
• Two capable adults are required for assembly.
• All who participate in the assembly process should wear safety glasses throughout the assembly.
• Do not use or store hot objects near the product.
• Proper and complete assembly are essential to reduce the risk of accident or injury.
• Most injuries are caused by misuse and/or not following instructions.
• Other warnings may be viewed towards the end of this manual.
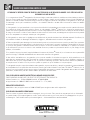
Français :
• Le non-respect de ces avertissements peut entraîner en conséquence des blessures sérieuses ou dommages à la propriété et annulera la
garantie.
• Pour assurer la sécurité, ne pas tenter d’assembler ce produit sans suivre attentivement les instructions.
• Assembler ce produit sur une surface nivelée.
• Il est possible d’endommager les pièces en plastique en serrant les vis excessivement. Pour éviter d’endommager le
plastique, nous recommandons vivement l’usage d’une perceuse électrique de faible puissance. S’utiliser aussi un
tournevis cruciforme n° 2.
• Deux adultes sont requis pour assembler ce produit.
• Toutes les personnes qui participent à l’assemblage doivent porter des lunettes de sécurité tout le long de l’assemblage.
• Ne pas utiliser ou conserver des objets chauds près du produit.
• L’assemblge correct et complet est essentiel pour réduire le risque de dangers ou de blessures.
• La plupart des blessures sont causées par l’abus ou le non-respect des instructions.
• Il y a d’autres avertissements vers la fi n de ce manuel.
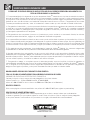
Español:
• El incumplimiento de seguir estas advertencias puede resultar en lesiones graves o daño a la propiedad y anulará la garantía.
• Para asegurar la seguridad, no intentar armar este producto sin seguir detenidamente las instrucciones.
• Ensamblar este producto sobre una superfi cie nivelada.
• Es posible dañar las piezas de plástico por apretar demasiado los tornillos. Para evitar dañar el plástico, recomendamos
l’utilisation de un taladro eléctrico de baja potencia. Se puede usar también un destornillador de punta Phillips No. 2.
• Dos adultos competentes son requeridos para ensamblar este producto.
• Todos los que participan en el ensamble deben llevar gafas de seguridad a lo largo del ensamble.
• No usar ni almacenar objetos calientes cerca el producto.
• El armado propio y completo son esenciales para reducir el riesgo de accidentes y lesiones.
• La mayoría de las lesiones son causadas por el uso erróneo y/o el incumplimiento de seguir las instrucciones.
• Se pueden ver otras advertencias al fi nal de este manual.
WARNINGS & NOTICES / AVERTISSEMENTS ET AVIS / ADVERTENCIAS Y AVISOS

6
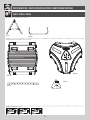
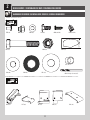
BII (x2)
BIH (x2)
BIT BIVBIS
PARTS IDENTIFIER / IDENTIFICATEUR DES PIÈCES / IDENTIFICADOR DE PIEZAS
Metal Parts / Pièces en métal / Piezas de metal
Plastic Parts / Pièces en plastique / Piezas de plástico
PARTS / PIÈCES / PIEZAS
Hardware / Quincaillerie / Herraje
BHN (x3)
BHQ (x1)
BHM (x2)
BHP (x2)

7
BII (x2)
BIH (x2)
7/16 in/po (11 mm)
Metal Parts / Pièces en métal / Piezas de metal
Hardware / Quincaillerie / Herraje
TOOLS REQUIRED / OUTILS REQUIS / INSTRUMENTAL REQUERIDO
PARTS REQUIRED / PIÈCES REQUISES / PIEZAS REQUERIDAS
HARDWARE REQUIRED / QUINCAILLERIE REQUISE / HERRAJE REQUERIDO
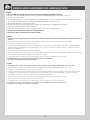
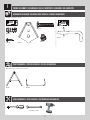
FRAME ASSEMBLY / ASSEMBLAGE DE LA CHARPENTE / ENSAMBLE DEL ARMAZÓN
1
BIT
BIV
BIN (x1)
BIJ (x2)
BHJ (x4)
ADJ (x2)
ABU (x2)
BIX (x1)

8
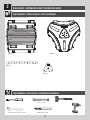
TOOLS AND HARDWARE REQUIRED / OUTILS ET QUINCAILLERIE REQUIS / INSTRUMENTAL Y HERRAJE REQUERIDOS
BIH
BIH
BII
BII
BHJ
BHJ
BHJ
BHJ
BHJ (x4)
1.2
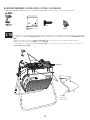
u SECTION 1 (CONTINUED) / SECTION 1 (SUITE) / SECCIÓN 1 (CONTINUACIÓN)
• Attach a Leg (BIH) to the two (2) A-Frames (BII) as
shown. Repeat this step for the second Frame Leg.
• Attacher un pied (BIH) aux deux (2) charpentes en
« A » (BII) comme illustré. Répéter cette étape pour le
deuxième pied.
• Sujetar una pata (BIH) al armazón en «A» (BII) como
se muestra. Repetir este paso para la segunda pata.
• Secure the two Legs to the A-Frames using four (4) Screws (BHJ)
at the locations shown. You must use a drill for this step.
• Attacher-bien les deux pieds à la charpente en « A » à l’aide de
quatre (4) vis (BHJ) aux emplacements indiqués. Il faut utiliser une
perceuse électrique dans cette étape.
• Sujetar bien las dos patas al armazón en «A» usando cuatro (4)
tornillos (BHJ) a las ubicaciones indicadas. Es preciso usar un taladro
eléctrico en este paso.
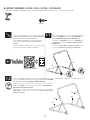
• If you have trouble with this section, follow the code below
to view a video on how to assemble the Frame.
• Si vous avez des problèmes avec cette section, suivez
le code en bas pour voir un vidéo sur l’assemblage de la
Charpente.
• Si tiene problemas con esta sección, siga el código debajo
para ver un video sobre el ensamble del Armazón.
http://go.lifetime.com/80frame
LIFETIME
©
1.1

9
TOOLS AND HARDWARE REQUIRED / OUTILS ET QUINCAILLERIE REQUIS / INSTRUMENTAL Y HERRAJE REQUERIDOS
BIN (x1)
BIX (x1)
BIN
BIX
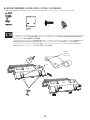
u SECTION 1 (CONTINUED) / SECTION 1 (SUITE) / SECCIÓN 1 (CONTINUACIÓN)
1.3
1.4
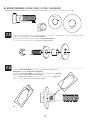
• Slide the Spring (BIN) over the Locking Pin (BIX) as
shown.
• Faire glisser le ressort (BIN) sur la goupille de
verrouillage (BIX) comme illustré.
• Deslizar el resorte (BIN) sobre el pasador de cierre
(BIX) como se muestra.
• Insert the Locking Pin through the top hole of an A-Frame as shown. It doesn’t matter which A-Frame is chosen. In the
next step, it’s shown on the right Frame.
• Insérer la goupille de verrouillage à travers le trou supérieur d’une charpente en « A » comme illustré. Il n’importe
pas la charpente sélectionnée. Dans l’étape
suivante, nous la montrons sur la droite.
• Insertar el pasador de cierre por el agujero
superior del armazón en «A» como se
muestra. No importa el armazón «A» escogido.
En el paso siguiente, se lo muestra en el derecho.

10
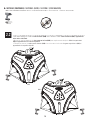
TOOLS AND HARDWARE REQUIRED / OUTILS ET QUINCAILLERIE REQUIS / INSTRUMENTAL Y HERRAJE REQUERIDOS
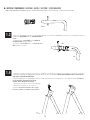
1.4
7/16 in/po
(11 mm)
BIJ (x2)
ADJ (x2)
ABU (x2)
BIJ
BIJ
ABU
ABU
ADJ
ADJ
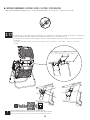
u SECTION 1 (CONTINUED) / SECTION 1 (SUITE) / SECCIÓN 1 (CONTINUACIÓN)
1.5
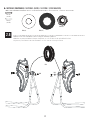
• Attach the Frame Brackets (BIJ) to the A-Frames as shown. Tighten securely, but do not overtighten.
• Attacher les supports de la charpente (BIJ) à la charpente en « A » comme illustré. Serrer-les bien, mais ne pas trop
serrer.
• Sujetar los soportes del armazón (BIJ) al armazón en «A» como se muestra. Apretar bien, mas no demasiado.

11
BIS
BIV
ADW (x38/40)
BTK (x6)
BIR (x6)
BHO (x6)
AAN (x6)
BHK (x38/40)
BIK (x2)
BIL (x2)
BIP (x2)BIO (x4) BIM (x2)
ADM (x2) AKH (x1)
BJA (x2)
BIZ (x2)
BJB (x2)BIY (x2) BJC (x2)
ARA 1/8 in/po (3 mm) (x1)
Hardware / Quincaillerie / Herraje
HARDWARE REQUIRED / QUINCAILLERIE REQUISE / HERRAJE REQUERIDO
BIN ASSEMBLY / ASSEMBLAGE DU BAC / ENSAMBLE DEL BARRIL
2

12
BHN (x3)
BHQ (x1)
BHM (x2)
BHP (x2)
1/2 in/po (13 mm), 3/4 in/po (19 mm)
(ARA) 1/8 in/po (3 mm)
3/4 in/po (19 mm)
Large Parts / Grandes pièces / Piezas grandes
TOOLS REQUIRED / OUTILS REQUIS / INSTRUMENTAL REQUERIDO
PARTS REQUIRED / PIÈCES REQUISES / PIEZAS REQUERIDAS
BIN ASSEMBLY / ASSEMBLAGE DU BAC / ENSAMBLE DEL BARRIL
2

13
TOOLS AND HARDWARE REQUIRED / OUTILS ET QUINCAILLERIE REQUIS / INSTRUMENTAL Y HERRAJE REQUERIDOS
1
2
BHN
BHN
u SECTION 2 (CONTINUED) / SECTION 2 (SUITE) / SECCIÓN 2 (CONTINUACIÓN)
2.1
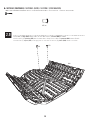
• Drill holes through the divots of only two Panels (BHN) at the locations shown. Do not drill through the third Panel; it will be
the Lid. Ensure the Drill Bit (ARA) is perpendicular to the surface of the Panel.
• Ne percer que les marques des deux panneaux (BHN) seulement aux emplacements indiqués. Le troisième panneau sera
le couvercle. Veiller à ce que le foret (ARA) est perpendiculaire à la surface du panneau.
• Taladrar las marcas de sólo dos paneles (BHN) a las ubicaciones indicadas. No taladrar por el tercer panel; será la tapa.
Asegurarse que la broca (ARA) es perpendicular a la superficie del panel.
ARA (x1)
• If you have trouble with this section, follow the code below to view a video on how to assemble the Bin.
• Si vous avez des problèmes avec cette section, suivez le code en bas pour voir un vidéo sur l’assemblage du bac.
• Si tiene problemas con esta sección, siga el código debajo para ver un video sobre el ensamble del barril.
http://go.lifetime.com/80bin
LIFETIME
©

14
TOOLS AND HARDWARE REQUIRED / OUTILS ET QUINCAILLERIE REQUIS / INSTRUMENTAL Y HERRAJE REQUERIDOS
1
2
u SECTION 2 (CONTINUED) / SECTION 2 (SUITE) / SECCIÓN 2 (CONTINUACIÓN)
ARA (x1)
2.2
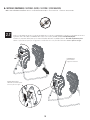
• Drill holes through the divots of both Side Panels (BHM) at the locations shown. Ensure the Drill Bit (ARA) is perpendicular
to the surface of the Panel.
• Ne percer que les marques des deux panneaux latéraux (BHM) aux emplacements indiqués. Veiller à ce que le foret
(ARA) est perpendiculaire à la surface du panneau.
• Taladrar las marcas de ambos paneles laterales (BHM) a las ubicaciones indicadas. Asegurarse que la broca (ARA) es
perpendicular a la superficie del panel.
BHM
BHM

15
TOOLS AND HARDWARE REQUIRED / OUTILS ET QUINCAILLERIE REQUIS / INSTRUMENTAL Y HERRAJE REQUERIDOS
AAN
AAN
AAN
AAN
AAN
AAN
BHO
BHO
BHO
BHO
BHO
BHO
BHM
BHM
BIR
BIR
BIR
BIR
BIR
BIR
BHP
BHP
BHP
1
2
BIR (x6)
BHO (x6)
AAN (x6)
1/2 in/po
(13 mm)
u SECTION 2 (CONTINUED) / SECTION 2 (SUITE) / SECCIÓN 2 (CONTINUACIÓN)
2.3
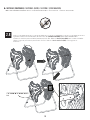
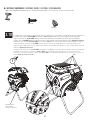
• Attach a Mounting Plate (BHP) to both Side Panels using the hardware provided.
• Attacher une plaque de montage (BHP) aux deux panneaux latéraux à l’aide de la quincaillerie indiquée.
• Sujetar una placa de montaje (BHP) a ambos paneles laterales usando el herraje incluido.

16
TOOLS AND HARDWARE REQUIRED / OUTILS ET QUINCAILLERIE REQUIS / INSTRUMENTAL Y HERRAJE REQUERIDOS
BIL (x2)
BIO (x2)
BIP (x2)
BIK
BIO
BIL
BIP
AKH
u SECTION 2 (CONTINUED) / SECTION 2 (SUITE) / SECCIÓN 2 (CONTINUACIÓN)
2.4
2.5
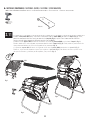
• Assemble the hardware as shown. Do this step twice.
• Assembler la quincaillerie comme illustré. Faire cette étape deux fois.
• Ensamblar el herraje como se muestra. Hacer este paso dos veces.
• Open the Grease Packet (AKH), and place a small amount of grease on the
Bushing (BIL) as shown. Do this step for both Bushings.
• Ouvrir le paquet de graise (AKH), et mettre un peu de lubrifiant sur la bague (BIL)
comme illustré. Faire cette étape pour les deux bagues.
• Abrir el paquete de grasa (AKH), y poner un poco de grasa en el cosquillo (BIL)
como se muestra. Hacer este paso para los dos cosquillos.
BIK (x2)
2 3/4 in/po (7 cm)

17
TOOLS AND HARDWARE REQUIRED / OUTILS ET QUINCAILLERIE REQUIS / INSTRUMENTAL Y HERRAJE REQUERIDOS
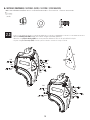
BIO (x4)
BIO
BIO
BIM (x2)
BIM
ADM
ADM
ADM (x2)
3/4 in/po
(19 mm)
3/4 in/po
(19 mm)
u SECTION 2 (CONTINUED) / SECTION 2 (SUITE) / SECCIÓN 2 (CONTINUACIÓN)
2.6
• Attach a Side Panel to both A-Frames using the hardware provided.
• Attacher un panneau latéral à chaque charpente en « A » à l’aide de la quincaillerie incluse.
• Sujetar un panel lateral a los dos armazones en «A» usando el herraje incluido.

18
TOOLS AND HARDWARE REQUIRED / OUTILS ET QUINCAILLERIE REQUIS / INSTRUMENTAL Y HERRAJE REQUERIDOS
BIX
u SECTION 2 (CONTINUED) / SECTION 2 (SUITE) / SECCIÓN 2 (CONTINUACIÓN)
2.7
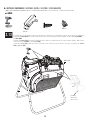
• Turn the Side Panel so the ventilation hole in the side is in the position shown. Lock the Panel in place.
• Tourner le panneau latéral pour que le trou d’aération soit dans la position illustrée. Verrouiller le panneau en place.
• Girar el panel lateral para que el agujero de ventilación esté en la posición illustrada. Cerrar el panel en su lugar.
• Ventilation hole
• Trou d’aération
• Agujero de ventilación
• Lock the Panel in place.
• Verrouiller le panneau en place.
• Cerrar el panel en su lugar.

19
TOOLS AND HARDWARE REQUIRED / OUTILS ET QUINCAILLERIE REQUIS / INSTRUMENTAL Y HERRAJE REQUERIDOS
BHQ
u SECTION 2 (CONTINUED) / SECTION 2 (SUITE) / SECCIÓN 2 (CONTINUACIÓN)
2.8
• Turn the second Side Panel to match the first. Place the Ventilation Tube (BHQ) into the two ventilation holes.
• Tourner le deuxième panneau latéral pour to match the first. Mettre le tube d’aération (BHQ) dans les trous d’aération.
• Girar el segundo panel lateral para to match the first. Colocar el tubo de ventilación (BHQ) en los agujeros de
ventilación.

20
TOOLS AND HARDWARE REQUIRED / OUTILS ET QUINCAILLERIE REQUIS / INSTRUMENTAL Y HERRAJE REQUERIDOS
BTK (x6)
BTK
BHN
BTK
u SECTION 2 (CONTINUED) / SECTION 2 (SUITE) / SECCIÓN 2 (CONTINUACIÓN)
2.9
• Insert two (2) Plugs (BTK) into the holes in each of the three (3) Panels (BHN) as shown.
• Insérer deux (2) capuchons (BTK) dans les trous dans chaque un des trois (3) panneaux (BHN) comme illustré.
• Insertar dos (2) tapones (BTK) en los agujeros en cada uno de los tres (3) paneles (BHN) como se muestra.
La page est en cours de chargement...
La page est en cours de chargement...
La page est en cours de chargement...
La page est en cours de chargement...
La page est en cours de chargement...
La page est en cours de chargement...
La page est en cours de chargement...
La page est en cours de chargement...
La page est en cours de chargement...
La page est en cours de chargement...
La page est en cours de chargement...
La page est en cours de chargement...
La page est en cours de chargement...
La page est en cours de chargement...
La page est en cours de chargement...
La page est en cours de chargement...
-
 1
1
-
 2
2
-
 3
3
-
 4
4
-
 5
5
-
 6
6
-
 7
7
-
 8
8
-
 9
9
-
 10
10
-
 11
11
-
 12
12
-
 13
13
-
 14
14
-
 15
15
-
 16
16
-
 17
17
-
 18
18
-
 19
19
-
 20
20
-
 21
21
-
 22
22
-
 23
23
-
 24
24
-
 25
25
-
 26
26
-
 27
27
-
 28
28
-
 29
29
-
 30
30
-
 31
31
-
 32
32
-
 33
33
-
 34
34
-
 35
35
-
 36
36


Lifetime 60058 Le manuel du propriétaire
- Taper
- Le manuel du propriétaire
dans d''autres langues
- English: Lifetime 60058 Owner's manual
- español: Lifetime 60058 El manual del propietario
Documents connexes
-
Lifetime 60058 Le manuel du propriétaire
-
-
-
-
-
-
-
-
-