Joovy Pootler Manuel utilisateur
- Catégorie
- Poussettes
- Taper
- Manuel utilisateur

Table of Contents
English
Safety and Warnings ........................................................................................................................ 2
Parts List .......................................................................................................................................... 3
Assembly .......................................................................................................................................... 5
Operation .......................................................................................................................................... 6
Care and Maintenance ..................................................................................................................... 8
Team 432 .......................................................................................................................................... 9
Francais
Sécurité et Mise en Gardes ............................................................................................................ 10
Liste des Pièces ............................................................................................................................. 11
Assemblage .................................................................................................................................... 13
Fonctionnement ............................................................................................................................. 14
Soin et entretien ............................................................................................................................. 16
Équipe 432 ..................................................................................................................................... 17
Español
Seguridad y Advertencias .............................................................................................................. 18
Lista de Partes ................................................................................................................................ 19
Montaje ........................................................................................................................................... 21
Funcionamiento .............................................................................................................................. 22
Cuidado y mantenimiento .............................................................................................................. 24
Equipo 432 ..................................................................................................................................... 24
日本語
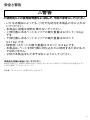
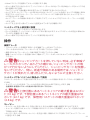
安全と警告 ...................................................................................................................................... 25
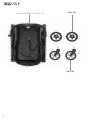
部 品リスト ....................................................................................................................................... 26
アセンブリ ....................................................................................................................................... 28
操作 ................................................................................................................................................ 29
取り扱いおよびメンテナンス ........................................................................................................... 30
チーム432 ....................................................................................................................................... 31

2
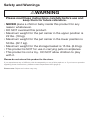
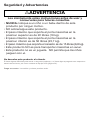
Safety and Warnings
•NEVER place a child or baby inside this product for any
reason whatsoever.
•DONOToverloadthisproduct.
•Maximumweightforthepetcarrierintheupperpositionis
22 lbs. (10 kg).
•Maximumweightforthepetcarrierinthelowerpositionis
50 lbs. (22.7 kg).
•Maximumweightforthestoragebasketis15lbs.(6.8kg).
•ThisproductisNOTforuseincarryingpetsonairplanes.
•Thisproductisnotatoy.DONOTallowchildrentoplay
with it.
Please do not return this product to the store.
Ifyouexperienceanyofdicultywiththeassemblyoruseofthisproduct,orifyouhaveaquestion
regardingtheseinstructions,pleasecontactDepartment432(page9).
Please note: Styles and colors may vary.
IWARNING
Please read these instructions carefully before use and
keep them for future reference.

3
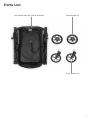
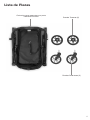
Parts List
Pet Stroller with Pet Carrier Included
Front Wheels (2)
Rear Wheels (2)

4
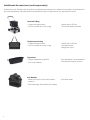
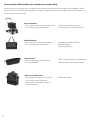
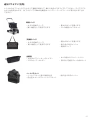
Additional Accessories (sold separately)
Customize your Pootler with a number of optional accessories for added functionality. All accessories
are sold separately. (All below Boot accessories can be attached to the pet stoller frame)
Insulated Bag
•Large storage space
•Can be used as a carry bag
•Holds up to 55 lbs.
•Two side mesh pockets
Replacement Bag
•Large storage space
•Can be used as a carry bag
•Holds up to 55 lbs.
•Durablemesh
•Magnetic clips
Organizer
•Large neoprene organizer
•Two cup holders
Pet Basket
•With 2nd layer for the pet basket
bottom
•Self-standing & portable pet basket
•Sixindividualcompartments
•Removable zipper pocket
•Durablemesh

5
•Holds up to 55 lbs.
•Two side mesh pockets
•Holds up to 55 lbs.
•Durablemesh
•Magnetic clips
•Sixindividualcompartments
•Removable zipper pocket
•Durablemesh
Assembly
IMPORTANT NOTE: Please refer to the end of this manual for all photos
that are referenced in parentheses in the instructions below.
Unpacking the Product
• Removeeverythingfromthebox–petstrollerwithpetcarrierincluded,frontwheels(2),rear
wheels(2),anddocuments(notshown).
•Discardallpackagingmaterialsproperlyincludingplasticcoverings.
•DONOTallowchildrentoplaywithanypackagingmaterials.
IWARNING: Adult assembly is required for this
product.Notoolsrequired.
Unfolding the Pet Stroller
• Orientthepetstrollerwiththehandlefacingupward.(1)
• Removethepetcarrierfromthestrollerandputitasideforlaterassembly.(2)
• Releasethesafetylatchlocatedontheleftsideofthepetstroller.(3)
•Pullupwardsonthehandle.(4) Keep pulling until the pet stroller is fully erected and the locking
mechanism has fully engaged.
•Gentlypushdownwardonthehandletoensurethatthepetstrolleriscompletelyopenedand
lockedbeforeANYuseoftheproduct.
IWARNING: Keep children away from pet stroller
whileunfolding.ALWAYSensurethelockingmechanismis
fully engaged when the pet stroller is in the opened position.
This action will prevent collapse of the pet stroller. Possible
pinchinghazard–Becarefulwhenunfoldingthepet stroller.
Installing/Removing the Front Wheels
• Slideonefrontwheelintothefrontwheelhousinguntilitclicksintoplace.(5) Repeat for the other
wheel. Pull on the wheels to ensure they are installed properly.
• Toremovethewheel,pressthemetalreleasebuttononthebackofthefrontwheelhousingand
pull the wheel away from the pet stroller. (6)
Installing/Removing the Rear Wheels
• Installarearwheelbyslidingtheaxleintotheholeinthewheelhubuntilitclicksintoplace.(7)
Repeat for the other wheel. Pull on the wheels to ensure they are installed properly.
• Toremovethewheel,pushthereleasebuttonontherearwheelhubandpullthewheelfromthe
pet stroller. (8)
Assembling the Pet Carrier
• Forthepetcarrierthatwaspreviouslyputaside,liftuponthesidesofthecarriertofullyexpandit.
(9)
• Keepingitfullyexpanded,gentlyplaceitontheoororatable.(10)
•Removethepadandpadsupportfromthecarrierandputthemaside.
•Openthefabricpocketonthebottomofthecarrierandlocatethesupportlegswiththefabric
loops attached. (11)
• Withonehandbracedagainstthebottomofthecarrier,useyourotherhandtormlypulltheloop
ononeofthesupportlegstowardsoneendofthecarrieruntilthesupportlegtsintothegroove

6
on the bottom panel of the carrier. (12) Repeat for the other support leg. The carrier should now
hold its shape.
• ClosethepocketusingtheVelcro®strips.(13)
• Placethepadsupport(withthezipperaroundit)(14) and the pad inside the carrier with the pocket
side facing down. (15)
The carrier is now ready to use with the pad in the lower position.
• Toattachthecarriertothestrollerframe,holdthecarryhandleandplacethecarrierintotheframe
sothattheU-shapedbracketonbothendsofthecarriertsbetweenthebrackettabsonthe
stroller frame bar. (16)
• Pushdowntheclamponbothsidesofthecarrierframetolockthepetcarriertothestrollerframe.
(17)
•Pulluponthecarriertoensureitissecure.
Setting up the Pet Carrier in the Upper Position
•Removethepadandpadsupportfromthecarrier.
•Attachthepadsupporttothecarrierfabricusingthezipper.Ensurethatthezipperiszippedall
the way around the perimeter of the carrier. (18)
•Replacethepadwiththepocketsidefacingdown.
Rear Wheel Brakes
• Alwaysengagetherearwheelbrakeswhennotpushingthepetstroller.
•Toengage,pushdownonthebrakelever.(19)
•Gentlypushthepetstrollerbackandforthtoensurethebrakesarefullyengaged.
•Torelease,pushdownonthebackofthebrakelever.(20)
IWARNING: Always make sure the wheel brakes
are engaged when the pet stroller is not being pushed so
thatthepetstrollerwillnotrollaway.Neverleave pet stroller
unattended,especiallyonahillorincline,asthepetstrollermay
tip over or slide.
Using the Pet Carrier as a Hand Held Product
• Toremovethecarrierfromthestroller,unlocktheclamponbothsidesofthecarrierframe.(21)
•Holdthecarryhandleandliftitupuntilitiscompletelyoutoftheframe.(22)
IMPORTANT NOTE: The storage basket should never be removed.
IWARNING: Maximumweightforthepetcarrierin
theupperpositionis22lbs.(10kg).).Maximumweightforthe
pet carrier in the lower position is 50 lbs. (22.7 kg). The
maximumweightthatcanbecarriedinthestoragebasketis
15 lbs. (6.8 kg).
Canopy
• Thecanopycanbepositionedbetweenfullyopenedandfullyclosed.
•Toopenthecanopy,unlocktheclamponbothendsofthecanopyandrotatethecanopytothe
desired position. (23)
Operation

7
•Tolockthecanopy,closethecanopyallthewaydownandpushdowntheclamponbothsidesto
secure it to the carrier frame. (24)
Tether
• Thetethershouldneverberemoved.
• Placeyourpetinthecarrierandattachthetethertothecollartosecurethem.(25)
•Thetethercanbeadjustedusingtheslidingplasticring.
Folding the Pet Stroller
• Keepchildrenawayfromthepetstrollerwhilefolding.
•TherearwheelbrakesMUSTbeengagedbeforefoldingthepetstroller.
•ThecarrierMUSTberemovedfromtheframe.
•Pushthefoldingreleaselockonthehandletotheleftandsqueezethebuttonontheinsideofthe
handle in. (26)
•Slowlypushthehandleforwarduntiltheproductiscompletelyfolded(27) and the safety latch has
automatically engaged. (28)
DO NOT force the pet stroller closed.
•Pulluponthehandletoensurethesafetylatchissecure.
CAUTION:Whilefoldingthepetstroller,becarefultokeepyourngersfrombeingpinchedby
moving parts.
Folding the Pet Carrier
•Topreparethecarrierforstorageortravel,removethepadandpadsupportfromthecarrier.
•Openthepocketonthebottomofthecarrier.(29)
•Withonehandbracedagainstthebottomofthecarrier,useyourotherhandtormlypullonthe
loopattachedtooneofthesupportlegsuntilitreleasesfromthegrooveandlaysat.(30) Repeat
for the other side.
•Collapsethecarrierbypushingdownonallsidessothatitliesatforstorageortravel.

8
Care & Maintenance
Maintenance
Allofthettings,snaps,locks,rivets,andotherhardwareandplasticpartsonthepetstrollershouldbe
inspected periodically to ensure that they are secured properly and not damaged or malfunctioning.
All straps and fabric items and their stitching should also be inspected periodically to ensure that they
aresecuredproperlyandnotloose,tornorotherwisedamaged.Allmovingparts,suchaswheels,
brakes,andhingesshouldalsobecheckedperiodicallytoensuretheyareoperatingproperly.
Anymissing,broken,orworncomponentsshouldbereplacedimmediately,andthepetstroller
should not be used until they are replaced. Only original manufacturer’s components should be
used.Ifneeded,pleasecontactJoovyatourtoll-freephonenumber.
Cleaning
Theframeandwheelsshouldalwaysbekeptcleanandfreeofdirtandforeignmatter,especially
after operating the pet strollerinrain,snow,orotherharshenvironments.Useaspongeorcloth
dampened with warm water and a mild detergent cleaner to clean the wheels after such use.
Storage
Directsunlightmayfadefabricanddryoutwheels.Storepet stroller indoors to prolong its
appearance.DONOTstoreoutdoors.Ensurethatthepet stroller is dry before storing for prolonged
periods. Always store the pet stroller in a dry environment. Store the pet stroller in a safe place when
notinuse(i.e.awayfromchildren).DONOTplaceheavyobjectsontopofthepetstroller.DONOT
store the petstrollernearadirectheatsourcesuchasaradiatororopenre.

9
Team 432
Please do not return this product to the store.
Ifyouexperienceanyofdicultywiththeassemblyoruseofthisproduct,orifyouhaveaquestion
regardingtheseinstructions,pleasecontactTeam432:
United States
Joovy
(877)456-5049,8:30am–5:00pmCentralTime
joovy.comLiveChat,8:30am–9:00pmCentralTime
customerservice@joovy.com
Canada
ElfeJuvenileProducts
(800)667-8184,8:30am–5:00pmEasternTime
@joovy

10
Sécurité et Mise en Gardes
•NE JAMAIS placer un enfant ou un bébé dans ce produit
pour quelque raison que ce soit.
•NEPASsurchargerceproduit.
•Lepoidsmaximalpourleporte-animalenposition
supérieure est de 10 kg (22 lb).
•Lepoidsmaximalpourleporte-animalenpositioninférieure
estde22,7kg(50lb).
•Lepoidsmaximalpourlepanierderangementestde
6,8kg(15lb).
•Ceproduitn'estPASpourletransportd'animauxsurles
avions.
•Ceproduitn’estpasunjouet.NEPASlaisserlesenfants
jouer avec celui-ci.
Veuillez ne pas retourner ce produit en magasin.
Sivousrencontrezdesdicultésavecl’assemblageoul’utilisationdeceproduit,ousivousavez
desquestionsàproposdecesinstructions,veuillezcontacterl'équipe432(page17).
Veuillez noter: Les styles et couleurs peuvent varier.
IMISE EN GARDE
Veuillez lire attentivement ces instructions avant l’utilisation
du produit, et conservez-les pour référence ultérieure.

11
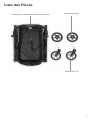
Liste des Pièces
Pousette pour animal avec porte-animal inclus
Roues Avant (2)
Roues Arrière (2))

12
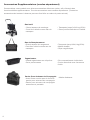
Accessoires Supplémentaires (vendus séparément)
Personnalisezvotreproduitavecdiversaccessoiresoertsenoption,and’obtenirdes
fonctionnalités supplémentaires. Tous les accessoires sont vendus séparément. (Toutes les
accessoiresdebottesci-dessouspeuventêtrexésaucadreduporte-animal)
Sac de Remplacement
•Grand espace de rangement
•Peut être utilisé comme sac de
transport
•Transportejusqu’à24,9kg(55lb).
•Maille durable
•Clips magnétiques
Sac Isolé
• Grand espace de stockage
• Peut être utilisé comme sac de
transport
•Transportejusqu’à24,9kg(55lb).
•Deuxpocheslatéralesenmailles
Organisateur
•Grand organisateur en néoprène
•Deuxporte-tasses
•Sixcompartimentsindividuels
•Poche amovible avec fermeture
•éclair
Panier Pour Animaux de Compagnie
•Avec 2ème couche pour le fond du
panierpouranimauxdecompagnie
•Panierpouranimauxdecompagnie
autonome et portable
•Maille résistante

13
•Transportejusqu’à24,9kg(55lb).
•Maille durable
•Clips magnétiques
•Transportejusqu’à24,9kg(55lb).
•Deuxpocheslatéralesenmailles
•Sixcompartimentsindividuels
•Poche amovible avec fermeture
•éclair
Assemblage
REMARQUE IMPORTANTE : Veuillez consulter la n de ce manuel pour
toutes les photos référencées entre parenthèses dans les instructions
ci-dessous.
Déballer le Produit
•Retireztoutdelaboîte–lapousettepouranimalavecleporte-animalinclus,lesrouesavant(2),
les roues arrière (2) et les documents (non illustrés).
•Éliminezcorrectementtoutlematérield’emballage,ycomprislessacsenplastique.
•NepermettezPASauxenfantsdejoueraveclematérield’emballage.
IMISE EN GARDE: L’assemblage par un adulte
est requis pour ce produit. Aucun outil requis.
Déplier la Poussette Pour Animal
•Orientezlapousettepouranimalaveclapoignéefaisantfaceverslehaut.(1)
•Retirezleporte-animaldelapousette.Mettez-ledecôtépourmontageultérieur.(2)
•Liberezleloquetdesécuritésituésurlecôtégauchedelapousettepouranimal. (3)
•Soulevezlapoignée.(4) Continuezdetirerjusqu'àcequelapousettepouranimalsoit
complètement droite et le mécanisme de blocage complètement engagé.
•Abaissezsoigneusementlapoignéepours'assurerquelapousettepouranimalestcomplètement
ouverte et fermée avant TOUTE utilisation du produit.
IMISE EN GARDE: Gardez les enfants éloignés
de la pousette pour animal lorsque vous la dépliez. Assurez
TOUJOURSquelemécanismedeblocageestcomplètement
engagé lorsque la pousette pour animal est en position
ouverte.Cetteactionempêcheral'eondrementdela
pousettepouranimal.Dangerdepincementpossible-Faites
attention lorsque vous dépliez la poussette pour animal.
Installation/Retrait des Roues Avant
• Faitesglisseruneroueavantdanslecompartimentderoueavantjusqu’àcequ’undéclicse
produise. (5) Répétez l’opération pour l’autre roue. Tirez sur les roues pour vous assurer qu’elles
sont correctement installées.
•Pourretirer,appuyezsurleboutondelibérationenmétalaudosducompartimentderoueavantet
retirez du panier de magasinage. (6)
Installation/Retrait des Roues Arrière
• Installezunerouearrièreenglissantlemoyeudansl’oriceaucentredelarouejusqu’àcequ’elle
se verrouille en place. (7) Répétez pour l’autre roue. Tirez sur les roues pour vous assurer qu’elles
sont correctement installées.
• Pourretirer,appuyezsurleboutondelibérationaucentredelarouearrièreetretirezdupanierde
magasinage the panier de magasinage. (8)
•Maille résistante

14
Freins de Roue Arrière
• Toujoursengagerlesfreinsderouearrièreavantd’utiliserlepanierdemagasinage.
• Pourengager,appuyezsurlelevierdefrein.(19)
• Pourlibérer,poussezsurledosdulevierdefrein.(20)
NOTE: Poussez doucement panier de magasinage d’avant vers l’arrière pour vous assurer que les
freins sont bien engagés.
IMISE EN GARDE: Assurez-vous toujours que
les freins de roue sont engagés lorsque vous n’utilisez pas le
panierdemagasinageand’éviterquelepanierdemagasinage
nesedéplace.Nelaissezjamaislepanierdemagasinage
sanssurveillance,enparticulierdansunecollineouunepente,
car le panier de magasinage pourrait basculer ou glisser.
Utiliser le Porte-animal Comme Produit Portable
Pourretirerletransporteurdelapousette,débloquezlapincesituéedesdeuxcôtésducadredu
transporteur. (21)
•Tenezlapoignéedutransporteuretsoulevez-lajusqu'àcequ'ellesortecomplètementducadre.(22)
REMARQUE IMPORTANTE : Le panier de rangement ne devrait jamais être enlevé.
Fonctionnement
Montage du Porte-animal
• Pourleporte-animalauparavantmisdecôté,levezlescôtésdutransporteurpourl'étendre
complètement. (9)
•Maintenez-lecomplètementétendu.Placez-lesoigneusmentsurleplancherousurunetable.(10)
•Retirezlecoussinetsonsupportdutransporteur.Mettez-lesdecôté.
•Ouvrezlapocheentissusituésurlebasdutransporteur.Localisezlespiedsdesoutienavecles
boucles en tissu attachées. (11)
•Avecunemainembrasséecontrelebasdutransporteur,utilisezl'autremainpourtirerfermement
surlaboucledel'undespiedsdeversl'unedesextrémitésdutransporteurjusqu'àcequelepied
de support entre dans la rainure située sur le panneau du bas du transporteur. (12) Répétez pour
l'autrepieddesupport.Letransporteurdevraitàprésentgardersaforme.
•Fermezlapocheàl'aidedesbandesVelcro®. (13)
•Placezlesupportdecoussin(aveclafermetureéclairautour) (14)etlecoussinàl'intérieurdu
transporteuraveclecôtédelapochefaisantfaceverslebas.(15)
Le transporteur est à présent prêt pour utilisation avec le coussin en position inférieure.
•Pourxerletransporteuraucadredelapousette,tenezlapoignéedetransportetplacez
letransporteurdanslecadredefaçonquelesupportenUsituésurlesdeuxextrémitésdu
transporteurs'ajusteentrelespattesdesupportsituéessurlabarreducadredelapousette. (16)
Abaissezlapincedesdeuxcôtésducadredutransporteurpourbloquerleporte-animalaucadre
de la pousette. (17)
•Tirezenlevantletransporteurpours'assurerqu'ilestbienxéenplace.
Réglage du Porte-animal en Position Supérieure
• Retirezlecoussinetsonsupportdutransporteur.
•Attachezlesupportdecoussinautissudutransporteuràl'aidedelafermeture-éclair.Assurez-
vous que la fermeture éclair est complètement fermée autour du périmètre du transporteur. (18)
•Remettezlecoussinaveclecôtédepochefaisantfaceverslebas

15
IMISE EN GARDE: Lepoidsmaximalpourle
porte-animal en position supérieure est de 10 kg (22 lb). Le
poidsmaximalpourleporte-animalenpositioninférieureestde
22,7kg(50lb).Lepoidsmaximalpourlepanierderangement
estde6,8kg(15lb).
Auvent
• L'auventpeutêtrepositionnéentreunepositioncomplètementouverteetunecomplètement
fermée.
•Pourouvrirl'auvent,débloquezlapincesituéedesdeuxboutsdel'auventettournezl'auventàla
position désirée. (23)
•Pourbloquerl'auvent,fermez-lecomplètementverslebasetpoussezsurlapincesituéedesdeux
côtéspourlaxeraucadredutransporteur. (24)
Attache
• L'attachenedevraitjamaisêtreenlevée.
•Placezvotreanimaldansletransporteur.Fixezl'attacheaucollier.(25)
•L'attachepeutêtrerégléeàl'aidedel'anneauenplastiqueglissant.
Plier la Poussette Pour Animal
•Gardezlesenfantséloignésdelapousettepouranimallorsquevousladépliez.
•LesfreinsderouearrièreDOIVENTêtreengagésavantdedéplierlapousettepouranimal.
•LetransporteurDOITêtreretiréducadre.
•Poussezleblocagedelibérationdepliagesituésurlapoignéeverslagauche.Appuyezsurle
boutonsituéàl'intérieurdelapoignée.(26)
•Poussezlentementlapoignéeversl'avantjusqu'àcequeleproduitsoitcomplètementplié (27) et
le loquet de sécurité automatiquement engagé. (28)
Ne forcez PAS la pousette pour animal lorsqu'elle est fermée.
•Tirezenlevantlapoignéepours'assurerqueleloquetdesécuritéestxéenplace.
ATTENTION : Lorsquevouspliezlapousettepouranimal,faitesattentionàempêchervosdoigts
d'êtrepincésparlespiècesmobiles.
Plier le Porte-Animal
• Pourpréparerletransporteurpourunrangementouundéplacement,retirezlecoussinetson
support du transporteur.
•Ouvrezlapocheentissusituésurlebasdutransporteur. (29)
•Avecunemainembrasséecontrelebasdutransporteur,utilisezl'autremainpourtirerfermement
surlaboucledel'undespiedsdesupportjusqu'àcequ'ilsedégagedelarainureetreposeàplat.
(30)Répétezpourl'autrecôté.
•Fermezletransporteurenpoussantverslebassurtouslescôtésanqu'ilreposeàplatpourson
rangement ou un déplacement.

16
Soin et Entretien
Entretien
Touslesraccords,fermoirs,verrous,rivets,etautrespiècesdequincaillerieetenplastiquesurla
pousettepouranimaldoiventêtreinspectéssurunebasepériodiquepours'assurerqu'ilssontbien
xés,nesontpasendommagésnidysfonctionnels.Leharnaisdesécurité,ainsiquelesautres
sangles,lespiècesentissuetleurscouturesdoiventégalementêtreinspectéspériodiquementpour
vérierleursoliditéets’assurerqu’ilsnesontpasdéchirésouendommagés.Touteslespièces
mobiles,telqueroues,freins,articulations,etc.,doiventaussifairel’objetd’unevéricationrégulière
pour s’assurer qu’elles fonctionnent bien
Toutcomposantmanquant,briséouusédoitêtreremplacéimmédiatement.Lapousettepouranimal
nedevraitpasêtreutiliséjusqu'àleurremplacement.Utilisezuniquementlespiècesoriginales
provenantdufabricant.Aubesoin,communiqueravecJoovyaunumérosansfraisfourni.
Nettoyage
Lecadreetlesrouesdoiventtoujoursêtreconservépropresetexemptsdesaletésoudecorps
étranger.Spécialementaprèsutilisationdelapoussettepouranimalsouslapluie,danslaneige
oud'autresenvironnementsdiciles.Lorsd’unetelleutilisation,nettoyezlesrouesàl’aided’une
épongeoud’unlingehumideavecdel’eautièdeetundétergentdoux.
Entreposage
La lumière directe du soleil peut décolorer le tissu et assécher les roues. Rangez la pousette pour
animalàl'intérieurpourprolongersonapparence.NErangezPASàl'extérieur.Assurez-vousque
lapousettepouranimalestsècheavantdel'entreposerpourdespériodesprolongées.Rangez
toujours la pousette pour animal dans un environnement sec. Rangez la pousette pour animal dans
unendroitsécuritairelorsqu'ellen'estpasenutilisation(loindesenfants).NeplacezPASdesobjets
lourssurlehautdelapousettepouranimal.NerangezPASlapousettepouranimalprèsd'une
sourcedechaleurdirectecommeunradiateurouuneammenue.

17
Équipe 432
Veuillez ne pas retourner ce produit en magasin.
Sivousrencontrezdesdicultésavecl’assemblageoul’utilisationdeceproduit,ousivousavez
desquestionsàproposdecesinstructions,veuillezcontacterl'équipe432:
États-Unis
Joovy
877)456-5049,8h30–17h00pm,heureduCentre
joovy.comClavardageenligne,8h30–21h00,heureduCentre
customerservice@joovy.co
Canada
ElfeJuvenileProducts
(800)667-8184,8h30–17h00,heuredel’Est
@joovy

18
Seguridad y Advertencias
•NUNCA coloque a un niño o un bebé dentro de este
producto por ningún motivo.
•NOsobrecargueesteproducto.
•Elpesomáximoquesoportaelportamascotasenla
posición superior es de 22 libras (10 kg).
•Elpesomáximoquesoportaelportamascotasenla
posicióninferioresde50libras(22,7kg).
•Elpesomáximoquesoportaelcanastoesde15libras(6,8kg).
•EsteproductoNOesparatransportarmascotasenavión.
•Esteproductonoesunjuguete.NOpermitaquelosniños
jueguen con él.
No devuelva este producto a la tienda.
Sitienealgunadicultadparaarmarousaresteproducto,ositienealgunapreguntaconrespectoa
estasinstrucciones,porfavorcontactealEquipo432(página24).
Tenga en cuenta: Los estilos y colores pueden variar.
IADVERTENCIA
Lea atentamente estas instrucciones antes de usar y
consérvelas para futuras consultas.

19
Lista de Piezas
Cochecito para mascotas con porta
mascotas incluido
RuedasDelanteras(2)
Ruedas Traseras (2)

20
Accesorios adicionales (se venden por separado)
Personalice su cochecito con una serie de accesorios opcionales para mayor funcionalidad. Todos
los accesorios se venden por separado. (Todos los siguientes accesorios Boot se pueden colocar en
la estructura del cochecito)
Bolso Mallado
•Gran espacio de almacenamiento
•Con manijas para transportar
•Transporta hasta 55 libras.
•Malla duradera
•Clips magnéticos
Bolso Aislante
•Gran capacidad de almacenamiento
•Con manijas para transportar
•Transporta hasta 55 libras.
•Dosbolsillosdemallalaterales
Organizador
•Gran organizador de neopreno
•Dosportavasos
•Seis compartimientos individuales
•Bolsillo con cierre desmontable
Cesta Para Mascotas
•Con segunda capa para el fondo
de la cesta para mascotas
•Cestaparamascotasportátile
independiente
•Malla duradera
La page est en cours de chargement...
La page est en cours de chargement...
La page est en cours de chargement...
La page est en cours de chargement...
La page est en cours de chargement...
La page est en cours de chargement...
La page est en cours de chargement...
La page est en cours de chargement...
La page est en cours de chargement...
La page est en cours de chargement...
La page est en cours de chargement...
La page est en cours de chargement...
-
 1
1
-
 2
2
-
 3
3
-
 4
4
-
 5
5
-
 6
6
-
 7
7
-
 8
8
-
 9
9
-
 10
10
-
 11
11
-
 12
12
-
 13
13
-
 14
14
-
 15
15
-
 16
16
-
 17
17
-
 18
18
-
 19
19
-
 20
20
-
 21
21
-
 22
22
-
 23
23
-
 24
24
-
 25
25
-
 26
26
-
 27
27
-
 28
28
-
 29
29
-
 30
30
-
 31
31
-
 32
32


Joovy Pootler Manuel utilisateur
- Catégorie
- Poussettes
- Taper
- Manuel utilisateur
dans d''autres langues
- English: Joovy Pootler User manual
- español: Joovy Pootler Manual de usuario
- 日本語: Joovy Pootler ユーザーマニュアル


