Haier AS07QS1ERA Mode d'emploi
- Catégorie
- Climatiseurs split-system
- Taper
- Mode d'emploi

Please read this operation manual before using the air conditioner.
●
Keep this operation manual for future reference.
SPLITTYPEROOMAIRCONDITIONER
OPERATION MANUAL
0010539319
AS09QS1ERA
AS12QS1ERA
6
1
2
4
7
PARTS AND FUNCTIONS
OPERATION
MAINTENANCE
TROUBLE SHOOTING
CAUTIONS
Contents
13
8
9
12
14
Índice
PRECAUCIONES
P
I
EZ
A
S Y FUNCIONES
FUNCIONAMIENTO
MANTENIMIENTO
RESOLUCIÓN DE PROBLEMAS
20
15
16
19
21
Contenuti
ATTENZIONE
PARTI E FUNZIONI
FUNZIONAMENTO
MANUTENZIONE
RISOLUZIONE DEI PROBLEMI
27
22
23
26
28
Table des matières
MISES EN GARDE
PIÈCES ET FONCTIONS
UTILISATION
MAINTENANCE
DÉPANNAGE
AS07QS1ERA


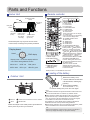
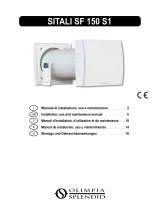
Outdoor Unit
Loading of the battery
1
2
3
4
Parts and Functions
Indoor Unit
OUTLET
INLET
CONNECTING PIPING AND ELECTRICAL WIRING
DRAIN HOSE
Remote controller
Remove the battery cover;
Load the batteries as illustrated.
2 R-03 batteries, resetting key
(cylinder);
Be sure that the loading
is in line with th
e" + "/"-";
Load the battery,then put on the cover again.
The distance between the signal transmission head and the rece-
iver hole should be within 7m without any obstacle as well.
When electronic-started type fluorescent lamp or change-over
wireless telephone is installed in the
ver is apt to be disturbed in receiving
the signals,
so the distance to the indoor unit should be shorter.
type fluorescent lamp or
room, the recei
Note:
Full display or unclear display during operation indicates the
ries have been used up.
Please change batteries.
If the remote controller can't run normally during operation, please
reload several minutes later.
batte
remove the batteries and
Please be subject to the actual produce purchased the
above picture is just from your reference
4
Hint:
Remove the batteries in case won't be in use for a long period. If
there is any display after taking-out, just press reset key.
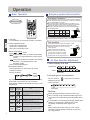
1. Mode display
2. Signal sending display
4. FAN SPEED display
5. LOCK display
6. TIMER OFF display
TIMER ON display
LO MED HI
7.TEMP display
16. LOCK button
Used to lock buttons and LCD display.
25. RESET button
When the remote controller
appears abnormal, use a sharp
pointed article to press this button
to reset the remote
22. HOUR button
Operation mode
AUTO FANCOOL DRY
Remote controller
HEAT
1
2
3
4
5
9
10
11
12
13
14
15
16
17
22
23
24
25
19
20
21
8
18
7
6
Control the lightening and extinguishing
of the indoor LED display board.
3. SWING display
8
.
9. QUIET button
10. HEAT button
11. COOL button
12. AUTO button
13. FAN SPEED button
14. TIMER button
15. HEALTH button
17. LIGHT button
18. POWER ON/OFF button
19. DRY button
20. TEMP button
21. SWING button
23. EXTRA FUNCTION button
24.CANCEL/CONFIRM button
AUTO
Function: Setting and cancel to the
timer and other additional functions.
Display
circulated
Operation mode
Remote controller
QUITE
POWER
SLEEP
HEALTH
Additional functions display
Healthy function is not available for some units.
Function: FAN mode --- Healthy
airflow position1--- Healthy airflow
position 2 --- Restore the original
flap position --- Right & left air airflow
--- A-B yard---10 and heating symbol
displayed simultaneously--- Sleeping
--- Electrical heating--- Refresh air
(
reserved function) --- Power ---
Fahrenheit/Celsius mode conversion
Actual indoop unit may vary from the one shown
in the manual, according to the product purchased.
TEMP display
Display board
COOL: blue
AUTO: white
HEAT: red
DRY: cyan
FAN: yellow
: green
HEALTH
Aureol
Display mode the aureole display different
colour when setting different function
Inlet grille
Inlet
Air Purifying Filter
(inside)
Emergency
Switch
Display board
(Adjust left and
right air flow)
Vertical blade
Horizontal flap
(Adjust up and
down air flow,
Don't adjust
it manually)
Outlet
Nano-aqua
generator
(inside)
1

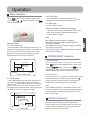
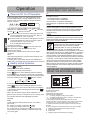
Operation
Air Flow Direction Adjustment
Press FAN button. For each press, fan speed
follows:
Remote controller:
Press
button
Every time the button is pressed, temp.setting
increase 1
o
C,if kept depressed, it will increase
rapidly
Every time the button is pressed, temp.setting
decrease 1
o
C,if kept depressed, it will
decrease rapidly
Select a desired temperature.
4.Fan speed selection
3.Select temp.setting
Air conditioner is running under displayed fan speed.
When FAN is set to AUTO, the air conditioner
automatically adjusts the fan speed according to room
temperature.
1. Unit start
Press ON/OFF on the remote controller, unit starts.
Base Operation
Remote controller
1.Status display of air flow
When restart after remote turning off, the remote
memorize the previous
2.Left and right air flow adjustment
Cautions:
When adjusting the flap by hand,turn off the unit.
When humidity is high,condensate water might occur
adjusted to left or
It is advisable not to keep horizontal flap at downward
position for a long time in COOLor DRY
otherwise, condensate water might occur.
Emergency operation and test operation
at air outlet if all vertical louvers are
right.
mode ,
controller will automatically
Note:
set swing position.
changes as
Operation
Mode
Remote
Controller
Note
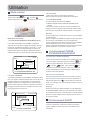
In DRY mode , when room temperature becomes lower
than temp.setting+2
o
C, unit will run intermittently at LOW
speed regardless of FAN setting.
Under the mode of auto operation, air conditioner will
automatically select Cool or Heat operation according to
room temperature. When FAN is set to AUTO the air
conditioner automatically adjusts the fan speed according
to room temperature.
In FAN operation mode , the unit will not operate in COOL or
HEAT mode but only in
FAN mode, AUTO is not available in
FAN mode. And temp. setting is disabled. In FAN mode,
sleep operation is not available.
Emergency Operation:
Use this operation only when the remote controller is defective
or lost, and with function of emergency running, air conditoner
can run automatically for a while.
When the emergency operation switch is pressed, the " Pi "
sound is heard once, which means the start of this operation.
When power switch is turning on for the first time and
emergency operation starts, the unit will run automatically in
the following modes:
Room
temperature
Designated
temperature
Timer
mode
Fan
speed
Operation
mode
Above 2
o
C
Below 2
o
C 2
o
C
2
o
C
No
AUTO
AUTO
COOL
HEAT
No
It is impossible to change the settings of temp. and fan speed,It
is also not possible to operate in timer or dry mode.
temperature is below 16
o
C, do not use it in the
Test operation:
Use this switch in the test operation when the room
normal operation.
your finger from the switch: the cooling
Continue to press the test operation
switch for more than 5 seconds . After
you hear the "Pi" sound twice,
release
Test operation switch is the same as emergency switch.
operation starts with the air flow speed "Hi".
LOW
MED HI
COOL/DRY:
HEAT:
Initial state
AUTO
2. Select operation mode
COOL button:Cooling mode
HEAT button: Heating mode
DRY button: Dehumidify mode
Display
circulated
Pi
Pi Pi
DRY
COOL
AUTO
HEAT
FAN
In HEAT mode, warm air will blow out after a short
period of the time due to cold-draft prevention function.
When FAN is set to AUTO, the air conditioner automatically
adjusts the fan speed according to room temperature.
remote controller:
Initial state
For each press of “ ” buttor,remote controller
displays as follows:
2

Operation
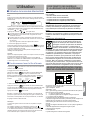
Sleep Operation
If the wind speed is high or middle before setting for the
sleep, set for lowing the wind speed after sleeping.
If it is low wind, no change.
5.Set the wind speed change when sleeping
Operation Mode
1. In COOL,DRY mode
SLEEP operation starts SLEEP operation stops
SLEEP
operation starts
SLEEP
operation stops
Approx.6hrs
1 hr
1 hr
1 hr
3 hrs
3 hrs
Rises 1
O
C
Rises 1
O
C
Rises 1
O
C
Temp.setting
Temp.setting
Unit stop
Unit stop
In COOL, DRY mode
In HEAT mode
Decreases 2
O
C
Decreases 2
O
C
1 hr
2.
3.
In HEAT mode
In AUTO mode
4. In FAN mode
It has no SLEEP function.
Note
POWER/QUIET Operation
1 hours after SLEEP mode starts,temp.will become
higher than temp.setting.After another 1 hours,temp.rises
by 1 futher.The unit will run for further
6 hours then
stops Temp. is higher than temp.setting so that room
temperature won’t be too low for your sleep.
1 hours after SLEEP mode starts,temp will become 2
lower than temp.setting.After another 1 hours,temp
decrease by 2
rises
by 1 futher.The unit will run for further 3 hours
then stops.Temp.is lower than temp. setting so that room
temperature won’t be
too high for your sleep.
The unit operaters in corresponding sleep mode
adapted to the automatically selected operation
mode.
O
C
O
C futher.After more another 3 hours,temp.
O
C
1
O
C
O
C
Press button to enter additional options, when
cycle display to , will flash. And then press
enter to sleep function.
(1)
POWER Operation
(2)
QUIET Operation
Note ˖
When you need rapid heating or cooling, you can use this function.
You can use this function when silence is needed for rest or reading.
During POWER operation, in rapid HEAT or COOL mode ,
the room will show inhomogeneous temperature distribution.
Long period QUIET operation will cause effect of not too
cool or not too warm.
Press QUIET button, the remote controller will show ,
and then achieve to the quiet function. Press again this
QUIET button , the quiet function will be cancelled.
Press button to enter additional options, when cycle
display to , will flash and then press ,enter to
power function. When cancel the function, please enter
additional options again and to cancel power function.
HEALTH Operation
After TIMER ON setting,SLEEP is unavailable;
After SLEEP setting,then TIMER ON setting,SLEEP is
cancelled automatically.
After TIMER OFF setting,then SLEEP setting,it's available
and running as sequencing;
After SLEEP setting,then TIMER OFF setting,it's available
and running as sequencing.
Nano-Aqua generator adopt two high voltage poles to
ionize the water molecule, produces plenty of positive and
negative ions, and release these ions to the air to kill the
bacterium, as well as to refresh the air.
3

Operation
1.After unit starts, select your desired operation mode.
2.Press TIMER button to change TIMER mode. Every
time the button is pressed, display changes as follows:
Remote controller:
BLANK
TIMER ON TIMER OFF TIMER ON-OFF
Then select your desired TIMER mode (TIMER ON or
TIMER OFF or TIMER ON-OFF). " "or " "will flash.
3.Press / button to set time.
It can be adjusted within 24 hours.
Hints:
After replacing batteries or a power failure happens, time
setting should be reset.
According to the Time setting sequence of TIMER ON or
TIMER OFF, either Start-Stop or Stop-Start can be achieved.
Timer On/Off On-Off Operation
CE
All the products are in conformity with the following
European provision:
- Low Voltage Directive 73/23/EEC
- Low Voltage Directive 2006/95/EC
-Electomagnetic CompatibilitY 89/336/EEC
-Electomagnetic CompatibilitY 2004/108/EC
ROHS
The products are fulfilled with the requirements in the
directive 2002/95/EEC of the European parliament and of
council on the Restriction of the use of Certain Hazardous
Substances in Electrical and Electronic Equipment (EU
RoHS Directive)
WEEE
DISPOSAL REQUIREMENTS:
Your air conditioning product is marked with this
symbol.This means that electrical and electronic
products shall not be mixed with unsorted
household waste. Do not try to dismantle the
system yourself : the dismantling of the air
EUROPEAN REGULATIONS
CONFORMITY FOR THE MODELS
1
1+2=
kg
R410A
2
kg
2=
1=
B
C
D
FE
kg
A
This product contains fluorinated greenhouse gases covered by
the Kyoto Protocol. Do not vent into the atmosphere.
Refrigerant type:R410A
GWP* value:1975
GWP=global warming potential
Please fill in with indelible ink,
• 1 the factory refrigerant charge of the product
• 2 the additional refrigerant amount charged in the field and
• 1+2 the total refrigerant charge
on the refrigerant charge label supplied with the product.
The filled out label must be adhered in the proximity of the product
charging port (e.g. onto the inside of the stop value cover).
A contains fluorinated greenhouse gases covered by the Kyoto
Protocol
B factory refrigerant charge of the product: see unit name plate
C additional refrigerant amount charged in the field
D total refrigerant charge
E outdoor unit
F refrigerant cylinder and manifold for charging
IMPORTANT INFORMATION REGA-
RDING THE REFRIGERANT USED
In accordance with the directive 2002/96/CE of the European
parliament, herewith we inform the consumer about the dis-
posal requirements of the electrical and electronic products.
conditioning system,treatment of the refrigerant, of oil and of
other part must be done by a qualified installer in
accordance
with relevant local and national legislation. Air conditioners
must be treated at a specialized treatment facility for reuse,
recycling and recovery. By ensuring this product is disposed
of correctly, you will help to prevent potential negative cons-
equences for the environment and humen health. Please
contact the installer or local authority for more information.
Battery must be removed from the remote controller and dis-
posed of separately in accordance with relevant local and
nationl legislation.
Contains fluorinated greenhouse gases
covered by the Kyoto Protocol
Healthy airflow Operation
1.Press to starting
Setting the comfort work conditions.
2.The setting of healthy airflow function
Note:
1.After setting the healthy airflow function, the position
grill is fixed.
4.In cooling and dry, using the air conditioner for a long
time under the high air humidity, condensate water may
occur at the grille .
3.The cancel of the healthy airflow function
Notice: Do not direct the flap by hand. Otherwise, the
grille will run incorrectly. If the grille is not run correctly, stop
for a minute and then start, adjusting by remote
controller.
2.In heating, it is better to select the
3.In cooling, it is better to select the
mode.
mode.
TIMER OFF-ON
0.5h
0.5h 0.5h
0.5h
Press the button for each time, setting time in the first
12 hours increased by 0.5 hour every time, after 12
hours,increased by 1 hour every time.
Press the button for each time, settiing time in the first
12 hours decreased by 0.5 hour every time, after 12
hours,decreased by 1 hour every time.
After adjust the time,press button and confirm the
time ON or OFF button will not flash any more.
4.Confirm timer setting
5.Cancel timer setting
Press the timer button by times until the time display
eliminated.
Press button to enter additional options,Press this
button continuously, the louvers location will cycle between
in the following three locations, to choose the swing location
what you needed,and then press button to confirm.
Press button to enter additional options,Press this
button continuously, the louvers location will cycle between
in the following three locations again,and then press
button to cancel.
Healthy
airflow
upwarder
Healthy
airflow
downwarder
Present
position
4

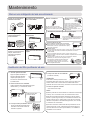
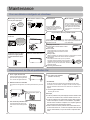
Maintenance
Setting of proper room
temperature
Close doors and windows
during operation
If the unit is not to be used
for a long time, turn off the
power supply main switch.
Use the timer effectively
Use the louvers effectively
Do not block the air inlet
or outlet
Proper
temperature
During cooling operation
prevent the penetration
of
direct sunlight with
curtain or blind
OFF
Remote Controller Indoor Body
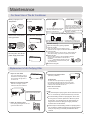
1.Open the lnlet Grille
2.Detach the standard air filter
3.Attach Air Purifying Filter
4.Attach the standard air filter
(Necessar
y installation)
5.Close the Inlet Grille
Close the Grille surely
Slide the knob slightly up
ward to
release the filter, then withdraw it.
Put air purifying filter appliances into the
right and left filter frames.
NOTE:
The photocatalyst air purifying filter will be solarized in fixed
time. In normal family,
it will be solarized every 6 months.
Prop up the inlet grille by using a
small device named grille-support
ATTENTION:
Please keep the bacteria-killing medium air purifying filter in
avoid long time directly sunshine
when you stop using it,or its ability of sterilization will
be
reduced.
The bacteria-killing medium air purifying filter will be used
for a long time,no need for replacement. But in the period
of using them ,you should remove the dust frequently by
which located in the right side of
the indoor unit.
using vacuum cleaner or flaping them lightly,otherwise ,
its performance will be affected.
the cool and dry conditions
For Smart Use of The Air Conditioner
Replacement of Air Purifying Filter
The white side of the photocatalyst air purifying filter
face outside,and the black side face the unit The green
side of the bacteria-killing medium air purifying filter face
outside,and the white side face the unit.
Do not usewater,wipe the controller
with a dry cloth.Do not use glass
cleaner or chemical cloth.
wipe the air conditioner by using a
soft and dry cloth.For serious stains,
use a neutral detergent diluted with
water.Wring the water out of the
cloth before wiping,then wipe off the
detergent completely.
Air Filter cleaning
Open the inlet grille by pulling it upward.
Remove the filter.
Clean the filter.
Attach the filter.
Close the inlet grille.
Push up the filter's center tab slightly until it is
from the stopper, and remove the filter do
wnw
ard.
Use a vacuum cleaner to remove dust, or wash the filter with
water.After washing, dry the filter completely in the shade.
Attach the filter correctly so that the "FRONT" indication
facing to the front.Make sure that the filter is
fixed behind the stopper.If the right
attached correctly, that
Do not use the following for cleaning
Gasoline,benzine, thinner or cleanser
ay
damage the coating of the unit.
Hot water over 40
O
C(104
O
F) may
discoloring or deformation.
Once every
two weeks
m
cause
released
is
completely
and left filters are not
may cause defects.
Detach old Air Purifying Filter
5

the power supply cord
and so on.
2.Do not install in the place where there is any
possibility of inflammable gas leakage around the unit.
3.Do not get the unit exposed
to vapor or oil steam.
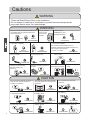
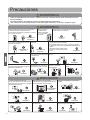
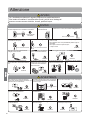
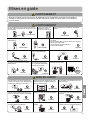
Cautions
Please call Sales/Service Shop for the Installation.
Do not attempt to install the air conditioner by yourself because improper works
may cause electric shock, fire, water leakage.
Connect the earth
cable.
earthing
WARNING
When abnormality such as burnt-small found,
immediately stop the operation button and
contact sales shop.
OFF
Use an exclusive
power source
with a circuit
breaker
ENFORCEMENT
Connect power supply cord
to the outlet completely
Use the proper voltage
Do not use power supply
cord in a bundle.
Take care not to damage
the power supply cord.
1.Do not use power supply cord extended
or connected in halfway
STRICT
ENFORCEMENT
STRICT
STRICT
ENFORCEMENT
PROHIBITION
PROHIBITION
PROHIBITION
PROHIBITION
Do not start or stop the
operation by disconnecting
Do not channel the air flow directly
at people, especially at infants or
the aged.
Do not try to repair or
reconstruct by yourself.
Do not use for the purpose of storage of
food, art work, precise equipment,
breeding, or cultivation.
CAUTION
Take fresh air occasionally especially
when gas appliance is running at the
same time.
PROHIBITION
STRICT
ENFORCEMENT
Do not operate the switch with
wet hand.
PROHIBITION
PROHIBITION
PROHIBITION
PROHIBITION
PROHIBITION
Do not install the unit near a fireplace
or other heating apparatus.
Check good condition of the
installation stand
Do not pour water onto the unit
for cleaning
PROHIBITION
Do not place animals or plants in
the direct path of the air flow
Do not place any objects on or
climb on the unit.
Do not place flower vase or water
containers on the top of the unit.
Do not insert objects into the air
inlet or outlet.
PROHIBITION
PROHIBITION
PROHIBITION
STRICT
ENFORCEMENT
Check proper
installation of the
drainage securely
WARNING
6

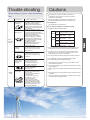
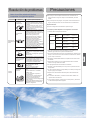
Trouble shooting
Normal
Performance
inspection
Noise is heard
Phenomenon
Cause or check points
The system
immediately.
Smells are
generated.
Mist or steam are
Multiple
check
Poor cooling
When unit is stopped, it won't restart
elapsed to protect the system.
When the electric plug is pulled out
and reinserted, the protection circuit
During unit operation or at stop,
a swishing or gurgling noise may
(This noise is generated by
refrigerant flowing in the system.)
During unit operation, a cracking
noise may be heard.This noise is
temperature changes.
Should there be a big noise from
filter may be too dirty.
This is because the system
circulates smells from the interior
During COOL or DRY operation,
This is due to the sudden cooling
Is power plug inserted?
Is there a power failure?
Is fuse blownout?
Is the air filter dirty?
Are there any obstacles before
Is temperature set correctly?
Are there some doors or
Is there any direct sunlight
through the window during the
Are there too much heat sources
or too many people in the room
In dry mode,
fan
speed can’t be
changed.
In DRY mode, when room temperature
setting+2
o
C,unit will run
regardless of FAN setting.
during cooling operation?
cooling operation?(Use curtain)
windows left open?
inlet and outlet?
Normally it should be cleaned
every 15 days.
intermittently at LOW speed
becomes lower than temp.
indoor unit may blow out mist.
of indoor air.
air such as the smell of furniture,
paint, cigarettes.
air flow in unit operation, air
generated by the casing expanding
or shrinking because of
be heard.At first 2-3 minutes after
unit start, this noise is more noticeable.
will work for 3 minutes to protect the
air conditioner.
immediately until 3 minutes have
Cautions
3. If the fuse of indoor unit on PC board is
it with the type of
T. 3.15A/ 250V
outdoor
broken,change it with the type of
T.25A/250V
Do not obstruct or cover the ventilation
conditoner.Do not put fingers
inlet/outlet and
swing louver.
Do not allow children to play with the air
conditioner
case should children be
allowed to sit on the outdoor unit.
The refrigerating circuit is leak-proof.
1.Applicable ambient temperature range:
Specifications
The machine is adaptive in following
situation
The power plug and connecting cable
acquired the local
2. If the power supply cord is damaged, it
must be replaced
manufacturer
qualified
person.
4. The wiring method should be in line with
the local wiring
5. After installation, the power plug should
be easily reached.
6. The waste battery should be disposed
properly.
7. The appliance is not intended for use
persons
without supervision.
8.Young children should be supervised
with
the appliance.
9. Please employ the proper power plug,
cord.
11.In order to protect the units,please turn
30 seconds
later, cutting off the power.
10.
Cooling
Indoor
Maximum:D.B/W.B
Maximum:D.B/W.B
D.B
Maximum:D.B
D.B
Minimum:D.B/W.B
Maximum:D.B/W.B
Minimum:D.B/W.B
Outdoor
Indoor
Outdoor
Heating
32
o
C/23
o
C
24
o
C/18
o
C
o
C/-8
o
C
46
o
C/26
o
C
18
o
C
27
o
C
21
o
C/15
o
C
Outdoor
Maximum:D.B/W.B
Minimum:D.B
24
o
C/18
o
C
-15
o
C
(INVERTER)
o
C
7
-
Minimum:
Minimum:
grille of the air
or any other things into the
.In no
or its service agent or a similar
broken,please
. If the fuse of
standard.
by young children or
to ensure that th
ey
which fit into the
must have
off the A/C first,
Before asking for service, check the following
first.
blown out.
does not restart
by the
change
unit is
infirm
do not play
p
ower supply
attestation.
and at least
15
7


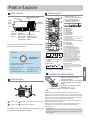
Unidad interior
Mando a distancia
filtro de aire purificador
Estos dibujos son orientativos, la unidad interior real puede
ser distinta de la que muestra el manual, dependiendo del
producto que haya adquirido.
Unidad exterior
SALIDA CONEXIÓN DE TUBERÍA Y CABLEADO ELÉCTRICO
ENTRADA MANGUERA DE DRENAJE
Observe el producto real que ha adquirido, ya que la
imagen anterior debe usarse solo como referencia
9. Botón SILENCIO
10. Botón CALEFACCIÓN
11. Botón REFRIGERACIÓN
12. Botón AUTO
13. Botón VELOCIDAD DEL V
14. Botón TEMP
ENTILADOR
ORIZADOR
r los botones y la
ontrola la iluminación o el
ción LED interior.
CIÓN
TRA
--- Salud
Visualización de modo
interruptor
de emergencia
15. Botón SALUD
16. Botón BLOQUEO
Se utiliza para bloquea
pantalla LCD.
17.Botón LUZ C
apagado de la
placa de visualiza
18. Bot
ón ENCENDIDO/APAGADO
19. Botón SECO
20. Botón TEMP
21. Botón OSCILA
22. Botón HORA
23. Botón FUNCIÓN EX
Función: Modo VENTILADOR
posición flujo de aire 1 --- Flujo de aire
saludable posición 2 --- Restablece la
1.
2. Visualización de envío de señal
3. Visualización de oscilación
4. Visualización VELOCIDAD
VENTILADOR
5. Visualización BLOQUEO
DOR
MPORIZADOR DE
de TEMP
s
posición original de la aleta --- Flujo de
simultánea--- Descanso ---
ONFIRMAR
función
ABLECER
a
ña, utilice
La función saludable no está disponible para algunas unidades.
6. Visualización TEMPORIZA
DE APAGADO
Visualización TE
ENCENDIDO
7. Visualización
8. Visualización de funcione
adicionales
aire derecha e izquierda ---
Depósito A-B--- 10 y el símbolo de
calefacción se muestran de forma
Calefacc ión eléctrica--- Refrescar el aire
(función reser
vada) --- Encendido ---
Conversión a modo grados
Fahrenheit/centígrados
24. Botón CANCELAR/C
Función: Ajusta y cancela el
temporizador y cualquier otra
adicional.
25. Botón REST
Cuando el mando a distanci
parece portarse de forma extra
un artículo con punta fina para pulsar
este botón y restablecer el mando a
distancia
Colocación de las baterías
Retire la cubierta de la batería;
Coloque las baterías tal y como se
muestra en la ilustración.
2 baterías R-03, tecla de restablecimiento
(cilíndricas);
Visualizador de temperatura
Modo de visualización el marco muestra un
color diferente según la función que se ajuste
REFRIGERACIÓN: azul CALEFACCIÓN: rojo
VENTILADOR: amarillo AUTO: blanco
SECO: cian SALUD: verde
Marco
Visualización
de temperatura
Visualizador de
temperatura
nano aqua
generador
Hoja vertical de salida
del ventialdor
1
2
3
4
4
Bajo Medium Alto
Auto Fan
Mando a distacia
Calor
1
2
3
4
5
9
10
11
12
13
14
15
16
17
22
23
24
25
19
20
21
8
18
7
6
Auto
Pantalla
circular
Modo de
funcionamiento
Mando a distacia
Piezas y funciones
Asegúrese de colocarlas en la dirección
ota:
lámpara fluorescente
ara durante el
y vuelva a
:
baterías cuando no vaya a utilizarse el mando durante un período largo de
correcta, dependiendo de los polos " + "/"-";
Coloque la batería y, a continuación, vuelva a colocar la tapa.
N
ϥ
ϥ Cuando en la misma habitación se encuentra instalada una
con encendido electrónico o un fluorescente de recambio, así como un teléfono
inalámbrico, es posible que el receptor tenga problemas al recibir señales, por lo
que la distancia con la unidad interior debería ser menor.
ϥ Una visualización completa o una visualización poco cl
funcionamiento indica que las
baterías se están agotando. Cámbielas.
ϥ Si el mando a distancia no funciona normalmente, retire las baterías
colocarlas transcurridos unos minutos.
Consejo
Retire las
tiempo. Si se visualiza algo tras haber retirado las baterías, pulse la tecla
Restablecer.
Silencio
Descanso
Salud
Encendido
Modo de
funcionamiento
Fresco Dry
Entrada de aire
Rejilla de la
toma de
entrada
Toma
de salida
(permite ajustar la
dirección del flujo de
aire hacia la izquierda
y hacia la derecha)
Aleta distribuidora
de aire
(permite ajustar la
dirección del flujo de
aire hacia arriba y
hacia abajo; no lo
ajuste manualmente)
(interior)
(interior)
la distancia entre el mando a distancia y el receptor de la unidad interior debería
ser de un máximo de 7 metros sin ningún obstáculo.
8

Funcionamiento
Modo
Mando
a distancia
Nota
AUTO
Bajo el modo de funcionamiento automático, el aire acondicionado
seleccionará automáticamente el funcionamiento como
Refrigeración o Calefacción, según sea la temperatura ambiente.
Cuando VENTILADOR está establecido en AUTO, el aire
acondicionado ajusta automáticamente la velocidad del
ventilados según la temperatura ambiente.
REFRIGERACI
ÓN
SECO
En el modo SECO, cuando la temperatura ambiente sea inferior
a en +2ºC a la temperatura ajustada. la unidad funcionará de
forma intermitente a una velocidad BAJA, independientemente
del ajuste que se haya realizado en VENTILADOR.
CALEFACCIÓN
En el modo CALEFACCIÓN, emitirá aire caliente tras un breve
período de tiempo, debido a la función con la que cuenta para
evitar las corrientes de aire frío. Cuando VENTILADOR está
establecido en AUTO, el aire acondicionado ajusta
automáticamente la velocidad del ventilados según la
temperatura ambiente.
VENTILADOR
En el modo de funcionamiento VENTILADOR, la unidad no
funcionará en los modos de REFRIGERACIÓN ni CALEFACCIÓN,
sino exclusivamente en el modo VENTILADOR, AUTO no se
encuentra disponible en el modo VENTILADOR. Y el ajuste de
temperatura se encuentra deshabilitado. En el modo
VENTILADOR, no se encuentra disponible la función de descanso.
1. Encendido de la unidad
Pulse ENCENDER/APAGAR en el mando a distancia para
arrancar la unidad.
2. Seleccione el modo de funcionamiento
Botón REFRIGERACIÓN: modo de refrigeración
Botón CALEFACCIÓN: Modo de calefacción
Botón SECO: Modo de deshumidificador
3.Seleccione el ajuste de temperatura
Pulse el botón
Cada vez que pulse el botón aumentará el ajuste de
temperatura 1ºC, si se mantiene pulsado, aumenta con
rapidez
Cada vez que pulse el botón disminuirá el ajuste de
temperatura 1ºC, si se mantiene pulsado, disminuye
con rapidez
Seleccione la temperatura deseada.
4.Selección de la velocidad de ventilación
Pulse el botón VENTILADOR. Cada vez que se pulse este botón,
cambiará la velocidad del ventilador de la forma siguiente:
Mando a distancia:
El aire acondicionado está funcionando con la velocidad del
ventilador que se muestra. Cuando VENTILADOR está establecido
en AUTO, el aire acondicionado ajusta automáticamente la
velocidad del ventilados según la temperatura
Temperatura
ambiente
Temperatura
designada
Velocidad
de
ventilador
Por encima
24
o
C
Por debajo
24
o
C
24
o
C
24
o
C
No
Auto
Fresco
Calor
No
Fresco/Dry:
Calor:
Pi
Pi Pi
Funcionamiento
Mando a distancia
Ajuste de la dirección del flujo de aire
Funcionamiento de emergencia y
funcionamiento de prueba
1.Visualización de estado del flujo de aire
Funcionamiento de emergencia:
Utilice este funcionamiento solo cuando el mando a distancia esté defectuoso
o se haya perdido, y con la función de emergencia activada, el aire
acondicionado puede funcionar de forma automática durante un tiempo.
Cuando se pulsa el interruptor de funcionamiento de emergencia, se escucha
el sonido "un Pitido" una vez, lo que significa el inicio de esta operación.
Cuando se activa por primera vez el interruptor de encendido y se inicia el
funcionamiento de emergencia, la unidad se activará automáticamente en los
siguientes modos:
Estado inicial
2.Ajuste del flujo de aire izquierdo y derecho
Cada vez que pulse el botón “ ”, el mando a distancia
cambiará su visualización de la forma siguiente:
Es imposible cambiar los ajustes de temperatura y velocidad del ventilador,
tampoco es posible el funcionamiento en el modo seco o temporizador.
Estado inicial
Precauciones:
ϥCuando vaya a ajustar la aleta con la mano, apague la unidad.
Funcionamiento de prueba:
ϥCuando la humedad sea elevada, podría producirse agua
condensada en al salida del aire si todas las lamas verticales se
ajustan a la izquierda o la derecha.
El interruptor de funcionamiento de prueba es el mismo que el interruptor de
emergencia.
ϥ
Se recomienda no conservar la aleta horizontal en posición
descendente durante un período largo de tiempo en el modo
REFRIGERACIÓN o SECO, de lo contrario, podría producirse
condensación de agua.
Utilice este interruptor en el funcionamiento de prueba cuando la
temperat
ure ambiente esté por debajo de 16ºC,
Nota:
Cuando se reinicia tras haberse apagado con el mando a
no lo utilice en el funcionamiento normal.
distancia, éste memorizará automáticamente la posición de
oscilación establecida anteriormente.
Mantenga pulsado el botón de funcionamiento de
prueba durante más de 5 segundos. Después oirá un
sonido "Pitido" dos veces, oirá un el dedo del interruptor:
comienza el funcionamiento de refrigeración con
la velocidad del aire en "Hi" (Alta)
mando a distacia:
Funcionamiento básico
Bajo Medium Alto
Auto
Pantalla
circular
Modo de
temporizador
Modo de
funcionamiento
Auto
9

3. En el modo AUTO
La unidad funciona en el modo de descanso correspondiente
adaptado al modo de funcionamiento seleccionado
automáticamente.
Funcionamiento en modo Sueño
4. En el modo VENTILADOR
No existe la función DESCANSO.
5.Ajuste el cambio de velocidad del viento mientras duerme
Pulse el botón
para introducir opciones adicionales, cuando
, parpadeará . Y, a continuación, pulse
para entrar en la función de descanso.
Si la velocidad del viento es alta o media, antes de ajustar el
descanso, reduzca a velocidad del viento tras el descanso. Si
hay poco viento, no son necesario cambios.
Nota
Tras realizar el ajuste TEMPORIZADOR DE ENCENDIDO, no estará
disponible DESCANSO;
Tras ajustar el DESCANSO, si se establece también
TEMPORIZADOR DE ENCENDIDO, se cancela automáticamente
DESCANSO.
Tras ajustar TEMPORIZADOR DE A
PAGADO, y a continuación
DESCANSO, estará disponible y en funcionamiento según la se
cuencia;
Tras ajustar DESCANSO, y a continuación el TEMPORIZADOR DE
APAGADO, estará disponible y en funcionamiento según la secuencia.
Funcionamiento INTENSO/SILENCIO
Modo de funcionamiento
1. En el modo REFRIGERACIÓN, SECO
Transcurrida 1 hora tras iniciarse el modo DESCANSO, la
temperatura se incrementará en 1ºCʳmás que el ajuste de
Cuando necesite calentar o enfriar con rapidez, puede utilizar esta
función. Pulse el botón para entrar en opciones adicionales,
cuando el ciclo muestra , parpadeará ,y, a continuación,
pulse ,para entrar en la función de potencia. Cuando cancele
esta función, entre en opciones adicionales de nuevo y cancele la
función de potencia.
temperatura. Transcu
rrida 1 hora, la temperatura se eleva otro
grado. La unidad funcionará durante otras 6 horas y se detendrá
cuando la temperatura se mayor que el ajuste de temperatura,
de forma que la temperatura ambiente no sea demasiado no
sea demasiado baja para su descanso.
Puede utilizar esta función cuando se requiere silencio para el
descanso o la lectura. Pulse el botón SILENCIO, el mando a
distancia mostrará ,y alcanzará entonces
la función de
silencio. Vuelva a pulsar el botón SILENCIO y se cancelará al
función de silencio.
Nota˖
Durante el funcionamiento en POTENCIA, en el modo de
CALEFACCIÓN o REFRIGERACIÓN rápida, la habitación no
tendrá una distribución homogénea de la temperatura.
El funcionamiento en el modo SILENCIO durante un largo período
puede provocar que la habitación no esté demasiado fresca ni
demasiado cálida.
2. En el modo CALEFACCIÓN
1 hora tras iniciarse el modo DESCANSO, la temperatura estará
2ºC por debajo del ajuste de temperatura. Transcurrida otra hora,
la temperatura disminuirá otros 2ºC. Transcurridas otras 3 horas,
la temperatura subirá 1ºC. La unidad funcionará durante otras 3
horas para detenerse a continuación. La temperatura es inferior
al ajuste de temperatura, de forma que la temperatura ambiente
no sea demasiado elevada durante su descanso.
Funcionamiento SALUD
El generador Nano-Aqua adopta dos polos de alto voltaje para
ionizar las moléculas de agua, producir gran cantidad de iones
positivos y negativos y liberar estos iones en el aire para acabar
con las bacterias y refrescar el aire.
Se inicia el funcionamiento
en descanso oper
Se detiene el funcionamiento
en descansor
Se inicia el funcionamiento
en descanso
Aprox 6hrsro
1 h
1 h
1 h
3 h
3 h
Se eleva 1
O
C
Se eleva 1
O
C
Se eleva 1
O
C
Ajuste de temp
Ajuste de temp.
Se detiene la unidad
Se detiene la unidad
En modo REFRIGERACIÓN, SECO
En modo Calefacción
Disminuye 2
O
C
Disminuye 2
O
C
1 h
(1) Funcionamiento INTENSO
(2) Funcionamiento SILENCIO
Funcionamiento
el ciclo visualiza
Se detiene el funcionamiento
en descanso
10

para confirmar la selección.
3.La cancelación de la función de flujo de aire saludable
Pulse el botón para entrar en las opciones adicionales. Pulse
este botón de forma continuada, la ubicación de las rejillas irá
cambiando de nuevo entre las tres ubicaciones siguientes y, a
continuación, pulse el botón para cancelar.
1.Una vez iniciada la unidad, seleccione el modo de
funcionamiento deseado.
2.Pulse el botón TEMPORIZADOR para cambiar al modo
TEMPORIZADOR. Cada vez que pulse el botón, la visualización
cambiará de la forma siguiente:
Mando a distancia:
Advertencia: No dirija la aleta con la mano. De lo contrario, la rejilla
funcionará de forma incorrecta. Si la rejilla no funciona correctamente,
detenga el aparato durante un minuto y vuelva después a encenderlo,
ajustándolo mediante el mando a distancia.
A continuación, seleccione el modo de TEMPORIZADOR deseado
(TEMPORIZADOR DE ENCENDIDO o TEMPORIZADOR DE
APAGADO o ACTIVAR-DESACTIVAR EL TEMPORIZADOR).
Parpadeará " " o " "
Nota:
1.Tras establecer la función de flujo de aire saludable, se fija la
3.Pulse el botón
para establecer la hora.
posición de la rejilla.
2.En el modo de calefacción, es mejor seleccionar el modo
3.En el modo de refrigeración, es mejor seleccionar el modo
Pulse el botón para cada vez, ajustando la hora en las primera
12 horas, con incrementos de 0,5 horas cada vez, tras 12 horas,
irá incrementando en 1 hora cada vez.
4.En refrigeración y seco, si se usa el aire acondicionado durante un
período largo de tiempo con gran humedad en el aire, podría
producirse condensación de agua en la rejilla.
Pulse el botón para cada vez, ajustando la hora en las primeras
12 horas, con descensos de 0,5 horas cada vez, tras 12 horas,
irá disminuyendo en 1 hora cada vez.
Puede ajustarse dentro de un período de 24 horas.
4.Confirme el ajuste del temporizador
Tras ajustar la hora, pulse el botón y confirme. El botón de
Temporizador de encendido o apagado ya no parpadeará.
5.Cancele el ajuste del temporizador
Pulse el botón del temporizador las veces necesarias hasta que se
muestre la hora y se elimine.
Consejos:
Tras sustituir las baterías o después de un fallo eléctrico, el ajuste
de la hora se restablecerá.
Según la secuencia de ajuste de la Hora del TEMPORIZADOR DE
ENCENDIDO o TEMPORIZADOR DE APAGADO, puede alcanzarse
Inicio-Detener o Detener-Inicio.
Funcionamiento del flujo de aire saludable
1.Pulse para arrancar
Ajuste unas condiciones de trabajo cómodas.
2.El ajuste de la función de flujo de aire saludable
Pulse el botón para introducir opciones adicionales. Pulse
este botón de forma continuada, la ubicación de las rejillas cambiará
de forma cíclica según las tres ubicaciones siguientes, con el objeto
de que elija la oscilación deseada, y pulse, a continuación, el botón
Vacío
Elevador del
flujo de aire
saludable
Reductor del
flujo de aire
saludable
Posición
preestablecida
Funcionamiento
CONFORMIDAD DE LOS MODELOS
SEGÚN LAS NORMATIVAS EUROPEAS
CE
Todos los productos satisfacen los requisitos de las
siguientes normas europeas:
- Directiva de baja tensión, 73/23/CEE
- Directiva de baja tensión, 2006/95/CE
- Compatibilidad electromagnética 89/336/CEE
- Compatibilidad electromagnética 2004/108/CE
ROHS
Los productos satisfacen los requisitos de la directiva
2002/95/CEE establecida por el Parlamento Europeo y el
Consejo sobre restricciones a la utilización de determinadas
sustancias peligrosas en aparatos eléctricos y electrónicos
(Directiva RoHS UE).
WEEE
De acuerdo con la directiva 2002/96/CE del Parlamento
Europeo, se informa al consumidor acerca de los requisitos
de eliminación de productos eléctricos y electrónicos.
REQUISITOS DE ELIMINACIÓN:
Su aparato de aire acondicionado ha sido
marcado con este símbolo, el cual significa que
los productos de tipo eléctrico y electrónico
no deben mezclarse con residuos domésticos
sin clasificar. No intente desmontar el sistema
personalmente: tanto el desmontaje del sistema
de aire acondicionado como la manipulación del refrigerante,
el aceite y cualquier otro componente deben ser llevados
a cabo por un instalador capacitado, de acuerdo con la
legislación local y nacional al efecto. Los aparatos de aire
acondicionado deben ser manipulados en instalaciones de
manipulación especializadas y aptas para su reutilización,
reciclado y recuperación. Al garantizar la correcta eliminación
de este producto, usted contribuirá a evitar las posibles
consecuencias negativas que podría provocar sobre el
medioambiente y la salud humana. Póngase en contacto con
el instalador o la autoridad local pertinente si desea obtener
más información. Las pilas deben ser extraídas del mando a
distancia y eliminadas de forma independiente, de acuerdo
con la legislación local y nacional al efecto.
INFORMACIÓN IMPORTANTE ACER-
CA DEL REFRIGERANTE UTILIZADO
1
1+2=
kg
R410A
2
kg
2=
1=
B
C
D
FE
kg
A
Este producto contiene gases fluorados de efecto invernadero regulados
por el Protocolo de Kioto. No los libere libremente a la atmósfera.
Tipo de refrigerante: R410A
Valor GWP*: 1975
GWP = Potencial de contribución al calentamiento global
Escriba con tinta indeleble:
• 1 la carga de refrigerante que contiene el producto de fábrica
• 2 la cantidad de refrigerante adicional cargada durante la instalación y
• 1+2 la carga total de refrigerante
en la etiqueta de carga de refrigerante suministrada con el producto.
Una vez escritos los datos correspondientes, la etiqueta deberá adherirse
cerca de la conexión de carga del producto (por ejemplo, sobre la parte
interna de la cubierta de la válvula de retención).
A Contiene gases fluorados de efecto invernadero regulados por el
Protocolo de Kioto.
B Carga de refrigerante que contiene el producto de fábrica: consulte la
placa de características de la unidad.
C Cantidad de refrigerante adicional cargada durante la instalación.
D Carga total de refrigerante.
E Unidad exterior.
F Botella de refrigerante y colector de carga.
Contiene
gases
fluorados
de
efecto
invernadero
regulados por el Protocolo de Kioto.
0,5 h
0,5 h
0,5 h
0,5 h
TEMPORIZADOR
DE ENCENDIDO
TEMPORIZADOR
DE APAGADO
TEMPORIZADOR DE
ENCENDIDO-APAGADO
TEMPORIZADOR DE
ENCENDIDO-APAGADO
Uso delTemporizador de encendido y
apagado
11

Ajuste de la temperatura
ambiente adecuada
No bloquee las entradas de
aire ni las salidas
Cierre las puertas y
ventanas durante el
funcionamiento
Utilice de forma eficiente el
temporizador
Si la unidad no va a utilizarse
durante un período largo de
tiempo, desconecte el
interruptor principal de
alimentación.
Utilice de forma eficiente las
rejillas
Mando a distancia
Cuerpo de la unidad
interior
limpie el aire acondicionado con un año
suave y seco. En manchas difíciles,
utilice un detergente neutro diluido en
agua. Escurra el agua del paño antes de
frotar, a continuación, retire
completamente el detergente. con un
panno asciutto.
No utilice agua, frote el mando a
distancia con un paño seco. No utilice
limpiadores de cristal ni paños químicos.
No utilice los productos siguientes para la limpieza
Gasolina,bencina, disolvente o
limpiadores ya que podrían dañar el
recubrimiento de la unidad
El agua caliente a temperaturas superiores a
40 C(104 F) podría provocar deformación o
decoloración.provocare la decolorazione o
deformazioni.
temperatura
adecuada
Desactivar
Una vez cada
dos semanas
Retirar el antiguo filtro
purificador de aire
Mantenimiento
Para un uso inteligente del aire acondicionado
o
o
Limpieza del filtro de aire
Abra la rejilla de entrada tirando hacia arriba.
Empuje ligeramente hacia arriba agarrando la pestaña
central del filtro, hasta que quede liberado del tapón y
retire el filtro hacia abajo.
Extraiga el filtro.
Utilice una aspiradora para retirar el polvo, o limpie el filtro con agua. Después
de lavarlo, seque bien el filtro colocándolo completamente a la sombra.
Limpie el filtro.
Utilice una aspiradora para retirar el polvo, o limpie el filtro con agua.
Después de lavarlo, seque bien el filtro colocándolo completamente a la sombra.
Coloque el filtro.
Coloque el filtro correctamente, de forma que la indicación "FRONT"
(FRONTAL) mire hacia el frente. Asegúrese de que el
filtro esté fijado completamente detrás del tapón.
Si los filtros derecho e izquierdo no se colocan
correctamente, podrían provocar funcionamiento.
Cierre la rejilla de entrada.
Durante la operación
de enfriamiento evitar
la penetración de la
luz directa del sol con
cortina o ciegos
Sustitución del filtro purificador de aire
1. Abra la rejilla de entrada
Apoye la rejilla de entrada en un
pequeño dispositivo llamado
"soporte para rejilla" que se
encuentra en el lado derecho de
la unidad interior.
2. Retire el filtro de aire estándar
Deslice el botón hacia arriba ligeramente para
liberar el filtro y, a continuación, retírelo.
3. Coloque el filtro purificador de aire
Poner los aparatos purificadores de
aire filtran en la marcos de filtro de
derecha e izquierda.
4.Coloque el filtro de aire estándar
(Instalación necesaria)
ATENCIÓN:
El lado blanco del filtro purificador de aire
fotocatalítico debe mirar hacia fuera y el lado negro negro debe mirar
hacia la unidad. El lado verde del elemento antibacterias del filtro
purificador de aire mira hacia fuera y el lado blanco mira hacia la unidad.
5.Cierre la rejilla de entrada
Cierre firmemente la rejilla
NOTA:
ϥ El filtro purificador de aire fotocatalítico se solarizará a intervalos fijos
de tiempo. En un uso familiar normal, se solarizará cada 6 meses.
ϥ El elemento antibacterias del filtro purificador de aire se utilizará
durante un período largo de tiempo, sin necesidad de sustituirse. Pero
durante el período de uso, debería retirar el polvo de forma frecuente
utilizando una aspiradora o sacudiéndolos ligeramente, de lo contrario,
su rendimiento se vería afectado.
ϥ Conserve el elemento antibacterias del filtro purificador de aire en
condiciones frescas y secas, evitando largos períodos de tiempo de
exposición directa al sol cuando deje de utilizarse, o su habilidad de
esterilización se vea reducida.
12

Si aprecia alguna anomalía, como una pequeña
quemadura, detenga inmediatamente el
funcionamiento del aparato y póngase en contacto
con su punto de venta.
Utilice una fuente
de alimentación
exclusiva equipada
con un interruptor
de circuito.
Compruebe que la instalación del drenaje se haya
llevado a cabo correctamente.
Conecte el cable de la fuente de
alimentación completamente a la toma
de suministro eléctrico.
Utilice un nivel de voltaje
adecuado.
1. No prolongue el cable de la fuente de alimentación ni lo
conecte por un punto intermedio.
2. No instale el aparato en un lugar en el que sea posible
la generación de fugas de gas inflamable alrededor de la
unidad.
3. No permita que la unidad resulte
expuesta a vapores de agua o de
aceite.
No enrolle el cable de la fuente de
alimentación.
Extreme la precaución para
evitar dañar el cable de la fuente
de alimentación.
No inserte objetos a través de la toma de entrada o salida
de aire.
No inicie ni detenga el funcionamiento
del aparato desconectando el cable de
la fuente de alimentación.
No dirija el flujo de aire
directamente hacia personas, en
especial hacia niños o ancianos.
No intente reparar o
reconstruir el aparato
personalmente.
Conecte el cable de conexión
a tierra.
Precauciones
ADVERTENCIA
Llame al departamento de ventas / asistencia técnica si desea obtener más información acerca
de la Instalación.
No intente instalar este aparato de aire acondicionado personalmente.
Una instalación incorrecta podría provocar descargas eléctricas, incendios o fugas de agua.
ADVERTENCIA
CUMPLIMIENTO
ESTRICTO
PROHIBIDO
PROHIBIDO
PROHIBIDO
PRECAUCIÓN
No utilice el aparato con fines de
conservación de alimentos, obras de arte,
equipos de precisión o cultivos, ni tampoco
en instalaciones agrarias.
Aspire aire fresco con frecuencia,
especialmente si hay algún aparato de gas
en funcionamiento al mismo tiempo.
No accione el interruptor con las manos
mojadas.
No instale la unidad cerca de una chimenea
u otro aparato de calefacción.
Compruebe que el soporte de instalación se
encuentre en buenas condiciones.
No deposite agua sobre la unidad para
limpiarla.
No coloque animales o plantas en la ruta
directa del flujo de aire.
No coloque ningún objeto sobre la unidad ni
se suba a ella.
No coloque jarrones o contenedores de
agua de otro tipo sobre la unidad.
PROHIBIDO
PROHIBIDO
PROHIBIDO
PROHIBIDO
PROHIBIDO
PROHIBIDO
PROHIBIDO
PROHIBIDO
CUMPLIMIENTO
ESTRICTO
CUMPLIMIENTO
ESTRICTO
CUMPLIMIENTO
ESTRICTO
CUMPLIMIENTO
ESTRICTO
PROHIBIDO
PROHIBIDO
PROHIBIDO
Conexión
a tierra
13

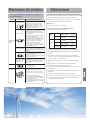
Resolución de problemas
Precauciones
Antes de solicitar asistencia técnica,
compruebe los siguientes puntos.
Problema Causa o puntos a comprobar
Inspección de
comportamiento
normal
El sistema
no se reinicia
inmediatamente.
Cuando se detiene la unidad, ésta no se
reinicia inmediatamente hasta después
de transcurridos 3 minutos para proteger
el sistema.
Si la toma eléctrica se extrae y vuelve a
insertarse, el circuito de protección se
activa durante 3 minutos para proteger el
acondicionador de aire.
La unidad emite
ruidos.
Es posible que se escuche un susurro o
gorgoteo durante el funcionamiento de la
unidad o al detenerla. El sonido es aún
más intenso después de 2-3 minutos una
vez puesta en marcha la unidad.
(El ruido viene generado por el
refrigerante que fluye por el sistema).
Es posible que se escuchen crujidos
durante el funcionamiento de la
unidad. Este sonido se genera como
consecuencia de la expansión o
contracción de la carcasa que se deriva
de los cambios de temperatura.
Si se escucha un ruido muy fuerte durante
el funcionamiento de la unidad, el filtro de
aire podría estar demasiado sucio.
Se aprecian olores.
Esto se debe a que el aire del entorno,
con olor a muebles, pintura o cigarrillos,
circula a través del sistema.
El aparato expulsa
vapor o vaho.
Durante el funcionamiento en el modo
FRÍO o SECO, el equipo podría expulsar
vapores.
Esto se debe a la refrigeración repentina
del aire interior.
No es posible
cambiar la velocidad
del ventilador en el
modo seco.
El el modo SECO, cuando la temperatura
de la habitación desciende por debajo
de la configuración de temperatura + 2 C,
o
la unidad pasa inmediatamente a la
velocidad BAJA independientemente de
la configuración de VENTILADOR.
Pruebas
múltiples
¿Está insertada la toma de alimentación?
¿Se ha producido un fallo de
alimentación?
¿Se ha fundido algún fusible?
Refrigeración
insuficiente
¿Está sucio el filtro de aire?
Normalmente debe limpiarse cada 15
días.
¿Existen obstáculos en la entrada o
salida de aire?
¿Se ha configurado a temperatura
correctamente?
¿Existen puertas o ventanas abiertas?
¿Penetra la luz solar directamente
a través las ventanas durante el
funcionamiento en modo de refrigeración?
(Utilice cortinas)
¿Existen demasiadas fuentes de calor o
demasiadas personas en la habitación
durante la refrigeración?
Refrigeración
Interior
Máximo: D.B/W.B 32
o
C/23
o
C
Mínimo: D.B/W.B 21
o
C/15
o
C
Exterior
Máximo: D.B/W.B 46
o
C/26
o
C
Mínimo: D.B 18
o
C
Calefacción
Interior
Máximo: D.B 27
o
C
Mínimo: D.B 15
o
C
Exterior
Máximo: D.B/W.B 24
o
C/18
o
C
Mínimo: D.B/W.B -7
o
C/-8
o
C
Exterior
(INVERTER)
Máximo: D.B/W.B 24
o
C/18
o
C
Mínimo: D.B -15
o
C
No obstruya ni cubra la rejilla de ventilación del aire acondicionado. No
coloque los dedos ni ningún otro objeto en la entrada/salida y las lamas
móviles.
No permita que los niños jueguen con el aparato de aire acondicionado. En
ningún caso debe permitirse a los niños sentarse sobre la unidad exterior.
Especificaciones
El circuito de refrigerante ha sido diseñado a prueba de fugas.
La máquina puede adaptarse a las siguientes situaciones
1. Intervalos válidos de temperatura ambiental:
2. Si el cable de alimentación está dañado deberá ser reemplazado por el
fabricante, agente de servicio o persona cualificada similar.
3. Si se funde el fusible de la placa de PC de la unidad interior, cámbielo por otro
de tipo T. 3,15 A / 250 V. Si se funde el fusible de la unidad exterior, cámbielo
por otro de tipo T. 25 A / 250 V.
4. El método de cableado debe satisfacer los requisitos de las normas locales
de cableado.
5. Después de la instalación, el enchufe de alimentación debe encontrarse
ubicado en un lugar fácilmente accesible.
6. Las pilas gastadas deben ser eliminadas correctamente.
7. El aparato no ha sido diseñado para su uso por niños o personas enfermas
sin supervisión.
8. Los niños pequeños deberán ser supervisados por un adulto para asegurarse
de que no juegan con el aparato.
9. Emplee la toma de alimentación adecuada para el cable de alimentación
utilizado.
10. El enchufe de alimentación y el cable de conexión deben satisfacer los
requisitos de la normativa local.
11. Para proteger los equipos, apague primero el interruptor A/C, y desconecte
la alimentación después de 30 segundos.
14


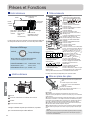
Parti e funzioni
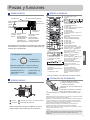
Unità interna
Telecomando
Pannello
La corona assume colori diversi quando sono
impostate funzioni diverse
RAFFREDDAMENTO: blu RISCALDAMENTO: rosso
VENTILATORE: giallo AUTOMATICO: bianco
DEUMIDIFICATORE: Ciano BENESSERE: verde
Unità esterna
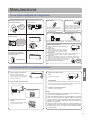
Installazione delle batterie
USCITA DELL’ARIA TUBATURE DI COLLEGAMENTO E CAVI ELETTRICI
Rimuovere il coperchio dello
scomparto batterie.
PRESA DELL’ARIA
Installare le batterie come illustrato.
2 R-03 batteries, tasto di ripristino
(reset);
Assicurarsi di caricare le batterie
allineando i poli " + "/"-".
Installare le batterie e rimettere il coperchio.
4
1
2
3
4
Basso Medio Alto Auto
1
2
3
4
5
9
10
11
12
13
14
15
16
17
22
23
24
25
19
20
21
8
18
7
6
Modalità operativa
Telecomando
Silenzioso
Potenza
Riposo Benessere
TUBO DI SCARICO CONDENSA
Nota:
ϥ La distanza tra la testina di trasmissione del segnale ed il foro del
ricevitore non deve essere superiore ai 7 m e non ci devono essere ostacoli.
ϥ Quando nella stanza sono presenti lampade fluorescenti ad accensione
elettronica o ad interruttore, oppure telefoni wireless, il ricevitore tende ad
essere disturbato e quindi la distanza deve essere ridotta.
ϥ
ϥ Se il telecomando non funziona in modo normale durante l’uso del
condizionatore, rimuovere le batterie, attendere diversi minuti e poi
stallarle di nuovo. in
Suggerimento:
Rimuovere le batterie se il telecomando non è usato per periodi prolungati
Se il display visualizza qualcosa dopo avere rimosso le batterie, premere
il tasto di ripristino.
.
Filtro purificatore d'aria
(interno)
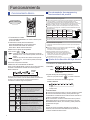
9. Tasto QUIET
interruttore
10. Tasto HEAT
11. Tasto COOL
12. Tasto AUTO
13. Tasto FAN
14. Tasto TIMER
15. Tasto HEALTH
16. Tasto LOCK
Usato per bloccare i tasti ed il display LCD.
17. Tasto LIGHT
Controlla l’accensione e lo spegnimento
del pannello LED interno.
18. Tasto d’accensione/spegnimento
19. Tasto DRY
20. Tasto TEMP
21. Tasto SWING
22. Tasto delle ORE
23. Tasto EXTRA FUNCTION
Funzione: Modalità VENTILATORE ---
Posizione 1 funzione benessere ---
Posizione 2 funzione benessere ---
Ripristino posizione originale deflettori
--- Flusso aria destro e sinistro --- A-B
2. Indicazione invio segnale
3. Indicazione OSCILLAZIONE
deflettori
4. Indicazione VELOCITÀ
VENTILATORE
5. Indicazione BLOCCO
6. Indicazione
TIMER SPEGNIMENTO
Indicazione TIMER ACCENSIONE
7. Indicazione TEMPERATURA
8. Indicazione funzioni extra
yard --- Il numero 10 ed il simbolo del
riscaldamento sono visualizzati
contemporaneamente --- Riposo ---
Riscaldamento elettrico --- Rinnovo aria
(funzione riservata) --- Potenza ---
Conversione gradi Fahrenheit/Celsius
24. Tasto CANCEL/CONFIRM
Funzione: Conferma e annullamento del
timer e delle funzioni extra.
25. Tasto Reset
Quando il telecomando si comporta in
modo anomalo, usare un oggetto appuntito
per premere questo tasto e ripristinare il
telecomando
Display di bordo
nano
generatore
di acqua
(interno)
flap orizzontale
(Regolare e
flusso d'aria in
alto e in basso,
Non regolare
manualmente)
lama verticale
(Regolare il flusso
d'aria da sinistra a
destra)
Corona
Visualizzazione
temperatura
Display
circlelare
1. Indicazione modalità
di emergenza
Modalità
operativa
AUTO
(auto-
matico)
COOL
(condi-
ziona-
tore)
DRY
(deu-
midifi-
catore)
HEAT
(riscal-
damen-
to)
VENTI-
LATO-
RE
Telecomando
L'immagine in alto è solo di riferimento e potrebbe non riprodurre
esattamente il prodotto acquistato.
pannello
Griglia
presa
d’aria
Uscita
L'immagine in alto è solo di riferimento e potrebbe non ripro-
durre esattamente il prodotto acquistato.
Sana funzione non è disponibile per alcune unità.
una visualizzazione poco chiara delle icone indica che le batterie sono
quasi
esaurite. Sostituire le batterie.
15

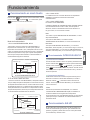
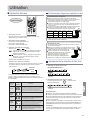
Funzionamento
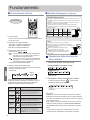
Modalità
Tele-
comando
Nota
In modalità Auto, il condizionatore selezionerà la modalità
Raffreddamento o Riscaldamento in base alla temperatura
d’ambiente. Quando IL VENTILATORE è impostato su
AUTO, il condizionatore regola automaticamente la velocità
del ventilatore in base alla temperatura d’ambiente.
In modalità DEUMIDIFICATORE, quando la temperatura
d’ambiente diventa inferiore di +2° C rispetto a quella impostata,
l’unità funzionerà ad intermittenza a velocità Bassa
indipendentemente dall’impostazione del VENTILATORE.
In modalità RISCALDAMENTO, l’aria calda sarà emessa dopo
un breve intervallo a causa della funzione di prevenzione
d’uscita di aria fredda. Quando il VENTILATORE è impostato
su AUTO, il condizionatore regola automaticamente la velocità
del ventilatore in base alla temperatura d’ambiente.
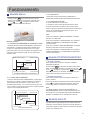
1. Avvio dell’unità
Premere il tasto d’accensione/spegnimento del telecomando
per avviare l’unità.
2. Selezionare la modalità operativa
Tasto COOL: modalità di raffreddamento
Tasto HEAT: modalità di riscaldamento
Tasto DRY: modalità deumidificatore
3. Impostazione della temperatura
Premere il tasto
Ogni volta che il tasto è premuto, la temperatura
aumenta di 1° C, se il tasto è tenuto premuto, la
temperatura aumenta rapidamente
Ogni volta che il tasto è premuto, la temperatura
diminuisce di 1° C,se il tasto è tenuto premuto, la
temperatura diminuisce rapidamente
4. Selezione della velocità della ventola.
Premere il tasto FAN. A ciascuna pressione la velocità del
ventilatore cambia come segue:
Telecomando:
Il condizionatore funziona con la velocità della ventola
visualizzata. Quando il VENTOLA è impostato su AUTO, il
condizionatore regola automaticamente la velocità del
ventilatore in base alla temperatura d’ambiente
Temperatura
d’ambiente
Temperatura
designata
Modalità
timer
Velocità
ventilatore
Modalità
operativa
Superiore
24
o
C
Inferiore
24
o
C
24
o
C
24
o
C
N.
N.
Basso
Medio Alto
Auto
Display
circolare
Beep
Funzionamento di base
Funzionamento
Telecomando
AUTOMATICO
CONDIZIONA-
TORE
DEUMIDIFI-
CATORE
RISCALDA-
MENTO
VENTILATO-
RE
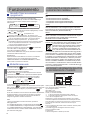
Modalità d'emergenza e di prova
Modalità d'emergenza:
Usare questa modalità solo quando il telecomando è difettoso o perso; con
la modalità d'emergenza il condizionatore può funzionare automaticamente
per un po’.
Quando viene premuto l’interruttore d’emergenza, è emesso un "segnale
acustico" che indica l’avvio di questa modalità.
È impossibile cambiare l’impostazione della temperatura e della velocità del
ventilatore È anche impossibile usare la modalità Timer o Deumidificatore.
Stato iniziale
Attenzione:
ϥSpegnere l'unità quando si regola manualmente il deflettore.
ϥQuando la percentuale d’umidità è alta, la condensa potrebbe
uscire dall’uscita dell’aria se tutte le feritoie verticali sono regolate
verso sinistra o destra.
ϥSi consiglia di non tenere il deflettore orizzontale in posizione
bassa per periodi prolungati in modalità RAFFREDDAMENTO
O DEUMIDIFICATORE, diversamente l'acqua può condensarsi.
Nota:
Al riavvio dopo lo spegnimento, il telecomando memorizza
automaticamente l’impostazione di oscillazione precedente.
L’interruttore è lo stesso di quello per l’emergenza.
Usare questo interruttore in modalità di prova quando la
temperatura d’ambiente è inferiore ai 16° C; non usarla durante
il funzionamento normale.
Continuare a premere l’interruttore di prova per
"segnali acustici", lasciare l’interruttore: la modalità
di raffreddamento si avvia col flusso dell’aria ad
“alta” velocità.
Regolazione della direzione del
flusso dell’aria
1. Indicazione di stato del flusso d’aria
2. Regolazione flusso d’aria sinistro e destro
A ciascuna pressione del tasto “ ”, il telecomando
visualizza le indicazioni che seguono:
Stato iniziale
AUTOMA-
TICO
CONDIZIO-
NATORE
AUTOMA-
TICO
RISCALDA-
MENTO
Beep
Beep
RISCALDAMENTO:
RAFFREDDAMENTO / DEUMIDIFICATORE:
Selezionare la temperatura desiderata.
In modalità VENTILATORE, l’unità non funzionerà in modalità
RAFFREDDAMENTO O RISCALDAMENTO ma solo a
modalità VENTILATORE; AUTO non è disponibile
in modalità VENTILATORE. L'impostazione temperatura
è disabilitata. In modalità VENTILATORE, la funzione Riposo
non è disponibile.
Test:
Quando l'interruttore viene attivato per la prima volta e viene avviata
l'operatività di emergenza , l’unità funzionerà automaticamente nelle
seguenti modalità:
altri 5 secondi. Dopo aver sentito due
16
La page est en cours de chargement...
La page est en cours de chargement...
La page est en cours de chargement...
La page est en cours de chargement...
La page est en cours de chargement...
La page est en cours de chargement...
La page est en cours de chargement...
La page est en cours de chargement...
La page est en cours de chargement...
La page est en cours de chargement...
La page est en cours de chargement...
La page est en cours de chargement...
-
 1
1
-
 2
2
-
 3
3
-
 4
4
-
 5
5
-
 6
6
-
 7
7
-
 8
8
-
 9
9
-
 10
10
-
 11
11
-
 12
12
-
 13
13
-
 14
14
-
 15
15
-
 16
16
-
 17
17
-
 18
18
-
 19
19
-
 20
20
-
 21
21
-
 22
22
-
 23
23
-
 24
24
-
 25
25
-
 26
26
-
 27
27
-
 28
28
-
 29
29
-
 30
30
-
 31
31
-
 32
32


Haier AS07QS1ERA Mode d'emploi
- Catégorie
- Climatiseurs split-system
- Taper
- Mode d'emploi
dans d''autres langues
- italiano: Haier AS07QS1ERA Istruzioni per l'uso
- English: Haier AS07QS1ERA Operating instructions
- español: Haier AS07QS1ERA Instrucciones de operación
Documents connexes
-
Haier HSU-24HEM03-R2 Le manuel du propriétaire
-
-
-
-
-
-
-
-
-
Autres documents
-
Sanyo SAP-CRV246EH Installation Instructions Manual
-
Hisense L1-04 Manuel utilisateur
-
Saunier Duval SDH 31-065 NW Le manuel du propriétaire
-
aerauliqa Quantum NEXT Mode d'emploi
-
-
 Olimpia Splendid Sitali SF150 S1 Manuel utilisateur
-
 LARQ LARQ Manuel utilisateur
-
 Oregon Scientific WS907 Le manuel du propriétaire


