Honeywell T6 Hydronic Programmable Thermostat Manuel utilisateur
- Catégorie
- Thermostats
- Taper
- Manuel utilisateur
Ce manuel convient également à

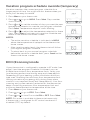
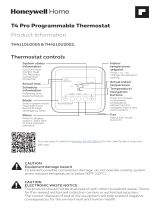
Package Includes:
• T6 Pro Hydronic Programmable
Thermostat
• Floor sensor (model AC11201)
• UWP™ Mounting System
• Decorative Cover Plate
• Screws and anchors
• 2 AA Batteries
• Thermostat literature
T6 Pro Hydronic
Programmable Thermostat
TH6100AF2004
User Guide
ProSeries
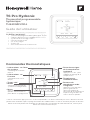
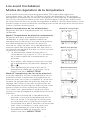
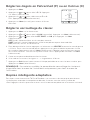
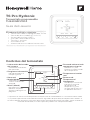
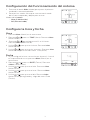
Thermostat controls
• System status
information
Heat On/Recovery
• Schedule information
Following time based
schedule
• Actual time
• Mode
Select system mode
Heat/Off
• Menu
Press to display options.
Start here to set a
program schedule
• Indoor temperature
setpoint
Press + or – to change
temperature setting
• Actual indoor
temperature
• Temperature/
Navigation buttons
Press to increase or
decrease temperature
setpoint and to
navigate menus and
menu options
The screen will wake up by pressing any of the five buttons. If powered by the C wire, the screen stays lit for 45 seconds
after you complete changes. If powered by battery only, the screen stays lit for 8 seconds. Depending on how your
thermostat was installed, the screen light may always be on.

2
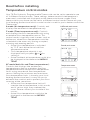
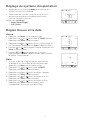
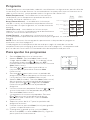
Temperature control modes
Your T6 Pro Hydronic Programmable Thermostat can be set to operate in one
of 3 different control modes. These settings determine which temperature is
measured, controlled and displayed on the thermostat home screen. Each
thermostat in your home can be set to a different control mode. Please ask your
local heating professional which control mode is used for you to better control the
Thermostat.
A, AF mode; main screen
F mode; main screen
A mode (Air temperature only): Controls and
displays the ambient air temperature only.
F mode (Floor temperature only): Controls
and displays the floor temperature only using
an external floor temperature sensor. This
control mode is typically used in areas such as
bathrooms where floor temperature could be
scheduled to be warm only during occupied,
morning and evening periods.
• Actual floor temperature is indicated
by “FLR” text above the actual floor
temperature value.
• Floor temperature setpoint is not
displayed until you press or for
setting it.
• Actual ambient air temperature could also
be displayed in the thermostat MENU/
TEMP.
AF mode (both Air and Floor temperatures):
Controls and displays the ambient air
temperature as well as maintains the floor
temperature within desired floor temperature
limits using an external floor temperature
sensor. Setting the minimum and maximum
floor temperature limits is done by your local
heating professional and is a way for you to
enhance the comfort and to protect your floor
covering at the same time.
• Minimum floor temperature limit will
override the air temperature in this mode,
and if set too high, may overheat the
room. Please contact your installer if this
occurs.
• Actual floor temperature could also be
displayed in the thermostat MENU/
TEMP.
Temperatures menu
Back
Read before installing

3
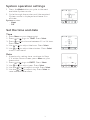
System operation settings
1 Press the Mode button to cycle to the next
available System mode.
2 Cycle through the modes until the required
System mode is displayed and leave it to
activate.
System modes:
‒Heat
‒Off
Set the time and date
Time
1 Press Menu on your thermostat.
2 Press or to go to TIME. Press Select.
3 Press or to choose between 12 or 24 hour.
Press Select.
4 Use or to adjust the hour. Press Select.
5 Use or to adjust the minutes. Press Select
to exit Time menu.
Date
1 If previously setting time, continue to Step
2. If at the Home screen, press Menu on your
thermostat.
2 Press or to go to DATE. Press Select.
3 Use or to adjust year. Press Select.
4 Use the or to adjust month. Press Select.
5 Use the or to adjust day. Press Select to
save and exit Date menu.

4
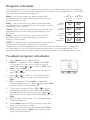
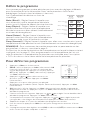
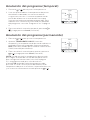
Program schedule
To adjust program schedules
You can program four time periods each day, with different settings for weekdays
and weekends. We recommend the pre-sets (shown in the table below), since they
can reduce your heating expenses.
Wake - Set to the time you wake up and the
temperature you want during the morning, until
you leave for the day.
Away - Set to the time you leave home and the
temperature you want while you are away (usually
an energy-saving level).
Home - Set to the time you return home and the
temperature you want during the evening, until
bedtime.
Sleep - Set to the time you go to bed and the
temperature you want overnight (usually an
energy-saving level).
NOTE: To temporarily or permanently override any
of the above program schedules, see page 5.
Depending on which temperature control mode the thermostat is configured
for (see page 2), you will be programing either air or floor temperature. Floor
temperature will be indicated with FLR text above the actual temperature value.
1 Press Menu on your thermostat.
2 PROG is displayed. Press Select. Then ON
is displayed. (If you do not want to use a
schedule, press or to display OFF. Press
Select.) Press Select.
3 Press or to select day or set of days to
edit. Press Select.
4 Press or to select a schedule period to
edit (Wake, Away, Home, and Sleep). Press
Select.
5 ON is displayed. Press Select to keep the
schedule period on. Or press and then Select
to turn off the schedule period.
6 Time starts blinking. Press or to adjust
the schedule period start time. Press Select.
7 Temperature starts blinking. Press or to
adjust the “Heat” setpoint temperature. Press
Select.
8 Repeat steps 4 through 7 for the remaining
schedule periods.
9 Press Home when you’re finished to save and
return to the home screen.
10 Schedule can be adjusted and turned ON or
OFF by returning to Menu and following the
steps provided above.
Air
Temperature
(A mode/
AF mode)
Floor
Temperature
(F mode)
Wake
(6:00 am)70 °82 °
Away
(8:00 am)62 °68 °
Home
(6:00 pm)70 °82 °
Sleep
(10:00
pm)62 °68 °

5
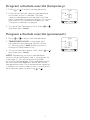
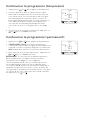
Program schedule override (permanent)
Program schedule override (temporary)
1 Press or to adjust the temperature.
2 Once at the desired setpoint temperature,
no further action is needed. The new
setpoint temperature will be held until the
next scheduled time period begins. For more
information on schedule time periods, see
“Program schedule” on page 4.
3 To cancel the Temporary Hold, Press or
and then press Cancel.
1 Press or to adjust the temperature.
2 TEMPORARY HOLD is displayed and
the setpoint temperature flashes. While
it’s flashing, press Hold (Mode) button to
change to Permanent Hold.
3 To cancel the Permanent Hold, press or
and then press Cancel.
NOTE: Depending on which temperature
control mode the thermostat is configured for
(see page 2), you will be adjusting either
air or floor temperature. Floor temperature will
be indicated with FLR text above the actual
temperature value. Floor temperature setpoint
is hidden on home screen in this case and will
be displayed again by pressing or .
Hold

6
Vacation program schedule override (temporary)
Vacation overrides the current program schedule for a
longer period of time. You might use this feature when you
know you’ll be away for awhile.
1 Press Menu on your thermostat.
2 Press or to go to VACA. Press Select. Days number
starts blinking.
3 Press or to set the number of days you want the new
temperature setpoint to override your program schedule.
Press Select. Temperature setpoint starts blinking.
4 Press or to adjust the temperature setpoint for these
days. Press Select to activate your vacation schedule and
return to the thermostat home screen.
NOTES:
• The active vacation schedule is indicated via VACA
above the temperature displayed on the thermostat
home screen.
• After vacation period ends, the thermostat will follow
your regular program schedule.
• To return back to your normal program schedule
before the vacation schedule ends, press Cancel on the
thermostat home screen.
ECO (Economy) mode
If your thermostat is configured to operate in AF mode (see
page 2) and the program schedule is followed, you can
disable the minimum floor temperature limits set by your
local heating professional during away and sleep periods.
Depending on your heating system installation and floor
type used, disabling the minimum floor temperature limit
setting can reduce your energy bills during times when
comfort is not required (Away and Sleep periods). Your floor
covering and system remains protected as the thermostat
keeps controlling maximum floor temperature limit and
minimum freeze protection temperature all the time.
1 Press Menu on your thermostat.
2 Press or to go to ECO. Press Select.
3 Press or to turn Eco mode ON or OFF. Press Select.
NOTE: Eco mode is available in thermostat menu only
if thermostat is configured for AF control mode and is
disabled (OFF) by default.
Home
Select
Home
Back Select
Home
Back Select
Heat
Home
Select

7
Setting degrees Fahrenheit (F) or Celcius (C)
1 Press Menu.
2 Press or to go to F / C. Press Select.
3 Press or to select F or C. Then press
Select.
4 Press Home to return to the home screen.
Adaptive Intelligent Recovery
Over time, the
Resideo
T6 Pro Thermostat “learns” how long it takes your system
to reach the temperature you want. It turns on the heating system earlier to make
sure you’re comfortable at the time you expect.
Adjusting keypad lockout
1 Press Menu on the thermostat.
2 Press or to go to LOCK. Press Select.
3 Press or to go to OFF, PART, or ON, and then press Select.
OFF: Unlocked, and full access allowed.
PART: Partial lockout, allowing only the temperature to be changed.
ON: No access allowed.
4 To unlock the keypad, press the CENTER button and then enter the password
“1234”. To enter the password, press or to change the first digit of the
number. Then press Select. Repeat this process to enter the second through
fourth digits of the number. Once all four numbers have been entered, press
Select again.
5 This will unlock the keypad.
6 If the code is incorrect, the screen will flash the lines "--".
7 Press Back to go back a step to enter the correct number and press Select.
NOTE: On some models, the keypad lockout setting is only available in the
installer menu and not available in the user menu.

8
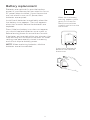
Batteries are optional (to provide backup
power) if your thermostat was wired to run on
AC power when installed. If your thermostat
was not wired to run on AC power, then
batteries are required.
Install fresh batteries immediately when the
low battery icon appears. The icon appears
about two months before the batteries are
depleted.
Even if the low battery icon does not appear,
you should replace batteries once a year, or
before leaving home for more than a month.
If batteries are inserted within two minutes, the
time and day will not have to be reset. All other
settings are permanently stored in memory,
and do not require battery power.
NOTE: When replacing batteries, alkaline
batteries are recommended.
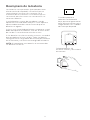
Battery replacement
Insert fresh alkaline AA
batteries and reinstall
thermostat.
When the low battery
warning appears, press
gently to loosen the
thermostat and then
carefully pull it from the
wall mount.

9
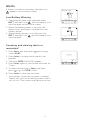
Alerts
If there is an alert or reminder, the alert icon
appears on the Home screen.
Low Battery Warning
1 The batteries need to be replaced when
BATT, the alert icon , and the battery icon
are displayed on the Home screen.
2 When the battery power is very low, the
thermostat’s backlight is disabled to save
battery power.
3 When battery power is critically low, only
BATT, the alert icon , and the battery icon
are displayed.
Heat
Home
Back
Snoozing and clearing alerts or
reminders*
1 Press Menu, and then press until display
shows ALRT.
2 Press Select to display which alert(s) are
present.
3 The word SNZE (SNOOZE) appears.
4 Press Select again to snooze the reminder for
7 days.
5 To clear the alert, press Select, and then
press to go to CLER (Clear).
6 Press Select to clear the reminder.
* Some alerts cannot be snoozed or cleared.
Please call your local heating professional if
this occurs. The system may require service.

10
Troubleshooting
If you have difficulty with your thermostat, please try the following suggestions.
Most problems can be corrected quickly and easily.
Display is
blank • Check circuit breaker and reset if necessary.
• Make sure power switch for heating system is on.
• Make sure fresh AA alkaline batteries are correctly installed
(see page 8).
Heating
system does
not respond
• Press Mode button to set system Heat (see page 3).
Make sure the desired temperature is set higher than the
inside temperature.
• Check circuit breaker and reset if necessary.
• Make sure power switch for heating system is on.
• Wait 5 minutes for the system to respond.
Temperature
settings do
not change
Make sure heating temperature is set to an acceptable range:
• Heat: 40 °F to 90 °F (4.5 °C to 32.0 °C)
Electrical ratings
Terminal Voltage (50 Hz/60 Hz) Running Current
W Heating 20 VAC - 30 VAC 0.0 A - 1.0 A

11
Resideo warrants this product, excluding battery, to be free from defects in
workmanship or materials, under normal use and service, for a period of five (5)
years from the date of first purchase by the original purchaser. If at any time
during the warranty period the product is determined to be defective due to
workmanship or materials, Resideo shall repair or replace it (at Resideo’s option).
If the product is defective,
(i) return it, with a bill of sale or other dated proof of purchase, to the place from
which you purchased it; or
(ii) call Resideo Customer Care at 18004681502. Customer Care will make the
determination whether the product should be returned to the following address:
Resideo Return Goods, 1985 Douglas Dr. N., Golden Valley, MN 55422, or whether
a replacement product can be sent to you.
This warranty does not cover removal or reinstallation costs. This warranty shall
not apply if it is shown by Resideo that the defect was caused by damage which
occurred while the product was in the possession of a consumer.
Resideo’s sole responsibility shall be to repair or replace the product within
the terms stated above. RESIDEO SHALL NOT BE LIABLE FOR ANY LOSS OR
DAMAGE OF ANY KIND, INCLUDING ANY INCIDENTAL OR CONSEQUENTIAL
DAMAGES RESULTING, DIRECTLY OR INDIRECTLY, FROM ANY BREACH OF ANY
WARRANTY, EXPRESS OR IMPLIED, OR ANY OTHER FAILURE OF THIS PRODUCT.
Some states do not allow the exclusion or limitation of incidental or consequential
damages, so this limitation may not apply to you.
THIS WARRANTY IS THE ONLY EXPRESS WARRANTY RESIDEO MAKES ON
THIS PRODUCT. THE DURATION OF ANY IMPLIED WARRANTIES, INCLUDING
THE WARRANTIES OF MERCHANTABILITY AND FITNESS FOR A PARTICULAR
PURPOSE, IS HEREBY LIMITED TO THE FIVE YEAR DURATION OF THIS
WARRANTY. Some states do not allow limitations on how long an implied warranty
lasts, so the above limitation may not apply to you.
This warranty gives you specific legal rights, and you may have other rights which
vary from state to state. If you have any questions concerning this warranty,
please write Resideo Customer Care, 1985 Douglas Dr, Golden Valley, MN 55422
or call 18004681502.
5-year limited warranty

33-00343EFS-07
Resideo Technologies Inc.
1985 Douglas Drive North, Golden Valley, MN 55422
1-800-468-1502
33-00343EFS—07 M.S. Rev. 09-21 | Printed in United States
www.resideo.com
© 2020 Resideo Technologies, Inc. All rights reserved.
The Honeywell Home trademark is used under license from Honeywell International, Inc. This product is manufactured by Resideo Technologies, Inc.
and its affiliates.
Tous droits réservés. La marque de commerce Honeywell Home est utilisée avec l’autorisation d’Honeywell International, Inc.
Ce produit est fabriqué par Resideo Technologies, Inc. et ses sociétés affiliées.
Todos los derechos reservados. La marca comercial Honeywell Home se utiliza bajo licencia de Honeywell International, Inc.
Este producto es fabricado por Resideo Technologies, Inc. y sus afiliados.
CAUTION: MERCURY NOTICE
If this product is replacing a control that contains mercury in a sealed
tube, do not place the old control in the trash. Contact your local waste
management authority for instructions regarding recycling and proper
disposal.
CAUTION: ELECTRICAL HAZARD
Can cause electrical shock or equipment damage. Disconnect power before
beginning installation.
Regulatory information
FCC - 47 CFR § 15.21, 15.105 (b)
See https://customer.resideo.com/enUS/support/residential/
codes-and-standards/FCC15105/Pages/default.aspx
for additional FCC information for this product.

ProSeries
La boîte comprend :
• Thermostat programmable hydronique T6 Pro
• Capteur de plancher (modèle AC11201)
• Système de montage UWP™
• Couvercle décoratif
• Vis et ancrages
• 2 piles AA
• Documentation du thermostat
T6 Pro Hydronic
Thermostat programmable
hydronique
TH6100AF2004
Guide de l’utilisateur
Commandes thermostatiques
• Informations sur l’état
du système
Chauffage en marche/
reprise
• Informations sur
l’horaire
Calendrier basé sur le
temps
• Temps réel
• Mode
Sélectionnez le mode du
système Chauffage/Arrêt :
• Menu
Appuyez pour afficher les
options. Commencez ici
pour définir un programme
• Point de consigne
de la température
intérieure
Appuyez sur + ou - pour
modifier le réglage de la
température
• Température
intérieure réelle
• Boutons de
température et de
navigation
Appuyez sur les boutons
pour augmenter ou
diminuer le point de
consigne de la température
et pour naviguer dans les
menus et leurs options
L’écran s’allume en appuyant sur l’un des cinq boutons. Un écran alimenté par un fil C demeure allumé
pendant 45 secondes après la programmation des modifications. Un écran alimenté par pile seulement
demeure allumé pendant 8 secondes. En fonction de l’installation de votre thermostat, l’écran peut
demeurer allumé en tout temps.

2
Modes de régulation de la température
Votre thermostat hydronique programmable T6 Pro peut être réglé pour
fonctionner dans l’un des trois différents modes de régulation. Ces réglages
permettent de déterminer la mesure, le réglage et l’affichage de la température
sur l’écran d’accueil du thermostat. Vous pouvez régler chacun des thermostats
de votre domicile dans un mode de régulation différent. Veuillez demander à votre
professionnel local en matière de chauffage quel mode de régulation utiliser pour
mieux contrôler le thermostat.
Mode A, AF; écran principal
Mode F; écran principal
Mode A (température de l’air uniquement) :
Régule et affiche la température de l’air ambiant
seulement.
Mode F (température du plancher uniquement) :
Régule et affiche la température du plancher
seulement, à l’aide d’un capteur externe de
température du plancher. Ce mode de régulation
est habituellement utilisé dans les endroits
comme les salles de bain, où la température du
plancher peut être programmée afin que celui-ci
soit chaud uniquement le matin, le soir et lorsque
la pièce est occupée.
• La température réelle du plancher est
indiquée par l’inscription « FLR » au-dessus
de la valeur réelle de la température du
plancher.
• Pour régler l’affichage du point de consigne
de la température du plancher, appuyer sur
ou .
• Il est également possible d’afficher la
température réelle de l’air ambiant sur le
thermostat dans MENU/TEMP.
Mode AF (température de l’air et du plancher) :
Ce mode régule et affiche la température de l’air
ambiant tout en maintenant la température du
plancher dans les limites souhaitées à l’aide d’un
capteur de température de plancher externe. Le
réglage des limites minimales et maximales de
la température du plancher est effectué par votre
professionnel local en matière de chauffage.
Ces limites vous permettent d’améliorer votre
confort tout en protégeant le revêtement de votre
plancher.
• La limite minimale de la température du
plancher contourne la température de l’air
dans ce mode. Si le réglage de cette limite
est trop élevé, elle risque de provoquer une
surchauffe de la pièce. Veuillez communiquer
avec votre installateur si cela se produit.
• Il est également possible d’afficher la
température réelle du plancher sur le
thermostat dans MENU/TEMP.
Menu des températures
Back
Lire avant l’installation

3
Réglage du système d’exploitation
1 Appuyez sur le bouton Mode pour passer au
mode suivant du système.
2 Parcourez les modes jusqu’à ce que vous
arriviez au mode du système voulu, puis
laissez-le pour l’activer.
Modes du système :
‒Heat (chauffage)
‒Off (arrêt)
Réglez l’heure et la date
Heure
1 Appuyez sur Menu sur le thermostat.
2 Appuyez sur ou pour aller à TIME (heure).
Appuyez sur Select (sélectionner).
3 Appuyez sur ou pour choisir l’affichage 12
ou 24 heures. Appuyez sur Select (sélectionner).
4 Utilisez ou pour régler l’heure. Appuyez sur
Select (sélectionner).
5 Utilisez ou pour régler les minutes.
Appuyez sur Select (Sélectionner) pour quitter
le menu Time (heure).
Date
1 Si vous avez déjà réglé l’heure, poursuivez
à l’étape 2. Si vous êtes à l’écran principal,
appuyez sur Menu sur le thermostat.
2 Appuyez sur ou pour aller à DATE.
Appuyez sur Select (sélectionner).
3 Appuyez sur ou pour modifier l’année.
Appuyez sur Select (sélectionner).
4 Appuyez sur ou pour modifier le mois.
Appuyez sur Select (sélectionner).
5 Appuyez sur ou pour modifier le jour.
Appuyez sur Select (Sélectionner) pour
sauvegarder et quitter le menu Date.

4
Définir le programme
Pour définir les programmes
Vous pouvez programmer quatre périodes par jour, avec des réglages différents
pour la semaine et la fin de semaine. Nous recommandons d’utiliser les
préréglages (indiqués dans le tableau ci-dessous),
car ils permettent de réduire vos frais de
chauffage.
Wake (Réveil) - Réglez l’heure à laquelle vous
vous levez ainsi que la température désirée le
matin, jusqu’à l’heure de départ de votre domicile.
Away (Départ) - Réglez l’heure à laquelle vous
quittez votre domicile ainsi que la température
désirée lorsque vous êtes absent (habituellement
un niveau écoénergétique).
Home (Retour) - Réglez l’heure à laquelle vous
rentrez à votre domicile ainsi que la température
désirée en soirée, jusqu’à l’heure du coucher.
Sleep (Sommeil) - Réglez l’heure à laquelle vous allez vous coucher ainsi que la
température désirée pendant la nuit (habituellement un niveau écoénergétique).
REMARQUE : Pour contourner de manière temporaire ou permanente un des
programmes ci-dessus, consultez la page 5.
En fonction du mode de régulation de la température sur lequel le thermostat est
configuré (voir la page 2), vous programmerez soit la température de l’air soit
celle du plancher. La température du plancher sera indiquée avec l’inscription
« FLR » au-dessus de la valeur réelle de la température du plancher.
1 Appuyez sur Menu sur le thermostat.
2 PROG s’affiche. Appuyez sur Select (sélectionner). ON
(marche) s’affiche alors. (Si vous ne souhaitez pas
utiliser de programme, appuyez sur ou pour afficher
OFF [arrêt]. Appuyez sur Select [sélectionner].) Appuyez
sur Select (sélectionner).
3 Appuyez sur ou pour sélectionner un ou
plusieurs jours à modifier. Appuyez sur Select
(sélectionner).
4 Appuyez sur ou pour sélectionner une période
du programme à modifier (Réveil, Départ, Retour et Sommeil). Appuyez sur Select
(sélectionner).
5 ON (marche) s’affiche. Appuyez sur Select (sélectionner) pour garder la période du
programme activée. Ou appuyez sur puis sur Select (sélectionner) pour désactiver la
période du programme.
6 L’heure commence à clignoter. Appuyez sur ou pour régler l’heure de début de la
période du programme. Appuyez sur Select (sélectionner).
7 La température commence à clignoter. Appuyez sur ou pour régler le point de
consigne de « chauffage » de la température. Appuyez sur Select (sélectionner).
8 Répétez les étapes 4 à 7 pour les périodes des programmes restants.
9 Une fois terminé, appuyez sur Home (accueil) pour enregistrer et retourner à l’écran
d’accueil.
10 Le programme peut être réglé et activé (ON) ou désactivé (OFF) en retournant au Menu
et en suivant les étapes indiquées ci-dessus.
Température
de l’air
(mode A/
mode AF)
Température
du planche
(mode F)
Wake (Réveil )
(6 h) 70 °82 °
Away (Départ )
(8 h) 62 °68 °
Home (Retour )
(18 h) 70 °82 °
Sleep (Sommeil
)
(22 h) 62 °68 °

5
Contourner le programme (permanent)
Contourner le programme (temporaire)
1 Appuyez sur ou pour régler la température.
2 Une fois que vous êtes au point de consigne
désiré de la température, aucune autre mesure
n’est nécessaire. Le nouveau point de consigne
de la température restera en place jusqu’à ce
que la période programmée suivante commence.
Pour obtenir de plus amples renseignements
concernant les périodes de programmation,
consultez la section « Programme » à la page
4.
3 Pour annuler le maintien temporaire, appuyez sur
ou puis sur Cancel (annuler).
1 Appuyez sur ou pour régler la température.
2 TEMPORARY HOLD (maintien temporaire)
s’affiche et le point de consigne de la température
clignote. Lorsqu’il clignote, appuyez sur le bouton
Hold (Mode) pour passer au maintien permanent.
3 Pour annuler le maintien permanent, appuyez sur
ou puis sur Cancel (annuler).
REMARQUE : En fonction du mode de régulation
de la température sur lequel le thermostat est
configuré (voir la page 2), vous réglerez
soit la température de l’air soit celle du plancher.
La température du plancher sera indiquée avec
l’inscription FLR au-dessus de la valeur réelle de la
température du plancher. Dans ce cas, le point de
consigne de la température du plancher est masqué
sur l’écran d’accueil. Il peut être affiché de nouveau
en appuyant sur ou .
Hold

6
Contourner le programme Vacances (temporaire)
Le programme Vacances contourne le programme actuel pendant
une période plus longue. Vous pouvez utiliser cette fonction lorsque
vous savez que vous serez absent pendant un moment.
1 Appuyez sur Menu sur le thermostat.
2 Appuyez sur ou pour aller à VACA. Appuyez sur Select
(sélectionner). Le nombre de jours commence à clignoter.
3 Appuyez sur ou pour régler le nombre de jours durant
lequel vous souhaitez que le point de consigne de la température
contourne votre programme. Appuyez sur Select (sélectionner). Le
point de consigne de la température commence à clignoter.
4 Appuyez sur ou pour régler le point de consigne de la
température pour ces jours. Appuyez sur Select (sélectionner)
pour activer votre programme Vacances et retourner à l’écran
d’accueil du thermostat.
REMARQUES :
• Le programme Vacances actif indique VACA au-dessus de la
température affichée sur l’écran d’accueil du thermostat.
• Une fois la période de vacances terminée, le thermostat
revient à votre programme habituel.
• Pour revenir au programme normal avant que le programme
Vacances ne se termine, appuyez sur Cancel (annuler) sur
l’écran d’accueil du thermostat.
Mode ECO (économie d’énergie)
Si votre thermostat est configuré pour fonctionner en mode AF (voir la page 2) et que
le programme est suivi, vous pouvez désactiver les limites minimales de la température du
plancher réglées par votre professionnel local en matière de chauffage pour les périodes
Départ et Sommeil. En fonction de l’installation de votre système de chauffage et du type
de plancher utilisé, le fait de désactiver les limites minimales de la température du plancher
peut réduire vos factures d’électricité lorsque le confort n’est pas nécessaire (périodes
Départ et Sommeil). Le revêtement de votre plancher et votre système de chauffage
sont continuellement protégés grâce au thermostat qui contrôle en tout temps la limite
maximale de la température du plancher ainsi que la température minimale pour protéger
contre le gel.
1 Appuyez sur Menu sur le thermostat.
2 Appuyez sur ou pour aller à ECO. Appuyez sur
Select (sélectionner).
3 Appuyez sur ou pour activer (ON) ou désactiver
(OFF) le mode Éco. Appuyez sur Select (sélectionner).
REMARQUE : Le mode Éco est disponible dans le menu
du thermostat uniquement si celui-ci est configuré en
mode de contrôle AF et qu’il est désactivé (OFF) par
défaut.
Home
Select
Home
Back Select
Home
Back Select
Heat
Home
Select

7
Régler les degrés en Fahrenheit (F) ou en Celcius (C)
1 Appuyez sur Menu.
2 Appuyez sur ou pour aller à F / C. Appuyez
sur Select (sélectionner).
3 Appuyez sur ou pour sélectionner F ou C.
Puis appuyez sur Select (sélectionner).
4 Appuyez sur Home (accueil) pour revenir à l’écran
d’accueil.
Reprise intelligente adaptative
Peu à peu, votre thermostat T6 Pro d’
Resideo
« se souvient » du temps que prend votre
système pour atteindre la température désirée. Il met en marche votre système de
chauffage plus tôt afin que votre maison soit à la bonne température au moment souhaité.
Régler le verrouillage du clavier
1 Appuyez sur Menu sur le thermostat.
2 Appuyez sur ou pour aller à LOCK (verrouiller). Appuyez sur Select (sélectionner).
3 Appuyez sur ou pour aller à OFF, PART, ou ON, puis appuyez sur Select
(sélectionner).
OFF (arrêt) : déverrouillé et accès complet autorisé.
PART (partiel) : verrouillage partiel, seule la température peut être modifiée.
ON (marche) : aucun accès autorisé..
4 Pour déverrouiller le clavier, appuyez sur le bouton au CENTRE et entrez le mot de passe
« 1234 ». Pour saisir le mot de passe, appuyez sur ou pour modifier le premier chiffre
du numéro. Appuyez ensuite sur Select (sélectionner). Répéter cette action pour entrer
les chiffres restants. Une fois les quatre chiffres saisis, appuyez de nouveau sur Select
(sélectionner).
5 Cette action permet de déverrouiller le clavier.
6 Si le code est incorrect, les lignes « -- » clignoteront à l’écran.
7 Appuyez sur Back (retour) pour revenir à l’étape précédente et saisir le bon numéro, puis
appuyez sur Select (sélectionner).
REMARQUE : Sur certains modèles, le paramètre de verrouillage du clavier est
disponible dans le menu de l’installateur uniquement, pas dans le menu de
l’utilisateur.

8
Les piles sont facultatives (pour fournir une
alimentation de secours) si votre thermostat a été
raccordé à une alimentation secteur lors de son
installation. Si votre thermostat n’a pas été raccordé
à une alimentation secteur, des piles sont alors
requises.
Insérez immédiatement des piles neuves lorsque
l’icône de pile faible s’affiche. L’icône s’affiche
environ deux mois avant l’épuisement des piles.
Même si l’icône de pile faible ne s’affiche pas, vous
devriez remplacer les piles une fois par année.
Remplacez-les également si vous quittez votre
domicile pendant plus d’un mois.
Si les piles sont insérées en l’espace de deux
minutes, vous n’aurez pas besoin de reconfigurer
l’heure et la date. Tous les autres réglages sont
stockés en permanence dans la mémoire et ne
requièrent aucune alimentation par pile.
REMARQUE : Il est recommandé d’utiliser des piles
alcalines.
Remplacement de la pile
Insérez des piles alcalines
AA neuves, puis réinstallez le
thermostat.
Lorsque l’avertissement de
pile faible s’affiche, appuyez
doucement sur le thermostat
pour le desserrer, puis
retirez-le soigneusement du
support mural.
La page est en cours de chargement...
La page est en cours de chargement...
La page est en cours de chargement...
La page est en cours de chargement...
La page est en cours de chargement...
La page est en cours de chargement...
La page est en cours de chargement...
La page est en cours de chargement...
La page est en cours de chargement...
La page est en cours de chargement...
La page est en cours de chargement...
La page est en cours de chargement...
La page est en cours de chargement...
La page est en cours de chargement...
La page est en cours de chargement...
La page est en cours de chargement...
-
 1
1
-
 2
2
-
 3
3
-
 4
4
-
 5
5
-
 6
6
-
 7
7
-
 8
8
-
 9
9
-
 10
10
-
 11
11
-
 12
12
-
 13
13
-
 14
14
-
 15
15
-
 16
16
-
 17
17
-
 18
18
-
 19
19
-
 20
20
-
 21
21
-
 22
22
-
 23
23
-
 24
24
-
 25
25
-
 26
26
-
 27
27
-
 28
28
-
 29
29
-
 30
30
-
 31
31
-
 32
32
-
 33
33
-
 34
34
-
 35
35
-
 36
36


Honeywell T6 Hydronic Programmable Thermostat Manuel utilisateur
- Catégorie
- Thermostats
- Taper
- Manuel utilisateur
- Ce manuel convient également à
dans d''autres langues
Documents connexes
-
Honeywell 135130 Mode d'emploi
-
-
-
Honeywell TL8100A1008 Manuel utilisateur
-
-
-
Autres documents
-
 Honeywell Home TH4110U2005/U Information produit
-
 Honeywell Home RLV4305A1000/U1 Le manuel du propriétaire
-
Honeywell Home RPLS731B Mode d'emploi
-
 Honeywell Home TH6320ZW2003/U Mode d'emploi
-
 Honeywell Home TH6320WF2003/U Mode d'emploi
-
resideo RT850T-347-U Electric Heating Solid State Relay Manuel utilisateur
-
-
Honeywell Home RPWL4045A2 Manuel utilisateur
-
-
Aube TH115-AF-GA Le manuel du propriétaire


