Makita VC1310L Vacuum Cleaner Manuel utilisateur
- Taper
- Manuel utilisateur

GB Vacuum Cleaner Instruction manual
F Aspirateur Manuel d’instructions
D Absauggerät Betriebsanleitung
I Aspiratore Istruzioni per l’uso
NL Stofzuiger Gebruiksaanwijzing
E Aspiradora Manual de instrucciones
P Aspirador de Pó Manual de instruções
DK Støvsuger Brugsanvisning
GR Ηλεκτρική σκούπα Οδηγίες χρήσης
VC1310L
VC2510L
VC3210L
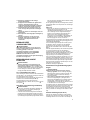
011586

2
1011593 2011594
3011595 4011609
5011597 6011598
7011599 8011645
12
12
3
4
1
2
5
4
6
7
8

3
9011611 10 011615
11 1207502 12 011630
13 011638 14 011588
910
11
12
9
10
11
12
18
13
14
15
16
17
18
19
17
20
21

4
15 011589 16 011604
17 011605
18 011606 19 011607
22
23
24
25
26
13
27
13
28
29

5
20 011608 21 011631
22 011632 23 011590
24 011591 25 011592
26 011600 27 011602
13
30
13
30
31
17
32 31
17
32
30
13

6
28 1207501 29 011610
30 011633 31 011597
32 011635 33 011634
34
33
35
36
37
4
4
6
37
4
4
6

7
34 011612 35 011613
36 011622 37 011623
38
39
24
40
24

8
38 011614 39 011601
17
16

9
ENGLISH (Original instructions)
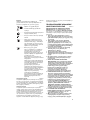
WARNING
• This machine is not intended for use by persons including children with reduced physical, sensory or mental
capabilities, or lack of experience and knowledge.
• Children should be supervised to ensure that they do not play with the cleaner.
• If the supply cord is damaged, it must be replaced by the authorized service facility.
• See the chapter “MAINTENANCE” for the appropriate details of precautions during user maintenance.
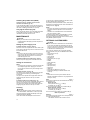
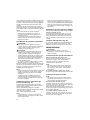
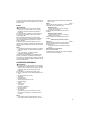
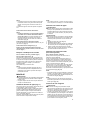
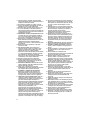
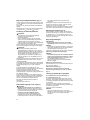
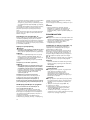
Explanation of general view
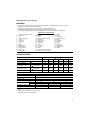
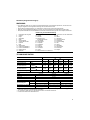
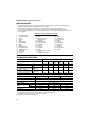
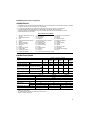
SPECIFICATIONS
• Due to our continuing program of research and development, the specifications herein are subject to change without
notice.
• Specifications may differ from country to country.
• The weight does not include accessories.
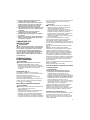
1. Suction force adjusting knob
2. Switch lever
3. Cap
4. Power supply cord
5. Holder
6. Base hook
7. Front cuffs
8. Hose
9. Caster
10. Stopper lever
11. FREE position
12. LOCK position
13. Tank cover
14. Powder filter
15. Damper
16. Prefilter
17. Tank
18. Mounting position marking
19. Water filter
20. Rubber holder
21. Paper pack
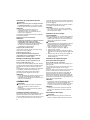
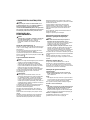
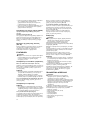
22. Cord hook
23. Press
24. Pipe holder
25. A section
26. Hooks
27. Press with a force and lower
28. Protrusion of the pipe holder
29. Groove
30. Hook
31. Holder plate
32. Polyethylene bag
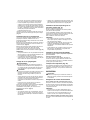
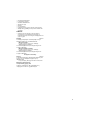
33. Float
34. Float cage
35. Handle
36. Head
37. Cord hook
38. Straight pipe
39. Corner nozzle
40. Stopper
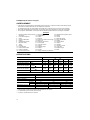
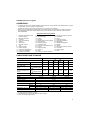
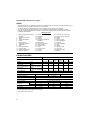
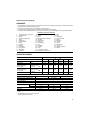
Model VC1310L / VC2510L / VC3210L
EU AU/NZ GB
110V
GB
230V CL AR/CH
Voltage Volt 230 - 240 230 - 240 110 230 - 240 220 230 - 240
Power consumption Watt 1,050 1,050 1,050 1,050 1,050 1,050
Connected load
for appliance socket
Watt
at symbol mode 2,400 1,200 600 1,900 2,200 1,100
Connected load
for appliance socket
Watt
at symbol mode 2,600 1,400 850 2,100 2,500 1,400
Total connected load Watt 3,450 2,250 1,650 2,950 3,250 2,150
Model VC1310L VC2510L VC3210L
Volume flow (air) 2.0 m3/min
Vacuum 22 kPa
Protection class 1
Type of protection IP X4 (splash-proof)
Recoverable capacity Dust 13L 25L 32L
Water 7L 14L 27L
Dimensions (L x W x H)
366 mm x 334 mm x 420 mm 432 mm x 416 mm x 451 mm 552 mm x 398 mm x 685 mm
Net weight 9.6 kg 10.5 kg 14.5 kg

10
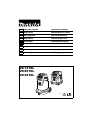
Symbols END108-7
The following show the symbols used for the equipment.
Be sure that you understand their meaning before use.
..... Read instruction manual.
................. Take particular care and attention.
............... Warning! The cleaner may contain
hazardous dust.
............... Never stand on the cleaner.
............... Dust class L (light). The cleaners are
capable of picking up dust class L. Follow
your country's regulations relating to
dusts and to occupational health and
safety.
............... Only for EU countries
Due to the presence of hazardous
components in the equipment, used
electrical and electronic equipment may
have a negative impact on the
environment and human health.
Do not dispose of electrical and
electronic appliances with household
waste!
In accordance with the European
Directive on waste electrical and
electronic equipment and its adaptation
to national law, used electrical and
electronic equipment should be collected
separately and delivered to a separate
collection point for municipal waste,
operating in accordance with the
environmental protection regulations.
This is indicated by the symbol of the
crossed-out wheeled bin placed on the
equipment.
Intended use ENE084-1
The tool is intended for collecting both wet and dry dust.
The tool is suitable for commercial use, for example in
hotels, schools, hospitals, factories, shops, offices and
rental businesses.
Power supply ENF001-1
The tool should be connected only to a power supply of
the same voltage as indicated on the nameplate, and can
only be operated on single-phase AC supply. This tool
should be grounded while in use to protect the operator
from electric shock. Use only three-wire extension cords
which have three-prong grounding-type plugs and three-
pole receptacles which accept the tool’s plug.
VACUUM CLEANER SAFETY
WARNINGS ENB119-6
WARNING: IMPORTANT! READ CAREFULLY all
safety warnings and all instructions BEFORE USE.
Failure to follow the warnings and instructions may result
in electric shock, fire and/or serious injury.
1. Before use, make sure that this cleaner must be
used by people who have been adequately
instructed on the use of this cleaner.
2. Before use, operators shall be provided with
information, instruction and training for the use of
the machine and the substances for which it is to
be used, including the safe method of removal and
disposal of the material collected.
3. Only use the socket outlet on the cleaner for
purposes specified in the instructions.
4. If foam/liquid comes out, switch off immediately.
5. Clean the water level limiting device regularly and
examine it for signs of damage.
6. Do not use the cleaner without the filter. Replace a
damaged filter immediately.
7. USE OF EXTENSION CORD. When using an
extension cord because of the great distance to
your power source, try to employ a cord that is
sufficiently thick but not too long, or cleaner
performance will be adversely affected. For
outdoor applications use an extension cord
suitable for outdoor use.
8. VOLTAGE WARNING: Before connecting the
cleaner to a power source (receptacle, outlet, etc.)
be sure the voltage supplied is the same as that
specified on the nameplate of the cleaner. A power
source with voltage greater than that specified for
the cleaner can result in SERIOUS INJURY to the
operator as well as damage to the cleaner. If in
doubt, DO NOT PLUG IN THE CLEANER. Using a
power source with voltage less than the
nameplate rating is harmful to the motor.
9. AVOID UNINTENTIONAL STARTING. Be sure
switch is OFF when plugging in.
10. Do not attempt to pick up flammable materials, fire
works, lighted cigarettes, hot ashes, hot metal
chips, sharp materials such as razors, needles,
broken glass or the like.
11. NEVER USE THE CLEANER IN THE VICINITY OF
GASOLINE, GAS, PAINT, ADHESIVES OR OTHER
HIGHLY EXPLOSIVE SUBSTANCES. The switch
emits sparks when turned ON and OFF. And so
does the motor commutator during operation. A
dangerous explosion may result.
12. Never vacuum up toxic, carcinogenic,
combustible or other hazardous materials such as
asbestos, arsenic, barium, beryllium, lead,
pesticides, or other health endangering materials.
13. Always place the cleaner on a horizontal flat
surface to prevent it from falling or moving
unintentionally.
14. Never use the cleaner outdoors in the rain.
15. For Finland, this machine is not to be used
outdoors at low temperature.
16. Do not use close to heat sources (stoves, etc.).
17. If the exhaust air is returned to the room, it is
necessary to provide for an adequate air change
rate in the room. Reference to National regulations
is necessary.
18. GUARD AGAINST ELECTRIC SHOCK. Prevent
body contact with grounded surfaces. For
example; pipes, radiators, ranges, refrigerator
enclosures.

11
19. Do not block cooling vents. These vents permit
cooling of the motor. Blockage should be carefully
avoided otherwise the motor will burn out from
lack of ventilation.
20. Keep proper footing and balance at all times.
21. DO NOT ABUSE CORD. Never carry the cleaner by
cord or yank it to disconnect from receptacle.
Keep cord away from heat, oil, and sharp edges.
Inspect cleaner cords periodically and if damaged,
have repaired by authorized service facility.
Inspect extension cords periodically and replace if
damaged.
22. Do not fold, tug or step on the hose.
23. Stop the cleaner immediately if you notice poor
performance or anything abnormal during
operation.
24. DISCONNECT THE CLEANER. When not in use,
before servicing, and when changing accessories.
25. Clean and service the cleaner immediately after
each use to keep it in tiptop operating condition.
26. MAINTAIN THE CLEANER WITH CARE. Keep the
cleaner clean for better and safer performance.
Follow instructions for changing accessories.
Keep handles dry, clean, and free from oil and
grease.
27. CHECK DAMAGED PARTS. Before further use of
the cleaner, a guard or other part that is damaged
should be carefully checked to determine that it
will operate properly and perform its intended
function. Check for alignment of moving parts,
binding of moving parts, breakage of parts,
mounting, and any other conditions that may
affect its operation. A guard or other part that is
damaged should be properly repaired or replaced
by an authorized service center unless otherwise
indicated elsewhere in this instruction manual.
Have defective switches replaced by authorized
service center. Don’t use the cleaner if switch
does not turn it on and off.
28. For user servicing, the machine shall be
dismantled, cleaned and serviced, as far as is
reasonably practicable, without causing risk to the
maintenance staff and others.
29. The machine should be technically inspected by
the manufacturer, or an instructed person, at least
annually, consisting of, for example, inspection of
filters for damage, air tightness of the machine
and proper function of the control mechanism.
30. When carrying out service or repair operations, all
contaminated items which cannot be satisfactorily
cleaned are to be disposed of; such items shall be
disposed of in impervious bags in accordance
with any current regulation for the disposal of
such waste.
31. REPLACEMENT PARTS. When servicing, use only
identical replacement parts.
32. When not in use, always store the cleaner
indoors.
33. Wet filters and the interior part of the liquid
container shall be dried before storage.
34. Be kind to your cleaner. Rough handling can
cause breakage of even the most sturdily built
cleaner.
35. Do not attempt to clean the exterior or interior with
benzine, thinner or cleaning chemicals. Cracks
and discoloration may be caused.
36. Do not use cleaner in an enclosed space where
flammable, explosive or toxic vapors are given off
by oil-base paint, paint-thinner, gasoline, some
mothproofing substances, etc., or in areas where
flammable dust is present.
37. Do not leave the cleaner cord lying on the floor
after you have finished a cleaning job. It can
become a tripping hazard or may cause damage to
the cleaner.
38. Do not operate the cleaner or any tool while under
the influence of drugs or alcohol.
39. As a basic rule of safety, use safety goggles or
safety glasses with side shields.
40. Use a dust mask in dusty work conditions.
41. This machine is not intended for use by persons
including children with reduced physical, sensory
or mental capabilities, or lack of experience and
knowledge.
42. Children should be supervised to ensure that they
do not play with the cleaner.
43. Never handle plug cord or cleaner with wet hands.
44. Use extreme caution when cleaning on stairs.
45. Do not use the cleaner as a stool or work bench.
The machine may fall down and may result in
personal injury.
SAVE THESE INSTRUCTIONS.
WARNING:
DO NOT let comfort or familiarity with product (gained
from repeated use) replace strict adherence to safety
rules for the subject product. MISUSE or failure to
follow the safety rules stated in this instruction
manual may cause serious personal injury.
FUNCTIONAL DESCRIPTION
WARNING:
•Before plugging the cleaner, always make sure that
the cleaner is switched off. Plugging the cleaner with
the switch on may cause an unexpected start resulting
in serious personal injury.
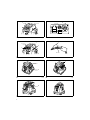
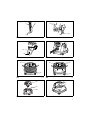
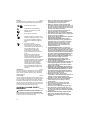
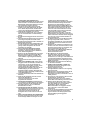
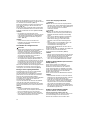
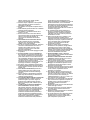
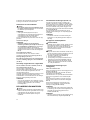
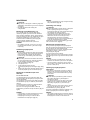
Switch action (Fig. 1)
To start the cleaner, rotate the switch lever to the “I” side.
To stop it, rotate the switch lever to the “O” side.
The suction power can be adjusted according to your
work need. (Fig. 2)
Suction power can be increased by turning the suction
force adjusting knob from the symbol to the
symbol.
Connecting electric power tools
WARNING:
• Observe the maximum connected loads for the
appliance socket (Refer to the SPECIFICATIONS.)
• Make sure that both the cleaner and the electric power
tool are switched off before connecting or
disconnecting. Connecting the power tool to the
cleaner with both of them being switched on may cause

12
unexpected and sudden start resulting serious
personal injury.
When connecting a grounded tool, insert a plug with a
grounding plate to the socket of the cleaner. (Fig. 3)
CAUTION:
• Never connect an electric power tool with an input
power exceeding that specified in the
“SPECIFICATIONS” to the socket of the cleaner by
turning the suction force adjusting knob. Connecting
the electric power tool exceeding the specified input
power may cause overheat and damage to the cleaner.
Refer to the specifications to avoid this.
The cleaner can be connected to an electric power tool up
to input power shown in the “SPECIFICATIONS”.
To connect an electric power tool, open the cap and insert
the power tool plug into the socket of the cleaner.
Rotate the switch lever to the “AUTO” position. (Fig. 2)
Move the suction force adjusting knob to the position
suitable for the input power of the electric power tool you
intend to use. Refer to the SPECIFICATIONS for the
relation between suction force adjusting knob and the
electric power tool input power.
Switching on and off of the connected electric power tool
simultaneously brings the cleaner switching on and off
action. The cleaner still works for a few seconds even
after the electric power tool is switched off.
After use, disconnect the power tool from the socket of
cleaner.
Switch off the cleaner after use.
Auto-suction stop during suction
operation
WARNING:
•Do not use for a long time while the float is at work.
Using the cleaner with its float at work for a long time
can cause overheat, resulting in the cleaner
deformation.
•Do not pick up foam or soapy liquid. Picking up
foam or soapy liquid can cause foam to come out of air
exit before the float works. Continuing to using in this
condition may cause an electric shock and breakage of
the cleaner.
The cleaner has a float mechanism that prevents water
from immersing into the motor when picking up more than
a certain amount of water.
When the tank is full and the cleaner no longer picks up
water, switch off the cleaner and empty the tank.
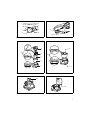
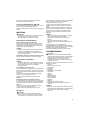
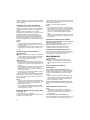
Installing the holder (Fig. 4)
When connecting an electric power tool, secure the power
supply cord and hose using the holders at a 70 cm -
80 cm distance among the holders that are provided with
the cleaner so that the hose is not entangled by the power
supply cord.
Usage of base hook
CAUTION:
•Be careful not to pinch your fingers when closing
the base hook. Failure to do so may cause personal
injury.
NOTE:
• Do not apply an excessive force on the base hook. The
excessive force on the base hook may damage the
base hook. Close the base hook when not in use.
Opening the base hook allows the following usage.
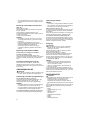
Storing the power supply cord
NOTE:
•Do not use the cleaner or a connected electric
power tool with a power supply cord wound on the
base hook. Using the cleaner or the connected electric
power tool with power supply cord may cause damage
the power supply cord. (Fig. 5)
Storing the front cuffs
Front cuffs 22, 24 and 38 can be stored (up to two at a
time.) (Fig. 6)
Storing the hose (Fig. 7)
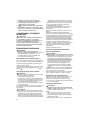
Resting a reasonable size of electric power tool for
the base hook, such as circular saw. (Fig. 8)
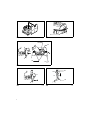
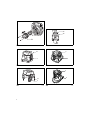
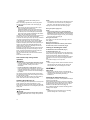
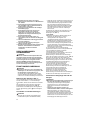
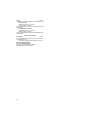
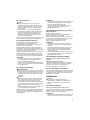
Locking or unlocking the caster
For Models VC1310L and VC2510L (Fig. 9)
For Model VC3210L (Fig. 10)
To lock the caster with a stopper, lower the stopper lever
and the caster no longer will rotate. To release the caster
from the locked position, raise the stopper lever.
Locking the caster is convenient when storing the cleaner,
stopping the work on the way and keeping the cleaner
still.
To operate the stopper, move it by hand.
NOTE:
• When moving the cleaner, make sure that the caster is
unlocked. Moving the cleaner with the caster in the
locked position may cause damage to the caster.
ASSEMBLY
CAUTION:
• Always be sure that the cleaner is switched off and
unplugged before carrying out any work on the cleaner.
• Always wear dust mask during assembly or
maintenance.
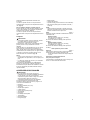
Installing the water filter (Fig. 11)
To pick up water or wet dust, remove prefilter and damper
and then use water filter.
When installing the water filter on the tank, set it tight at
the opening of the tank so that the hook of the water filter
engages the tank opening firmly and there is no space
between the water filter and the tank. (Fig. 12)
Also, install the water filter so that the mounting position
marking can be aligned.
NOTE:
• Models VC2510L and VC3210L have no mounting
position marking and no need to align it.

13
Installing the paper pack
WARNING:
• When using the paper pack, also use the prefilter
together that is preinstalled on the tool. Failure to use
the prefilter together may cause unusual noise and
heat, resulting in a fire.
CAUTION:
• Never pick up water or other liquids or wet dusts when
using the paper pack. Picking up such things may
cause the paper pack breakage.
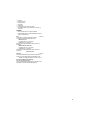
1. Remove the rubber holder. (Fig. 13)
2. Extend the paper pack.
3. Align the paper pack opening with the dust suction
opening of the cleaner. (Fig. 14 & 15)
4. Insert the cardboard of the paper pack onto the too so
that it is positioned at the end beyond the detent
protrusion.
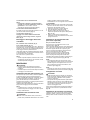
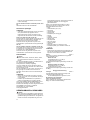
Installing the pipe holder (optional
accessory)
For Model VC1310L only
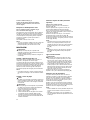
Depress the cord hook as shown in the figure. (Fig. 16)
Attach the pipe holder onto the cord hook. (The hooks are
away from the tank cover.)
Raise the pipe holder as far as the hooks contact the tank
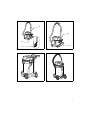
cover and press the A section of the pipe holder. (Fig. 17)
Press the A section with a great force and with the A
section so pressed lower the pipe holder. (Fig. 18)
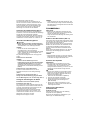
Fit two protrusion of the pipe holder into the grooves of the
tank cover and then press down the pipe holder. (Fig. 19
& 20)
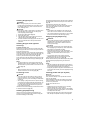
NOTE:
• The pipe holder that is excessively lowered than the
intended position cannot be installed on the cord hook
with the hook away from the tank cover as shown in the
figure. (Fig. 21)
NOTE:
• Make sure that the two hooks of the pipe holder are
hooked on the tank cover securely. (Fig. 22)
Connecting a hose
CAUTION:
• Never force the hose for bending or stamp it. Never
move the cleaner by a hose. Forcing, stamping and
pulling the hose may cause a breakage or deformation
of the hose.
• When picking up large wastes such as planer carvings,
concrete dusts or similars other than small wastes, use
the 38 mm inner diameter hose (optional accessory).
Using the 28 mm inner diameter hose may cause a
hose stuffing and damage.
Insert the hose onto the mounting port of the tank and turn
it clockwise until it locks. (Fig. 23)
Installing polyethylene bag
Cleaner can also be used without polyethylene bag.
However, using polyethylene bag is easier to empty the
tank without letting your hands dirty.
Spread the polyethylene bag in the tank. Insert it between
the holder plate and the tank, and pull it to the hose inlet.
(Fig. 24)
Spread the bag around the top of the tank.
Hook up the other side of the bag around the top of the
tank so that the prefilter hook can catch and hold it
securely. (Fig. 25)
NOTE:
• A polyethylene bag available on the market can be
used. The 0.04 mm or thicker one is recommended.
• Too much dust will tear the bag easily, so do not collect
the dust more than the half of the bag capacity.
Emptying the polyethylene bag
WARNING:
• Always make sure that the cleaner is switched off and
unplugged before emptying the polyethylene bag.
Failure to do so may cause an electric shock and
serious personal injury.
CAUTION:
• Do not apply a great impact on the powder filter and
tank. Applying a great impact may cause deformation
and damage to powder filter and tank.
• Empty the tank at least once a day although this
depends on picked-up dust volume in the tank. Or, the
suction force will weaken and the motor may be
broken.
• Do not grab the hook when emptying the tank.
Grabbing the hook may cause the hook to break.
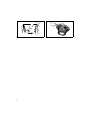
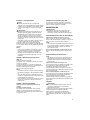
Unhook and lift up the tank cover. (Fig. 26)
Shake off the dust from powder filter, damper and prefilter
and then take the polyethylene bag out of the tank.
(Fig. 27)
NOTE:
• Take the polyethylene bag carefully out of the tank so
that the polyethylene bag cannot be caught and torn by
the protrusion inside the tank when emptying it.
• Empty the polyethylene bag before it becomes full. Too
much dust in the tank may cause the polyethylene bag
to be torn.
Installing powder filter (for dry dust)
(Fig. 11)
Place the prefilter in the tank.
Next, mount the damper on the powder filter and then
place it in the prefilter.
When installing powder filter and prefilter, the mounting
position marking on each of them are aligned with that
one at the top of the tank.
Finally, mount the tank cover.
NOTE:
• Models VC2510L and VC3210L have no mounting
position marking and no need to align it.
• Before using the powder filter, make sure that prefilter
and damper are always used together. It is not allowed
to install powder filter solely.
• Before using the paper pack, make sure that powder
filter, damper and prefilter are always used together.

14
Installing the powder filter (HEPA)
Optional accessory, available only for models
VC2510L and VC3210L (Fig. 28)
To use powder filter (HEPA), remove the float cage and
float by removing the bolts. Then follow the procedure of
the section “Installing powder filter (for dry dust)”.
Carrying the cleaner (Fig. 29)
When carrying the cleaner, carry it by holding the handle
on the head as shown in the figure. The handle is
retractable at the head when not in use.
MAINTENANCE
CAUTION:
• Always be sure that the tool is switched off and
unplugged before attempting to perform inspection or
maintenance.
Storage of power supply cord
For Model VC1310L only (Fig. 30 & 31)
Pull out the cord hook or open the base hook. Wind up the
power supply cord and hang it on the cord hook or wind it
around the base hook.
NOTE:
• Do not force the power supply cord off the cord hook
when trying to disconnect it from there. Forcing power
supply cord to disconnect from the cord hook may
cause damage to the cord.
For Models VC2510L and VC3210L (Fig. 32 & 33)
Wind up the power supply cord around the base hook.
Storage of accessories
NOTE:
• Do not apply an excessive force to the accessories that
are held by the pipe holder. Applying an excessive
force to these accessories may cause damage to the
pipe holder.
For Model VC1310L only (Fig. 34)
Pipe holder can be used to store straight pipe, bent pipe,
corner nozzle and similars by just inserting these
accessories.
The pipes can be placed into the pipe holder when also
stopping using the cleaner on the way for a while.
(Fig. 35)
For Models VC2510L and VC3210L (Fig. 36)
Pipe rest can be used to store straight pipe, bent pipe and
others by just inserting these accessories. (Fig. 37)
The pipes can be placed into the pipe holder when also
stopping using the cleaner on the way for a while.
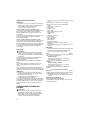
Cleaning
CAUTION:
• Never use gasoline, benzine, thinner, alcohol or the
like. Discoloration, deformation or cracks may result.
Clogged powder filter, prefilter and damper cause poor
suction performance. (Fig. 38)
Clean out the filters and dampers from time to time.
To remove dust or particles adhering to the filters, shake
the frame bottom quickly several times.
Occasionally wash the powder filter in water, rinse and dry
thoroughly in the shade before use. Never wash filters in a
washing machine. (Fig. 39)
NOTE:
• Do not rub and scratch the powder filter, the prefilter or
the damper with hard objects such as a brush and a
paddle.
• The filters are consumable and are recommended to
have some spares for them.
To maintain product SAFETY and RELIABILITY, repairs,
any other maintenance or adjustment should be
performed by Makita Authorized Service Centers, always
using Makita replacement parts.
OPTIONAL ACCESSORIES
CAUTION:
• These accessories or attachments are recommended
for use with your Makita tool specified in this manual.
The use of any other accessories or attachments might
present a risk of injury to persons. Only use accessory
or attachment for its stated purpose.
If you need any assistance for more details regarding
these accessories, ask your local Makita Service Center.
•Hose
• Front cuffs (22, 24, 38)
• Straight pipe
• Corner nozzle
• Round brush
• Powder filter (For dry type)
• Damper
• Prefilter
• Nozzle assembly
• Bent pipe
• Polyethylene bag
• Filter (For water)
• Paper pack
• Holder set
• Pipe holder (for Model VC1310L only)
• Powder filter (HEPA) (For Models VC2510L and
VC3210L)
NOTE:
• Some items in the list may be included in the tool
package as standard accessories. They may differ from
country to country.
Noise ENG905-1
The typical A-weighted noise level determined according
to IEC60335-2-69:
Model VC1310L
Sound pressure level (LpA): 72 dB (A)
Uncertainty (K): 2.5 dB (A)
The noise level under working may exceed 80 dB (A).
Model VC2510L, VC3210L
Sound pressure level (LpA): 73 dB (A)
Uncertainty (K): 2.5 dB (A)
The noise level under working may exceed 80 dB (A).
Wear ear protection.
Vibration ENG900-1
The vibration total value (tri-axial vector sum) determined
according to IEC60335-2-69:
The vibration emission value is below 2.5 m/s2.

15
EC Declaration of Conformity
For European countries only
The EC declaration of conformity is included as Annex A
to this instruction manual.

16
FRANÇAIS (Instructions d’origine)
AVERTISSEMENT
• Cette machine n’est pas destinée à être utilisée par des personnes (y compris les enfants) aux facultés physiques,
sensorielles ou mentales diminuées ou sans expérience ni expertise.
• Les enfants doivent être sous la surveillance d’un adulte afin de s’assurer qu’ils ne jouent pas avec l’aspirateur.
• Si le cordon d’alimentation est endommagé, vous devez le confier pour réparation à un centre de service agréé.
• Voir le chapitre « ENTRETIEN » pour des précautions détaillées pendant l’entretien à la charge de l’utilisateur.
Descriptif
SPÉCIFICATIONS
• Étant donné l’évolution constante de notre programme de recherche et de développement, les spécifications
contenues dans ce manuel sont sujettes à des modifications sans préavis.
• Les spécifications peuvent varier suivant les pays.
• Le poids ne comprend pas les accessoires.
1. Bouton de réglage de la puissance
d’aspiration
2. Levier de l’interrupteur
3. Cache
4. Cordon d’alimentation
5. Support
6. Compartiment de base
7. Manchons avant
8. Tuyau
9. Roulette
10. Levier de butée
11. Position déverrouillée
12. Position verrouillée
13. Couvercle du réservoir
14. Filtre à poudre
15. Humidificateur
16. Préfiltre
17. Réservoir
18. Repère de la position de montage
19. Filtre à eau
20. Support en caoutchouc
21. Sac en papier
22. Crochet du cordon
23. Appuyez
24. Support du tuyau
25. Section A
26. Fermoirs
27. Appuyez fortement puis abaissez
28. Renflement du support du tuyau
29. Rainure
30. Crochet
31. Plaque de support
32. Sac en polyéthylène
33. Flotteur
34. Cage du flotteur
35. Poignée
36. Chapeau
37. Crochet du cordon
38. Tuyau droit
39. Embout d’angle
40. Butée
Modèle VC1310L / VC2510L / VC3210L
EU AU/NZ GB
110V
GB
230V CL AR/CH
Tension Volt 230 - 240 230 - 240 110 230 - 240 220 230 - 240
Consommation électrique Watt 1 050 1 050 1 050 1 050 1 050 1 050
Puissance raccordée
pour la prise de l’appareil
Watt
en mode 2 400 1 200 600 1 900 2 200 1 100
Puissance raccordée
pour la prise de l’appareil
Watt
en mode 2 600 1 400 850 2 100 2 500 1 400
Puissance raccordée totale Watt 3 450 2 250 1 650 2 950 3 250 2 150
Modèle VC1310L VC2510L VC3210L
Débit du volume (air) 2,0 m3/min
Vide 22 kPa
Classe de protection 1
Type de protection IP X4 (étanche aux projections)
Capacité récupérable Poussière 13 L 25 L 32 L
Eau 7 L 14 L 27 L
Dimensions (L x P x H)
366 mm x 334 mm x 420 mm 432 mm x 416 mm x 451 mm 552 mm x 398 mm x 685 mm
Poids net 9,6 kg 10,5 kg 14,5 kg

17
Symboles END108-7
Les symboles utilisés pour l’appareil sont indiqués ci-
dessous. Assurez-vous d’avoir bien compris leur
signification avant d’utiliser l’appareil.
..... Reportez-vous au manuel d’instructions.
................. Veuillez être prudent et rester attentif.
............... Avertissement ! L’aspirateur peut
renfermer des poussières dangereuses.
............... Ne vous tenez jamais debout sur
l’aspirateur.
............... Catégorie de poussière L (légère). Un
aspirateur est capable de ramasser les
poussières de catégorie L. Suivez les
réglementations de votre pays
concernant les poussières et la santé et
la sécurité au travail.
............... Pour les pays de l’Union européenne
uniquement
En raison de la présence de composants
dangereux dans l’équipement, les
équipements électriques et électroniques
usagés peuvent avoir un impact négatif
sur l’environnement et la santé humaine.
Ne jetez pas les appareils électriques et
électroniques avec les ordures
ménagères !
Conformément à la directive européenne
relative aux déchets d’équipements
électriques et électroniques et à son
adaptation à la législation nationale, les
équipements électriques et électroniques
usagés doivent être collectés
séparément et déposés dans un point de
collecte distinct pour déchets urbains,
conformément aux réglementations en
matière de protection de
l’environnement.
Cela est indiqué par le symbole de la
poubelle à roulettes barrée sur
l’équipement.
Utilisations ENE084-1
Cet appareil est destiné à recueillir les poussières
humides et sèches. L’outil est destiné à une utilisation
commerciale, notamment dans les hôtels, les écoles, les
hôpitaux, les usines, les magasins, les bureaux et les
agences de location.
Alimentation ENF001-1
L’appareil ne doit être raccordé qu’à une alimentation de
la même tension que celle figurant sur la plaque
signalétique, et il ne peut fonctionner que sur un courant
secteur monophasé. Cet appareil doit être mis à la terre
lors de son fonctionnement afin de protéger l’opérateur
contre les chocs électriques. Utilisez uniquement des
rallonges à trois fils munies de fiches de mise à la terre à
trois broches et de prises d’alimentation tripolaires
compatibles avec la fiche de l’appareil.
CONSIGNES DE SÉCURITÉ
CONCERNANT L’ASPIRATEUR
ENB119-6
AVERTISSEMENT : IMPORTANT ! LIRE
ATTENTIVEMENT toutes les consignes de sécurité et
toutes les instructions AVANT UTILISATION. Le non-
respect des avertissements et des instructions peut
entraîner une électrocution, un incendie et/ou de graves
blessures.
1. Avant l’utilisation, veillez à ce que l’aspirateur soit
utilisé par des personnes ayant reçu des
instructions adéquates quant à son utilisation.
2. Avant toute utilisation, les opérateurs doivent
recevoir les informations, les instructions et la
formation nécessaires à l’utilisation de la machine
et sur les substances pour lesquelles elle est
utilisée, notamment la méthode sûre pour retirer
et jeter les matières collectées.
3. Utilisez la prise de courant située sur l’aspirateur
uniquement aux fins spécifiées dans les
instructions.
4. Si de la mousse ou un liquide sort, éteignez-le
immédiatement.
5. Nettoyez régulièrement le dispositif limitant le
niveau d’eau et vérifiez qu’il ne présente pas de
signes de dommage.
6. N’utilisez pas l’aspirateur sans le filtre. Remplacez
immédiatement le filtre s’il est endommagé.
7. UTILISATION D’UNE RALLONGE. Lorsque vous
utilisez une rallonge en raison de l’éloignement de
votre source d’alimentation, essayez d’employer
un cordon qui est suffisamment épais mais pas
trop long sous peine d’affecter négativement les
performances de l’aspirateur. En cas d’utilisation
à l’extérieur, utilisez une rallonge convenant pour
l’utilisation à l’air libre.
8. AVERTISSEMENT DE TENSION : Avant de
connecter l’aspirateur à une source d’alimentation
(fiche femelle, prise, etc.), vérifiez que la tension
fournie est la même que celle indiquée sur la
plaque signalétique de l’aspirateur. Une source
d’alimentation avec une tension supérieure à celle
spécifiée pour l’aspirateur peut BLESSER
GRAVEMENT l’opérateur ainsi qu’endommager
l’aspirateur. En cas de doute, NE BRANCHEZ PAS
L’ASPIRATEUR. L’utilisation d’une source
d’alimentation avec une tension inférieure à celle
sur la plaque signalétique est dangereuse pour le
moteur.
9. ÉVITEZ LES DÉMARRAGES INTEMPESTIFS.
Veillez à mettre l’outil hors tension lors du
branchement.
10. N’essayez pas d’aspirer des matériaux
inflammables, du matériel pyrotechnique, des
cigarettes allumées, des cendres chaudes, des
copeaux de métal chauds, des matériaux
tranchants comme un rasoir, des aiguilles, des
morceaux de verre, etc.
11. N’UTILISEZ JAMAIS L’ASPIRATEUR À PROXIMITÉ
D’ESSENCE, GAZ, PEINTURE, ADHÉSIFS OU
AUTRES SUBSTANCES TRÈS EXPLOSIVES.
L’interrupteur émet des étincelles à la mise sous
et hors tension. Tout comme le commutateur du

18
moteur pendant le fonctionnement. Une
dangereuse explosion peut survenir.
12. N’aspirez jamais des matériaux toxiques,
cancérigènes, combustibles ou d’autres produits
dangereux comme l’amiante, l’arsenic, le baryum,
le béryllium, le plomb, les pesticides ou d’autres
matières présentant un danger pour la santé.
13. Placez toujours l’aspirateur sur une surface plane
et horizontale afin d’empêcher sa chute ou son
déplacement accidentel.
14. N’utilisez jamais l’aspirateur à l’extérieur sous la
pluie.
15. Pour la Finlande, cette machine ne doit pas être
utilisée à l’extérieur à basse température.
16. N’utilisez pas l’aspirateur près de sources de
chaleur (cuisinières, etc.).
17. Si l’air évacué est ramené dans la pièce, il est
nécessaire de prévoir un taux de renouvellement
d’air adéquat dans la pièce. Il est nécessaire de
consulter les réglementations nationales.
18. MESURES DE PRÉVENTION CONTRE
L’ÉLECTROCUTION. Évitez tout contact physique
avec des surfaces mises à la terre. Par exemple :
tuyaux, radiateurs, cuisinières, réfrigérateurs.
19. Ne bloquez pas les fentes d’aération. Ces fentes
permettent le refroidissement du moteur. Il faut
éviter soigneusement de les bloquer sous peine
de griller le moteur en raison d’un manque
d’aération.
20. Maintenez constamment une bonne assise et un
bon équilibre.
21. NE MALTRAITEZ PAS LE CORDON
D’ALIMENTATION. Ne transportez jamais
l’aspirateur par le cordon, et pour le débrancher
de la fiche femelle, ne tirez pas sur le cordon.
Tenez le cordon à l’écart de la chaleur, de l’huile et
de bords tranchants. Inspectez régulièrement les
cordons de l’aspirateur et s’ils sont endommagés,
confiez leur réparation à un centre de service
après-vente agréé. Inspectez les rallonges
périodiquement et remplacez-les si elles sont
détériorées.
22. Ne pliez pas le tuyau, ni ne tirez ou marchez
dessus.
23. Arrêtez immédiatement l’aspirateur si vous
remarquez des performances médiocres ou toute
autre anomalie pendant le fonctionnement.
24. DÉBRANCHEZ L’ASPIRATEUR. Lorsque vous
n’utilisez pas l’aspirateur, avant de le réparer et
lors du remplacement des accessoires.
25. Procédez au nettoyage et à l’entretien de
l’aspirateur immédiatement après chaque
utilisation pour le maintenir dans des conditions
de fonctionnement optimales.
26. ENTRETENEZ SOIGNEUSEMENT L’ASPIRATEUR.
L’aspirateur doit toujours être propre pour
améliorer la sécurité et les performances. Suivez
les instructions pour remplacer les accessoires.
Les poignées doivent toujours être sèches,
propres et exemptes d’huile ou de graisse.
27. VÉRIFIEZ LES PIÈCES ENDOMMAGÉES. Avant
toute nouvelle utilisation de l’aspirateur, vérifiez
soigneusement un carter de protection ou toute
autre pièce endommagés pour déterminer qu’ils
fonctionnent bien et remplissent leurs fonctions
respectives. Vérifiez l’alignement des pièces
mobiles, le blocage des pièces mobiles, les pièces
cassées, l’installation et tout autre état
susceptible d’affecter le fonctionnement. Un
carter de protection ou toute autre pièce
endommagés doivent être réparés ou remplacés
correctement par un centre de service après-vente
agréé sauf indication contraire de ce mode
d’emploi. Confiez le remplacement des
interrupteurs défectueux à un centre de service
après-vente agréé. N’utilisez pas l’aspirateur s’il
ne peut pas être mis sous et hors tension au
moyen de l’interrupteur.
28. Pour le dépannage utilisateur, la machine doit être
démontée, nettoyée et dépannée, autant que
raisonnablement possible, sans mettre en danger
le personnel de maintenance et d’autres
personnes.
29. La machine doit être inspectée sur le plan
technique par le fabricant ou une personne
formée, au moins une fois par an, et cette
inspection doit comprendre, entre autres, la
vérification des dommages des filtres, de
l’étanchéité à l’air de la machine et du bon
fonctionnement du mécanisme de contrôle.
30. Lors des tâches d’entretien ou de réparation, tous
les éléments contaminés ne pouvant être nettoyés
de manière satisfaisante doivent être mis au rebut.
Ces éléments doivent être jetés dans des sacs
étanches conformément aux réglementations
actuelles en matière de mise au rebut de ce type
de déchets.
31. PIÈCES DE RECHANGE. En cas de réparation,
utilisez uniquement des pièces de rechange
identiques.
32. RANGEZ L’ASPIRATEUR APRÈS UTILISATION.
Lorsque vous n’utilisez pas l’aspirateur, rangez-le
à l’intérieur.
33. Les filtres humides et la partie intérieure du
récipient de liquide doivent être séchés avant
rangement.
34. Épargnez votre aspirateur. Une manipulation
brutale peut entraîner la rupture de l’aspirateur le
plus robuste.
35. Ne nettoyez pas l’extérieur ou l’intérieur avec du
benzène, du diluant ou d’autres produits
chimiques de nettoyage. Vous risqueriez de le
fissurer ou de le décolorer.
36. N’utilisez pas l’aspirateur dans un endroit fermé
où des vapeurs inflammables, explosives ou
toxiques sont dégagées par de la peinture à base
d’huile, du diluant pour peinture, de l’essence,
certains produits antimites, etc., ou dans des
endroits exposés à des poussières inflammables.
37. Ne laissez pas le cordon de l’aspirateur à même le
sol après avoir terminé d’aspirer. Il pourrait faire
trébucher quelqu’un ou endommager l’aspirateur.
38. N’utilisez pas cet outil ou tout autre sous l’emprise
de drogues, de médicaments ou d’alcool.
39. Par mesure de sécurité, utilisez des lunettes à
coques ou des lunettes de sécurité avec écrans
latéraux.

19
40. Utilisez un masque anti-poussière dans des
conditions de travail poussiéreuses.
41. Cette machine n’est pas destinée à être utilisée
par des personnes (y compris les enfants) aux
facultés physiques, sensorielles ou mentales
diminuées ou sans expérience ni expertise.
42. Les enfants doivent être sous la surveillance d’un
adulte afin de s’assurer qu’ils ne jouent pas avec
l’aspirateur.
43. Ne manipulez jamais la fiche de cordon ou
l’aspirateur avec les mains mouillées.
44. Redoublez de précaution lorsque vous nettoyez
des escaliers.
45. N’utilisez pas l’aspirateur comme marchepied ou
établi. La machine pourrait tomber et provoquer
des blessures corporelles.
CONSERVEZ CES
INSTRUCTIONS.
AVERTISSEMENT :
NE vous laissez PAS tromper (au fil d’une utilisation
répétée) par un sentiment d’aisance et de familiarité
avec le produit, en négligeant le respect rigoureux
des consignes de sécurité qui accompagnent le
produit en question. La MAUVAISE UTILISATION de
l’outil ou l’ignorance des consignes de sécurité
indiquées dans ce mode d’emploi peut entraîner de
graves blessures.
DESCRIPTION DU
FONCTIONNEMENT
AVERTISSEMENT :
•Avant de brancher l’aspirateur, assurez-vous
toujours qu’il est éteint. Le fait de brancher
l’aspirateur alors que l’interrupteur est en position de
marche risque de provoquer le démarrage involontaire
de l’appareil et d’entraîner de graves blessures
corporelles.
Interrupteur (Fig. 1)
Pour démarrer l’aspirateur, tournez le levier de
l’interrupteur en position « I ». Pour l’éteindre, tournez le
levier de l’interrupteur en position « O ».
Vous pouvez régler la puissance de l’aspiration en
fonction de vos besoins. (Fig. 2)
Vous pouvez augmenter la puissance de l’aspiration en
tournant le bouton de réglage correspondant depuis le
symbole vers le symbole .
Branchement d’appareils électriques
AVERTISSEMENT :
• Respectez les charges maximales à raccorder pour la
prise de l’appareil (reportez-vous aux
SPÉCIFICATIONS.)
• Assurez-vous que l’aspirateur et l’appareil électrique
sont éteints avant de les brancher ou de les
débrancher. Si vous raccordez l’appareil électrique à
l’aspirateur alors qu’ils sont tous les deux allumés,
vous risquez de déclencher un démarrage involontaire
et soudain, entraînant de graves blessures corporelles.
Lors du raccordement d’un outil mis à la terre, insérez une
fiche munie d’une prise de terre dans la prise de
l’aspirateur. (Fig. 3)
ATTENTION :
• Ne raccordez jamais à la prise de l’aspirateur un
appareil électrique dont la puissance d’entrée est
supérieure à celle spécifiée dans les
« SPÉCIFICATIONS » en tournant le bouton de
réglage de la puissance d’aspiration. Si vous raccordez
un appareil électrique présentant une puissance
d’entrée supérieure à celle spécifiée, vous risquez de
déclencher une surchauffe et d’endommager
l’aspirateur. Pour éviter ce type de problème, reportez-
vous aux spécifications.
Vous pouvez raccorder l’aspirateur à un appareil
électrique dont la puissance d’entrée est conforme à
celles indiquées dans les « SPÉCIFICATIONS ».
Pour raccorder un appareil électrique, ouvrez le couvercle
et insérez la prise de l’appareil électrique dans la prise de
l’aspirateur.
Tournez le levier de l’interrupteur en position « AUTO ».
(Fig. 2)
Déplacez le bouton de réglage de la puissance
d’aspiration sur la position adéquate pour la puissance
d’entrée de l’appareil électrique que vous prévoyez
d’utiliser. Reportez-vous aux SPÉCIFICATIONS pour
régler le bouton de réglage de la puissance d’aspiration
selon la puissance d’entrée de l’appareil électrique.
Le fait d’allumer et d’éteindre simultanément l’appareil
électrique raccordé entraîne l’activation et la désactivation
de l’aspirateur. L’aspirateur fonctionne encore pendant
quelques secondes, même après la désactivation de
l’appareil électrique.
Après avoir utilisé l’appareil électrique, débranchez-le de
la prise de l’aspirateur.
Éteignez l’aspirateur après l’avoir utilisé.
Arrêt de l’aspiration automatique pendant
le fonctionnement
AVERTISSEMENT :
•N’utilisez pas l’appareil pendant une durée
prolongée lors du fonctionnement du flotteur.
L’utilisation prolongée de l’aspirateur lors du
fonctionnement de son flotteur peut provoquer une
surchauffe et entraîner une déformation de l’aspirateur.
•N’aspirez pas de mousse ou de liquide savonneux.
L’aspiration de mousse ou de liquide savonneux peut
entraîner l’expulsion de la mousse avant le
fonctionnement du flotteur. Si vous continuez à utiliser
l’appareil dans cet état, vous risquez de provoquer un
choc électrique et de casser l’aspirateur.
L’aspirateur est équipé d’un mécanisme à flotteur qui
empêche l’eau de pénétrer dans le moteur lors de
l’aspiration d’une quantité d’eau trop importante.
Lorsque le réservoir est plein et que l’aspirateur n’aspire
plus d’eau, éteignez l’aspirateur et videz le réservoir.
Installation du support (Fig. 4)
Lors du raccordement d’un appareil électrique, sécurisez
le cordon d’alimentation et le tuyau en espaçant les
supports fournis avec l’aspirateur de 70 à 80 cm l’un de
l’autre, de sorte que le tuyau ne soit pas emmêlé par le
cordon d’alimentation.

20
Utilisation du compartiment de base
ATTENTION :
•Veillez à ne pas vous pincer les doigts en fermant
le compartiment de base. Le non-respect de cette
instruction peut provoquer des blessures corporelles.
REMARQUE :
• Ne forcez pas de manière excessive sur le
compartiment de base. Vous risqueriez de
l’endommager. Fermez le compartiment de base
lorsque vous ne l’utilisez pas.
L’ouverture du compartiment de base permet d’effectuer
les opérations suivantes.
Rangement du cordon d’alimentation
REMARQUE :
•N’utilisez pas l’aspirateur ou un appareil électrique
raccordé après avoir enroulé un cordon
d’alimentation sur le compartiment de base.
L’utilisation de l’aspirateur ou de l’appareil électrique
raccordé avec le cordon d’alimentation risque
d’endommager ce dernier. (Fig. 5)
Rangement des manchons avant
Les manchons avant 22, 24 et 38 peuvent être rangés
(jusqu’à deux à la fois.) (Fig. 6)
Rangement du tuyau (Fig. 7)
Pose d’un appareil électrique de dimensions
raisonnables pour le compartiment de base, par
exemple une scie circulaire. (Fig. 8)
Blocage ou déblocage des roulettes
Pour les modèles VC1310L et VC2510L (Fig. 9)
Pour le modèle VC3210L (Fig. 10)
Pour bloquer les roulettes à l’aide d’une butée, abaissez
le levier de la butée afin d’empêcher la roulette de tourner.
Pour débloquer les roulettes, soulevez le levier de la
butée.
Il est pratique de bloquer les roulettes lors du rangement
de l’aspirateur, de l’interruption momentanée de
l’aspiration et du maintien à l’arrêt de l’aspirateur.
Pour bouger la butée, déplacez-la avec la main.
REMARQUE :
• Lors du déplacement de l’aspirateur, assurez-vous que
les roulettes sont débloquées. Si vous déplacez
l’aspirateur alors que les roulettes sont bloquées, vous
risquez de les endommager.
ASSEMBLAGE
ATTENTION :
• Avant d’effectuer toute intervention sur l’aspirateur,
assurez-vous toujours qu’il est hors tension et
débranché.
• Portez toujours un masque anti-poussière pendant
l’assemblage ou l’entretien.
Installation du filtre à eau (Fig. 11)
Pour aspirer de l’eau ou de la poussière humide, retirez le
préfiltre et l’humidificateur, puis utilisez le filtre à eau.
Lors de l’installation du filtre à eau sur le réservoir, serrez-
le à fond sur l’ouverture du réservoir, de sorte que le
crochet du filtre à eau s’insère à fond dans l’ouverture du
réservoir et qu’il n’y ait pas d’espace entre le filtre à eau et
le réservoir. (Fig. 12)
Installez également le filtre à eau, de manière à l’aligner
sur le repère de la position de montage.
REMARQUE :
• Les modèles VC2510L et VC3210L ne comportent
aucun repère pour la position de montage car il n’est
pas nécessaire de les aligner.
Installation du sac en papier
AVERTISSEMENT :
• Lors de l’utilisation du sac en papier, utilisez également
le préfiltre préinstallé sur l’outil. La non utilisation du
préfiltre risque de provoquer un bruit anormal et de la
chaleur, puis de déclencher un incendie.
ATTENTION :
• N’aspirez jamais d’eau ou d’autres liquides ou bien des
poussières humides lors de l’utilisation du sac en
papier. L’aspiration de ces types de substance peut
entraîner le déchirement du sac en papier.
1. Retirez le support en caoutchouc. (Fig. 13)
2. Déployez le sac en papier.
3. Alignez l’ouverture du sac en papier sur l’ouverture
d’aspiration de la poussière de l’aspirateur. (Fig. 14 et
15)
4. Insérez le carton du sac en papier sur l’appareil, de
sorte qu’il se trouve à l’extrémité au-delà du
renflement bloquant.
Installation du support du tuyau
(accessoire fourni en option)
Pour le modèle VC1310L uniquement
Appuyez sur le crochet du cordon comme indiqué sur la
figure. (Fig. 16)
Fixez le support du tuyau sur le crochet du cordon. (Les
crochets sont toujours éloignés du couvercle du
réservoir.)
Soulevez le support du tuyau jusqu’à ce que les crochets
entrent en contact avec le couvercle du réservoir et
appuyez sur la partie A du support du tuyau. (Fig. 17)
Appuyez fortement sur la section A et maintenez-la
appuyée tout en abaissant le support du tuyau. (Fig. 18)
Insérez les deux renflements du support du tuyau dans
les rainures du couvercle du réservoir, puis appuyez sur le
support du tuyau. (Fig. 19 et 20)
REMARQUE :
• Si le support du tuyau est trop abaissé par rapport à la
position prévue, il ne peut pas être installé sur le
crochet du cordon, qui se trouve éloigné du couvercle
du réservoir, comme illustré sur la figure. (Fig. 21)
REMARQUE :
• Assurez-vous que les deux crochets du support du
tuyau sont bien attachés au couvercle du réservoir.
(Fig. 22)
Raccordement d’un tuyau
ATTENTION :
• Ne forcez jamais sur le tuyau pour le courber ou le
marquer. Le déplacez jamais l’aspirateur en le tirant
La page est en cours de chargement...
La page est en cours de chargement...
La page est en cours de chargement...
La page est en cours de chargement...
La page est en cours de chargement...
La page est en cours de chargement...
La page est en cours de chargement...
La page est en cours de chargement...
La page est en cours de chargement...
La page est en cours de chargement...
La page est en cours de chargement...
La page est en cours de chargement...
La page est en cours de chargement...
La page est en cours de chargement...
La page est en cours de chargement...
La page est en cours de chargement...
La page est en cours de chargement...
La page est en cours de chargement...
La page est en cours de chargement...
La page est en cours de chargement...
La page est en cours de chargement...
La page est en cours de chargement...
La page est en cours de chargement...
La page est en cours de chargement...
La page est en cours de chargement...
La page est en cours de chargement...
La page est en cours de chargement...
La page est en cours de chargement...
La page est en cours de chargement...
La page est en cours de chargement...
La page est en cours de chargement...
La page est en cours de chargement...
La page est en cours de chargement...
La page est en cours de chargement...
La page est en cours de chargement...
La page est en cours de chargement...
La page est en cours de chargement...
La page est en cours de chargement...
La page est en cours de chargement...
La page est en cours de chargement...
La page est en cours de chargement...
La page est en cours de chargement...
La page est en cours de chargement...
La page est en cours de chargement...
La page est en cours de chargement...
La page est en cours de chargement...
La page est en cours de chargement...
La page est en cours de chargement...
La page est en cours de chargement...
La page est en cours de chargement...
La page est en cours de chargement...
La page est en cours de chargement...
La page est en cours de chargement...
La page est en cours de chargement...
La page est en cours de chargement...
La page est en cours de chargement...
-
 1
1
-
 2
2
-
 3
3
-
 4
4
-
 5
5
-
 6
6
-
 7
7
-
 8
8
-
 9
9
-
 10
10
-
 11
11
-
 12
12
-
 13
13
-
 14
14
-
 15
15
-
 16
16
-
 17
17
-
 18
18
-
 19
19
-
 20
20
-
 21
21
-
 22
22
-
 23
23
-
 24
24
-
 25
25
-
 26
26
-
 27
27
-
 28
28
-
 29
29
-
 30
30
-
 31
31
-
 32
32
-
 33
33
-
 34
34
-
 35
35
-
 36
36
-
 37
37
-
 38
38
-
 39
39
-
 40
40
-
 41
41
-
 42
42
-
 43
43
-
 44
44
-
 45
45
-
 46
46
-
 47
47
-
 48
48
-
 49
49
-
 50
50
-
 51
51
-
 52
52
-
 53
53
-
 54
54
-
 55
55
-
 56
56
-
 57
57
-
 58
58
-
 59
59
-
 60
60
-
 61
61
-
 62
62
-
 63
63
-
 64
64
-
 65
65
-
 66
66
-
 67
67
-
 68
68
-
 69
69
-
 70
70
-
 71
71
-
 72
72
-
 73
73
-
 74
74
-
 75
75
-
 76
76


Makita VC1310L Vacuum Cleaner Manuel utilisateur
- Taper
- Manuel utilisateur
dans d''autres langues
- italiano: Makita VC1310L Vacuum Cleaner Manuale utente
- español: Makita VC1310L Vacuum Cleaner Manual de usuario
- Deutsch: Makita VC1310L Vacuum Cleaner Benutzerhandbuch
- Nederlands: Makita VC1310L Vacuum Cleaner Handleiding
- português: Makita VC1310L Vacuum Cleaner Manual do usuário
- dansk: Makita VC1310L Vacuum Cleaner Brugermanual