
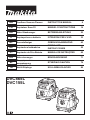
DVC865L
DVC155L
EN Cordless Vacuum Cleaner INSTRUCTION MANUAL 6
FR Aspirateur Sans Fil MANUEL D’INSTRUCTIONS 14
DE Akku-Staubsauger BETRIEBSANLEITUNG 23
IT Aspirapolvere a batteria ISTRUZIONI PER L’USO 33
NL Accustofzuiger GEBRUIKSAANWIJZING 43
ES Aspiradora Inalámbrica MANUAL DE
INSTRUCCIONES 52
PT Aspirador de Pó a Bateria MANUAL DE INSTRUÇÕES 62
DA Akku støvsuger BRUGSANVISNING 71
EL
79
TR Akülü Süpürge KULLANMA KILAVUZU 89

2
3
4
5
1
Fig.1
2
1
Fig.2
1
Fig.3
1
2
Fig.4
1
2
Fig.5
Fig.6
2
1
3
Fig.7
2

1
2
3
4
Fig.8
Fig.9
2
1
Fig.10
1
2
3
4
5
6
6
6
Fig.11
1
2
3
Fig.12
1
Fig.13
3

1
2
Fig.14
1
2
Fig.15
1
Fig.16
Fig.17
Fig.18
Fig.19
Fig.20
1
3
2
Fig.21
4

1
2
3
Fig.22
1
Fig.23
Fig.24
Fig.25
Fig.26
1
Fig.27
Fig.28
5

6ENGLISH
ENGLISH (Original instructions)
WARNING
• This machine is not intended for use by persons including children with reduced physical, sensory or mental
capabilities, or lack of experience and knowledge.
• Children should be supervised to ensure that they do not play with the cleaner.
• See the chapter “SPECIFICATIONS” for the type reference of the battery.
• See the section “Installing or removing battery cartridge” for how to remove or install the battery.
• When disposing the battery cartridge, remove it from the tool and dispose of it in a safe place. Follow your local
regulations relating to disposal of battery.
• If the tool is not used for a long period of time, the battery must be removed from the tool.
• Do not short the battery cartridge.
• See the chapter “MAINTENANCE” for the appropriate details of precautions during user maintenance.
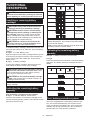
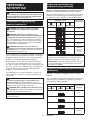
SPECIFICATIONS
Model: DVC865L DVC155L
/min
Recoverable capacity Dust
Water
Rated voltage
Net weight
Protection degree
without notice.
Applicable battery cartridge and charger
Charger
• Some of the battery cartridges and chargers listed above may not be available depending on your region of
residence.
WARNING: Only use the battery cartridges and chargers listed above. Use of any other battery cartridges
Symbols
The followings show the symbols which may be used
meaning before use.
Read instruction manual.
Take particular care and attention.
Warning! The cleaner may contain haz
ardous dust.
Never stand on the cleaner.
country's regulations relating to dusts and
to occupational health and safety.

7ENGLISH
Ni-MH
Li-ion
Only for EU countries
Due to the presence of hazardous com
and batteries may have a negative impact
on the environment and human health.
Do not dispose of electrical and electronic
appliances or batteries with household
waste!
In accordance with the European Directive
ment and on accumulators and batteries
and waste accumulators and batteries,
as well as their adaptation to national law,
accumulators should be stored separately
and delivered to a separate collection point
for municipal waste, operating in accor
dance with the regulations on environmen
tal protection.
This is indicated by the symbol of the
Intended use
The tool is intended for collecting both wet and dry dust.
The tool is suitable for commercial use, for example in
rental businesses.
Noise
Model DVC865L
pA
Model DVC155L
pA
NOTE:
been measured in accordance with a standard test
method and may be used for comparing one tool with
another.
NOTE:
may also be used in a preliminary assessment of
exposure.
WARNING: Wear ear protection.
WARNING: The noise emission during actual
value(s) depending on the ways in which the
tool is used especially what kind of workpiece is
processed.
WARNING: Be sure to identify safety mea-
sures to protect the operator that are based on an
estimation of exposure in the actual conditions of
use (taking account of all parts of the operating
cycle such as the times when the tool is switched
trigger time).
Vibration
h,M or less
NOTE:
measured in accordance with a standard test method
and may be used for comparing one tool with another.
NOTE:
be used in a preliminary assessment of exposure.
WARNING: The vibration emission during
declared value(s) depending on the ways in which
the tool is used especially what kind of workpiece
is processed.
WARNING: Be sure to identify safety mea-
sures to protect the operator that are based on an
estimation of exposure in the actual conditions of
use (taking account of all parts of the operating
cycle such as the times when the tool is switched
trigger time).
EC Declaration of Conformity
For European countries only
The EC declaration of conformity is included as Annex A
to this instruction manual.
SAFETY WARNINGS
Cordless vacuum cleaner safety warnings
WARNING: IMPORTANT! READ CAREFULLY
all safety warnings and all instructions BEFORE
USE. Failure to follow the warnings and instructions
Before use, make sure that this cleaner must
be used by people who have been adequately
instructed on the use of this cleaner.
Before use, operators shall be provided with
information, instruction and training for the
use of the machine and the substances for
which it is to be used, including the safe
method of removal and disposal of the mate-
rial collected.
Clean the water level limiting device regularly
and examine it for signs of damage.
6. AVOID UNINTENTIONAL STARTING. Be sure
switch is OFF when installing battery(ies).
metal chips, sharp materials such as razors,
needles, broken glass or the like.

8ENGLISH
NEVER USE THE CLEANER IN THE VICINITY OF
GASOLINE, GAS, PAINT, ADHESIVES OR OTHER
HIGHLY EXPLOSIVE SUBSTANCES. The switch
emits sparks when turned ON and OFF. And so
does the motor commutator during operation. A
dangerous explosion may result.
Never vacuum up toxic, carcinogenic, combusti-
ble or other hazardous materials such as asbes-
tos, arsenic, barium, beryllium, lead, pesticides,
or other health endangering materials.
surface to prevent it from falling or moving
unintentionally.
Never use the cleaner outdoors in the rain.
For Finland, this machine is not to be used
outdoors at low temperature.
Do not use close to heat sources (stoves, etc.).
If the exhaust air is returned to the room, it
is necessary to provide for an adequate air
change rate in the room. Reference to National
regulations is necessary.
Do not block suction inlet/outlet/cooling vents.
These vents permit cooling of the motor. Blockage
should be carefully avoided otherwise the motor
will burn out due to a lack of ventilation.
Keep proper footing and balance at all times.
Do not fold, tug or step on the hose.
Stop the cleaner immediately if you notice
poor performance or anything abnormal
during operation.
REMOVE THE BATTERY(IES). When not in
use, before servicing, and when changing
accessories.
Clean and service the cleaner immediately
after each use to keep it in tiptop operating
condition.
MAINTAIN THE CLEANER WITH CARE. Keep
the cleaner clean for better and safer per-
formance. Follow instructions for changing
accessories. Keep handles dry, clean, and free
from oil and grease.
CHECK DAMAGED PARTS. Before further use of
the cleaner, a guard or other part that is damaged
should be carefully checked to determine that it will
operate properly and perform its intended function.
Check for alignment of moving parts, binding of
moving parts, breakage of parts, mounting, and
A guard or other part that is damaged should be
properly repaired or replaced by an authorized ser-
vice center unless otherwise indicated elsewhere
in this instruction manual. Have defective switches
replaced by authorized service center. Don’t use the
For user servicing, the machine shall be dis-
mantled, cleaned and serviced, as far as is
reasonably practicable, without causing risk to
The machine should be technically inspected
by the manufacturer, or an instructed person,
at least annually, consisting of, for example,
of the machine and proper function of the
control mechanism.
When carrying out service or repair opera-
tions, all contaminated items which cannot be
satisfactorily cleaned are to be disposed of;
such items shall be disposed of in impervious
bags in accordance with any current regula-
tion for the disposal of such waste.
REPLACEMENT PARTS. When servicing, use
only identical replacement parts.
When not in use, always store the cleaner indoors.
container shall be dried before storage.
Be kind to your cleaner. Rough handling can cause
breakage of even the most sturdily built cleaner.
Do not attempt to clean the exterior or interior
with benzine, thinner or cleaning chemicals.
Cracks and discoloration may be caused.
Do not use cleaner in an enclosed space where
Do not operate the cleaner or any tool while
As a basic rule of safety, use safety goggles or
safety glasses with side shields.
Use a dust mask in dusty work conditions.
This machine is not intended for use by per-
sons including children with reduced physical,
sensory or mental capabilities, or lack of expe-
rience and knowledge.
Children should be supervised to ensure that
they do not play with the cleaner.
Never handle battery(ies) and cleaner with wet hands.
Use extreme caution when cleaning on stairs.
Do not use the cleaner as a stool or work
bench. The machine may fall down and may
result in personal injury.
Battery tool use and care
the manufacturer. A charger that is suitable for
when used with another battery pack.
-
nated battery packs. Use of any other battery
When battery pack is not in use, keep it away
from other metal objects, like paper clips,
coins, keys, nails, screws or other small metal
objects, that can make a connection from one
terminal to another. Shorting the battery termi
Under abusive conditions, liquid may be ejected
from the battery; avoid contact. If contact acci-
eyes, additionally seek medical help.
from the battery may cause irritation or burns.
Do not use a battery pack or tool that is dam-
may exhibit unpredictable behaviour resulting in
6.
excessive temperature.

9ENGLISH
Follow all charging instructions and do not
charge the battery pack or tool outside the
-
tions. Charging improperly or at temperatures
SAVE THESE INSTRUCTIONS.
WARNING: DO NOT let comfort or familiarity
with product (gained from repeated use) replace
strict adherence to safety rules for the subject
product. MISUSE or failure to follow the safety
rules stated in this instruction manual may cause
serious personal injury.
Important safety instructions for
battery cartridge
Before using battery cartridge, read all instruc-
tions and cautionary markings on (1) battery char-
ger, (2) battery, and (3) product using battery.
Do not disassemble or tamper with the battery
cartridge.
or explosion.
If operating time has become excessively
shorter, stop operating immediately. It may
result in a risk of overheating, possible burns
and even an explosion.
If electrolyte gets into your eyes, rinse them out
with clear water and seek medical attention right
away. It may result in loss of your eyesight.
Do not short the battery cartridge:
Do not touch the terminals with any con-
ductive material.
Avoid storing battery cartridge in a con-
tainer with other metal objects such as
nails, coins, etc.
Do not expose battery cartridge to water
or rain.
A battery short can cause a large current
breakdown.
6. Do not store and use the tool and battery car-
tridge in locations where the temperature may
reach or exceed 50 °C (122 °F).
Do not incinerate the battery cartridge even if
it is severely damaged or is completely worn
Do not nail, cut, crush, throw, drop the battery
cartridge, or hit against a hard object to the
battery cartridge. Such conduct may result in a
Do not use a damaged battery.
The contained lithium-ion batteries are subject to
the Dangerous Goods Legislation requirements.
For commercial transports e.g. by third parties,
aging and labeling must be observed.
For preparation of the item being shipped, consulting an
observe possibly more detailed national regulations.
battery in such a manner that it cannot move
around in the packaging.
When disposing the battery cartridge, remove
it from the tool and dispose of it in a safe
place. Follow your local regulations relating to
disposal of battery.
Use the batteries only with the products
Installing the batteries to
sive heat, explosion, or leak of electrolyte.
If the tool is not used for a long period of time,
the battery must be removed from the tool.
During and after use, the battery cartridge may
take on heat which can cause burns or low
temperature burns. Pay attention to the han-
dling of hot battery cartridges.
Do not touch the terminal of the tool imme-
diately after use as it may get hot enough to
cause burns.
Do not allow chips, dust, or soil stuck into the
terminals, holes, and grooves of the battery
cartridge. It may result in poor performance or
breakdown of the tool or battery cartridge.
Unless the tool supports the use near
high-voltage electrical power lines, do not use
the battery cartridge near high-voltage electri-
cal power lines. It may result in a malfunction or
breakdown of the tool or battery cartridge.
Keep the battery away from children.
SAVE THESE INSTRUCTIONS.
CAUTION: Only use genuine Makita batteries.
have been altered, may result in the battery bursting
also void the Makita warranty for the Makita tool and
charger.
Tips for maintaining maximum
battery life
Charge the battery cartridge before completely
discharged. Always stop tool operation and
charge the battery cartridge when you notice
less tool power.
Never recharge a fully charged battery car-
tridge. Overcharging shortens the battery
service life.
Charge the battery cartridge with room tem-
perature at 10 °C - 40 °C (50 °F - 104 °F). Let
a hot battery cartridge cool down before
charging it.
When not using the battery cartridge, remove
it from the tool or the charger.
Charge the battery cartridge if you do not use
it for a long period (more than six months).
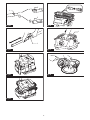
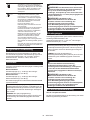
PARTS DESCRIPTION
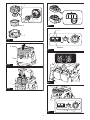
Fig.1: 1. Tank cover 2. Float 3. Float cage 4. Cloth
5. Tank

10 ENGLISH
FUNCTIONAL
DESCRIPTION
CAUTION: Always be sure that the tool is
before adjusting or checking function on the tool.
Installing or removing battery
cartridge
CAUTION:
installing or removing of the battery cartridge.
CAUTION: Hold the cleaner and the battery
-
tery cartridge. Failure to hold the cleaner and the
your hands and result in damage to the cleaner and
CAUTION: -
gers when opening or closing the battery cover.
then open the battery cover. After that, insert the battery
cartridge.
Fig.2: 1.2.
Align the tongue on the battery cartridge with the groove
in the housing and slip it into place. Insert it all the way
until it locks in place with a little click. Then lock the
battery cover.
Fig.3: 1.
To remove the battery cartridge, slide it from the tool
while sliding the button in front of the cartridge.
CAUTION: Always install the battery cartridge
fully until the red indicator cannot be seen. If not,
it may accidentally fall out of the cleaner, causing
CAUTION: Do not install the battery cartridge
forcibly. If the cartridge does not slide in easily, it is
not being inserted correctly.
NOTE: The cleaner does not work with only one
battery cartridge.
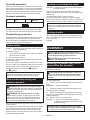
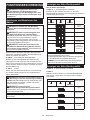
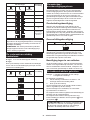
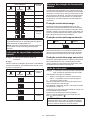
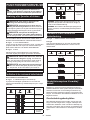
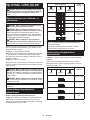
Indicating the remaining battery
capacity
Only for battery cartridges with the indicator
Fig.4: 1. Indicator lamps 2. Check button
Press the check button on the battery cartridge to indi
cate the remaining battery capacity. The indicator lamps
light up for a few seconds.
Indicator lamps Remaining
capacity
Lighted Blinking
Charge the
battery.
The battery
may have
malfunctioned.
NOTE: Depending on the conditions of use and the
from the actual capacity.
NOTE:
the battery protection system works.
Indicating the remaining battery
capacity
Fig.5: 1.2. Check button
Fig.6
Press the check button to indicate the remaining battery
capacities. The battery indicators correspond to each
battery.
Battery indicator status Remaining
battery
capacity
On Blinking
Charge the
battery
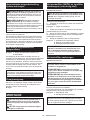
Tool / battery protection system
motor to extend tool and battery life. The tool will auto
matically stop during operation if the tool or battery is

11 ENGLISH
Overload protection
When the tool is operated in a manner that causes it to
draw an abnormally high current, the tool automatically
stops without any indication. In this situation, turn the
become overloaded. Then turn the tool on to restart.
Overheat protection
On Blinking
When the tool is overheated, the tool stops automatically, and
tion, let the tool cool down before turning the tool on again.
Overdischarge protection
When the battery capacity becomes low, the tool stops
automatically. If the product does not operate even
when the switches are operated, remove the batteries
from the tool and charge the batteries.
Switch action
Fig.7: 1.2. Power button 3. Suction
power button again.
Suction power can be increased by turning the suc
symbol to
the symbol.
NOTICE:
side when not using the cleaner for long time. The
Auto-suction stop during wet
suction operation
WARNING: Do not use for a long time while
work for a long time can cause overheat, resulting in
the cleaner deformation.
WARNING: Do not pick up foam or soapy
liquid.
Continuing to using in this condition may cause an
electric shock and breakage of the cleaner.
from immersing into the motor when picking up more
than a certain amount of water. When the tank is full
cleaner and empty the tank.
Locking or unlocking the caster
Fig.8: 1. Caster 2. Stopper lever 3. FREE position
4.
cleaner, stopping the work on the way and keeping the
cleaner still.
To operate the stopper, move it by hand.
To lock the caster with a stopper, lower the stopper
lever and the caster no longer will rotate. To release the
caster from the locked position, raise the stopper lever.
NOTE: When moving the cleaner, make sure that
the caster is unlocked. Moving the cleaner with the
caster in the locked position may cause damage to
the caster.
Carriage handle
When carrying the cleaner, carry it by holding the han
dle on the head. The handle is retractable at the head
when not in use.
Fig.9
ASSEMBLY
CAUTION: Always be sure that the tool is
before carrying out any work on the tool.
CAUTION: Always wear dust mask during
assembly or maintenance.
Optional accessory
CAUTION: Never pick up water or other liq-
breakage.
1.
bolts.
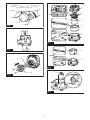
Fig.10: 1. Float 2. Float cage
2.
mounting position markings.
3.
position markings.
4. Mount the tank cover and lock it.
Fig.11: 1. Tank cover 2.
3. Damper 4.5. Tank 6. Mounting
position marking
NOTICE:
It

12 ENGLISH
Optional accessory
NOTICE: Never pick up water or wet dust without
NOTICE: For picking up wet dust, make sure that
cleaner.
NOTICE:
tank, set it tight at the opening of the tank so
tion marking with the one on the tank.
Fig.12: 1.2. Tank 3. Mounting position
marking
NOTE:
picking up large amount of water repeatedly.
Otherwise vacuum ability may be reduced in case of
Installing the paper pack
Optional accessory
WARNING: Before using the paper pack,
together.
together may cause unusual noise and heat, resulting
NOTICE: Never pick up water or other liquids or
wet dusts when using the paper pack. Picking up
such things may cause the paper pack breakage.
NOTICE:
the tank cover.
NOTICE:
together.
1. Remove the rubber holder.
Fig.13: 1. Rubber holder
2. Extend the paper pack.
3. Align the paper pack opening with the dust suction
opening of the cleaner.
4. Insert the cardboard part of the paper pack onto
the holder so that it is positioned at the end beyond the
detent protrusion.
Fig.14: 1. Paper pack 2.
Installing the polyethylene bag
Cleaner can also be used without polyethylene bag.
tank without letting your hands dirty.
Spread the polyethylene bag in the tank. Insert it between
the holder plate and the tank, and pull it to the hose inlet.
Fig.15: 1.2. Polyethylene bag
Spread the bag around the top of the tank so that the
securely.
Fig.16: 1.
NOTE: A polyethylene bag available on the
recommended.
NOTE: Too much dust will tear the bag easily, so
do not collect the dust more than the half of the bag
capacity.
Emptying the polyethylene bag
WARNING: Always make sure that the
removed before emptying the polyethylene bag.
Failure to do so may cause an electric shock and
CAUTION: Do not apply a great impact on the
Applying a great impact may
cause deformation and damage to the parts.
CAUTION: Empty the tank at least once a day
although this depends on picked-up dust volume
in the tank. Or, the suction force will weaken and the
motor may be broken.
CAUTION: Do not grab the hook when empty-
ing the tank. Grabbing the hook may cause the hook
to break.
Unhook and lift up the tank cover.
take the polyethylene bag out of the tank.
Fig.17
NOTE: Take the polyethylene bag carefully out of the
tank so that the polyethylene bag cannot be caught
and torn by the protrusion inside the tank when emp
tying it.
NOTE: Empty the polyethylene bag before it
becomes full. Too much dust in the tank may cause
the polyethylene bag to be torn.
Installing the tool box
1. Release the lock of the battery cover, and open
the battery cover.
2. Set the rails on the tool box along the grooves on
the housing.
3. Close the battery cover and apply the lock.
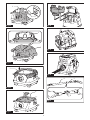
Fig.18
Fig.19

13 ENGLISH
Connecting the hose
NOTICE:
Never force the hose for bending or stamp it.
Never move the cleaner by a hose. Forcing, stamping and pull
ing the hose may cause a breakage or deformation of the hose.
NOTICE:
When picking up large wastes such as
planer carvings, concrete dusts or similar other than
small wastes, use the 38 mm inner diameter hose
(optional accessory).
Insert the hose onto the mounting port of the tank and
turn it clockwise until it locks.
Fig.20
Connecting the attachment with
lock function
Optional accessory
Insert the attachment into the suction inlet until it clicks.
To remove, pull the attachment while pushing the release button.
Fig.21: 1. Suction inlet with lock function 2. Release
button 3. Attachment with lock function
NOTE: The attachment with lock function is available
when using the suction inlet with lock function.
Fig.22: 1. Attachment with lock function 2. Suction
inlet with lock function 3. Suction inlet with
out lock function
Adjusting the length of the slide-
type extension wand
Optional accessory
The length is locked when releasing the slide button.
Fig.23: 1. Slide button
MAINTENANCE
CAUTION:
Always be sure that the tool is
attempting to perform inspection or maintenance.
NOTICE:
Never use gasoline, benzine, thinner, alcohol
or the like. Discoloration, deformation or cracks may result.
be performed by Makita Authorized or Factory Service
Centers, always using Makita replacement parts.
Storage of accessories
The pipes can be placed into the pipe holder when not
using the cleaner for a short time.
Fig.24
Fig.25
The hose can be stored around the tool by connecting each ends.
Fig.26
Fig.27: 1.
Optional accessory
from time to time.
dry thoroughly in the shade before use. Never wash
Fig.28
NOTE:
brush and a paddle.
NOTE:
recommended to have some spares for them.
OPTIONAL ACCESSORIES
CAUTION: These accessories or attachments
are recommended for use with your Makita tool
The use of any other
accessories or attachments might present a risk of
for its stated purpose.
If you need any assistance for more details regarding
these accessories, ask your local Makita Service Center.
• Straight pipe
• Extension wand
• Corner nozzle
• Round brush
• Damper
• Nozzle assembly
• Polyethylene bag
• Paper pack
• Water Filter
• Makita genuine battery and charger
NOTE: Some items in the list may be included in the
tool package as standard accessories. They may

14 FRANÇAIS
FRANÇAIS (Instructions originales)
AVERTISSEMENT
• Voir le chapitre « SPÉCIFICATIONS » pour la désignation de la batterie.
• Voir la section « Insertion ou retrait de la batterie » pour la méthode de retrait ou d’insertion de la batterie.
tion locale en matière de mise au rebut des batteries.
• Voir le chapitre « ENTRETIEN » pour des précautions détaillées pendant l’entretien à la charge de l’utilisateur.
SPÉCIFICATIONS
Modèle : DVC865L DVC155L
/min
Capacité de récupération Poussière
Eau
Tension nominale
Poids net
Degré de protection
Batterie et chargeur applicables
Chargeur
résidez.
AVERTISSEMENT : N’utilisez que les batteries et les chargeurs répertoriés ci-dessus.
Symboles
d’être utilisés pour l’appareil. Veillez à comprendre leur
Veuillez être prudent et rester attentif.
contienne des poussières dangereuses.
aspirateur est capable de ramasser les
réglementations de votre pays concernant
les poussières et la santé et la sécurité
au travail.

15 FRANÇAIS
Ni-MH
Li-ion
Pour les pays de l’Union européenne
En raison de la présence de composants
peuvent avoir un impact négatif sur l’envi
ronnement et la santé humaine.
ordures ménagères !
Conformément à la directive européenne
son adaptation à la législation nationale,
les batteries et les accumulateurs doivent
être collectés séparément et déposés
dans un point de collecte distinct pour
déchets urbains, conformément aux régle
mentations en matière de protection de
l’environnement.
Utilisations
par exemple, dans les hôtels, écoles, hôpitaux, usines,
magasins, bureaux et agences de location.
Bruit
Modèle DVC865L
pA
Modèle DVC155L
pA
NOTE :
rées ont été mesurées conformément à la méthode
de test standard et peuvent être utilisées pour com
parer les outils entre eux.
NOTE :
rées peuvent aussi être utilisées pour l’évaluation
préliminaire de l’exposition.
AVERTISSEMENT : Portez un serre-tête
antibruit.
AVERTISSEMENT : L’émission de bruit
lors de l’usage réel de l’outil électrique peut être
la façon dont l’outil est utilisé, particulièrement
selon le type de pièce usinée.
AVERTISSEMENT : Les mesures de sécurité
à prendre pour protéger l’utilisateur doivent être
basées sur une estimation de l’exposition dans
des conditions réelles d’utilisation (en tenant
compte de toutes les composantes du cycle
d’utilisation, comme par exemple le moment de
sa mise hors tension, lorsqu’il tourne à vide et le
moment de son déclenchement).
Vibrations
h, M ou moins
NOTE :
rées ont été mesurées conformément à la méthode
de test standard et peuvent être utilisées pour com
parer les outils entre eux.
NOTE :
rées peuvent aussi être utilisées pour l’évaluation
préliminaire de l’exposition.
AVERTISSEMENT : L’émission de vibrations
lors de l’usage réel de l’outil électrique peut être
la façon dont l’outil est utilisé, particulièrement
selon le type de pièce usinée.
AVERTISSEMENT : Les mesures de sécurité
à prendre pour protéger l’utilisateur doivent être
basées sur une estimation de l’exposition dans
des conditions réelles d’utilisation (en tenant
compte de toutes les composantes du cycle
d’utilisation, comme par exemple le moment de
sa mise hors tension, lorsqu’il tourne à vide et le
moment de son déclenchement).
Déclaration de conformité CE
Pour les pays européens uniquement
A à ce mode d’emploi.
CONSIGNES DE SÉCURITÉ
Consignes de sécurité pour
AVERTISSEMENT : IMPORTANT ! LIRE
ATTENTIVEMENT toutes les consignes de
sécurité et toutes les instructions AVANT
UTILISATION.
des instructions peut entraîner une électrocution, un
incendie et/ou de graves blessures.
Avant l’utilisation, veillez à ce que l’aspirateur
soit utilisé par des personnes ayant reçu des
instructions adéquates quant à son utilisation.
Avant toute utilisation, les opérateurs doivent
recevoir les informations, les instructions et
la formation nécessaires à l’utilisation de la
machine et sur les substances pour lesquelles
elle est utilisée, notamment la méthode sûre
pour retirer et jeter les matières collectées.
Si de la mousse ou un liquide sort, éteignez-le
immédiatement.
Nettoyez régulièrement le dispositif limitant le
de signes de dommage.

16 FRANÇAIS
6. ÉVITEZ LES DÉMARRAGES INTEMPESTIFS.
Veillez à mettre l’outil hors tension lors de la
mise en place de la ou des batteries.
N’essayez pas d’aspirer des matériaux
cigarettes allumées, des cendres chaudes,
des copeaux de métal chauds, des matériaux
tranchants comme un rasoir, des aiguilles, des
morceaux de verre, etc.
N’UTILISEZ JAMAIS L’ASPIRATEUR À
PROXIMITÉ D’ESSENCE, GAZ, PEINTURE,
ADHÉSIFS OU AUTRES SUBSTANCES TRÈS
EXPLOSIVES. L’interrupteur émet des étin-
celles à la mise sous et hors tension. Tout
comme le commutateur du moteur pendant le
fonctionnement. Une dangereuse explosion
peut survenir.
N’aspirez jamais des matériaux toxiques, cancé-
rigènes, combustibles ou d’autres produits dan-
gereux comme l’amiante, l’arsenic, le baryum, le
béryllium, le plomb, les pesticides ou d’autres
matières présentant un danger pour la santé.
Placez toujours l’aspirateur sur une surface
ou son déplacement accidentel.
N’utilisez jamais l’aspirateur à l’extérieur sous la pluie.
Pour la Finlande, cette machine ne doit pas
être utilisée à l’extérieur à basse température.
N’utilisez pas l’aspirateur près de sources de
chaleur (cuisinières, etc.).
Si l’air évacué est ramené dans la pièce, il
est nécessaire de prévoir un taux de renou-
vellement d’air adéquat dans la pièce. Il est
nécessaire de consulter les réglementations
nationales.
Ne bloquez pas les fentes de l’entrée d’aspiration,
de la sortie ou d’aération. Ces fentes permettent
le refroidissement du moteur. Il faut éviter soi-
gneusement de les bloquer sous peine de griller le
moteur en raison d’un manque d’aération.
Maintenez constamment une bonne assise et
un bon équilibre.
Ne pliez pas le tuyau, ni ne tirez ou marchez dessus.
Arrêtez immédiatement l’aspirateur si vous
remarquez des performances médiocres
ou toute autre anomalie pendant le
fonctionnement.
RETIREZ LA OU LES BATTERIES. Lorsque
vous n’utilisez pas l’aspirateur, avant de
le réparer et lors du remplacement des
accessoires.
Procédez au nettoyage et à l’entretien de l’as-
pirateur immédiatement après chaque utilisa-
tion pour le maintenir dans des conditions de
fonctionnement optimales.
ENTRETENEZ SOIGNEUSEMENT
L’ASPIRATEUR. L’aspirateur doit toujours être
propre pour améliorer la sécurité et les per-
formances. Suivez les instructions pour rem-
placer les accessoires. Les poignées doivent
toujours être sèches, propres et exemptes
d’huile ou de graisse.
VÉRIFIEZ LES PIÈCES ENDOMMAGÉES. Avant toute
-
sement un carter de protection ou toute autre pièce
endommagés pour déterminer qu’ils fonctionnent
bien et remplissent leurs fonctions respectives.
des pièces mobiles, les pièces cassées, l’installation
-
nement. Un carter de protection ou toute autre pièce
endommagés doivent être réparés ou remplacés
correctement par un centre de service après-vente
agréé sauf indication contraire de ce mode d’emploi.
-
tueux à un centre de service après-vente agréé.
N’utilisez pas l’aspirateur s’il ne peut pas être mis
sous et hors tension au moyen de l’interrupteur.
Pour le dépannage utilisateur, la machine doit être
démontée, nettoyée et dépannée, autant que rai-
sonnablement possible, sans mettre en danger le
personnel de maintenance et d’autres personnes.
La machine doit être inspectée sur le plan
technique par le fabricant ou une personne
formée, au moins une fois par an, et cette
inspection doit comprendre, entre autres,
l’étanchéité à l’air de la machine et du bon
fonctionnement du mécanisme de contrôle.
Lors des tâches d’entretien ou de réparation,
tous les éléments contaminés ne pouvant être
nettoyés de manière satisfaisante doivent être
mis au rebut. Ces éléments doivent être jetés
dans des sacs étanches conformément aux
réglementations actuelles en matière de mise
au rebut de ce type de déchets.
PIÈCES DE RECHANGE. En cas de réparation, utili-
sez uniquement des pièces de rechange identiques.
RANGEZ L’ASPIRATEUR APRÈS UTILISATION.
Lorsque vous n’utilisez pas l’aspirateur, ran-
gez-le à l’intérieur.
de liquide doivent être séchés avant rangement.
Épargnez votre aspirateur. Une manipulation
brutale peut entraîner la rupture de l’aspirateur
le plus robuste.
Ne nettoyez pas l’extérieur ou l’intérieur avec
du benzène, du diluant ou d’autres produits
chimiques de nettoyage. Vous risqueriez de le
N’utilisez pas l’aspirateur dans un endroit fermé
toxiques sont dégagées par de la peinture à base
d’huile, du diluant pour peinture, de l’essence,
certains produits antimites, etc., ou dans des
N’utilisez pas cet outil ou tout autre sous l’em-
prise de drogues, de médicaments ou d’alcool.
Par mesure de sécurité, utilisez des lunettes
à coques ou des lunettes de sécurité avec
écrans latéraux.
Utilisez un masque anti-poussière dans des
conditions de travail poussiéreuses.
Cette machine n’est pas destinée à être utilisée
par des personnes (y compris les enfants) aux
facultés physiques, sensorielles ou mentales
diminuées ou sans expérience ni expertise.

17 FRANÇAIS
Les enfants doivent être sous la surveillance
pas avec l’aspirateur.
Ne manipulez jamais la ou les batteries et
l’aspirateur avec les mains mouillées.
Redoublez de précaution lorsque vous net-
toyez des escaliers.
N’utilisez pas l’aspirateur comme marchepied
ou établi. La machine pourrait tomber et pro-
voquer des blessures corporelles.
Utilisation et entretien des outils fonctionnant sur batterie
Rechargez la batterie uniquement avec le char-
un autre type de batterie.
Utilisez un outil électrique uniquement avec la
blessure et d’incendie.
Lorsque vous n’utilisez pas la batterie, tenez-la à
l’écart des objets métalliques, comme des trom-
bones, pièces de monnaie, clés, clous, vis ou
autres petits objets métalliques, susceptibles de
créer une connexion entre deux bornes.
circuiter les bornes d’une batterie entre elles peut
Dans des conditions d’utilisation inadéquate,
il peut y avoir une fuite de l’électrolyte de la
batterie. Le cas échéant, évitez tout contact
avec ce liquide. En cas de contact accidentel,
rincez à l’eau. Si le liquide pénètre dans les
yeux, consultez par ailleurs un médecin.
N’utilisez pas une batterie ou un outil s’ils sont
Une batterie endom
imprévisible susceptible d’entraîner un incendie,
une explosion ou des blessures.
6. N’exposez pas la batterie ou l’outil au feu ou à
une température excessive.
Respectez toutes les instructions de charge et
ne chargez pas la batterie ou l’outil en dehors
de la plage de température indiquée dans les
instructions. Une charge incorrecte ou à une
d’incendie.
CONSERVEZ CES
INSTRUCTIONS.
AVERTISSEMENT : NE vous laissez PAS
sentiment d’aisance et de familiarité avec le
produit, en négligeant le respect rigoureux des
consignes de sécurité qui accompagnent le pro-
duit en question. La MAUVAISE UTILISATION de
l’outil ou l’ignorance des consignes de sécurité
indiquées dans ce mode d’emploi peut entraîner
de graves blessures.
Consignes de sécurité importantes
pour la batterie
Avant d’utiliser la batterie, lisez toutes les
instructions et précautions relatives (1) au
chargeur de batterie, (2) à la batterie, et (3) au
produit utilisant la batterie.
batterie. Cela pourrait entraîner un incendie, une
chaleur excessive ou une explosion.
Cessez immédiatement l’utilisation si le temps
de fonctionnement devient excessivement
voire d’explosion.
Si l’électrolyte pénètre dans vos yeux, rincez-les
à l’eau claire et consultez immédiatement un
médecin. Il y a risque de perte de la vue.
Ne court-circuitez pas la batterie :
Ne touchez les bornes avec aucun maté-
riau conducteur.
Évitez de ranger la batterie dans un
conteneur avec d’autres objets métal-
liques, par exemple des clous, des pièces
de monnaie, etc.
N’exposez pas la batterie à l’eau ou à la
pluie.
Un court-circuit de la batterie peut provoquer
parfois des brûlures et même une panne.
6. Ne rangez ni n’utilisez l’outil et la batterie dans
un endroit où la température risque d’atteindre
ou de dépasser 50 °C.
Ne jetez pas la batterie au feu même si elle est
sérieusement endommagée ou complètement
épuisée. La batterie peut exploser au contact
du feu.
Abstenez-vous de clouer, couper, écraser,
jeter, laisser tomber la batterie, ou de la heurter
contre un objet dur. Cela pourrait entraîner un
incendie, une chaleur excessive ou une explosion.
N’utilisez pas la batterie si elle est endommagée.
Les batteries au lithium-ion contenues sont
soumises aux exigences de la législation sur
les marchandises dangereuses.
parties ou des transitaires par exemple, des exi
d’emballage doivent être respectées.
Pour la préparation de l’article expédié, il est néces
saire de consulter un expert en matériau dangereux.
Veuillez également respecter les réglementations
nationales susceptibles d’être plus détaillées.
Recouvrez les contacts exposés avec du ruban adhésif
Lors de la mise au rebut de la batterie, reti-
rez-la de l’outil et jetez-la en lieu sûr. Suivez les
réglementations locales en matière de mise au
rebut des batteries.
Utilisez les batteries uniquement avec les
batteries dans des produits non conformes peut
une explosion ou une fuite de l’électrolyte.

18 FRANÇAIS
Lorsque vous n’utilisez pas l’outil pendant une
période prolongée, la batterie doit être retirée
de l’outil.
Pendant et après l’utilisation, la batterie peut
compris en cas de température relativement
basse. Manipulez les batteries chaudes avec
précaution.
Ne touchez pas la borne de l’outil immédiate-
ment après utilisation car elle peut être assez
chaude pour provoquer des brûlures.
Évitez que des copeaux, de la poussière ou
du sol adhèrent aux bornes, aux trous et aux
rainures de la batterie. Cela pourrait réduire les
performances ou casser l’outil ou la batterie.
À moins que l’outil prenne en charge un tel
usage, n’utilisez pas la batterie à proximité de
lignes électriques haute tension. Cela pourrait
entraîner un dysfonctionnement ou casser l’outil
ou la batterie.
Conservez la batterie hors de portée des
enfants.
CONSERVEZ CES
INSTRUCTIONS.
ATTENTION : N’utilisez que des batteries
Makita d’origine.
rels. Cela annulera également la garantie Makita pour
l’outil et le chargeur Makita.
Conseils pour assurer la durée
de vie optimale de la batterie
Chargez la batterie avant qu’elle ne soit com-
plètement déchargée. Arrêtez toujours l’outil
et rechargez la batterie quand vous remarquez
que la puissance de l’outil diminue.
Ne rechargez jamais une batterie complète-
ment chargée. La surcharge réduit la durée de
service de la batterie.
Chargez la batterie à une température
ambiante comprise entre 10 °C et 40 °C. Avant
de charger une batterie chaude, laissez-la
refroidir.
Lorsque vous n’utilisez pas la batterie, reti-
rez-la de l’outil ou du chargeur.
Rechargez la batterie si elle est restée inutili-
sée pendant une période prolongée (plus de
six mois).
DESCRIPTION DES
PIÈCES
Fig.1: 1. Couvercle du réservoir 2. Flotteur
3.4. Filtre en tissu
5. Réservoir
DESCRIPTION DU
FONCTIONNEMENT
ATTENTION : Assurez-vous toujours que
l’outil est hors tension et que sa batterie est
fonctionnement.
Insertion ou retrait de la batterie
ATTENTION : Éteignez toujours l’outil avant
de mettre en place ou de retirer la batterie.
ATTENTION : Tenez fermement l’aspirateur et
la batterie lors de la mise en place ou du retrait de
la batterie. Si vous ne tenez pas fermement l’aspira
teur et la batterie, ils peuvent vous glisser des mains,
et s’abîmer ou vous blesser.
ATTENTION : Veillez à ne pas vous pincer les
doigts lors de l’ouverture ou de la fermeture du
couvercle de batterie.
vous blesser.
Pour mettre la batterie en place, libérez d’abord le
verrou, puis ouvrez le couvercle de batterie. Ceci fait,
insérez la batterie.
Fig.2: 1. Verrou 2. Couvercle de batterie
Alignez la languette sur la batterie avec la rainure sur le
le couvercle de batterie.
Fig.3: 1.
tout en faisant glisser le bouton à l’avant de la batterie.
ATTENTION : Toujours installer la batterie à
fond jusqu’à ce que l’indicateur rouge soit invi-
sible. Sinon, elle pourrait tomber accidentellement de
ATTENTION : N’insérez pas la batterie de
force.
ne l’insérez pas correctement.
NOTE :
seule batterie.
Indication de la charge restante de
la batterie
Uniquement pour les batteries avec voyant
lumineux
Fig.4: 1. Témoins 2.

19 FRANÇAIS
Témoins Charge
restante
Allumé Éteint Clignotant
Chargez la
batterie.
Anomalie
possible
de la batterie.
NOTE : Selon les conditions d’utilisation et la tem
pérature ambiante, l’indication peut être légèrement
NOTE :
clignotera pendant le fonctionnement du système de
protection de la batterie.
Indication de la charge restante de
la batterie
Fig.5: 1. Témoin de la batterie 2.
Fig.6
Statut du témoin de la batterie Charge
restante de la
batterie
Allumé Éteint Clignotant
Chargez la
batterie
Système de protection de l’outil/la batterie
tation vers le moteur pour prolonger la durée de vie de
l’outil et de la batterie. Si l’outil ou la batterie se trouve
dans l’une des situations suivantes, l’outil cessera
Protection contre la surcharge
appel de courant anormalement élevé, l’outil s’arrête
l’outil. Puis rallumez l’outil pour reprendre la tâche.
Allumé Clignotant
Dans ce cas, laissez l’outil refroidir avant de rallumer l’outil.
Protection contre la décharge totale
de la batterie
Fonctionnement de la gâchette
Fig.7: 1.2.
tion 3.
d’aspiration
à nouveau sur le bouton d’alimentation.
Pour éteindre l’aspirateur, placez le bouton de veille sur
la position « O ».
de vos besoins.
nant le bouton de réglage de la puissance d’aspiration
du symbole au symbole .
REMARQUE :
sur la position « O » si vous prévoyez de ne pas
utiliser l’aspirateur pendant une période prolongée.
Arrêt automatique de l’aspiration
pendant l’aspiration humide
AVERTISSEMENT : N’utilisez pas l’aspira-
fonctionne.
teur fonctionnant pendant une période prolongée, une
AVERTISSEMENT : Ne ramassez pas la
mousse ou les liquides savonneux. Si vous
la mousse peut s’échapper de la sortie d’air avant
l’aspirateur dans cette condition, vous pourriez vous
électrocuter ou l’aspirateur pourrait être cassé.

20 FRANÇAIS
empêche l’immersion de l’eau dans le moteur lors du
Blocage ou déblocage de la roulette
Fig.8: 1. Roulette 2. Frein de blocage 3. Position
4.
interrompre la tâche en cours et immobiliser l’aspirateur.
blocage et la roulette ne pourra plus tourner. Pour libérer la
NOTE :
Poignée de transport
Transportez l’aspirateur en le tenant par la poignée située sur la tête.
Fig.9
ASSEMBLAGE
ATTENTION : Assurez-vous toujours que
l’outil est hors tension et que sa batterie est reti-
ATTENTION : Portez toujours un masque
anti-poussière pendant l’assemblage ou
l’entretien.
Accessoire en option
ATTENTION : Ne ramassez jamais d’eau,
d’autres liquides ou de poussières humides
poudre pourrait autrement se rompre.
1.
déposant les boulons.
Fig.10: 1. Flotteur 2.
2.
repères d’emplacement de montage.
3.
d’emplacement de montage.
4.
Fig.11:
1. Couvercle du réservoir 2. Filtre à poudre
3. Amortisseur 4.5. Réservoir
6. Repère d’emplacement de montage
REMARQUE :
toujours utilisés ensemble. Il est interdit d’installer
Accessoire en option
REMARQUE : Ne ramassez jamais d’eau ou de
REMARQUE : Avant de ramasser des pous-
sières humides, assurez-vous que la chambre
l’aspirateur.
REMARQUE :
eau sur le réservoir, placez-le bien contre l’ouver-
à eau s’enclenche fermement dans l’ouverture du
à eau et le réservoir.
en tissu.
d’emplacement de montage sur le repère sur le
réservoir.
Fig.12: 1. Filtre à eau 2. Réservoir 3. Repère d’em
placement de montage
NOTE :
Installation du sac papier
Accessoire en option
AVERTISSEMENT : Avant d’utiliser le sac
Si vous n’utilisez pas éga
chaleur et un bruit anormaux peuvent se produire et
REMARQUE : Ne ramassez jamais d’eau,
d’autres liquides ou des poussières humides
lorsque vous utilisez le sac papier. En ramassant
papier.
REMARQUE :
réservoir.
REMARQUE :
-
seur sont utilisés ensemble.
La page est en cours de chargement...
La page est en cours de chargement...
La page est en cours de chargement...
La page est en cours de chargement...
La page est en cours de chargement...
La page est en cours de chargement...
La page est en cours de chargement...
La page est en cours de chargement...
La page est en cours de chargement...
La page est en cours de chargement...
La page est en cours de chargement...
La page est en cours de chargement...
La page est en cours de chargement...
La page est en cours de chargement...
La page est en cours de chargement...
La page est en cours de chargement...
La page est en cours de chargement...
La page est en cours de chargement...
La page est en cours de chargement...
La page est en cours de chargement...
La page est en cours de chargement...
La page est en cours de chargement...
La page est en cours de chargement...
La page est en cours de chargement...
La page est en cours de chargement...
La page est en cours de chargement...
La page est en cours de chargement...
La page est en cours de chargement...
La page est en cours de chargement...
La page est en cours de chargement...
La page est en cours de chargement...
La page est en cours de chargement...
La page est en cours de chargement...
La page est en cours de chargement...
La page est en cours de chargement...
La page est en cours de chargement...
La page est en cours de chargement...
La page est en cours de chargement...
La page est en cours de chargement...
La page est en cours de chargement...
La page est en cours de chargement...
La page est en cours de chargement...
La page est en cours de chargement...
La page est en cours de chargement...
La page est en cours de chargement...
La page est en cours de chargement...
La page est en cours de chargement...
La page est en cours de chargement...
La page est en cours de chargement...
La page est en cours de chargement...
La page est en cours de chargement...
La page est en cours de chargement...
La page est en cours de chargement...
La page est en cours de chargement...
La page est en cours de chargement...
La page est en cours de chargement...
La page est en cours de chargement...
La page est en cours de chargement...
La page est en cours de chargement...
La page est en cours de chargement...
La page est en cours de chargement...
La page est en cours de chargement...
La page est en cours de chargement...
La page est en cours de chargement...
La page est en cours de chargement...
La page est en cours de chargement...
La page est en cours de chargement...
La page est en cours de chargement...
La page est en cours de chargement...
La page est en cours de chargement...
La page est en cours de chargement...
La page est en cours de chargement...
La page est en cours de chargement...
La page est en cours de chargement...
La page est en cours de chargement...
La page est en cours de chargement...
La page est en cours de chargement...
La page est en cours de chargement...
La page est en cours de chargement...
La page est en cours de chargement...
-
 1
1
-
 2
2
-
 3
3
-
 4
4
-
 5
5
-
 6
6
-
 7
7
-
 8
8
-
 9
9
-
 10
10
-
 11
11
-
 12
12
-
 13
13
-
 14
14
-
 15
15
-
 16
16
-
 17
17
-
 18
18
-
 19
19
-
 20
20
-
 21
21
-
 22
22
-
 23
23
-
 24
24
-
 25
25
-
 26
26
-
 27
27
-
 28
28
-
 29
29
-
 30
30
-
 31
31
-
 32
32
-
 33
33
-
 34
34
-
 35
35
-
 36
36
-
 37
37
-
 38
38
-
 39
39
-
 40
40
-
 41
41
-
 42
42
-
 43
43
-
 44
44
-
 45
45
-
 46
46
-
 47
47
-
 48
48
-
 49
49
-
 50
50
-
 51
51
-
 52
52
-
 53
53
-
 54
54
-
 55
55
-
 56
56
-
 57
57
-
 58
58
-
 59
59
-
 60
60
-
 61
61
-
 62
62
-
 63
63
-
 64
64
-
 65
65
-
 66
66
-
 67
67
-
 68
68
-
 69
69
-
 70
70
-
 71
71
-
 72
72
-
 73
73
-
 74
74
-
 75
75
-
 76
76
-
 77
77
-
 78
78
-
 79
79
-
 80
80
-
 81
81
-
 82
82
-
 83
83
-
 84
84
-
 85
85
-
 86
86
-
 87
87
-
 88
88
-
 89
89
-
 90
90
-
 91
91
-
 92
92
-
 93
93
-
 94
94
-
 95
95
-
 96
96
-
 97
97
-
 98
98
-
 99
99
-
 100
100


dans d''autres langues
- italiano: Makita DVC865L Manuale utente
- español: Makita DVC865L Manual de usuario
- Deutsch: Makita DVC865L Benutzerhandbuch
- Nederlands: Makita DVC865L Handleiding
- português: Makita DVC865L Manual do usuário
- dansk: Makita DVC865L Brugermanual
- Türkçe: Makita DVC865L Kullanım kılavuzu
Documents connexes
-
Makita DVC150L Manuel utilisateur
-
Makita VC001GL Manuel utilisateur
-
-
-
Makita VC2211M Manuel utilisateur
-
Makita DVC750L Manuel utilisateur
-
-
Makita VC005GL Manuel utilisateur
-
-