Metrologic SP5700 Series Quick Start Manuals
- Taper
- Quick Start Manuals

Optimus PDA SP5700 Series
Quickstart Guides
- English
- Deutsch
- Espagnol
- Francais
- Italiano
Optimus PDA SP5700 Series
Copyright
© 2005 by Metrologic Instruments, Inc. All rights reserved. No part of this work may be reproduced, transmitted, or stored in any form or by
any means without prior written consent, except by reviewer, who may quote brief passages in a review, or provided for in the Copyright Act
of 1976. Products and brand names mentioned in this document are trademarks of their respective companies.

Optimus PDA SP5700 Series
Quick Start Guide
Optimus PDA SP5700series Quick Start Guide
Copyright
© 2005 by Metrologic Instruments, Inc. All rights reserved. No part of this work may be reproduced, transmitted, or stored in any form or by
any means without prior written consent, except by reviewer, who may quote brief passages in a review, or provided for in the Copyright Act
of 1976. Products and brand names mentioned in this document are trademarks of their respective companies.

Optimus PDA SP5700series Quick Start Guide
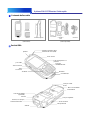
Box contents
(Basic Items)
(Optional Items)
PDA
Battery
Stylus Pen/Hand Strap
Leather Case
Ear Phone
Protection
Film
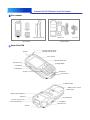
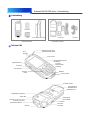
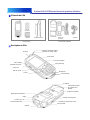
Parts of the PDA
Operation Indicator (LED)
Charging Indicator (LED)Speaker
Touch Screen
Ear Phone Jack
Scan Button
Power Button
Keypad
4 Way Navigation Pad
Backlight Button
Microphone
I/O Connector
Digital Camera (Optional)
Stylus Pen
Scanner
(Type may vary )
IrDA Communication
Antenna
Battery Cover Lock Key
Battery Cover
Hand Strap Hole
Scan Button
Mini USB Port
Soft Reset Button

Optimus PDA SP5700series Quick Start Guide
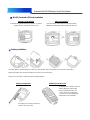
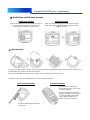
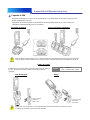
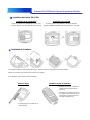
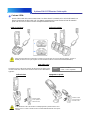
Battery Installation
• Gently wipe the LCD with a soft cloth
before adding the protective film
• Start by adhering the film to one
corner of the LCD and apply film
across the LCD. Avoid trapping air
between the LCD and the film.
Pulling out Stylus Pen Adhering Protection Film
To install a battery, slide the battery cover lock to the open position. Remove the battery door and insert a new battery.
Replace the battery door ensuring the battery door lock is in the closed position.
Always ensure your PDA is switched off when changing batteries.
• The Stylus pen is stored and removed
from the rear of your PDA
MiniSD Card and SIM Card Installation
MiniSD Card Installation
Insert MiniSD Card with label facing upwards. To remove,
gently press the card into the socket to eject
SIM Card Installation
Open the battery cover and remove the paper labeled
“UIM/SIM Card Slot Area” before inserting the SIM card.

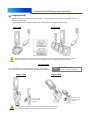
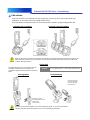
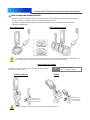
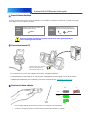
Charging the PDA
1-Slot Cradle
4-Slot Cradle
Optimus PDA SP5700series Quick Start Guide
Status
x Red – Now Charging
x Green – Charging Completed
Vehicle Cradle
Trigger Handle
The LED light on the Vehicle Cradle and Trigger Handle indicates power is on.
The current charge status is indicated by the charging indicator on the PDA.
Press Lock Key
when removing
the PDA
Press Lock Key
when removing
the PDA
OK
X
Before using the PDA for the first time or when the unit has not been used for a long period of time, charge the
battery for at least 3 hours and then perform a Hardware reset (see Software/Hardware reset section)
Insert the handset into the cradle as shown below. To avoid damage to the charging connector do not force
the PDA into the cradle.
A spare battery can be inserted in the rear slot of both cradles and charged simultaneously.
The charging indicator on the top of the PDA shows the current charge
status. The LED on the charger displays the spare battery charging status
Charging Status

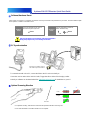
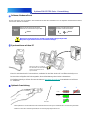
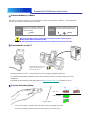
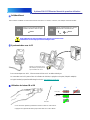
PC Synchronization
Optimal Scanning Direction
• For Optimal scanning, hold the base of the barcode just below the PDA scanning unit.
• Press and hold either scan button until the scan is complete
Optimus PDA SP5700series Quick Start Guide
Press the Sync Button on the 4
slot cradle to sync PDA with PC.
OK
X
Laser
Imager
Barcode
To communicate with a host PC, connect the PDA to the PC and run ActiveSync.
Connection can be made via the Vehicle Cradle, Trigger Handle or either of the charging cradles.
ActiveSync software can be downloaded from http://www.microsoft.com
for installation on your PC.
Software/Hardware Reset
Only use the Stylus Pen provided to press the Reset button.
Using sharp objects may cause damage to the PDA.
Software
Reset
Press Reset button on the rear of
the PDA using the Stylus Pen
Hardware
Reset
Press Power button and Reset
button simultaneously
Reset
Reset
Under certain circumstances a Software or Hardware reset may be needed to be performed on your PDA. The below tables explain
how to perform a software or hardware reset.

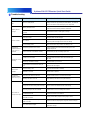
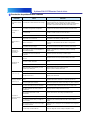
Troubleshooting
Optimus PDA SP5700series Quick Start Guide
Lean the barcode to 45° direction or scan the barcode back
against the sunlight
Scan under direct sunlight
Ensure that the barcode program recognizes the barcode type
Barcode program doesn’t recognize that
type of barcode
Ensure you are within proper scanning range (15cm)
Distance between scan window and
barcode is incorrect
Ensure the barcode is not defacedUnreadable barcode
Activate ‘Run Scanner’ in Settings-Barcode tabScanning Program was not activated
Rescan the barcode without the bar code movingTarget barcode was moving while scanning
Gently clean scan window with soft clothScan window is dirty or obstructed
PDA does not
accept scan input
Adjust Memory allocation in the System-MemoryMemory allocation is too low
Transfer stored Data to PC or delete unused filesToo many files stored on the PDA
A message
appears stating
that ‘Memory Full’
Remove dust in speakerSpeaker is not clean
Check the volume slider in SettingsVolume setting is low
No sound is
audible
Remove the PDA from the Cradle and re-insert.
Input the PDA name again
Connected as a Guest not the name you
set
Reinstall Active sync in the PCActiveSync installed incorrectly
Check the cable connection status and authenticity of
the cable
Cradle is not connected
Insert the PDA into the Cradle again and run ActiveSyncPDA is not inserted into Cradle correctly
ActiveSync is not
working
Recalibrate Stylus pen In Settings-Stylus tabLCD screen does not calibrate correctly
Execute Software Reset and recalibrate the Stylus in the
Settings-Stylus tab
Temporary system error occurred
Tapping the
screen buttons or
icons does not
activate
WiFi communication may fail when the battery is lowLack of battery power
More than 2 PDAs are using the same static IP.
Ask your system manager for the correct IP settings
IP Crashed
Check the static IP and set againIncorrect IP input
Fail to use WiFi
Clean dust or rust with dry clothI/O Connector is not clean
Insert the PDA into the Cradle again to charge
PDA wasn’t inserted into the Cradle
properly
Change the battery.
If the PDA is still not active, perform a Hard Reset
Battery failed/end of life
Battery did not
charge
PDA turns off after a period of inactivity. The period can be set in
Settings-Power tab. By pressing the power button, The PDA will
return to the status it was before going in to sleep mode.
PDA is in Sleep Mode.
PDA turns itself
off
SolutionCauseProblem

Optimus PDA SP5700 Serie
Kurzanleitung
Optimus PDA SP5700 Serie – Kurzanleitung
Copyright
© 2005 Metrologic Instruments, Inc. Alle Rechte vorbehalten. Kein Teil dieses Dokuments darf reproduziert, übertragen oder in irgendeiner
Form oder Weise ohne vorherige schriftliche Zustimmung gespeichert werden, außer vom Rezensenten, der kurze Abschnitte in einer Zu-
sammenfassung zitieren darf, oder wie im Copyright Act von 1976 beschrieben. Die in diesem Dokument erwähnten Produkt- und Marken-
namen sind Marken der entsprechenden Hersteller.

Optimus PDA SP5700 Serie – Kurzanleitung
Lieferumfang
(Standardzubehör)
(Optionales Zubehör)
PDA
Akku
Stylus-Stift/Handschlaufe
Ledertasche
Kopfhörer
Schutzfolie
Teile des PDA
Betriebsanzeige (LED)
Akkuladeanzeige (LED)Laut-
sprecher
Touch-Screen
Kopfhörerbuchse
Scantaste
Ein-/Austaste
Eingabe-
tasten
Navigationsfeld mit vier
Richtungen
Taste für
Hintergrundbe-
leuchtung
Mikrofon
E-/A-Anschluss
Digitalkamera (optional)
Stylus-Stift
Scanner
(Typ kann von dieser
Darstellung abweichen)
IrDA-Kommunikation
Antenne
Verriegelung für
Akkuabdeckung
Akkuabdeckung
Aufhänger für
Handschlaufe
Scantaste
Mini-USB-
Anschluss
Soft-Reset-Taste

Optimus PDA SP5700 Serie – Kurzanleitung
Akku einsetzen
• Wischen Sie das LC-Display mit
einem weichen Tuch ab, bevor Sie die
Schutzfolie aufkleben.
• Starten Sie dabei in einer Ecke des
Displays und kleben Sie die Folie über
das gesamte Display. Dabei dürfen
keine Luftblasen zwischen dem
Display und der Folie entstehen.
Stylus-Stift herausnehmen Schutzfolie aufkleben
Wenn Sie einen Akku einsetzen möchten, schieben Sie die Verriegelung der Akkuabdeckung auf die Position „Open“. Entfernen Sie
die Akkuabdeckung und setzen Sie einen neuen Akku ein.
Setzen Sie die Akkuabdeckung wieder auf und schieben Sie die Verriegelung auf die Position „Lock“.
Vergewissern Sie sich vor einem Batteriewechsel, dass Ihr PDA ausgeschaltet ist.
• Der Stylus-Stift wird hinten in den PDA
eingesteckt.
MiniSD-Karte und SIM-Karte einsetzen
MiniSD-Karte einsetzen
Legen Sie die MiniSD-Karte mit dem Etikett nach oben ein.
Zum Herausnehmen drücken Sie die Karte zuerst
vorsichtig in den Steckplatz, um sie zu lösen.
SIM-Karte einsetzen
Öffnen Sie die Akkuabdeckung und entfernen Sie das Papier
mit der Beschriftung „UIM/SIM Card Slot Area“ bevor Sie die
SIM-Karte einsetzen.

PDA aufladen
Ladestation mit 1 Steckplatz
Ladestation mit 4 Steckplätzen
Optimus PDA SP5700 Serie – Kurzanleitung
Zustand Rot – wird geladen Grün – Ladevorgang abgeschlossen
Fahrzeugstation
Auslösehalterung
Die LEDs auf der Fahrzeugstation und der Auslösehalterung zeigen an, ob diese eingeschaltet
sind. Den aktuellen Ladezustand erkennen Sie an der Ladeanzeige auf dem PDA.
Drücken Sie auf die
Verriegelungstaste, wenn
Sie den PDA
herausnehmen.
Drücken Sie auf die
Verriegelungstaste,
wenn Sie den PDA
herausnehmen.
OK
X
Bevor Sie den PDA zum ersten Mal verwenden oder falls das Gerät längere Zeit nicht genutzt wurde, laden Sie den
Akku mindestens 3 Stunden lang auf und führen Sie anschließend einen Hardware-Reset durch (siehe Abschnitt
„Software-/Hardware-Reset“).
Legen Sie den PDA in die Ladestation wie unten angezeigt. Drücken Sie das Gerät nie mit Gewalt in die
Ladestation, da der Ladeanschluss beschädigt werden könnte.
Im Rückteil beider Ladestationen lässt sich ein zusätzlicher Akku einlegen, der gleichzeitig geladen wird.
Die Akkuladeanzeige oben auf dem PDA zeigt den
derzeitigen Ladezustand an. Die LED auf der
Ladestation zeigt den Ladezustand des zusätzlichen
Akkus.
Ladezustand

Synchronisieren mit dem PC
Optimale Scanrichtung
• Beim optimalen Scannen befindet sich die Unterseite des Barcodes genau unterhalb der Scanvorrichtung des PDAs.
• Halten Sie eine der Scantasten gedrückt, bis der Scanvorgang abgeschlossen ist.
Optimus PDA SP5700 Serie – Kurzanleitung
Drücken Sie die Sync-Taste auf
der Ladestation mit 4 Steckplätzen,
um den PDA mit Ihrem PC zu
synchronisieren.
OK
X
Laser
Imager
Barcode
Wenn Sie mit einem Host-PC kommunizieren, verbinden Sie den PDA mit dem PC und führen ActiveSync aus.
Der Anschluss erfolgt über die Fahrzeugstation, die Auslösehalterung oder eine der Ladestationen.
Die Software ActiveSync können Sie unter der Adresse http://www.microsoft.com
herunterladen und auf Ihrem
PC installieren.
Software-/Hardware-Reset
Drücken Sie die Reset-Taste nur mit dem zu Ihrem Gerät gehörigen Stylus-Stift.
Mit spitzen Gegenständen können Sie den PDA beschädigen.
Software-
Reset
Drücken Sie die Reset-Taste auf der
Rückseite des PDA mit dem Stylus-Stift.
Hardware-
Reset
Drücken Sie gleichzeitig die Ein-
/Austaste und die Reset-Taste.
Reset
Reset
Es kann vorkommen, dass ein Software- oder Hardware-Reset Ihres PDA erforderlich ist. In der folgenden Tabelle wird beschrieben,
wie Sie diese Aktionen durchführen.

Optimus PDA SP5700serie – Kurzanleitung
Fehlerbehebung
Neigen Sie den Barcode bis auf 45° oder scannen Sie ihn mit der
Rückseite gegen das Sonnenlicht.
Sie scannen im direkten Sonnenlicht.
Vergewissern Sie sich, dass das Barcode-Programm den Barcode-
Typ erkennt.
Das Barcode-Programm erkennt diesen
Barcode-Typ nicht.
Halten Sie einen korrekten Scanabstand ein (15 cm).
Die Entfernung zwischen Scanfenster und
Barcode war nicht korrekt.
Vergewissern Sie sich über den Zustand des Barcodes.Der Barcode ist unlesbar.
Aktivieren Sie „Run Scanner“ (Scanner aktivieren) in der
Registerkarte „Settings-Barcode“ (Einstellungen-Barcode).
Das Scanprogramm war nicht aktiv.
Scannen Sie den Barcode erneut, ohne ihn zu bewegen.
Der zu scannende Barcode wurde während
des Scanvorgangs bewegt.
Reinigen Sie das Scanfenster vorsichtig mit einem weichen Tuch.
Das Scanfenster ist verschmutzt oder
verdeckt.
PDA akzeptiert
keine
Scaneingaben
Passen Sie die Speicherzuweisung im Systemspeicher an.Die Speicherzuweisung ist zu gering.
Übertragen Sie gespeicherte Daten auf den PC oder löschen Sie
nicht benötigte Dateien.
Auf dem PDA sind zu viele Dateien
gespeichert.
Meldung „Memory
Full“ bedeutet
Speicher ist voll
Entfernen Sie den Staub im Lautsprecher.Der Lautsprecher ist nicht sauber.
Überprüfen Sie den Schieberegler für die Lautstärke unter
„Settings“ (Einstellungen).
Die Lautstärke ist zu leise eingestellt.
Kein Ton
verfügbar
Nehmen Sie den PDA aus der Ladestation und legen Sie ihn erneut
ein.
Geben Sie den PDA-Namen erneut ein.
Sie sind als „Guest“ und nicht mit dem
festgelegten Namen verbunden.
Installieren Sie ActiveSync erneut auf dem PC.ActiveSync wurde fehlerhaft installiert.
Überprüfen Sie das Kabel und ob es korrekt ist.Die Ladestation ist nicht verbunden.
Legen Sie den PDA erneut in die Ladestation und führen Sie
ActiveSync aus.
Der PDA wurde nicht korrekt in die
Ladestation eingelegt.
ActiveSync
funktioniert nicht
Ändern Sie die Einstellungen für den Stylus in der Registerkarte
„Settings-Stylus“ (Einstellungen-Stylus).
Display stellt sich nicht korrekt ein
Führen Sie einen Software-Reset durch und ändern Sie die
Einstellungen für den Stylus in der Registerkarte „Settings-
Stylus“ (Einstellungen-Stylus).
Vorübergehender Systemfehler
Keine Aktivierung
durch
Bildschirmtasten
oder Symbole
Die WiFi kann fehlschlagen, wenn der Akku zu schwach ist.Mangelnder Akkuladezustand
Mehr als zwei PDAs verwenden dieselbe statische IP.
Fragen Sie Ihren Systemmanager nach den korrekten IP-
Einstellungen.
IP ist abgestürzt.
Überprüfen Sie die statische IP und versuchen Sie es erneut.Falsche IP-Eingabe
Fehler beim
Verwenden von
WiFi
Wischen Sie Staub oder Rost mit einem trockenem Tuch ab.Der E-/A-Anschluss ist verschmutzt.
Legen Sie den PDA erneut in die Ladestation zum Laden.
Der PDA wurde nicht korrekt in die
Ladestation eingelegt.
Wechseln Sie den Akku.
Ist der PDA immer noch nicht aktiv, führen Sie einen Hard-Reset
durch.
Akku kaputt/Akkulebensdauer überschritten
Akku lädt sich
nicht auf
Der PDA schaltet sich aus, nachdem er eine gewisse Zeit lang nicht
benutzt wurde. Diese Zeitspanne kann in der Registerkarte „Settings-
Power“ (Einstellungen-Stromversorgung) festgelegt werden. Wenn
Sie die Ein-/Austaste drücken, kehrt der PDA in den Zustand vor
dem Energiesparmodus zurück.
Der PDA ist im Energiesparmodus.
PDA schaltet sich
selbst aus
LösungUrsacheProblem

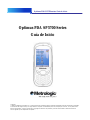
Optimus PDA SP5700 Series
Guía de Inicio
Optimus PDA SP5700series Guía de Inicio
Copyright
© 2007 por Metrologic Instruments, Inc. Todos los derechos reservados. Ninguna parte de este trabajo puede ser reproducido, transmitido,
o almacenado de ninguna forma y en ningún medio sin el previo consentimiento por escrito, excepto por un revisor, el cual puede hacer
breves citas textuales , según lo previsto en el Copyright Act de 1976. Los productos y marcas mencionadas en este documento son
marcas registras por sus respectivas compañías.

Optimus PDA SP5700series Guía de Inicio
Contenido del Kit
(Elementos básicos)
(Elementos opcionales)
PDA
Batería
Puntero Stylus / Correa
de mano
Funda de
cuero
Auriculares
Protector
de pantalla
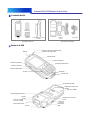
Partes de la PDA
Indicador de funcionamiento (LED)
Indicador de carga (LED)Altavoz
Pantalla Táctil
Conector Auriculares
Botón de Escaneo
Botón de Encendido
Teclado
Botón navegador
Botón retro-iluminación
Micrófono
Conector E/S
Cámara Digital (Opcional)
Puntero
Stylus
Lector de Códigos
(El tipo es opcional)
Comunicación IrDA
Antena
Pestillo de la Tapa de la
batería
Tapa de la Batería
Agujero de la correa de
mano
Botón de
Escaneo
Puerto mini-
USB
Botón Reseteo Soft

Optimus PDA SP5700series Guía de Inicio
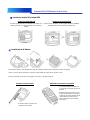
Instalación de la Batería
• Con cuidado limpie la pantalla LCD
con un trapo suave antes de poner el
protector.
• Empiece pegando una punta en una
esquina de la pantalla LCD y aplique
el protector por toda la pantalla. Evite
crear burbujas pasando un trapo
sobre el protector al mismo tiempo
que lo pone.
Sacando el Puntero Stylus Adhiriendo una protector de pantalla
Para instalar la batería, abra el pestillo de la tapa de la batería. Retire la tapa de la batería e inserte una batería.
Vuelva a poner la tapa de la batería y asegúrese que el pestillo de la tapa esta en posición ‘Close’.
Siempre asegúrese que su PDA esta apagada cuando vaya a cambiar la batería.
• El Puntero Stylus se guarda en la
parte trasera de su PDA.
Instalación tarjeta SD y tarjeta SIM
Instalación tarjeta Mini-SD
Inserte la tarjeta Mini-SD con la etiqueta hacia arriba. Para
quitarla, presione con cuidado la tarjeta hacia la dentro, y
suéltela.
Instalación de la tarjeta SIM
Abra la tapa de la batería y quite el papel etiquetado “UIM/SIM
Card Slot Area” antes de introducir la tarjeta SIM.

Cargando la PDA
Cuna para un terminal
Cunas en línea para 4 terminales
Optimus PDA SP5700series Guía de Inicio
Estados
x Rojo – Cargando
x Verde – Completamente cargado
Cuna de Automóvil
Mango
El LED en la cuna de vehiculo y en el mango indica que está encendida la PDA. El estado de la carga
es indicado por el LED de carga de la misma en la PDA.
Presione el botón
pestillo para
retirar la PDA
OK
X
Antes de utilizar la PDA por primera vez o cuando la unidad no ha sido utilizada durante un largo periodo de tiempo,
cargue la batería al menos durante 3 horas y después realice un Reseteo Hard (vea Reset Hardware en la pág. 4)
Introduzca el terminal en la cuna como se muestra abajo. Para evitar daños al conector de carga no fuerce
la PDA al introducirla en la cuna.
Una batería de sustitución puede ser introducida en el hueco posterior tanto en las cunas como en los
cargadores, simultáneamente junto con un terminal.
El indicador de carga situado arriba de la PDA muestra el estado actual de
la carga. El LED en el cargador muestra el estado de la batería de
sustitución.
Estado de la Carga
Presione el botón
pestillo para
retirar la PDA

Sincronización con un PC
Posición de Lectura Optima
• Para la lectura optima, mantenga la base del código de barras justo debajo de la PDA.
• Presione y mantenga pulsado el botón de escaneo hasta que se realice la lectura.
Optimus PDA SP5700series Guía de Inicio
Presione el botón ‘Sync’ de una
de las cunas en línea, para
sincronizar con el PC
OK
X
Lector Láser
Lector de Imagen
Código de Barras
Para comunicarse con un PC, conecte la PDA a un PC y ejecute el programa ActiveSync.
La conexión puede realizarse también a través de la cuna para vehículos, el mango o incluso las cunas
cargadoras.
El software de sincronización puede descargarse de http://www.microsoft.com
e instalarlo en su PC.
Reseteo Hardware y Software
Utilice solo el Puntero Stylus proporcionado con la PDA para pulsar el botón de Reset.
Utilizar objetos afilados puede dañar la PDA.
Un Reseteo Hard deja la PDA igual que cuando sale de fabrica. Borrará todos sus datos.
Reseto
Software
Presione con el puntero el botón de
Reset que se encuentra en la parte
trasera de la PDA.
Reseteo
Hardware
Encienda el equipo, mientras pulsa
al mismo tiempo el botón de Reset.
Reset Reset
Bajo ciertas circunstancias puede que se necesite realizar a la PDA un reseto Hardware o Software. Las siguientes tablas
muestran como realizar un reseteo Hardware y Software

Resolución de problemas mas comunes
Optimus PDA SP5700series Guía de Inicio
Incline el código 45º o lea el código de espaldas al Sol.Lectura bajo luz directa del Sol.
Asegúrese que el código que lee, está habilitado en el programa
del lector.
El programa del lector no reconoce el tipo
de código de barras.
Asegúrese que está trabajando dentro de la zona de lectura
(15cm)
La distancia entre el lector y el código no
es la correcta.
Asegúrese que el código no esta defectuoso.Código en mal estado o ilegible.
Ejecute ‘Run Scanner’ en Settings- pestaña Barcode.
El programa del lecturas no está
funcionado.
Mantenga quieto el código durante su lectura.
El código de barras se movió cuando lo
intentó leer.
Con cuidado, limpie la ventana del lector con un trapo suave.La venta del lector esta sucia u obstruida.
La PDA no
escanea códigos
de barras.
Ajuste la asignación de memoria en Settings - System – Memory.La ha asignado poca memoria.
Transfiera parte de los datos al PC o borre los que no usa.
Demasiada información almacenada en la
PDA.
Aparece un
mensaje diciendo:
“Memory Full”
Quite el polvo del altavoz.El altavoz está sucio.
Compruebe la barra del volumen.La configuración del volumen esta bajo.
Casi no se oye.
Quite la PDA de la cuna y vuelva a ponerla.
Vuelva a poner el nombre de la PDA.
Está conectado como invitado y no es el
nombre que usted puso.
Reinstale ActiveSync y reinicie el PC.ActiveSync no esta bien instalado
Compruebe el estado del cable de conexión y la autenticidad del
mismo.
La cuna no está conectada.
Inserte la PDA en la cuna y ejecute ActiveSync de nuevo.
La PDA no esta correctamente metida en
la cuna.
ActiveSync no
funciona.
Recalibre el puntero en Settings - pestaña Stylus.
La pantalla no está correctamente
calibrada.
Hagala un Reseteo Soft y recalibre el puntero en Settings -
pestaña Stylus.
Ha ocurrido un error y se ha bloqueado la
PDA temporalmente.
Pulso en la
pantalla y no
hace nada.
La comunicación Wifi puede fallar cuando hay poca batería.La batería tiene poca carga.
Mas de dos PDAs están usando la misma IP.
Pregunte a su administrador de red sobre la configuración
correcta.
Esa IP no funciona
Compruebe la IP estática y pruebe de nuevo.Ha puesto una IP incorrecta.
No funciona el
Wifi
Limpie el polvo o la suciedad con un trapo seco.El conector de E/S no esta limpio.
Pruebe a insertar la PDA en la cuna de nuevo.
La PDA no está puesta en la cuna
correctamente.
Cambie la batería.
Si la PDA aun no está aun funcional, realice un Reseto Hard.
La batería esta agotada o estropeada
La batería no
carga.
La PDA se apaga sola después de un periodo de inactividad.
Este periodo puede ser configurado en la opción Settings-
pestaña Power. Pulsando el botón de encendido, la PDA volverá
al estado en que estaba antes de entrar en el modo ahorro.
La PDA pasa a modo de ahorro de energía.
La PDA se apaga
sola
SoluciónCausaProblema

Optimus PDA SP5700 Series
Manuel de première utilisation
Optimus PDA SP5700series Manuel de première utilisation
Copyright
© 2005 by Metrologic Instruments, Inc. All rights reserved. No part of this work may be reproduced, transmitted, or stored in any form or by
any means without prior written consent, except by reviewer, who may quote brief passages in a review, or provided for in the Copyright Act
of 1976. Products and brand names mentioned in this document are trademarks of their respective companies.
La page charge ...
La page charge ...
La page charge ...
La page charge ...
La page charge ...
La page charge ...
La page charge ...
La page charge ...
La page charge ...
La page charge ...
La page charge ...
-
 1
1
-
 2
2
-
 3
3
-
 4
4
-
 5
5
-
 6
6
-
 7
7
-
 8
8
-
 9
9
-
 10
10
-
 11
11
-
 12
12
-
 13
13
-
 14
14
-
 15
15
-
 16
16
-
 17
17
-
 18
18
-
 19
19
-
 20
20
-
 21
21
-
 22
22
-
 23
23
-
 24
24
-
 25
25
-
 26
26
-
 27
27
-
 28
28
-
 29
29
-
 30
30
-
 31
31


Metrologic SP5700 Series Quick Start Manuals
- Taper
- Quick Start Manuals
dans d''autres langues
- italiano: Metrologic SP5700 Series
- English: Metrologic SP5700 Series
- español: Metrologic SP5700 Series
- Deutsch: Metrologic SP5700 Series
Autres documents
-
 T'nB PCOPTIL3 Fiche technique
-
Renkforce RF-IDC9277L Le manuel du propriétaire
-
 Winmate E430RM4L Series Manuel utilisateur
-
Winmate E500RM8-4EH Manuel utilisateur
-
 Winmate E500RM8 Series Manuel utilisateur
-
Motorola MTC100 TETRA Basic User's Manual
-
Holux GR-213 Quick Manual
-
AIRIS T480 Guide de démarrage rapide
-
Miller PIPEPRO PROGRAM MANAGEMENT SOFTWARE Le manuel du propriétaire
-


