Aiwa SC-UC78 Operating Instructions Manual
- Taper
- Operating Instructions Manual

amsa
SC4JC78
ACTIVESPEAKERSYSTEM
SISTEMA DEALTAVOCESACTIVOS
SYSTEME D’ENCEINTESACTIVES
OPERATING INSTRUCTIONS
MANUAL DE INSTRUCCIONES
MODE D’EMPLOI -
OWNER’S RECORD
For your convenience, record the model number and serial number (you
will find them on the rear of your set) in the space provided below.
Please refer to them when you contact your AIWA dealer in case of
difficulty.
Model No.
Serial No.
SC-UC78
( For assistance and information,
)
call toll free I-800-BUY-AIWA.
L
(United States and Puerto Rico)
J
mm
11
.,
m
-
B

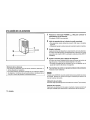
PRECAUTIONS
● The unit should be situated so that its location or position does not interfere
with the heat ventilation openings around the right speaker and sound pressure
ventilation on the rear of the left speaker.
Allow 15cm (6 in.) clearance from the rear and the top of the unit, and 5 cm (2
in,) from each side.
● Do not use the unit in places which are extremely hot, cold, dusty or humid.
In particular, do not keep the unit:
● in a high humidity area such as a bathroom
● near a heater
● in an area exposed to direct sunlight (e.g., inside a parked car, where there
could be a considerable rise in temperature)
● Keep cassette tapes, magnetic cards and other magnetically recorded materials
away from the speakers as the recorded information may be erased or noise
may occur on the cassette tapes.
Using the system near a TV set
● Ifthe TV picture is distorted, turn off the power of the TV set, and after 15 to 30
minutes turn it on again. If there seems to be no improvement, move the
system further away from the TV set.
● Be sure not to place magnets or objects using magnets, such as audio racks,
toys etc. near the TV set. These may cause magnetic distortion to the picture.
Safety
. When disconnecting the AC cord, pull it out by the AC power plug, Do not pull
the cord itself.
● If you are not going to use the system for a long period of time, disconnect the
AC cord,
Should any problem occur, disconnect the AC cord and refer servicing to qualified
personnel only,
H FCC Part 156, Class B
FCC NOTICE
This equipment has been tested and found to comply with the limits
for a Class B digital device, pursuant to Part 15 of the FCC Rules.
These limits are designed to provide reasonable protection against
harmful interference in a residential installation.
This equipment generates, uses, and can radiate radio frequency
energy and, if not installed and used in accordance with the instructions,
may cause harmful interference to radio communications.
However, there is no guarantee that interference will not occur in a
particular installation. Ifthis equipment does cause harmful interference
to radio or television reception, which can be determined by turning
the equipment off and on, the user is encouraged to try to correct the
interference by one or more of the following measures:
– Reorient or relocate the receiving antenna.
– Increase the separation between the equipment and receiver.
– Connect the equipment into an outlet on circuit different from
that to which the receiver is connected.
– Consult the dealer or an experienced radio/TV technician for
help,
CAUTION
Modifications or adjustments to this product, which are not expressly
approved by the manufacturer, may void the user’s right or authority
to operate this product.
● Windows@95 and Windows@98 are the trademarks of Microsoft Corporation
registered in the US and other countries,
● Company and product names mentioned herein are the trademarks or
registered trademarks of their respective owners.
2 ENGLISH

TABLE OF CONTENTS
ABOUT USB
PRECAUTIONS ...................................................................................... 2
ABOUT USB ........................................................................................... 3
FEATURES ............................................................................................. 4
NAMES OF PARTS ................................................................................ 5
CONNECTION AND SETTINGS ............................................................ 6
Before connecting the speakers to your PC .. . ... .. ... .. .. ... .. .. . . 6
Connecting the speakers .................................................................... 8
INSTALLING THE USB DEVICE DRIVERS ........................................... 9
Verifying installation . ... . .... . .. . . . .. .. . . . ... . .... 11
If the USB port does not work .... .... ..... .. ... .... ... .... ..... .... .. .. ..... 12
When the Universal Serial bus controller is not displayed or
when thedevice driver installation will not begin 13
USING THE SPEAKERS ...................................................................... 14
OPERATION ......................................................................................... 15
(1) Using the USB port for audio .... .. ... .... .. .. ... . . .. .... .. .. .... 15
(2) Playing music CDs using the USB port ....... ... . . .... ....... .. ..... 17
TROUBLESHOOTING .......................................................................... 18
CARE .................................................................................................... 18
SPECIFICATIONS ................................................................................ 19
USB is an abbreviation of Universal Serial Bus. A USB is a high speed
interface for easily connecting a PC and peripheral devices.
The USB has the following features.
● With one USB cable, various peripherals can be connected.
● Data transfer speeds as high as 12 Mbps are possible.
* Peripherals can be plugged in even while the PC is on (hot plug in).
● Using a USB hub, as many as 127 peripherals can be plugged into a
singl; PC.
Requirements for connecting these speakers to a PC via a USB
To connect these speakers to a PC via a USB, a PC with a USB port
and Windows ‘ 98 is required. The USB port must be properly configured.
For more information, ask your computer dealer or manufacturer whether
or not USB audio is supported by your computer.
Notes reaardirw the use of these speakars with a USB
● When t;ese sp-eakers are connected to a PC by a USB, use the included
111111
. .
USB cord or a shielded-type (high speed tYPe) USB cord.
● After the speakers are co-nnected to the PC, it will take the PC about ten
seconds to recognize the speakers. Until the speakers are recognized,
avoid unplugging the USB cord or turning off the speakers.
ENGLISH 3

FEATURES
● Equipped with both USB and analog audio inputs
● Dynamic Bass system
● QSOUND system
● Front 180’ speaker system
● High power sound of 5.5 W + 5.5 W speakers and
powered subwoofer
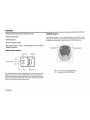
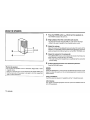
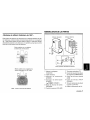
<Dynamic Bass system>
Cavity (A)
Cavity (B)
I
I
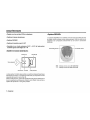
<QSOUND system>
The QSOUND system is a front surround system that produces virtual
reality sounds (stereoscopic sound field). This is achieved by processing
the directional components of sounds with the QSOUND processor.
11
w
built-in
Left speaker -
Port
Duct
Speaker unit
The subwoofer adopts a Dynamic Bass System in which port, duct and air
cavity (A) compose an acoustic bandpass filter in front of air cavity (B).
By virtue of this structure, the bass reproduction limit is extended and sounds
higher than middle range frequencies are reduced. This makes it possible
for the unit to reproduce powerful bass sound.
- Right speaker
= : Sound field without QSOUND effect
\WMI’: Sound field with QSOUND effect
4 ENGLISH

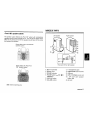
NAMES OF PARTS
<Front 180° speaker system>
This speaker system features the Front 180” system with unidirectional
speakers pointed inward at angles of 45°. You can get an optimal stereo
effect not only directly in front of the speakers but also when off the center
line between the speakers.
Stereo effect with a conventional
speaker
system
n /7
r-1
Stereo effect with Aiwa Front
180° speaker system
—
Left speaker
Right speaker
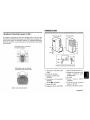
Rear panel of the right speaker
@ Built-in subwoofer @ fl (headphones) jack
-—
@ Speaker cord
‘@ SUBWOOFER volume control
@ POWER indicator
@ USB port
@ POWER switch (~ ON/ l(!)
@ INPUT PHONES (input) cord
STANDBY)
@ L SP
OUT (left speaker
@ QSOUND button
output) jack
@ VOLUME control @AC cord
_: Stereo listening area
ENGLISH 5

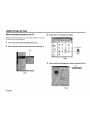
CONNECTION AND SETTINGS
Before connecting the speakers to your PC
Before connecting the speakers to your PC through a USB port, verify that
the USB port is properly configured.
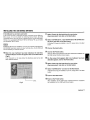
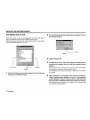
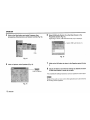
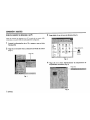
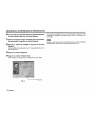
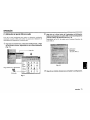
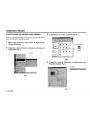
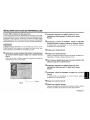
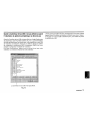
1 Turn on your PC and wait for Windows@98 to start.
z Click on the Start button and select the Control Panel (Fig. 1).
Click.
s Double click on the System icon (Fig.2).
Fig. 2
Q Click on the Device Manager tab in System Properties (Fig. 3).
Fig. 1
Fig. 3
6 ENGLISH

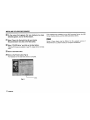
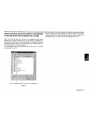
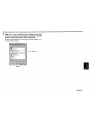
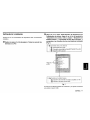
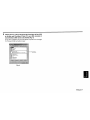
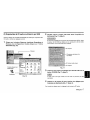
s Click onthe[+] totheleft of Universal serial bus controller
and verify that USB Universal Host Controller and USB Root
Hub are displayed (Fig. 4).
if these two drivers are not displayed, see page 12, “If the USB port
does not work.”
Verify.
Fig. 4
ENGLISH 7

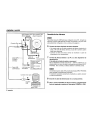
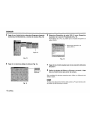
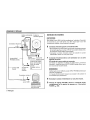
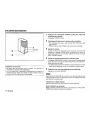
CO/V/VECTIONA/VD SETTINGS
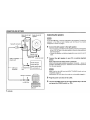
Backside of right Back side of left Connecting the speakers
speaker -
@
speaker
cord
+8
to an AC
(input) cord
— USB cord
to headphones
(supplied)
jack
outlet
1
PortableCDplayer,
portableMDplayer,
portablecassetteplayer,
PC,soundboard,etc.
To use the USB port, it must be configured by the computer. Connect the
speakers to the USB port after making sure that the port is properly
configured, as shown on page 6.
6
7
8
9
Connect the left speaker to the right speaker.
● Donotconnect acordother than thespeaker cord from the leftspeaker
to the L SP OUT jack of the right speaker; otherwise these speakers
may be damaged.
● Connect thespeaker cord before plugging thepower cord into anAC
outlet.
Connect the right speaker to your PC or another playback
device.
If the output from the audio source is monaural
Attach a commercially available plug adaptor (monaural + stereo) to
the INPUT PHONES (input)cord. Otherwise no sound will be produced
from the right speaker.
Make sure that the USB cord and INPUT PHONES (input) cord are
completely plugged in.
Malfunctions can occur when the cords are only partially plugged in.
Plug the power cord into an AC outlet.
Turn the VOLUME control on the right speaker fully to the left
and press the POWER switch ( = ON).
PC equipped with
USB port
8 ENGLISH

INSTALLING THE USB DEVICE DRIVERS
11 Select “Search for the best driver for your device
(Recommended)” and click on the Next button.
12 Select “CD-ROM drive”, insert the Windows” 98 CD-ROM into
the drive, and click on the Next button.
If Windowsm 98 was pre-installed on your PC, simply click on the Next
button.
1s Click on the Next button.
1 q Click on the Finish button.
After the USB Composite Device has been installed, the installation for
the USB Human Interface Device begins.
Ill!l
15 On the screen that appears after new hardware has been ‘o
detected appears, click on the Next button.
16 Select “Search for the best driver for your device
(Recommended)” and click on the Next button.
17 Select “CD-ROM drive” and click on the Next button.
If Windows@ 98 was pre-installed on your PC, simply click on the Next
button.
18 Click on the Next button.
I g Click on the Finish button.
After installation for the USB Human Interface Device is completed,
the installation for the USB Audio Device begins.
ENGLISH 9

INSTALLING THE USB DEVICE DRIVERS
20 On the screen that appears after new hardware has been
This completes the installation for the USB Composite Device, the USB
detected appears, click on the NeKt button.
Human Interface Device, and the USB Audio Device drivers.
21 Select “Search for the best driverfor your device
(Recommended)” and click on the Next button.
22 Select “CD-ROM drive” and click on the Next button.
If Windows@98 was pre-installed on your PC, simply click on the Next
button.
23 Click on the Next button.
24 Click on the Finish button (Fig. 6).
The installation for the USB Audio Device is complete.
~ click,
Fig. 6
m
Some of these steps may be different for the upgrade version of
Windows@ 98. If so, please consult your computer manufacturer.
10 ENGLISH

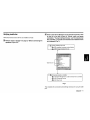
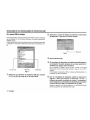
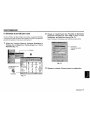
Verifying installation
Verify that the three device drivers are installed correctly.
25 Perform steps 2 through 4 on page 6, “Before connecting the
speakers to your PC. ”
26Click on the Device Manager tab in System Properties. Click
on the [+] to the left of each of “Sound, video, and game
controllers,”” Human Interface Devices, ”and “Universal serial
bus controller,” and make sure that the three installed drivers
are displayed (Fig. 7).
~
&--w Human Interface Devices
W HID-complmnt consumer control dwce
~& USE Human Interface Device
T
Click on [+].
&l * Universal serial bu$ controller
Intel 32371 AE/EE PCI to USE Universal Hoxt Controller
,,
USE Composite Device
USB Root Hub
Fig. 7
This completes the connections and settings necessary for using the USB
port.
ENGIVSH 1I

INSTALLING THE USB DEVICE DRIVERS
If the USB port does not work
If any of the symbols [?], [!], or [x] are displayed to the left of a USB device
driver, the USB device driver is not installed correctly (Fig. 8).
When this happens, follow the steps outlined below to remove and reinstall
a device driver that displays [?], [!], or [x],
1
[?],
[!]~or [x]
Ciick
Select
Fig. 8
?
Select the USB device driver that displays [?], [!], or [x] (Fig. 8)
and click on the Remove button.
2
3
4
5
The Confirm Device Removal dialog box will appear. Click on
the OK button (Fig.9).
Restart Windowsm 98.
The USB device driver will be automatically installed and the
installation is complete, after the Add New Hardware Wizard
appears.
If the Insert Disk screen is displayed, insert the Windows” 98 CD-ROM
as instructed on the screen and click the OK button.
The USB device driver will be automatically installed and the installation
is complete.
After installation is completed, follow the steps on page 6,
“Before connecting the speakers to your PC, ” and using the
screen displayed in step 5, make sure that the USB Universal
Host Controller and USB Root Hub device drivers are installed.
Follow then the steps 10 through 24 on pages 9 and 10, “INSTALLING
THE USB DEVICE DRIVERS.”
i 2 ENGLISH

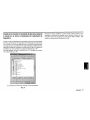
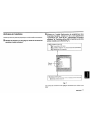
When the Universal Serial bus controller is not displayed
After the USB port has been enabled, the Add New Hardware Wizard will
or when the device driver installation will not begin
appear when the PC is rebooted. After this, refer to step 4 on page 12, “if
the USB port does not work,” to install the USB device drivers.
When the Universal Serial bus controller is not displayed on the Device
Manager tab in System Properties (Fig. 10) or when the installation for a
device driver will not begin, it is possible that the PC’s USB port is disabled.
Enable the USB port using a setup utility (BIOS setup, CMOS setup, etc.)
for changing the PC’s hardware settings.
For more details, refer to the manual that came with your PC or contact
manufacturer of your PC.
The Universal Serial Bus controller is not displayed.
Fig. 10
ENGLISH i 3

USING THE SPEAKERS
1
3
QSOUND
R
4
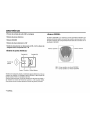
Placing the speakers
● Do not place the speakers close to televisions, floppy disks or other
magnetic items,
● There is a subwoofer duct on the back of the left speaker. Make sure
that the back side of the speaker is at least 5 cm (2 in.) away from
walls or other obstructions.
1
2
3
4
5
Press the POWER switch (~ ON) to turn the speakers on.
The POWER indicator will come on,
Begin playback from the connected audio source.
● To play back sounds using the USB port, refer to the next page,
● Refer to the user’s manual for the connected audio source,
Adjust the volume.
Adjust the volume of the playback device and adjust the volume of the
speakers. The VOLUME control simultaneously adjusts the volume for
audio coming into the USB connector orviathe INPUT PHONES cord.
Adjust the volume for the subwoofer.
The SUBWOOFER volume control adjusts the volume of low frequency
audio. Normally, it should be left in the middle.
● The audio coming from headphones is unaffected by the subwoofer
volume setting,
Enjoying sound with even more enhanced presence:
Press the QSOUND button,
When the QSOUND is on, the sound can be distorted due to the too much
input. Turn down the volume on the connected equipment to level down the
sound volume,
Using a headphone
Insert the plug (mini-plug) of a headphone to the (1 (headphone) jack.
After listening
Turn off the connected equipment and then press the POWER switch to
turn off the speakers.
I 4 ENGLLSH

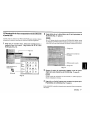
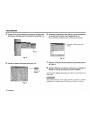
(1) Using the USB port for audio
2
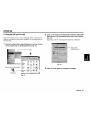
Click on the Audio tab in Multimedia Properties. Select USB
Audio Device (1) in the Preferred device menu under Playback
if your PC is already set up to use a multimedia device connected to the
USB port, the steps for device driver installation can be skipped and you
(Fig. 12).
can begin here.
Depending on the PC, USB Audio Device(2) may be displayed.
1 Click on the Start button, select Settings, and click on Control
Panel. Double click on the Multimedia icon (Fig. 11 ).
— Select USB
Audio Device (l).
Fig. 12
s Click on the OK button to complete
the settings.
ENGLISH 15

OPERATION
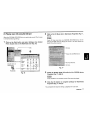
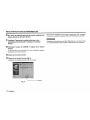
q Click on the Start button and select Programs, then
Accessories, Entertainment, and Volume Control (Fig. 13).
6 Select USB Audio Device (1) as the Mixer Device in the
Properties section (Fig. 15).
Depending on the PC, USB Audio Device(2) may be displayed.
Fig. 13
s Click on Options under Speakers (Fig. 14).
Fig. 15
‘7 Click on the OK button to return to the Speakers panel of step
5.
8 Adjust the Balance and Volume settings as desired and click
on the Close button to close the window.
This completes the settings necessary to use your speakers for audio output.
m
Breaks in the audio can occur when other applications are used while the
PC is being used for playback.
Fig. 14
16 ENGLISH

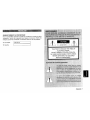
(2) Playing music CDs using the USB port
When the CD-ROM (DVD-ROM) drive is used to play music CDs, be sure
to verify the folIowing settings.
1 Click on the Start button and select Settings, then Control
Panel. Double click on the Multimedia icon (Fig. 16).
2
3
4
Click on the CD Music tab in Multimedia Properties (Fig. 17,
step 2).
m
If your PC has more than one CD-ROM (DVD-ROM) drive, set the
Default CD-ROM drive for playing CD music to the drive where the
music CDs will be inserted.
drive.
Fig. 17
Check the Enable digital CD audio for this CD-ROM device
Checkbox (Fig. 17, step 3).
If this checkbox is not checked, music CDs cannot be played.
Click the OK button to complete settings for Multimedia
Properties (Fig. 17, step 4).
This completes the steps for setting up playback of music CDs.
ENGLISH I
7

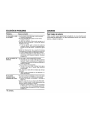
TROUBLESHOOTING
CARE
Problem
Cause and solution
To clean the cabinet
Nosoundor sound is .Thespeakers arenotturned on.
Use a soft cloth lightly moistened with mild detergent solution.
very faint. + Tumthe poweron Do not use strong solvents such as alcohol, benzene or thinner.
. The VOLUME controlE set to the mmimum level
+ Adjust the volume,
.
The Mute checkbox IS checked m the Volume Control
panel or the volume lever ISset low.
+ If there IS no sound, uncheck the Mute checkbox. If
thesound letoofaint, movethevolume leverup (Refer
to page 16)
● Under Playback in the Audio section of Multimedia
Properties, the USB Audio Device (1) IS not selected as
the Preferred Device,
+ Select the USB Audio Device (1) as the Preferred
Device. (Refer to page 15.)
The speakera are not
●The USBcord lsnotplugged incompletely.
detected by the PC.
+ Makesurethat the USBcord is fkmlyplugged in. Note
that It WIIItake the PC approximately 10 seconds to
recognize the speakers after they are plugged in.
● The USB port Isnotfunctiomng,
+ Refer to’’lfthe USBport does notworkonpage12
to get the USB port functioning correctly.
● Anon-shielded (lowspeed type) USBcord lsbelng used.
+ Usethecord that comes with thespeakersor usea
shielded USB cord
Music CDs cannot be ●The[Enable digital CDaudio forthis CD-ROM device]
played.
checkbox is notchecked
+ Cllckon thecheckbox, (Refertopage17,)
● If your PC has more than one CD-ROM (DVD-ROM)
drive, the correct drive is not selected for playing music
CDs.
+ Select the CD Music tabin Multimedia Properties and
select the proper playback drwe under the CD-ROM
drive setting. (Refer to page 17,)
18 ENGLISH

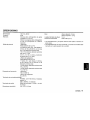
Power output
Power supply
120V AC, 60Hz
● Specifications and external appearance are subject to change without
Power consumption
30VV
notice.
Speakers 77mm full range antimagnetic type
● Specifications, trade mark and model name are marked on the rear of
speakers (2)
the umt.
10Omm antimagnetic type subwoofer (built
in the left speaker)
<Speakers>
FTC RULE
5.5 watts per channel, Mln RMS at 4
ohms, from 150 Hz to 20,000 Hz, with no
more than 1
YO total harmonic distortion
7 W + 7 W (4 ohms, THD 10% at 1 kHz)
5,5 W + 5.5 W (4 ohms, THD 17. at 1 kHz)
<Subwoofer>
FTC RULE
11 watts, Mm. RMS at 6 ohms, form 40 Hz
to 200 Hz, with no more than 17. total
harmonic distortion
14 W (6 ohms, THD 10% at 100 Hz)
11 W (6 ohms, THD 1% at 100 Hz)
Frequency response
<Speakers>
150 Hz to 20,000
Hz
&u bwoofer>
40 Hz to 200
HZ
Input terminals/sensitwty PHONES” 0.8 V/1500hms, stereo mini-
plug (1)
USB USB Rev.1.0 standard
Output terminals Headphones output: 10 mW+lOmV/16
ohms
Dimensions (w/h/d) 124x279 x219mm
(5xllx8%m)
Weight
Right speaker. 2.4 kg (5 lb 5 OZ)
Left speaker: 2.2 kg (4 lb 14 OZ)
Speaker cord length
1,5 m (59
‘/8 h.)
Supphed accessory USB cord (1.5m) (1)
ENGLISH 19

La page est en cours de chargement...
La page est en cours de chargement...
La page est en cours de chargement...
La page est en cours de chargement...
La page est en cours de chargement...
La page est en cours de chargement...
La page est en cours de chargement...
La page est en cours de chargement...
La page est en cours de chargement...
La page est en cours de chargement...
La page est en cours de chargement...
La page est en cours de chargement...
La page est en cours de chargement...
La page est en cours de chargement...
La page est en cours de chargement...
La page est en cours de chargement...
La page est en cours de chargement...
La page est en cours de chargement...
La page est en cours de chargement...
La page est en cours de chargement...
La page est en cours de chargement...
La page est en cours de chargement...
La page est en cours de chargement...
La page est en cours de chargement...
La page est en cours de chargement...
La page est en cours de chargement...
La page est en cours de chargement...
La page est en cours de chargement...
La page est en cours de chargement...
La page est en cours de chargement...
La page est en cours de chargement...
La page est en cours de chargement...
La page est en cours de chargement...
La page est en cours de chargement...
La page est en cours de chargement...
La page est en cours de chargement...
La page est en cours de chargement...
La page est en cours de chargement...
La page est en cours de chargement...
La page est en cours de chargement...
-
 1
1
-
 2
2
-
 3
3
-
 4
4
-
 5
5
-
 6
6
-
 7
7
-
 8
8
-
 9
9
-
 10
10
-
 11
11
-
 12
12
-
 13
13
-
 14
14
-
 15
15
-
 16
16
-
 17
17
-
 18
18
-
 19
19
-
 20
20
-
 21
21
-
 22
22
-
 23
23
-
 24
24
-
 25
25
-
 26
26
-
 27
27
-
 28
28
-
 29
29
-
 30
30
-
 31
31
-
 32
32
-
 33
33
-
 34
34
-
 35
35
-
 36
36
-
 37
37
-
 38
38
-
 39
39
-
 40
40
-
 41
41
-
 42
42
-
 43
43
-
 44
44
-
 45
45
-
 46
46
-
 47
47
-
 48
48
-
 49
49
-
 50
50
-
 51
51
-
 52
52
-
 53
53
-
 54
54
-
 55
55
-
 56
56
-
 57
57
-
 58
58
-
 59
59
-
 60
60


Aiwa SC-UC78 Operating Instructions Manual
- Taper
- Operating Instructions Manual
dans d''autres langues
- English: Aiwa SC-UC78
- español: Aiwa SC-UC78
Documents connexes
Autres documents
-
Roland UA-1A Le manuel du propriétaire
-
Edirol Edirol Audio Capture UA-5 Getting Started
-
-
Yamaha UW500 Le manuel du propriétaire
-
-
-
Edirol AudioCapture UA-700 Le manuel du propriétaire
-
-
-