
D.I.S.C.
™
The Cutting Edge in Precision Sharpening
HELPFUL TIPS TO REMEMBER
Always keep the tip/toe pointed to the center
of the D.I.S.C.
Always keep the handle (not the shank) of the instru
-
ment parallel to the Instrument Reference Lines.
When sharpening instruments, make sure that only
the cutting surface of the working end (as compared
to the shank) is touching the stone to avoid weaken
-
ing the integrity of the shank.
Avoid re-tipping of instruments, as this can cause
stress fractures of the handle.
No lubrication necessary using the D.I.S.C.
From time to time, clean the ceramic stones using
a mild abrasive pad (without cleaners/chemicals)
under running water.
1
2
3
4
5
6
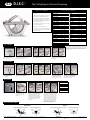
Turn the protractor dial to the
appropriate dial setting (Example:
“G” for any Gracey 1-10).
Hold the instrument with the handle parallel
to the Instrument Reference Lines. Position the
working end towards the center.
Keeping the wrist stiff, use a pull-stroke with moderate
pressure (repeat 5 or 6 times).
On a curette, roll the instrument as you finish
your pull-stroke to avoid sharpening the toe
of the instrument.
Turn the protractor dial to the
appropriate dial setting for the
first cutting surface (Example: “L”
for a 204S Scaler).
Hold the instrument with the handle parallel
to the Instrument Reference Lines. Position the
working end towards the protractor.
Keeping the wrist stiff, use a pull-stroke with moderate
pressure (repeat 5 or 6 times).
Change the dial setting for the
second cutting surface (Example:
“d” for a 204S Scaler). Notice that
the Instrument Reference Lines are
now going down from left to right.
Move the instrument to the other side of
the protractor dial - sharpen the cutting
surface with a moderate pull-stroke (keeping
the wrist stiff) - notice that the instrument
handle will be below the stones.
Identify the cutting surface(s) of
the instrument.
Hold the instrument so that the cut-
ting surface is perpendicular
to, and above the stone, with
the tip/toe pointing towards
the protractor.
Lower the instrument handle in a clockwise
manner until the stone is in optimal contact
with the cutting surface (avoid going too low
and making contact with the shank of the
instrument). While holding the instrument
in this position, turn the protractor dial until
the Instrument Reference Lines are parallel
to the instrument handle. Sharpen in the
usual manner.
If the instrument has two cutting surfaces, hold
the instrument so that the cutting surface is
perpendicular to, and below the stone, with the
tip/toe pointing towards the protractor. Raise
the instrument in a counter-clockwise manner
until the stone is in optimal contact with the
cutting surface (avoid going too high and mak-
ing contact with the shank of the instrument).
While holding the instrument in this position,
turn the protractor dial until the Instrument
Reference Lines are parallel to the instrument
handle. Sharpen in the usual manner.
Identify the dial setting(s) and
record them above.
One-Sided Blade
Two-Sided Blade
Unlisted Blade
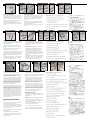
Parts of an Instrument Blade
Gracey 1-10 G
Gracey 11/12 J
Gracey 13/14 15˚
Gracey 15/16 J
Gracey 17/18 b(or-10˚)
McCalls 13/14 50˚ -15˚
McCalls 17/18 H b
McCalls 13S/14S H b
McCalls 17S/18S H b
Columbia 2L/2R G a
Columbia 4L/4R I b
Columbia 13/14 J c
204S L d
H204S 70˚ -45˚
H204SD 50˚ -10˚
Barnhart 1/2 50˚ -20˚
Barnhart 5/6 50˚ -20˚
Langer 1/2 35˚ 0˚
Langer 3/4 40˚ -20˚
Langer 5/6 20˚
Langer 17/18 40˚ -20˚
U15 / Jac 1 F
Jac 1/1 F
Jac 2/3 K b
Jac 34/35 40˚ 0˚
H6/H7 F a
H5/33 10˚
U15/33 F
U15/30 15˚
Younger Good 7/8 30˚ -5˚
Younger Good H-7/830˚ -5˚
Neb 128 15˚
NV1 Scaler 15˚
NV1 Scoop G**
NV2 65˚ -35˚
NV4 35˚ 0˚
137 Scaler 15˚
137 Currette 15˚
135 50˚ -20˚
Morse 0/00 10˚
Wil 8 30˚ -10˚
Ball 5/6 50˚ -25˚
UT 107/108 40˚ 0˚
S107/S108 70˚ -30˚
GF 21 15˚ 15˚
CK6 80˚ -30˚
SIUFW204 40˚ -15˚
D.I.S.C™ Scaler & Curette Angles*
Sickle Scaler
Curette
A. The two cutting edges meet in a pointed end. B. Cross-section - a triangular shape.
A. The cutting edges come together in a spoon shape.
B. Cross-section - a half circle shape.
shank
face
lateral
side
cutting
edges
tip
back
cutting
edge
cutting
edge
lateral
surface
lateral
surface
face
back
cutting
edge
cutting
edge
lateral
surface
lateral
surface
face
back
shank
face
lateral
surface
cutting
edges
toe
back
A. The two cutting edges meet in a pointed end.B. Cross-section - a triangular shape.
shank
face
lateral
side
cutting
edges
tip
back
cutting
edge
cutting
edge
lateral
surface
lateral
surface
face
back
A. The cutting edges come together in a spoon shape.
B. Cross-section - a half circle shape.
cutting
edge
cutting
edge
lateral
surface
lateral
surface
face
back
shank
face
lateral
surface
cutting
edges
toe
back
SICKLE SCALER CURETTE
Premier® Dental Products Company • 1710 Romano Drive • Plymouth Meeting, PA 19462 • 610-239-6053 • www.premusa.com Made in U.S.A.
*There may be slight variations in setting with other manufacturer’s instruments. You can
fine tune your instruments settings by following the directions for unlisted blades. **As you
pull the disc shaped scoop end across the stone, turn it so that it sharpens around the scoop.
At the end of the sweep, you should have turned the scoop 2/3 around. Now, sharpen on
other side the same way. You do not want to finish one side at the top of the scoop, or it will
start to become a point.
DFU04801 051460 Rev8 NKP 1M

Une surface tranchante
1. Tourner le cadran de sélection du rapporteur jusqu’à obtenir le
réglage approprié (exemple: « G » pour toute curette de Gracey 1-10).
2. Maintenir l’instrument avec la poignée parallèle aux Lignes de
référence de l’instrument. Diriger l’extrémité active vers le centre.
3. Maintenir fermement le poignet, puis tirer d’un coup sec en
adoptant une pression modérée (répéter 5 à 6 fois).
4. Pour une curette, faire rouler l’instrument une fois parvenu au
bout de la partie à aiguiser afin d’éviter d’aiguiser l’extrémité de
la curette.
Un superficie cortante
1. Gire el compás hasta que la raya roja marcada en el cuerpo plástico
del disco quede alineada con el ángulo de referencia para el instru-
mento que aparece en el compás. (Ejemplo: “G” por Gracey 1-10)
2. Posicione el instrumento paralelo a las dos líneas negras del
compás rotativo.
3. Mantenga la muñeca de su brazo rígida mientras pasa el instru-
mento sobre la piedra de cerámica con un movimiento horizontal
en dirección a Ud. (Repetir 5 o 6 veces).
4. Por una cureta, mientras pasar el instrumento, rodarlo para evitar
afilar la punta.
Deux surfaces tranchantes
1. Tourner le cadran de sélection du rapporteur jusqu’à obtenir le
réglage approprié pour la première surface tranchante (exemple :
« L » pour un détartreur 204S).
2. Maintenir l’instrument avec la poignée parallèle aux Lignes de
référence de l’instrument. Diriger l’extrémité active vers le rap-
porteur.
3. Maintenir fermement le poignet, puis tirer d’un coup sec en
adoptant une pression modérée (répéter 5 à 6 fois).
4. Régler la sélection sur le cadran du rapporteur jusqu’à obtenir
le réglage approprié pour la seconde surface tranchante (exemple
: « d » pour un détartreur 204S). Noter que les Lignes de référence
de l’instrument se dirigent maintenant vers le bas, de gauche à
droite.
5. Aiguiser la surface tranchante d’un coup sec à pression modérée
(en maintenant fermement le poignet)—noter que la poignée de
l’instrument se situe au-dessous des pierres.
Dos superficies cortantes
1. Gire el compás hasta que la raya roja marcada en el cuerpo
plástico del Disc quede alineada con el ángulo de referencia para
la primera superficie cortante del instrumento. (Ejemplo: “L” para
un raspador 204S)
2. Posicione el instrumento paralelo a las dos líneas negras del
compás rotativo
3. Mantenga la muñeca de su brazo rígida mientras pasa el
instrumento sobre la piedra de cerámica con un movimiento
horizontal en dirección a Ud. (Repetir 5 o 6 veces).
4. Cambie el ángulo apropiado para afilar la segunda superficie
cortante del instrumento. (Ejemplo “d” para un raspador 204S).
Toma nota que las líneas marcadas en el disco corren de izqui-
erda a derecha.
5. Mantenga la muñeca de su brazo rígida y pasar el instrumento
sobre la piedra de cerámica con un movimiento horizontal en
dirección a Ud. (Repetir 5 o 6 veces). Esta vez el mango del
instrumento estará debajo de la piedra de cerámica.
Un instrument non connu
1. Identifier la/les surfaces tranchantes de l’instrument.
2. Maintenir l’instrument de telle manière que la surface tran-
chante soit perpendiculaire à et située au-dessus de la pierre, la
pointe/l’extrémité dirigée vers le rapporteur.
3. Abaisser la poignée de l’instrument dans le sens des aiguilles
d’une montre jusqu’à obtenir un point de contact optimal entre
la pierre et la surface tranchante (éviter de descendre trop bas
et d’entrer en contact avec le corps de l’instrument). Maintenir
l’instrument dans cette position, puis tourner le cadran de
sélection du rapporteur jusqu’à ce que les Lignes de référence
de l’instrument soient parallèles à la poignée de l’instrument.
Aiguiser suivant les techniques habituelles.
4. Si l’instrument comprend deux surfaces tranchantes, maintenir
l’instrument de telle manière que la surface tranchante soit per-
pendiculaire à et située au-dessus de la pierre, la pointe/l’extrémité
dirigée vers le rapporteur. Relever l’instrument dans le sens
contraire des aiguilles d’une montre jusqu’à obtenir un point de
contact optimal entre la pierre et la surface tranchante (éviter
de trop relever l’instrument et d’entrer en contact avec le corps
de l’instrument). Maintenir l’instrument dans cette position, puis
tourner le cadran de sélection du rapporteur jusqu’à ce que les
Lignes de référence de l’instrument soient parallèles à la poignée
de l’instrument. Aiguiser suivant les techniques habituelles.
Déterminer les réglages du cadran et les inscrire sur la fiche, dans
la section prévue à cet effet.
Conseils utiles à garder en mémoire
• Toujours maintenir la pointe/l’extrémité dirigée vers le centre du
D.I.S.C.
• Toujours maintenir la poignée (pas le corps) de l’instrument par-
allèle aux Lignes de référence de l’instrument.
• Au moment de procéder à l’aiguisage des instruments, s’assurer
que seule la surface tranchante de l’extrémité active (par opposi-
tion au corps) est en contact avec la pierre afin d’éviter de com-
promettre l’intégrité du corps.
• Éviter de faire re-basculer les instruments par risque de fractures
de stress de la poignée.
• L’utilisation du D.I.S.C ne nécessite pas de lubrification.
• Nettoyer les pierres de céramique une fois de temps en temps
sous l’eau claire à l’aide d’un tampon abrasif doux (sans déter-
gents/agents chimiques).
Un instrumento desconocido
1. Identifique lal superficie cortante del instrumento.
2. Tome el instrumento de forma tal que la punta de este apunte
hacia Ud. y que la porción distal del mango este perpendicular
al piso.
3. Bajar el instrumento hasta que la piedra este en contacto
con la superficie cortante del instrumento (tratar de evitar que
el mango del instrumento este en contacto con la piedra).
Mantenga el instrumento en su posición y gire el compás hasta
que las marcas en el cuerpo del disco queden perfectamente
alineadas con el instrumento. Afilar igual que antes.
4. Si el instrumento tiene dos superficies cortantes, bajar el
instrumento hasta que este perpendicular al piso y a la piedra
(tratar de evitar que el mango del instrumento este en contacto
con la piedra). Mantenga el instrumento en su posición y gire el
compás hasta que las marcas en el cuerpo del disco queden per-
fectamente alineadas con el instrumento. Afilar igual que antes.
Identificar los ángulos apropiados para el instrumento en el
compás y tomar nota para el próximo afilado.
Recuerda estos consejos
• Siempre mantenga el instrumento de forma tal que la punta
de este apunte hacia Ud. y que la porción distal del mango, este
perpendicular al piso.
• Mantenga el mango del instrumento perpendicular a las líneas
en el compás.
• Mientras afila el instrumento, solo la punta debe estar en
contacto con la piedra y tratar de evitar que el mango del instru-
mento este en contacto con la piedra.
• Evitar que la punta del instrumento sea reemplazada, esto
puede causar daño al mango del instrumento.
• No es necesario lubricar el instrumento mientras usa el disco.
• De vez en cuando, limpiar las piedras cerámicas usando una
esponja abrasiva debajo del agua (no usar productos químicos).
1 2 3 4
1 2 3 4 5
1 2 3 4
-
 1
1
-
 2
2


dans d''autres langues
- English: Premier D.I.S.C.
- español: Premier D.I.S.C.
Autres documents
-
EMS Piezon Operation Instructions Manual
-
Yamaha CLP-950 Manuel utilisateur
-
-
Roland EXR-7s Le manuel du propriétaire
-
-
-
Korg D1 Le manuel du propriétaire
-
Korg LP-380U Le manuel du propriétaire
-
Boss TU-88 Le manuel du propriétaire