Worx WG782 Le manuel du propriétaire
- Catégorie
- Tondeuses à gazon
- Taper
- Le manuel du propriétaire

3-in-1 Cordless Lawn Mower EN
Tondeuse à Gazon Sans Fil 3 En 1 F
Cortacesped de Bateria 3 En 1 ES
P07
P17
P28
WG782


1
2
3
4
5
6
7
9
8
11
10
12
13
19

Front
a
Back
I
III
II
a
I
II
b
14
18
A1 A2
B3
B1
B4B2
C2 C3C1
D1 D2C4

I
I
II
Rear
Front
15
3
2
1
90mm (3.5”)
70mm (2.75”)
50mm (2”)
90mm (3.5”)
70mm (2.75”)
50mm (2”)
D3 E1
E4
E2
F1E3
F3 GF2
I JH

16
17
N-1
N-2
N-3
a
b
M-1
M-2
M-3
K L
O1
M
O2N
P2P1

3-in-1 Cordless Lawn Mower EN
7
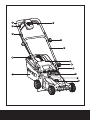
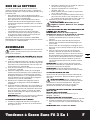
1. UPPER HANDLE
2. SWITCH LEVER
3. CABLE CLIP
4. GRASS BAG FILLING INDICATOR
5. GRASS COLLECTION BAG
6. SAFETY KEY
7. HANDLE KNOBS, UPPER
8. HANDLE KNOBS,LOWER
9. MIDDLE HANDLE
10. LOWER HANDLE
11. SAFETY FLAP
12. BATTERY PACK*
13. MOTOR COVER
14. CHARGER* (See Fig. A1)
15. MULCH PLUG (See Fig. G)
16. BLADE BOLT (See Fig. O1)
17. BLADE (See Fig.O1)
18.
CHARGED INDICATOR LIGHT (See Fig. A2)
19. INTELLICUT DIAL
* Not all the accessories illustrated or
described are included in standard delivery.
TECHNICAL DATA
Power input 24V
Deck diameter 14’’
Cutting diameter 13“
Front wheel diameter 5-1/2"
Rear wheel diameter 5-1/2"
Cutting height positions 2’’, 2.75”, 3.5’’
Grass collection capacity 0.85bushels
Battery type Lead acid
Battery model WA3216
Charging time 6-7hrs
Charger model WA3748
Charger rating
Input: AC 120V~60Hz
Output: 29.5Vdc, 1.0A
Machine weight 33 lbs
ACCESSORY
Battery Pack (WA3216) 1
Charger (WA3748) 1
Mulch Plug 1
Grass Collection Bag 1
Only use the appropriate accessories intended for
this tool. Accessory information can be found on
the product packaging, at a WORX dealer or on our
website at www.worx.com.
SAFETY INSTRUCTIONS
WARNING! Some dust created by power
sanding, sawing, grinding, drilling and
other construction activities contains chemicals
known to the state of California to cause cancer,
birth defects or other reproductive harm.
Some examples of these chemicals are:
• Lead from lead-based paints,
• Crystalline silica from bricks and cement
and other masonry products, and
• Arsenic and chromium from
chemically-treated lumber.
Your risk from these exposures varies,
depending on how often you do this type
of work. To reduce your exposure to these
chemical: work in a well ventilated area,
and work with approved safety equipment,
such as those dust masks that are specially
designed to filter out microscopic particles.
WARNING: This product contains
or emits chemicals known to State
of California to cause cancer and birth
defects or other reproductive harm.
Please wash your hands after use.
WARNING: Battery posts, terminals and
related accessories contain lead and lead
compounds. Wash hands after handling.
READ ALL INSTRUCTIONS
WARNING: When using electric lawn mowers,
basic safety precautions should always be
followed to reduce the risk of fire, electric shock,
and personal injury, including the following:
WARNING: Risk of injury could
occur if the lawn mower is operated
without the catcher assembly attached.
WARNING: the use of any other accessory or
attachment might increase the risk of injury
CAUTION: For battery-operated lawn mowers,
use only identical replacement batteries and
specifying the battery type and manufacturer.
FOR ALL LAWN MOWERS
1) Avoid Dangerous Environment - Don’t use
lawn mowers in damp or wet locations.
2) Don’t Use In Rain.

3-in-1 Cordless Lawn Mower EN
8
3) Keep Children Away - All visitors should
be kept a safe distance from work area.
4) Dress Properly - Do not wear loose clothing
or jewelry. They can be caught in moving
parts. Use of rubber gloves and footwear is
recommended when working outdoors.
5) Use Safety Glasses - Always use face
or dust mask if operation is dusty.
6) Use Right Appliance - Do not use lawn mower
for any job except that for which it is intended.
7) Don’t Force Lawn Mower - It will do the job better
and safer at the rate for which it was designed.
8) Don’t Overreach - Keep proper
footing and balance at all times.
9) Stay Alert - Watch what you are doing.
Use common sense. Do not operate
lawn mower when you are tired.
10) Store Idle Lawn Mower Indoors - When not in
use, lawn mower should be stored in an indoor
dry and locked-up place - out of reach of children.
11) Maintain Lawn Mower With Care - Keep cutting
edges sharp and clean for best and safest
performance. Follow instructions for lubricating
and changing accessories. Keep handles
dry, clean, and free from oil and grease.
12) Keep guards in place and in working order.
13) Keep blades sharp.
14) Keep hands and feet away from cutting area.
15) Objects struck by the lawn mower blade can
cause severe injuries to persons. The lawn
should always be carefully examined and
cleared of all objects prior to each mowing.
16) If lawn mower strikes a foreign
object, follow these steps:
i) Stop lawn mower. Release the switch.
ii) Remove battery pack.
iii) Inspect for damage.
iv) Repair any damage before restarting
and operating the lawn mower.
17) Use identical replacement blades only.
SUPPLEMENT SA-BATTERY-
OPERATED LAWN MOWERS
a) Do not charge lawn mower in
rain, or in wet locations.
b) Do not use battery-operated lawn mower in rain.
c) Remove or disconnect battery before
servicing, cleaning, or removing
material from the lawn mower.
FOR ALL BATTERY-OPERATED
PRODUCTS EMPLOYING A DETACHABLE
OR SEPARABLE BATTERY
a) Use only the following type and
model battery(ies): WA3216
b) Do not dispose of the battery(ies) in a fire.
The cell may explode. Check with local codes
for possible special disposal instructions.
c) Do not open or mutilate the battery(ies). Released
electrolyte is corrosive and may cause damage
to the eyes or skin. It may be toxic if swallowed.
d) Exercise care in handling batteries in order not
to short the battery with conducting materials
such as rings, bracelets, and keys. The battery
or conductor may overheat and cause burns.
FOR A BATTERY-OPERATED LAWN MOWER
EMPLOYING A VENTED WET CELL BATTERY
SUPPLY INTENDED TO BE INITIALLY OR
PERIODICALLY FILLED BY THE USER:
CAUTION: The electrolyte is a dilute sulfuric
acid that is harmful to the skin and eyes.
It is electrically conductive and corrosive. The
following procedures should be observed:
a) Wear full eye protection and protective clothing.
b) If electrolyte contacts the skin, wash
it off immediately with water.
c) If electrolyte contacts the eyes, flush
thoroughly and immediately with
water. Seek medical attention.
IMPORTANT
SAFE PRACTICES FOR WALK-BEHIND MOWERS
I. GENERAL OPERATION
1. Read, understand, and follow all instructions on
the machine and in the manual(s) before starting.
2. Do not put hands or feet near or
under the machine. Keep clear of the
discharge opening at all times.
3. Only allow responsible adults, who are familiar
with the instructions, to operate this machine.
4. Clear the area of objects such as rocks,
wire, toys, etc., which could be thrown
by the blade. Stay behind the handle
when the engine (motor) is running.
5. Be sure the area is clear of bystanders
before operating. Stop machine
if anyone enters the area.
6. Do not operate machine barefooted
or while wearing sandals. Always
wear substantial footwear.
7. Do not pull machine backward unless
absolutely necessary. Always look down and
behind before and while moving backward.
8. Never direct discharged material toward
anyone. Avoid discharging material
against a wall or obstruction. Material may
ricochet back toward the operator. Stop the
blade when crossing gravel surfaces.
9. Do not operate the mower without the entire
Grass Collection Bag, Safety Flap, or other
safety protective devices in place and working.
10. Never leave a running machine unattended.
11. Stop the engine (motor) and wait until the
blade comes to a complete stop before
cleaning the machine, removing grass
catcher, or unclogging the discharge guard.
12. Operate machine only in daylight
or good artificial light.
13. Do not operate machine while under
the influence of alcohol or drugs.
14. Never operate mower in wet grass. Always
be sure of your footing; walk; never run.
15. Disengage the drive system, if so equipped,
before starting the engine (motor).
16. If the machine should start to vibrate
abnormally, stop the engine (motor) and
check for the cause immediately. Vibration

3-in-1 Cordless Lawn Mower EN
9
is generally a warning of trouble.
17. Always wear eye protection
when operating machine.
18. See manufacturer’s instructions for proper
operation and installation of accessories. Only
use accessories approved by the manufacturer.
II. SLOPE OPERATION
Slopes are a major factor related to slip and
fall accidents, which can result in severe injury.
Operation on all slopes requires extra caution. If
you feel uneasy on a slope, do not mow it.
1. Mow across the face of slopes; never
up and down. Exercise extreme caution
when changing direction on slopes.
2. Watch for holes, ruts, bumps, rocks, or other
hidden objects. Uneven terrain could cause a slip
and fall accident. Tall grass can hide obstacles.
3. Do not mow on wet grass or excessively
steep slopes. Poor footing could
cause a slip and fall accident.
4. Do not mow near drop-offs, ditches,
or embankments. You could lose
your footing or balance.
III. CHILDREN
Tragic accidents can occur if the operator is
not alert to the presence of children. Children
are often attracted to the machine and the
mowing activity. Never assume that children
will remain where you last saw them.
1. Keep children out of the mowing area and
under the watchful care of a responsible
adult other than the operator.
2. Be alert and turn mower off if
a child enters the area.
3. Never allow children to operate the machine.
4. Use extra care when approaching blind
corners, shrubs, trees, or other objects
that may block your view of a child.
IV. SERVICE
GENERAL SERVICE
1. Keep all nuts and bolts tight to be sure the
equipment is in safe working condition.
2. Never tamper with safety devices. Check
their proper operation regularly.
3. Keep machine free of grass, leaves,
or other debris build-up.
4. If you strike a foreign object, stop and inspect the
machine. Repair, if necessary, before starting.
5. Never make any adjustments or repairs
with the engine (motor) running.
6. Always unplug electric mowers before
adjusting, cleaning, or repairing.
7. Check grass catcher components and the safety
flap frequently and replace with manufacturer’s
recommended parts, when necessary.
8. Mower blades are sharp. Wrap the
blade or wear gloves, and use extra
caution when servicing them.
9. Maintain or replace safety and
instruction labels, as necessary.
SAFE OPERATION PRACTICES FOR
WALK-BEHIND MOWERS
1. SAFETY INSTRUCTIONS
1.1 Training
a) Read the operating and service instruction
manual carefully. Be thoroughly familiar with the
controls and the proper use of the equipment.
b) Never allow children to operate a power mower.
c)
Keep the area of operation clear of all persons,
particularly small children, and pets.
d) Do not use a mower for any job except
that for which it is intended.
1.2 Preparation
a) Thoroughly inspect the area where the
equipment is to be used and remove all stones,
sticks, wires, bones, and other foreign objects.
b) Do not operate the equipment when
barefoot or wearing sandals. Always
wear substantial footwear.
c) Disengage the self-propelled mechanism
or drive clutch on units so equipped
before starting the motor.
d) Never attempt to make a wheel height
adjustment while the motor is running.
e) Mow only in daylight or in good artificial light.
f) Never operate the equipment on wet grass.
Always be sure of your footing. Keep a firm
hold on the handle and walk, never run.
1.3 Operation
a) Do not put hands or feet near or
under rotating parts. Keep clear of the
discharge opening at all times.
b) Stop the blade(s) when crossing
gravel drives, walks, or roads.
c) After striking a foreign object, stop the motor,
unplug, thoroughly inspect the mower for
any damage, and repair the damage before
restarting and operating the mower.
d) If the equipment should start to vibrate
abnormally, stop the motor and check
immediately for the cause. Vibration
is generally a warning of trouble.
e) Stop the motor and no plug on this motor
whenever you leave the equipment, before
cleaning the mower housing, and before
making any repairs or inspections.
f) Shut the motor off and wait until the blade
comes to a complete stop before removing the
grass catcher or before unclogging the chute.
g) Mow across the face of slopes, never
up and down. Exercise extreme caution
when changing direction on slopes. Do
not mow excessively steep slopes.
h) Never operate the mower without proper guards,
plates, or other safety protective devices in place.
i) Do not wash with a hose, avoid getting
water in motor and electrical connections.
1.4 Maintenance
a) Check the blade and the engine mounting bolts
at frequent intervals for proper tightness.
b) Keep all nuts, bolts, and screws tight to be sure

3-in-1 Cordless Lawn Mower EN
10
the equipment is in safe working condition.
c) Check bag frequently for deterioration and wear,
and replace worn bags. Check that replacement
bags comply with the original manufacturer’s
recommendations or specifications.
d) Replace the blade if it is bent or cracked.
An unbalanced blade causes vibration
that could damage the motor drive
unit or cause personal injury.
e) Sharpen a dull blade equally at each
end to maintain the balance.
f) Clear the blade thoroughly and check its balance
by supporting it horizontally on a thin nail
through its center hole. The nail should also
be in a horizontal position. If either end of the
blade rotates downward, remove some metal
from the heavy or lower end until the blade is
balanced. It is balanced when neither end drops.
SAVE THESE INSTRUCTIONS
GENERAL SAFETY WARNINGS
1)
WARNING: Risk of fire and burns. Do
not disassemble, heat above 100°C
(212°F), or incinerate. Do not expose cells
or batteries to heat or fire. Avoid storage in
direct sunlight.
2) Dispose of used battery promptly..
When disposing of secondary cells
or batteries, keep cells or batteries
of different electrochemical systems
separate from each other.
3) Keep battery out of reach of children and
in original package until ready to use.
4) Never put batteries in mouth. If
swallowed, contact your physician
or local poison control center.
5)
CAUTION – The battery used in this
device may present a risk of fire or
chemical burn if mistreated. Replace battery
with ( WORX ) only. Use of another battery
may present a risk of fire or explosion.
6) WARNING: Do not use a visibly
damaged battery pack or appliance as
applicable.
7)
WARNING: Do not modify or attempt
to repair the appliance or the battery
pack as applicable.
8) BATTERY MUST BE RECYCLED.
9) Do not short-circuit a cell or battery. Do
not store cells or batteries haphazardly
in a box or drawer where they may
short-circuit each other or be short-
circuited by conductive materials.
10) Do not subject cells or batteries
to mechanical shock.
11) Keep cells and batteries clean and
dry. Wipe the cell or battery terminals with
a clean dry cloth if they become dirty.
12) Do not maintain secondary cells and
batteries on charge when not in use.
13) Retain the original cell and battery
literature for future reference.
14) Do not use any charger other than that
specifically provided for use with the
equipment. Secondary cells and batteries
need to be charged before use. Always
use the correct charger and refer to the
manufacturer’s instructions or equipment
manual for proper charging instructions.
15) When possible, remove the battery from
the equipment when not in use.
16) Prevent unintentional starting. Ensure the
switch is in the off-position before connecting
to battery pack, picking up or carrying the
appliance. Carrying the appliance with your
finger on the switch or energizing appliance
that have the switch on invites accidents.
17) Disconnect the battery pack from the appliance
before making any adjustments, changing
accessories, or storing appliance. Such
preventive safety measures reduce the risk
of starting the appliance accidentally.
18) Under abusive conditions, liquid may be
ejected from the battery; avoid contact.
If contact accidentally occurs, flush with
water. If liquid contacts eyes, additionally
seek medical help. Liquid ejected from the
battery may cause irritation or burns.
19) Have servicing performed by a qualified
repair person using only identical
replacement parts. This will ensure that
the safety of the product is maintained.
ADDITIONAL SAFETY RULES
FOR LEAD ACID BATTERY:
1. In the event of a cell leaking, do not allow
the liquid to come into contact with the
skin or eyes. If contact has been made,
wash the affected area with copious
amounts of water and seek medical advice.
2. Under abusive conditions, liquid may be
ejected from the battery; avoid contact.
If contact accidentally occurs, flush with
water. If liquid contacts eyes, additionally
seek medical help. Liquid ejected from
the battery may cause irritation or burns.
3. Working in the vicinity of a lead-acid battery
is dangerous. Batteries generate explosive
gases during normal battery operation. For
this reason it is of the utmost importance that
each time before using your charger, you read
and follow the instructions provided exactly.
4. Never smoke or allow an open spark or
flame in the vicinity of the battery.
5. Use charger for charging a lead-acid battery only.
6. Never place the charger directly above or
below the battery being charged; gases
or fluids from the battery will corrode and
damage the charger. Locate the charger as far
away from the battery as DC cables permit.
7. Do not operate charger in a closed-in
area or restrict ventilation in any way.
8. Battery must be recycled or disposed
of properly. Do not crush, disassemble,
short terminals or dispose in fire; there
is a risk of burns, explosion or fire.
9.
WARNING –For use only with WA3748
charger.

3-in-1 Cordless Lawn Mower EN
11
SYMBOLS CHARGER SAFETY RULES
1. Plug charger directly into an electrical outlet. DO
NOT ABUSE THE CORD. Never carry charger by
cord. Do not disconnect the charger from the
outlet or mower by pulling it by the cord.
2.
CAUTION: To reduce the risk of fire,
electrical shock, or personal injury do not
attempt to use this charger with any other
product. Likewise, do not attempt to charge the
battery with any other charger.
3. Do not service mower with charger or safety key
installed.
4. Do not operate a damaged charger. Replace
damaged cords or charger immediately by
calling the WORX Helpline at 1-866-354-9679.
5. Always charge the mower in a dry area protected
from the weather. Do not expose the mower or
charger to rain. Do not charge in wet locations.
Do not charge mower when temperature is
above 104°F (40°C) or below 41°F (5°C).
6. Keep the mower and charger away from water,
heat sources, (Such as radiators, heaters,
stoves...etc.) flames, or chemicals. Be careful not
to damage the charger cord, by keeping cord
away from sharp edges.
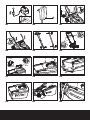
CHARGING PROCEDURE
(See Fig. A1, A2)
1. Charging can be carried out only with the battery
REMOVED from the machine (See Fig. A1).
2. Plug the charger connector into the receptacle on
the battery. (See Fig. A1)
3. Insert the plug of the charger into the wall
receptacle.
4. The light will be red to show the charging
is beginning. The light will turn green when
charging is complete (approximately 6-7hours to
charge a fully discharged mower). (See Fig. A2)
NOTE: If the battery is defective, the red light
will flash.
The lights will only function when the charger
is connected to both the battery and wall
receptacle.
5. Always keep the battery connect with the charger
and the charger is powered on. After the battery
is fully charged, the green light will turn on.
The charger will not switch off and will continue
charging to make sure the capacity stays above
90%.
BATTERY CARE
The battery in your cordless lawnmower is a 24-volt
sealed lead acid system. The battery can be stored in
any position without fear of leakage.
• For optimal battery life and performance the
battery should be fully charged every 2 months
during storage
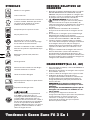
Safety alert
Read the operator’s manual
Blade continues to rotate after the
machine is switched off. Wait until all
machine components have completely
stopped before touching them.
Do not expose to rain or water
Do not burn
Do not dispose of batteries. Return
exhausted batteries to your local
collection or recycling point.
Contains Pb battery. Battery must be
recycled or disposed of properly.
Lead-acid battery, battery must be
recycled.
Slip on slope
Severing of toes or fingers-Rotary
mower blade
Keep bystanders/children away
Thrown objects from mower deck
CPSC Danger label
POSITEC Inc. has established a
partnership with the RBRC Corporation
to recycle any Positec batteries with
the RBRC-call2recycle seal. For
environmental protection, please do not
discard batteries in the trash. After the
batteries’ life cycle is ended, then please
call 1-800-822-8837 for a free service
that will properly dispose of the battery.
KEEP HANDS AND FEET AWAY
GARDER MAINS ET PIEDS À DISTANCE

3-in-1 Cordless Lawn Mower EN
12
• For optimal battery life and performance the
battery should be fully charged after each use
• Store the battery in a cool dry location.
• The battery can be safely stored down to 14°F
(-10°C).
• The battery does not need to be fully discharged
before recharging.
• Initially 2 to 3 charging cycles may be required
after purchase to achieve the maximum run time
capacity.
The battery is maintenance free and requires no
service. ADDITIONAL BATTERIES can be obtained
from the Customer Helpline 1-866-354-9679.
ASSEMBLY
IMPORTANT! Before you assemble the lawn
mower, check the accessories according to the
above information, make sure the accessories are
included and functional.
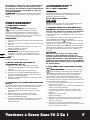
1.FITTING THE HANDLE BAR (See Fig. B1-B4)
1) Remove the screws (a) on both sides of the deck
(See Fig. B1) .
2) Insert the Lower Handle Bar (10) into the holes
on the deck. Be sure to carefully align the screw
holes found on the Lower Handles with the
screws holes found on the deck (a). (See Fig. B1
B2)
3) Secure the Lower Handle Bars to the deck with
the screws provided (See Fig B2) .
4) Attach the Middle Handle (9) to the Lower Handle
with the bolts and Lower Handle knobs (8). After
this is complete, attach the Upper Handle (1)
to the Middle Handle with the bolts and upper
Handle knobs (7) (See Fig. B3).
5) Tightening the Handle Knobs(7/8). Check that the
handles are FULLY secured.
6) First, insert the cable into the Cable Clips (3)
provided ensuring there is enough slack cable
to allow the handlebars to collapse for storage.
After inserting the cable, attach the Cable Clips to
the Upper and Middle Handle bars (See Fig. B4).
NOTE: Make sure the cable is routed underneath
the Middle Handle Bar (See Fig.B4).
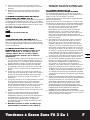
2. GRASS COLLECTION BAG ASSEMBLY
1) Attach the Grass Collection Bag handle to the
grass bag assembly as shown in Fig C1-C4.
a. Identify the front and rear of both the handle
and the Grass Collection Bag(5) assembly (See
Fig. C1).
b. Insert the front portion of the handle into
position (See Fig. C2).
c. Secure the front portion of the handle in place
by pushing it forward (See Fig. C2).
d. Insert and secure the rear portion of the handle
in position by pushing down on the back of the
handle. Ensure that “clicks” into position (See
Fig. C2) .
2) Clip the plastic clips of the Grass Collection Bag
over the metal frame (See Fig. C3) .
WARNING: Make sure to not fit the handle
in the reverse direction as it will not
remain secure. Make sure to fit the handle as
shown in Fig C4.
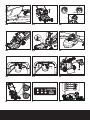
3. ATTACHING THE GRASS BAG TO THE
MOWER (See Fig. D1, D2, D3)
NOTE: The grass bag is held in place by the
Safety Flap.
1. Switch the mower off, remove the Safety Key (6)
and wait until the mower Blade (17) has stopped.
2. Raise the Safety Flap (11) and hold it in the
upward position while the Grass Collection Bag
(5) is properly located below it (See Fig. D1).
3. Position the lower edge of the Grass Collection
Bag on the plastic tabs (b) found below the rear
discharge chute on the mower deck. (See Fig.
D2).
4. While holding the Grass Collection Bag in
position lower the safety flap into its’ final
position. It should rest on top of the grass bag
with the tabs of the Grass Collection Bag being
inserted into the Safety Flap. Ensure the Safety
Flap locks securely into position with the Grass
Collection Bag (See Fig. D3) .
NOTE: The two parts should smoothly slide
together with little force. They WILL NOT “click”
together.
NOTE: Press down on the Grass Collection Bag
slightly to ensure that it is completely installed.
4. REMOVING/EMPTYING THE GRASS
COLLECTION BAG
1) Switch the mower off, remove the Safety Key (6)
and wait until the mower blade has stopped.
2) Hold the grass bag handle.
3) Raise the Safety Flap (11) upward and hold it in
the upward position until the Grass Collection
Bag is removed (See Fig. D1).
WARNING! Before each use, always check that
the safety flap closes securely over the rear
discharge chute. Never lift the Safety Flap when the
lawn mower is in operation. The Blade(17) must be
completely at rest before handling the safety flap.
5. FITTING/REMOVING THE BATTERY PACK
(See Fig. E1, E2, E3, E4)
REMOVING BATTERY PACK (12)
1) While gripping the battery handle lift it upward
without twisting or turning it (See Fig. E1) .
FITTING BATTERY PACK
1)
Locate the front and rear of the battery (See Fig. E2).
2)
Lower the battery into position. (See Fig. E3).
NOTE: For a secure fit, make sure the
battery tray is free of debris and the
contacts on the battery and in the battery
tray are clean (use a dry cloth to clean)
(See Fig. E4).
NOTE: When fitting or removing the battery be
careful not to drop the battery onto your foot or the
ground.

3-in-1 Cordless Lawn Mower EN
13
OPERATION
1. STARTING AND STOPPING
(See Fig. F1, F2, F3)
WARNING! The Blade(17) continues to rotate
for a few seconds after the machine is switched
off. Allow the motor/blade to stop rotating before
switching “on” again. Do not rapidly switch off and
on.
STARTING
1) Insert Safety Key (6) into the housing of the
switch box (See Fig. F1) .
2) Slide the Safety Key to the right and hold in
position (See Fig. F2) .
3) Pull the Switch Lever(2) towards the handle bar
and the mower will start (See Fig. F3) .
4) Release the Safety Key and begin mowing.
NOTE: The Safety Key will stay in the “on” position as
long as the operator holds the lever tightly against the
handlebar.
STOPPING
Release the Switch Lever and remove the Safety Key.
2. INSTALLING MULCH PLUG (15) (See Fig. G)
1) Turn the mower off, wait until the blade stops and
remove the Safety Key (6).
2) Raise the Safety Flap and hold it up.
3) Slide the mulching insert into the discharge
opening until it is firmly in contact with the deck.
4) Release Safety Flap and ensure it is properly
closed.
3.
REMOVING MULCH PLUG(15) (See Fig. G)
Remove the mulch plug when you desire to either
collect grass or discharge grass from the rear of the
mower.
1) Shut the mower off, wait until the blade stops
and remove the Safety Key (6).
2) Raise the Safety Flap (11) and hold it in the up
position.
3) Grasp the handle on the Mulch Plug then lift
upward and pull it out.
4) Release the Safety Flap and ensure it is properly
closed.
4. INTELLICUT CUTTING MODE DIAL
SELECTION (See Fig. H)
QUIET MODE
Set the IntelliCut Dial (19) to QUIET mode when
mowing in everyday conditions, removing
approximately 1 inch of grass at a time.
POWER MODE
Set the IntelliCut Dial to POWER mode when cutting
dense or overgrown grass.
5. BATTERY STATUS LED’S (See Fig. I)
NOTE: The Power Level will indicate the battery
condition when the button on the battery is
pressed.
The Power Level Lights display the battery condition
as follows:
Press the button “POWERTEST”, the power level
light(s) will illuminate.
When the three green lights are illuminated, the
Battery Pack (12) is in a highly charged condition.
When two lights (
) are illuminated, the battery is
in a moderately charged condition.
When only one green light (
) is illuminated, the
battery charge is very low and should be recharged .
Before using your new mower for the first time, it is
recommended that the unit be charged overnight to
ensure that the battery is fully charged.
IMPORTANT
When only one light is illuminated, your battery
is discharged, even though the mower may
still be capable of cutting grass. Continuing to
operate your lawnmower with the battery in
this discharged condition may reduce the life
and performance of your battery.
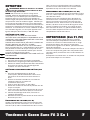
6. ADJUSTING THE CUTTING HEIGHT (See Fig. J)
WARNING! Before adjusting the mower
height, wait for the mower to completely stop.
Mower blades continue to rotate after the machine
is switched off and a rotating blade can cause injury.
Wait until all machine components have completely
stopped before touching them.
• The mower was shipped at the lowest cut height
setting.
• Before your first use of the mower make sure the
cut height is adjusted..
• The lawnmower can be set to 3 cut heights: 2”,
2.75”, and 3.5”.
• Adjust one wheel at a time.
• Remove the Battery Pack (12).
• Turn mower onto its left side (See Fig. J)
1) Grip the wheel and pull or push it forward.
2) Make sure to pull it forward far enough that it
is able to be move up and/or down in the wheel
bracket.
3) With the wheel in its most forward position slide
it up or down into the desired position.
4) Repeat the above steps to all four wheels.
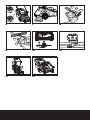
7. GRASS BAG FILLING INDICATOR(4) (See Fig. K)
To alert you that the Grass Collection Bag(5) is full,
the mower provides a Grass Collection Bag Filling
Indicator on the top of the bag.
Empty status: flap floats (a)
Fully status: flap falls down (b)
8. REAR DISCHARGE (See Fig. L)
The mower provides a rear discharge function, so that

3-in-1 Cordless Lawn Mower EN
14
you can mow collecting or mulching the grass. Grass
clippings will be discharged from the rear chute of the
mower and exit below the Safety Flap(11).
9. MOWING TIPS
WARNING: Always inspect area where
mower is to be used and remove all
stones, sticks, wire, metal and other debris
which might be thrown by the rotating blade.
1) Mow across the face of slopes, never up-and-
down. Exercise extreme caution when changing
direction on slopes. Do not mow excessively
steep slopes. Always maintain good footing.
2) Release Switch Lever(2) to turn mower “OFF”
when crossing any graveled area (stones can be
thrown by the blade).
3) Set mower at highest cutting height when
mowing in rough ground or in tall weeds.
Removing too much grass at one time can cause
circuit breaker to trip, which stops mower.
4) If a Grass Collection Bag (5) is used during the
fast growing season, the grass may tend to clog
up at the discharge opening. Release Switch
Lever to turn the mower “OFF” and remove the
Safety Key(6). Remove the Grass Collection Bag
and shake the grass down to the back end of the
bag. Also clean out any grass or debris which
may be packed around the discharge opening.
Replace the Grass Collection Bag.
5) If mower should start to vibrate abnormally,
release Switch Lever to turn the mower “OFF”
and remove the Safety Key. Check immediately
for cause. Vibration is a warning of trouble. Do
not operate mower until a service check has been
made.
6. Always release switch lever to turn mower
“off” and remove safety key when leaving
it unattended even for a short period of
time.
10. MULCHING MOWING TIPS
While mulching, your new mower is designed
to cut the grass clippings into small pieces and
distribute them back into the lawn. Under normal
conditions, the mulched grass will biodegrade quickly
to provide nutrients to the lawn. Please review the
following recommendations for optimum mulching
performance.
1) Avoid mowing when the grass is wet from rain or
dew. Wet grass may form clumps which interfere
with the mulching action and reduce runtime. The
best time to mow grass is in the late afternoon
when the grass is dry and the newly cut area will
not be exposed to direct sunlight.
2) For best mulching performance, set the cutting
height to remove about one third of the grass
blade length, ideally no more than 1.5” inches
at one time. If the lawn is overgrown, it may be
necessary to increase the cut height to reduce
the pushing effort and prevent overloading
the motor. For extremely heavy mulching, it is
advisable to first cut at a high cut height setting,
and then re-cut to the final cut height. Otherwise,
make narrower cuts and mow slowly.
3) For best performance, keep the mower housing
free of built-up grass. From time to time turn
off mower and wait for the blade to come to a
complete stop. Then unplug the Safety Key (6)
and turn mower on its side. Using an object such
as a stick, wipe out any accumulation of grass
in the blade area. Be careful of the sharp edges
of the blade. Clean often in wet, new grass, and
always after every use.
4) Certain types of grass or grass conditions may
require that an area be mulched a second time
to fully disperse the grass throughout the lawn.
If cutting a second time, it is advisable to cut
perpendicular (across) the first cut pattern. DO
NOT CHANGE CUT PATTERN IN ANY WAY THAT
WOULD CAUSE MOWING DOWN AHILL.
5) Change your cutting pattern from week to week.
This will help prevent matting and graining of the
lawn.
MAINTENANCE
WARNING: Stop the mower and remove
the safety key before removing the grass
bag.
NOTE: To ensure long and reliable service, perform
the following maintenance procedures regularly.
Check for obvious defects such as a loose, dislodged
or a damaged blade, loose fittings, and worn or
damaged components. Check that the covers and
guards are all undamaged and are correctly attached
to mower. Carry out any necessary maintenance or
repairs before operating mower. If the mower should
happen to fail despite regular maintenance, please
call our customer helpline for advice , 1-866-354-9679.
BLADE (17) SHARPENING
KEEP BLADE SHARP FOR BEST MOWER
PERFORMANCE. A DULL BLADE DOES NOT CUT
GRASS CLEANLY OR MULCH PROPERLY.
WEAR PROPER EYE PROTECTION WHILE REMOVING,
SHARPENING, AND INSTALLING BLADE. ENSURE
THAT SAFETY KEY IS REMOVED.
Sharpening the blade twice during a mowing season
is usually sufficient under normal circumstances.
Sand causes the blade to dull quickly. If your lawn
has sandy soil, more frequent sharpening may be
required.
REPLACE BENT OR DAMAGED BLADE IMMEDIATELY.
WHEN SHARPENING THE BLADE:
1. Make sure blade remains balanced.
2. Sharpen blade at the original cutting angle.
3. Sharpen cutting edges on both ends of blade,
removing equal amounts of material from both
ends.
TO SHARPEN BLADE IN A VISE (See Fig. M)
1. Be sure the Switch Lever(2) is released, the blade
has stopped and the Safety Key(6) removed
before removing the blade.

3-in-1 Cordless Lawn Mower EN
15
2. Remove Blade from mower. See instructions for
removing and attaching blade.
3. Secure Blade See Fig. M-1.
4. Wear safety glasses and gloves and be careful
not to cut yourself.
5. Carefully file the cutting edges of the blade with a
fine tooth file See Fig. M3 or sharpening stone.
6. Check balance of blade. See instructions for Blade
balancing.
7. Replace Blade on mower and tighten securely.
Refer to instructions below.
BLADE BALANCING (See Fig. N)
Check balance of blade by placing center hole in blade
See Fig. N1 over a nail or screwdriver shank See
Fig. N2, clamped horizontally in a vise See Fig. N3. If
either
end of the blade rotates downward, file that end. The
blade is properly balanced when neither end drops.
BLADE MAINTENANCE (See Fig. O1, O2)
Replace your metal Blade(17) after 50 hours mowing
or 2 years, which ever is the sooner-regardless of
condition.
Follow these procedures to remove and replace the
blade. You will need garden gloves (not provided)
and a spanner wrench (not provided) to remove the
blade. Hold the Blade and unscrew the Blade Bolt
(16) counter-clockwise using a spanner wrench, and
then remove blade.
To re-assemble, position the Blade with the cutting
edges towards the ground. Then securely tighten the
Blade Bolt.
STORAGE: (See Fig. P1, P2)
Stop the mower and always remove the safety key.
Clean the exterior of the machine thoroughly using
a soft brush and cloth. Do not use water, solvents or
polishes. Remove all grass and debris, especially from
the ventilation slots.
Turn the machine on its side and clean the blade area.
If grass cuttings are compacted in the blade area,
remove with a wooden or plastic implement.
Store the mower in a dry place. Do not place other
objects on top of the mower.
To aid storage, release the Handle knobs, and rotate
or fold the Upper Handle forward.

1716
3-in-1 Cordless Lawn Mower EN
16
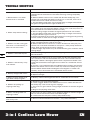
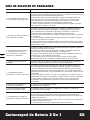
TROUBLE SHOOTING
Problem Solution
1. Mower doesn’t run when
Switch Lever is activated.
A. Check to make sure that the Safety Key has been installed and is fully
seated and that the button on the switch housing is being completely
pushed.
B. Release Switch Lever to turn mower off. Remove Safety Key, turn
mower over and check that blade is free to turn. If not free, return to an
authorized servicer. Blade should turn freely.
C. Has the Battery Pack been fully charged? Plug in charger and wait for
the green Charged Indicator Light to come on.
2. Motor stops while mowing.
A. Release the Switch Lever to turn mower off. Remove the Safety Key,
turn mower over and check that blade is free to turn. If not free, return to
an authorized servicer. Blade should turn freely.
B. Raise cutting height of wheels to highest position and start mower.
C. Has the Battery Pack been fully charged? Plug in charger and wait for
Charged Indicator Light to come on.
D. Avoid overloading the mower. Slow down the cutting pace by pushing
mower slower or raise the cut height. Or both.
3. Mower runs but cutting per-
formance is unsatisfactory, or
does not cut entire lawn.
A. Has the Battery Pack been fully charged? Plug in charger and wait for
green Charged Indicator Light to come on.”
B. Release the Switch Lever to turn mower off. Remove safety key. Turn
mower over and check the blade for sharpness - always keep the blade
sharp. Deck and discharge chute for clogging.
C. Wheel height adjustment may be set too low for grass condition. Raise
cutting height.
4. Mower is too hard to push.
A. Raise cutting height to reduce deck drag on grass. Check each wheel
for free rotation.
5. Mower is abnormally noisy
and vibrates.
A. Release the Switch Lever to turn mower off. Remove the Safety Key.
Turn mower on side and check blade to ensure it has not been bent or
damaged. If blade is damaged, replace with a replacement blade. If the
underside of the deck is damaged return mower to a authorized service
center.
B. If there is no visible damage to the blade and the mower still vibrates:
Release the Switch Lever to turn mower off, remove the Safety Key and
remove blade. Rotate blade 180 degrees and retighten. If mower still
vibrates, return the mower to an authorized service center.
6. Battery charger LED not on.
A. Check plug connection.
B. Replace charger.
7. Battery charger power level
light does not flip to green.
A. Battery needs to be diagnosed. Take to authorized service center.
8. Mower not picking up
clippings with bag.
A. Remove mulch plate when bagging.
B. Chute clogged. Release The Switch Lever to turn mower off. Remove
the Safety Key. Clear chute of grass clippings.
C. Too much cut grass. Raise cutting height of wheels to shorten length of
the cut.
D. Bag full. Empty bag more often.
9. When mulching there are
clippings visible.
A. Too much cut grass. Raise cutting height of wheels to shorten length of
the cut. Do not cut off more than 1/3 of total length.
B. Check blade for sharpness. Always keep blade sharp.
10. Low or diminished run-time
after many uses
A. Return to Authorized Service location - may need new battery.

Tondeuse à Gazon Sans Fil 3 En 1 F
1716
1. POIGNÉE SUPÉRIEURE
2. LEVIER DU COMMUTATEUR
3. SERRE-CÂBLES
4. TÉMOIN DE REMPLISSAGE DU BAC DE
RAMASSAGE DE L’HERBE
5. SAC À HERBE
6. CLÉ DE SÉCURITÉ
7. MOLETTE DE POIGNÉE, SUPÉRIEURE
8. MOLETTE DE POIGNÉE, INFÉRIEURE
9. CADRE INTERMÉDIAIRE
10. POIGNÉE INFÉRIEURE
11. BAVETTE DE SÉCURITÉ
12. BLOCS*
13. COUVERCLE DU MOTEUR
14. CHARGEUR*(Voir A1)
15. DISPOSITIF DE PAILLAGE (Voir G)
16. BOULON DE LA LAME (Voir O1)
17. LAME (Voir O1)
18. TÉMOIN LUMINEUX VERT (Voir A2)
19. COMMUTATEUR DE MODE DE
FONCTIONNEMENT
* Les accessoires illustrés ou décrits ne sont
pas tous compris dans le cadre de la livraison
standard.
DONNÉES TECHNIQUES
Puissance assignée 24V
Diamètre du châssis 35cm(14po)
Diamètre de coupe 33cm(13po)
Diamètre des roues avant 140mm(5-1/2po)
Diamètre des roues arrière 140mm(5-1/2po)
Hauteur de coupe, nombre
de hauteurs de coupe
50,70,90mm
(2po,2.75po,3.5po)
Capacité de cueillette de
gazon
30L(0.85 boisseaux)
Type de batterie au plomb
Modèle de batterie WA3216
Temps de recharge normal 6-7hrs
Modèle de chargeur WA3748
Valeurs nominales du
chargeur
entrée: 120V~60Hz
sortie: 29.5Vdc, 1.0A
Poids de la machine 15kg (33 lbs)
ACCESSOIRES
Blocs-piles(WA3216) 1
Chargeur (WA3748) 1
Dispositif de déchiquetage 1
Sac à herbe 1
N’utilisez que les accessoires compatibles à cet
outil. Les informations des accessoires peuvent être
trouvées sur l’emballage du produit, chez un détaillant
WORX ou sur notre site Web www.worx.com.
CONSIGNES DE SÉCURITÉ
AVERTISSEMENT! Des produits
chimiques connus de l’état de Californie
pour causer des cancers et des anomalies
congénitales ou autre trouble reproductif. Voici
des exemples de ces produits chimiques:
• Plomb issu de peinture à base de plomb.
• Silice crystalline issue de briques et du
ciment et autres produits de maçonnerie.
• Arsenic et chrome issus de bois
traité chimiquement.
Votre risque de ces expositions varie en
fonction de la fréquence à laquelle vous
effectuez ce travail. Pour réduire votre
exposition à ces produits chimiques:
travaillez dans une zone bien ventilée;
portez un équipement de sécurité approuvé,
tel que des masques antipoussières
spécialement conçus pour éliminer les
particules microscopiques par filtrage.
AVERTISSEMENT! Ce produit peut
contenir du plomb, des phtalates ou
d’autres agents chimiques connus dans
l’État de Californie pour causer le cancer,
des malformations congénitales et d’autres
problèmes lies à la reproduction. Lavez
vos mains après chaque utilisation.
AVERTISSEMENT! Les bornes, plots et
accessoires de connexion de la batterie
contiennent du plomb et des composés de
plomb. Se laver les mains après manipulation.

Tondeuse à Gazon Sans Fil 3 En 1 F
1918
LISEZ ET ASSIMILEZ
TOUTES LES
INSTRUCTIONS
AVERTISSEMENT! Lors de l’utilisation
d’appareils électriques de jardinage, des
précautions de base doivent être observées afin
de réduire les risques de feu, choc électrique, et
blessure grave, incluant ce qui suit:
AVERTISSEMENT! L’emploi de la tondeuse
sans sac de ramassage peut provoquer des
risques de blessure.
AVERTISSEMENT! L’emploi de tout autre
accessoire ou dispositif est susceptible
d’augmenter les risques de blessure.
AVERTISSEMENT! Pour les tondeuses à
batterie, ne remplacez la batterie que par un
modèle de remplacement identique, du même type
et du même fabricant.
POUR TOUTES LES TONDEUSES À GAZON
1) Évitez les environnements dangereux.-N’utilisez
pas les appareils dans des endroits très humides
ou mouillés.
2) N’utilisez pas sous la pluie.
3) Tenez les enfants éloignés.-Tous les visiteurs
devraient être tenus éloignés de l’aire de travail.
4) Habillez-vous convenablement.-Ne portez
pas des vêtements lousses ou des bijoux.
Ils peuvent se prendre dans des pièces en
mouvement. L’utilisation de gants de caoutchouc
et chaussures épaisses est recommandée lors de
travaux extérieurs. Portez une protection pour
cheveux afin de contenir les cheveux longs.
5) Utilisez des lunettes de sécurité.-Toujours
porter un masque de visage ou de poussière si
l’opération est poussiéreuse.
6) Utilisez le bon appareil.-N’utilisez pas l’appareil
pour tout autre travail que pour celui auquel il
est destiné.
7) Ne forcez pas l’appareil-Il va faire un meilleur
travail et avec moins de risques de blessure en
travaillant au taux de charge pour lequel il a été
conçut.
8) N’essayez pas d’utiliser l’appareil hors de votre
portée normale.-Gardez votre équilibre et les
pieds bien ancrés en tout temps.
9) Restez alerte.-Faites attention à ce que vous
faites. Utilisez le bon sens. N’utilisez pas
l’appareil lorsque vous êtes fatigué.
10) Entreposez à l’intérieur les appareils qui ne
sont pas utilisés.-Lorsqu’inutilisés, les appareils
devraient êtres entreposés à l’intérieur dans un
endroit sec, élevé et gardé sous clef, hors de la
portée des enfants.
11) Entretenez les appareils avec soins.-Gardez les
arêtes de coupe aiguisées et propres pour une
meilleure performance et des risques réduits de
blessure. Suivez les instructions pour lubrifier
et changer les accessoires. Gardez les poignées
sèches, propres, et libres d’huile et graisse.
12) Maintenez les gardes en place et en bon ordre
de fonctionnement.
13) Gardez les lames aiguisées.
14) Gardez les mains et les pieds hors de l’aire
de coupe. Les objets frappés par la lame de la
tondeuse à gazon peuvent causer des blessures
graves aux gens.
15) Les objets frappés par la lame de la tondeuse à
gazon peuvent causer des blessures graves aux
gens. La pelouse devrait toujours être examinée
avec soin et débarrassée de tous objets avant
chaque tonte.
16) Si la tondeuse à gazon frappe un corps étranger,
suivez ces étapes:
i) Arrêtez la tondeuse à gazon. Relâchez le
commutateur.
ii) Retrait du bloc de batterie.
iii) Inspectez pour dommages possibles.
iv) Réparez tout dommage avant de redémarrer
et d’opérer la tondeuse à gazon.
17) Utilisez seulement des lames identiques de
remplacement.
INSTRUCTIONS DE SÉCURITÉ POUR LES
TONDEUSES À BATTERIE
a) Ne rechargez pas la tondeuse sous la pluie ou
dans un endroit humide.
b) N’utilisez pas la tondeuse à batterie sous la
pluie.
c) Retirez ou débranchez la batterie avant
d’effectuer une opération de maintenance, de
nettoyage ou avant de démonter la tondeuse.
POUR TOUS LES APPAREILS FONCTIONNANT
SUR BATTERIES, EMPLOYEZ UNE BATTERIE
AMOVIBLE OU SÉPARABLE:
a) N’utilisez que ce type de batterie: WA3216.
b) Ne jetez pas la batterie au feu. Les cellules
pourraient en effet exploser. Vérifiez les
réglementations locales pour connaître les
instructions de recyclage.
c) Ne tentez pas de démonter ou de modifier
la batterie. L’électrolyte qui se trouve dans la
batterie est corrosive et peut être dangereuse
pour la peau et pour les yeux. Elle peut
également être toxique si avalée.
d)
Faites toujours très attention en manipulant la
batterie afin de ne pas la mettre en court-circuit
avec des matériaux conducteurs, comme une
bague, un bracelet, ou des clefs. La batterie et
le conducteur risqueraient de surchauffer et de
causer des brûlures.
POUR LES TONDEUSES À GAZON ÉQUIPÉES
D’UNE BATTERIE LIQUIDE VENTILÉE CONÇUE
POUR ÊTRE REMPLIE AU DÉPART OU DE
MANIÈRE PÉRIODIQUE PAR L’UTILISATEUR:
ATTENTION: L’électrolyte est un acide
sulfurique dilué qui peut être dangereux
pour la peau et pour les yeux. C’est un conducteur
électrique et il est corrosif. Observez les procédures
de sécurité suivantes:
a) Portez des lunettes et des vêtements de
protection.

Tondeuse à Gazon Sans Fil 3 En 1 F
1918
b) Si l’électrolyte venait en contact avec la peau,
lavez immédiatement à l’eau claire.
c) Si l’électrolyte venait en contact avec les yeux,
rincez immédiatement et abondamment à l’eau
claire. Consultez un médecin sans tarder.
IMPORTANT
INSTRUCTIONS DE SÉCURITÉ POUR LES
TONDEUSES POUSSÉES
I. FONCTIONNEMENT GÉNÉRAL
1. Lisez, comprenez et suivez toutes les instructions
concernant la machine et contenues dans le(s)
manuel(s) avant de démarrer.
2. Ne placez pas les mains ou les pieds à proximité
de la machine ou en dessous. Restez à distance
de l’ouverture d’éjection à tout instant.
3. N’autorisez que des adultes responsables qui
sont familiers avec les instructions à opérer cette
machine.
4. Dégagez la zone d’objets comme des pierres,
des câbles ou des jouets, etc… , qui pourraient
être propulsés par la lame. Restez derrière la
poignée quand le moteur tourne.
5. Assurez-vous qu’il n’y a pas de spectateurs dans
la zone avant l’opération. Arrêtez la machine si
quelqu’un pénètre dans la zone.
6. N’opérez pas la machine pieds nus ou si
vous portez des sandales. Portez toujours des
chaussures robustes.
7. Ne tirez pas la machine en arrière, à moins
que ce soit indispensable. Regardez toujours
vers le bas et en arrière avant et pendant un
déplacement en arrière.
8. Ne dirigez jamais les matériaux éjectés vers
quelqu’un. Évitez d’éjecter des matériaux contre
un mur ou un obstacle. Les matériaux peuvent
ricocher sur l’opérateur. Arrêtez la lame lorsque
vous traverser des surfaces de gravier.
9. N’opérez pas la machine sans le ramasse-herbe,
la chicane de décharge, la protection arrière
ou autres dispositifs de protection de sécurité
complets en place et en fonctionnement.
10. Ne laissez jamais une machine fonctionner sans
surveillance.
11. Arrêtez le moteur et attendez que la lame
s’arrête totalement avant de nettoyez la machine,
de retirer le ramasse-herbe ou de dégager la
chicane de décharge.
12.
Opérez la machine à la lumière du jour ou sous
un bon éclairage artificiel uniquement.
13. N’opérez pas la machine lorsque vous êtes sous
l’influence d’alcool ou de médicaments.
14. N’opérez jamais la tondeuse dans de l’herbe
humide. Soyez toujours sûr(e) de votre appui ;
marchez, ne courez jamais.
15. Débrayez le système d’entraînement, s’il y a,
avant de démarrer le moteur.
16. Si la machine se met à vibrer de manière
anormale, arrêtez le moteur et vérifiez
immédiatement la cause. Les vibrations
indiquent généralement un problème.
17. Portez toujours une protection pour les yeux
quand vous opérez la machine.
18. Consultez les instructions du fabricant pour
installer et opérer les accessoires de manière
appropriée. N’utilisez que les accessoires
approuvés par le fabricant.
II. FONCTIONNEMENT DANS UNE PENTE
Les pentes constituent un facteur majeur d’accidents
par glissage et par chute, ce qui peut entraîner des
blessures graves. Opérer dans des pentes exige une
prudence extrême. Si vous ne vous sentez pas à
l’aise dans une pente, ne la tondez pas.
1. Tondez la surface des pentes transversalement,
jamais de haut en bas ou vice-versa. Soyez
extrêmement vigilent(e) lorsque vous changez
de sens dans des pentes.
2. Faites attention aux trous, ornières, bosses,
pierres ou autres objets dissimulés. Un terrain
inégal peut entraîner un accident par glissade
et par chute. L’herbe haute peut dissimuler des
obstacles.
3. Ne tondez pas de l’herbe humide ou dans des
pentes excessivement raides. De mauvaises
chaussures peuvent entraîner un accident par
glissade et par chute.
4. Ne tondez pas à proximité de fossés, de rigoles
ou de remblais. Vous pourriez perdre appui ou
perdre l’équilibre.
III. ENFANTS
Des accidents graves peuvent survenir si l’opérateur
n’est pas alerté de la présence d’enfants. Les enfants
sont souvent attirés par la machine et par l’activité de
tonte. Ne supposez jamais que des enfants resteront
au dernier endroit où vous les avez vus.
1. Gardez les enfants à distance de la zone de tonte
et sous la surveillance d’un adulte responsable
autre que l’opérateur.
2. Soyez alerté(e) et éteignez la tondeuse si un
enfant pénètre dans la zone.
3. Ne laissez jamais les enfants opérer la machine.
4. Soyez extrêmement prudent(e) lorsque vous
vous approchez de tournants sans visibilité,
d’arbustes, d’arbres ou autres objets qui
pourraient vous empêcher de voir la présence
d’un enfant.
IV. ENTRETIEN
1. Gardez tous les écrous et les boulons serrés
pour être certain(e) que l’état de marche de
l’équipement est sécurisé.
2. N’altérez jamais des dispositifs de sécurité.
Vérifiez régulièrement qu’ils fonctionnent
correctement.
3. Ne laissez pas d’herbe, de feuilles ou autres
débris s’accumuler dans la machine.
4. Si vous heurtez un objet étranger, arrêtez la
machine et inspectez-la. Le cas échéant, effectuez
une réparation avant de démarrer.
5. Ne procédez jamais à des réglages ou des
réparations avec le moteur en fonctionnement.
6. Débranchez toujours les tondeuses électriques
avant d’effectuer un réglage, un nettoyage ou
une réparation.

Tondeuse à Gazon Sans Fil 3 En 1 F
2120
7. Vérifiez fréquemment les composants du
ramasse-herbe et la chicane de décharge et
remplacez-les avec des pièces recommandées
par le fabricant lorsque c’est nécessaire.
8. Les lames de la tondeuse sont très coupantes.
Emballez-les ou portez des gants et soyez
extrêmement prudent(e) lorsque vous effectuez
une procédure d’entretien sur les lames.
9. Maintenez ou remplacez les étiquettes de
sécurité et de consignes selon les besoins.
PRATIQUES SÉCURITAIRES POUR LES
TONDEUSES POUSSÉES
1. CONSIGNES DE SÉCURITÉ
1.1 Entraînement
a) Lisez attentivement le manuel d’instructions
d’utilisation et d’entretien. Familiarisez-vous
avec les commandes et l’utilisation adéquate de
l’appareil.
b) Ne laissez jamais un enfant utiliser une tondeuse
à moteur.
c) Tenez toutes les personnes, en particuliers les
jeunes enfants, ainsi que les animaux, à distance
de votre lieu de travail.
d) N’utilisez une tondeuse que pour l’utilisation
pour laquelle elle a été conçue.
1.2 Préparation
a) Inspectez attentivement la zone où vous
passerez la tondeuse, et retirez les pierres,
bâtons, câbles, os et autres objets.
b) N’employez jamais la tondeuse pieds nus ou
en ne portant que des sandales. Portez toujours
une paire de souliers qui vous protègent
suffisamment.
c) Débrayez le système d’entraînement, s’il y a,
avant de démarrer le moteur.
d) Ne tentez jamais d’ajuster la hauteur des roues
alors que le moteur tourne.
e) Utilisez l’outil uniquement à la lumière du jour
ou sous un éclairage artificiel approprié.
f) N’opérez jamais la tondeuse dans de l’herbe
humide. Assurez-vous toujours de vous tenir
fermement sur vos pieds. Tenez fermement la
poignée, et marchez ; ne courrez jamais.
1.3 Opération
a) Ne mettez pas les mains ou les pieds près de ou
sous les pièces rotatives de l’appareil. Ne restez
jamais à proximité de la zone d’évacuation.
b) Arrêtez la/les lame(s) lorsque vous traversez une
allée, un chemin ou une route pleine de gravier.
c) Après avoir heurté un objet, arrêtez le moteur,
débranchez la prise électrique, inspectez
soigneusement la tondeuse et assurez-vous
qu’elle n’est pas endommagée, puis réparez les
dommages, le cas échéant, avant de redémarrer
et d’utiliser la tondeuse.
d) Si l’appareil commence à vibrer de façon
anormale, arrêtez le moteur et tentez
immédiatement d’en déceler la cause. Les
vibrations indiquent généralement qu’un
problème existe.
e) Arrêtez le moteur chaque fois que vous quittez
l’appareil, et également avant de réparer ou
d’inspecter l’appareil.
f) Arrêtez le moteur et attendez que la lame
s’arrête complètement avant de retirer l’herbe
coincée dans le sac de ramassage ou avant de
déboucher la chute d’évacuation.
g) Tondez en traversant les pentes dans le sens de
la longueur, jamais de haut en bas ou de bas en
haut. Soyez extrêmement prudent lorsque vous
changez de direction dans une pente. Ne tondez
pas sur des pentes trop abruptes.
h) N’utilisez jamais la tondeuse si celle-ci n’est
pas équipée des dispositifs de protection et des
plaques correspondantes.
i) Ne lavez pas l’appareil à l’aide d’un tuyau ; évitez
que l’eau ne pénètre dans le moteur et au niveau
des connexions électriques.
1.4 Entretien
a) Vérifiez de façon périodique que la lame soit
bien serrée.
b) Assurez-vous que tous les écrous, boulons et vis
sont bien serrés afin que l’appareil fonctionne en
toute sécurité.
c) Vérifiez régulièrement le sac de ramassage
de l’herbe et assurez-vous qu’il n’est pas
endommagé ou usé. Remplacez-le le cas
échéant. Vérifiez que le sac de remplacement
est conforme aux recommandations ou aux
spécifications du fabricant.
d) Remplacez la lame si elle est courbée ou fendue.
Une lame déséquilibrée fera vibrer le système
d’entraînement du moteur ou pourra causer des
blessures.
e) Aiguisez les lames émoussées de manière égale
à chaque extrémité pour en préserver l’équilibre.
f) Nettoyez adéquatement la lame et vérifiez
qu’elle est bien équilibrée en la posant à
l’horizontale sur un clou placé dans son trou
central. Le clou doit également être placé à
l’horizontale. Si l’une des extrémités de la lame
penche vers le bas, meulez un peu de métal du
côté qui penche vers le bas, jusqu’à ce que la
lame soit bien équilibrée. La lame est équilibrée
lorsqu’aucune extrémité ne s’abaisse.
CONSERVEZ CES INSTRUCTIONS
CONSIGNES GÉNÉRALES DE SÉCURITÉ
CONCERNANT LA BATTERIE
1)
AVERTISSEMENT: Risque d’incendie et
de brûlures. Ne démontez pas, ne
chauffez pas à une température supérieure
à 100°C (212°F) et n’incinérez pas
l’appareil. N’exposez pas les piles
cellulaires ou la batterie à la chaleur ou au
feu. Evitez de ranger la batterie dans un
endroit exposé à la lumière directe du
soleil.
2) Jetez rapidement les piles usagées. Lors
de l’élimination des piles cellulaires ou
des batteries, gardez les piles ou les
batteries de types électrochimiques
La page est en cours de chargement...
La page est en cours de chargement...
La page est en cours de chargement...
La page est en cours de chargement...
La page est en cours de chargement...
La page est en cours de chargement...
La page est en cours de chargement...
La page est en cours de chargement...
La page est en cours de chargement...
La page est en cours de chargement...
La page est en cours de chargement...
La page est en cours de chargement...
La page est en cours de chargement...
La page est en cours de chargement...
La page est en cours de chargement...
La page est en cours de chargement...
La page est en cours de chargement...
La page est en cours de chargement...
La page est en cours de chargement...
La page est en cours de chargement...
-
 1
1
-
 2
2
-
 3
3
-
 4
4
-
 5
5
-
 6
6
-
 7
7
-
 8
8
-
 9
9
-
 10
10
-
 11
11
-
 12
12
-
 13
13
-
 14
14
-
 15
15
-
 16
16
-
 17
17
-
 18
18
-
 19
19
-
 20
20
-
 21
21
-
 22
22
-
 23
23
-
 24
24
-
 25
25
-
 26
26
-
 27
27
-
 28
28
-
 29
29
-
 30
30
-
 31
31
-
 32
32
-
 33
33
-
 34
34
-
 35
35
-
 36
36
-
 37
37
-
 38
38
-
 39
39
-
 40
40


Worx WG782 Le manuel du propriétaire
- Catégorie
- Tondeuses à gazon
- Taper
- Le manuel du propriétaire
dans d''autres langues
- English: Worx WG782 Owner's manual
- español: Worx WG782 El manual del propietario
Documents connexes
-
Worx WG773E Fiche technique
-
Positec WG775 Le manuel du propriétaire
-
Worx WG708E Original Instructions Manual
-
-
-
-
-
Worx WG751.9 Le manuel du propriétaire
-
-
Autres documents
-
-
-
 WORX Tools WG788 Manuel utilisateur
-
 Elem Garden Technic LTDE1842-23 Le manuel du propriétaire
-
Toro Carefree Electric WPM, 24 VDC Manuel utilisateur
-
-
-
 JBM 60045 Mode d'emploi
-
Sun Joe MJ401C-XR-SJB Manuel utilisateur
-
Rockwell Shopseries RS8065 Manuel utilisateur


