Toro String Mower Manuel utilisateur
- Catégorie
- Tondeuses à gazon
- Taper
- Manuel utilisateur

FormNo.3445-374RevB
StringMower
58620
Desbrozadoradehilo
58620
Tondeuseàl
58620
www.T oro.com.
*3445-374*


FormNo.3441-773RevB
StringMower
ModelNo.58620—SerialNo.320000001andUp
Registeratwww.Toro.com.
OriginalInstructions(EN)
*3441-773*

ItisaviolationofCaliforniaPublicResourceCode
Section4442or4443touseoroperatetheengineon
anyforest-covered,brush-covered,orgrass-covered
landunlesstheengineisequippedwithaspark
arrester,asdenedinSection4442,maintainedin
effectiveworkingorderortheengineisconstructed,
equipped,andmaintainedforthepreventionofre.
Theenclosedengineowner'smanualissupplied
forinformationregardingtheUSEnvironmental
ProtectionAgency(EPA)andtheCaliforniaEmission
ControlRegulationofemissionsystems,maintenance,
andwarranty.Replacementsmaybeorderedthrough
theenginemanufacturer.
Pleaserefertotheenginemanufacturer’sinformation
includedwiththemachine.
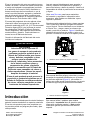
WARNING
CALIFORNIA
Proposition65Warning
Theengineexhaustfromthisproduct
containschemicalsknowntotheStateof
Californiatocausecancer,birthdefects,
orotherreproductiveharm.
Batteryposts,terminals,andrelated
accessoriescontainleadandlead
compounds,chemicalsknownto
theStateofCaliforniatocause
cancerandreproductiveharm.Wash
handsafterhandling.
Useofthisproductmaycauseexposure
tochemicalsknowntotheStateof
Californiatocausecancer,birthdefects,
orotherreproductiveharm.
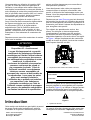
Introduction
Thismachineisintendedtobeusedbyresidential
homeownerstotrimgrassasneededoutdoors.Using
thisproductforpurposesotherthanitsintendeduse
couldprovedangeroustoyouandbystanders.
Readthisinformationcarefullytolearnhowtooperate
andmaintainyourproductproperlyandtoavoid
injuryandproductdamage.Youareresponsiblefor
operatingtheproductproperlyandsafely.
Visitwww.Toro.comforproductsafetyandoperation
trainingmaterials,accessoryinformation,helpnding
adealer,ortoregisteryourproduct.
Wheneveryouneedservice,genuineToroparts,or
additionalinformation,contactanAuthorizedService
DealerorT oroCustomerServiceandhavethemodel
andserialnumbersofyourproductready.Figure1
identiesthelocationofthemodelandserialnumbers
ontheproduct.Writethenumbersinthespace
provided.
g337001
Figure1
1.Modelandserialnumberlocation
ModelNo.
SerialNo.
Thismanualidentiespotentialhazardsandhas
safetymessagesidentiedbythesafety-alertsymbol
(Figure2),whichsignalsahazardthatmaycause
seriousinjuryordeathifyoudonotfollowthe
recommendedprecautions.
g000502
Figure2
1.Safety-alertsymbol
Thismanualuses2wordstohighlightinformation.
Importantcallsattentiontospecialmechanical
informationandNoteemphasizesgeneralinformation
worthyofspecialattention.
©2021—TheToro®Company
8111LyndaleAvenueSouth
Bloomington,MN55420
2
Contactusatwww.Toro.com.
PrintedintheUSA
AllRightsReserved

Contents
Safety.......................................................................3
GeneralSafety...................................................3
SafetyandInstructionalDecals..........................4
Setup........................................................................5
1RaisingtheHandle..........................................5
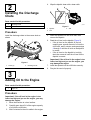
2InstallingtheDischargeChute.........................6
3AddingOiltotheEngine...................................6
ProductOverview.....................................................7
Specications....................................................7
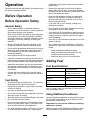
BeforeOperation...................................................8
BeforeOperationSafety.....................................8
AddingFuel........................................................8
AdjustingtheHandleHeightandAngle...............9
PerformingDailyMaintenance............................9
AdjustingtheHeightofCut.................................9
DuringOperation.................................................10
DuringOperationSafety...................................10
StartingtheEngine...........................................10
EngagingtheMowerHead................................11
ShuttingOfftheEngine......................................11
OperatingTips..................................................11
AfterOperation.....................................................11
AfterOperationSafety.......................................11
Maintenance...........................................................12
MaintenanceSafety..........................................12
RecommendedMaintenanceSchedule(s)...........12
Pre-MaintenanceProcedures..............................13
PreparingforMaintenance...............................13
EngineMaintenance...........................................13
ServicingtheAirFilter.......................................13
ChangingtheEngineOil...................................13
ServicingtheSparkPlug...................................15
DriveSystemMaintenance..................................16
RemovingandInstallingtheWheels.................16
ReplacingtheDriveBelt...................................16
AdjustingtheDriveBeltT ension........................17
MowerMaintenance.............................................18
ReplacingtheMowerLine................................18
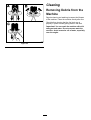
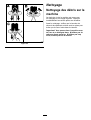
Cleaning..............................................................19
RemovingDebrisfromtheMachine..................19
Storage...................................................................20
StorageSafety..................................................20
StoringtheMachine..........................................20
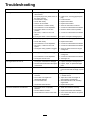
Troubleshooting......................................................21
Safety
Thismachinehasbeendesignedinaccordancewith
EN14910:2007+A1:2009.
GeneralSafety
Thisproductiscapableofthrowingobjects.Always
followallsafetyinstructionstoavoidseriouspersonal
injury.
•Read,understand,andfollowtheinstructions
andwarningsinthisOperator’sManualandon
themachineandattachmentsbeforestartingthe
engine.
•Donotputyourhandsorfeetnearmovingparts
orunderthemachine.
•Donotoperatethemachinewithoutallguards
andothersafetyprotectivedevicesinplaceand
functioningproperlyonthemachine.
•Keepbystandersandchildrenoutoftheoperating
area.Donotallowchildrentooperatethe
machine.Localregulationsmayrestrictthe
ageoftheoperator.Allowonlypeoplewhoare
responsible,trained,familiarwiththeinstructions,
andphysicallycapabletooperatethemachine.
•Stopthemachine,shutofftheengine,andwaitfor
allmovingpartstostopbeforeservicing,fueling,
oruncloggingthemachine.
•Improperlyusingormaintainingthismachinecan
resultininjury.Toreducethepotentialforinjury,
complywiththesesafetyinstructionsandalways
payattentiontothesafety-alertsymbol
,which
meansCaution,Warning,orDanger—personal
safetyinstruction.Failuretocomplywiththese
instructionsmayresultinpersonalinjury.
3

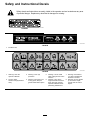
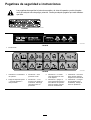
SafetyandInstructionalDecals
Safetydecalsandinstructionsareeasilyvisibletotheoperatorandarelocatednearanyarea
ofpotentialdanger.Replaceanydecalthatisdamagedormissing.
decal133-8062
133-8062
decal144-4838
144-4838
1.Installtheline.
decal144-4840
144-4840
1.Warning—readthe
Operator’sManual.
3.Warning—weareye
protection.
5.Warning—donotinstall
othercuttingdevicesonthe
machine.
7.Warning—lookbehind
youwhenoperatingthe
machineinreverse.
2.Thrownobject
hazard—keepbystanders
away.
4.Warning—stayawayfrom
movingparts;keepall
guardsandshieldsinplace.
6.Warning—shutoffthe
engineanddisconnectthe
sparkplugandreadthe
Operator’sManualbefore
performingmaintenance.
8.Warning—donotoperate
upanddownslopes;
operatesidetosideon
slopes.
4

Setup
LooseParts
Usethechartbelowtoverifythatallpartshavebeenshipped.
ProcedureDescription
Qty.
Use
1
Nopartsrequired
–
Raisethehandle.
Dischargechute1
2
Screw
4
Installthedischargechute.
3
Engineoil1Addoiltotheengine.
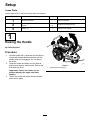
1
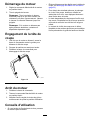
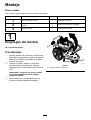
RaisingtheHandle
NoPartsRequired
Procedure
1.Holdthehandlewith1handandusetheotherto
loosenbothhandle-adjustmentknobsuntilthe
ratchetteetharedisengaged.Donotremove
theknobs.
2.Raisethehandleandadjustittothedesired
positionandaligntheratchetteeth.Ensurethat
bothsidesarelevel.
Important:Ensurethecablesarenot
pinchedbetweentheupperandlower
handles.
3.Tightentheknobsandensurethatthehandle
pivotslockinplace.
g334797
Figure3
1.Handle-adjustmentknob(2)
5

2
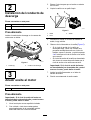
InstallingtheDischarge
Chute
Partsneededforthisprocedure:
1Dischargechute
4
Screw
Procedure
Installthedischargechutetothemowerdeckas
shown.
g342810
Figure4
1.Screw(4)
2.Dischargechute
3
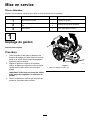
AddingOiltotheEngine
Partsneededforthisprocedure:
1Engineoil
Procedure
Important:Iftheoillevelintheengineistoo
lowortoohighandyouruntheengine,youmay
damagetheengine.
1.Movethemachinetoalevelsurface.
2.Carefullypourabout3/4oftheenginecapacity
ofoilintotheoil-lltube.
3.Wait3minutesfortheoiltosettleintheengine.
4.Wipethedipstickcleanwithacleancloth.
g334792
Figure5
1.Dipstick3.Add
2.Full
5.Insertthedipstickintotheoil-lltube,then
removethedipstick.
6.Readtheoillevelonthedipstick(Figure5).
•Iftheoillevelonthedipstickistoolow,
carefullypourasmallamountofoilintothe
oil-lltube,wait3minutes,andrepeatsteps
4through6untiltheoillevelonthedipstick
iscorrect.
•Iftheoillevelonthedipstickistoohigh,
draintheexcessoiluntiltheoillevelonthe
dipstickiscorrect.
Important:Iftheoillevelintheengineistoo
lowortoohighandyouruntheengine,you
maydamagetheengine.
7.Installthedipstickintotheoil-lltubesecurely.
8.Recycletheusedoilproperly.
6

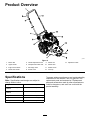
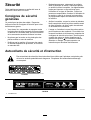
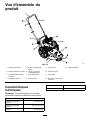
ProductOverview
g334820
Figure6
1.Mowerbail5.Handle-adjustmentknob9.Mowerline13.Adjustmentcable
2.Upperhandle
6.Oildipstickandllerneck
10.Mowerdeck
3.Engineon/offswitch
7.Dischargechute11.Debrisscreen
4.Recoilstarthandle8.Mowerhead12.Fuelcap
Specications
Note:Specicationsanddesignaresubjectto
changewithoutnotice.
Length
137cm(54inches)
Widthwithdischargechute
installed
62cm(24inches)
Widthwithoutchute
installed
54.5cm(21.5inches)
Height
99cm(39inches)
Weight
31kg(68lb)
Cuttingwidth56cm(22inches)
Toensureoptimumperformanceandcontinuedsafety
certicationofthemachine,useonlygenuineT oro
replacementpartsandaccessories.Replacement
partsandaccessoriesmadebyothermanufacturers
couldbedangerous,andsuchusecouldvoidthe
productwarranty.
7

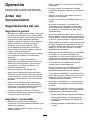
Operation
Determinetheleftandrightsidesofthemachinefrom
thenormaloperatingposition.
BeforeOperation
BeforeOperationSafety
GeneralSafety
•Donotallowchildrenoruntrainedpeopleto
operateorservicethemachine.Localregulations
mayrestricttheageoftheoperator.
•Shutoffthemachineandwaitforallmovingparts
tostopbeforeyouleavetheoperator’sposition.
Allowthemachinetocoolbeforeadjusting,fueling,
unclogging,servicing,cleaning,orstoringthe
machine.
•Becomefamiliarwiththesafeoperationofthe
equipment,operatorcontrols,andsafetysigns.
•Checkthatallguardsandsafetydevices,suchas
deectors,areinplaceandfunctioningproperly.
Donotoperatethemachineunlesstheyare
functioningproperly.
•Knowhowtoshutofftheenginequickly.
•Inspectthemachinefrequentlytoensurethatitis
insafeworkingconditionandthatengine-mounting
boltsandotherfastenersareproperlytightened.
•Inspecttheareawhereyouwillusethemachine
andremoveallobjectsthatcouldinterferewith
theoperationofthemachineorthatthemachine
couldthrow.
•Contactwiththemovingstringlineswillcause
seriousinjury.Donotputyourhandsorfeetnear
them.
FuelSafety
•Useextremecareinhandlingfuel.Itisextremely
ammableanditsvaporsareexplosive.
•Extinguishallcigarettes,cigars,pipes,andother
sourcesofignition.
•Useonlyanapprovedfuelcontainer.
•Donotremovethefuelcaporaddfueltothetank
whiletheengineisrunning.
•Allowtheenginetocoolbeforellingthefueltank.
•Donotllthefueltankindoors.
•Donotstorethemachineorfuelcontainerwhere
thereisanopename,spark,orpilotlight,such
asonawaterheaterorotherappliance.
•Donotllcontainersinsideavehicleoronatruck
ortrailerbedwithaplasticliner.Alwaysplace
containersontheground,awayfromthevehicle
beforelling.
•Removethemachinefromthetruckortrailer
beforellingthefueltank.Ifthisisnotpossible,
thenaddfuelfromaportablecontainerratherthan
fromafuel-dispensernozzle.
•Keepthefuel-dispensernozzleincontactwith
therimofthefueltankorcontaineropeningat
alltimesuntilfuelingiscomplete.Donotusea
nozzlelock-opendevice.
•Ifyouspillfuelonyourclothing,changeyour
clothingimmediately.
•Donotoverllthefueltank.Replacethefuelcap
andtightenitsecurelyafterfueling.
•Ifyouspillfuel,donotattempttostarttheengine;
movethemachineawayfromthespillandavoid
creatingasourceofignitionuntilthefuelvapors
havedissipated.
•Storefuelinafuelcontainerandkeepitoutofthe
reachofchildren.
•Fuelisharmfulorfatalifswallowed.Long-term
exposuretovaporscancauseseriousinjuryand
illness.
–Avoidprolongedbreathingofvapors.
–Keepyourhandsandfaceawayfromthe
nozzleandthefuel-tankopening.
–Keepfuelawayfromyoureyesandskin.
AddingFuel
FuelSpecications
TypeUnleadedgasoline
Minimumoctanerating
87(US)or91(research
octane;outsidetheUS)
Ethanol
Nomorethan10%byvolume
MethanolNone
MTBE(methyltertiarybutyl
ether)
Lessthan15%byvolume
OilDonotaddtothefuel
Useonlyclean,fresh(nomorethan30daysold),fuel
fromareputablesource.
UsingStabilizer/Conditioner
Usefuelstabilizer/conditionerinthemachinetokeep
thefuelfreshlongerwhenusedasdirectedbythe
fuel-stabilizermanufacturer.
Important:Donotusefueladditivescontaining
methanolorethanol.
Addtheamountoffuelstabilizer/conditionertofresh
fuelasdirectedbythefuel-stabilizermanufacturer.
8

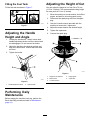
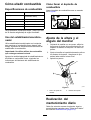
FillingtheFuelTank
FillthefueltankasshowninFigure7.
g230458
Figure7
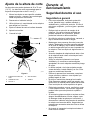
AdjustingtheHandle
HeightandAngle
1.Holdingthehandlewith1hand,loosenboth
handle-adjustmentknobsuntiltheratchetteeth
aredisengaged.Donotremovetheknobs.
2.Adjustthehandletothedesiredpositionand
aligntheratchetteeth.Ensurethatbothsides
arelevel.
3.Tightentheknobs.
g334885
Figure8
1.Handle-adjustmentknob2.Ratchetteeth
PerformingDaily
Maintenance
Beforestartingthemachineeachday,performthe
EachUse/DailyprocedureslistedinMaintenance
(page12).
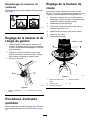
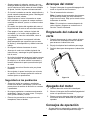
AdjustingtheHeightofCut
Youcanadjusttheheightofcutfrom38to76mm
(1-1/2to3inches).Therecommendedcuttingheight
formostyardsis51mm(2inches).
1.Movethemachinetoalevelsurface,shutoffthe
engine,andwaitforallmovingpartstostop.
2.Disconnectthespark-plugwirefromthespark
plug.
3.UsetheL-handlewrenchprovidedwiththe
machinetoloosenthe2capscrews.
4.Adjustthemowerheadtothedesiredheight.
5.Tightenthecapscrews.
6.Connectthesparkplug.
g335100
Figure9
1.Height-of-cutpositions
4.Heightguide
2.Mowerhead
5.Capscrews
3.L-handlewrench
9

DuringOperation
DuringOperationSafety
GeneralSafety
•Wearappropriateclothing,includingeye
protection;longpants;substantial,slip-resistant
footwear;andhearingprotection.Tiebacklong
hairanddonotwearlooseclothingorloose
jewelry.
•Useyourfullattentionwhileoperatingthe
machine.Donotengageinanyactivitythat
causesdistractions;otherwise,injuryorproperty
damagemayoccur.
•Donotoperatethemachinewhileill,tired,or
undertheinuenceofalcoholordrugs.
•Keepbystandersoutoftheoperatingarea.Keep
smallchildrenoutoftheoperatingareaandunder
thewatchfulcareofaresponsibleadultwhois
notoperatingthemachine.Stopthemachineif
anyoneentersthearea.
•Alwayslookdownandbehindyoubeforemoving
themachineinreverseorpullingthemachine
towardyou.
•Operatethemachineonlyingoodvisibilityand
appropriateweatherconditions.Donotoperate
themachinewhenthereistheriskoflightning.
•Wetgrassorleavescancauseinjuryifyouslip
andfall.Avoidmowinginwetconditions.
•Useextremecarewhenapproachingblind
corners,shrubs,trees,orotherobjectsthatmay
blockyourview.
•Donotdirectthedischargematerialtoward
anyone.Avoiddischargingmaterialagainstawall
orobstruction;materialmayricochettowardyou.
Stopthemachinewhencrossinggravelsurfaces.
•Watchforholes,ruts,bumps,rocks,orother
hiddenobjects.Uneventerraincouldcauseyou
toloseyourbalanceorfooting.
•Ifthemachinestrikesanobjectorstartsto
vibrate,immediatelyshutofftheengine,waitfor
allmovingpartstostop,anddisconnectthewire
fromthesparkplugbeforeexaminingthemachine
fordamage.Makeallnecessaryrepairsbefore
resumingoperation.
•Donotpickuporcarrythemachinewhilethe
engineisrunning.
•Alwaysshutoffthemachine,waitforallmoving
partstostop,andallowthemachinetocoolbefore
adjusting,servicing,cleaning,orstoringit.
•Iftheenginehasbeenrunning,itwillbehotand
canseverelyburnyou.Keepawayfromthehot
engine.
•Operatetheengineonlyinwell-ventilatedareas.
Exhaustgasescontaincarbonmonoxide,whichis
anodorless,deadlypoison.
•Donotchangetheenginegovernorsettingsor
overspeedtheengine.
•Whenshuttingofftheengine,reducethethrottle
settingand,iftheengineisequippedwitha
shut-offvalve,shutoffthefuel.
•Shutoffthemachineifyoumusttiltittotransportit
whencrossingsurfacesotherthangrassandwhen
transportingittoandfromtheoperatingarea.
•Donotengagethebailwhenstartingtheengine.
•Starttheenginecarefullyaccordingtothe
instructionsandkeepyourfeetawayfromthe
cuttingline.
•Donottiltthemachinewhenstartingtheengine
unlessitisnecessary.Ifyoumusttiltthemachine,
donottiltitmorethannecessaryandliftonlythe
partthatisawayfromyou.
•Neverreplacethecuttinglineswithmetalparts.
•Neveradjustorrepairthemachinewhilethe
engineisrunning.Alwaysweareyeprotection
wheneveryoumakeadjustmentsorrepairs.
SlopeSafety
•Mowacrossthefaceofslopes;neverupand
down.Usecautionwhenchangingdirectionon
slopes.
•Donotmowonexcessivelysteepslopes.Walk,
neverrun.Poorfootingcouldcauseaslip-and-fall
accident.
•Mowwithcautionneardrop-offs,ditches,or
embankments.
StartingtheEngine
1.Settheengineon/offswitchtotheONposition.
2.Pulltherecoil-starthandle.
Note:Whenyoupulltherecoil-starthandle,
pullitlightlyuntilyoufeelresistance,thenpullit
sharply.Allowtheropetoreturntothehandle
slowly.
Note:Ifthemachinedoesnotstartafterseveral
attempts,contactanAuthorizedServiceDealer.
10

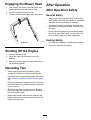
EngagingtheMowerHead
1.Afterstartingtheengine,holdthemowerbail
againstthehandletostartmowerhead.
2.Pushthemachineforwardtomow.
3.Releasethebailtodisengagethemowerhead.
g337012
Figure10
ShuttingOfftheEngine
1.Releasethemowerbail.
2.Movetheengineon/offswitchtotheOFF
position.
3.Waitforallmovingpartstostopbeforeleaving
theoperatingposition.
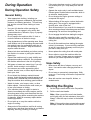
OperatingTips
•Whenmowingtallandthickweedsorgrass,
operatethemachineataslowerwalkingspeed.
•Frequentlyremovegrassbuildupunderthemower;
refertoRemovingDebrisfromtheMachine(page
19).
•Forbestresultsandincreasedlinelife,mowusing
theendsofthelinebymovingslowlythroughthick
orheavyweeds.
•Shortermowerlinesincreasejobtime.Replace
themowerlineswhentheyareworntolessthan
halftheiroriginallength.
•Mowerheadcontactwithconcrete,asphalt,and
hardersurfacesmaycauseprematureweartothe
heightguideandlines.
AfterOperation
AfterOperationSafety
GeneralSafety
•Alwaysshutoffthemachine,waitforallmoving
partstostop,andallowthemachinetocoolbefore
adjusting,servicing,cleaning,orstoringit.
•Cleangrass,debris,andexcessivegreasefrom
themachinetohelppreventres.Cleanupoilor
fuelspills.
•Neverstorethemachineorfuelcontainerwhere
thereisanopename,spark,orpilotlight,such
asonawaterheateroronotherappliances.
HaulingSafety
•Usecarewhenloadingorunloadingthemachine.
•Securethemachinefromrolling.
11

Maintenance
MaintenanceSafety
•Disconnectthespark-plugwirefromthesparkplug
beforeperforminganymaintenanceprocedure.
•Nevertamperwithsafetydevices.Checktheir
properoperationregularly.
•Keepallnuts,boltsandscrewstighttoensurethat
themachineisinsafeworkingcondition.
•Replaceafaultymufer.
•Tippingthemachinemaycausethefueltoleak.
Fuelisammableandexplosive,andcancause
personalinjury.Runtheenginedryorremovethe
fuelwithahandpump;neversiphonthefuel.
•Inspectthemachineregularlyandreplaceworn
ordamagedparts.Donotreplacethecuttingline
withmetalparts.
•Toensureoptimumperformanceofthemachine,
useonlygenuineTororeplacementpartsand
accessories.Replacementpartsandaccessories
madebyothermanufacturerscouldbedangerous,
andsuchusecouldvoidtheproductwarranty.
•Shutofftheenginebeforecheckingtheoilor
addingoiltothecrankcase.
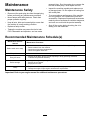
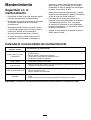
RecommendedMaintenanceSchedule(s)
MaintenanceService
Interval
MaintenanceProcedure
Beforeeachuseordaily
•Checkthemowerlines.Replacethelinewhenitishalftheoriginallength.
•Removedebrisfromthemachine.
•Checkthemowerheadengagement.
•Checkandtightenfasteners.
Every2hours
•Checkthebelttension.
Every25hours
•Servicetheairlter;serviceitmorefrequentlyindustyoperatingconditions.
•Lubricatethejackshaftassembly.
Beforestorage
•Changetheengineoilperenginemanufacturerrequirements..
•Servicetheaircleaner.
•Emptythefueltank.
Yearly
•Replacetheairlter;replaceitmorefrequentlyindustyoperatingconditions.
•Changetheengineoilperenginemanufacturerrequirements.
Important:Refertoyourenginemanualforadditionalmaintenanceprocedures.
12

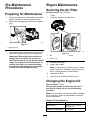
Pre-Maintenance
Procedures
PreparingforMaintenance
1.Movethemachinetoalevelsurface,shutoffthe
engine,andwaitforallmovingpartstostop.
2.Disconnectthespark-plugwirefromthespark
plug.
g339525
Figure11
1.Spark-plugwire
3.Afterperformingthemaintenanceprocedure(s),
connectthespark-plugwiretothesparkplug.
Important:Beforetippingthemachineto
changetheoilorreplacethemowerline,
allowthefueltanktorundrythroughnormal
usage.Ifyoumusttipthemachinepriorto
runningoutoffuel,useahandfuelpump
toremovethefuel.Alwaystipthemachine
ontoitsside,withthedipstickdown.
EngineMaintenance
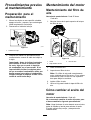
ServicingtheAirFilter
ServiceInterval:Every25hours
Yearly
1.Unclipthetopoftheair-ltercover.
g334791
Figure12
1.Clip3.Airlter
2.Air-ltercover
2.Removetheairlter.
3.Inspecttheairlter.
Note:Iftheairlterisexcessivelydirty,replace
itwithanewlter.Otherwise,gentlytaptheair
lteronahardsurfacetoloosendebris.
4.Installtheairlter.
5.Usethecliptoinstalltheair-ltercover.
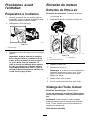
ChangingtheEngineOil
ServiceInterval:Yearly
Changingtheengineoilisnotrequired,butif
youwanttochangetheoil,usethefollowing
procedure.
Note:Runtheengineafewminutesbeforechanging
theoiltowarmit.Warmoilowsbetterandcarries
morecontaminants.
EngineOilSpecications
Engineoilcapacity
0.44L(15oz)*
OilviscositySAE30orSAE10W-30
detergentoil
APIserviceclassicationSJorhigher
13

*Thereisresidualoilinthecrankcaseafteryoudrain
theoil.Donotpourtheentirecapacityofoilintothe
crankcase.Fillthecrankcasewithoilasdirectedin
thefollowingsteps.
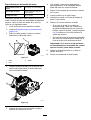
1.Movethemachinetoalevelsurface.
2.RefertoPreparingforMaintenance(page13).
3.Removethedipstickbyrotatingthecap
counterclockwiseandpullingitout.
g334792
Figure13
1.Dipstick3.Add
2.Full
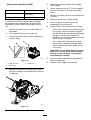
4.Tipthemachineontoitsside(sothattheairlter
isup)todraintheusedoilfromtheoil-lltube.
g334793
Figure14
5.Afterdrainingtheusedoil,returnthemachineto
theoperatingposition.
6.Carefullypourabout3/4oftheenginecapacity
ofoilintotheoil-lltube.
7.Wait3minutesfortheoiltosettleintheengine.
8.Wipethedipstickcleanwithacleancloth.
9.Insertthedipstickintotheoil-lltube,then
removethedipstick.
10.Readtheoillevelonthedipstick.
•Iftheoillevelonthedipstickistoolow,
carefullypourasmallamountofoilintothe
oil-lltube,wait3minutes,andrepeatsteps
8through10untiltheoillevelonthedipstick
iscorrect.
•Iftheoillevelonthedipstickistoohigh,
draintheexcessoiluntiltheoillevelonthe
dipstickiscorrect.
Important:Iftheoillevelintheengineistoo
lowortoohighandyouruntheengine,you
maydamagetheengine.
11.Installthedipstickintotheoil-lltubesecurely.
12.Recycletheusedoilproperly.
14

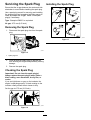
ServicingtheSparkPlug
Ensurethattheairgapbetweenthecenterandside
electrodesiscorrectbeforeinstallingthesparkplug.
Useasparkplugwrenchforremovingandinstalling
thesparkplug(s)andagappingtool/feelergaugeto
checkandadjusttheairgap.Installanewspark
plug(s)ifnecessary.
Type:ChampionRN9YCorequivalent
Airgap:0.75mm(0.03inch)
RemovingtheSparkPlug
1.Disconnectthespark-plugwirefromthespark
plug.
g339525
Figure15
1.Spark-plugwire
2.Cleanaroundthesparkplugstopreventdirt
fromenteringtheengineandpotentiallycausing
damage.
3.Removethesparkplug.
CheckingtheSparkPlug
Important:Donotcleanthesparkplug(s).
Alwaysreplacethesparkplug(s)whenithasa
blackcoating,wornelectrodes,anoilylm,or
cracks.
Ifyouseelightbrownorgrayontheinsulator,the
engineisoperatingproperly.Ablackcoatingonthe
insulatorusuallymeanstheaircleanerisdirty.
Setthegapto0.75mm(0.03inch).
g206628
Figure16
InstallingtheSparkPlug
g027480
Figure17
15

DriveSystem
Maintenance
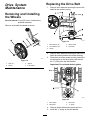
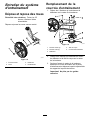
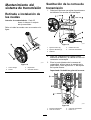
RemovingandInstalling
theWheels
ServiceInterval:Every25hours—Lubricatethe
jackshaftassembly.
Removeandinstallthewheelsasshown.
g337013
Figure18
1.Axlenut
3.Spacer
2.Wheel4.Lockwasher
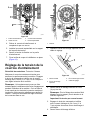
ReplacingtheDriveBelt
1.Removethe2fastenerssecuringtherearofthe
shieldtothemowerhousing.
g337959
Figure19
1.Rearfastener(2)
4.Mowerhead
2.Frontfastener(4)
5.Drivebelt
3.Shield
2.Removethe4fastenerssecuringthefrontofthe
shieldandmowerheadtothemowerhousing.
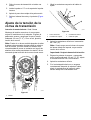
3.Raisethefrontofthemowerhousing,loosenthe
mountingboltonthedrivepulley,andremove
the“V”pulleyfromtheidlerbracket.
Important:Donotbendthebeltguides.
g337960
Figure20
1.Drivepulley3.Drivebelt
2.Beltguide
4.“V”pulley
4.Removethedrivebeltandinstallanewone.
5.Installthe“V”pulleytotheidlerbracket.
16

6.Tightenthemountingboltonthedrivepulley.
7.Securethemowerheadandtheshield(Figure
19).
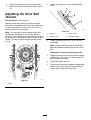
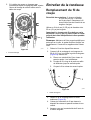
AdjustingtheDriveBelt
Tension
ServiceInterval:Every2hours
Maintainproperbelttensiontoimprovemachine
performance.Engagethedriveleverandensurethat
thespringextends3to6mm(1/8to1/4inch).Ifit
doesnot,adjustthebelttension.
Note:Youmayhearashortbuzzingsoundafter
releasingtheengagementleverwhileusingthe
machine.Thisisnormalandiscausedbytheteethof
thecoggedbeltcontactingthewirebeltguidetostop
rotation.Youdonotneedtoadjustthebelttension
forthis.
g337958
Figure21
1.Spring
1.Loosentheupperjamnutontheadjustment
cable.
g337972
Figure22
1.Barrelnut3.Lowerjamnut
2.Upperjamnut4.Adjustmentcable
2.Tightenthelowerjamnutin3mm(1/8inch)
increments.
Note:Ahighernumberofbarrel-nutthreads
belowthebracketincreasesthetensiononthe
belt.
Important:Donotoveradjustthetension.
3.Engagethedriveleverandverifythatthespring
extends3to6mm(1/8to1/4inch);adjustthe
jamnutagainasneeded.
4.Tightenthebottomjamnut.
5.Ifthemowerstilldoesnotproperlyengageafter
adjustingthecable,adjustthejamnutforthe
secondcableunderthemowerdeck.
17

g337971
Figure23
1.Jamnut
MowerMaintenance
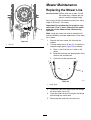
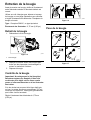
ReplacingtheMowerLine
ServiceInterval:Beforeeachuseordaily—Check
themowerlines.Replacetheline
whenitishalftheoriginallength.
Usea4mm(0.155inchdiameter)mowerline,witha
lengthof55cm(21-1/2inches).
Important:Donotallowthelinelengthstovary
morethan2.5cm(1inch).Otherwise,themower
headmaynotbebalancedandvibrateduring
operation.
Note:Keepthemowerlinemoisttoextenditslife,
maintainexibility,andeasereplacement.Storeextra
lineinwater.
1.Removethewornmowerlinefromtheline
retainer.
2.Cutnewmowerlineto55cm(21-1/2inches)or
usingthelengthguide(Figure24)asfollows:
A.Place1endofthelineat1markonthe
shield.
B.Bendthelinealongtheraisedportionofthe
shieldtothesecondmark.
C.Cutthelineatthesecondmark.
g338089
Figure24
1.Lengthguide
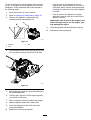
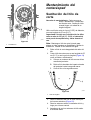
3.Threadtheendsofthenewmowerlinethrough
theouterloops(Figure25).
4.Crosstheendsoverthelineretainerandthreat
themthroughthecenterhole.
5.Ensurethattheendsofthelineareeven.
18
La page est en cours de chargement...
La page est en cours de chargement...
La page est en cours de chargement...
La page est en cours de chargement...
La page est en cours de chargement...
La page est en cours de chargement...
La page est en cours de chargement...
La page est en cours de chargement...
La page est en cours de chargement...
La page est en cours de chargement...
La page est en cours de chargement...
La page est en cours de chargement...
La page est en cours de chargement...
La page est en cours de chargement...
La page est en cours de chargement...
La page est en cours de chargement...
La page est en cours de chargement...
La page est en cours de chargement...
La page est en cours de chargement...
La page est en cours de chargement...
La page est en cours de chargement...
La page est en cours de chargement...
La page est en cours de chargement...
La page est en cours de chargement...
La page est en cours de chargement...
La page est en cours de chargement...
La page est en cours de chargement...
La page est en cours de chargement...
La page est en cours de chargement...
La page est en cours de chargement...
La page est en cours de chargement...
La page est en cours de chargement...
La page est en cours de chargement...
La page est en cours de chargement...
La page est en cours de chargement...
La page est en cours de chargement...
La page est en cours de chargement...
La page est en cours de chargement...
La page est en cours de chargement...
La page est en cours de chargement...
La page est en cours de chargement...
La page est en cours de chargement...
La page est en cours de chargement...
La page est en cours de chargement...
La page est en cours de chargement...
La page est en cours de chargement...
La page est en cours de chargement...
La page est en cours de chargement...
La page est en cours de chargement...
La page est en cours de chargement...
La page est en cours de chargement...
La page est en cours de chargement...
La page est en cours de chargement...
La page est en cours de chargement...
La page est en cours de chargement...
La page est en cours de chargement...
La page est en cours de chargement...
La page est en cours de chargement...
La page est en cours de chargement...
La page est en cours de chargement...
-
 1
1
-
 2
2
-
 3
3
-
 4
4
-
 5
5
-
 6
6
-
 7
7
-
 8
8
-
 9
9
-
 10
10
-
 11
11
-
 12
12
-
 13
13
-
 14
14
-
 15
15
-
 16
16
-
 17
17
-
 18
18
-
 19
19
-
 20
20
-
 21
21
-
 22
22
-
 23
23
-
 24
24
-
 25
25
-
 26
26
-
 27
27
-
 28
28
-
 29
29
-
 30
30
-
 31
31
-
 32
32
-
 33
33
-
 34
34
-
 35
35
-
 36
36
-
 37
37
-
 38
38
-
 39
39
-
 40
40
-
 41
41
-
 42
42
-
 43
43
-
 44
44
-
 45
45
-
 46
46
-
 47
47
-
 48
48
-
 49
49
-
 50
50
-
 51
51
-
 52
52
-
 53
53
-
 54
54
-
 55
55
-
 56
56
-
 57
57
-
 58
58
-
 59
59
-
 60
60
-
 61
61
-
 62
62
-
 63
63
-
 64
64
-
 65
65
-
 66
66
-
 67
67
-
 68
68
-
 69
69
-
 70
70
-
 71
71
-
 72
72
-
 73
73
-
 74
74
-
 75
75
-
 76
76
-
 77
77
-
 78
78
-
 79
79
-
 80
80


Toro String Mower Manuel utilisateur
- Catégorie
- Tondeuses à gazon
- Taper
- Manuel utilisateur
dans d''autres langues
- English: Toro String Mower User manual
- español: Toro String Mower Manual de usuario
Documents connexes
-
Toro 50cm Mulching/Rear Bagging Lawn Mower Manuel utilisateur
-
-
-
-
Toro 55cm Recycler Lawn Mower Manuel utilisateur
-
-
-
-