KitchenAid KP26M9PC Mode d'emploi
- Catégorie
- Mélangeurs
- Taper
- Mode d'emploi

W10862776C_EN_v02.indd 1 6/13/17 2:29 PM

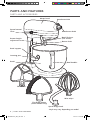
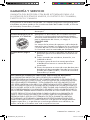
2 | PARTS AND FEATURES
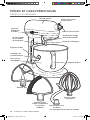
PARTS AND FEATURES
PARTS AND ACCESSORIES
Motor head
Attachment hub
Attachment knob
Speed control
lever
Beater height
adjustment screw
Bowl support
Locating pins
Flat beater
Spiral dough hook
Wire whip*
Bowl*
Bowl lift lever
(not shown)
Bowl handle*
Beater shaft
Flex Edge beater
(select models only)
*Style may vary depending on model
W10862776C_EN_v02.indd 2 6/13/17 2:29 PM

ENGLISH
STAND MIXER SAFETY | 3
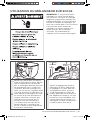
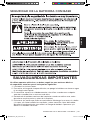
STAND MIXER SAFETY
IMPORTANT SAFEGUARDS
When using electrical appliances, basic safety precautions should always
be followed, including the following:
1. Read all instructions.
2. To avoid risk of electrical shock, do not put Stand Mixer in water or other liquid.
3. Close supervision is necessary when any appliance is used by or near children.
4. Unplug Stand Mixer from outlet when not in use, before putting on or taking
off parts, and before cleaning.
5. Avoid contacting moving parts. Keep hands, hair, and clothing, as well as
spatulas and other utensils away from beater during operation to reduce
the risk of injury to persons and/or damage to the Stand Mixer.
6. Do not operate Stand Mixer with a damaged cord or plug or after the
Stand Mixer malfunctions, or is dropped or damaged in any manner.
Call the KitchenAid Customer Satisfaction Center at 1-800-541-6390
for more information.
7. The use of attachments not recommended or sold by KitchenAid may cause
re, electrical shock, or injury.
8. Do not use the Stand Mixer outdoors.
W10862776C_EN_v02.indd 3 6/13/17 2:29 PM

4 | STAND MIXER SAFETY
STAND MIXER SAFETY
9. Do not let the cord hang over edge of table or counter.
10. Remove at beater, Flex Edge beater, wire whip, or spiral dough hook from Stand
Mixer before washing.
ELECTRICAL REQUIREMENTS
Volts: 120 V~
Hertz: 60 Hz
NOTE: The power rating for your Stand
Mixer is printed on the serial plate.
Do not use an extension cord. If the
power supply cord is too short, have a
qualied electrician or serviceman install
an outlet near the appliance.
The maximum rating is based on the
attachment that draws the greatest
load (power). Other recommended
attachments may draw signicantly
less power.
This product is designed for household use only.
SAVE THESE INSTRUCTIONS
W10862776C_EN_v02.indd 4 6/13/17 2:29 PM

ENGLISH
USING THE STAND MIXER | 5
All speeds have the Soft Start
®
feature
that automatically starts the Stand Mixer
at a lower speed to help avoid ingredient
splash-out and “our puff” at start-up, then
quickly increases to the selected speed for
optimal performance.
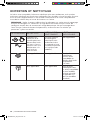
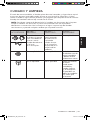
SPEED CONTROL GUIDE — 10 SPEED STAND MIXERS
USING THE STAND MIXER
SPEED USED FOR ATTACHMENT DESCRIPTION
Stir Stirring
For slow stirring, combining, mashing, and
starting all mixing procedures. Use to add flour
and dry ingredients to batter, and add liquids to
dry ingredients. Do not use STIR speed to mix
or knead yeast doughs.
2 Slow mixing,
Kneading
For slow mixing, mashing, and faster stirring.
Use to mix and knead yeast doughs, heavy
batters, and candies; start mashing potatoes
or other vegetables; cut shortening into flour;
mix thin or splashy batters.
4 Mixing, Beating
For mixing semi-heavy batters, such as cookies.
Use to combine sugar and shortening and to
add sugar to egg whites for meringues. Medium
speed for cake mixes. Use with: food grinder,
rotor slicer/shredder, pasta roller, and fruit/
vegetable strainer.
6 Beating,
Creaming
For medium-fast beating (creaming) or
whipping. Use to finish mixing cake, doughnut,
and other batters. High speed for cake mixes.
8-10 Fast beating,
Fast whipping,
Whipping
For whipping cream, egg whites, and boiled
frostings. For whipping small amounts of cream,
egg whites, or for final whipping of mashed
potatoes.
NOTE: Use Speed 2 to mix or knead
yeast doughs. Use of any other speed
creates high potential for Stand Mixer
failure. The PowerKnead™ spiral dough
hook efficiently kneads most yeast dough
within 4 minutes.
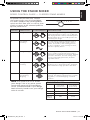
CAPACITY CHART
6-6.5 Quart
(5.67-6.15 L)
5-5.5 Quart
(4.73-5.20 L)
Flour 13-14 cups 10-12 cups
Bread 8
1
/
4
loaves 6 loaves
Cookies 13 dozen 9 dozen
Mashed
Potatoes
8 lbs 6.5 lbs
W10862776C_EN_v02.indd 5 6/13/17 2:29 PM

6 | USING THE STAND MIXER
USING THE STAND MIXER
FOR DETAILED INFORMATION ON USING THE STAND MIXER
Visit KitchenAid.com for additional Instructions with videos, inspiring recipes, and tips
on how to use your Stand Mixer.
For best performance, please go through these quick steps before using your Stand Mixer.
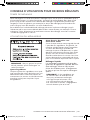
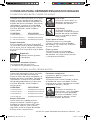
GETTING STARTED WITH YOUR NEW BOWL-LIFT STAND MIXER
IMPORTANT: If bowl is not securely
snapped into place, it will be unstable
and wobble during use.
1
Make sure Stand Mixer is turned to
the OFF position and is unplugged.
2
Attach the bowl to the Stand Mixer.
Fit bowl supports over locating pins
and press down on back of the bowl
until bowl pin snaps into spring latch.
Spring latch
Locating pin
3
Attach flat beater. Slip flat beater
onto the shaft. Turn left, hooking
beater over the pin.
4
Raise bowl to mixing position.
Rotate bowl lift lever counter-
clockwise to the straight up
position. The bowl must always be
in the raised position when mixing.
Pin
W10862776C_EN_v02.indd 6 6/13/17 2:29 PM

ENGLISH
USING THE STAND MIXER | 7
USING THE STAND MIXER
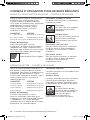
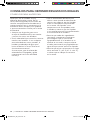
5
Test beater to bowl clearance. Check
the proximity of the flat beater to
the bowl. The beater should just
clear the bottom of the bowl but
should not touch it. Plug Stand
Mixer into a grounded 3 prong
outlet. Turn Stand Mixer ON and
test each speed, making sure the
beater does not touch the bowl
during operation. If the beater is
too far away from the bottom or is
hitting the bowl, proceed to step 6
to make the necessary adjustments.
6
Adjust your beater to bowl
clearance. Unplug the Stand Mixer.
Lower the bowl to the down
position. Adjust the beater height
adjustment screw to lower or raise
the bowl. Repeat steps 2-5
with the wire whip and spiral dough
hook. Your Stand Mixer is now set
up and ready for use.
Raise Bowl
Lower Bowl
IMPORTANT: The Stand Mixer may
become warm during use. Under heavy
loads with extended mixing time periods,
you may not be able to comfortably
touch the top of the Stand Mixer. This is
normal. The Stand Mixer motor may emit
a pungent odor during initial operation.
This is common with electric motors.
W10862776C_EN_v02.indd 7 6/13/17 2:29 PM

8 | CARE AND CLEANING
CARE AND CLEANING
The bowl, coated metal at beater, Flex Edge beater, and coated metal spiral dough
hook may be washed in an automatic dishwasher. Or, clean them thoroughly in hot,
sudsy water and rinse completely before drying. Do not store beaters on shaft.
NOTE: Always be sure to unplug the Stand Mixer before cleaning. Wipe the
Stand Mixer with a soft, damp cloth. Do not use household/commercial cleaners.
Do not immerse in water. Wipe off beater shaft frequently, removing any residue
that may accumulate.
ACCESSORIES
BURNISHED
METAL
COATED METAL
STAINLESS
STEEL
Burnished metal
beater and dough
hook should be
hand washed. May
discolor if used in
dishwasher.
White or silver
coated metal
beaters are
dishwasher-safe.
(Available on most
models)
Not applicable
Not applicable Not applicable All wire whips are
stainless steel and
should be hand
washed only.
Not applicable Not applicable All metal bowls are
stainless steel and
dishwasher-safe.
(Available on all
bowl-lift models)
W10862776C_EN_v02.indd 8 6/13/17 2:29 PM

ENGLISH
TIPS FOR GREAT RESULTS | 9
TIPS FOR GREAT RESULTS
MIXING TIME
MIXER USE
Your KitchenAid
®
Stand Mixer will mix faster and more thoroughly than most other
electric stand mixers. Therefore, the mixing time in most recipes must be adjusted to
avoid over-beating. With cakes, for example, beating time may be half as long as with
other stand mixers.
To help determine the ideal mixing time, observe the batter or dough and mix only until
it has the desired appearance described in your recipe, such as “smooth and creamy.”
To select the best mixing speeds, use the “Speed control guide” section.
NOTE: Do not scrape bowl while Stand
Mixer is operating.
Adding Ingredients
Always add ingredients as close to the
side of bowl as possible, not directly into
moving beater.
Adding Nuts, Raisins, or Candied Fruits
Follow individual recipes for guidelines on
including these ingredients. In general,
solid materials should be folded in the last
few seconds of mixing on STIR Speed. The
batter should be thick enough to keep the
fruit or nuts from sinking to the bottom of
the pan during baking. Sticky fruits should
be dusted with our for better distribution
in the batter.
Liquid Mixtures
Mixtures containing large amounts of
liquid ingredients should be mixed at
lower speeds to avoid splashing. Increase
speed only after mixture has thickened.
NOTE: If ingredients in very bottom of
bowl are not thoroughly mixed, then the
beater is not far enough into the bowl.
See the “Using the Stand Mixer” section.
W10862776C_EN_v02.indd 9 6/13/17 2:29 PM

10 | TIPS FOR GREAT RESULTS
TIPS FOR GREAT RESULTS
Place room temperature egg whites in
clean, dry bowl. Attach bowl and wire
whip. To avoid splashing, gradually turn
to designated speed and whip to desired
stage. See chart below.
AMOUNT SPEED
1 egg white ................GRADUALLY to 10
2-4 egg whites ...............GRADUALLY to 8
6 or more egg whites ......GRADUALLY to 8
Whipping Stages
With your KitchenAid
®
Stand Mixer, egg
whites whip quickly, so watch to avoid
over-whipping. This list tells you what
to expect.
Frothy
Large, uneven air bubbles.
Begins to Hold Shape
Air bubbles are ne and compact;
product is white.
Soft Peak
Tips of peaks fall over when
wire whip is removed.
Almost Stiff
Sharp peaks form when wire
whip is removed, but whites
are actually soft.
Stiff but not Dry
Sharp, stiff peaks form when wire whip
is removed. Whites are uniform in color
and glisten.
Stiff and Dry
Sharp, stiff peaks form when wire
whip is removed. Whites are speckled
and dull in appearance.
WHIPPING TIPS FOR EGG WHITES
WHIPPING TIPS FOR WHIPPED CREAM
Pour cold whipping cream into chilled
bowl. Attach bowl and wire whip.
To avoid splashing, gradually turn to
designated speed and whip to desired
stage. See chart below.
AMOUNT SPEED
1/4 cup (50 mL) ............... GRADUALLY to 10
1/2 cup (125 mL) ............. GRADUALLY to 10
1 cup (250 mL) ................. GRADUALLY to 8
1 pint (500 mL) ................ GRADUALLY to 8
Whipping Stages
Watch cream closely during whipping.
Because your KitchenAid
®
Stand Mixer
whips so quickly, there are just a few
seconds between whipping stages.
Look for these characteristics:
Begins to Thicken
Cream is thick and custard-like.
Holds its Shape
Cream forms soft peaks when stainless
steel whip is removed. Can be folded
into other ingredients when making
desserts and sauces.
Stiff
Cream stands in stiff, sharp
peaks when wire whip is
removed. Use for topping
on cakes or desserts, or
lling for cream puffs.
W10862776C_EN_v02.indd 10 6/13/17 2:29 PM

ENGLISH
TIPS FOR GREAT RESULTS | 11
TIPS FOR GREAT RESULTS
BREAD-MAKING TIPS
Making bread with a mixer is quite different
from making bread by hand. Therefore,
it will take some practice before you are
completely comfortable with the new
process. For your convenience, we offer
these tips to help you become accustomed
to bread-making the KitchenAid
brand way.
• Always use the PowerKnead™ spiral
dough hook to mix and knead yeast
doughs.
• Use Speed 2 to mix or knead yeast
dough. Use of any other speed with
heavy doughs may cause mixer to stop
rotating to limit mixer damage. This is
normal operation.
If this occurs, turn the speed selector
to OFF, and then turn back on to a
lower speed.
• Use a candy or other kitchen
thermometer to assure that liquids
are at temperature specied in the
recipe. Liquids at higher temperature
can kill yeast, while liquids at lower
temperatures will retard yeast growth.
• Warm all ingredients to room
temperature to ensure proper rising
of dough. If yeast is to be dissolved
in bowl, always warm bowl rst by
rinsing with warm water to avoid
cooling of liquids.
• Allow bread to rise in a warm place,
80°F to 85°F (27 °C to 29 °C), free from
draft, unless otherwise specied in recipe.
W10862776C_EN_v02.indd 11 6/13/17 2:29 PM

12 | WARRANTY AND SERVICE
WARRANTY AND SERVICE
KITCHENAID
®
STAND MIXER WARRANTY FOR
THE 50 UNITED STATES, THE DISTRICT OF COLUMBIA,
PUERTO RICO, AND CANADA
This warranty extends to the purchaser and any succeeding owner for Stand Mixers
operated in the 50 United States, the District of Columbia, Puerto Rico, and Canada.
Length of Warranty: One Year Full Warranty from date of purchase.
KitchenAid Will Pay
for Your Choice of:
Hassle-Free Replacement of your Stand Mixer. See
the next page for details on how to arrange for
service, or call the Customer eXperience Center
toll-free at 1-800-541-6390.
OR
The replacement parts and repair labor costs to correct
defects in materials and workmanship.
Service must be provided by an Authorized
KitchenAid Service Center.
KitchenAid Will
Not Pay for:
A. Repairs when your Stand Mixer is used in
other than normal single family home use.
B. Damage resulting from accident, alteration,
misuse, or abuse.
C. Any shipping or handling costs to deliver
your Stand Mixer to an Authorized Service Center.
D. Replacement parts or repair labor costs for
Stand Mixers operated outside the 50 United
States, District of Columbia, Puerto Rico,
and Canada.
DISCLAIMER OF IMPLIED WARRANTIES; LIMITATION OF REMEDIES
IMPLIED WARRANTIES, INCLUDING TO THE EXTENT APPLICABLE WARRANTIES
OF MERCHANTABILITY OR FITNESS FOR A PARTICULAR PURPOSE, ARE EXCLUDED
TO THE EXTENT LEGALLY PERMISSIBLE. ANY IMPLIED WARRANTIES THAT MAY
BE IMPOSED BY LAW ARE LIMITED TO ONE YEAR, OR THE SHORTEST PERIOD
ALLOWED BY LAW. SOME STATES AND PROVINCES DO NOT ALLOW LIMITATIONS
OR EXCLUSIONS ON HOW LONG AN IMPLIED WARRANTY OF MERCHANTABILITY
OR FITNESS LASTS, SO THE ABOVE LIMITATIONS OR EXCLUSIONS MAY NOT APPLY
TO YOU.
IF THIS PRODUCT FAILS TO WORK AS WARRANTED, CUSTOMER’S SOLE AND
EXCLUSIVE REMEDY SHALL BE REPAIR OR REPLACEMENT ACCORDING TO THE
TERMS OF THIS LIMITED WARRANTY. KITCHENAID AND KITCHENAID CANADA
DO NOT ASSUME ANY RESPONSIBILITY FOR INCIDENTAL OR CONSEQUENTIAL
DAMAGES. This warranty gives you specic legal rights and you may also have other
rights which vary from state to state or province to province.
W10862776C_EN_v02.indd 12 6/13/17 2:29 PM

ENGLISH
WARRANTY AND SERVICE | 13
®/™ ©2017 KitchenAid. All rights reserved. KITCHENAID and the design of the stand mixer
are trademarks in the U.S. and elsewhere. Used under license in Canada.
In the United States and Puerto Rico:
For service information, or to order
accessories or replacement parts, call
toll-free at 1-800-541-6390 or write to:
Customer eXperience Center,
KitchenAid Small Appliances,
P.O. Box 218, St. Joseph, MI 49085-0218
Outside the United States and Puerto Rico:
Consult your local KitchenAid dealer or the
store where you purchased the Stand Mixer
for information on how to obtain service.
For service information in Canada:
Call toll-free 1-800-807-6777.
For service information in Mexico:
Call toll-free 01-800-0022-767.
We’re so condent the quality of our
products meets the exacting standards
of KitchenAid that, if your Stand
Mixer should fail within the rst year
of ownership, KitchenAid will arrange
to deliver an identical or comparable
replacement to your door free of charge
and arrange to have your original Stand
Mixer returned to us. Your replacement
unit will also be covered by our one year
limited warranty.
If your Stand Mixer should fail within
the rst year of ownership, simply call
our toll-free Customer eXperience Center
at 1-800-541-6390 Monday through Friday.
Please have your original sales receipt
available when you call. Proof of purchase
will be required to initiate the claim. Give
the consultant your complete shipping
address (no P.O. Box numbers, please).
When you receive your replacement Stand
Mixer, use the carton, packing materials,
and prepaid shipping label to pack up
your original Stand Mixer and send it
back to KitchenAid.
We’re so condent the quality of our
products meets the exacting standards of
the KitchenAid brand that, if your Stand
Mixer should fail within the rst year of
ownership, we will replace your Stand
Mixer with an identical or comparable
replacement. Your replacement unit will
also be covered by our one year limited
warranty.
If your Stand Mixer should fail within the
rst year of ownership, simply call our
toll-free Customer eXperience Center
at 1-800-807-6777 Monday through Friday.
Please have your original sales receipt
available when you call. Proof of purchase
will be required to initiate the claim. Give
the consultant your complete shipping
address.
When you receive your replacement Stand
Mixer, use the carton, packing materials,
and prepaid shipping label to pack up
your original Stand Mixer and send it
back to KitchenAid.
WARRANTY AND SERVICE
HASSLE-FREE REPLACEMENT WARRANTY – 50 UNITED STATES,
DISTRICT OF COLUMBIA, AND PUERTO RICO
HASSLE-FREE REPLACEMENT WARRANTY – CANADA
ARRANGING FOR SERVICE AFTER THE WARRANTY EXPIRES,
OR ORDERING ACCESSORIES AND REPLACEMENT PARTS
W10862776C_EN_v02.indd 13 6/13/17 2:29 PM

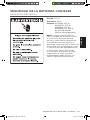
14 | PIÈCES ET CARACTÉRISTIQUES
PIÈCES ET CARACTÉRISTIQUES
PIÈCES ET ACCESSOIRES
Tête du moteur
Prise à accessoires
multifonction
Bouton à accessoires
Levier de
réglage de
la vitesse
Vis de réglage
de la hauteur
du mélangeur
Support du bol
Goupilles de
positionnement
Batteur plat
Crochet pétrisseur
en spirale
Fouet en acier
inoxydable*
Bol en acier
inoxydable*
Manette de levage
du bol (dissimulée)
Poignée du bol*
Arbre du mélangeur
Batteur à côté
souple (uniquement
sur certains
modèles)
*Le style peut varier selon le modèle
W10862776C_FR_v02.indd 14 6/13/17 2:30 PM

SÉCURITÉ DU MÉLANGEUR SUR SOCLE | 15
FRANÇAIS
SÉCURITÉ DU MÉLANGEUR SUR SOCLE
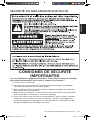
CONSIGNES DE SÉCURITÉ
IMPORTANTES
Lors de l’utilisation d’appareils électriques, il faut toujours observer certaines
précautions élémentaires de sécurité, y compris les suivantes :
1. Lire toutes les instructions.
2. Pour éviter tout risque de choc électrique, ne pas immerger le mélangeur
sur socle dans de l’eau ou tout autre liquide.
3. Une surveillance étroite s’impose lorsqu’un appareil ménager est utilisé par
des enfants ou à leur proximité.
4. Débrancher le mélangeur sur socle lorsqu’il n’est pas utilisé, avant d’installer
ou de retirer des accessoires et avant de le nettoyer.
5. Éviter tout contact avec les pièces en mouvement. Tenir les mains, cheveux,
vêtements et les spatules ou autres ustensiles à l’écart du mélangeur lors
du fonctionnement an de réduire le risque de blessures corporelles et (ou)
d’endommagement du mélangeur sur socle.
Poignée du bol*
W10862776C_FR_v02.indd 15 6/13/17 2:30 PM

16 | SÉCURITÉ DU MÉLANGEUR SUR SOCLE
SÉCURITÉ DU MÉLANGEUR SUR SOCLE
6. Ne pas faire fonctionner le mélangeur sur socle si le cordon ou la prise est
endommagé(e), ou si le mélangeur ne fonctionne pas correctement, s’il est
tombé ou a été endommagé d’une quelconque façon. Contacter le Centre
de satisfaction de la clientèle KitchenAid au 1-800-807-6777.
7. L’utilisation d’accessoires non recommandés ou non vendus par KitchenAid
peut causer un incendie, un choc électrique ou des blessures.
8. Ne pas utiliser le mélangeur sur socle à l’extérieur.
9. Ne pas laisser le cordon pendre du rebord d’une table ou d’un plan de travail.
10. Retirer le batteur plat, le fouet, ou le crochet pétrisseur en spirale du mélangeur
sur socle avant de les laver.
SPÉCIFICATIONS ÉLECTRIQUES
Tension : 120 V~
Fréquence : 60 Hz
REMARQUE : La puissance nominale
du mélangeur sur socle est imprimée sur
la plaque signalétique.
Ne pas utiliser de câble de rallonge.
Si le cordon d’alimentation électrique
est trop court, faire installer une prise
près de l’appareil électroménager par
un électricien ou un technicien de
service qualié.
La puissance nominale maximum est
basée sur l’accessoire qui utilise le plus
d’énergie (charge maximale). D’autres
accessoires recommandés peuvent
utiliser beaucoup moins d’énergie.
Ce produit est conçu uniquement pour un usage domestique.
CONSERVER CES INSTRUCTIONS
W10862776C_FR_v02.indd 16 6/13/17 2:30 PM

UTILISATION DU MÉLANGEUR SUR SOCLE | 17
FRANÇAIS
Toutes les vitesses disposent de la fonction
Soft Start
®
qui déclenche automatiquement
le démarrage progressif à basse vitesse
du mélangeur avant de passer à la vitesse
sélectionnée pour un résultat optimal,
an de minimiser les éclaboussures et les
“nuages de farine” au début du mélange.
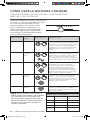
GUIDE DE RÉGLAGE DE LA VITESSE — MÉLANGEURS SUR
SOCLE À 10 VITESSES
UTILISATION DU MÉLANGEUR SUR SOCLE
VITESSE
À UTILISER
POUR
ACCESSOIRE DESCRIPTION
Stir Remuer
Pour remuer lentement, lier, écraser les ingrédients et
commencer toutes les procédures de mélange. Utiliser
cette vitesse pour incorporer la farine et les ingrédients
secs à une pâte et pour incorporer des liquides à des
ingrédients secs. Ne pas utiliser la vitesse STIR pour
mélanger ou pétrir les pâtes à base de levure.
2 Mélanger,
pétrir lentement
Pour mélanger lentement, écraser et remuer plus
rapidement. Utiliser cette vitesse pour mélanger
et pétrir les pâtes au levain, les pâtes épaisses et
les confiseries; pour commencer à réduire en purée
les pommes de terre ou autres légumes; pour sabler
la matière grasse avec la farine; pour mélanger les
pâtes légères ou celles susceptibles de produire
des éclaboussures.
4 Mélanger, battre
Pour mélanger les pâtes semi-épaisses comme celles
à biscuits. Utiliser cette vitesse pour travailler le sucre
et la matière grasse ainsi que pour incorporer le
sucre aux blancs d’oeufs pour les meringues. Vitesse
moyenne utilisée pour les préparations à gâteaux du
commerce. À utiliser avec : le hachoir, la trancheuse/
râpeuse rotative, la machine à pâtes et l’égouttoir
à fruits/légumes.
6 Battre,
réduire en crème
Pour battre à vitesse moyenne à élevée
(pour réduire en crème) et pour fouetter. Utiliser cette
vitesse pour finir de mélanger les pâtes à gâteaux,
à beignets et autres. Vitesse élevée utilisée pour
les mélanges à gâteaux.
8-10 Battre et fouetter
rapidement,
fouetter
Pour fouetter la crème, les blancs d’oeufs et les
glaçages cuits. Utiliser cette vitesse pour fouetter de
petites quantités de crème et de blancs d’oeufs et
pour lefouettage final de purées de pommes de terre.
REMARQUE : Utiliser la vitesse 2 pour
mélanger ou pétrir les pâtes au levain.
L’utilisation de toute autre vitesse entraîne
un potentiel élevé de défaillance du
mélangeur sur socle. Le crochet
pétrisseur en spirale PowerKnead™
pétrit efficacement la plupart des
pâtes au levain en 4 minutes maximum.
TABLEAU DE CAPACITÉ
6 à 6,5 pintes
(5,67 à 6,15 L)
5 à 5,5 pintes
(4,73 à 5,20 L)
Farine 13 à 14 tasses 10 à 12 tasses
Pain 8
1
/
4
pains 6 pains
Biscuits 13 douzaines 9 douzaines
Pommes
de terre
en purée
8 lbs 6.5 lbs
W10862776C_FR_v02.indd 17 6/13/17 2:30 PM

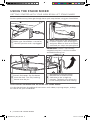
18 | UTILISATION DU MÉLANGEUR SUR SOCLE
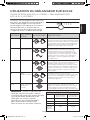
UTILISATION DU MÉLANGEUR SUR SOCLE
1
S’assurer que le mélangeur sur socle
est à la position OFF (arrêt) et qu’il
est débranché.
2
Fixer le bol en acier inoxydable
au mélangeur sur socle. Placer
les supports du bol par-dessus les
goupilles de positionnement puis
appuyer sur l’arrière du bol jusqu’à
ce que la goupille du bol s’emboîte
dans le loquet à ressort.
Loquet à ressort
Goupille de
positionnement
3
Fixer le batteur plat. Insérer le
batteur plat sur l’arbre du batteur.
Tourner le batteur vers la gauche en
l’accrochant sur la goupille.
4
Relever le bol et le placer en
position pour le processus de
mélange. Faire pivoter la manette
de levage du bol dans le sens
antihoraire pour la placer en position
redressée. Le bol doit toujours
être en position redressée lors du
mixage.
Goupille
MISE EN ROUTE DU NOUVEAU MÉLANGEUR LÈVE-BOL SUR SOCLE
Pour une performance idéale, veuillez suivre ces étapes rapides avant d’utiliser le
mélangeur sur socle.
IMPORTANT : Si le bol n’est pas bien
emboîté, il sera instable et peut tanguer
durant son utilisation.
POUR OBTENIR DES RENSEIGNEMENTS DÉTAILLÉS SUR L’UTILISATION
DU BATTEUR SUR SOCLE
Visiter le KitchenAid.ca pour des instructions supplémentaires avec vidéos, des recettes
qui inspirent et des conseils sur la façon d’utiliser le batteur sur socle.
W10862776C_FR_v02.indd 18 6/13/17 2:30 PM

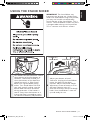
UTILISATION DU MÉLANGEUR SUR SOCLE | 19
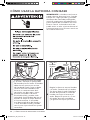
FRANÇAIS
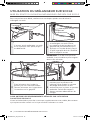
UTILISATION DU MÉLANGEUR SUR SOCLE
5
Vérifier qu’il existe bien un espace
entre le mélangeur et le bol. Vérifier
que le batteur plat est proche du
bol. Le mélangeur doit être très près
du fond du bol mais il ne doit pas
le toucher. Brancher le batteur sur
socle sur une prise à 3 alvéoles reliée
à la terre. Brancher le mélangeur sur
socle. Mettre le mélangeur sur socle
en marche et le faire fonctionner à
chaque vitesse en s’assurant que
le batteur plat ne touche pas le
bol durant son fonctionnement.
Si le batteur plat est trop loin du
fond du bol ou s’il touche le bol,
passer à l’étape 6 pour effectuer les
ajustements nécessaires.
6
Ajuster le dégagement entre le
mélangeur et le bol. Débrancher
le mélangeur sur socle. Abaisser
complètement le bol. Ajuster la
vis de réglage de la hauteur du
batteur pour abaisser ou élever le
bol. Répéter les étapes 2 à 5 avec
le fouet en acier inoxydable et le
crochet pétrisseur en spirale. Ce
mélangeur sur socle est désormais
installé et prêt à être utilisé.
Soulever
le bol
Abaisser
le bol
IMPORTANT : Il est possible que le
mélangeur sur socle chauffe durant
son utilisation. Lorsque l’on mélange
de grosses préparations pendant une
période prolongée, il est possible que
toucher le sommet du mélangeur sur
socle soit inconfortable. Ceci est normal.
Il est possible que le moteur du
mélangeur sur socle produise une
odeur âcre lors de sa première
utilisation. Ce phénomène est
fréquent avec les moteurs électriques.
W10862776C_FR_v02.indd 19 6/13/17 2:30 PM

20 | ENTRETIEN ET NETTOYAGE
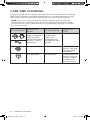
ENTRETIEN ET NETTOYAGE
Le bol en acier inoxydable, le batteur métallique plat avec revêtement, et le crochet
pétrisseur métallique en spirale avec revêtement sont lavables au lave-vaisselle. On peut
aussi les laver soigneusement à l’eau chaude savonneuse et les rincer complètement
avant de les sécher. Ne pas laisser les batteurs sur l’arbre.
REMARQUE : Veiller à toujours débrancher le mélangeur sur socle avant le nettoyage.
Essuyer le mélangeur sur socle avec un linge doux et humide. Ne pas utiliser de
nettoyants vendus dans le commerce/à usage domestique. Ne pas immerger dans
l’eau. Essuyer l’arbre du batteur fréquemment, et éliminer tous les résidus qui
pourraient s’y être accumulés.
ACCESSOIRES MÉTAL POLI
MÉTAL AVEC
REVÊTEMENT
ACIER
INOXYDABLE
Le batteur en
métal poli et le
crochet pétrisseur
doivent être lavés
à la main. Ceux-ci
peuvent subir une
décoloration s’ils
sont lavés au
lave-vaisselle.
On peut nettoyer
les mélangeurs
métalliques avec
revêtement blanc
ou argenté au lave-
vaisselle (Disponible
sur la plupart des
modèles)
Non applicable
Non applicable Non applicable Tous les fouets
métalliques
sont en acier
inoxydable et
doivent être lavés
uniquement
à la main.
Non applicable Non applicable Tous les bols
métalliques sont
en acier inoxydable
et sont lavables
au lave-vaisselle.
(Disponible sur
tous les modèles
lève-bol)
W10862776C_FR_v02.indd 20 6/13/17 2:30 PM
La page est en cours de chargement...
La page est en cours de chargement...
La page est en cours de chargement...
La page est en cours de chargement...
La page est en cours de chargement...
La page est en cours de chargement...
La page est en cours de chargement...
La page est en cours de chargement...
La page est en cours de chargement...
La page est en cours de chargement...
La page est en cours de chargement...
La page est en cours de chargement...
La page est en cours de chargement...
La page est en cours de chargement...
La page est en cours de chargement...
La page est en cours de chargement...
La page est en cours de chargement...
La page est en cours de chargement...
La page est en cours de chargement...
La page est en cours de chargement...
-
 1
1
-
 2
2
-
 3
3
-
 4
4
-
 5
5
-
 6
6
-
 7
7
-
 8
8
-
 9
9
-
 10
10
-
 11
11
-
 12
12
-
 13
13
-
 14
14
-
 15
15
-
 16
16
-
 17
17
-
 18
18
-
 19
19
-
 20
20
-
 21
21
-
 22
22
-
 23
23
-
 24
24
-
 25
25
-
 26
26
-
 27
27
-
 28
28
-
 29
29
-
 30
30
-
 31
31
-
 32
32
-
 33
33
-
 34
34
-
 35
35
-
 36
36
-
 37
37
-
 38
38
-
 39
39
-
 40
40


KitchenAid KP26M9PC Mode d'emploi
- Catégorie
- Mélangeurs
- Taper
- Mode d'emploi
dans d''autres langues
- English: KitchenAid KP26M9PC User guide
- español: KitchenAid KP26M9PC Guía del usuario
Documents connexes
-
KitchenAid KSM6521XSR Manuel utilisateur
-
KitchenAid KSM5SSB Mode d'emploi
-
KitchenAid Professional 5 Plus Series Bowl-Lift Manuel utilisateur
-
KitchenAid KP26M1XSL5 Le manuel du propriétaire
-
-
KitchenAid KSM7586P Manuel utilisateur
-
-
-
-