
Octubre 1998
MEAT MINCER
P-12
PICADORA DE CARNE
P-12
HACHOIR À VIANDE
P-12
C
1
2
4
a
b
c
5
8
e
h
d
M
Marrón
Brown
Marron
Marrón
Brown
Marron
Amarillo-Verde
Yelow-Green
Jaune-Verte
Azul
Blue
Bleu
Azul
Blue
Bleu
Negro
Black
Noir
Blanco
White
Blanc
220V / 50Hz / 1~
ALIMENTATION ÉLECTRIQUEELECTRICAL SUPPLYALIMENTACION ELECTRICA 220V / 50Hz / 1~
ELECTRICAL LOADINGPOTENCIA ELECTRICA
DIMENSIONS EXTÉRIEURES
-Largeur
-Profondeur
-Hauteur
EXTERNAL DIMENSIONS
-Width
-Depth
-Height
DIMENSIONES EXTERIORES
-Ancho
-Fondo
-Alto
235 mm
400 mm
450 mm
POIDS NETNET WEIGHTPESO NETO 19 kg
CARACTÉRISTIQUESSPECIFICATIONSCARACTERÍSTICAS P-12
PUISSANCE ÉLECTRIQUE 440 W
Nota: Todas estas especificaciones están sujetas a permanentes innovaciones exigidas por la mejora de nuestros productos.
Note: These specifications are subject to change without notice due to continous improvement.
Note: SAMMIC se réserve le droit de modifier et améliorer ses fabrications sans préavis.
ER-437/1/96
UNE-EN ISO 9001
SAMMIC, S.A. (Sociedad Unipersonal) C/ Atxubiaga, 14 - 20730 AZPEITIA (ESPAÑA)

P-12
2 3
STARTING
1.Open the drive socket, fit the mincer hou-
sing, close the drive socket and fasten secu-
rely.
2.Insert the worm drive into the mincer hou-
sing and check that it is properly engaged.
3.Slide the cutter knife on the worm drive
ensuring the edge faces outwards.
4.Place the perforated plate on the worm drive
against the cutter knife.
5.Screw the retaining ring firmly on to the end
of the mincer housing.
6.Mount the feed pan on top of the mincer
housing and secure the fixing screw.
7.Plug in to the mains supply.
The mincer is fitted with a two directional
motor, forward and reverse:
a.Normal use. Switch in position one (for-
ward).
b.Reserve. If the mincer jams during use,
stop it immediately, turn the switch to “reser-
ve”, then back to “forward”. If this does not
clear the obstruction, insolate the mincer from
the electric supply and dismantle to rectify.
NOTE: Always use the pusher provided to
feed the mincer. Do not use any other
implement as for safety reasons the length
is critical and never use your fingers.
MAINTENANCE
-Oil should be changed approximately avery
two years: 0,7 l SAE 90.
-All the elements that are in contact with the
product, should be cleaned inmediately after
use with hot water and a food compatible
detergent.
Clear copiously with hot water and desinfect
with a soft cloth impregnated with 90º ethyl
alcohol.
-The outside of the machine MUST NOT BE
washed under a direct water jet; instead you
can use a wet cloth and any ordinary deter-
gent.
-Inspect periodically the ventilation grill, in
case they would be clogged.
-In the event the power supply cable should
get damaged and have to be replaced, the
repair may only be done by a SAMMIC appro-
ved assistance service.
-Never put the hand nor utensils in the machi-
ne when the unit is operating, to prevent of
injuries or damage in the unit.
-Before cleaning, overhauling or repairing the
meat mincer, it is necessary to unplug it from
the mains.
-Blades are sharp-edged and must be hand-
led with care when cleaning them.
-The level of noise emission for a machine
working loaded, placed 1,6 metre high and
measured at a distance of 1 metre is less than
70 dB(A). Background noise: 32 dB(A).
PUESTA EN MARCHA
1.Soltar la roseta de la toma de accesorios y
acoplar el cuerpo, volviendo a atar la roseta
fuertemente.
2.Introducir el conjunto sinfín en el cuerpo y
comprobar que no se puede girar con la
mano.
3.Colocar la cuchilla en el conjunto sinfín con
el filo hacia el exterior.
4.Colocar la placa perforada sobre la cuchilla.
5.Roscar la tuerca de blocaje en el extremo
del cuerpo, apretando con la mano.
6.Colocar la tolva encima del cuerpo y atorni-
llar fuertemente.
7.Conectar la máquina a la tensión de la red.
La máquina dispone de dos sentidos de giro,
con el fin de desatascarla en caso de blo-
queo:
a.Marcha normal. Interruptor en posición I. La
máquina realiza su trabajo normal.
b.Marcha inversa. Si durante el trabajo normal
la máquina se bloquea, parar inmediatamen-
te y girar el interruptor a “marcha inversa”.
Seguidamente, accionar “marcha normal” y
continuar el trabajo.
NOTA: Es muy peligroso introducir la
carne con los dedos. Utilice siempre el
mazo empujador.
MANTENIMIENTO
-Cambiar el aceite cada 2 años aproximada-
mente: 0,7 litros SAE 90 o similar.
-Todos los elementos del aparato que están
en contacto con los alimentos se deben lim-
piar inmediatamente después de su utiliza-
ción, con agua caliente y un detergente admi-
tido en alimentación.
Después, aclarar con abundante agua calien-
te y desinfectar con un paño suave impregna-
do en alcohol etílico a 90º.
-El exterior del aparato NO SE DEBE limpiar
con un chorro directo de agua. Emplear para
su limpieza un paño húmedo y cualquier
detergente habitual.
-Vigilar periódicamente que la rejilla de venti-
lación no se obstruya.
-Si el cable de alimentación se deteriora y es
preciso instalar uno nuevo, dicho recambio
sólo podrá ser realizado por un servicio técni-
co reconocido por SAMMIC.
-No introducir nunca la mano ni utensilio algu-
no en el aparato, a fin de evitar daños perso-
nales o daños materiales.
-Antes de cualquier intervención para la lim-
pieza, revisión o reparación del aparato, es
obligatorio desconectar la máquina de la red.
-Las cuchillas están afiladas. Se deben mane-
jar con precaución durante su limpieza.
-Nivel de ruido de la máquina, en marcha,
colocada a 1,6 m de altura y 1 m de distancia,
inferior a 70 dB(A). Ruido de fondo: 32 db(A).
MISE EN MARCHE
1.Ouvrir la prise, mettre en place le corps du
hachoir, fermer la prise et la fixer fermement.
2.Introduir la vis sans-fin dans le corps du
hachoir et vérifier qu’on ne peut pas la faire
tourner avec la main.
3.Placer le couteau-hélice dans la vis sans-fin
avec le tranchant vers l’extérieur.
4.Placer la plaque sur le couteau-hélice.
5.Placer l’écrou de blocage sur le corps du
hachoir et visser fermement.
6.Placer la trémie d’alimentation sur le corps
du hachoir et visser à fond.
7.Brancher la machine.
Le moteur a deux sens de rotation, normal et
marche arrière pour déboucher:
a.Marche normale. Interrupteur en position I.
b.Marche arrière. Si la machine s’obstrue pen-
dant l’óperation, arrêter immédiatement et
tourner l’interrupteur vers la marche arrière.
De suite faire marche normale pour continuer.
NOTE: Il est très dangereux de mettre la
viande avec les doigts. Utiliser toujours le
pilon poussoir.
MAINTENANCE
-Vidanger et changer l’huile tous les 2 années
environ: 0,7 l SAE 90.
-Après utilisation, nettoyer impérativement
toutes les pièces de la machine qui sont en
contact avec les aliments, à l’eau chaude
additionnée de détergent alimentaire.
Après, rinçer abondament à l’eau chaude et
désinfecter à l’aide d’un chiffon imprégné d’al-
cool à 90º.
-Ne pas nettoyer l’extérieur au jet d’eau, mais
avec un chiffon humide et un détergent cou-
rant.
-Vérifier régulièrement que les grilles d’aéra-
tion ne sont pas obstruées.
-Si le câble d’alimentation est en panne, le
changement doit être recommandé à un tech-
nicien reconnu par SAMMIC.
-Ne jamais introduire ni la main ni quelque
outil dans l’hachoir pendant la marche, pour
éviter de graves blessures ou que l’appareil
s’endommage.
-Avant une intervention sur l’appareil, soit
pour le nettoyer, soit pour le réparer, il est
impératif de le débrancher.
-Les couteaux étant aiguisés, les nettoyer
avec délicatesse.
-Le niveau de bruit de la machine en marche,
posée à 1,6 mètre de haut et à une distance
d’un mètre est inférieur à 70 dB(A). Bruit de
fond: 32 dB(A).
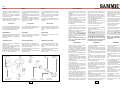
Tapones aceite
Oil caps
Tolva
Feed pan
Roseta
Socket knob
Sinfin
Worm drive
Placa perforada
Perforated plate
Cuchilla
Cutter knife
Cuerpo
Mincer housing
Interruptor
Swith
Junta tapa trasera
Back cover joint
Tuerca de blocaje
Retaining ring
MODELOS
Este manual describe la instalación, funcio-
namiento y mantenimiento de la picadora de
carne P-12.
La referencia del modelo y sus característi-
cas se indican en la placa de identificación
colocada en la máquina.
Esta máquina está diseñada y fabricada de
acuerdo con las directivas Europeas 89 / 392
/ CEE, 93 / 68 CEE, 73 / 23 / CEE.
INSTALACION
Para conseguir las mejores prestaciones, así
como una buena conservación de la máqui-
na, hay que seguir cuidadosamente las ins-
trucciones contenidas en este manual.
EMPLAZAMIENTO
Colocar la máquina de tal manera que quede
debidamente nivelada. Para evitar daños, la
máquina no debe apoyarse nunca sobre uno
de sus lados.
CONEXION ELECTRICA
La máquina, monofásica, se suministra para
tensión de 220V.
Antes de conectar la picadora a la red, com-
probar si el motor está preparado para el
mismo voltaje que el de la red.
Es obligatoria la conexión con Tierra. El hilo
de toma-tierra de la máquina está señalizado.
Preparar una toma de corriente mural 2P+T
de 20A y su clavija correspondiente.
MODELS
This manual describes the installation, opera-
tion and maintenance of the electrical meat
mincer P-12.
The model reference and its specifications
are shown on the identification plate located
in the machine.
These meat mincers have been designed and
manufactured in accordance with the follo-
wing European directives: 89/392/EEC,
93/68/EEC and 73/23/EEC.
INSTALLATION
For a suitable working operation and long
service life of the machine, follow the instruc-
tions contained in this manual.
POSITIONING
Place the machine so that it stands perfectly
levelled. To avoid damages, never lean the
machine on one of its sides.
ELECTRIC INSTALLATION
Single-phase motor, are supplied for 220V.
Before connecting the meat mincer to the
mains, check if the motor is prepared for the
same voltage as the mains.
They must be earthed. The grounding wire of
the machine is identified.
Prepare one 20A, 2P+T wall socket and the
corresponding plug.
MODÈLES
Ce manuel explique l’installation, le fonction-
nement et la maintenance du hachoir à vian-
de P-12.
La référence du modèle et ses caractéristi-
ques sont indiquées sur la plaque d’identifi-
cation située dans la machine.
Ce machine est en conformité avec les nor-
mes Européennes 89/392/CEE, 93/68/CEE,
73/23/CEE.
INSTALLATION
Pour obtenir une bonne utilisation et une
bonne conservation de la machine, prière de
suivre les indications contenues dans le
manuel.
EMPLAÇEMENT
La présenter sur une surfaçe lisse, libre de
tout mouvement.
INSTALLATION ÉLECTRIQUE
Le moteur, Monophasé, est utilisé en 220V.
Avant de brancher l’appareil sur le réseau,
vérifier que le moteur correspond au même
voltage.
Le branchement avec la Terre est obligatoire.
Le fil se trouve dans la fiche.
Préparer une prise de courant murale 2P+T
de 20A et une fiche.

P-12
2 3
STARTING
1.Open the drive socket, fit the mincer hou-
sing, close the drive socket and fasten secu-
rely.
2.Insert the worm drive into the mincer hou-
sing and check that it is properly engaged.
3.Slide the cutter knife on the worm drive
ensuring the edge faces outwards.
4.Place the perforated plate on the worm drive
against the cutter knife.
5.Screw the retaining ring firmly on to the end
of the mincer housing.
6.Mount the feed pan on top of the mincer
housing and secure the fixing screw.
7.Plug in to the mains supply.
The mincer is fitted with a two directional
motor, forward and reverse:
a.Normal use. Switch in position one (for-
ward).
b.Reserve. If the mincer jams during use,
stop it immediately, turn the switch to “reser-
ve”, then back to “forward”. If this does not
clear the obstruction, insolate the mincer from
the electric supply and dismantle to rectify.
NOTE: Always use the pusher provided to
feed the mincer. Do not use any other
implement as for safety reasons the length
is critical and never use your fingers.
MAINTENANCE
-Oil should be changed approximately avery
two years: 0,7 l SAE 90.
-All the elements that are in contact with the
product, should be cleaned inmediately after
use with hot water and a food compatible
detergent.
Clear copiously with hot water and desinfect
with a soft cloth impregnated with 90º ethyl
alcohol.
-The outside of the machine MUST NOT BE
washed under a direct water jet; instead you
can use a wet cloth and any ordinary deter-
gent.
-Inspect periodically the ventilation grill, in
case they would be clogged.
-In the event the power supply cable should
get damaged and have to be replaced, the
repair may only be done by a SAMMIC appro-
ved assistance service.
-Never put the hand nor utensils in the machi-
ne when the unit is operating, to prevent of
injuries or damage in the unit.
-Before cleaning, overhauling or repairing the
meat mincer, it is necessary to unplug it from
the mains.
-Blades are sharp-edged and must be hand-
led with care when cleaning them.
-The level of noise emission for a machine
working loaded, placed 1,6 metre high and
measured at a distance of 1 metre is less than
70 dB(A). Background noise: 32 dB(A).
PUESTA EN MARCHA
1.Soltar la roseta de la toma de accesorios y
acoplar el cuerpo, volviendo a atar la roseta
fuertemente.
2.Introducir el conjunto sinfín en el cuerpo y
comprobar que no se puede girar con la
mano.
3.Colocar la cuchilla en el conjunto sinfín con
el filo hacia el exterior.
4.Colocar la placa perforada sobre la cuchilla.
5.Roscar la tuerca de blocaje en el extremo
del cuerpo, apretando con la mano.
6.Colocar la tolva encima del cuerpo y atorni-
llar fuertemente.
7.Conectar la máquina a la tensión de la red.
La máquina dispone de dos sentidos de giro,
con el fin de desatascarla en caso de blo-
queo:
a.Marcha normal. Interruptor en posición I. La
máquina realiza su trabajo normal.
b.Marcha inversa. Si durante el trabajo normal
la máquina se bloquea, parar inmediatamen-
te y girar el interruptor a “marcha inversa”.
Seguidamente, accionar “marcha normal” y
continuar el trabajo.
NOTA: Es muy peligroso introducir la
carne con los dedos. Utilice siempre el
mazo empujador.
MANTENIMIENTO
-Cambiar el aceite cada 2 años aproximada-
mente: 0,7 litros SAE 90 o similar.
-Todos los elementos del aparato que están
en contacto con los alimentos se deben lim-
piar inmediatamente después de su utiliza-
ción, con agua caliente y un detergente admi-
tido en alimentación.
Después, aclarar con abundante agua calien-
te y desinfectar con un paño suave impregna-
do en alcohol etílico a 90º.
-El exterior del aparato NO SE DEBE limpiar
con un chorro directo de agua. Emplear para
su limpieza un paño húmedo y cualquier
detergente habitual.
-Vigilar periódicamente que la rejilla de venti-
lación no se obstruya.
-Si el cable de alimentación se deteriora y es
preciso instalar uno nuevo, dicho recambio
sólo podrá ser realizado por un servicio técni-
co reconocido por SAMMIC.
-No introducir nunca la mano ni utensilio algu-
no en el aparato, a fin de evitar daños perso-
nales o daños materiales.
-Antes de cualquier intervención para la lim-
pieza, revisión o reparación del aparato, es
obligatorio desconectar la máquina de la red.
-Las cuchillas están afiladas. Se deben mane-
jar con precaución durante su limpieza.
-Nivel de ruido de la máquina, en marcha,
colocada a 1,6 m de altura y 1 m de distancia,
inferior a 70 dB(A). Ruido de fondo: 32 db(A).
MISE EN MARCHE
1.Ouvrir la prise, mettre en place le corps du
hachoir, fermer la prise et la fixer fermement.
2.Introduir la vis sans-fin dans le corps du
hachoir et vérifier qu’on ne peut pas la faire
tourner avec la main.
3.Placer le couteau-hélice dans la vis sans-fin
avec le tranchant vers l’extérieur.
4.Placer la plaque sur le couteau-hélice.
5.Placer l’écrou de blocage sur le corps du
hachoir et visser fermement.
6.Placer la trémie d’alimentation sur le corps
du hachoir et visser à fond.
7.Brancher la machine.
Le moteur a deux sens de rotation, normal et
marche arrière pour déboucher:
a.Marche normale. Interrupteur en position I.
b.Marche arrière. Si la machine s’obstrue pen-
dant l’óperation, arrêter immédiatement et
tourner l’interrupteur vers la marche arrière.
De suite faire marche normale pour continuer.
NOTE: Il est très dangereux de mettre la
viande avec les doigts. Utiliser toujours le
pilon poussoir.
MAINTENANCE
-Vidanger et changer l’huile tous les 2 années
environ: 0,7 l SAE 90.
-Après utilisation, nettoyer impérativement
toutes les pièces de la machine qui sont en
contact avec les aliments, à l’eau chaude
additionnée de détergent alimentaire.
Après, rinçer abondament à l’eau chaude et
désinfecter à l’aide d’un chiffon imprégné d’al-
cool à 90º.
-Ne pas nettoyer l’extérieur au jet d’eau, mais
avec un chiffon humide et un détergent cou-
rant.
-Vérifier régulièrement que les grilles d’aéra-
tion ne sont pas obstruées.
-Si le câble d’alimentation est en panne, le
changement doit être recommandé à un tech-
nicien reconnu par SAMMIC.
-Ne jamais introduire ni la main ni quelque
outil dans l’hachoir pendant la marche, pour
éviter de graves blessures ou que l’appareil
s’endommage.
-Avant une intervention sur l’appareil, soit
pour le nettoyer, soit pour le réparer, il est
impératif de le débrancher.
-Les couteaux étant aiguisés, les nettoyer
avec délicatesse.
-Le niveau de bruit de la machine en marche,
posée à 1,6 mètre de haut et à une distance
d’un mètre est inférieur à 70 dB(A). Bruit de
fond: 32 dB(A).
Tapones aceite
Oil caps
Tolva
Feed pan
Roseta
Socket knob
Sinfin
Worm drive
Placa perforada
Perforated plate
Cuchilla
Cutter knife
Cuerpo
Mincer housing
Interruptor
Swith
Junta tapa trasera
Back cover joint
Tuerca de blocaje
Retaining ring
MODELOS
Este manual describe la instalación, funcio-
namiento y mantenimiento de la picadora de
carne P-12.
La referencia del modelo y sus característi-
cas se indican en la placa de identificación
colocada en la máquina.
Esta máquina está diseñada y fabricada de
acuerdo con las directivas Europeas 89 / 392
/ CEE, 93 / 68 CEE, 73 / 23 / CEE.
INSTALACION
Para conseguir las mejores prestaciones, así
como una buena conservación de la máqui-
na, hay que seguir cuidadosamente las ins-
trucciones contenidas en este manual.
EMPLAZAMIENTO
Colocar la máquina de tal manera que quede
debidamente nivelada. Para evitar daños, la
máquina no debe apoyarse nunca sobre uno
de sus lados.
CONEXION ELECTRICA
La máquina, monofásica, se suministra para
tensión de 220V.
Antes de conectar la picadora a la red, com-
probar si el motor está preparado para el
mismo voltaje que el de la red.
Es obligatoria la conexión con Tierra. El hilo
de toma-tierra de la máquina está señalizado.
Preparar una toma de corriente mural 2P+T
de 20A y su clavija correspondiente.
MODELS
This manual describes the installation, opera-
tion and maintenance of the electrical meat
mincer P-12.
The model reference and its specifications
are shown on the identification plate located
in the machine.
These meat mincers have been designed and
manufactured in accordance with the follo-
wing European directives: 89/392/EEC,
93/68/EEC and 73/23/EEC.
INSTALLATION
For a suitable working operation and long
service life of the machine, follow the instruc-
tions contained in this manual.
POSITIONING
Place the machine so that it stands perfectly
levelled. To avoid damages, never lean the
machine on one of its sides.
ELECTRIC INSTALLATION
Single-phase motor, are supplied for 220V.
Before connecting the meat mincer to the
mains, check if the motor is prepared for the
same voltage as the mains.
They must be earthed. The grounding wire of
the machine is identified.
Prepare one 20A, 2P+T wall socket and the
corresponding plug.
MODÈLES
Ce manuel explique l’installation, le fonction-
nement et la maintenance du hachoir à vian-
de P-12.
La référence du modèle et ses caractéristi-
ques sont indiquées sur la plaque d’identifi-
cation située dans la machine.
Ce machine est en conformité avec les nor-
mes Européennes 89/392/CEE, 93/68/CEE,
73/23/CEE.
INSTALLATION
Pour obtenir une bonne utilisation et une
bonne conservation de la machine, prière de
suivre les indications contenues dans le
manuel.
EMPLAÇEMENT
La présenter sur une surfaçe lisse, libre de
tout mouvement.
INSTALLATION ÉLECTRIQUE
Le moteur, Monophasé, est utilisé en 220V.
Avant de brancher l’appareil sur le réseau,
vérifier que le moteur correspond au même
voltage.
Le branchement avec la Terre est obligatoire.
Le fil se trouve dans la fiche.
Préparer une prise de courant murale 2P+T
de 20A et une fiche.

Octubre 1998
MEAT MINCER
P-12
PICADORA DE CARNE
P-12
HACHOIR À VIANDE
P-12
C
1
2
4
a
b
c
5
8
e
h
d
M
Marrón
Brown
Marron
Marrón
Brown
Marron
Amarillo-Verde
Yelow-Green
Jaune-Verte
Azul
Blue
Bleu
Azul
Blue
Bleu
Negro
Black
Noir
Blanco
White
Blanc
220V / 50Hz / 1~
ALIMENTATION ÉLECTRIQUEELECTRICAL SUPPLYALIMENTACION ELECTRICA 220V / 50Hz / 1~
ELECTRICAL LOADINGPOTENCIA ELECTRICA
DIMENSIONS EXTÉRIEURES
-Largeur
-Profondeur
-Hauteur
EXTERNAL DIMENSIONS
-Width
-Depth
-Height
DIMENSIONES EXTERIORES
-Ancho
-Fondo
-Alto
235 mm
400 mm
450 mm
POIDS NETNET WEIGHTPESO NETO 19 kg
CARACTÉRISTIQUESSPECIFICATIONSCARACTERÍSTICAS P-12
PUISSANCE ÉLECTRIQUE 440 W
Nota: Todas estas especificaciones están sujetas a permanentes innovaciones exigidas por la mejora de nuestros productos.
Note: These specifications are subject to change without notice due to continous improvement.
Note: SAMMIC se réserve le droit de modifier et améliorer ses fabrications sans préavis.
ER-437/1/96
UNE-EN ISO 9001
SAMMIC, S.A. (Sociedad Unipersonal) C/ Atxubiaga, 14 - 20730 AZPEITIA (ESPAÑA)
-
 1
1
-
 2
2
-
 3
3
-
 4
4


dans d''autres langues
- English: Sammic P-12 Operating instructions
- español: Sammic P-12 Instrucciones de operación
Documents connexes
Autres documents
-
Hobart 4812 Chopper Le manuel du propriétaire
-
-
Bodum Bistro Meat Mincer 11514 Manuel utilisateur
-
Unold 78131 Le manuel du propriétaire
-
Fakir FWO Le manuel du propriétaire
-
Ankarsrum 6230 Rouge Le manuel du propriétaire
-
 Assistent n30 Manuel utilisateur
-
Bosch MUZ8FA1 Manuel utilisateur
-
Bosch MUM55761/06 Le manuel du propriétaire
