Fakir FWO Le manuel du propriétaire
- Catégorie
- Hachoirs
- Taper
- Le manuel du propriétaire
Ce manuel convient également à

Gebrauchsanleitung
Instructions for use
Mode d´emploi
Instrucciones de uso
Fleischwolf
Mincing machine
Hachoir
Picadora de carne
Prestige FWO

2

Tables des matiéres
Informationen für Ihr Sicherheit und Entsorgungshinweise Seite 4-5
Grundausstattung Seite 6
Inbetriebnahme Seite 6-9
Nach dem Gebrauch Seite 9
Informations for your safety and notes on disposal page 10-11
Standard equipment page 12
Operation and use page 12-15
After use page 15
Informations pour votre sécurité et remarques d’ordre général page 16-17
Accessoires des base page 18
Mise en service page 18-21
Aprés l’emploi page 21
Informaciones para su seguridad e instrucciones para
la eliminación del aparato desechado Pág. 22-23
Eqipamiento básico Pág. 24
Puesta en funcionamiento Pág. 24-27
Despues del uso Pág. 27
3
Inhaltsverzeichnis
D
Table of contents
GB
Indice
E
F

4
Vor dem Gebrauch
• Bitte lesen Sie alle im folgenden aufgeführten Informationen aufmerksam durch. Sie
geben wichtige Hinweise für den Einsatz, die Sicherheit sowie die Wartung/Pflege der
Geräte. Bewahren Sie die Gebrauchsanleitung sorgfältig auf und geben Sie diese
gegebenenfalls an den Nachbesitzer weiter.
• Fakir Geräte entsprechen den anerkannten Regeln der Technik und dem aktuellen
Gerätesicherheitsgesetz.
• Diese Geräte erfüllen die Anforderungen der EG-Richtlinien 89/336/EWG
“Elektromagnetische Verträglichkeit” und 73/23/EWG “Niederspannungsrichtlinie”.
Das Gerät trägt auf dem Typenschild die CE-Kennzeichnung.
• Fakir behält sich Konstruktions- und Ausstattungsänderungen vor.
Allgemeine Hinweise
• Dieses Gerät ist nur für Haushalt
szwecke geeignet.
• Das Gerät nicht in Betrieb nehmen, wenn das Gehäuse erkennbare Schäden (Risse
oder Brüche) aufweist, die Anschlussleitung defekt ist oder der Verdacht auf einen
unsichtbaren Defekt (z.B. nach einem Sturz) besteht.
• Das Gerät nur dann anschließen, wenn die auf dem Typenschild angegebene
Spannung mit der Netzspannung übereinstimmt.
• Die Steckdose muss über einen 10A-Sicherungsautomaten abgesichert werden.
• Wird das Gerät zweckentfremdet, unsachgemäß bedient oder nicht fachgerecht repa-
riert und gewartet, kann keine Haftung für eventuelle Schäden übernommen werden.
• Das Zerkleinerungsgehäuse, die Förderschnecke sowie den Verschlussring nicht im
Geschirrspülautomat waschen. Scharfe Reiniger verursachen eine Verdunkelung die-
ser Teile. Es empfiehlt sich, diese Teile mit der Hand unter Zugabe von üblichen
Geschirrspülmitteln zu waschen.
• Das zu zerkleinende Fleisch sollte keine Knochen, Knorpel oder Sehnen enthalten.
• Die Produkte vor der Zerkleinerung in kleine Stücke schneiden, damit man sie ohne
Schwierigkeiten in das Gehäuse stecken kann.
• Drücken Sie die zu verwendeten Produkte nur mit dem Stopfer in den Einfüllschacht.
Das Benutzen anderer Gegenstände wie z.B. Löffel oder Gabel können eine Beschä-
digung des Gerätes und des Motorblocks hervor rufen.
• Das Gerät während des Betriebes nicht mit einer zu großen Menge Fleisch belasten
und darauf achten, dass der Stopfer nicht zu stark in den Füllschacht gedrückt wird.
• Das Gerät hat eine elektrische Schutzeinrichtung - eine Schmelzsicherung. Falls der
Motor nicht anläuft, wenden Sie sich an einen Fakir-Kundendienst.
• Beim Reinigen und Warten des Gerätes, beim Auswechseln von Teilen oder beim
Umstellen auf eine andere Funktion ist das Gerät auszuschalten und der Netzstecker
zu ziehen.
• Kindern die Benutzung von Elektrogeräten nur unter Aufsicht gestatten.
• Reparaturen dürfen nur von Fachkräften (z.B. Fakir-Kundendienst) ausgeführt wer-
den. Dabei dürfen nur Original Fakir-Ersatzteile eingesetzt werden. Nicht fachgerecht
reparierte Geräte stellen eine Gefahr für den Benutzer dar. Lassen Sie die heißen
Flächen abkühlen, bevor Teile angebaut oder abgenommen werden
Informationen für Ihre Sicherheit und Entsorgungshinweise

5
Sicherheits-Hinweise
• Zur Vermeidung von Feuer, elektrischem Schlag und Personenschäden darf das
Netzkabel, der Netzstecker oder das Gerät selbst niemals in Wasser oder andere
Flüssigkeiten getaucht werden.
• Den Stecker nie über die Anschlussleitung aus der Steckdose ziehen.
• Die Anschlussleitung nicht über scharfe Kanten ziehen oder einklemmen.
• Keine beschädigten Verlängerungsleitungen verwenden.
• Die Netzanschlussleitung darf nur von einer autorisierten Fakir-Kundendienstwerkstatt
ersetzt werden.
• Das Netzkabel darf keine heißen Flächen berühren, einschließlich Herd.
• Das Gerät darf nicht auf oder in die Nähe von heißen Gas- oder Elektrokochplatten
oder einem geheizten Backofen aufgestellt werden.
• Vor jeder Wartung, Reinigung und nach dem Gebrauch das Gerät ausschalten und
den Netzstecker ziehen.
• Das Gerät nicht im Freien aufbewahren.
• Gerät keinen Witterungseinflüssen, keiner Feuchtigkeit und keinen Hitzequellen aus-
setzen.
• Das Gerät nur trocken oder mit einem leicht feuchten Tuch reinigen.
Entsorgungs-Hinweise
• Bitte werfen Sie die Verpackung und später das ausgediente Gerät nicht einfach weg,
sondern entsorgen Sie alles gemäß den von Ihrer Stadt-/Gemeindeverwaltung oder
vom zuständigen Entsorgungsunternehmen aufgestellten Richtlinien.
• Das Verpackungsmaterial sortenrein in die dafür vorgesehenen Sammelbehälter
geben, damit es der Wiederverwendung zugeführt werden kann.
• Das ausgediente Gerät bei der dafür vorgesehenen Sammelstelle abgeben.
Technische Daten
Die technischen Parameter sind auf dem Typenschild des Gerätes angegeben.
Das Gerät benötigt keine Erdung
Kurzbetrieb (ohne Unterbrechnung) 10 Min.
Betreibspause vor erneutem Einschalten 30 Min.
Informationen für Ihre Sicherheit und Entsorgungshinweise

Dieses Gerät ist ausschließlich für den Haushalt, zum Herstellen von gehacktem Fleisch,
Gemüse u.a. Lebensmitteln bestimmt.
Dieser Fleischwolf ist vielseitig anwendbar und dient zur schnellen und qualitätsgerech-
ten Zerkleinerung von Fleisch, Weißkäse, Gemüse, Mohn - aber auch zur Herstellung
von Wurst- und Geflügelprodukten.
Der Fleischwolf besitzt im Bodenteil einen Hohlraum zur Aufbewahrung einer
Ersatzkupplung, einer Lochscheibe und der Anschlussleitung. In diesem Hohlraum befin-
den sich Lüftungsöffnungen zur Abkühlung des Motors. Aus diesem Grund darf das
betriebsbereite Gerät nicht auf einem weichen Untersatz stehen.
Die Leistungsfähigkeit des Gerätes hängt von der Einhaltung des bestimmungsgemäßen
Gebrauchs ab.
6
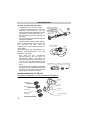
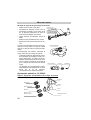
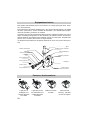
Grundausstattung
Inbetriebnahme
Platz für Kupplung
im Hohlraum des
Bodenteils
Platz für die Loch-
scheiben im Hohl-
raum des Bodenteils
Gekürzte
Anschlussleitung
Unterbringung
der gesamten
Anschlussleitung
mit Netzstecker
Zerkleinerungsgehäuse
Kupplung
Förderschnecke kompl.
Messer
Lochscheibe ø 8
Lochscheibe ø 4
Verschlussring
Lochscheibe ø2,5
................................ Stopfer
Tablett mit Einfüllschacht
EintriegelungstasteMesser
..... Antriebskopf
..... Netzschalter
............... Motorblock
......... Anschlussleitung mit Netzstecker

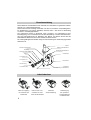
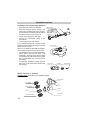
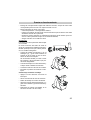
• Die entsprechende Länge der Anschlussleitung herausziehen, den Motorblock auf
eine ebene Fläche in der Nähe der Netzsteckdose stellen.
• Setzen Sie den Fleischwolf, wie folgt zusammen:
- Förderschnecke - Kupplung nach Innen
- auf den Bolzen der Schnecke das Messer so aufsezten, dass die Schneidekanten
zur Lochscheibe weisen
- Die Lochscheibe in das Zerkleinerungsgehäuse so stecken, dass die Kerbung in der
Lochscheibe auf den Gehäusevorsprung trifft
- das Ganze mit dem Verschlussring befestigen.
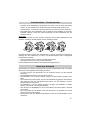
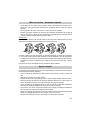
ACHTUNG;
Die Kerbung in der Lochscheibe muss auf den
Vorsprung treffen
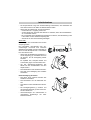
Ein unkorrektes Verschliessen des Ver-
schlussringes verursacht eine schlechte
Zerkleinerungsqualität und kann ebenfalls ein
Grund für das Stumpfsein der Lochscheiben
bzw. des Messers sein.
• Setzen Sie das Zerkleinerungsgehäuse (1)
auf die Kupplung (2) und drehen Sie es in
die Position, bis die Verriegelung hörbar
einrastet.
Es empfiehlt sich, stumpfes Messer und
Lochscheibe gegen neue auszutauschen.
• Auf das Zerkleinerungsgehäuse das
Tablett mit dem Einfüllschacht und dem
Stopfer setzen.
• Den Netzstecker in die Steckdose stecken.
• Den Wolf durch Betätigung des Schalters
einschalten.
Nach Beendigung der Arbeit:
• Den Motor durch erneutes Drücken des
Schalters ausschalten.
• Den Netzstekcer aus der Steckdose zie-
hen.
• Das Tablett mit dem Einfüllschacht abneh-
men.
• Die Entriegelungstaste (1) drücken und
das gesamte Gehäuse (2) nach rechts dre-
hen und abnehmen.
• Auseinanderlegen der Gehäuseteile in
umgekehrter Reihenfolge wie beim
Zusammensetzen.
Inbetriebnahme
7

8
Inbetriebnahme
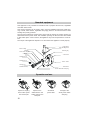
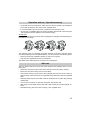
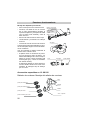
Montage des Wurst-Abfüll-Vorsatzes
• Den Motorblock auf den Tisch stellen.
• In das Gehäuse der Reihe nach einführen:
komplette Förderschnecke, auf den
Schneckenbolzen die Plastikkappe und die
Austrittsdüse (mit der Spitze nach vorn).
• Den Verschlussring bis zum Anschlag auf-
schrauben.
• Das zusammengesetzte Gehäuse mit dem
Motorblock verbinden.
• Den Netzstecker in die Steckdose stecken.
Wenn Sie den Wurstdarm über die Düse zie-
hen, beachten Sie bitte, dass die
Luftöffnungen an der Austrittsdüse nicht ver-
deckt werden.
Nach Beendigung des Arbeitsganges das
Gehäse auseinandernehmen wie beim
Zerkleinern von Fleisch.
• Das Gerät hat eine mechanische
Schutzvorrichtung, die den Motor vor
Zerstörungen schützt - die Zähne der
Antriebskupplung der Förderschnecke bre-
chen ab, wenn das Gerät überlastet wird
(z.B. wenn ins Gehäse Knochen geraten
sind).
Die Reparatur der beschädigten Kupplung
geschieht durch das Herausschrauben der
Schraube an der Förderschnecke. Die alte
Kupplung durch eine neue ersetzen.
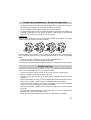
Sonderzubehör Nr. 19 08 810
Gemüseschneidwerk mit verschiedenen Einsätzen
Zerkleinerungsgehäuse
Förderschnecke kompl.
Distanzstück
Wurst-Abfüll-Vorsatz
Verschlussring
Nicht verdecken!
Förderschnecke Kupplung Schraube M5x20
Reibeisen fein
Reibeisen grob
Schneideisen
Reibeisen zum
Zerdrücken
Stopfer
Tablett
Gehäuse
Schnappverschluss

• Produkte, die zur Zerkleinerung vorgesehen sind, sollen vorher in Stücke geschnitten
werden, die man problemlos in das Gehäuse des Gemüsehoblers stecken kann.
• Das Zerkleinern von weichem Obst sowie Kernobst mit hartem Kern wird abgeraten.
• Restzerkleinertes, das im Reibeisen oder im Gehäuse zurück geblieben ist, mit einem
Holzlöffel entfernen. Vorher das Gerät ausschalten und den Netzstecker aus der
Steckdose ziehen.
ACHTUNG:
Vor dem Auswechseln und dem erneuten Anbringen eines anderen Reibeisens in das
Gehäuse, unbedingt den Netzstecker aus der Steckdose ziehen!
Der Nährwert einer Gemüse- oder Obstspeise ist von der Art und Weise der Zubereitung
abhängig. Bei der Zubereitung von Obst- unnd Gemüsespeisen sollen nachfolgende
Punkte beachtet werden:
• Obst und Gemüse nicht zu lange im Wasser liegen lassen.
• Das Gemüse erst kurz vor dem Verzehr zerkleinern.
Die Schneidekanten der Reibeisen benötigen keine Regenerierung.
Die Reinigung und Pflege des Fleischwolfs und des Gemüsehoblers soll nach jedem
Gebrauch in nachfolgender Reihenfolge geschehen:
• Vor dem Reinigen den Netzstecker aus der Steckdose ziehen und die Schüssel
abnehmen.
• Das Zerkleinerungsgehäuse vom Motorblock trennen.
• Den Motorblock nur mit einem feuchten Lappen, mit Brennspiritus getränkt, abwi-
schen.
• Den Verschlussring abschrauben und aus dem Zerkleinerungsgehäuse die einzelnen
Teile entfernen oder den Schnappverschluss öffnen und das Reibeisen aus dem
Gemüsehobler herausnehmen.
• Die Plastikteile in warmen Wasser waschen, hingegen die Metallteile in heißem
Wasser, unter Zusatz von Geschirrspülmitteln.
• Zum Reinigen der Metallteile kann eine weiche Bürste verwendet werden. Alle Teile
gut trocknen.
• Die Lochscheibe und das Messer nach dem Abtrocknen mit Speiseöl zum Schutz
gegen Korrosion leicht einreiben.
• Die trockenen Teile des Zerkleinerungsgehäuses oder des Gemüsehoblers zusam-
menbauen.
9
Nach dem Gebrauch
Inbetriebnahme - Sonderzubehör

10
Before use
• Please read the information below with care. This gives important guidance on the
safety, use and maintenance of the appliance. Keep this booklet in a safe place and,
if appropriate, hand it on to the next owner.
• Fakir appliances comply with recognized technological standards and the current
safety regulations for electrical appliances.
• These appliances fulfil the requirements of EU Guidelines “89/336/EEC
Electromagnetic compatibility” and “73/23/EEC Low voltage guideline”. The appliance
is marked with the CE symbol on the rating plate.
• Fakir reserves the right to modify designs and specifications without notice.
Important information
• This appliance is intended for household use only
.
• Do not switch on the appliance if the housing exhibits any evidence of damage
(cracks/fractures), if the connecting lead is defective, or if an internal defect is sus-
pected (e.g. if the appliance has been dropped).
• Appliance only to be connected to voltage indicated on the rating plate.
• You have acquired an appliance of exceptionally strong suction power. As fuse pro-
tection a min. 10 ampere fuse has to be used.
• Fakir will not accept any liability for damage or injury if the appliance is used other than
for its intended purpose or is improperly operated or inexpertly repaired and maintai-
ned.
• Do not wash the mincer casing, the feed screw or the closing ring in the dishwasher.
Strong detergents will cause these parts to go dark. We recommend washing manual-
ly using a normal washing up detergent.
• The meat which is to be minced should not contain any bones, cartilage or ligaments.
• Cut the product into small pieces before mincing so that it can be easily placed into the
mincer.
• Only use the food pusher to press the products into the filling shaft. If, for example,
spoons or forks are used this could damage the appliance and the motor block.
• Do not overload the appliance with too much meat during operation and ensure that
the food pusher is not pressed too far into the filling shaft.
• The appliance has a safety fuse for electrical protection. If the motor does not start, the
appliance should be brought to an authorised workshop.
• When connecting accessories, cleaning, repairing or servicing the unit, unplug the unit.
• Do not let children use electrical appliances unsupervised.
• Repairs should be carried out by an authorized Fakir service center. Incorrect repairs
may the user to electrical danger. Let the hot surface cool before putting on or taking
off parts.
Safety Precautions
• To protect against fire, electric shock and injury, do not immerse cord, plug or appli-
ance in water or other liquid.
• Do not pull out the plug from power supply socket by pulling on the connecting lead.
• Do not pull the connecting lead over sharp edges or allow it to become jammed.
• Do not use damaged extension leads.
Informations for your safety and notes on disposal

• The supply cable has to be replaced by an autorized Fakir After-Sales-Service only.
• Do not let cord contact hot surface, including the stove.
• Do not place on or near a hot gas or electric burner, or in a heated oven.
• Before any maintenance operation and after use, switch off the appliance and pull out
the mains plug.
• Do not store the appliarice in the open air.
• Do not exposure the machine to weather, humidity nor excessive heat.
• Clean the appliance only with a dry or slightly moist cloth.
Disposal instructions
• Please dispose of packaging materials and, eventually, the appliance itself in accor-
dance with any official regulations or guidelines which may apply.
• f facilities are available in your locality for the recycling of packaging materials, please
make use of these accordingly.
• When finally disposing of the appliance itself, please render it unserviceable before
taking it to the autorized place of disposal.
Technical data
The technical parameters are stated on the appliance's type plate.
The appliance does not need to be earthed.
Short operation (without interruption) 10 min.
Operating break before switching on again 30 min.
Informations for your safety and notes on disposal
11

12
Standard equipment
Operation and use
Mincer casing
Coupling
Feed screw complete
Blade
Attachment ø8
Attachment ø4
Closing ring
Attachement ø2,5
....................... Food pusher
Tray with filling shaft
Unlocking key
..... Drive head
..... Power switch
............... Motor block
............... Power cable with mains plug
This appliance is only intended for household use to prepare minced meat, vegetables
and other similar foods.
This mincing machine can be used in many ways and facilitates rapid high quality min-
cing of meat, white cheese, vegetables and poppy seeds. It can also be used to make
sausage and poultry products.
The mincing machine has a hollow space in the base for storage of a spare coupling, an
attachment and the power cable. The ventilation openings for the motor are also located
in this hollow space. For this reason, the appliance may never be operated on a soft sur-
face.
The output of the appliance depends on to what extent the appliance is used properly.
Space for coupling
in the hollow space
in the base part
Space for the
attachments in the
hollow space in the
base part
Shortened
power cable
Storage of the
whole power cable
with plug

• Pull out the power cable until it has the required length, then place the motor block
onto an even surface close to the mains socket.
• Assemble the mincing machine as follows:
- Feed screw - coupling on the inside,
- Set the blade onto the bolt of the screw so that the cutting edges point towards the
attachment.
- Place the attachment into the mincer casing so that the notch in the attachment
meets the casing overhang,
- Then affix all parts using the closing ring.
A
TTENTION:
The notch in the attachment must meet the
overhang.
Incorrect closing of the closing ring will impair
the quality of the minced goods and can also
cause the attachment and the blade to beco-
me blunt.
• Place the mincer casing (1) onto the cou-
pling (2) and turn it into position until you
hear it click into place.
It is advisable to exchange blunt knives
and attachments.
• Place the tray with the filling shaft and the
food pusher onto the mincer casing.
• Connect plug to mains socket.
• Switch on the mincing machine by pressing
the switch.
After you have finished:
• Switch off the motor by pressing the switch
again.
• Disconnect the plug from the mains socket.
• Remove the tray with the filling shaft.
• Press the release key (1) and turn the
whole casing (2) to the right and then
remove.
• Remove the casing parts in reverse order
to assembly procedure.
13
Operation and use

Assembly of the sausage filling attachment
• Place the motor block onto the table.
• Place the following into the casing in the
right order: complete feed screw, the plas-
tic cap and the exit nozzle (with the narrow
end to the front) onto the screw bolt.
• Screw on the closing ring until tight.
• Connect the assembled casing to the
motor block.
• Connect plug to the main socket.
If you pull the sausage skin over the nozzle,
please ensure that the air openings on the exit
nozzle are not covered.
After you are finished, dismantle the applian-
ce in the same manner as for mincing meat.
• The appliance has a mechanical protection
fixture which protects the motor from
destruction - the teeth on the drive coupling
of the feed screw will break off if the appli-
ance is overloaded (e.g. if bones get into
the casing).
To repair the damaged coupling, unscrew
the screw on the feed screw. Replace the
old coupling.
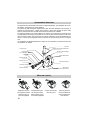
Special accessory nr. 19 08 810
V
egetable slicer: Assembly of the vegetable chopper
14
Operation and use
Mincer casing
Feed screw complete
Distance piece
Sausage filling
attachment
Closing ring
Do not cover!
Feed screw Coupling Screw M5x20
Fine blades
Larger blades
Slicer
Puree attachment
Food pusher
Tray
Casing
Snap catch

• You should first cut those products, which are to be sliced or grated, into small pieces
so that they fit easily into the casing of the vegetable slicer.
• It is not advisable to process soft fruit or malaceous fruit with hard cores.
• Any rest fruit or vegetables left in the casing should be removed with a wooden spoon
- but first disconnect the appliance from the mains supply.
A
TTENTION:
Always disconnect the plug from the mains supply before changing and reattaching ano-
ther blade to the casing!
The nutritional value of a vegetable or fruit dish depends on the way it has been prepa-
red. When preparing fruit and vegetable dishes, you should observe the following points:
• Never leave fruit and vegetables standing in water for a long time.
• Only chop the vegetables just before consumption.
The blades of the attachments do not need to be re-sharpened.
After use, always clean and care for the mincer machine and vegetable slicer in the fol-
lowing way:
• Disconnect the plug from the mains socket and remove the key before cleaning.
• Disconnect the mincer casing from the motor block.
• Unscrew the closing ring and remove the individual parts from the mincer casing or
open the snap catch and remove the vegetable slicing attachment from the vegetable
slicer.
• Wash the plastic parts in warm water; wash the metal parts in hot water using washing
up detergent.
• You can use a soft brush to clean the metal parts. Dry all parts well.
• After drying, rub the blade and the knife with a little cooking oil to protect against cor-
rosion.
• Assemble the dry parts of the mincer casing or the vegetable slicer.
15
After use
Operation and use - Special accessory

Informations pour votre sécurité et remarques d'ordre général
Avant l'emploi
• Lisez attentivement les informations ci-dessous: elles contiennent d'importantes
remarques ainsi que des précieux conseils quant à la sécurité, l'emploi, et l'entretien
de votre appareil. Conservez le présent mode, d'emploi dans un endroit où vous sau-
rez le retrouver en cas de besoin, et, si vous vendez ou donnez votre appareil à quel-
qu'un d'autre, remettez-le au nouveau propriétaire.
• Les appareils Fakir répondent aux règles usuelles de la technique moderne ainsi
qu'aux prescriptions légales les plus récentes.
• Les appareils satisfont aux prescriptions de directives “CEE 89/336 Compatibilité élec-
tromagnétique” et “CEE 73/23 Directive basse tension”. Uappareil porte le marquage
CE sur la plaquette signalétique.
• Fakir se réserve le droit de modifier la construction et l'équipement.
Remarques importantes
• Cet appareil est uniquement destine a des fins domestiques.
• Ne pas mettre un appareil en service, qui présenterait des dommages visibles.
• Ne branchez l'appareil qu'à la tension indiquée sur la plaque signalétique.
• Cet appareil a une puissance d'aspiration particulièrement forte. Pour la protection un
fusible de min. 10 Ampère est nécessaire.
• Uappareil ne doit être utilisé qu'aux fins pour lesquelles il a été concu. Toute autre uti-
lisation, ou un mauvais emploi, ou une réparation effectuée par des personnes non
agréés, entraînent la perte de la garantie et dégagent la responsabilité du construc-
teur quant aux dommages résultant éventuellement d'un emploi abusif ou non confor-
me.
• Le corps broyeur, la vis de transport ainsi que l'anneau de fermeture ne vont pas au
lave-vaisselle. Les nettoyants puissants provoquent le noircissement de ces compo-
sants. Il est recommandé de laver ces composants à la main avec de l'eau additionnée
de quelques gouttes de produits à laver la vaisselle.
• La viande à hacher ne doit pas contenir d'os, de cartilage ou de nerfs.
• Coupez les produits en petits morceaux avant de les broyer afin de pouvoir les intro-
duire sans difficulté dans le corps broyeur.
• N'enfoncez les produits qu'avec le poussoir dans l'orifice d'introduction. L'utilisation
d'autres objets comme une cuillère et une fourchette peut endommager l'appareil et le
bloc moteur.
• Ne placez pas une trop grande quantité de viande dans l'appareil pendant qu'il fonc-
tionne et veillez à ce que le poussoir ne soit pas trop fortement introduit dans l'orifice
d'introduction.
• L'appareil est équipé d'un dispositif de protection électrique sous la forme d'un fusible.
Si le moteur ne démarre pas, il doit être remis à un atelier sous contrat.
• Avant de fixer un accessoire ou nettoyer l'appareil ainsi que pour des travaux de
dépannage et d'entretien déconnecter l'appareil du réseau.
• Ne permettre l'utilisation d'appareils électriques aux enfants que sous surveillance.
• Les réparations devraient être effectuées dans un atelier du service après vente Fakir.
Des réparations non conformes peuvent présenter des risques pour l'utilisateur.
Laissez les surfaces chaudes refroidir avant de monter ou de retirer des pièces.
16

17
Informations pour votre sécurité et remarques d'ordre général
Remarques relatives à la sécurité
• Pour éviter un incendie, des décharges électriques ou des accidents personnels, ne
jamais plonger le câble, la fiche ou l'appareil lui-même dans de l'eau ou dans d'autres
liquides.
• Ne jamais débrancher la prise de courant en tirant sur le câble d'alimentation!
• Dérouler le câble de telle sorte qu'il ne repose pas sur des arêtes contondantes, ni ne
soit emmêlé ou coincé.
• Ne jamais utiliser de rallonges défectueuses!
• Le câble d'amenée doit seulement être remplacé par une Station S.A.V. Fakir agrée.
• Le câble secteur ne doit pas être en contact avec des surfaces chaudes, cuisinière,
gazinière comprise
• L'appareil ne doit pas être mis en place sur ou à proximité de plaques électriques, de
becs à gaz chauds ou près d'un four chaud.
• Toujours débrancher l'appareil après usage et avant toutes tâches d'entretien, de
réparation etc.
• Ne jamais entreposer l'appareil à l'extérieur !
• Ne jamais exposer la machine aux influences atmosphériques, ni à l'humidité, ni aux
sources de chaleur excessives.
• Ne nettoyer l'appareil qu'avec un tissu sec ou à peine humide!
Comment se débarrasser d'un appareil devenu inutilisable
• Tenir compte, pour se débarrasser du matériau d'emballage de l'appareil ainsi que de
l'appareil luimême, celui-ci une fois devenu inutilisable, des prescriptions locales rela-
tives à la protection de l'environnement. Renseignez-vous auprès des autorités
compétentes ou de l'entreprise d'enlèvement des déchets encombrants.
• Trier le matériau d'emballage (généralement. recyclable) et le jeter dans les conte-
neurs de récupération prévus à cet effet.
• Rendre immédiatement inutilisables des apareils mis à la remise et s'en débarrasser
ensuite en, se conformant aux prescriptions locales relatives à la protection de l'envi-
ronnement.
Caractéristiques techniques
Les caractéristiques techniques sont indiquées sur la plaque signalétique de l'appareil.
L'appareil n'a pas besoin d'être mis à la terre.
Fonctionnement de courte durée (sans interruption) 10 mn
Pause avant une nouvelle remise en marche 30 mn

18
Accessoires des base
Corps broyeur
Accouplement
Vis de transport cplte
Couteau
Disque troué ø8
Disque troué ø 4
Anneau de fermeture
Disque troué ø2,5
................................ Poussoir
Plateau avec orifice d'introduction
Touche de déverrouillage
Tête d'entraînement
Interrupteur secteur
............... Bloc moteur
Cordon de branchement avec fiche secteur
Cet appareil est exclusivement réservé à un usage domestique, pour préparer de la vian-
de hachée, des légumes et autres aliments.
Ce hachoir se prête à diverses applications et sert à hacher rapidement de la viande, à
préparer du fromage blanc, à râper des légumes, à broyer des graines de pavot mais
aussi à confectionner des produits à base de charcuterie et de volailles.
Le hachoir possède sur sa partie inférieure un espace creux réservé au rangement d'un
accouplement de rechange, d'une grille à trous et du cordon de branchement. C'est aussi
dans cet espace creux que se trouvent les orifices d'aération pour le refroidissement du
moteur. C'est pourquoi l'appareil prêt à fonctionner ne doit pas être posé sur un support
mou.
Le rendement de l'appareil dépend du respect de son utilisation conformément aux fins
auxquelles il est destiné.
Mise en service
Emplacement pour
l'accouplement dans
l'espace creux au
fond de l'appareil
Emplacement pour
les disques troués
dans l'espace creux
au fond de l'appareil
Cordon de branche-
ment raccourci
Mise en place du
cordon de branche-
ment complet avec
fiche secteur

• Dégagez la longueur nécessaire du cordon de branchement, placez le bloc moteur sur
un support plan à proximité d'une prise de courant.
• Assemblez le hachoir comme suit:
- Vis de transport - accouplement vers l'intérieur
- Placez le couteau sur le boulon de la vis de manière que les arêtes tranchantes
soient dirigées vers le disque à trous
- Placez le disque troué dans le corps broyeur de manière que l'encoche du disque
troué corresponde à la saillie du corps
- Fixez le tout avec l'anneau de fermeture.
A
TTENTION:
L'encoche pratiquée dans le disque troué doit
correspondre à la saillie.
Une fermeture non correcte de l'anneau de
fermeture provoque une mauvaise qualité de
hachage et peut également être responsable
de l'émoussage des disques troués ou du
couteau.
• Placez le corps broyeur (1) sur l'accouple-
ment (2) et tournez le tout en position jus-
qu'à ce que le verrouillage se fasse enten-
dre.
Nous conseillons de remplacer les couteau
et disque troué émoussés.
• Placez le plateau avec l'orifice d'introduc-
tion et le poussoir sur le corps broyeur.
• Branchez la fiche secteur sur la prise de
courant.
• Mettez le hachoir en marche en actionnant
l'interrupteur.
A la fin des travaux:
• Mettez le moteur hors service en appuyant
à nouveau sur l'interrupteur.
• Débranchez la fiche secteur de la prise de
courant.
• Retirez le plateau avec l'orifice d'introduc-
tion.
• Appuyez sur la touche de déverrouillage
(1) puis tournez le corps complet (2) sur la
droite avant de le retirer.
• Le démontage des composants se fait
dans l'ordre inverse à l'assemblage.
Mise en service
19

Montage du dispositif de garnissage de saucisses
• Placez le bloc moteur sur la table.
• Assemblez les éléments comme suit: vis
de transport complète, sur le boulon de la
vis, le capuchon plastique et le cône de
sortie (la pointe dirigée vers l'avant).
• Vissez l'anneau de fermeture jusqu'à la
butée.
• Reliez le corps assemblé au bloc moteur.
• Branchez la fiche secteur à la prise de cou-
rant.
Lorsque vous introduisez le boyau d'une sau-
cisse sur le cône, veillez à ce que les orifices
d'air sur le cône de sortie ne soient pas dissi-
mulés.
A l'achèvement des travaux, démontez le
corps comme pour le broyage de viande.
• L'appareil possède un dispositif de protec-
tion mécanique qui protège le moteur con-
tre les destructions - les dents de l'accou-
plement d'entraînement de la vis de trans-
port se cassent si l'appareil est surchargé
(p. ex. lorsque des os se trouvent dans le
corps).
La réparation de l'accouplement endom-
magé implique le dévissage de la vis qui se
trouve sur la vis de transport.
L'accouplement usé doit être remplacé.
Accessoire spécial nr. 19 08 810
Râpe à légumes: assemblage de la râpe à gumes
Mise en service
20
Corps broyeur
Vis de transport cplte
Ecarteur
Dispositif d'intr. des
morceaux de viande
Anneau de fermeture
Ne pas dissimuler!
Vis de transport Accoupl Vis M5x20
Elément fin
Elément grossier
Eminceur
Elément pour
réduire en purée
Poussoir
Plateau
Corps
Fermeture à déclic
La page est en cours de chargement...
La page est en cours de chargement...
La page est en cours de chargement...
La page est en cours de chargement...
La page est en cours de chargement...
La page est en cours de chargement...
La page est en cours de chargement...
La page est en cours de chargement...
-
 1
1
-
 2
2
-
 3
3
-
 4
4
-
 5
5
-
 6
6
-
 7
7
-
 8
8
-
 9
9
-
 10
10
-
 11
11
-
 12
12
-
 13
13
-
 14
14
-
 15
15
-
 16
16
-
 17
17
-
 18
18
-
 19
19
-
 20
20
-
 21
21
-
 22
22
-
 23
23
-
 24
24
-
 25
25
-
 26
26
-
 27
27
-
 28
28


Fakir FWO Le manuel du propriétaire
- Catégorie
- Hachoirs
- Taper
- Le manuel du propriétaire
- Ce manuel convient également à
dans d''autres langues
- English: Fakir FWO Owner's manual
- español: Fakir FWO El manual del propietario
- Deutsch: Fakir FWO Bedienungsanleitung
Documents connexes
Autres documents
-
Hendi 210819 Manuel utilisateur
-
Tefal ME701188 Manuel utilisateur
-
-
-
Hobart 4812 Chopper Le manuel du propriétaire
-
Westfalia 87 83 03 Manuel utilisateur
-
-
Unold 78131 Le manuel du propriétaire
-
 grossag KFW 500 Manuel utilisateur
-
Palson Zeus 1400 Mode d'emploi
