Aeg-Electrolux HC452020EB Manuel utilisateur
- Catégorie
- Plaques de cuisson
- Taper
- Manuel utilisateur

HC452020EB
EN
HOB USER MANUAL
2
ET PLIIDIPLAAT KASUTUSJUHEND 18
FI
KEITTOTASO KÄYTTÖOHJE
34
FR
TABLE DE CUISSON NOTICE D'UTILISATION
50

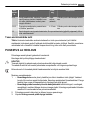
FOR PERFECT RESULTS
Thank you for choosing this AEG product. We have
created it to give you impeccable performance for many
years, with innovative technologies that help make life
simpler – features you might not find on ordinary
appliances. Please spend a few minutes reading to get the
very best from it.
ACCESSORIES AND CONSUMABLES
In the AEG webshop, you’ll find everything you need to
keep all your AEG appliances looking spotless and
working perfectly. Along with a wide range of accessories
designed and built to the high quality standards you
would expect, from specialist cookware to cutlery baskets,
from bottle holders to delicate laundry bags…
Visit the webshop at:
www.aeg.com/shop
2

CONTENTS
4 Safety information
5 Installation instructions
9 Product description
10 Operating instructions
14 Helpful hints and tips
15 Care and cleaning
16 What to do if…
17 Environment concerns
The following symbols are used in this user
manual:
Important information concerning your
personal safety and information on how to
avoid damaging the appliance.
General information and tips
Environmental information
Subject to change without notice
Contents
3

SAFETY INFORMATION
For your safety and correct operation of the appliance, read this manual carefully before
installation and use. Always keep these instructions with the appliance even if you move or
sell it. Users must fully know the operation and safety features of the appliance.
General safety
WARNING!
Persons (including children) with reduced physical sensory, mental capabilities or lack of ex-
perience and knowledge must not use the appliance. They must have supervision or instruc-
tion for the operation of the appliance by a person responsible for their safety.
Child safety
• Only adults can use this appliance. Children must get supervision to make sure that they
do not play with the appliance.
• Keep all packaging away from children. There is a risk of suffocation.
• Keep children away from the appliance when it is on.
WARNING!
Start the child safety device to prevent small children and pets from an accidental activa-
tion of the appliance.
Safety during operation
• Remove all packaging, stickers and layers from the appliance before the first use.
• Set the cooking zones to "off" after each use.
• Risk of burns! Do not put cutlery or saucepan lids on the cooking surface, as they can
become hot.
WARNING!
Fire danger! Overheated fats and oils can ignite very quickly.
Correct operation
• Always monitor the appliance during operation.
• Only use the appliance for domestic cooking tasks!
• Do not use the appliance as a work or a storage surface.
• Do not put or keep very flammable liquids and materials, or fusible objects (made of
plastic or aluminium) on or near the appliance.
• Be careful when you connect the appliance to the near sockets. Do not let electricity
bonds touch the appliance or hot cookware. Do not let electricity bonds tangle.
How to prevent a damage to the appliance
• If the objects or cookware fall on the glass ceramic, the surface can be damaged.
• Cookware made of cast iron, cast aluminium or with damaged bottoms can scratch the
glass ceramic if you move them on the surface.
4 Safety information

• Do not let cookware boil dry to prevent the damage to cookware and glass ceramics.
• Do not use the cooking zones with empty cookware or without cookware.
• Do not cover any part of the appliance with aluminium foil.
WARNING!
If there is a crack on the surface, disconnect power supply to prevent the electric shock.
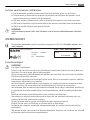
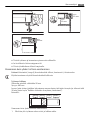
INSTALLATION INSTRUCTIONS
Before the installation, note down the serial number (Ser. Nr.) from the rating plate.The
rating plate of the appliance is on its lower casing.
PNC: 941 560 803/00
220-240V ~50/60Hz
3,5 kW
Typ: 55FED02BO
Serie:
HC452020EB
Made in Switzerland
Safety instructions
WARNING!
You must read these!
Make sure that the appliance is not damaged because of transportation. Do not connect a
damaged appliance. If it is necessary, speak to the supplier.
Only an authorised service technician can install, connect or repair this appliance. Use only
original spare parts.
Only use built-in appliances after you assemble the appliance into correct built-in units and
work surfaces that align to the standards.
Do not change the specifications or modify this product. Risk of injury and damage to the
appliance.
Fully obey the laws, ordinances, directives and standards in force in the country where you
use the appliance (safety regulations, recycling regulations, electrical safety rules etc.)!
Keep the minimum distances to other appliances and units!
Install anti-shock protection, for example install the drawers only with a protective floor
directly below the appliance!
Protect the cut surfaces of the worktop against moisture with a correct sealant!
Seal the appliance to the work top with no space left with a correct sealant!
Protect the bottom of the appliance from steam and moisture, e.g. from a dishwasher or
oven!
Do not install the appliance adjacent to doors and below windows! If not, hot cookware can
be hit off the hob when you open doors or windows.
WARNING!
Risk of injury from electrical current. Carefully obey the instructions for electrical connec-
tions.
• The electrical mains terminal is live.
• Make electrical mains terminal free of voltage.
Installation instructions
5

• Install correctly to give anti-shock protection.
• Loose and incorrect plug and socket connections can make the terminal become too hot.
• A qualified electrician must install the clamping connections correctly.
• Use a strain relief clamp on cable.
• Use the correct mains cable of type H05BB-F Tmax 90°C (or higher) for a single-phase.
• Replace the damaged mains cable with a special cable (type H05BB-F Tmax 90°C; or
higher). Speak your local Service Force Centre.
The appliance must have the electrical installation which lets you disconnect the appliance
from the mains at all poles with a contact opening width of minimum 3 mm.
You must have correct isolation devices: line protecting cut-outs, fuses (screw type fuses
removed from the holder), earth leakage trips and contactors.
If, you use the accessory frame C-FRAME, first read the instruction supplied with the frame
before you install the appliance.
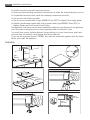
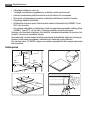
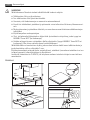
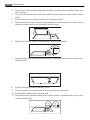
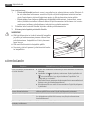
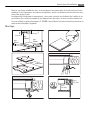
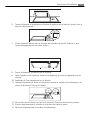
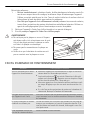
Assembly
min.
50mm
min.
50mm
min.
500mm
=
=
340
+1
mm
600mm
490
+1
mm
R 5mm
min.
25 mm
min.
20 mm
6 Installation instructions

min.
28 mm
• Seal the gap between the worktop and glass ceramic with silicone.
• Put some soapy water on the silicone.
• Pull off the excess silicone with the scraper.
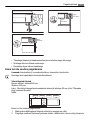
The installation of more than one appliance
Added parts:connection bar(s), heat resistant silicon, rubber shape, sealing strap.
Only use special a heat - resistant silicon.
The worktop cut out
Distance from the wall : minimum 50 mm
Depth : 490 mm
Width : sum widths of all the appliances to be built-in and subtract 20 mm (see also "Over-
view of all appliance widths" )
Example :
580 mm
520 mm
490 mm
360 mm
+-=
20 mm 920 mm
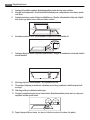
The installation of more than one appliance
1. Put down the dimension of the worktop cut out and saw it out.
2. Put the appliances one at time on some soft surface, a blanket for example, with the
bottom side up.
3. Put the seal stripe around the lower edge of the appliance along the outer edge of the
glass ceramic.
4. Loosely screw the fixing plates into the appropriate holes in the protective casing.
5. Put the first appliance in the worktop cut out. Put the connection bar in the worktop
cut out and push up half of the width against the appliance.
Installation instructions
7

6. Loosely turn in fixing plates from below on the worktop and on the connection bar.
7. Put the subsequent appliance in the worktop cut out . Make sure that the front ends
of the appliances are on the same level.
8. Tighten the fixing plate / retaining grip screws.
9. Seal the gap between the worktop and appliances and between appliances with sili-
cone.
10. Put some soapy water on the silicon.
11. Press the rubber shape with some strength against the glass ceramic and move it
slowly along the space.
12. Do not touch the silicon until it become hard, it can last about a day.
13. Carefully remove silicon that came out with a shaving blade.
14. Clean glass ceramic fully.
8 Installation instructions

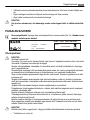
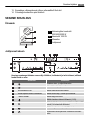
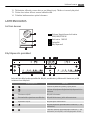
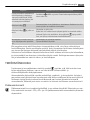
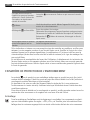
PRODUCT DESCRIPTION
General overview
1
3
2
120/175/210
mm
145
mm
4
1 Triple cooking zone 800/1600/2300W
2 Cooking zone 1200W
3 Glass bar
4 Control panel
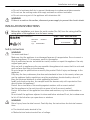
Control panel layout
5 63
1014 1113 912
2
1
7 84
Use the sensor fields to operate the appliance. The displays, indicators and sounds tell which
functions operate.
sensor field function
1
It activates and deactivates the appliance.
2
It locks/unlocks the control panel.
3
A heat setting display. It shows the heat setting.
4
Cooking zones' indicators of timer. It shows for which of the cooking zones you set
the time.
5
The timer display. It shows the time in minutes.
6
It shows that the Count Up Timer function oper-
ates (1–59).
7
It shows that the Count Down Timer operates (1
to 99 minutes) or shows that Minute Minder oper-
ates.
8
It activates and deactivates the outer rings.
9
It activates the Automatic Heat Up function.
10
/
It increases or decreases the time.
Product description 9

sensor field function
11
It sets the cooking zone for the Timer functions.
12
It sets the Timer functions.
13
a control bar To set the heat setting.
14
It activates and deactivates the STOP+GO func-
tion.
Heat setting displays
Display Description
The cooking zone is off
-
The cooking zone operates
Keep Warm / function is on
The automatic heat-up function is on
+ digit
There is a malfunction
/ /
OptiHeat Control (3 step Residual heat indicator): still cooking / keep
warm / residual heat
Lock/Child safety function is on
The automatic switch off is on
OptiHeat Control (3 step Residual heat indicator)
WARNING!
/ / Risk of burns from residual heat!
OptiHeat Control indicates the level of the residual heat.
OPERATING INSTRUCTIONS
On and Off
Touch for 1 second to start or stop the appliance.
Automatic Switch Off
The function stops the hob automatically if:
• all cooking zones are off.
• you do not set the heat setting after you start the hob.
• you cover a sensor field with an object (a pan, a cloth, etc.) for longer than 10 seconds.
The sound operates until you remove the object.
• the hob gets too hot (e.g. when a saucepan boils dry). Before you use the hob again, the
cooking zone must be cool.
• you do not stop a cooking zone or change the heat setting. After some time
comes
on and the hob stops. See the table.
10 Operating instructions

Automatic Switch Off times
Heat setting
- - - -
Stops after 6 hours 5 hours 4 hours 1.5 hours
The heat setting
Touch the control bar at the heat setting. Change
to the left or the right, if it is necessary. Do not
release before you have a correct heat setting. The
display shows the heat setting.
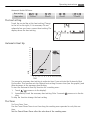
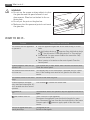
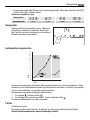
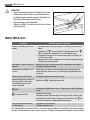
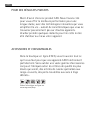
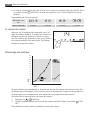
Automatic Heat Up
1
2
3
4
5
6
7
8
9
10
11
12
13
14
0
1234567891011121314
MIN.
TEM.
You can get a necessary heat setting in a shorter time if you activate the Automatic Heat
Up function. This function sets the highest heat setting for some time (see the graphic), and
then decreases to the necessary heat setting.
To start the Automatic Heat Up function for a cooking zone:
1. Touch
( comes on in the display).
2. Immediately touch the necessary heat setting. After 3 seconds
comes on in the dis-
play.
To stop the function change the heat setting.
The Timer
The Count Down Timer.
Use the Count Down Timer to set how long the cooking zone operates for only this one
time.
Set the Count Down Timer after the selection of the cooking zone.
Operating instructions 11

The selection of Timer function is possible for cooking zones that are active and the heat
setting is set.
• To set the cooking zone: touch
again and again until the indicator of a necessary
cooking zone comes on.
When this function is activated,
comes on.
• To activate the Count Down Timer: touch
of the timer to set the time (
00
-
99
minutes). When the indicator of the cooking zone starts to flash slow, the time counts
down.
• To see the remaining time: set the cooking zone with
. The indicator of the cooking
zone starts to flash quickly. The display shows the remaining time.
• To change the Count Down Timer:set the cooking zone with
touch or .
• To deactivate the Count Down Time: set the cooking zone with
. Touch . The re-
maining time counts back to
00
. The indicator of the cooking zone goes out.
When the timer countdown comes to an end, the sound operates and
00
flashes. The
cooking zone deactivates.
• To deactivate the sound: touch
The Count up timer
Use the Count up timer to monitor how long the cooking zone operates.
• The selection of the cooking zone (if more than 1 cooking zone operates) : touch
again and again until the indicator of a necessary cooking zone comes on.
When this function is activated,
comes on.
• To activate the Count up timer:
Touch
The symbol goes out and comes on.
• To see how long the cooking zone operates:set the cooking zone with
. The indica-
tor of the cooking zone starts to flash quickly. The display shows the time that the zone
operates. The display shows the time of the cooking zone that operates for longer period
of time.
• To deactivate the Count up timer: set the cooking zone with
and touch or to
deactivate the timer. the symbol
goes out and comes on.
When the two Timer functions operate at the same time, the display shows the Count Up
Timer first.
The Minute minder.
You can use the timer as a minute minder while the cooking zones do not operate. Touch
.
Touch
or of the timer to set the time. When the time comes to an end, the sound
operates and
00
flashes.
• To stop the sound: touch
12 Operating instructions

STOP+GO
The function sets all cooking zones that operate to the lowest heat setting - Keep Warm
(
).
When
operates, you cannot change the heat setting.
The
function does not stop the timer function.
• To activate this function touch
. The symbol comes on.
• To deactivate this function touch
. The heat setting that you set before comes on.
Lock
You can lock the control panel, but not . It prevents an accidental change of the heat
setting.
First set the heat setting.
To start this function touch
. The symbol comes on for 4 seconds.
The Timer stays on.
To stop this function touch
. The heat setting that you set before comes on.
When you stop the appliance, you also stop this function.
The child safety device
This function prevents an accidental operation of the hob.
Starting the child safety device
• Start the hob with
. Do not set the heat settings.
• Touch
for 4 seconds. The symbol comes on.
• Stop the hob with
.
Switching off the child safety device
• Start the hob with
. Do not set the heat settings. Touch for 4 seconds. The symbol
comes on.
• Stop the hob with
.
Overriding the child safety device for one cooking session
• Start the hob with
. The symbol comes on.
• Touch
for 4 seconds. Set the heat setting in less than 10 seconds. You can operate
the hob.
• When you stop the hob with
, the child safety device operates again.
OffSound Control (Deactivation and activation of the sounds)
Deactivation of the sounds
Deactivate the appliance.
Touch
for 3 seconds. The displays come on and go out. Touch for 3 seconds.
comes on, the sound is on. Touch , comes on, the sound is off.
When this function operates, you can hear the sounds only when:
• you touch
• the Minute Minder comes down
• the Count Down Timer comes down
• you put something on the control panel.
Operating instructions
13

Activation of the sounds
Deactivate the appliance.
Touch
for 3 seconds. The displays come on and go out. Touch for 3 seconds.
comes on, because the sound is off. Touch , comes on. The sound is on.
HELPFUL HINTS AND TIPS
Cookware
• The bottom of the cookware must be as thick and flat as possible.
• Cookware made of enamelled steel and with aluminium or copper bottoms can cause
discoloration on glass ceramic surface.
Energy saving
• If possible, always put the lids on the cookware.
• Put cookware on a cooking zone before you start it.
• Stop the cooking zones before the end of the cooking time to use residual heat.
• The bottom of pans and cooking zones must have the same dimension.
Öko Timer (Eco Timer)
To save the energy, the heater of the cooking zone switches itself off earlier than count
down timer signal. The heating time reduction depends on cooking level and cooking time.
Examples of cooking applications
The data in the table is for guidance only.
Heat
setting
Use to: Time Hints
1 Keep cooked foods warm as re-
quired
Cover
1-3 Hollandaise sauce, melt: butter, choco-
late, gelatine
5-25
min
Mix occasionally
1-3 Solidify: fluffy omelettes, baked eggs 10-40
min
Cook with a lid on
3-5 Simmer rice and milkbased dishes, heat-
ing up ready-cooked meals
25-50
min
Add at least twice as much liquid as
rice, stir milk dishes part way
through
5-7 Steam vegetables, fish, meat 20-45
min
Add a few tablespoons of liquid
7-9 Steam potatoes 20-60
min
Use max. ¼ l water for 750 g of po-
tatoes
7-9 Cook larger quantities of food, stews
and soups
60-150
min
Up to 3 l liquid plus ingredients
14 Helpful hints and tips

Heat
setting
Use to: Time Hints
9-12 Gentle fry: escalope, veal cordon bleu,
cutlets, rissoles, sausages, liver, roux,
eggs, pancakes, doughnuts
as re-
quired
Turn halfway through
12-13 Heavy fry, hash browns, loin steaks,
steaks
5-15
min
Turn halfway through
14 Boil large quantities of water, cook pasta, sear meat (goulash, pot roast), deep fry chips
Information on acrylamides
Important! According to the newest scientific knowledge, if you brown food (specially the
one which contains starch), acrylamides can pose a health risk. Thus, we recommend that
you cook at the lowest temperatures and do not brown food too much.
CARE AND CLEANING
Clean the appliance after each use.
Always use cookware with clean bottom.
WARNING!
Sharp objects and abrasive cleaning agents will damage the appliance.
For your safety, do not clean the appliance with steam blasters or high-pressure cleaners.
Scratches or dark stains on the glass ceramic have no effect on how the appliance operates.
To remove the dirt:
1. – Remove immediately:melted plastic, plastic foil, and food with sugar. If not, the dirt
can cause damage to the appliance. Use a special scraper for the glass . Put the
scraper on the glass surface at an acute angle and move the blade on the surface .
– Remove after the appliance is sufficiently cool:limescale rings , water rings, fat
stains, shiny metallic discolorations. Use a special cleaning agent for glass ceramic
or stainless steel.
2. Clean the appliance with a moist cloth and some detergent.
3. At the end rub the appliance dry with a clean cloth.
Care and cleaning
15

WARNING!
• Do not use the scraper or sharp objects to clean
the glass bar and the space between it and
glass ceramic. Glass bar is attached to the ce-
ramic plate.
• Do not put the pots on the glass bar.
• Make sure that the pans and pots do not touch
the glass bar.
WHAT TO DO IF…
Problem Possible cause and remedy
You cannot start the appliance
or operate it.
• Start the appliance again and set the heat setting in 10 sec-
onds.
•
The child safety device or
operates. Stop child safety device
or
. See the section “Child safety device” or "Stop and go".
• You touched 2 or more sensor fields at the same time. Only
touch one sensor field.
• There is water or fat stains on the control panel. Clean the
control panel
A sound operates when the ap-
pliance is off.
You covered one or more sensor fields. Uncover the sensor fields.
Clean the control panel.
The residual heat indicator does
not come on.
The cooking zone is not hot because it operated only for a short
time. If the cooking zone must be hot, speak to the after sales
service.
You cannot switch on the outer
rings.
Switch on the inner ring first.
A sound operates and appli-
ance starts and stops again. Af-
ter 5 seconds one more sound
operates.
You covered . Uncover the sensor field.
comes on
The automatic switch off operates. Stop the appliance and start it
again.
and number come on.
There is an error in the appliance.
Disconnect the appliance from the electrical supply for some
time. Disconnect the fuse from the electrical system of the house.
Connect again. If
comes on again, speak to the after sales
service.
There is no signal when you
touch panel keys
The signals are off.
Switch on the signals.
16 What to do if…

If you tried the above solutions and cannot repair the problem, speak to your dealer or the
Customer Care Department. Give the data from the rating plate, three-digit-letter code for
the glass ceramic (it is in the corner of the cooking surface) and an error message that
comes on.
If you operated the appliance incorrectly, the servicing by a customer service technician or
dealer will not be free of charge, even during the warranty period. The instructions about
the customer service and conditions of guarantee are in the guarantee booklet.
ENVIRONMENT CONCERNS
The symbol on the product or on its packaging indicates that this product may not be
treated as household waste. Instead it should be taken to the appropriate collection point
for the recycling of electrical and electronic equipment. By ensuring this product is
disposed of correctly, you will help prevent potential negative consequences for the
environment and human health, which could otherwise be caused by inappropriate waste
handling of this product. For more detailed information about recycling of this product,
please contact your local council, your household waste disposal service or the shop where
you purchased the product.
Packaging material
The packaging materials are friendly to the environment and can be recycled. The plastic
components are identified by marking: >PE<,>PS<, etc. Discard the packaging materials as
household waste at the waste disposal facilities in your municipality.
Environment concerns 17

PARIMATE TULEMUSTE SAAVUTAMISEKS
Täname teid selle AEG toote valimise eest. Lõime toote,
mis tagab teile aastateks laitmatu toimimise ning lisasime
teie elu lihtsamaks ja kergemaks muutvaid innovaatilisi
tehnoloogiaid – omadusi, mida te tavaliste seadmete
juures ei pruugi leida. Leidke mõni minut aega ning
lugege, kuidas seadmega parimaid tulemusi saavutada.
LISASEADMED JA KULUTARVIKUD
AEG veebipoest leiate kõik vajaliku, mida te oma AEG
seadmete laitmatu väljanägemise ja heas töökorras
hoidmise jaoks vajate. Koos laia valiku
kvaliteedistandarditele vastavate lisatarvikutega, alates
spetsialistidele mõeldud kööginõudest kuni söögiriistade
korvideni, pudelihoidjatest kuni õrnade pesuesemete
pesukottideni...
Külastage veebipoodi aadressil
www.aeg.com/shop
18

SISUKORD
20 Ohutusinfo
21 Paigaldusjuhised
25 Seadme kirjeldus
26 Käitusjuhised
30 Vihjeid ja näpunäiteid
31 Puhastus ja hooldus
32 Mida teha, kui...
33 Jäätmekäitlus
Käesolevas kasutusjuhendis on kasutatud
järgmisi hoiatusmärke:
Tähtis info teie isikliku ohutuse kohta ja info
seadme kahjustamise vältimise kohta.
Üldine info ja nõuanded
Keskkonnainfo
Jäetakse õigus teha muutusi
Sisukord
19

OHUTUSINFO
Teie turvalisuse huvides ning tagamaks õiget kasutamist lugege kasutusjuhend hoolikalt lä-
bi, enne kui paigaldate seadme ja kasutate seda esimest korda. Hoidke need juhised alati
masina juures, ka siis, kui muudate selle asukohta või müüte masina maha. Kasutajad pea-
vad olema hästi tuttavad masina töö ja ohutusfunktsioonidega.
Üldine ohutus
HOIATUS
Isikud (sh lapsed), kellel on vähenenud füüsilised, sensoorsed, vaimsed võimed või kellel
puuduvad vastavad kogemused ja teadmised, ei tohi masinat kasutada. Seadet kasutades
peab neid juhendama või kontrollima isik, kes vastutab nende turvalisuse eest.
Lapselukk
• Seadet tohivad kasutada ainult täiskasvanud. Laste üle peab olema järelvalve tagamaks,
et nad ei mängiks seadmega.
• Hoidke pakend lastele kättesaamatus kohas. Esineb lämbumisoht.
• Hoidke lapsed töötavast masinast eemal.
HOIATUS
Kasutage lapselukku, et väikesed lapsed ja loomad ei saaks seadet kogemata tööle panna.
Ohutu töö
• Enne esmakordset kasutamist eemaldage seadmelt kogu pakend, kleebised ja kattekihid.
• Lülitage keedutsoonid pärast iga kasutamist välja.
• Põletusoht! Ärge pange pliidipinnale söögiriistu ega potikaasi, sest need võivad tuliseks
minna.
HOIATUS
Tuleoht! Ülekuumenenud rasvad ja õli võivad väga kergesti süttida.
Nõuetekohane töö
• Kui seade töötab, tuleb seda pidevalt jälgida.
• Kasutage seadet ainult koduseks toiduvalmistamiseks!
• Ärge kasutage seadet tööpinnana ega hoiukohana.
• Ärge asetage seadmele ega selle lähedusse ega hoidke seal väga kergestisüttivaid ve-
delikke, materjale või sulavaid esemeid (plastmasse, alumiiniumi).
• Olge ettevaatlik, kui ühendate seadme lähedalasuvatesse pistikupesadesse. Vältige elek-
trijuhtmete kokkupuudet seadme või tuliste nõudega. Vältige elektrijuhtmete sassimine-
kut.
Kuidas vältida seadme kahjustamist
• Kui klaaskeraamilisele pinnale kukub esemeid või nõusid, võivad need pinda vigastada.
• Valurauast, alumiiniumvalust või rikutud põhjaga nõud võivad klaasikeraamikat kriimusta-
da, kui neid klaaskeraamilisel pinnal liigutatakse.
20
Ohutusinfo
La page charge ...
La page charge ...
La page charge ...
La page charge ...
La page charge ...
La page charge ...
La page charge ...
La page charge ...
La page charge ...
La page charge ...
La page charge ...
La page charge ...
La page charge ...
La page charge ...
La page charge ...
La page charge ...
La page charge ...
La page charge ...
La page charge ...
La page charge ...
La page charge ...
La page charge ...
La page charge ...
La page charge ...
La page charge ...
La page charge ...
La page charge ...
La page charge ...
La page charge ...
La page charge ...
La page charge ...
La page charge ...
La page charge ...
La page charge ...
La page charge ...
La page charge ...
La page charge ...
La page charge ...
La page charge ...
La page charge ...
La page charge ...
La page charge ...
La page charge ...
La page charge ...
La page charge ...
La page charge ...
La page charge ...
La page charge ...
-
 1
1
-
 2
2
-
 3
3
-
 4
4
-
 5
5
-
 6
6
-
 7
7
-
 8
8
-
 9
9
-
 10
10
-
 11
11
-
 12
12
-
 13
13
-
 14
14
-
 15
15
-
 16
16
-
 17
17
-
 18
18
-
 19
19
-
 20
20
-
 21
21
-
 22
22
-
 23
23
-
 24
24
-
 25
25
-
 26
26
-
 27
27
-
 28
28
-
 29
29
-
 30
30
-
 31
31
-
 32
32
-
 33
33
-
 34
34
-
 35
35
-
 36
36
-
 37
37
-
 38
38
-
 39
39
-
 40
40
-
 41
41
-
 42
42
-
 43
43
-
 44
44
-
 45
45
-
 46
46
-
 47
47
-
 48
48
-
 49
49
-
 50
50
-
 51
51
-
 52
52
-
 53
53
-
 54
54
-
 55
55
-
 56
56
-
 57
57
-
 58
58
-
 59
59
-
 60
60
-
 61
61
-
 62
62
-
 63
63
-
 64
64
-
 65
65
-
 66
66
-
 67
67
-
 68
68


Aeg-Electrolux HC452020EB Manuel utilisateur
- Catégorie
- Plaques de cuisson
- Taper
- Manuel utilisateur
dans d''autres langues
Documents connexes
Autres documents
-
Electrolux EHI6540FW1 Manuel utilisateur
-
-
-
-
-
-
Electrolux EHF3920BOK Manuel utilisateur
-
Electrolux EHH3920BOK Manuel utilisateur
-
-
AEG HC652600EB Manuel utilisateur