
GEAppliances.com
0
0_
0_
Safety Instructions ............. 2, 3
Operating Instructions
Controls ........................... 4-6
Care and Cleaning
Air Filter .............................. 6
Outdoor Coils ......................... 6
Installation Instructions ...... 7-13
Troubleshooting Tips ............ 14
Normal Operating Sounds ............ 14
Consumer Support
Consumer Support .......... Back Cover
Ownership Registration for
Customers in Canada only ........ 1S, 16
Warranty for Customers
in Canada ........................... 18
Warranty for Customers
in the U.SA........................... 17
*ENERGY STAR ® labeled product
I
ENERGYSTAR
As an ENERGYSTAR®partner, GE has
determined that this product meets
the ENERGYSTAR®guidelines for
energy efficiency.
AEZ24*
AEW24*
Climatiseur
La section franCaise commence 5 la page 19
Acondicionador
deaire
La secci6n en espaflol empieza en la p6gina 37
Write the model and serial numbers here:
Model #
Serial #
Find these numbers on a label on the sideof
the air conditioner.
In Canada, contact us at:
www.GEAppliances.ca
49-7661-1 12-10 GE

IMPORTANTSAFETYINFORMATION.
READALLINSTRUCTIONSBEFOREUSING.
WARNING!
Foryour safety, the information in this manual must be followed to minimize the risk of fire, electric shock
or personal injury.
SAFETYPRECAUTIONS
Usethis applianceonly for itsintended
purposeas described inthis Owner's
Manual.
Thisairconditioner must be properly
installed in accordance with the Installation
Instructions before it isused.
Never unplug your air conditioner by pulling
on the power cord. Always grip plug firmly
and pull straight out from the receptacle.
Replaceimmediately allelectricservice
cordsthat have becomefrayed or otherwise
damaged.A damaged power supply cord
must bereplacedwith a new power supply
cord obtained from the manufacturer and
not repaired.Donot usea cord that shows
cracksor abrasiondamage along its length
orat eitherthe plug or connector end.
Turn the unit OFFand unplug your air
conditioner before cleaning.
GEdoes not support any servicing of the
air conditioner. We strongly recommend
that you do not attempt to service the air
conditioner yourself.
For your safety...do not store or use
combustible materials, gasoline or other
flammable vapors or liquids in the vicinity
of this or any other appliance.
All air conditioners contain refrigerants,
which under federal law must be removed
prior to product disposal. Ifyou are getting
rid of an old product with refrigerants, check
with the company handling disposal about
what to do.
If the receptacle does not match the plug,
the receptacle must be changed out by a
qualified electrician.
These R410A air conditioning systems
require contractors and technicians to
use tools, equipment and safety standards
approved for use with this refrigerant.
DO NOT use equipment certified for
R22 refrigerant only.
2
HOWTOCONNECTELECTRICITY
Do not, under any circumstances, cut or remove
the third (ground) prong from the power cord.
For personal safety, this appliance must be properly
grounded.
DONOT usean adapterplug with thisappliance.
The power cord of this appliance is equipped
with a 3-prong (grounding) plug which mates
with a standard 3-prong (grounding) wall outlet
to minimize the possibility of electric shock
hazard from this appliance.
Power cord includes a current interrupter device.
A test and reset button is provided on the plug
case. The device should be tested on a periodic
basis by first pressing the TESTbutton and
then the RESETbutton while plugged into the
outlet. If the TESTbutton does not trip or if the
RESETbutton will not stay engaged, discontinue
use of the air conditioner and contact a qualified
service technician.
Have the wall outlet and circuit checked by
a qualified electrician to make sure the outlet
is properly grounded.
Where a 2-prong wall outlet is encountered,
it isyour personal responsibility and obligation to
have it replaced with a properly grounded
3-prong wall outlet.
The air conditioner should always be plugged
into its own individual electrical outlet which has
a voltage rating that matches the rating plate.
This provides the best performance and also
prevents overloading house wiring circuits which
could cause a fire hazard from overheated wires.
See the Installation Instructions, Electrical
Requirements section for specific electrical
connection requirements.

WARNING!
USEOFEXTENSIONCORDS
RISK OF FIRE. Could cause serious injury or
death.
• DO NOT use an extension cord with this
Window Air Conditioner.
• DO NOT use surge protectors or multi-outlet
adaptors with this Window Air Conditioner.
GEAppliances.com
READAND FOLLOWTHISSAFETYINFORMATIONCAREFULLY
SAVETHESEINSTRUCTIONS

About the controlson the air conditioner
Features and appearance will vary.
Lights next to the touch pads on the air conditioner control panel indicate the selected settings.
NOTE:Thedisplay always showsthe room
temperatureexceptwhen setting the Set
temperatureorthe Delaytimer.
Lightindicates the unit
is in the temperatureel
delaytime Setmode.
•=,Cool
J Energg Saver
m Fan Onlg
T_g_ Delay1-24hr
CV_ Delaytimer
Decrease C
Modeselect 0
Decrease
Temperature 0
setlncrease
andDecrease
Lightindicates the delay
timer is set.
Air Conditioner Controls
Remote Control
Controls
Power Pad 0
Turns air conditioner on and off.When turned
on,the display will show the room temperature.
Display
Shows the room temperature or time remaining
on the Delaytimer. Showsthe Settemperature
while setting the temperature in Cool or Energy
Saver modes.TheSet light willturn on while
setting.
O emp Increase •/Decrease • Pads
Useto set temperature when in Cool or Energy
Saver mode. TheSetlight will turn on while
setting.
Delay Timer Increase • (+)/Decrease • (-)
Pads
Eachtouch of the Increase • / Decrease •
padson the unit or the Increase + / Decrease
- pads on the remote control will set the delay
time when using the Delay ./.-24hrtimer. The
Set light willturn on while setting.
O an Speed Pads
Useto set the fan speedto Low, Med,High
orAuto onthe unit. NOTE:Onthe remote
control, use the fan speed Increase + /
Decrease - padsto set the fan speedsto Low,
Med or High. UsetheAuto pad to turn Auto
fan on.
ti
Mode Pad
Useto set the air conditioner to Cool, Energy
Saver or FanOnly mode.
Delay Pads/Delay 1-24hr Pad
Delay ON--When the air conditioner is off,it can
be set to automatically come on in 1 to 24 hours
at its previous mode and fan settings.
Delay OFF--When the air conditioner ison,
itcan be setto automatically turn off in i to
24 hours.
How to set:
Pressthe Delay 2-24hrpad on the unit or the
Delaypad on the remote control. Eachtouch
of the Increase • / Decrease• pads on the
unit or the Increase + / Decrease - pads on
the remote control will set the timer in 1-hour
intervals.The Setlight will turn on while setting.
To review the remaining time on the Delay
1-24hr timer, press the Delay 1-24hr pad on
the unit or the Delay pad on the remote control.
Use the Increase • / Decrease • pads on the
unit or the Increase + / Decrease - pads on the
remote control to set a new time if desired.
To cancel the timer, pressthe Delay ]-24hr pad
untilthe light on the Delay ]-24hr pad goesoff.
Note:The default temperature reading on the display isdegree Fahrenheit (°F). Tochange the display to
degree Celcius (°C),press the Temp Increase • and Temp Decrease • buttons together and hold for 3
seconds. Repeat the process to change back to degree Fahrenheit (°F)
4

GEAppliances.com
Do Not Operate in Freezing Outdoor Conditions
Thiscool-only air conditioner was not designed for
freezing outdoor conditions. It must not be used in
freezing outdoor conditions.
Remote Control
To ensure proper operation, aim the remote
control at the signal receiver on the air
conditioner.
Hake sure nothing isbetween the air conditioner
and the remote control that could block the
signal.
Theremote control signal has o rangeof
up to 20 feet.
Make sure batteries ore fresh and installed
correctly os indicated on the remote control.
Remotecontains o magnet allowing it to attach
to metal surfaces.
Cool Mode
Usethe Cool mode atLow, Mad, High or Auto Fen
Speedfor cooling. Usethe Temperature Increase •
/ Decrease • podsto set the desiredtemperature
between 64°F and 86°F in l°F increments.
An electronicthermostat isusedto maintain the room
temperature. Thecompressorwill cycleon
and off to keepthe room ot the set levelof comfort.
Setthe thermostat ot o lowernumber and the indoor
air will become cooler.Setthe thermostat ot o higher
number and the indoor air will become wormer.
NOTE:Iftheair conditioner isoff and isthen turned on
while set to a Cool setting or if turned from a fan
setting to a Cool setting,it may take approximately
3 minutes for the compressor to start and coolingto
begin.
Cooling Descriptions
For Normal Cooling-Select the Cool mode and
High orMed fan with o middle set temperature.
For Maximum Cooling--Select the Cool mode
and High fan with o lower settemperature.
For Quieter end Nighttime Cooling-Select the
Cool mode and Low fan with o middle set
temperature.
Energy Saver Mode
Controls the fan.
ON--The fan will cycleon and off with the
compressor.This resultsin wider variations of room
temperature and humidity. Normally usedwhen the
room isunoccupied. NOTE:Thefan may continue to
run for a short time after thecompressor cyclesoff.
OFF--Thefan runsoil the time, while the compressor
cycles on and off.
Fan Only Mode
Usethe FanOnly Node ot Low, Ned or Highfan
speedto provide air circulation and filtering without
cooling. Sincefan-only settings do not provide
cooling, o Settemperature cannot be entered. The
room temperature will appear in the display.
NOTE:Auto FanSpeed cannot be used when in the
Fan Only Mode.
Auto Fan Speed
Setto Auto fan speedfor the fan speedto
automatically set to the speed needed to provide
optimumcomfort settings with the set temperature.
If the room needsmore cooling, the fan speed
will automatically increase.Ifthe room needs less
cooling, the fan speedwill automatically decrease.
NOTE:Auto FanSpeedcannot be used when in the
Fan Only Mode.
Power Outage Recovery Feature
Inthe case of o power outage or interruption, the
unit will automatically restart in the settings lost
used offer the power isrestored. Ifthe Delay 1-24hr
feature was set,it will resume countdown. You may
need to set o new time if desired.

About the controlsonthe air conditioner
Additional important information.
Air Direction
Usethe leverto adjust the air direction left and right
only.
Careand cleaningof the air conditioner.
Grille and Case
Turn the air conditioner off and remove the plug from Toclean, usewater and a mild detergent. Do not use
the wall outlet before cleaning, bleachor abrasives.
Air Filter
Theair filter behind the front grilleshould be checked
and cleaned at least every 30 days or
more often if necessary.
Toremove:
Open the inlet grille by pulling downward on the tabs
at the top upper corners ofthe inlet grille until the
grille is in a 850position. Removethe filter.
Cleanthe filter with warm, soapy water. Rinseand let
the filter dry before replacing it. Donot cleanthe filter
in a dishwasher.
CAUTION:_oNoro_erotetheair
conditioner without o filter becausedirt and lint will
clog itand reduceperformance.
Tab
Outdoor Coils
Thecoils on the outdoor sideof the air conditioner
should be checked regularly. Ifthey areclogged with
dirt or soot,they may be professionallycleaned.
6
How to Insert the Batteries in the Remote Control
-_---] emove the battery cover by sliding it according
to the arrow direction.
r2-] insert new batteries, makingsure that the (+)
and (-) of battery are installed correctly.
r-_ Reattachthe cover by slidingit back
into position.
NOTES:
Use2 "AAA"(1.5volt) alkaline batteries. Do not
use rechargeable batteries.
Removethe batteriesfrom the remote control if
the system isnot going to be usedfor a long time.
Donot mix old and new batteries. Donot mix
alkaline,standard (carbon-zinc)or rechargeable
(ni-cad,ni-mh, etc) batteries.

]l.s,a,,a:io".s,ruc,,o.s] ,irCo.di,io.er]
jr-_- I Questions? Call 800.GE.CARES(800.432.2737)or Visit our Website at: GEAppliances.com
|
In Canada, call 1.800.561.3344or visit www.GEAppliances.ca
I
BEFOREYOU BEGIN
Read these instructions completely
and carefully.
• IMPORTANT- Savetheseinstructions
for local inspector's use.
• IMPORTANT--Observe all governing
codes and ordinances.
• Note to Installer- Be sure to leave these
instructions with the Consumer.
• Note to Consumer - Keep these instructions for
future reference.
• Skill level - Installation of this appliance
requires basic mechanical skills.
• Completion time - Approximately 1 hour
• We recommend that two people install
this product.
• Proper installation is the responsibility
of the installer.
• Product failure due to improper installation is not
covered under the Warranty.
• You MUST use all supplied parts and use proper
installation procedures as described in these
instructions when installing this air conditioner.
_ ELECTRICALREQUIREMENTS
Some models require a 115/120-volt AC,
(_ 0-Hz grounded outlet protected with a
15-amp time-delay fuse or circuit breaker.
The 3-prong grounding plug minimizes the
possibility of electric shock hazard. If the wall outlet
you plan to use is only a 2-prong outlet, it isyour
responsibility to have it replaced with a properly
grounded 3-prong wall outlet.
©
@
Some models require 230/208-volt AC,
protected with a time-delay fuse or circuit
breaker. These models should be installed on
their own single brunch circuit for best
performance and to prevent overloading
house or apartment wiring circuits, which
could cause a possible fire hazard from
overheating wires.
ZI,CAUTION:
Do not, under any circumstances, cut or remove
the third (ground) prong from the power cord.
Do not change the plug on the power cord
of this air conditioner.
Aluminum house wiring may present special
problems--consult a qualified electrician.
TOOLSYOUWILL NEED
Phillips head screwdriver
Flat-blade screwdriver
Pencil Ruler or tape measure
Level Scissors or knife
Power cord includes u current interrupter device. A
test and reset button is provided on the plug case. The
device should be tested on a periodic basis by first
pressing the TEST button and then the RESET button
while plugged into the outlet. Ifthe TEST button does
not trip or if the RESET button will not stay engaged,
discontinue use of the air conditioner and contact a
qualified service technician.

Installation Instructions
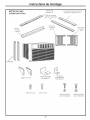
PARTS INCLUDED
(Appearance may vary)
Top
mounting
rail
\
Top rail gasket (1)
Window
seal
Foam top window _u_,
gasket (1) _
Right
accordion
panel
Side rail(2)
V-supports (2)
Type A
screws (10)
Sillangle
bracket (2)
Type C
screws (5)
Window
locking bracket
(1)
Type Ebolt
with nut (4)
Type Fbolt
with nut (2)
8

Installation Instructions
D WINDOW REQUIREMENTS
•Theseinstructions are for a standard double-hung
window. You will need to modify them for other types
of windows.
• All supporting parts must be secured
to firm wood, masonry or metal.
• The electrical outlet must be within reach of the
power cord.
• Follow the dimensions in the table and illustration
for your model.
19 1/4;'
= 29" - 41 "
(With accordion panels)
I
I
D STORMWINDOW REQUIREMENTS
A storm window frame will not allow the air
conditioner to tilt toward the outside, and will keep it
from draining properly.
To adjust for this, attach a piece of wood to the sill.
WOODPIECES
WIDTH:2"
LENGTH:Long enough to fit inside the window
frame.
THICKNESS:To determine the thickness, place a
piece of wood on the sill to make it 1/2" higher
than the top of the storm window frame or the vinyl
frame.
Attach securely with nails or screws provided by the
installer.
1/2" higher
than storm
window
frame
Storm window
frame
1/2" higher
than vinyl frame
_ _(°ns°mewind°ws v/Woo d
=.T,,
- r'- Vinylframe I I
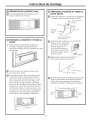
D PREPARETHEAIR CONDITIONER
[] Pull down the front panel and remove the filter.
Remove the front panel by lifting up at an
angle.
r_ Remove the four front screws. Save them
for reinstalling the front housing.
Grasp the lower corners of the grille while
pressing in on the case sides with your
finger tips. Pull out to release and lift it up.
NOTE: Do not pull the bottom edge
toward you more than 3" or you may
damage the tabs of the grille.
e
D When the front grille is removed the
control panel will still be attached by
a harness. Turn the grille around so
you can see the back side of the grille.
Remove the 2 screws to separate the
control panel housing from the grille.
NOTE: Be sure to save these screws. You will
need them later in the installation.
Remove Screws
9

Installation Instructions
D PREPARETHEAIR CONDITIONER
(continues)
[] Remove the shipping screws located on
the top of the case.
E_ Remove the ground screws from each
side of the case. Keep it in a safe location.
NOTE: Be sure te save this screw. Yeu will need
them later in the installatien.
D
Slide the air conditioner from the case by
gripping the base pan handle and pulling
forward while bracing the case. Do not
pull or lift on the styrofoam discharge area.
Do not
pull
area i
damage
to the
unit may
result
FRONT
E_] Your unit may come with internal
packaging. This packaging must be
removed prior to installing the air
conditioner back into the cabinet.
D PREPARETHECASE
[_ Attach the top rail gasket to the bottom
of the top rail.
r_ Install the top mounting rail with 4 type A
screws from the inside of the case. Press
firmly to drive the screws into the gasket
and through the top mounting rail.
Top mounting rail
D Slide each side retainer onto the edge of
each according panel. The figure shows
the orientation of each accordion panel
and side retainer assembly relative to the
case from a top view of the unit.
WINDOW FILLER PANEL
D Slide the left and right accordion panels
into the top and bottom mounting rails.
Top_ight
Bottom mounting _a
0

Installation Instructions
I-_ PREPARETHECASE(continues)
[] Attach the side retainers to the case using 6
type A screws.
D PREPARETHEWINDOW AND INSTALL
THECASE
r_ cut the window sash seal to the proper length.
Peel off the backing and attach the seal to the
underside of the window sash.
r_Open the window and mark the center of
the window sill.
['_ Carefully slide the case into the window
and center the case. Lower the window
behind the top mounting rail. Pull the
bottom of the case forward so that the
bottom mounting rail is tight against the
back of the window stool. Mount the case
to the window sill using 2 type C screws.
Drill pilot holes, if necessary.
Stool
DPREPARETHEWINDOW AND INSTALL
THECASE(continues)
r_ Assemble the V-support and V-support
bracket with Type F nut and bolt
Type Ebolt
nut
Left
ml
D
Sillangle
bracket __ _
V-supporLType
Fbolt and nut
Right
Position the V-supports
on the case bottom so
that they will be near
the outside wall. Attach
a V-support to each side
of the bottom of the case
with Type E bolts, 2 for
each support.
Adjust sill angle brackets to rest on sill.
tpport
D Extend the left and right accordion panels
to the vertical window sashes. Drill pilot
holes and attach the top corners with 2 type
C screws.
_L__IL_CJI
Type C
screw
screw
11

Installation Instructions
r_IPREPARETHEWINDOW AND INSTALL
THECASE(continues)
[] CAUTION:
To prevent broken Vinyl
glass or damage to
windows, on vinyl or
other similarly
constructed windows,
attach the window
locking bracket to the window side jamb.
Attach the window locking Wood
bracket with one Type C
screw.
D Cut the foam top window gasket to the
window width.
[71 Stuff the foam
between the
glass and the
window to
prevent air and
insects from getting into the room.
NOTE: If the gasket supplied does not fit
your window, obtain appropriate material
locally to provide a proper installation seal.
INSTALL THE AIR CONDITIONER
IN THE CASE
Slide the air conditioner into the case by
the base pan. Do not push on the controls,
styrofoam air discharge housing or the finned
coils. Make sure the air conditioner is firmly
seated.
Do not presson
these areas-
damage to the unit
may result
Base Pan
INSTALL THE AIR CONDITIONER
IN THE CASE (continues)
FB] Replace the 2 screws removed earlier, one
on each side of the case.
IMPORTANT: THE GROUND SCREWS MUST BE
REINSTALLEDTO ENSURE PROPERGOUND.
[ .....................
ij
i
[] Reinstall the control to the panel housing by
replacing the 2 screws you removed earlier.
[]
Screws
Attach the front grille to the case by inserting
the tabs on the grille into the slots on the
front top of the case. Push the grille in.
r_ Replace the screws.
r_ Install the filter and the front grille.
['_ Plug in the air conditioner.
12

Through-the-Wall Installation Instructions--Optional
The case may be installed through-the-wall
in both existing and new construction.
Read completely, then follow step-by-step.
NOTE: Obtain all materials locally for
mounting the air conditioner through-
the-wall.
ITI IMPORTANT (cont.)
FD1Secure with 14 wood screws anchored at
least an inch into the wall support structure.
NOTE: Drill pilot holes, if necessary, for
proper installation. If the frame is oversized,
use shims to prevent case distortion.
ITI IMPORTANT
Through-the-wall installation is not
appropriate if any of the side or top louvers
in the case will be obstructed by the wall.
All side and top louvers in the case must
project on the outdoor side of the wall.
The room side of the case must project
into the room far enough to maximize the
balance of the unit.
The case must be installed level from side-
to-side and with a slight tilt from front to
rear. Use a level; no more than a 1/2 bubble
will be the correct case slant to the outside.
Lintel angle is required to support bricks or
blocks above opening.
Flashing is required and should extend the
length of the opening to ensure no inside
cavity leakage occurs.
_-1 Remove the air conditioner from the case.
For specific instruction, refer to the Window
Installation Instructions.
[_] Make certain that a wall receptacle is
available close to the hole location or make
arrangements to install a receptacle.
[] Place the case in the wall opening and
place wood support strips between the case
bottom and the flashing on both sides of the
bottom rail. They should be the same height
as the bottom rail and the same length as
the wall openin.q.
13
FINISH THE WALL OPENING
[_] Caulk all four sides on the outdoor side of
the case to prevent moisture from getting
through to the interior wall. Use of flashing
(drip rail) will further prevent water from
dripping inside the wall and down the
outside of the building.
Caulking
[_ Plaster line
I1 Trim molding (if
• II """ desired)
OUTSIDE
Air louvers (top /
and sides must/
project on thev
outdoor side of
the wall)
INSIDE
Bottom rail
J
Wood filler and
caulking (above an
below the flashinc
Flashing
(Drip rail)
Bottom
rail
Flashing
(Drip rail)
Wood support strips
FB1Place the air conditioner into the case.
For specific instruction, refer to the Window
Installation Instructions.

TroubleshootingTips.
Possible Causes What ToDo
Theair conditioner •Hake surethe air conditioner plug ispushed
doesnotstart _sunplugged, completely into the outlet.
Thefuse isblown/circuit .Check the housefuse/circuit breaker box and replace
breaker istripped, the fuse or resetthe breaker.
Power failure. .The unitwill automatically restart in the settings last
usedafter the power is restored.
•There is a protective time delay (approximately
:3minutes) to prevent tripping of the compressor
overload. For this reason, the unit may not start
normal cooling for :3minutes after it isturned
back on.
The current interrupter • Pressthe RESETbutton located on the power cord plug.
device istripped. • If the RESETbutton will not stay engaged, discontinue
use of the air conditioner and contact a qualified
service technician.
Airconditionerdoes Airflow isrestricted. • Make surethere are nocurtains, blindsor furniture
notcoolasitshould blocking the front of the air conditioner.
Thetemp control may • Inthe Coolmode,pressthe Decrease• pad.
not be set correctly.
Theair filter is dirty. .Clean the filter at least every 30 days.
Seethe CareandCleaningsection.
Theroom may have been hot. .When the air conditioner isfirst turned on,you need
to allow time for the room to cool down.
Coldair isescaping. .Check for open furnace registersand cold air returns.
Cooling coils have iced up. .See "Air conditionerfreezingup" below.
Aircondtioner Iceblocks the air flow •Setthe controls at HighFanor HighCooland set the
freezingup and stops the air conditioner thermostat to a higher temperature.
from cooling the room.
Theremotecontrol Thebatteries are inserted .Check the position of the batteries.They should be
isnotworking incorrectly, inserted in the opposite (+)and (-) direction.
Thebatteries may be dead. • Replacethe batteries.
Water dripsoutside Hot,humid weather. .This isnormal.
Water dripsindoors The air conditioner is not • Forproper water disposal,make surethe air conditioner
tilted to the outside, slants slightlyfrom the case front to the rear.
Moisture removed from air
and drains into base pan.
WaterCollectsin
basepan
•This isnormal for a short period in areas with little
humidity; normal for a longer period invery humid areas.
Normal Operating Sounds
You may hear apinging noisecaused by
water being picked up and thrown against the
condenser on rainy days or when the humidity
is high.Thisdesign feature helps remove
moisture and improve efficiency.
You may hear the thermostat click when the
compressor cycles on and off.
iiiiiiiiiiii_iii
iiiiiiiiiiii_iii
Water will collect inthe base pan during
high humidity or on rainy days.Thewater
may overflow and drip from the outdoor side
of the unit.
Thefan may run even when the compressor
does not.
14

Notes.
15

Notes.
16

GEAir Conditioner--One-Vear Limited Warranty. (Forcustomersin the U.S.AJ
All warranty service provided by our Factory Service Centers,
or an authorized Customer Care®technician. To schedule service,
visit us on-line at ge.com, or call 800.GE.CARES (800.432.2737).
Have serial number and model number available when calling
for service.
Stapleyour receipt here.
Proof of the original purchase
date is needed to obtain service
under the warranty.
From thedate of the
origina!purchase
GE Will Replace:
Any part of the air conditioner which failsdue to a defect in materials or workmanship.
Duringthis limited one-yearwarranty, GEwill also provide, free of charge, all labor and related
service to replace the defective part.
Service trips to your home to teach you how to
usethe product.
Replacement of house fuses or resetting of circuit
breakers.
installation, delivery or maintenance. If you
have an installation problem, or if the air conditioner
is of improper cooling capacity for the intended use,
contact your dealer or installer. You are responsible
for providing adequate electrical connecting facilities.
Failure of the product resulting from modifications to
the product or due to unreasonable use including failure
to provide reasonable and necessary maintenance.
Failure due to corrosion on models not corrosion-
protected.
Damage to the product caused by improper power
supply voltage, accident, fire, floods or acts of God.
Incidental or consequential damage caused by possible
defects with this air conditioner.
Damage caused after delivery.
In commercial locations, labor necessary to move the
unit to a location where it is accessible for service
by an individual technician.
EXCLUSION OF IMPLIED WARRANTIES--Your sole and exclusive remedy is product repair as provided in
this Limited Warranty. Any implied warranties, including the implied warranties of merchantability or
fitness for a particular purpose, are limited to one year or the shortest period allowed by law.
This warranty is extended to the original purchaser and any succeeding owner for products purchased for
home use within the USA. If the product is located in an area where service by a GEAuthorized Servicer is
not available, you may be responsible for a trip charge or you may be required to bring the product to an
Authorized GE Service location for service. In Alaska, the warranty excludes the cost of shipping or service calls
to your home.
Some states do not allow the exclusion or limitation of incidental or consequential damages. This warranty
gives you specific legal rights, and you may also have other rights which vary from state to state. To know
what your legal rights are, consult your local or state consumer affairs office or your state's Attorney General.
Warrantor: General Electric Company. Louisville, KV40225
17

GEAir Conditioner--One-Year Limited Warranty. (Forcustomers in Canada)
All warranty service provided by our Factory Service Centers,
or an authorized Customer Care®technician. For service, call
1.800.561.3344. Please have serial number and model number
available when calling for service.
From the date of the
origina!purchase
Mabe Will Replace:
Any part of the air conditioner which failsdue to a defect in materials or workmanship.
Duringthis limited one-year warranty, Mabewill also provide,free of charge, alllabor and
related serviceto replacethe defective part.
Servicetrips to your home to teach you how to
usethe product.
Improper installation, delivery or maintenance. If you
have an installation problem, or if the air conditioner
isof improper cooling capacity for the intended use,
contact your dealer or installer. You are responsible
for providing adequate electrical connecting facilities.
Failure ofthe product resulting from modifications to
the product or due to unreasonable use including failure
to provide reasonable and necessary maintenance.
In commercial locations, labor necessary to move the
unit to a location where it is accessible for service
by an individual technician.
Replacement of house fuses or resetting of circuit
breakers.
Failure due to corrosion on models not corrosion-
protected.
Damage to the product caused by improper power
supply voltage, accident, fire, floods or acts of God.
Incidental or consequential damage caused by possible
defects with this air conditioner.
Damage caused after delivery.
EXCLUSION OF IMPLIED WARRANTIES--Your sole and exclusive remedy is product repair as provided in
this Limited Warranty. Any implied warranties, including the implied warranties of merchantability or
fitness for a particular purpose, are limited to one year or the shortest period allowed by law.
This warranty is extended to the original purchaser and any succeeding owner for products purchased in Canada
for home use within Canada. In-home warranty service will be provided in areas where it is available and deemed
reasonable by Mabe to provide.
Some provinces do not allow the exclusion or limitation of incidental or consequential damages, so the above
exclusion may not apply to you. This warranty gives you specific legal rights, and you may also have other rights
which vary from province to province. To know what your legal rights are in your province, consult your local or
provincial consumer affairs o_ce.
Warrantor: Mabe Canada Inc.,
BuHington, Ontario
18

Consignes de s@curit@............. 2o,21
Consignesd'utilisotion
Commandes ..........................22-24
Entretien et nettoyage
Filtre (_air ................................ 24
Serpentins extGrieurs ..................... 24
Instructions de montage .......... 25-si
Conseils de d@pannage .............. s2
Bruits normaux de fonctionnement ........ 32
Assistance _ la client@le
Assistonce (_Ioclientele ................... 36
Gorontie .................................. 35
Enregistrement du titre
de propriGt6 ........................... 33, 34
AEZ24*
AEW24*
* Produits homologuGs ENERGYSTAR@
ENERGYSTAR
Entont que portenoire d'ENERGYSTAR®,GEo
d@ermin6 que ce produit @oit conforme oux
exigences d'efficocit6 6nerg@ique d'ENERGY
STAR®.
Inscrivez ici les num@rosde mod@leet de s@rie:
Num@rode mod@le:
Num@rode S#rie :
Vous trouverez ces num@os sur 1'6tiquette
opposGe sur le cGt6 du climotiseur.
Au Conodo, visitez-nous ou •
www.electromenogersge.co
o-Cb
rD O
co
dD, th
t'h_ L/1
c_d- b
r- O
__o ,,,
'J-J,7-4"
___-L:::::D
O rD
Lt_
ll,J
i i m
LQ
tn
CD
D___"
,-Jl- _
-- [i1
19

IMPORTANTES CONSIGNES DE S 'CURIT '.
VEUILLEZ LIRE TOUTES LES CONSIGNES AVANT UTILISATION.
AVERTISSEMENT!
Pour votre s6curit6, les informations contenues dans ce manuel doivent 6tre suivies afin de minimiser
les risques d'incendie, de chocs 61ectriques ou de blessures corporelles.
20
CONSIGNESDESL-CURITL-
N'utilisez cet appareil qu'aux fins pr6vues
d6crites dans le manuel d'utilisation.
Ce climatiseur doit @trecorrectement
install6 conform6ment aux Instructions
d'lnstallation avant toute utilisation.
Ne d6branchezjamais votre climatiseur en
tirant sur le cordon d'alimentation. Prenez
toujours fermement la fiche en main et tirez
pour la sortir de la prise.
Remplacez imm6diatement tout cordon
61ectrique us6 ou endommag6. Un
cordon d'alimentation endommag6 doit
6tre remplac6 par un nouveau cordon
d'alimentation obtenu du fabricant. Ne
r6parez pas le cordon endommag6. N'utilisez
pas un cordon fissur6 ou pr6sentant des
dommages dus aux frottements soit sur sa
Iongueur ou aux extr6mit6s du c6t6 de la
fiche ou du raccord.
Eteignez votre climatiseur et d6branchez-le
avant de le nettoyer.
GE n'offre pas de service d'entretien pour
les climatiseurs. Nous vous recommandons
de ne pas essayer d'effectuer I'entretien de
votre climatiseur vous-m6me.
BRANCHEMENTS L-LECTRIQUES
Ne coupez pas ou n'enlevez pas, sous aucun
pr6texte, la troisi6me broche de mise 6 la terre
du cordon d'alimentation. Pour des raisons de
s6curit6, cet appareil dolt 6tre correctement mis
6 la terre.
N'utilisez PASd'adaptateur avec cet appareil.
Le cordon d'alimentation de cet appareil est
6quip6 d'une fiche 6 trois broches (pour une
mise 6 la terre) qui s'adapte 6 la prise de courant
standard 6 3 broches (pour une mise 6 la terre)
pour minimiser les risques de chocs 61ectriques
par cet appareil.
Le cordon d'alimentation est 6quip6 d'un
dispositif d'interruption du courant. Un bouton
d'essai et de r6enclenchement est fourni
sur le battier de la prise. Vous devez tester le
m6canisme r6guli_rement en appuyant d'abord
sur le bouton TEST(essai) puis sur le bouton
RESET(r6enclenchement)Iorsque I'appareil est
branch6. Si le bouton TEST(essai) ne bascule
pas ou si le bouton RESET(r6enclenchement)
ne reste pas enclench6, cessez d'utiliser votre
climatiseur et appelez un technicien de service
qualifi6.
Pour votre s6curit6, ne stockez pas et
n'utilisez pas de mat6riaux combustibles,
d'essence ou d'autres vapeurs et liquides
inflammables dans les parages de cet
appareil ou de tout autre appareil.
Tousles climatiseurs contiennent des
fluides frigorig_nes qui, conform6ment, 6 la
16gislation f6d6rale doivent 6tre retir6s avant
la mise au rebut de I'appareil. Si vous mettez
au rebus un ancien appareil contenant des
fluides frigorig6nes, v6rifiez la proc6dure 6
suivre aupr6s de la compagnie responsable
de 1'61imination.
Si la prise de courant est d'un format
diff6rent de la fiche, cette prise doit @tre
chang6e par un 61ectricien qualifi6.
Ces syst@mesde climatisation R/-d_OA
n6cessitent que les entrepreneurs et
techniciens adoptent des outils, du mat6riel
et des normes de s6curit6 approuv6s pour
utilisation avec ce r6frig6rant. N'utilisez pas
de mat6riel certifi6 pour le r6frig6rant R22
uniquement.
Faites v6rifier la prise murale et le circuit
61ectrique par un 61ectricien qualifi6 pour
s'assurer que le syst6me est correctement mis 6
la terre.
Dansle cas d'une prise biphas6e,I'installateura
la responsabilit6et robligation de la remplacer
par une prisetriphas6e correctement mise6 la
terre.
Le climatiseur doit toujours 6tre branch6 6 sa
propre prise 61ectrique d'une tension nominale
correspondant 6 celle indiqu6e sur sa plaque
signal6tique.
Ceci permet d'obtenir un meilleur rendement
du climatiseur et 6vite de surcharger les circuits
61ectriques du domicile qui risque d'occasionner
un incendie en surchauffant.
Consultez les Consignes d'lnstallations, dans la
section E×igences Electriques pour les exigences
de branchements 61ectriques particuliers.
La page est en cours de chargement...
La page est en cours de chargement...
La page est en cours de chargement...
La page est en cours de chargement...
La page est en cours de chargement...
La page est en cours de chargement...
La page est en cours de chargement...
La page est en cours de chargement...
La page est en cours de chargement...
La page est en cours de chargement...
La page est en cours de chargement...
La page est en cours de chargement...
La page est en cours de chargement...
La page est en cours de chargement...
La page est en cours de chargement...
La page est en cours de chargement...
La page est en cours de chargement...
La page est en cours de chargement...
La page est en cours de chargement...
La page est en cours de chargement...
La page est en cours de chargement...
La page est en cours de chargement...
La page est en cours de chargement...
La page est en cours de chargement...
La page est en cours de chargement...
La page est en cours de chargement...
La page est en cours de chargement...
La page est en cours de chargement...
La page est en cours de chargement...
La page est en cours de chargement...
La page est en cours de chargement...
La page est en cours de chargement...
La page est en cours de chargement...
La page est en cours de chargement...
La page est en cours de chargement...
La page est en cours de chargement...
-
 1
1
-
 2
2
-
 3
3
-
 4
4
-
 5
5
-
 6
6
-
 7
7
-
 8
8
-
 9
9
-
 10
10
-
 11
11
-
 12
12
-
 13
13
-
 14
14
-
 15
15
-
 16
16
-
 17
17
-
 18
18
-
 19
19
-
 20
20
-
 21
21
-
 22
22
-
 23
23
-
 24
24
-
 25
25
-
 26
26
-
 27
27
-
 28
28
-
 29
29
-
 30
30
-
 31
31
-
 32
32
-
 33
33
-
 34
34
-
 35
35
-
 36
36
-
 37
37
-
 38
38
-
 39
39
-
 40
40
-
 41
41
-
 42
42
-
 43
43
-
 44
44
-
 45
45
-
 46
46
-
 47
47
-
 48
48
-
 49
49
-
 50
50
-
 51
51
-
 52
52
-
 53
53
-
 54
54
-
 55
55
-
 56
56


dans d''autres langues
- English: GE AEW24DQL1 Owner's manual
- español: GE AEW24DQL1 El manual del propietario
Documents connexes
-
GE AEW24DQL1 Le manuel du propriétaire
-
-
-
-
GE AEE08ATL2 Le manuel du propriétaire
-
-
GE AEM06LPL1 Le manuel du propriétaire
-
-
-