INSTEON SwitchLinc Dimmer (2005-2010) Guide de démarrage rapide
- Taper
- Guide de démarrage rapide

INSTEON Limited Warranty – INSTEON warrants to original consumer of this product for a period of 2 years from
date of purchase, this product will be free from defects in material and workmanship and will perform in substantial
conformity with its Owner's Manual. Warranty shall not apply to defects caused by misuse or neglect.
Protected under U.S. and foreign patents (see www.insteon.com) © Copyright 2012
INSTEON, 16542 Millikan Ave., Irvine, CA 92606, 800-762-7845, www. Insteon.com
Quick Start Guide
SwitchLinc
™ Dimmer 240V, 50/60Hz (Dual-Band)
INSTEON
®
Remote Control Dimmer Switch
Model: 2478D
About SwitchLinc Dimmer 240V, 50/60Hz
Congratulations on purchasing the SwitchLinc Dimmer 240V. This
internationally-compatible version of our bestselling SwitchLinc Dimmer
features automatic 50/60Hz detection of the AC power frequency and flexible
100 - 277VAC support, allowing operation in a variety of electrical
environments.
Preparation
Installation should be performed only by a qualified electrician or by a
homeowner who is familiar and comfortable with electrical circuitry. If you have any questions regarding installation, we
suggest consulting an electrician. If you have any questions regarding setup, contact the INSTEON Support Line.
What’s in the box?
• SwitchLinc Dimmer • Four wire nuts
Tools Needed
• Slotted screwdriver • Phillips screwdriver
• Wire cutter / stripper • Voltage Meter
Installation
1) Turn off circuit breaker(s) or remove fuse(s) feeding wall box
2) Use a voltage meter to verify that power is off
3) Remove wallplate from switch and unscrew switch you are replacing and
gently pull out
4) Turn breaker(s) back on
5) Use a voltage meter to identify line and load wires connected to switch
6) Identify Neutral and ground wires
7) Turn breaker(s) back off
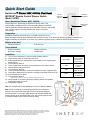
8) Connect wires as indicated. Confirm firm attachment with no exposed wire.
9) Gently place SwitchLinc into wall box, orienting unit with the LED bar on left
10) Screw SwitchLinc into place
11) Turn breaker(s) back on
SwitchLinc LED bar and connected light will turn on
12) Verify SwitchLinc is working properly by tapping SwitchLinc’s paddle
turning light (load) on and off
13) Reinstall the wallplate
Note: For 3-way/4-way circuit installations, refer to the Owner’s Manual
Note: When mounting in a multiple-ganged junction box, SwitchLinc
Dimmer is de-rated for 200-watts less for each immediately adjacent
dimmer installed. For example, 600W load control becomes 400W with
another dimmer to the immediate right or left. Use a triple-gang box with
a mechanical switch in the center to avoid de-rating.
SwitchLinc Wire
Wall Box Wires
Bare copper
Ground
(commonly bare,
green wire or
green screw)
White
Neutral
(commonly
white)
Red
Load
(light, fan, etc.)
Black
Line
(100 - 277VAC
to Ground)
LED bar
brightness
indicators
Paddle top
(on/brighten)
Paddle bottom
(off/dim)
Set button

INSTEON Limited Warranty – INSTEON warrants to original consumer of this product for a period of 2 years from
date of purchase, this product will be free from defects in material and workmanship and will perform in substantial
conformity with its Owner's Manual. Warranty shall not apply to defects caused by misuse or neglect.
Protected under U.S. and foreign patents (see www.insteon.com) © Copyright 2012
INSTEON, 16542 Millikan Ave., Irvine, CA 92606, 800-762-7845, www. Insteon.com
Using the Paddle
Paddle
Tap
Double-Tap
Press and Hold
Top
Ramp to on-level
Fast on
Brighten
Bottom
Ramp to off
Fast off
Dim
Adding SwitchLinc to a Scene as an INSTEON Responder
1) Press and hold scene controller button until it beeps
1
Controller LED will start blinking
2) Tap SwitchLinc on
Load will turn on
3) Press and hold SwitchLinc Set button until it double-beeps
Controller’s LED will stop blinking and will double-beep
2
4) Confirm scene addition was successful by tapping controller scene button on and off
The light connected to SwitchLinc will respond appropriately
Add SwitchLinc to a Scene as an INSTEON Controller
1) Press and hold SwitchLinc’s Set button until it beeps
SwitchLinc LED will blink
2) Adjust the scene responder(s) to the “state” you want when scene is activated from SwitchLinc (e.g., 50%, 25% or
even off)
3
3) Press and hold responder Set button until it double-beeps (or until its LED/load flashes)
SwitchLinc will double-beep and its LED will stop blinking
4
Responder LED will stop blinking and it may double-beep
4
4) Confirm scene addition was successful by tapping SwitchLinc paddle on and off
Responder will toggle between the scene’s on-level and off
Owner’s Manual and Tech Support
Owner’s Manual and current Quick Start Guide: http://www.insteon.com/support
Call: INSTEON Support Line at 800-762-7845
FCC/UL and ETL/UL Statements
This device complies with FCC Rules and Industry Canada license-exempt RSS standard(s). Operation is subject to the following two conditions: (1) this device may not cause harmful interference,
and (2) this device must accept any interference, including interference that may cause undesired operation of the device.
Le present appareil est conforme aux CNR d'Industrie Canada applicables aux appareils radio exempts de licence. L'exploitation est autorise aux deux conditions suivantes: (1) l'appareil ne doit pas
produire de brouillage, et (2) l'utilisateur de l'appareil doit accepter tout brouillage radiolectrique subi, mme si le brouillage est susceptible d'en compromettre le fonctionnement.
CAUTION - To reduce the risk of overheating and possible damage to other equipment do not install to control a receptacle, a motor-operated appliance, a fluorescent lighting fixture, or a transformer-
supplied appliance.
Gradateurs commandant une lampe a filament de tungstene – afin de reduire le risqué de surchauffe et la possibilite d’endommagement a d’autres materiels, ne pas installer pour commader une prise,
un appareil a moteur, une lampe fluorescente ou un appareil alimente par un transformateur.
1
If the controller does not have a beeper, wait until its LED begins blinking
2
Most models
3
If the responder is a multi-scene device such as a KeypadLinc, tap the scene button you wish to control until its LED is in the desired scene state (on or off)
4
If either the SwitchLinc or responder’s LED continues to blink, the addition failed. Tap the device’s Set button until LED stops blinking and try again.
-
 1
1
-
 2
2


INSTEON SwitchLinc Dimmer (2005-2010) Guide de démarrage rapide
- Taper
- Guide de démarrage rapide
dans d''autres langues
Documents connexes
-
INSTEON Dimmer Module Guide de démarrage rapide
-
-
-
-
-
-
-
-
-