Motion Sensor
Owner’s Manual

Contents
Getting Started
Device Overview 4
Motion Range Adjustment 5
Installation 6
Battery
Micro USB Power
Mounting Options 7
Tabletop
Corner Mount
Flexible Mount
Basic Linking
Control an Insteon Device with Motion Sensor 9
Control Multiple Insteon Devices with Motion Sensor 10
Removing Control of an Insteon Device From Motion Sensor 11
Removing Control of Multiple Insteon Devices From Motion Sensor 12
Insteon app for iPhone, iPad and iPod touch
Add to the Insteon Hub 14
Congure Motion Sensor 15
Congure Motion Sensor 16
Control a Device with Motion 17
Control a Device with Motion 18
Insteon app for Android
Add to the Insteon Hub 20
Congure Motion Sensor 21
Android
Congure Motion Sensor 22
Android
Control a Device with Motion 23
Android
Control a Device with Motion 24
Local Programming
About Local Programming 26
Local Programming Flow Chart 27
Factory Reset
Factory Reset 29
Appendix
Specications 31
Troubleshooting 33
Certications and Warnings 34
Product Warranty 35

3
Everything you need to quickly get up and running.
Getting Started

4
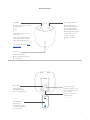
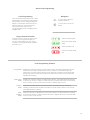
Device Overview
Motion Detected
Motion Enabled
Error Controlling a Device
Motion Disabled
Low Battery
Motion Override Button
Tap to toggle motion
detection enable/disable.
All other sensor features
are not affected. Motion
detection will automatically
resume after 12 hours.
Set Button
Tap to send on/off commands
to linked devices.
Link: press & hold until LED
blinks green.
Unlink: press & hold until LED
blinks green. Press and hold
again until LED blinks red.
For more functions see Local
Programming
Battery Compartment
Tamper Switch
Not Pictured
Micro USB
Optional power
through Micro USB
(cable sold separately)
CR123A Battery
Depending on
activation frequency,
the battery should last
6 to 18 months
On
Off
Status LED
Sensitivity Jumper
Reduces range by ~10ft
when covering both pins
(off by default)

5
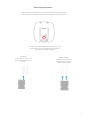
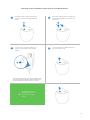
Full Range:
Jumper only on one pin. This
is the default setting from the
factory.
Reduced Range:
Installing the jumper across
both pins reduces range by
approximately 10 feet.
Depending upon your application you may want to reduce the motion detection
range. To do this will require a pair of needle nose pliers to access the jumper.
Just below the micro USB port there are two pins. From
the factory a jumper is covering only one of the pins.
This indicates full range is enabled.
Motion Range Adjustment

6
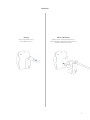
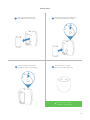
Battery Micro USB Power
Installation
Remove the battery tab to
power Motion Sensor.
Motion Sensor can be powered using a
right-angled Micro USB Cable (2822-222) and
standard USB power adapter.

7
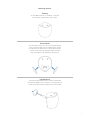
Tabletop
Corner Mount
Flexible Mount
Mounting Options
To place Motion Sensor on a tabletop or other at
surface, leave the at battery cover in place.
To mount Motion Sensor in a corner, leave the at battery
cover in place and apply the two adhesive strips. Ensure
the wall surface is clean before mounting. Motion Sensor
must be unmounted when replacing battery. Adhesive
strips are designed to be reusable for this purpose.
To precisely position Motion Sensor, slide off the at back
and install the exible mount. Screw the mounting bracket to
a solid surface and position the Motion Sensor as desired.

8
Congure Insteon Motion Sensor without Insteon Hub; do not use these
instructions if you intend to use Motion Sensor with Insteon Hub or other
Insteon management software.
Basic Linking

9
X
Test Motion Sensor by
tapping Motion Sensor’s
set button to simulate
motion.
Control an Insteon Device with Motion Sensor
1
On Motion Sensor, press and
hold the set button until its LED
begins blinking green.
2
On the device that you would like
Motion Sensor to control, turn
on the device and adjust it to the
desired brightness, if applicable.
3
Press and hold the set button
until you hear a double-beep.*
*For Insteon bulbs, remove from power and then return
to power. For devices that do not have a beeper, look
for their status LED to ash and return to normal.

10
X
Test Motion Sensor by
tapping Motion Sensor’s
set button to simulate
motion.
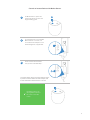
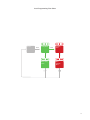
Control Multiple Insteon Devices with Motion Sensor
1
On Motion Sensor, press and hold the
set button until its LED begins blinking
green then tap the set button.
3
One at a time, press and hold the set
button on each device until it double-
beeps.*
*For Insteon bulbs, remove from power and then return
to power. For devices that do not have a beeper, look
for their status LED to ash and return to normal.
2
4
Adjust each device to their desired state:
On, off, or brightness level if dimming.
Tap the set button on Motion Sensor to
exit multi-link mode.
Lamp 1
Lamp 3
Lamp 2
Appliance
50% 72%
30%
ON
A B

11
X
Test Motion Sensor by
tapping Motion Sensor’s
set button to simulate
motion.
Removing Control of an Insteon Device From Motion Sensor
1
On Motion Sensor, press and
hold the set button until its LED
begins blinking green.
2
Press and hold the set button
again until its LED begins blinking
red.
3
Press and hold the controlled
device’s set button until the
device double-beeps.
*For Insteon bulbs, remove from power and then return
to power. For devices that do not have a beeper, look
for their status LED to ash and return to normal.

12
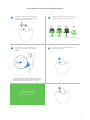
X
Test Motion Sensor by
tapping Motion Sensor’s
set button to simulate
motion.
Removing Control of Multiple Insteon Devices From Motion Sensor
1
On Motion Sensor, press and hold the
set button until its LED begins blinking
green.
3
One at a time, press and hold the set
button on each device until it double-
beeps.*
*For Insteon bulbs, remove from power and then return
to power. For devices that do not have a beeper, look
for their status LED to ash and return to normal.
2
4
Press and hold the set button again until
its LED begins blinking red then tap the
set button.
Tap the set button on Motion Sensor to
exit multi-unlink mode.
A B

13
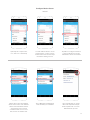
Use the Insteon app to congure and control Motion Sensor.
Insteon app for iPhone, iPad and iPod touch

14
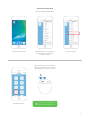
When prompted, press and hold the
set button on Motion Sensor until the
device beeps then tap the set button
Launch the Insteon App
Tap Motion Sensor
Tap Add a DeviceTap the drawer icon or swipe from
the right edge of the display to
open the drawer
You can now manage Motion
Sensor with the Insteon app.
X
Add to the Insteon Hub
iPhone, iPad and iPod touch
A B

15
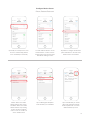
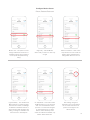
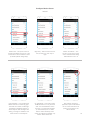
Congure Motion Sensor
iPhone, iPad and iPod touch
Motion Alert is sent when
Motion Sensor sees motion.
No Motion Alert is sent when
Motion Sensor stops seeing
motion and the countdown
ends. To turn on an alert, be
sure to enable it here.
Tap in the eld that you would
like to edit. Separate multiple
email recipients with a comma.
When nished, tap Done.
To make a Motion Sensor control
another device, a scene must be
created. Follow the next few steps
rst before creating a scene
Tap on Message & Recipients
under the alert you’ve enabled
Optionally set a unique name, icon,
and room membership (default
room membership is Favorites)
Tap Alerts to congure email and/or
push notications to be sent when
Motion Sensor is activated

16
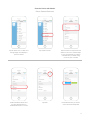
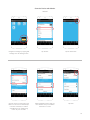
Congure Motion Sensor
iPhone, iPad and iPod touch
Light Sensitivity – How sensitive the
Motion Sensor is to detecting light.
The lower the number, the less light
is needed for the Motion Sensor to
detect daytime while the higher the
setting, more light is needed for the
motion sensor to read daytime.
After making changes to
properties, tap Done and follow
the on-screen instructions to
push those changes to the
Motion Sensor
Night Only – Tells the Motion
Sensor that you want it to work only
at night
On Only Mode – This mode causes
the Motion Sensor to only send the
“ON” command.Usefull for when
you want to control when the lights
(or other devices) turn off. Note
that the status will always show
active and if alerts are enabled, only
Motion Alerts will be sent.
Motion LED – This option turns off
the light that ashes in the front of
the Motion Sensor when it detects
motion (It will still operate during
setup)
Motion Countdown – After motion
stops the amount of time that the
Motion Sensor will wait before
telling linked devices to turn off

17
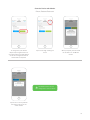
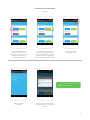
Control a Device with Motion
iPhone, iPad and iPod touch
Select the Motion Sensor and
any other devices that you
would like the sensor to control
Ensure devices that you want to
control are set as Responder
Tap Create a Scene
Tap Next
Tap the drawer icon or swipe from
the right edge of the display to
open the drawer
Give the scene a unique name and
select icon and room memberships.
It won’t be necessary to create a
schedule since you will be using
motion as your controller.

18
Control a Device with Motion
iPhone, iPad and iPod touch
Tap Yes to turn off any devices
that were turned on for the
scene creation
Tap Done to begin creating the
scene
To change how your devices
respond tap the green button for
each responder. Dimmable devices
can be set to brightness level as
well as fade on/off speed.
When prompted, press and hold
the set button on the Motion
Sensor
Your Motion Sensor is now
congured to control a device.
X

19
Use the Insteon app to congure and control Motion Sensor.
Insteon app for Android

20
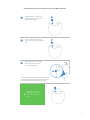
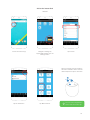
Add to the Insteon Hub
Android
Launch the Insteon App
Tap the Add button
Tap DevicesNavigate to Settings by
tapping Edit Settings from the
Settings button
Tap Motion Sensor
You can now manage Motion
Sensor with the Insteon app.
X
When prompted, press and hold the
set button on Motion Sensor until the
device beeps then tap the set button
A B
La page est en cours de chargement...
La page est en cours de chargement...
La page est en cours de chargement...
La page est en cours de chargement...
La page est en cours de chargement...
La page est en cours de chargement...
La page est en cours de chargement...
La page est en cours de chargement...
La page est en cours de chargement...
La page est en cours de chargement...
La page est en cours de chargement...
La page est en cours de chargement...
La page est en cours de chargement...
La page est en cours de chargement...
La page est en cours de chargement...
-
 1
1
-
 2
2
-
 3
3
-
 4
4
-
 5
5
-
 6
6
-
 7
7
-
 8
8
-
 9
9
-
 10
10
-
 11
11
-
 12
12
-
 13
13
-
 14
14
-
 15
15
-
 16
16
-
 17
17
-
 18
18
-
 19
19
-
 20
20
-
 21
21
-
 22
22
-
 23
23
-
 24
24
-
 25
25
-
 26
26
-
 27
27
-
 28
28
-
 29
29
-
 30
30
-
 31
31
-
 32
32
-
 33
33
-
 34
34
-
 35
35


INSTEON Motion Sensor II Le manuel du propriétaire
- Taper
- Le manuel du propriétaire
- Ce manuel convient également à
dans d''autres langues
Documents connexes
-
INSTEON Remote Control Plug-In Lamp Dimmer Module Manuel utilisateur
-
-
-
-
-
-
-
-
-