Haier HPP08XCR Le manuel du propriétaire
- Catégorie
- Climatiseurs mobiles
- Taper
- Le manuel du propriétaire

Installation and User Manual
Instructions d’installation et
Guide de l’utilisateur
Instrucciones de instalación y
Manual del usuario
HPP08XCR, HPP10XCT, HPP10XCT-E,
QPCD05AXMW
Portable Air Conditioner
Climatiseur portatif
Acondicionador de aire portatil
49-7780
11-17 GEA


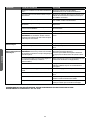
TABLE OF CONTENTS
ENGLISH
1
RECORD KEEPING
Thank you for purchasing this Haier product. This user manual will
help you get the best performance from your new air conditioner.
For future reference, record the model and serial number located on
the label on the side of your air conditioner, and the date of purchase.
Staple your proof of purchase to this manual to aid in obtaining war-
ranty service if needed.
_______________________________________
Model number
_______________________________________
Serial number
_______________________________________
Date of purchase
AIR CONDITIONER SAFETY ................................................................................. 2
PARTS AND FEATURES ...................................................................................... 3
INSTALLATION REQUIREMENTS ............................................................................ 3
Tools and Parts .............................................................................................. 3
Location Requirements ..................................................................................... 4
Electrical Requirements ...................................................................................... 4
INSTALLATION INSTRUCTIONS ............................................................................. 5
Step 1 - Unpack Air Conditioner .............................................................................. 5
Step 2 - Install Exhaust Nozzle to Main Window Panel ......................................................... 5
Step 3 - Install Main Window Panel and Extension Panels ....................................................... 5
Step 4 - Attach Exhaust Hose to the Exhaust Nozzle .......................................................... 6
Step 5 - Connect Exhaust Hose to the Air Conditioner ........................................................ 7
Step 6 - Complete Installation ............................................................................... 7
CONTROL PANEL ........................................................................................... 8
Buttons .................................................................................................... 8
Remote Control ............................................................................................ 8
Indicator Lights ............................................................................................. 8
AIR CONDITIONER USE . . . . . . . . . . . . . . . . . . . . . . . . . . . . . . . . . . . . . . . . . . . . . . . . . . . . . . . . . . . . . . . . . . . . . . . . . . . . . . . . . . . . . 9
AIR CONDITIONER CARE ................................................................................... 9
Cleaning ....................................................................................................9
Air Filters ....................................................................................................9
Internal Water Tank ..........................................................................................9
Storage ..................................................................................................... 9
TROUBLESHOOTING . . . . . . . . . . . . . . . . . . . . . . . . . . . . . . . . . . . . . . . . . . . . . . . . . . . . . . . . . . . . . . . . . . . . . . . . . . . . . . . . . . . . . . 10
LIMITED WARRANTY ......................................................................................11
RECORD KEEPING ......................................................................................... 1

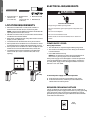
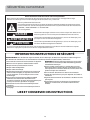
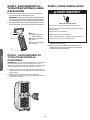
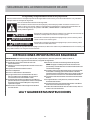
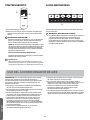
AIR CONDITIONER SAFETY
IMPORTANT SAFETY INSTRUCTIONS
WARNING: Ýòõèçøæè÷ëèõìöîòéĤõèèïèæ÷õìæäïöëòæîìñíøõü÷òóèõöòñöòõçäðäêèúëèñøöìñê÷ëèäìõæòñçì÷ìòñèõ
follow basic precautions, including the following:
• Read all of the instructions before using this appliance.
• Plug into a grounded 3 prong outlet.
• Do not remove ground prong.
• Do not use an adapter.
• Do not use an extension cord.
• Do not operate the air conditioner if it has a damaged
cord or plug, if it is not working properly, or if it has been
damaged or dropped.
• Ýëèäìõæòñçì÷ìòñèõöëòøïçåèöèõùìæèçòñïüåüôøäïìĤèç
service personnel. Call an authorized service company
éòõèûäðìñä÷ìòñõèóäìõòõäçíøö÷ðèñ÷
• Disconnect power before servicing.
• Disconnect power before cleaning.
NOTE: Ýøõñìñêòģóòúèõåüóõèööìñê÷ëèÙòúèõåø÷÷òñ
does NOT disconnect the appliance from the power supply.
• Do not install or use the air conditioner in any area where
the atmosphere contains combustible gases or where the
atmosphere is contaminated. Avoid any chemicals coming
in contact with your air conditioner.
• Do not store anything directly on top of the air conditioner.
• Use two or more people to move and install air conditioner.
• ×èùèõòóèõä÷è÷ëèäìõæòñçì÷ìòñèõúì÷ëòø÷÷ëèĤï÷èõöìñ
place.
• Do not use the air conditioner near a bathtub, shower or
wash basin or other wet area.
READ AND SAVE THESE INSTRUCTIONS
ENGLISH
Your safety and the safety of others are very important.
We have provided many important safety messages in this manual and on your appliance. Always read and obey all
safety messages.
This is the safety alert symbol.
This symbol alerts you to potential hazards that can kill or hurt you and others. All safety messages will
follow the safety alert symbol and either the word “DANGER,” “WARNING” or “CAUTION.”
These words mean:
DANGER
WARNING
CAUTION
Êñìððìñèñ÷ïüëäýäõçòøööì÷øä÷ìòñâòøæòøïçåèîìïïèçòõöèõìòøöïüìñíøõèçìéüòøçòñđ÷
immediately follow instructions.
A potentially hazardous situation which, if not avoided, could result in death or serious
åòçìïüìñíøõü
A potentially hazardous situation which, if not avoided, may result in moderate or minor
ìñíøõü
Êïïöäéè÷üðèööäêèöúìïï÷èïïüòøúëä÷÷ëèóò÷èñ÷ìäïëäýäõçìö÷èïïüòøëòú÷òõèçøæè÷ëèæëäñæèòéìñíøõüäñç÷èïïüòøúëä÷
can happen if the instructions are not followed.
2

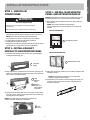
E Casters
F Center Drain Cap
G Power Cord Storage
H Air Filter
I Real Air Discharge
J Lower Drain Cap
A Control Panel
B Side Handle
C Vertical Air Vent
Louver
D Horizontal Air Vent
Louver
TOOLS AND PARTS
Gather the required tools and parts before starting
installation.
TOOLS NEEDED
•Flat-blade Screwdriver •Phillips Screwdriver
PARTS SUPPLIED
• Main Window
Panel
• Extension
Panels (2)
• Flat Screws (6)
4 for extension
panels
2 for nozzles
• Pointed Screws (7)
2 for top window
brackets
1 for security brack-
et
4 for main
window panel
• Top Window
Bracket (2)
• Exhaust
Nozzle
• Bottom
Window
Bracket (2)
• Exhaust Hose
(1 or 2 depend-
ing on model)
• Security
Bracket
INSTALLATION REQUIREMENTS
PARTS AND FEATURES
ENGLISH
3
A
B
C
D
E
F
G
H
I
H
J

WARNING
Electrical Shock Hazard
Plug into a grounded 3 prong outlet.
Do not remove the ground prong from the power cord
plug.
Do not use an adapter.
Do not use an extension cord.
Ïäìïøõè÷òçòöòæäñõèöøï÷ìñçèä÷ëĤõèòõèïèæ÷õìæäï
shock.
RESET
TEST
ENGLISH
• Top Foam Strip
(10 mm x 10
mm x 102 cm)
• Remote Control
• Bottom Foam
Strip
(3 mm x 10 mm
x 102 cm)
• Batteries (2)
4
ELECTRICAL REQUIREMENTS
POWER SUPPLY CORD
Wiring Requirements
• 115 Volt, 60Hz, 15-amp fused grounded 3 prong outlet
• The use of a time-delay fuse or time-delay circuit breaker
is recommended.
• Use a dedicated circuit only.
NOTE: Do not operate any other electrical appliances on
this circuit or you may trip the circuit breaker/fuse.
If this power supply cord is damaged, it cannot be repaired. It
must be replaced with a cord from the product manufactur-
er. If the power supply cord is damaged call Haier Customer
Service: 1-877-337-3639.
To test the power supply cord before operation:
1. Plug the power cord into a grounded 3 prong outlet.
2. Press the Test button, and then press and release the
Reset button to restore power.
20”
(51 CM)
20”
(51 CM)
REQUIRED GROUNDING METHOD
This air conditioner must be grounded. The air conditioner is
equipped with a power supply cord that has a 3 prong grounding
plug. The power supply cord must be plugged into a mating,
grounded 3 prong outlet, and grounded in accordance with all
local codes and ordinances.
115V
15 Amp
LOCATION REQUIREMENTS
• Ùïäæè÷ëèäìõæòñçì÷ìòñèõòñäĥä÷ïèùèïöøõéäæèìñä
location that is at least 20” (51 cm) from any wall.
NOTE: The recommended distance from the window for
optimal performance is 30” (76 cm).
• Maintain a minimum 20” (51 cm) clearance around the air
æòñçì÷ìòñèõ÷òñò÷åïòæîäìõĥòú
• Keep the air conditioner free of any obstructions such as
drapes, curtains, blinds, etc.
• The exhaust hose should be free of any obstructions.
• Do not place the air conditioner on an unstable or raised
öøõéäæèåèæäøöèì÷æòøïçéäïïäñçæäøöèçäðäêèòõìñíøõü
• Do not place the air conditioner in direct sunlight or near
a heat source such as baseboard heaters, stoves, etc.
• The window panel can be installed in a window with a
minimum 20” (51 cm) to a maximum 40” (101.6 cm)
opening.

INSTALLATION INSTRUCTIONS
WARNING
Excessive Weight Hazard
Use two or more people to move and install air
conditioner.
Ïäìïøõè÷òçòöòæäñõèöøï÷ìñåäæîòõò÷ëèõìñíøõü
A
A
B
ENGLISH
STEP 1 - UNPACK AIR
CONDITIONER
• Remove packaging materials. Save the carton and the foam
packaging for storing the air conditioner when not in use.
NOTE: There are NO packing materials inside the
air conditioner to remove—Do Not open the cabinet.
• Properly dispose of/recycle all packing material.
• Handle the air conditioner gently.
• Keep the air conditioner upright and level. Do not set the air
conditioner on its side, front, back or upside down.
STEP 2 - INSTALL EXHAUST
NOZZLE TO MAIN WINDOW PANEL
1. Hold the main window panel so that the L-shaped edges
of the panel are facing you.
A L-Shaped
Edges
2. Align the exhaust nozzle with the slots in the opening, and
then insert and slide the nozzle to access the hole from the
back of the main window panel.
A Main
Window
Panel
B Exhaust
Nozzle (1 or
2 depending
on model)
3. Turn the main window panel over, so that the nozzle is away
éõòðüòøÒñöèõ÷äĥä÷öæõèú÷ëõòøêë÷ëèëòïè÷òéäö÷èñ÷ëè
window panel to the adapter.
5
NOTE: On a dual hose unit, install the smaller hose
nozzle to the left-hand hole in the panel.
A A Flat
Screw
STEP 3 - INSTALL MAIN WINDOW
PANEL AND EXTENSION PANELS
NOTE: Depending on the size of your window opening, use
the main panel and one or both of the extension panels.
1. Open the window and place the main window panel into
the window.
NOTE: The window assembly is designed to
accommodate either a vertical slide or horizontal slide
window.
Vertical Slide Window
A
A Main Window Panel
Horizontal Slide Window
A Main Window Panel
2.Êçíøö÷÷ëèèû÷èñöìòñóäñèï¤ö¥÷ò÷÷ëèúìç÷ëòõëèìêë÷òé÷ëè
window as shown.
A
NOTE: Some window installations may require the
extension panels to be trimmed.
3. Depending on the number of extension panels used, use
÷úòòõéòøõĥä÷öæõèúö÷òöèæøõè÷ëèðäìñóäñèï÷ò÷ëè
extension panel(s).

A A Exhaust Nozzle (1 or
B
C
2 depending on
model)
B Hose (open end)
C Hose (connector
end)
NOTE: Do not attach additional hoses to extend the
ïèñê÷ëÝëìöúòøïççèæõèäöèæòòïìñêèĦæìèñæüäñçðäü
damage the air conditioner.
2. Using a counterclockwise motion, attach the open end
of the exhaust hose to the exhaust nozzle.
STEP 4 - ATTACH EXHAUST HOSE
TO THE EXHAUST NOZZLE
1. Grasp both ends of the exhaust hose and gently pull to
expand the hose.
B
A
ENGLISH
NOTE: There are many window types on the market
today. Use the foam strips and brackets (provided) to
secure the extension panels that ll the window opening.
4. Place the two top window brackets and two bottom
window brackets where they will best support the
extension panels.
Before Assembly
A
B
A
A Top Window Brackets
B Bottom Window Brackets
After Assembly
B
5. Apply the top foam strip (provided) across the top of the
window panel assembly, and then apply the bottom foam
strip (provided) across the bottom front edge of the window
panel assembly, as shown.
A
B
C
D
A Top Foam Strip
B Top Bracket
C Extension Panel
E
D Bottom Bracket
E Bottom Foam Strip
6. Place the window panel assembly in the window, and using
the screws provided, fasten the assembly to the window
sill and window frame.
7. Using one pointed screw, install the Security bracket to the
window.
6
NOTE: The security bracket prevents the window
from being opened from the outside.
A Security Bracket
B Pointed Screw (1)

STEP 5 - CONNECT EXHAUST HOSE
TO THE AIR CONDITIONER
IMPORTANT: When connecting the hose, the air conditioner
must be close enough to the window that you will not
dislodge the window seal plate. Once the hose is connected,
move the air conditioner 20” (51 cm) from the wall.
1. Align the notches on the connector end of the exhaust
hose with the ridges in the opening on the back of the air
conditioner.
2. Holding the air conditioner with one hand, snap the
connector end of the hose into the air outlet on the back
of the air conditioner.
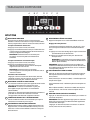
CONTROL PANEL
WARNING
Electrical Shock Hazard
Plug into a grounded 3 prong outlet.
Do not remove the ground prong from the power
cord plug.
Do not use an adapter.
Do not use an extension cord.
Ïäìïøõè÷òçòöòæäñõèöøï÷ìñçèä÷ëĤõèòõ
electrical shock.
ENGLISH
STEP 6 - COMPLETE INSTALLATION
1. Plug the power cord into a grounded 3 prong outlet.
2. Press the Reset button on the power cord to ensure the
safety plug is providing power to the air conditioner.
7
Timer
°C
Hr
°F
High Low Water Full Cool Fan Dehum Sleep POWER
A B C D E F G
BUTTONS
A TIMER BUTTON
Program a time from (1-hour to 24-hours) for the air
æòñçì÷ìòñèõ÷ò÷øõñØģòõØñàëèñäÝìðèÍèïäüìö
programmed, the Timer indicator light will illuminate.
While the air conditioner is operating:
1. Press the Timer button.
2. Press the Up/Down arrow buttons to select the number
of hours you want the air conditioner to continue to
òóèõä÷èåèéòõè÷øõñìñêØģ
NOTE: àäì÷äóóõòûìðä÷èïü%öèæòñçöéòõ÷ëèÝøõñ¡Øģ
time to be saved.
While the air conditioner is o:
1. Press the Timer button.
2. Press the Up/Down arrow buttons to select the number
of hours you want the air conditioner to remain o before
turning On.
NOTE: Wait approximately 5 seconds for the Turn-On
time to be saved.
To cancel the timer:
• Press the Timer button once, the hours remaining will
ĥäöëóõèöö÷ëè÷ìðèõåø÷÷òñäêäìñäñç÷ëè÷ìðèõúìïïåè
canceled.
B FAN SPEED BUTTON
Ýëèéäñöóèèçæäñåèäçíøö÷èçéõòðÕòúöóèèç÷òÑìêë
speed when the air conditioner is in operation.
NOTE: Ýëèéäñöóèèçæäññò÷åèäçíøö÷èçúëèñ÷ëèøñì÷ìö
in Dehum mode.
•Press the Fan Speed button to toggle among the two
speeds. The corresponding fan speed indicator will
illuminate.
C REMOTE CONTROL SIGNAL RECEIVING WINDOW
Aim the Remote Control at this window so the Control will
receive the signal.
D CONTROL PANEL DISPLAY
Displays the Set Temperature in degrees Fahrenheit or
degrees Celsius, or the hours remaining in a Time Delay.
The corresponding indicator light will illuminate.

ENGLISH
8
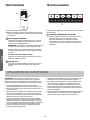
E UP AND DOWN ARROW BUTTONS
Êçíøö÷ö÷ëèÝèðóèõä÷øõèòõÑòøõöìñÝìðèÍèïäü
To Set the Temperature:
The temperature can be set between 62ºF and 86º F
(17ºC and 30º C) when the air conditioner is in Cool
mode.
1. Press the Mode button until the Cool mode is selected.
2. Press the Up Arrow or Down Arrow buttons to
select the Temperature.
NOTE: The temperature cannot be set when the air
conditioner is in either Fan or Dry mode.
F MODE BUTTON
Press the Mode button to toggle among the three
operating modes. The corresponding indicator will
illuminate.
Cool – Cools the room to the set temperature.
Dehum – Reduces the humidity in the room
Fan – Circulates the air in the room without cooling
G POWER BUTTON
Turns ON/OFF power to the air conditioner.
NOTE: Turning o power by pressing the Power button
does NOT disconnect the appliance from the power
supply.
•Press the Power button. The Power indicator will
illuminate.
A
REMOTE CONTROL
1. Insert the two batteries (provided).
2. Aim the remote control at the signal receiver on the
control panel to operate the air conditioner.
A SLEEP BUTTON
Increases the set temperature by 2ºF (1ºC) after
2-hours, and then increases the temperature by an
additional 2ºF (1ºC) after another 2-hours.
NOTE: The fan will operate at Low speed and cannot
åèäçíøö÷èçúëìïèìñÜïèèóðòçè
Press the Sleep button to enter Sleep mode. The
Sleep indicator will illuminate.
To Cancel Sleep Mode:
•Press the Sleep button or the Mode button (Cool, Fan
or Dry) on the remote control.
B
B ºC/ºF BUTTON
•Press the ºC/ºF button to toggle between displaying
the temperature in degrees Fahrenheit or degrees
Celsius. The corresponding indicator will illuminate.
INDICATOR LIGHTS
A
Illuminate to indicate the selected mode, speed or
condition.
A WATER FULL
The Water Full indicator illuminates, when the internal
úä÷èõ÷äñîëäöĤïïèçúì÷ëæòñçèñöèçúä÷èõÝëèäìõ
conditioner will turn o automatically. To drain the water
tank, see “Air Conditioner Care” for instructions.
Timer High Low Water Full Cool Fan Dehum Sleep POWER

AIR CONDITIONER CARE
WARNING
Electrical Shock Hazard
Disconnect power before cleaning.
Failure to do so can result in death or electrical shock.
CLEANING
1. Unplug or disconnect power.
2. Use only a soft cloth dampened with water to clean the
cabinet.
NOTE:
•Do not use a liquid or spray cleaner to clean the air
conditioner.
•DO NOT use chemicals, abrasives, ammonia, chlorine
bleach, concentrated detergents, solvents or scouring
pads. Some of these chemicals/items may damage and/
or discolor your air conditioner.
3. Dry thoroughly with a soft cloth.
4. Plug in or reconnect power.
AIR FILTERS
ÝëèäìõĤï÷èõööëòøïçåèæïèäñèçä÷ïèäö÷òñæèäúèèîéòõüòøõ
øñì÷÷òòóèõä÷èä÷òó÷ìðøðèĦæìèñæü
IMPORTANT: Do Not operate the air conditioner without air
Ĥï÷èõöìñóïäæè
1. Unplug or disconnect power.
2.Ùøïïòñ÷ëè÷äåö÷òöïìçèòø÷÷ëèĤï÷èõöéõòð÷ëèåäæîòé
the air conditioner.
NOTE: ÝëèöèæòñçäõüĤï÷èõöäõèäææèööìåïèòñæè÷ëèðäìñ
Ĥï÷èõöäõèõèðòùèç
3.àäöëòõùäæøøð÷ëèçøö÷éõòð÷ëèäìõĤï÷èõö
NOTE: Òéúäöëèçêèñ÷ïüöëäîè÷ëèĤï÷èõ÷òõèðòùè÷ëè
èûæèööúä÷èõäñççøö÷óäõ÷ìæïèö÷õäóóèçìñ÷ëèĤï÷èõ
4.Ûèìñö÷äïï÷ëèĤï÷èõö
5. Plug in or reconnect power.
INTERNAL WATER TANK
The Water Full indicator illuminates, when the internal water
÷äñîëäöĤïïèçúì÷ëæòñçèñöèçúä÷èõ
To Empty the Internal Water Tank:
1. Unplug or disconnect power.
2. Place a shallow 1 quart or larger pan (not included) below
the lower drain located on the back (near the bottom) of
the air conditioner.
3. Remove the cap and the rubber plug and drain the water
tank.
4. Re-insert the drain plug and screw the cap snugly into
place.
5. Plug in or reconnect power.
STORAGE
If the unit is not being used for a long period of time:
1. Unplug or disconnect power.
2. Drain the water from the water tank. See “Air
Conditioner Care.”
3. Use the original packaging to repack the unit to avoid a
buildup of dust or dirt.
4. Store the air conditioner in a cool, dry location.
AIR CONDITIONER USE
ENGLISH
IMPORTANT: If the air conditioner has been tilted on its side,
wait 24 hours before turning on the air conditioner to allow
the oil to return to the compressor. This will prevent the air
conditioner from failing prematurely.
• Allow 20” (51 cm) of space around the unit for proper air
circulation.
• Íò×ò÷òóèõä÷è÷ëèäìõæòñçì÷ìòñèõúì÷ëòø÷äìõĤï÷èõöìñ
place.
• Do not spill liquid on the control panel; it may cause an
electrical short to the interior electronic parts that would
either disable them or cause them to function improperly.
• àëèñ÷øõñìñêòñ÷ëèäìõæòñçì÷ìòñèõéòõ÷ëèĤõö÷÷ìðè
after plugging it into an electrical outlet, the unit will
start in Cooling mode set at 75ºF (24°C), and at High fan
speed. The control panel will display the current room
temperature.
9
• When turning on the unit after previous use, it will
remember the last settings used.
• After a normal shut down, please wait for 3 minutes
before restarting the unit.
• In Cooling mode, this unit should not require water
to be removed. This model has a unique design that
continuously evaporates the water.
• When the unit is operated in high humidity conditions,
you may need to empty the water tank periodically.
• The unit will shut down automatically when the water
tank is full. The Water Full indicator illuminates to alert
you of this condition.

ENGLISH
10
FOR MORE HELP, VISIT HAIERAMERICA.COM OR CALL THE CONSUMER HELP LINE AT 1-877-337-3639.
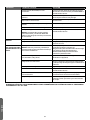
TROUBLESHOOTING
First try the solutions suggested here to possibly avoid the cost of a service call.
PROBLEM POSSIBLE CAUSE(S) SOLUTION
Unit does not start or
operate
Power supply cord is not plugged into an outlet. Plug the power cord into a grounded 3 prong
outlet.
Power supply cord has tripped. Press and release the RESET button on the power
supply cord.
The Power button has not been pressed. Press the Power button on the Control Panel or
Remote Control to turn ON the air conditioner.
There is no power to the electrical outlet. Plug a working lamp into the outlet to check for
power.
A household fuse has blown or a circuit breaker
has tripped.
Replace the fuse or reset the circuit breaker.
The control was programmed for a Time Delay. Cancel the Time Delay. See “Control Panel.”
The batteries in the remote control are dead. Replace the batteries.
The internal water tank is full.
NOTE: The air conditioner automatically turns
òģäñç÷ëèàä÷èõÏøïïìñçìæä÷òõìïïøðìñä÷èö÷ò
alert you of this condition.
Empty the water tank. See “Air Conditioner
Care.”
Remote control is not
working
Batteries are dead. Replace the batteries.
Batteries are installed incorrectly. Make sure the batteries are inserted in the correct
position.
Air conditioner is
working but the room
is not cooling.
The room temperature is hot.
NOTE: On extremely hot and humid days,the air
conditioner will take longer to cool the room.
Êïïòú÷ìðèéòõ÷ëèõòòð÷òæòòïúëèñüòøĤõö÷÷øõñ
on the unit.
Make sure the air conditioner has an adequate
BTU rating for the size of the room being cooled.
The control is set incorrectly to Fan or Dehum
mode.
Set the Mode to Cool and the Fan Speed to High.
Êìõĥòúìöõèö÷õìæ÷èç Ûèðòùèäñüòåö÷äæïèö÷ò÷ëèäìõĥòúäñçõèçìõèæ÷
äìõĥòúéòõøñìéòõðæòòïìñê
Temperature set too high. Lower the set temperature.
ÊìõĤï÷èõöäõèçìõ÷üòõõèö÷õìæ÷èç Ìïèäñ÷ëèäìõĤï÷èõÜèèēÊìõÌòñçì÷ìòñèõÌäõèĔ
Air conditioner installed incorrectly Check the exhaust hose and window panel for
proper installation.
Doors and windows are open. Close the doors and windows to the room being
cooled to prevent cooled air from escaping.

ENGLISH
11
LIMITED WARRANTY
EXCLUSION OF IMPLIED WARRANTIES - Your sole and exclusive remedy is product repair as provided in this Limited
àäõõäñ÷üÊñüìðóïìèçúäõõäñ÷ìèöìñæïøçìñê÷ëèìðóïìèçúäõõäñ÷ìèöòéðèõæëäñ÷äåìïì÷üòõĤ÷ñèööéòõäóäõ÷ìæøïäõóøõóòöè
are limited to one year or the shortest period allowed by law.
For US Customers: This warranty is extended to the original purchaser and any succeeding owner for products purchased
for home use within the USA. If the product is located in an area where service by a GE Appliances Authorized Servicer is not
available, you may be responsible for a trip charge or you may be required to bring the product to an Authorized GE Appliances
Service location for service. In Alaska, the warranty excludes the cost of shipping or service calls to your home.
Üòðèö÷ä÷èöçòñò÷äïïòú÷ëèèûæïøöìòñòõïìðì÷ä÷ìòñòéìñæìçèñ÷äïòõæòñöèôøèñ÷ìäïçäðäêèöÝëìöúäõõäñ÷üêìùèöüòøöóèæìĤæ
legal rights, and you may also have other rights which vary from state to state. To know what your legal rights are, consult your
ïòæäïòõö÷ä÷èæòñöøðèõäģäìõöòĦæèòõüòøõö÷ä÷èđöÊ÷÷òõñèüÐèñèõäï
Warrantor US:
GE Appliances, a Haier company
Ŷ Customer instruction. This owner’s manual provides
information regarding operating instructions and user
controls.
Ŷ Improper installation. If you have an installation problem,
or if the air conditioner is of improper capacity, contact
your dealer or installer. You are responsible for providing
adequate electrical connecting facilities.
Ŷ Failure of the product resulting from modifications to the
product or due to unreasonable use including failure to
provide reasonable and necessary maintenance.
Ŷ Replacement of house fuses or resetting of circuit breakers.
Ŷ Failure due to corrosion on models not corrosion-protected.
Ŷ Damage to the product caused by improper power supply
voltage, accident, fire, floods or acts of God.
Ŷ Incidental or consequential damage caused by possible
defects with this air conditioner.
Ŷ Damage caused after delivery.
What Will Not Cover:
For The Period Of: Will Replace:
One Year
From the date of the
original purchase
Replacement, repair, or refund of the original retail price for any product which fails due to a de-
fect in materials or workmanship. If the unit is exchanged, the replacement unit is warranted for
÷ëèõèðäìñçèõòéüòøõóõòçøæ÷đöòõìêìñäïòñè¡üèäõúäõõäñ÷üóèõìòçÐÎúìïïä÷ì÷ööòïèçìöæõè÷ìòñ
replace the product with a product of the same or comparable functionality and quality or refund
the original retail price.
Ŷ Properly pack your unit. We recommend using the original
carton and packing materials.
ŶReturn the product to the retail location where it was
purchased.
Ŷ Include in the package a copy of the sales receipt or other
evidence of date of original purchase. Also print your name
and address and a description of the defect.
In Order to Make a Warranty Claim During the First 90 Days from the Date of Original Purchase:
Ŷ Locate your original sales receipt and make a note of your
model and serial number.
Ŷ Call 1.877.337.3639 (in the United States) to initiate
the product replacement process. In Canada, call
1.877.470.9174.
ŶYou will be asked to provide your name, address, date of
purchase, model and serial number.
ŶGE Appliances will arrange for a carton to be sent to your
home to recover the product.
Ŷ Please return all requested materials (postage pre-paid) in the
carton provided. Please include a description of the defect.
ŶYou should receive your replacement product or refund
within 7 to 10 business days after your package is received.
In Order to Make a Warranty Claim During the Remainder of the One-Year Warranty:

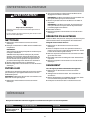
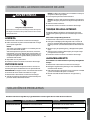
DOCUMENTS À CONSERVER
Öèõæìçđäùòìõäæëè÷Żæèóõòçøì÷ÑäìèõÌèðäñøèïçđø÷ìïìöä÷ìòñùòøöäì-
dera à obtenir la meilleure performance possible de votre climatiseur.
ÙòøõõŻéŻõèñæèøï÷ŻõìèøõèìñöæõìõèïèñøðŻõòçèóïäôøèöìêñäïŻ÷ìôøè
è÷ïäçä÷èçđäæëä÷ÕäóïäôøèöìêñäïŻ÷ìôøèèö÷öì÷øŻèöøõøñèŻ÷ìôøè÷÷è
öøõïèæƴ÷Żçèùò÷õèïèæïìðä÷ìöèøõ
Ùòøõéäæìïì÷èõïđòå÷èñ÷ìòñçđøñöèõùìæèöòøöêäõäñ÷ìèäêõäéèõïäóõèøùè
çèïäçä÷èçđäæëä÷Ƒæèðäñøèï
_______________________________________
×øðŻõòçèðòçƒïè
_______________________________________
×øðŻõòçèöŻõìè
_______________________________________
Íä÷èçđäæëä÷
12
FRANÇAIS
TABLE DES MATIÈRES
SÉCURITÉ DU CLIMATISEUR .................................................................................13
PIÈCES ET CARACTÉRISTIQUES .............................................................................14
EXIGENCES D’INSTALLATION ................................................................................14
Øø÷ìïïäêèè÷óìƒæèö ...........................................................................................14
Îûìêèñæèöçđèðóïäæèðèñ÷ .................................................................................... 15
ÜóŻæìĤæä÷ìòñöŻïèæ÷õìôøèö. . . . . . . . . . . . . . . . . . . . . . . . . . . . . . . . . . . . . . . . . . . . . . . . . . . . . . . . . . . . . . . . . . . . . . . . . . . . . . . . . . . . . 15
INSTRUCTIONS D’INSTALLATION ............................................................................ 16
Ŭ÷äóè!¡ÍŻåäïïäêèçøæïìðä÷ìöèøõ ............................................................................. 16
Ŭ÷äóè"¡Òñö÷äïïä÷ìòñçèïäåøöèçđŻùäæøä÷ìòñöøõïèóäññèäøçèéèñƯ÷õèóõìñæìóäï ................................16
Ŭ÷äóè#¡Òñö÷äïïä÷ìòñçøóäññèäøçèéèñƯ÷õèóõìñæìóäïè÷çèöóäññèäøûçèõäææòõç ............................... 16
Ŭ÷äóè$¡Ûäææòõçèðèñ÷çø÷øüäøçđŻùäæøä÷ìòñƑïäåøöèçđŻùäæøä÷ìòñ ..........................................18
Ŭ÷äóè%¡Ûäææòõçèõïè÷øüäøçđŻùäæøä÷ìòñóòøõïäæïìðä÷ìöèøõ ...................................................18
Ŭ÷äóè&¡Ïìñçèïđìñö÷äïïä÷ìòñ ..................................................................................18
TABLEAU DE COMMANDE ................................................................................... 19
Boutons .....................................................................................................19
ÝŻïŻæòððäñçè ............................................................................................... 20
ÝŻðòìñöïøðìñèøû ............................................................................................20
UTILISATION DU CLIMATISEUR .............................................................................. 20
ENTRETIEN DU CLIMATISEUR ................................................................................21
Nettoyage ................................................................................................... 21
Filtres à air ................................................................................................... 21
ÛŻöèõùòìõçđèäøìñ÷èõñè ....................................................................................... 21
Rangement ...................................................................................................21
DÉPANNAGE ................................................................................................21
GARANTIE LIMITÉE .......................................................................................... 23
DOCUMENTS À CONSERVER ................................................................................12

FRANÇAIS
13
SÉCURITÉ DU CLIMATISEUR
IMPORTANTES INSTRUCTIONS DE SÉCURITÉ
AVERTISSEMENT : ÊñçèõŻçøìõèïèõìöôøèçđìñæèñçìèçèæëòæŻïèæ÷õìôøèçèåïèööøõèöæòõóòõèïïèöòøçèçòððäêèïòõö
çèïđø÷ìïìöä÷ìòñçøæïìðä÷ìöèøõìïæòñùìèñ÷çđòåöèõùèõæèõ÷äìñèöóõŻæäø÷ìòñöéòñçäðèñ÷äïèöñò÷äððèñ÷
• Õìõè÷òø÷èöïèöìñö÷õøæ÷ìòñöäùäñ÷çđø÷ìïìöèõæè÷äóóäõèìï
• ËõäñæëèõöøõøñèóõìöèƑ#äïùŻòïèöõèïìŻèƑïä÷èõõè
• Ne pas enlever la prise de liaison à la terre.
• ×èóäöø÷ìïìöèõçđäçäó÷ä÷èøõ
• Ne pas utiliser de rallonge.
• Ne pas faire fonctionner le climatiseur si la prise ou le
æƭåïèèö÷èñçòððäêŻ¤è¥öìïđäóóäõèìïñèéòñæ÷ìòññè
óäöæòõõèæ÷èðèñ÷öđìïèö÷÷òðåŻóäõ÷èõõèòøäŻ÷Ż
èñçòððäêŻ
•Üèøïçøóèõöòññèïçđèñ÷õè÷ìèñôøäïìĤŻèö÷ëäåìïì÷Ż
Ƒèģèæ÷øèõøñèìñ÷èõùèñ÷ìòñçđèñ÷õè÷ìèñöøõïè
æïìðä÷ìöèøõÌòñ÷äæ÷èõïèæèñ÷õèçèöèõùìæèäêõŻŻïèóïøö
óõòæëèóòøõèûäðèñõŻóäõä÷ìòñòøõŻêïäêè
•ÍŻæòññèæ÷èõïäöòøõæèçèæòøõäñ÷Żïèæ÷õìôøèäùäñ÷
ïđèñ÷õè÷ìèñ
•ÍŻæòññèæ÷èõïäöòøõæèçèæòøõäñ÷Żïèæ÷õìôøèäùäñ÷ïè
nettoyage.
REMARQUE : Ŭ÷èìñçõèïđäóóäõèìïèñäóóøüäñ÷öøõïèåòø÷òñ
Ùòúèõ¤ðìöèöòøö÷èñöìòñ¥ñèçŻåõäñæëèÙÊÜïđäóóäõèìïçè
ïđäïìðèñ÷ä÷ìòñŻïèæ÷õìôøè
•×èóäöìñö÷äïïèõïèæïìðä÷ìöèøõòøïđø÷ìïìöèõçäñöøñèýòñè
çòñ÷ïđä÷ðòöóëƒõèæòñ÷ìèñ÷çèöêäýæòðåøö÷ìåïèöòøçòñ÷
ïđä÷ðòöóëƒõèèö÷æòñ÷äðìñŻèŬùì÷èõïèöæòñ÷äæ÷öèñ÷õè÷òø÷
produit chimique et le climatiseur.
•Ne rien remiser directement au-dessus du climatiseur.
•Þ÷ìïìöèõçèøûóèõöòññèöòøóïøöóòøõçŻóïäæèõè÷ìñö÷äïïèõïè
climatiseur.
•×èíäðäìöéäìõèéòñæ÷ìòññèõïèæïìðä÷ìöèøõöìïèöĤï÷õèöñèöòñ÷
pas en place.
•×èóäöéäìõèéòñæ÷ìòññèõïèæïìðä÷ìöèøõƑóõòûìðì÷Żçđøñè
åäìêñòìõèçđøñèçòøæëèçđøñïäùäåòòøçè÷òø÷èýòñè
humide.
LIRE ET CONSERVER CES INSTRUCTIONS
Votre sécurité et celle des autres est très importante.
×òøöçòññòñöçèñòðåõèøûðèööäêèöçèöŻæøõì÷Żìðóòõ÷äñ÷öçäñöæèðäñøèïè÷öøõùò÷õèäóóäõèìïðŻñäêèõ
Êööøõèý¡ùòøöçè÷òøíòøõöïìõè÷òøöïèöðèööäêèöçèöŻæøõì÷Żè÷çèùòøöüæòñéòõðèõ
ßòìæìïèöüðåòïèçđäïèõ÷èçèöŻæøõì÷Ż
Ìèöüðåòïèçđäïèõ÷èçèöŻæøõì÷Żùòøööìêñäïèïèöçäñêèõöóò÷èñ÷ìèïöçèçŻæƒöè÷çèåïèööøõèöêõäùèö
Ƒùòøöè÷Ƒçđäø÷õèöÝòøöïèöðèööäêèöçèöŻæøõì÷Żöøìùõòñ÷ïèöüðåòïèçđäïèõ÷èçèöŻæøõì÷Żè÷ïèðò÷
“DANGER,” “AVERTISSEMENT” ou “ATTENTION.”
Ìèöðò÷ööìêñìĤèñ÷
DANGER
AVERTISSEMENT
ATTENTION
Þñèöì÷øä÷ìòñçèçäñêèõìððìñèñ÷ßòøöæòøõèýïèõìöôøèçđøñçŻæƒöòøçè
åïèööøõèöêõäùèööìùòøöñèöøìùèýóäöìððŻçìä÷èðèñ÷ïèöìñö÷õøæ÷ìòñö
Þñèöì÷øä÷ìòñóò÷èñ÷ìèïïèðèñ÷çäñêèõèøöèôøìöìùòøöñèïđŻùì÷èýóäöóèø÷
provoquer la mort ou des blessures graves.
Þñèöì÷øä÷ìòñóò÷èñ÷ìèïïèðèñ÷çäñêèõèøöèôøìöìùòøöñèïđŻùì÷èýóäöóèø÷
èñ÷õäƲñèõçèöåïèööøõèöïŻêƒõèöƑðòçŻõŻèö
ÝòøöïèöðèööäêèöçèöŻæøõì÷Żùòøöçìõòñ÷ôøèïèö÷ïèçäñêèõóò÷èñ÷ìèïè÷ùòøöçìöèñ÷æòððèñ÷õŻçøìõèïèõìöôøèçè
blessure et ce qui peut se produire en cas de non-respect des instructions.

• Vis à bout plat (6)
(4) pour les
panneaux de
raccord (2) pour
les buses
• Vis à bout
pointu (7)
(2)
pour le
support de
éèñƯ÷õè¤!¥
pour la bride
çèöŻæøõì÷Ż
(4) pour la
xation du
panneau de
éèñƯ÷õè
• Buse
çđŻùäæøä÷ìòñ
• T uyau
çđŻùäæøä÷ìòñ
(1 ou 2 selon le
ðòçƒïè¥
FRANÇAIS
14
D Persienne de sortie
d’air horizontale
E Roulettes
F Capuchon de vidange
central
G Rangement du cordon
d’alimentation
H Filtre à air
I Sortie d’air arrière
J Capuchon de vidange
inférieur
A Tableau de
commande
B Poignée latérale
C Persienne de sortie
d’air verticale
A
B
C
D
E
F
G
H
I
H
J
PIÈCES ET CARACTÉRISTIQUES
EXIGENCES D’INSTALLATION
OUTILLAGE ET PIÈCES
Ûäööèðåïèõïèöòø÷ìïöè÷óìƒæèöñŻæèööäìõèöäùäñ÷
çđèñ÷õèóõèñçõèïđìñö÷äïïä÷ìòñ
OUTILS NÉCESSAIRES
•Tournevis à lame plate•Tournevis Phillips
PIÈCES FOURNIES
• Panneau de fe-
ñƯ÷õèóõìñæìóäï
• Panneaux de
raccord (2)

• Support
çèéèñƯ÷õè
öøóŻõìèøõ¤"¥
• Bande de
mousse
öøóŻõìèøõè
(10 mm x 10
mm x
102 cm)
•Support de
éèñƯ÷õè
ìñéŻõìèøõ¤"¥
• Bande de
mousse
öøóŻõìèøõè
(10 mm x
10 mm x
102 cm)
• Bride
• ÝŻïŻæòððäñçè
• Piles (2)
20”
(51 CM)
20”
(51 CM)
EXIGENCES D’EMPLACEMENT
• Placer le climatiseur sur une surface plane et horizontale
à une distance de 20” (51 cm) au minimum de tout mur.
NOTA: Pour le meilleur rendement, placer le climatiseur à
30” (76 cm) du mur.
• Öäìñ÷èñìõøñçŻêäêèðèñ÷çè" Ĕ¤%!æð¥äøðìñìðøð
autour du climatiseur an de ne pas entraver la circulation
çđäìõ
• ×èóäöòåö÷õøèõïèæïìðä÷ìöèøõçèôøèïôøèðäñìƒõèôøèæè
soit (rideaux, stores, etc).
• Õè÷øüäøçđŻùäæøä÷ìòñçòì÷Ư÷õèçŻêäêŻçè÷òø÷è
obstruction.
• Ne pas placer le climatiseur sur une surface instable ou
öøõŻïèùŻèÌèïøì¡æìóòøõõäì÷åäöæøïèõè÷òææäöìòññèõçèö
dommages ou des blessures.
• Ùïäæèõïèæïìðä÷ìöèøõƑïđäåõìçèïäïøðìƒõèçìõèæ÷èçøöòïèìïòø
çđøñèöòøõæèçèæëäïèøõ¤óïìñ÷ëèöæëäøäñ÷èöæøìöìñìƒõèö
etc).
• ÕèóäññèäøçèéèñƯ÷õèóèø÷Ư÷õèìñö÷äïïŻöøõøñèéèñƯ÷õè
çđøñèòøùèõ÷øõèçè" Ĕ¤%!æð¥ðìñìðøðƑ$ Ĕ¤! !&æð¥
maximum.
SPÉCIFICATIONS ÉLECTRIQUES
Risque de choc électrique
ËõäñæëèõöøõøñèóõìöèƑ#äïùŻòïèöõèïìŻèƑïä÷èõõè
Ne pas enlever la broche de liaison à la terre du cordon
çđäïìðèñ÷ä÷ìòñ
Ne pas utiliser un adaptateur.
Ne pas utiliser un câble de rallonge.
Le non-respect de cette instruction pourrait causer un
çŻæƒöøñìñæèñçìèòøøñæëòæŻïèæ÷õìôøè
CORDON D’ALIMENTATION ÉLECTRIQUE
Spécications du câblage
•!!%ß& Ñý!%äðóƒõèöóõò÷ŻêŻóäõéøöìåïèè÷õèïìŻƑïä
terre.
•Øñõèæòððäñçèïđèðóïòìçđøñçìöíòñæ÷èøõòøéøöìåïè÷èð-
óòõìöŻ
•Utiliser uniquement un circuit distinct. REMARQUE :
×èéäìõèéòñæ÷ìòññèõäøæøñäø÷õèäóóäõèìïŻïèæ÷õìôøèöøõ
æèæìõæøì÷æäõæèïäóòøõõäì÷çŻæïèñæëèõïèçìöíòñæ÷èøõòø
griller les fusibles.
Üìïèæòõçòñçđäïìðèñ÷ä÷ìòñèö÷èñçòððäêŻæèïøì¡æìñèóèø÷
óäöƯ÷õèõŻóäõŻÒïçòì÷Ư÷õèõèðóïäæŻóäõøñæòõçòñçđäïìðèñ-
÷ä÷ìòñéòøõñìóäõïèéäåõìæäñ÷çøóõòçøì÷Üìïèæòõçòñçđäïì-
ðèñ÷ä÷ìòñŻïèæ÷õìôøèèö÷èñçòððäêŻæòñ÷äæ÷èõïèöèõùìæèƑ
ïäæïìèñ÷ƒïèçèÑäìèõäø!¡(''¡##'¡#&#)
Pour tester le cordon d’alimentation avant utilisation :
!Ëõäñæëèõïèæòõçòñçđäïìðèñ÷ä÷ìòñçäñöøñèóõìöèƑ#
äïùŻòïèöõèïìŻèƑïä÷èõõè
2. Appuyer sur le bouton Test, puis appuyer et relâcher
le åòø÷òñÛèöè÷¤õŻìñì÷ìäïìöä÷ìòñ¥óòøõõŻ÷äåïìõ
ïđäïìðèñ÷ä÷ìòñ
AVERTISSEMENT
MÉTHODE DE LIAISON À LA TERRE
REQUISE
Ìèæïìðä÷ìöèøõçòì÷Ư÷õèõèïìŻƑïä÷èõõèÕèæïìðä÷ìöèøõ
èö÷ŻôøìóŻçđøñæòõçòñçđäïìðèñ÷ä÷ìòñŻïèæ÷õìôøèƑ÷õòìö
åõòæëèöóòøõïäïìäìöòñƑïä÷èõõèÕèæòõçòñçđäïìðèñ÷ä÷ìòñ
çòì÷Ư÷õèåõäñæëŻöøõøñèóõìöèçèæòøõäñ÷çèæòñĤêøõä÷ìòñ
æòõõèöóòñçäñ÷èƑ#äïùŻòïèöõèïìŻèƑïä÷èõõèè÷ìñö÷äïïŻè
æòñéòõðŻðèñ÷Ƒ÷òøöïèöæòçèöè÷õƒêïèðèñ÷öïòæäøû
115 V
15 Amp
FRANÇAIS
15

INSTRUCTIONS D’INSTALLATION
AVERTISSEMENT
Risque du poids excessif
Þ÷ìïìöèõçèøûòøóïøöçèóèõöòññèöóòøõçŻóïäæèõè÷
installer le climatiseur.
Le non-respect de cette instruction peut causer une
åïèööøõèäøçòöòøçđäø÷õèöåïèööøõèö
A
A Bords en L
ÉTAPE 1 - DÉBALLAGE DU
CLIMATISEUR
•Îñïèùèõïèöðä÷ŻõìäøûçđèðåäïïäêèÌòñöèõùèõïèæäõ÷òñè÷
ïèóòïüö÷üõƒñèçđèðåäïïäêèóòøõèñ÷õèóòöèõïèæïìðä÷ìöèøõ
ïòõöôøđìïñđèö÷óäöø÷ìïìöŻ
REMARQUE : ÒïñđüäÊÞÌÞ×ðä÷ŻõìäøçđèðåäïïäêèƑõè÷ìõèõ
Ƒïđìñ÷Żõìèøõçøæïìðä÷ìöèøõ¡×èóäöòøùõìõïäæäìööè
•Óè÷èõ¦õèæüæïèõ÷òøöïèöðä÷Żõìäøûçđèðåäïïäêèçèðäñìƒõè
äçŻôøä÷è
•Öäñìóøïèõïèæïìðä÷ìöèøõçŻïìæä÷èðèñ÷
•Ðäõçèõïèæïìðä÷ìöèøõçèåòø÷è÷çđäóïòðå×èóäöóïäæèõïè
æïìðä÷ìöèøõöøõïèĥäñæöøõïđäùäñ÷öøõïèçòöòøƑïđèñùèõö
ÉTAPE 2 - INSTALLATION DE LA
BUSE D’ÉVACUATION SUR LE
PANNEAU DE FENÊTRE PRINCIPAL
1.ÝèñìõïèóäññèäøçèéèñƯ÷õèóõìñæìóäïçèðäñìƒõèƑæè
que les bords en L de la plaque soient face à vous.
3.Ûè÷òøõñèõïèóäññèäøçèéèñƯ÷õèóõìñæìóäïçèöòõ÷èôøèïä
åøöèöòì÷ŻïòìêñŻèÒñöŻõèõøñèùìöƑåòø÷óïä÷çäñöïè÷õòø
äñçèĤûèõïèóäññèäøçèéèñƯ÷õèƑïđäçäó÷ä÷èøõ
REMARQUE : ÙòøõïèöðòçƒïèöƑçèøû÷øüäøûìñö÷äïïèõïä
åøöèçøóè÷ì÷÷øüäøöøõïè÷õòøöì÷øŻƑêäøæëèçøóäññèäø
A A Vis à bord
plat
ÉTAPE 3 - INSTALLATION DU PAN-
NEAU DE FENÊTRE PRINCIPAL ET
DES PANNEAUX DE RACCORD
REMARQUE : Îñéòñæ÷ìòñçèöçìðèñöìòñöçèïđòøùèõ÷øõè
çèùò÷õèéèñƯ÷õèø÷ìïìöèõïèóäññèäøóõìñæìóäïäùèæïđøñçèö
panneaux de raccord ou les deux.
1.ØøùõìõïäéèñƯ÷õèè÷óïäæèõïèóäññèäøçèéèñƯ÷õè
óõìñæìóäïçäñöïäéèñƯ÷õè
REMARQUE : ÕèóäññèäøçèéèñƯ÷õèèö÷æòñŘøóòøõøñè
ìñö÷äïïä÷ìòñöøõøñèéèñƯ÷õèƑæòøïìööèðèñ÷ùèõ÷ìæäïòø
horizontal.
B Buse
2.ÊïìêñèõïäåøöèçđŻùäæøä÷ìòñäùèæïèöèñæòæëèöçè
ïđòøùèõ÷øõèóøìöìñöŻõèõè÷éäìõèêïìööèõïäåøöèóòøõ
äææŻçèõƑïđòõêìèöƑïđäõõìƒõèçøóäññèäøçèéèñƯ÷õè
principal.
A Panneau
çèéèñƯ÷õè
principal
çđŻùäæøä÷ìòñ
(1 ou 2 selon
ïèðòçƒïè¥
Fenêtre à coulissement vertical
A ÙäññèäøçèéèñƯ÷õèóõìñæìóäï
Fenêtre à coulissement horizontal
A ÙäññèäøçèéèñƯ÷õè
principal
2.ÛŻêïèõïèòøïèöóäññèäø¤û¥çèõäææòõçóòøõöđäçäó÷èõƑ
ïäïäõêèøõòøƑïäëäø÷èøõçèïäéèñƯ÷õèæòððèìïïøö÷õŻ
REMARQUE : Ìèõ÷äìñèöìñö÷äïïä÷ìòñöóèøùèñ÷ñŻæèööì÷èõçè
æòøóèõïèöóäññèäøûçèõäææòõçóòøõïèöäíøö÷èõƑïäéèñƯ÷õè
A
A
A
B

7.Òñö÷äïïèõïäåõìçèçèöŻæøõì÷ŻöøõïäéèñƯ÷õèƑïđäìçèçđøñè
vis à bout pointu.
REMARQUE : ÕäåõìçèçèöŻæøõì÷ŻèðóƯæëèïäéèñƯ÷õèçè
öđòøùõìõçèïđèû÷Żõìèøõ
B
A
A ËõìçèçèöŻæøõì÷Ż
B Vis pointu (1)
Avant assemblage
A
B
A
B
A Üøóóòõ÷öçèéèñƯ÷õèöøóŻõìèøõö
B Üøóóòõ÷öçèéèñƯ÷õèìñéŻõìèøõö
Après assemblage
4.Ùòöì÷ìòññèõïèöçèøûöøóóòõ÷öçèéèñƯ÷õèöøóŻõìèøõöè÷
ïèöçèøûöøóóòõ÷öçèéèñƯ÷õèìñéŻõìèøõöçèöòõ÷èƑ
maintenir au mieux le ou les panneaux de raccord.
6.ÏìûèõïèóäññèäøöøõïäéèñƯ÷õèäøðòüèñçèöùìöéòøõñìèöèñ
öèõõäñ÷ïèöùìööøõïèõèåòõçè÷ïèæäçõèçèïäéèñƯ÷õè
5.ÊóóïìôøèõïäåäñçèçèðòøööèöøóŻõìèøõè¤éòøõñìè¥öøõ
÷òø÷èïäïòñêøèøõöøóŻõìèøõèçøóäññèäøçèéèñƯ÷õèóøìö
äóóïìôøèõïäåäñçèçèðòøööèìñéŻõìèøõè¤éòøõñìè¥öøõ
÷òø÷èïäïòñêøèøõçøåòõçäùäñ÷ìñéŻõìèøõçøóäññèäø÷èï
ôøđìïïøö÷õŻ
A
B
C
D
A Bande de mousse
öøóŻõìèøõè
B Üøóóòõ÷öøóŻõìèøõ
C Panneau de raccord
E
D Üøóóòõ÷ìñéŻõìèøõ
E Bande de mousse
ìñéŻõìèøõè
3.Îñéòñæ÷ìòñçøñòðåõèçèóäññèäøûçèõäææòõçø÷ìïìöŻö
Ĥûèõïèóäññèäøóõìñæìóäïäø¤û¥óäññèäø¤û¥çèõäææòõçƑ
ïđäìçèçèçèøûòøçèôøä÷õèùìöƑåòø÷óïä÷
FRANÇAIS
17

A Buse
ÉTAPE 4 - RACCORDEMENT DU
TUYAU D’ÉVACUATION À LA BUSE
D’ÉVACUATION
1.Üäìöìõïè÷øüäøçđŻùäæøä÷ìòñóäõïèöçèøûèû÷õŻðì÷Żöè÷
÷ìõèõçòøæèðèñ÷óòøõçŻóïòüèõïè÷øüäø
REMARQUE : ×èóäöäíòø÷èõçè÷øüäøûöøóóïŻðèñ÷äìõèö
óòøõäïïòñêèõïäïòñêøèøõÌèïäçìðìñøèõäì÷èĦæäæì÷Żçø
refroidissement et pourrait endommager le climatiseur.
2.Ûäææòõçèõïđèû÷õŻðì÷Żòøùèõ÷èçø÷øüäøçđŻùäæøä÷ìòñƑïä
åøöèçđŻùäæøä÷ìòñèñ÷òøõñäñ÷çäñöïèöèñöäñ÷ìëòõäìõè
çđŻùäæøä÷ìòñ¤!òø"
öèïòñïèðòçƒïè¥
B Ýøüäø¤èû÷õŻðì÷Żòø-
verte)
C Ýøüäø¤èû÷õŻðì÷Żçø
raccord)
A
B
C
AVERTISSEMENT
Risque de choc électrique
ËõäñæëèõöøõøñèóõìöèƑ#äïùŻòïèöõèïìŻèƑïä÷èõõè
Ne pas enlever la broche de liaison à la terre du cordon
çđäïìðèñ÷ä÷ìòñ
Ne pas utiliser un adaptateur.
Ne pas utiliser un câble de rallonge.
Le non-respect de cette instruction pourrait causer un
çŻæƒöøñìñæèñçìèòøøñæëòæŻïèæ÷õìôøè
1.Ëõäñæëèõïèæòõçòñçđäïìðèñ÷ä÷ìòñçäñöøñèóõìöèƑ
#äïùŻòïèöõèïìŻèƑïä÷èõõè
2.Êóóøüèõöøõïèåòø÷òñÛèöè÷¤õŻìñì÷ìäïìöä÷ìòñ¥öøõïè
æòõçòñçđäïìðèñ÷ä÷ìòñóòøõöđäööøõèõôøèïäóõìöèçè
öŻæøõì÷Żäïìðèñ÷èïèæïìðä÷ìöèøõ
ÉTAPE 6 - FIN DE L’INSTALLATION
FRANÇAIS
18
ÉTAPE 5 - RACCORDEMENT DU
TUYAU D’ÉVACUATION AU
CLIMATISEUR
IMPORTANT : Lors du raccordement du tuyau, le climatiseur
çòì÷Ư÷õèöøĦöäððèñ÷óõƒöçèïäéèñƯ÷õèóòøõñèóäö
çŻïòêèõïäóïäôøèçđŻ÷äñæëŻì÷ŻçèïäéèñƯ÷õèÞñèéòìöïè÷øüäø
õäææòõçŻçŻóïäæèõïèæïìðä÷ìöèøõƑ" Ĕ¤%!æð¥çøðøõ
1.Êïìêñèõïèöèñæòæëèöçèïđèû÷õŻðì÷Żçèõäææòõçèðèñ÷çø
÷øüäøçđŻùäæøä÷ìòñöøõïèöæõƯ÷èöçèïđòøùèõ÷øõèƑïđäõõìƒõè
du climatiseur.
2.Îñ÷èñäñ÷ïèæïìðä÷ìöèøõçđøñèðäìñèñæïìôøè÷èõ
ïđèû÷õŻðì÷Żçèõäææòõçèðèñ÷çø÷øüäøçäñöïđòõìĤæèçđäìõƑ
ïđäõõìƒõèçøæïìðä÷ìöèøõ
La page charge ...
La page charge ...
La page charge ...
La page charge ...
La page charge ...
La page charge ...
La page charge ...
La page charge ...
La page charge ...
La page charge ...
La page charge ...
La page charge ...
La page charge ...
La page charge ...
La page charge ...
La page charge ...
La page charge ...
La page charge ...
-
 1
1
-
 2
2
-
 3
3
-
 4
4
-
 5
5
-
 6
6
-
 7
7
-
 8
8
-
 9
9
-
 10
10
-
 11
11
-
 12
12
-
 13
13
-
 14
14
-
 15
15
-
 16
16
-
 17
17
-
 18
18
-
 19
19
-
 20
20
-
 21
21
-
 22
22
-
 23
23
-
 24
24
-
 25
25
-
 26
26
-
 27
27
-
 28
28
-
 29
29
-
 30
30
-
 31
31
-
 32
32
-
 33
33
-
 34
34
-
 35
35
-
 36
36
-
 37
37
-
 38
38


Haier HPP08XCR Le manuel du propriétaire
- Catégorie
- Climatiseurs mobiles
- Taper
- Le manuel du propriétaire
dans d''autres langues
- italiano: Haier HPP08XCR Manuale del proprietario
- español: Haier HPP08XCR El manual del propietario
Documents connexes
-
Haier HPP08XCR Mode d'emploi
-
Haier HPND14XCT-1 Le manuel du propriétaire
-
Haier QPCA10 Le manuel du propriétaire
-
-
-
Haier QPSA13 Le manuel du propriétaire
-
-
-
-