
4-094-602-
11
(1)
Flat Panel Colour TV
KE-32TS2E
KE-42TS2E
© 2003 Sony Corporation
Operating Instructions
Bedienungsanleitung
Manual de instrucciones
Mode d’emploi
GB
DE
ES
FR

2
NOTICE FOR CUSTOMERS IN THE UNITED KINGDOM
A moulded plug complying with BS1363 is fitted to this equipment for your safety and
convenience.
Should the fuse in the plug supplied need to be replaced, a 5 AMP fuse approved by ASTA or
BSI to BS 1362 (i.e. marked with
2
or
@
) must be used.
When an alternative type of plug is used it should be fitted with a 5 AMP FUSE, otherwise the
circuit should be protected by a 5 AMP FUSE at the distribution board.
If the plug supplied with this equipment has a detachable fuse cover, be sure to attach the fuse
cover after you change the fuse. Never use the plug without the fuse cover. If you should lose
the fuse cover, please contact your nearest Sony service station.
How to replace the fuse
Open the fuse compartment with a blade screwdriver, and replace the fuse.
•
IMPORTANT
If the plug supplied is not suitable for the socket outlets in your home, it should be cut off and
an appropriate plug fitted in accordance with the following instructions:
The wires in this mains lead are coloured in accordance with the following code:
Blue Neutral
Brown Live
As the colours of the wires in the mains lead of this apparatus may not correspond with the
coloured markings identifying the terminals in your plug, proceed as follows:
The wire which is coloured blue must be connected to the terminal which is marked with the
letter N or coloured black. The wire which is coloured brown must be connected to the
terminal which is marked with the letter L or coloured red. Do not connect either wire to the
earth terminal in the plug which is marked by the letter E or by the safety earth symbol
Y
or
coloured green or green and yellow.
WARNING
• To prevent the risk of electric shock, do not insert the plug cut off from the mains lead into
a socket outlet. This plug cannot be used and should be destroyed.
• To prevent the risk of fire or electric shock, do not expose the unit to rain or moisture.
• Dangerously high voltages are present inside the set. Do not open the cabinet. Refer servicing
to qualified personnel only.

3
Table of Contents
GB
Introduction
Thank you for choosing this Sony Flat Panel Colour Television.
Before operating the TV, please read this manual thoroughly and retain it for future
reference.
Symbols used in the manual
Table of Contents
Notice for Customers in the United Kingdom ....................................................................................2
Introduction..............................................................................................................................................3
Safety Information ...................................................................................................................................4
Additional Safety Information ..............................................................................................................5
Checking the Accessories Supplied ......................................................................................................5
Overview
Overview of TV Buttons .........................................................................................................................6
Overview of Remote Control Buttons ..................................................................................................7
Installation
Inserting Batteries into the Remote Control ........................................................................................8
Connecting the AC Cable, Aerial and VCR .........................................................................................8
Preventing the TV from Falling Down .................................................................................................9
First Time Operation
Switching On the TV and Automatically Tuning .............................................................................11
Menu System
Introducing and Using the Menu System ..........................................................................................13
Picture Adjustment................................................................................................................................13
Sound Adjustment.................................................................................................................................15
Screen Control........................................................................................................................................16
Features ...................................................................................................................................................19
Set Up ......................................................................................................................................................21
Timer........................................................................................................................................................24
Unit Status...............................................................................................................................................26
Teletext
Teletext ....................................................................................................................................................27
Additional Information
Connecting Optional Equipment ........................................................................................................28
Using Optional Equipment ..................................................................................................................30
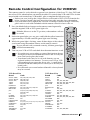
Remote Control Configuration for VCR/DVD .................................................................................31
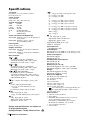
Specifications..........................................................................................................................................32
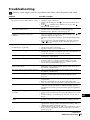
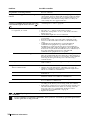
Troubleshooting.....................................................................................................................................33
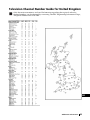
Television Channel Number Guide for United Kingdom...............................................................35
......Important information.
......Information on a feature.
1,2 ........Sequence of instructions.
......Shaded buttons on the remote
control show you the buttons you
have to press to follow the sequence
of instructions.
...........Informs you of the result of
instructions.
OK

4
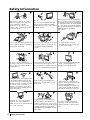
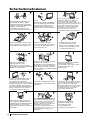
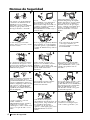
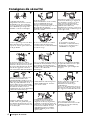
Safety Information
Do not open the cabinet and the rear
cover of the TV. Refer to qualified
service personnel only.
To prevent fire or shock
hazard, do not expose the TV
to rain or moisture.
For your own safety, do not touch
any part of the TV, power lead or
aerial lead during lightning
storms.
Do not cover the ventilation
openings of the TV. For ventilation,
leave a space of at least 10cm all
around the set.
Never place the TV in hot, humid
or excessively dusty places. Do
not install the TV where it may be
exposed to mechanical vibrations.
To prevent fire, keep inflammable
objects or naked lights (eg
candles) away from the TV.
Pull out the power lead by the
plug. Do not pull on the power
lead itself.
Take care not to place heavy
objects on the power lead as this
could result in damage.
We recommend you wind any
excess lead around the holders
provided on the rear of the TV.
Place the TV on a secure stable
stand. Do not allow children to
climb on to it. Do not place the TV
on its side or face up.
Do not cover the ventilation
openings of the TV with items
such as curtains or newspapers
etc.
Safety Information
Never push objects of any kind into
the set as this could result in a fire
or electric shock. Never spill liquid
of any kind on the set. If any liquid
or solid object does fall through, do
not operate the TV. Have it checked
immediately by qualified
personnel.
For environmental and safety
reasons, it is recommended that
the TV set is not left in standby
mode when not in use. Disconnect
from the mains.
This set is to operate on a 220-
240V AC supply only. Take care
not to connect too many
appliances to the same power
socket as this could result in fire
or electric shock.
Unplug the power lead before
moving the TV. Avoid uneven
surfaces, quick steps or excessive
force. If the set has been dropped
or damaged, have it checked
immediately by qualified service
personnel.
Clean the screen and cabinet with a
soft, lightly dampened cloth. Do
not use any type of abrasive pad,
alkaline cleaner, scouring powder
or solvent, such as alcohol or
benzine, or antistatic spray. As a
safety precaution, unplug the TV
before cleaning it.

5
Safety Information
GB
Additional Safety Information
• This set should only be moved by two or
more people. If the set needs to be
transported, it should be protected to insure
that it is not subject to shock, vibration or
excessive force.
• The slots and openings in the cabinet and in
the back and bottom are provided for the
necessary ventilation. To ensure reliable
operation of the set, and to protect it from
overheating, these slots and openings must
never be blocked or covered.
• After transporting the set directly from a cold
to a warm location, or if the room
temperature has changed suddenly, pictures
may be blurred or show poor colour over
portions of the picture. This is because
moisture has condensed on the mirrors or
lenses inside the set. Let the moisture
evaporate before using the set.
• To obtain a clear picture, do not expose the
screen to direct illumination or direct
sunlight. If possible, use spot lighting
directed down from the ceiling.
• The screen of this display unit has an anti-
reflection screen coating. To avoid screen
degradation, follow the points mentioned
below. Do not push on or scratch with hard
objects, or throw anything at the screen. The
screen may be damaged.
– Be sure to unplug the mains lead connected
to the media receiver unit from the mains
before cleaning.
– Do not touch the display panel after
operating continuously for along period as
the display panel becomes hot.
– The screen of this display unit has an anti-
reflection screen coating. We recommend
that the screen surface is touched as little as
possible.
– Clean the screen with the supplied cleaning
cloth or a soft cloth lightly moistened with
a mild detergent solution.
– Never use any type of abrasive pad,
scouring powder, or solvent, such as
alcohol or benzine. This type of contact may
result in damage to the screen surface.
• The TV set is not disconnected from the
mains when the switch is in Off position. To
disconnect completely the set, pull the plug
from the mains.
•
Note on use in highlands
When used at an altitude of greater than 1900
m or 6248 feet (air pressure less than 800hPa),
this Plasma Display Panel may generate a
low buzzing sound as a result of the
difference between the interior and exterior
air pressure of the panels. This is not
considered a defect and is not covered by the
Sony Warranty. This buzzing sound is an
inherent characteristic of any Plasma display
Panel.
Corrosion
Use of this set near the seashore may subject the
set to excessive salt, corrosion and internal
damage and result in deterioration of the set’s
performance. If the set will be subjected to any
of these conditions, steps should be taken to
reduce the humidity and temperature of the
area where the set is located.
On image retention
• If the following images are displayed for an
extended period time, image retention
(afterimage) in areas of the screen may result
due to the characteristics of the Plasma
Display Panel.
– Black bars at the top and bottom that
appear with a wide video source (Letterbox
picture).
– Black bars to the left and right that appear
with a 4:3 video source (conventional TV
broadcasts).
– Video game sources
– PC images
– DVD on-screen menu displays
– On-screen menus, channel numbers, etc., of
connected equipment such as Set top box,
Cable modem, VCR, etc.
The risk of this is higher if the set is in “Live”
mode or has a high contrast setting. This
image cannot be removed once burnt onto
the screen. To avoid the risk of image
retention do not leave the TV set operating on
such a picture, or programme for a long time,
use the “Screen Saver” function or lower the
contrast setting. Repeated extended daily
usage of the same image, or programme can
also result in this occurrence. IMAGE
RETENTION IS NOT COVERED BY THE
SONY WARRANTY.
• To reduce image retention, this TV set has the
“Screen Saver” function. The default setting
of the “Orbit” function in “Screen Saver” is
“On.”
• The “Screen Saver” function prevents and
reduces image retention.
• With extensive use of this TV set in 4:3 mode,
the 4:3 screen area might become darker
within a 16:9 panel. To avoid this problem,
the “Smart” picture mode should be used.
Checking the Accessories Supplied
See page 32.

6
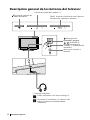
Overview
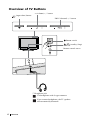
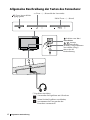
Overview of TV Buttons
(input select) button
2 (volume) +/– button
PROG (channel) +/– button
Power switch
/ (standby/sleep)
indicator
Remote control sensor
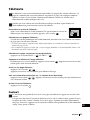
i Headphone jack
Use headphones with L type connector.
If you connect headphones, the TV speakers
will automatically be muted.

7
Overview
GB
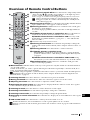
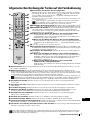
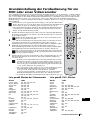
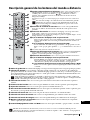
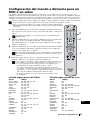
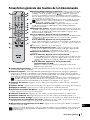
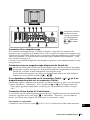
Overview of Remote Control Buttons
q;
Media Selector:
With this remote control you can operate not only this TV but also the main functions
of your VCR or DVD.
Switch on the device you want to operate and next press this button repeatedly to select the VCR, TV or
DVD. A green light will be lit momentarily.
qa
Selecting channels:
Press these buttons to select the next or previous channel.
qs
Muting the Sound:
Press this button to mute TV sound. Press again to restore the sound.
qd
Adjusting TV volume:
Press these buttons to adjust the volume of the TV.
qf
Displaying the menu system:
Press this button to display the menu on the TV screen. Press again to
remove the menu display from the TV screen.
qg
Selecting TV mode:
Press this button to switch off teletext or video input.
qh
Selecting Sound effect:
Press this button repeatedly to change the sound effect.
qj
Selecting Picture mode:
Press this button repeatedly to change the picture mode.
qk
Displaying on-screen information:
Press this button to display all on-screen indications. Press again
to cancel.
ql
VCR or DVD on/off:
Press this button to switch your VCR or DVD on or off.
An initial set up is required to synchronise this remote control to your VCR or DVD. It will depend on
the Brand of those products. For more details, refer to chapter “Remote Control Configuration for
VCR/DVD” on page 31.
Besides TV functions, all coloured buttons as well as green symbols are also used for
Teletext operations. For more details, please refer to the “Teletext” section on page 27 of this instruction
manual.
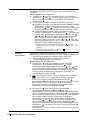
1
To Temporarily Switch Off TV:
Press this button to temporarily switch
off the TV (the / (standby/sleep) indicator
on TV lights up). Press
again to switch on the TV from standby mode.
To save energy we recommend switching off completely when TV is not in use.
After a certain period without a signal and without any button
being pressed, the TV switches automatically into standby mode
(Auto Shutoff, page 25).
2
Selecting input source:
Press this button repeatedly until the desired
input symbol of the source appears on the TV screen.
3
Selecting channels:
If Media Selector is switched on TV or VCR, press
this button to select channels.
For double-digit programme numbers, enter the second digit within 2.5
seconds.
4
a)If Media Selector button is switched on TV:
Press this button to
watch the last channel selected (watched for at least 5 seconds).
b)If Media Selector button is switched on VCR:
For Sony’s VCR
double-digit programme numbers, e.g. 23, press -/- - first and then the
buttons 2 and 3.
5 This button only works in Teletext mode.
6 Selecting screen format: Press this button repeatedly to change the
format of the screen. For more details, refer to chapter “Screen Control” on
page 16.
7 Selecting Teletext: Press this button to switch on Teletext.
8 a)If Media Selector is switched on TV:
When MENU is switched on, use these buttons to operate the menu
system. For details refer to “Introducing and Using the Menu System”
on page 13.
b)If Media Selector button is switched on VCR or DVD: Using
these buttons you can control the main functions of your VCR or DVD.
9 Recording button: If Media Selector is switched to VCR, press this
button to record programmes.
/
TVVIDEO
OK
DVDVCR
123
456
789
0
PROG
TV
MENU REC
1
2
4
5
3
6
!ª
!•
!§
7
9
!º
!¡
8
!∞
!¢
!£
!™
!¶

8
Installation
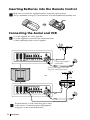
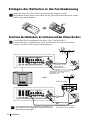
Inserting Batteries into the Remote Control
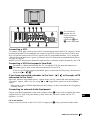
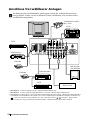
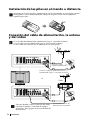
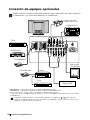
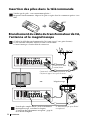
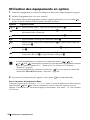
Connecting the Aerial and VCR
Make sure you insert the supplied batteries using the correct polarity.
Always remember to dispose of used batteries in an environmentally friendly way.
• Use the supplied AC cable (Type BF).
• Use the supplied coaxial cable for aerial connection.
• Other connecting cables are not supplied.
For more details of VCR connection, please refer
to the section “Connecting Optional Equipment”
on page 28 of this instruction manual.
L/G/S/IR/D/D/D
L/G/S/I
(SMARTLINK)
R/D/D/D Y/G PB/CB/BPR/CR/RHD VD
L/G/S/I
R/D/D/D
CTRL S
(W/G/W/G)
AC IN
L/G/S/IR/D/D/D
L/G/S/I
(SMARTLINK)
R/D/D/D Y/G PB/CB/BPR/CR/RHD VD
L/G/S/I
R/D/D/D
CTRL S
(W/G/W/G)
AC IN
OUT IN
or
Connect the supplied
cosxial cable.
VCR
Connect the supplied AC cable
(Type BF, with safety earth).
Scart lead is optional.

9
Installation
GB
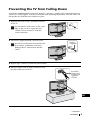
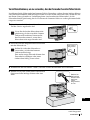
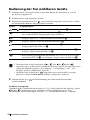
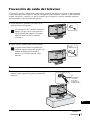
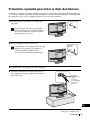
Preventing the TV from Falling Down
Attach the supplied bracket to the rear of the TV, and pass a sturdy cord or chain through it to
attach it to a wall or pillar. Consult your dealer when attaching the bracket, since the screws for
the bracket also hold the rear cabinet in a place.
1 Remove one of the screws attached at the rear
of the TV.
Do not remove both screws at the same
time as these screws secure the rear
cabinet. Never use the TV with the
screws removed.
2 Attach the supplied bracket with the screw.
Be sure to use the screw that attaches the
rear cabinet. A different screw may
damage the TV and result in electric
shock.
3 Repeat steps 1 and 2 to attach the other bracket.
4 Attach a sturdy cord or chain securely to each
bracket on the rear of the TV.
Bracket
(supplied)
Attach the
sturdy cord
or chain (not
supplied)
securely.
continued...

10
Installation
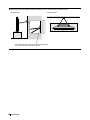
5 Fix the cord or chain to a wall or pillar.
Screw a hook (not supplied) to the wall or pillar
securely.
Side view Rear view

11
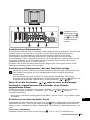
First Time Operation
GB
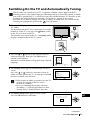
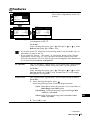
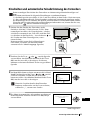
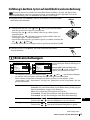
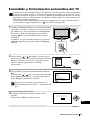
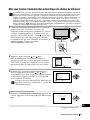
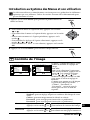
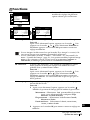
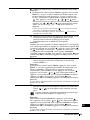
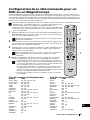
Switching On the TV and Automatically Tuning
The first time you switch on your TV, a sequence of menu screens appear on the TV
enabling you to: 1) choose the language of the menu screen, 2) choose the country in which
you wish to operate the TV, 3) search and store all available channels (TV Broadcast) and
4) change the order in which the channels (TV Broadcast) appear on the screen.
However, if you need to change any of these settings at a later date, you can do that by
selecting the appropriate option in the (Set Up) menu.
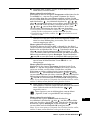
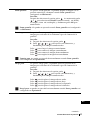
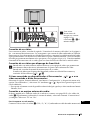
1 Connect the TV plug to the mains socket (220-240V
AC, 50Hz)
The first time that the TV set is connected, it is usually
turned on. If the TV is off, press the Power switch
on the TV set to turn on the TV.
The first time you switch on the TV, a Language menu
displays automatically on the TV screen.
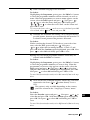
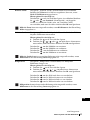
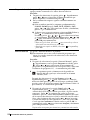
2 Press the or button on the remote control to
select the language, then press the OK button to
confirm your selection.
From now on all the menus will appear in the selected
language.
3 The Country menu appears automatically on the TV
screen.
Press the or button to select the country in
which you will operate the TV set, then press the OK
button to confirm your selection.
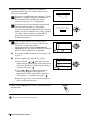
• If the country in which you want to use the TV
set does not appear in the list, select “-”
instead of a country.
• In case of changing the country selection
(including “-”), the next procedure of Auto
Tuning always should be done after that.
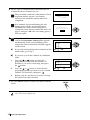
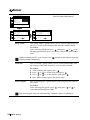
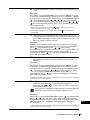
4 The Auto Tuning menu appears on the screen.
Press the OK button to select Yes.
Language
Engl
Españo l
Italiano
Françai s
Por t uguês
Deutsch
Neder l ands
ish
Select language
, to select, press
to set
OK
OK
OK
Count r y
Select country
—
United Kingdom
France
España
Italia
Portugal
Nederland
Deutschland
, to select, press
to set
OK
OK
Do you
Yes
No
automatic tuning?
want to start
continued...

12
First Time Operation
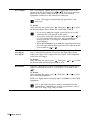
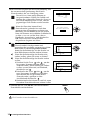
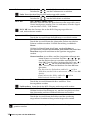
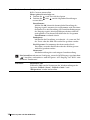
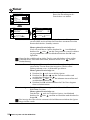
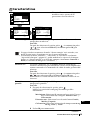
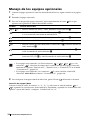
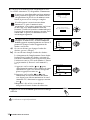
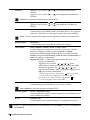
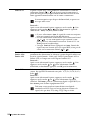
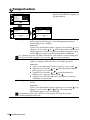
5 The TV starts to automatically search and store all
available broadcast channels for you.
This procedure could take some minutes. Please
be patient and do not press any buttons,
otherwise the automatic tuning will not be
completed.
If no channels were found during the auto
tuning process then a new menu appears
automatically on the screen asking you to
connect the aerial. Please connect the aerial (see
page 8) and press OK. The auto tuning process
will start again.
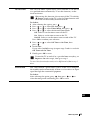
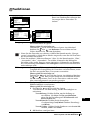
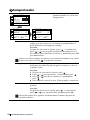
6 After all available channels are captured and
stored, the Programme Sorting menu appears
automatically on the screen enabling you to
change the order in which the channels appear
on the screen.
a) If you wish to keep the broadcast channels in the
tuned order, go to step 7.
b) If you wish to store the channels in a different
order:
1 Press the or button to select the
programme number with the channel (TV
Broadcast) you wish to rearrange, then press
the button.
2 Press the or button to select the new
programme number position for your selected
channel (TV Broadcast), then press .
3 Repeat steps b)1 and b)2 if you wish to change
the order of the other channels.
7 Press the MENU button to remove the menu from the
screen.
Your TV is now ready for use
OK
Auto Tuning
Conf
Programme
Searching. . .
:
Channel :
System :
01
C21
I
No channel found.
Conf i rm
Please connect aer i
al
OK
OK
Programme Sorting
01
02
03
04
05
06
07
08
TVE
TVE2
TV3
C33
C27
C58
S02
S06
Select
Exit :
channel
MENU
, to select,
,to set
OK
Programme Sorting
01
02
03
04
05
06
07
08
TVE
TVE2
TV3
C33
C27
01 TVE
C58
S02
S06
Select
Exit :
new position
MENU
, to select, press to return
OK
MENU

13
Menu System
GB
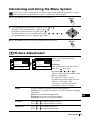
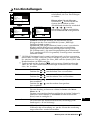
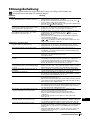
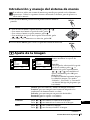
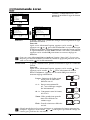
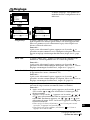
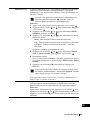
Introducing and Using the Menu System
Picture Adjustment
Your TV uses an on-screen menu system to guide you through the operations. Use the
following buttons on the Remote Control to operate the menu system:
1Press the MENU button to switch the first level menu on.
2 • To highlight the desired menu or option, press or .
• To enter to the selected menu or option, press .
• To return to the last menu or option, press .
• To alter settings of your selected option, press //or.
• To confirm and store your selection, press OK.
3 Press the MENU button to remove the menu from the screen.
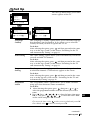
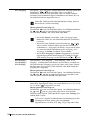
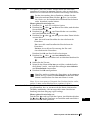
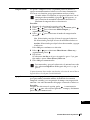
The “Picture Adjustment” menu
allows you to alter the picture
adjustments.
To do this:
After selecting the item you want to
alter press , then press
repeatedly / / or to
adjust it and finally press OK to store
the new adjustment.
This menu also allows you to
customise the picture quality for the
“Movie,” “Personal1,” and
“Personal2” modes based on the
programme you are watching.
Mode Live (for enhanced picture contrast and sharpness).
Standard (for a picture with contrast to suit your room’s lighting
conditions.).
Movie (for a finely detailed picture).
Personal1 (for your own custom settings).
Personal2 (for your own custom settings).
Contrast Press / to reduce picture contrast
Press / to enhance picture contrast
Brightness Press / to darken the picture
Press / to brighten the picture
MENU
OK
MENU
Con t
Mode
rast
Pict
Brightness
Colour
Sharpness
NR
Dynamic
Low
Personal1
On
:
:
Picture Adjustment
,,,to to
enter adj . menu
select
OK
Colour
Tone
Cool
:
Con t
Mode
rast
Pict
Brightness
Colour
Sharpness
NR
Dynamic
Low
Personal1
On
:
:
Picture Adjustment
,,,to to
set
select
OK
Colour
Tone
Cool
:
continued...

14
Menu System
Colour Press / to decrease colour intensity.
Press / to increase colour intensity.
Colour cannot be adjusted for the RGB input.
Sharpness Press / to soften the picture.
Press / to sharpen the picture.
NR (Noise
Reduction)
Off/Low/Mid/High
Select to reduce the noise level of all connected equipment. It is
most effective on the signal from the VHF/UHF jack.
You cannot adjust NR (Noise Reduction) for equipment connected to the RGB
input.
Dynamic Pict On/Off
Select to enhance the picture contrast.
Colour Tone Cool/Normal/Warm/User1/User2/User3
Select to give bright colours a red tint (Setting is variable from Cool
to Warm).
Select User1, User2, or User3 to customise the Colour Tone by
adjusting Red Gain, Green Gain, and Blue Gain (tint), and store
them in memory.
Name Set: Select to name your personal settings. Press / /
/ to select the letter, then press OK. Finally press
// or to select the word “End” on the
screen and press OK to store.
• To correct the letter, select on the screen to go
back and press OK.
• For a blank, select on the screen and press OK.
Colour Correct On/Off
Select to emphasise reds and blues.
Colour Correct cannot be adjusted for the RGB input.
Gamma Correct High/Mid/Low
Select to adjust the balance between bright and dark areas of the
picture.
Reset Cancel/OK
Select OK to reset the picture to the factory preset levels.
Each option cannot be adjusted when Mode is set to Live or Standard.

15
Menu System
GB
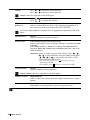
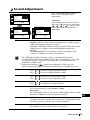
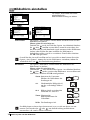
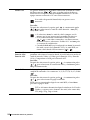
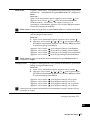
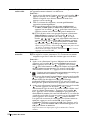
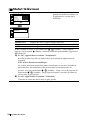
Sound Adjustment
The “Sound Adjustment” menu
allows you to alter the sound
adjustments.
To do this:
After selecting the item you want to
alter, press , then press repeatedly
// or to adjust it and
finally press OK to store the new
adjustment.
Effect Off (no effect).
Natural (enhances clarity, detail and presence of sound by using
“BBE High Definition Sound system”
*).
Dynamic (“BBE High Definition Sound system”* intensifies clarity
and presence of sound for better intelligibility and musical
realism).
TS (TruSurround**) (for surround sound (for example, DVD
software). It produces a virtual sound effect.)
* The “BBE High Definition Sound system” is manufactured by Sony
Corporation under license from BBE Sound, Inc. It is covered by U.S. Patent
No. 4,638,258 and No. 4,482,866. The word “BBE” and BBE Symbol are
trademarks of BBE sound.
** TruSurround and the symbol are trademarks of SRS Labs, Inc.
Trusurround technology is incorporated under license from SRS Labs, Inc.
Treble
Press / to decrease higher-pitched sounds.
Press / to increase higher-pitched sounds.
Bass
Press / to decrease lower-pitched sounds.
Press / to increase lower-pitched sounds.
Balance Press / to emphasise the left speaker.
Press / to emphasise the right speaker.
Dual Sound Mono/Stereo
For a stereo broadcast, select Stereo or Mono.
Mono/A/B
For a bilingual broadcast, select A for sound channel 1, B for sound
channel 2 or Mono for mono channel if available.
Auto Volume On/Off
Volume level of the channels will stay the same, independent of the
broadcast signal (e.g. in the case of advertisements).
Reset Cancel/OK
Select OK to reset the sound to the factory preset.
Con t
Mode
rast
Pict
Brightness
Colour
Sharpness
NR
Dynamic
Low
Personal1
On
:
:
Picture Adjustment
,,,to to
enter adj . menu
select
OK
Colour
Tone
Cool
:
T reble
Bass
Effect
Balance
AutoVolume
Dual
Reset
Off
Off
Mono
:
:
:
Sound
Sound
Adjustment
,,,to to
enter adj . menu
select
OK
T reble
Bass
Balance
AutoVolume
Dual
Reset
Off
Mono
:
:
Sound
Sound
Adjustment
Effect
Off
:
,,,to to
set
select
OK

16
Menu System
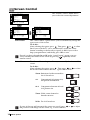
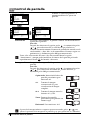
Screen Contro
l
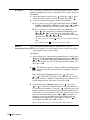
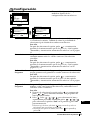
The “Screen Control” menu allows
you to alter the screen adjustments.
Auto Format The “Auto Format” option allows you to automatically change the
aspect ratio of the screen.
To do this:
After selecting the option, press . Then press or
to select
On (if you wish the TV set to automatically switch the screen
format according to the broadcast signal) or Off (if you wish to
keep your preference) and finally press OK to store.
Even if you have selected On or Off in the “Auto Format” option, you can
always modify the format of the screen by pressing repeatedly on the
remote control.
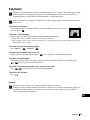
Screen Format The “Screen Format” option allows you to modify the format of the
screen.
To do this:
After selecting the option, press . Then press or to select
the desired screen format and finally press OK to store.
Smart: Imitation of wide screen effect
for 4:3 broadcast.
4:3: Conventional 4:3 picture size,
full picture information.
14:9: Compromise between 4:3 and
16:9 picture size.
Zoom: Wide screen format for
letterbox movies.
Wide: For 16:9 broadcast.
If parts of the top and bottom of the screen are cut off, press
or to adjust
the position of the image on the screen (e.g. to read subtitles).
Con t
Mode
rast
Pict
Brightness
Colour
Sharpness
NR
Dynamic
Low
Personal1
On
:
:
Picture Adjustment
,,,to to
enter adj . menu
select
OK
Colour
Tone
Cool
:
Screen
Screen
Screen Size
Adjust Pixel
Screen
Reset
Wide
:
Shift
Auto Format
Format
Zoom
On
:
:
Screen Control
S tandard
,,,to to
enter adj . menu
select
OK
Screen
Screen
Screen Size
Adjust Pixel
Screen
Reset
Wide
:
Shift
Format
Format
Zoom
:
Screen Control
S tandard
Auto
On
:
,,,to to
set
select
OK
Zoom
14:9
Wide
4:3
Smart

17
Menu System
GB
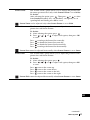
Screen Zoom The “Screen Zoom” option allows you to enlarge the picture with
the centre position fixed (only when Screen Format is set to Wide).
To do this:
After selecting the option, press . Then press or to select
from Standard (normal size), x 2 (doubled), x 3 (tripled), or x 4
(quadrupled) and finally press OK to store.
Screen Zoom can be adjusted only when Screen Format is set to Wide.
Screen Size The “Screen Size” option allows you to adjust the size of the
picture for each Screen Format.
To do this:
1 After selecting the option, press .
2 Press / / or to adjust each option, then press OK
to store.
Press to enlarge the Screen Size vertically.
Press to shrink the Screen Size vertically.
Press to shrink the Screen Size horizontally.
Press to enlarge the Screen Size horizontally.
Screen Size cannot be adjusted horizontally when Screen Format is set to Smart.
Screen Shift The “Screen Shift” option allows you to adjust the position of the
picture for each Screen Format.
To do this:
1 After selecting the option, press .
2 Press / / or to adjust each option, then press OK
to store.
Press to move the screen up.
Press to move the screen down.
Press to move the screen to the left.
Press to move the screen to the right.
Screen Shift cannot be adjusted horizontally when Screen Format is set to Smart.
continued...

18
Menu System
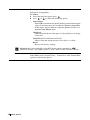
Adjust Pixel The “Adjust Pixel” option allows you to adjust the picture from an
RGB piece of equipment.
To do this:
1 After selecting the option, press .
2 Press or to select the following option.
Auto Adjust:
Select OK to automatically make the best picture for the input
signal. Note that it may not be adjusted perfectly depending
on the input signal condition or picture pattern. In this case,
perform Auto Adjust again.
Dot phase:
Adjust between 00-63 when part of a displayed text or image
is not clear.
Total H Pixel (Total Horizontal Pixel):
Adjust when the whole picture is not clear as a whole.
Reset:
Reset to the factory settings.
Adjust Pixel is only available for the RGB input signal connected to 5
connector and the “AV5 Input”option is set to “RGB” in the “Features” menu.
Reset Cancel / OK
Select OK to reset “Screen Zoom”, “Screen Size” and “Screen Shift”
options to the factory preset

19
Menu System
GB
Features
The “Features” menu allows you to
alter various adjustments of this TV’s
features.
Power Saving The “Power Saving” option allows you to reduce the power
consumption of this TV.
To do this:
After selecting the option, press
. Then press or to select
Reduce and finally press OK to store.
• If you turn off the TV whilst the Power Saving mode is on, the mode stays on
next time you turn on the TV.
• If you select the “Movie,” “Personal1” or “Personal2” mode on the “Picture
Adjustment” menu (page 13), you can adjust the picture option even if the
Power Saving mode is set to on. Note that power consumption will still increase
if you increase the Contrast or Brightness.
TV Speakers The “TV Speakers” option allows you to control the sound output
of the TV’s speakers when using your audio system speakers.
To do this:
After selecting the option, press
. Then press or to select
Off and finally press OK to store. Sound of the TV is not output
through the TV’s speakers.
Screen Saver The “Screen Saver” option allows you to reduce image retention.
To do this:
1 After selecting the option, press
.
Move the picture position to reduce image retention.
Orbit: Select On to move the position. If you select On, set
Orbit Range and Orbit Cycle.
Orbit Range: Select the moving range from Large, Mid
(Middle), and Small.
Orbit Cycle: Select the moving time from 10sec, 30sec,
1min, and 5min.
2 Press OK to store.
Con t
Mode
rast
Pict
Brightness
Colour
Sharpness
NR
Dynamic
Low
Personal1
On
:
:
Picture Adjustment
,,,to to
enter adj . menu
select
OK
Colour
Tone
Cool
:
TV
Screen
AV3 Output
AV4 Input
AV5 Input
RGB Mode
Auto
DTV
V ideo
Component
:
:
AV3 Input
V ideo
:
:
:
Saving
Speakers
Saver
:
F eatures
StandardPower
On
:
,,,to to
enter adj . menu
select
OK
TV
Screen
AV3 Output
AV4 Input
AV5 Input
RGB Mode
Auto
DTV
V ideo
Component
:
:
AV3 Input
V ideo
:
:
:
Speakers
Saver
:
F eatures
On
Saving St andardP ower :
,,,to to
set
select
OK
continued...

20
Menu System
AV3 Output The “AV3 Output” option allows you to select the source to be
output from the Scart connector 3/ . You can record from
this Scart any signal coming from the TV or from external
equipment connected to the other Scart connectors.
If your VCR supports SmartLink, this procedure is not
necessary.
To do this:
After selecting the option, press . Then press or to select
the desired output signal: Auto, TV, AV1, AV2, or AV4.
• If you select Auto, the output signal will always be the
same one that is displayed on the screen.
• If you have connected a decoder to the Scart 3/ or
to a VCR connected to this Scart, please remember to
change back the “AV3 Output” to Auto for correct
unscrambling.
• When AV3 Output is set to Auto, the signal input through
the AV5 input and the RGB signal are not output from the
Scart connector 3/ .
AV3 Input/
AV4 Input/
AV5 Input
The “AV3 Input,”“AV4 Input,” and “AV5 Input” options allow
you to select which jack the TV receives the input signal from;
Video or S Video for AV3 Input and AV4 Input, and Component
or RGB for AV5 input.
To do this:
After selecting the option, press
. Then press or to select
the desired jack and finally press OK to store.
RGB Mode Select the “RGB Mode” option if equipment which outputs RGB
signal is connected to the Y/G, PB/CB/B, PR/CR/R jacks of the
5.
To do this:
After selecting the option, press . Then press or to select
the connected equipment:
DTV for a digital tuner with RGB signal, or Others for other RGB
equipment.
DTV is the digital broadcast format standardised in the
United States, and there are several signal formats, such as
480i, 575i, 480p, 575p, 720p, or 1080i.
S
S
S
La page charge ...
La page charge ...
La page charge ...
La page charge ...
La page charge ...
La page charge ...
La page charge ...
La page charge ...
La page charge ...
La page charge ...
La page charge ...
La page charge ...
La page charge ...
La page charge ...
La page charge ...
La page charge ...
La page charge ...
La page charge ...
La page charge ...
La page charge ...
La page charge ...
La page charge ...
La page charge ...
La page charge ...
La page charge ...
La page charge ...
La page charge ...
La page charge ...
La page charge ...
La page charge ...
La page charge ...
La page charge ...
La page charge ...
La page charge ...
La page charge ...
La page charge ...
La page charge ...
La page charge ...
La page charge ...
La page charge ...
La page charge ...
La page charge ...
La page charge ...
La page charge ...
La page charge ...
La page charge ...
La page charge ...
La page charge ...
La page charge ...
La page charge ...
La page charge ...
La page charge ...
La page charge ...
La page charge ...
La page charge ...
La page charge ...
La page charge ...
La page charge ...
La page charge ...
La page charge ...
La page charge ...
La page charge ...
La page charge ...
La page charge ...
La page charge ...
La page charge ...
La page charge ...
La page charge ...
La page charge ...
La page charge ...
La page charge ...
La page charge ...
La page charge ...
La page charge ...
La page charge ...
La page charge ...
La page charge ...
La page charge ...
La page charge ...
La page charge ...
La page charge ...
La page charge ...
La page charge ...
La page charge ...
La page charge ...
La page charge ...
La page charge ...
La page charge ...
La page charge ...
La page charge ...
La page charge ...
La page charge ...
La page charge ...
La page charge ...
La page charge ...
La page charge ...
La page charge ...
La page charge ...
La page charge ...
La page charge ...
La page charge ...
La page charge ...
La page charge ...
La page charge ...
La page charge ...
La page charge ...
La page charge ...
La page charge ...
La page charge ...
La page charge ...
La page charge ...
La page charge ...
La page charge ...
La page charge ...
La page charge ...
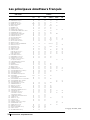
-
 1
1
-
 2
2
-
 3
3
-
 4
4
-
 5
5
-
 6
6
-
 7
7
-
 8
8
-
 9
9
-
 10
10
-
 11
11
-
 12
12
-
 13
13
-
 14
14
-
 15
15
-
 16
16
-
 17
17
-
 18
18
-
 19
19
-
 20
20
-
 21
21
-
 22
22
-
 23
23
-
 24
24
-
 25
25
-
 26
26
-
 27
27
-
 28
28
-
 29
29
-
 30
30
-
 31
31
-
 32
32
-
 33
33
-
 34
34
-
 35
35
-
 36
36
-
 37
37
-
 38
38
-
 39
39
-
 40
40
-
 41
41
-
 42
42
-
 43
43
-
 44
44
-
 45
45
-
 46
46
-
 47
47
-
 48
48
-
 49
49
-
 50
50
-
 51
51
-
 52
52
-
 53
53
-
 54
54
-
 55
55
-
 56
56
-
 57
57
-
 58
58
-
 59
59
-
 60
60
-
 61
61
-
 62
62
-
 63
63
-
 64
64
-
 65
65
-
 66
66
-
 67
67
-
 68
68
-
 69
69
-
 70
70
-
 71
71
-
 72
72
-
 73
73
-
 74
74
-
 75
75
-
 76
76
-
 77
77
-
 78
78
-
 79
79
-
 80
80
-
 81
81
-
 82
82
-
 83
83
-
 84
84
-
 85
85
-
 86
86
-
 87
87
-
 88
88
-
 89
89
-
 90
90
-
 91
91
-
 92
92
-
 93
93
-
 94
94
-
 95
95
-
 96
96
-
 97
97
-
 98
98
-
 99
99
-
 100
100
-
 101
101
-
 102
102
-
 103
103
-
 104
104
-
 105
105
-
 106
106
-
 107
107
-
 108
108
-
 109
109
-
 110
110
-
 111
111
-
 112
112
-
 113
113
-
 114
114
-
 115
115
-
 116
116
-
 117
117
-
 118
118
-
 119
119
-
 120
120
-
 121
121
-
 122
122
-
 123
123
-
 124
124
-
 125
125
-
 126
126
-
 127
127
-
 128
128
-
 129
129
-
 130
130
-
 131
131
-
 132
132
-
 133
133
-
 134
134
-
 135
135


Sony KE-32TS2E Manuel utilisateur
- Catégorie
- Téléviseurs à écran plasma
- Taper
- Manuel utilisateur
dans d''autres langues
- English: Sony KE-32TS2E User manual
- español: Sony KE-32TS2E Manual de usuario
- Deutsch: Sony KE-32TS2E Benutzerhandbuch