Delphi DEA355 Le manuel du propriétaire
- Catégorie
- Lecteur CD
- Taper
- Le manuel du propriétaire

Delphi CD/MP3/USB/iPod
®
/Aux/
Bluetooth/SAT Receivers
Owner’s Manual
©2009 Delphi Corporation.
All rights reserved
T
ous droits réservés.
T
odos los derec
hos reser
v
ados.
DESEN_FR_SP0900083
P/N 28150203 04/09
www.delphi.com
Information included in this owner’s manual was
accurate at the time of publication. Delphi, however,
reserves the right to make changes in product
configuration and performance without prior notice.
Please check with your dealer for details regarding
changes that may ha
ve occurred since the time of
printing.
Les renseignements compris dans ce manuel
du propriétaire étaient exacts au moment de la
publication. Toutefois, Delphi se réserve le droit
d’effectuer des changements de configuration et
de performance du produit sans préavis. Vérifier
auprès de votre concessionnaire pour des dét
ails
au sujet de tout changement qui peuvent s’être
produits depuis l’impression.
La información incluida en este manual del propietario
fue precisa en el momento de su publicación. Sin
embargo, Delphi se reserva el derecho a hacer cambios
en la configuración y el desempeño del producto sin
previo aviso. Por favor verifique con su concesionario
por detalles relacionados con cambios que pueden
haber ocurrido a partir del momento de la impresión.
Stereo Receiver
XM Satellite Radio
®
Ready Receiver
Sirius Satellite Radio
®
Ready Receiver
XM Satellite Radio
®
Ready Receiver with Bluetooth
Sirius Satellite Radio
®
Ready Receiver with Bluetooth
iP
od, iP
od
T
ouch and iPhone are registered trademarks of Apple,
Inc. XM
Satellite R
adio and Sirius Satellite R
adio are registered
trademarks of Sirius XM Radio.

TABLE OF CONTENTS
In this manual you will find out how to operate the receiver included in your
vehicle and information about optional equipment that can be purchased to
enhance your audio system. Be sure to read about the specific unit supplied with
your vehicle.
Introduction . . . . . . . . . . . . . . . . . . . . . . . . . . . . . . . . . . . . . . . . . . . . . . . . . . . . . . . . . . . . . . . .3
Receiver Layout . . . . . . . . . . . . . . . . . . . . . . . . . . . . . . . . . . . . . . . . . . . . . . . . . . . . . . . . . . . .3
Vehicle Damage Warnings . . . . . . . . . . . . . . . . . . . . . . . . . . . . . . . . . . . . . . . . . . . . . . . .4
Operating Instructions . . . . . . . . . . . . . . . . . . . . . . . . . . . . . . . . . . . . . . . . . . . . . . . . . . . . .4
Using the Clock . . . . . . . . . . . . . . . . . . . . . . . . . . . . . . . . . . . . . . . . . . . . . . . . . . . . . . . . . . . . . . .4
Setting the Clock . . . . . . . . . . . . . . . . . . . . . . . . . . . . . . . . . . . . . . . . . . . . . . . . . . . . . . . . . . . .4
Using the Alarm . . . . . . . . . . . . . . . . . . . . . . . . . . . . . . . . . . . . . . . . . . . . . . . . . . . . . . . . . . . . . . .5
Setting the Alarm . . . . . . . . . . . . . . . . . . . . . . . . . . . . . . . . . . . . . . . . . . . . . . . . . . . . . . . . . . .5
Turning the Alarm Off . . . . . . . . . . . . . . . . . . . . . . . . . . . . . . . . . . . . . . . . . . . . . . . . . . . . . . . .6
Activating Snooze . . . . . . . . . . . . . . . . . . . . . . . . . . . . . . . . . . . . . . . . . . . . . . . . . . . . . . . . . . .6
Satellite Radio Service . . . . . . . . . . . . . . . . . . . . . . . . . . . . . . . . . . . . . . . . . . . . . . . . . . . . . . . . . .6
Activating Satellite Radio . . . . . . . . . . . . . . . . . . . . . . . . . . . . . . . . . . . . . . . . . . . . . . . . . . . .6
XM Satellite Radio Service . . . . . . . . . . . . . . . . . . . . . . . . . . . . . . . . . . . . . . . . . . . . . . . . . . .6
SIRIUS Satellite Radio Service . . . . . . . . . . . . . . . . . . . . . . . . . . . . . . . . . . . . . . . . . . . . . . . . .7
General Radio Receiver Functions . . . . . . . . . . . . . . . . . . . . . . . . . . . . . . . . . . . . . . . . . . . . . . . . .7
Turning the Power On . . . . . . . . . . . . . . . . . . . . . . . . . . . . . . . . . . . . . . . . . . . . . . . . . . . . . . . .7
Adjusting the Volume . . . . . . . . . . . . . . . . . . . . . . . . . . . . . . . . . . . . . . . . . . . . . . . . . . . . . . . .7
One-Hour Timer . . . . . . . . . . . . . . . . . . . . . . . . . . . . . . . . . . . . . . . . . . . . . . . . . . . . . . . . . . . . .7
Display . . . . . . . . . . . . . . . . . . . . . . . . . . . . . . . . . . . . . . . . . . . . . . . . . . . . . . . . . . . . . . . . . . . .7
Radio Mode Displays . . . . . . . . . . . . . . . . . . . . . . . . . . . . . . . . . . . . . . . . . . . . . . . . . . . . .7
CD Mode Displays . . . . . . . . . . . . . . . . . . . . . . . . . . . . . . . . . . . . . . . . . . . . . . . . . . . . . . .7
MP3/USB/iPod Mode Displays . . . . . . . . . . . . . . . . . . . . . . . . . . . . . . . . . . . . . . . . . . . . .8
AUX Input Mode Displays . . . . . . . . . . . . . . . . . . . . . . . . . . . . . . . . . . . . . . . . . . . . . . . . .9
HANDS FREE Mode (Bluetooth) Displays . . . . . . . . . . . . . . . . . . . . . . . . . . . . . . . . . . . . .9
CLOCK/ALARM Button Mode Displays . . . . . . . . . . . . . . . . . . . . . . . . . . . . . . . . . . . . . .10
Front Auxiliary Mode . . . . . . . . . . . . . . . . . . . . . . . . . . . . . . . . . . . . . . . . . . . . . . . . . . . . . . . .10
Rear Auxiliary Mode . . . . . . . . . . . . . . . . . . . . . . . . . . . . . . . . . . . . . . . . . . . . . . . . . . . . . . . .10
Adjusting the Receiver Audio Settings . . . . . . . . . . . . . . . . . . . . . . . . . . . . . . . . . . . . . . . . . .10
Bass . . . . . . . . . . . . . . . . . . . . . . . . . . . . . . . . . . . . . . . . . . . . . . . . . . . . . . . . . . . . . . . . .10
Middle . . . . . . . . . . . . . . . . . . . . . . . . . . . . . . . . . . . . . . . . . . . . . . . . . . . . . . . . . . . . . . .10
Treble . . . . . . . . . . . . . . . . . . . . . . . . . . . . . . . . . . . . . . . . . . . . . . . . . . . . . . . . . . . . . . . .11
Fade . . . . . . . . . . . . . . . . . . . . . . . . . . . . . . . . . . . . . . . . . . . . . . . . . . . . . . . . . . . . . . . . .11
Balance . . . . . . . . . . . . . . . . . . . . . . . . . . . . . . . . . . . . . . . . . . . . . . . . . . . . . . . . . . . . . .11
Auto EQ . . . . . . . . . . . . . . . . . . . . . . . . . . . . . . . . . . . . . . . . . . . . . . . . . . . . . . . . . . . . . .11
Adjusting the Receiver Menu Settings . . . . . . . . . . . . . . . . . . . . . . . . . . . . . . . . . . . . . . . . . .11
1
CONSEJOS DE FUNCIONAMIENTO
Consejos sobre su sistema de audio
El daño auditivo por la exposición a ruidos fuertes casi no se puede detectar
hasta que es demasiado tarde. Su audición se puede adaptar a volúmenes de
sonido alto. El sonido que parece normal puede ser alto y dañar su audición.
Tome precauciones y regule el volumen de su receptor a un nivel de sonido
seguro antes de que su oído se adapte al mismo.
Para evitar la pérdida de audición:
• Regule el volumen lo más bajo posible.
• Aumente el volumen lentamente hasta que escuche de forma cómoda y clara.
Comprensión de la recepción de radio
FM STEREO: la FM estéreo le proporciona un mejor sonido que la AM, pero las
señales de FM sólo se alcanzarán entre 10 y 40 millas (entre 16 y 65 km). Los
edificios altos o las montañas pueden interferir con las señales de FM,
provocando que el sonido aparezca y desaparezca.
AM: el alcance de la mayoría de las emisoras de AM es superior al de las FM,
especialmente de noche. Sin embargo, el alcance más largo puede causar
interferencias entre las emisoras. La AM puede captar ruidos como los de tormentas
y líneas de alta tensión. Intente reducir los agudos para disminuir este ruido.
SATELLITE RADIO: la radio satelital le proporcionará sonido con calidad digital de
costa a costa en todo el territorio de los Estados Unidos. Sin embargo, es posible
que la recepción se degrade debido a la obstrucción de la señal satelital.
Cuidado de sus discos compactos
Manipule los discos con cuidado. Guárdelos en sus estuches originales u otros
estuches de protección y lejos de la luz solar directa y el polvo. Si la superficie de un
disco está sucia, humedezca un paño suave y limpio en una solución detergente
neutra suave. Limpie el disco desde el centro hacia el borde.
Nunca toque la superficie de la señal cuando manipula los discos. Recoja los discos
tomándolos por los bordes externos o el borde del orificio y el borde externo.
No pegue una etiqueta ni cinta, ni escriba sobre la superficie de un disco.
66
NOTICIA:
Antes de agregar cualquier equipo de sonido a su vehículo, como una radio CB,
teléfono celular o radio de dos vías, asegúrese de que es posible hacerlo. Es mu
y
importante que lo haga correctamente. El equipo de sonido agregado puede interferir
con el funcionamiento del motor de su vehículo, radio u otros sistemas e incluso
dañarlos. Los sistemas de su vehículo pueden interferir con el funcionamiento del
equipo de sonido que se ha agregado de forma incorrecta. Antes de agregar un
equipo de sonido, verifique con su distribuidor y asegúrese de comprobar las
reglamentaciones federales que cubren las unidades telefónicas y radios móviles.
NOTICIA:
Sólo un instalador de Delphi autorizado debería instalar este receptor. La instalación
realizada por una persona no autorizada anulará la garantía de la unidad.

2
Clock . . . . . . . . . . . . . . . . . . . . . . . . . . . . . . . . . . . . . . . . . . . . . . . . . . . . . . . . . . . . . . . . . . . .4
Alarm . . . . . . . . . . . . . . . . . . . . . . . . . . . . . . . . . . . . . . . . . . . . . . . . . . . . . . . . . . . . . . . . . . . .5
Advanced . . . . . . . . . . . . . . . . . . . . . . . . . . . . . . . . . . . . . . . . . . . . . . . . . . . . . . . . . . . . . . . .11
Speakers . . . . . . . . . . . . . . . . . . . . . . . . . . . . . . . . . . . . . . . . . . . . . . . . . . . . . . . . . . . . . . .12
Seek Sensitivity . . . . . . . . . . . . . . . . . . . . . . . . . . . . . . . . . . . . . . . . . . . . . . . . . . . . . . . . .12
Dimming . . . . . . . . . . . . . . . . . . . . . . . . . . . . . . . . . . . . . . . . . . . . . . . . . . . . . . . . . . . . . . .12
Hands Free (Bluetooth) . . . . . . . . . . . . . . . . . . . . . . . . . . . . . . . . . . . . . . . . . . . . . . . . . . . . .12
RDS . . . . . . . . . . . . . . . . . . . . . . . . . . . . . . . . . . . . . . . . . . . . . . . . . . . . . . . . . . . . . . . . . . . .13
Sirius . . . . . . . . . . . . . . . . . . . . . . . . . . . . . . . . . . . . . . . . . . . . . . . . . . . . . . . . . . . . . . . . . . .13
USB . . . . . . . . . . . . . . . . . . . . . . . . . . . . . . . . . . . . . . . . . . . . . . . . . . . . . . . . . . . . . . . . . . . .13
Using the Radio . . . . . . . . . . . . . . . . . . . . . . . . . . . . . . . . . . . . . . . . . . . . . . . . . . . . . . . . . . . . .14
Finding a Station . . . . . . . . . . . . . . . . . . . . . . . . . . . . . . . . . . . . . . . . . . . . . . . . . . . . . . . . . .14
Setting Presets . . . . . . . . . . . . . . . . . . . . . . . . . . . . . . . . . . . . . . . . . . . . . . . . . . . . . . . . . . .15
Using the Weatherband . . . . . . . . . . . . . . . . . . . . . . . . . . . . . . . . . . . . . . . . . . . . . . . . . . . . . . .15
Using the Compact Disc Player/USB . . . . . . . . . . . . . . . . . . . . . . . . . . . . . . . . . . . . . . . . . . . . .15
Playing a Compact Disc . . . . . . . . . . . . . . . . . . . . . . . . . . . . . . . . . . . . . . . . . . . . . . . . . . . . .15
Button Functions . . . . . . . . . . . . . . . . . . . . . . . . . . . . . . . . . . . . . . . . . . . . . . . . . . . . . . . . .16
Playing an MP3 Disc/USB . . . . . . . . . . . . . . . . . . . . . . . . . . . . . . . . . . . . . . . . . . . . . . . . . . .16
Button Functions . . . . . . . . . . . . . . . . . . . . . . . . . . . . . . . . . . . . . . . . . . . . . . . . . . . . . . . . .18
Using an iPod . . . . . . . . . . . . . . . . . . . . . . . . . . . . . . . . . . . . . . . . . . . . . . . . . . . . . . . . . . . . . . .19
Playing an iPod . . . . . . . . . . . . . . . . . . . . . . . . . . . . . . . . . . . . . . . . . . . . . . . . . . . . . . . . . . .19
Button Functions . . . . . . . . . . . . . . . . . . . . . . . . . . . . . . . . . . . . . . . . . . . . . . . . . . . . . . . . .19
Troubleshooting . . . . . . . . . . . . . . . . . . . . . . . . . . . . . . . . . . . . . . . . . . . . . . . . . . . . . . . . .20
Optional Equipment . . . . . . . . . . . . . . . . . . . . . . . . . . . . . . . . . . . . . . . . . . . . . . . . . . . . .21
Infrared Remote Control . . . . . . . . . . . . . . . . . . . . . . . . . . . . . . . . . . . . . . . . . . . . . . . . . . . . . . .21
Operating Tips . . . . . . . . . . . . . . . . . . . . . . . . . . . . . . . . . . . . . . . . . . . . . . . . . . . . . . . . . . .22
Tips About Your Audio System . . . . . . . . . . . . . . . . . . . . . . . . . . . . . . . . . . . . . . . . . . . . . . . . . .22
Understanding Radio Reception . . . . . . . . . . . . . . . . . . . . . . . . . . . . . . . . . . . . . . . . . . . . . . . . .22
Care of Your Compact Discs . . . . . . . . . . . . . . . . . . . . . . . . . . . . . . . . . . . . . . . . . . . . . . . . . . . .22
N
OTA:
L
a calidad del sonido, los saltos, la dificultad para encontrar pistas y/o
para cargar o expulsar un CD-R se pueden ver afectadas por la calidad del CD-R,
el método de grabación, la calidad de la música que se ha grabado o la forma en
que se manipula el CD-R. Si se producen estos problemas, intente reproducir un
CD que sepa que está bien para ver si el error se corrige solo. Si un error se
produce repetidamente o no se puede corregir, comuníquese con su
distribuidor. Si la radio muestra un mensaje de error, escríbalo y proporciónelo a
su distribuidor cuando informe el problema.
EQUIPO OPCIONAL
Control remoto infrarrojo
Su receptor es compatible con un control remoto manual opcional que puede
comprar en su distribuidor. Con el control remoto podrá:
1. Seleccionar una banda
2. Encender y apagar su receptor.
3. Seleccionar la pista siguiente o anterior
4. Silenciar/pausar
5. Seleccionar entradas AUX 1 ó 2, iPod/USB
6. Reproducir un CD
7. Regular el volumen
8. Seleccionar una emisora preestablecida
Funciones de los botones
BAND:
presione este botón para seleccionar FM1, FM2, AM, Satellite 1,
Satellite 2, Satellite 3 o WX.
PWR: presione este botón para encender/apagar el receptor.
SEEK / : presione estos botones para desplazarse a la siguiente emisora
de radio disponible o para pasar a la siguiente pista.
|
|
|
|
: presione este botón para bajar el volumen al mínimo. La pantalla de la radio
mostrará MUTE. Para desactivar la función de silenciar, vuelva a presionar este
botón. La fuente de audio continuará reproduciéndose mientras el volumen está
al mínimo.
AUX: presione este botón para seleccionar Front Auxiliary, Rear Auxiliary,
iPod/USB.
CD: presione este botón para encender el reproductor de CD integrado.
V
OL +/-:
presione este botón para regular el v
olumen.
1 – 6: presione este botón para avanzar por los valores predeterminados en la
banda seleccionada.
65
8
7
6
1
2
3
4
5

INTRODUCTION
Your Delphi Receiver has been designed to operate easily and give you years of
listening pleasure. To get the most enjoyment out of your receiver, read this
manual and acquaint yourself with the receiver before you use it. Find out what
it can do and how to operate all of its controls. By doing so you can be sure you
are getting the most out of the advanced technology that has been designed into
the unit.
Delphi CD/MP3/USB/ iPod/AUX Jack/Bluetooth/ SAT Receiver
Button Function Page
1. Ejects CD . . . . . . . . . . . . . . . . . . . . . . . . . . . . . . . . . . . . . . . . . . .16,19
2. BAND/AUTO Switches bands/stores strongest stations to presets . . . . . . . . . . .14
3. Turns radio ON and OFF . . . . . . . . . . . . . . . . . . . . . . . . . . . . . . . . . . .7
4. ON/AUDIO Turns radio ON/controls volume/adjusts audio, bass, middle,
treble, fade, balance, auto EQ/ iPod control (iPod mode)/
Scroll (on menu) . . . . . . . . . . . . . . . . . . . . . . . . . . . . . . . . . . . . . . .7,10
5. SEEK Switches to next or previous available radio station/CD
track/MP3/WMA file/satellite radio station . . . . . . . . . .14,16,18,19
6. SCAN/PSCAN Scans all stations and presets in current band/CD
tracks/MP3/WMA files and folders . . . . . . . . . . . . . . . . . . . .14,16,18
7. CLOCK/ALARM Displays alarm set time for 3 seconds . . . . . . . . . . . . . . . . . . . . . .4,5
8. SRC Switches to CD/MP3/USB/iPod/AUX mode . . . . . . . . . . . . . .9,10,16
9. Pushbuttons 1-6 Presets stations/controls CD/MP3/WMA/USB/iPod/
Menu functions . . . . . . . . . . . . . . . . . . . . . . . . . . . . . . . . . . . . . . . . .15
10. ESC Exits when in a menu or backs one submenu . . . . . . . . . . . . . . . . .20
11. Pause/Play Pauses CDs, MP3 files and iPod . . . . . . . . . . . . . . . . . . . .8,9,16,18,20
12. BRWSE Allows access into iPod menu . . . . . . . . . . . . . . . . . . . . . . . . . . . . .20
13. RPT Repeats the same CD track or MP3/WMA file/folder
until cancelled . . . . . . . . . . . . . . . . . . . . . . . . . . . . . . . . . .8,9,16,18,20
14. RDM
Plays CD tracks and MP3/WMA files and folders randomly
(shuffle mode on iPod) . . . . . . . . . . . . . . . . . . . . . . . . . . .8,9,16,18,20
15. OK Enables selection on a menu . . . . . . . . . . . . . . . . . . . . . . . . . . . .12,20
16. Switches to next or previous available radio station (TUNE)/Changes
folder on an MP3/WMA disc or USB/Changes category when
in SAT mode . . . . . . . . . . . . . . . . . . . . . . . . . . . . . . . . . . . . . . . . . .8,19
17. Aux input Auxiliary input for external audio devices . . . . . . . . . . . . . . . . . . . . .9
18. i T
itle/Menu
Displays information/Title of current song/Enter menu mode . . . .7,8
19. USB
USB input for memory devices
. . . . . . . . . . . . . . . . . . . . . . . . . . . . .
13
1
9
2
3
4
5
6
7
8
10
11
12
13
14
15
16
18
19
3
17
64
1
/ESC:
p
resione el botón ESC para salir o regresar al menú anterior.
2/PAUSE/PLAY: presione el botón PAUSE/PLAY para pausar una pista. Se
mostrará PAUSE y el audio se silenciará. Vuelva a presionar PAUSE/PLAY para
reanudar la reproducción de la pista.
3/BRWSE: presione el botón BRWSE para ingresar al menú del iPod. En el
menú del iPod, podrá desplazarse y seleccionar con el botón ON/AUDIO. Gire
hacia la derecha para subir, hacia la izquierda para bajar y presione el botón para
confirmar la selección (sólo en el menú iPod).
4/RPT: presione el botón RPT una vez para repetir la pista actual. Se mostrarán
el icono RPT y REPEAT ONE TRACK en la pantalla. El mismo archivo continuará
reproduciéndose hasta que se vuelva a presionar el botón RPT. Si presiona RPT
por segunda vez, se mostrará REPEAT ALL TRACKS en la pantalla y el icono
RPT permanecerá activo. La misma carpeta/lista de reproducción (último modo
seleccionado del iPod) continuará reproduciéndose hasta que vuelva a presionar
el botón RPT. Si presiona RPT por tercera vez, se mostrará REPEAT OFF en la
pantalla. Se apagará la función y se desactivará el icono RPT. Luego, la pantalla
regresa a sus valores predeterminados.
5/RDM: si presiona el botón RDM, se activa la función aleatoria. El icono RDM
que figura en la pantalla indica que esta función está activa. Para cancelar
SHUFFLE TRACKS o SHUFFLE ALBUMS, vuelva a presionar el botón RDM
hasta llegar a SHUFFLE OFF.
6/OK: presione el botón OK cuando se encuentre en un menú para confirmar la
selección.
Para extraer el conector del cable USB del iPod, simplemente extraiga el
dispositivo del puerto USB. La radio regresará a la fuente/modo anterior.
SOLUCIÓN DE PROBLEMAS
Los siguientes mensajes de error pueden aparecer mientras reproduce un CD,
disco de MP3/USB, iPod:
NO CD: No se ha cargado ningún CD en el
reproductor.
NO PLAYABLE DISC: Archivos no reproducibles en los medios.
– Cambie de medios.
NO MUSIC FILES: Archivos no reproducibles en los medios.
– Cargue archivos de música en los medios.
FRONT AUX UNPLUGGED: No está conectado el auxiliar frontal
mientras está conectado el iPod. – Conecte
el cable auxiliar delantero.
iPOD NOT SUPPORTED: El receptor no admite el iPod conectado.
-- Desconecte el iPod.
DEVICE NOT SUPPORTED: El receptor no admite el dispositivo
conectado. – Desconecte el dispositivo.

VEHICLE DAMAGE WARNING
In this manual you will find the following Notices:
In the NOTICE area, you are informed of something that can damage your
vehicle. Many times this damage would not be covered by your warranty and
could be costly. The notice will tell you what to do to help avoid the damage.
NOTE: Other manuals may use NOTICE differently.
OPERATING INSTRUCTIONS
To learn how to get the most from your Delphi receiver, read all of the
instructions that follow.
Using the Clock
Your clock can function in a 12-hour or 24-hour mode. The 12-hour mode
distinguishes between AM and PM. The 24-hour mode operates as military
time.
Setting the Clock
1. Turn the ignition on.
2. Press and hold the “i Title/Menu” button for more than 2 seconds until the
menu appears. This indicates you are in the menu mode.
3. Press OK button to enter to the clock submenu.
4. Turn the ON/AUDIO knob or press the up/down buttons to change to SET
TIME. Press the OK button to enter set mode.
5. Turn the ON/AUDIO knob or press the up/down buttons to change between
12-hour or 24-hour format. Press the OK button to select one.
6. The display changes to clock configuration, causing the hour digits to flash.
Rotate the ON/AUDIO knob or press the up/down buttons to change the
hour. Rotating the knob clockwise or pressing the up button will increase
the hour; rotating counterclockwise or pressing the down button will
decrease the hour.
7. Press the OK button causing the minute digits to flash. Rotate the
ON/AUDIO knob or press the up/down buttons to change the minutes.
Rotating the knob clockwise or pressing the up button will increase the
minutes; rot
ating countercloc
kwise or pressing the do
wn but
ton will
decrease the minutes.
At any point in the time set process, not pressing a button or rotating the knob
within 8 seconds will cancel time set mode, ret
urn the radio to normal operation
and keep whatever setting changes have been made. Pressing the power or
NOTICE:
These mean there is something that could damage your vehicle.
463
::presione el botón durante menos de 2 segundos mientras se
reproduce un archivo MP3 para encontrar la carpeta anterior en el disco.
Saltar a inicio: presione el botón durante más de 2 segundos mientras se
reproduce un archivo MP3 para iniciar la reproducción en el primer archivo de la
primera carpeta.
: presione el botón durante menos de 2 segundos mientras se
reproduce un archivo MP3 para encontrar la siguiente carpeta del disco.
Saltar al final: presione el botón durante más de 2 segundos mientras se
reproduce un archivo MP3 para iniciar la reproducción en el primer archivo de la
última carpeta.
EJECT: presione el botón para expulsar un disco.
Para extraer un dispositivo USB, simplemente extraiga el dispositivo del puerto
USB. La radio regresará a su fuente/modo anterior.
Cómo utilizar un iPod
®
La radio puede controlar y reproducir música desde un iPod. Le recomendamos
que no conecte el iPhone 3G o iPod Touch a la radio.
Cómo reproducir un iPod
Introduzca el conector del cable USB del iPod en el conector USB de la radio (el
otro extremo conectado a su iPod). Se mostrará iPod READING en la pantalla.
Introduzca el conector de cable de audio de 3,5 mm al conector de entrada
auxiliar de la radio (el otro extremo conectado al conector de audio de 3,5 mm
de su iPod). Si el cable de audio no está conectado, la radio mostrará FRONT
AUX JACK UNPLUGGED. Después de que se hayan realizado todas las
conexiones y la radio haya terminado de leer el iPod, éste comenzará a
reproducir. Se mostrarán el tiempo transcurrido y el número de pista. La
reproducción comienza desde la pista actual reproducida en el iPod y continúa
en forma secuencial por todas las pistas desde el último modo seleccionado del
iPod. Después de reproducir la última pista, se detiene la reproducción y la radio
mostrará el menú del iPod.
Funciones de los botones
SEEK :
presione durante menos de 2 segundos para pasar a la siguiente
pista. Mantenga presionado el mismo botón para activar el avance rápido.
Cuando suelte el botón, la pista seguirá reproduciéndose.
SEEK : presione durante menos de 2 segundos para ir al comienzo de la
pist
a act
ual. Si se presionó dentro de los primeros 1
0 segundos de la pist
a,
pasará a la pista anterior. Vuelva a presionar el botón dentro del primer segundo
para ir al comienzo de la pista anterior. Mantenga presionado el mismo botón
para activ
ar el retroceso rápido. Cuando suelte el botón, la pista seguirá
reproduciéndose.

band buttons sets the clock at whatever time you have selected. The clock is
displayed when the ignition is on and the radio is off. With radio and ignition off,
the display is blank.
Using the Alarm
The alarm activates the radio at a set time. Pressing the CLOCK/ALARM button
for more than 2 seconds will display the alarm set time for 3 seconds.
Setting the Alarm
1. With the radio on, press and hold the “i Title/Menu” button for more than 2
seconds until the menu appears. This indicates you are in the menu mode.
2. Rotate the ON/AUDIO knob or press the up/down buttons to change to SET
ALARM. Press the OK button to enter the alarm submenu.
3. Press the OK button to turn the alarm on or off. The alarm icon will turn
on when enabling the alarm. Rotate the ON/AUDIO knob or press up/down
buttons to change to SET TIME and press the OK button. The hour digits for
the alarm time will begin to flash. The format will be the same as you set
for the clock (12- or 24-hour mode).
4. Rotate the ON/AUDIO knob or press the up/down buttons to change the
hour. Rotating the knob clockwise or pressing up button will increase the
hour, rotating counterclockwise or pressing the down button will decrease
the hour.
5. Press the OK button causing the minute digits to flash. Rotate the
ON/AUDIO knob or press the up/down buttons to change the minutes.
Rotating the knob clockwise or pressing up button will increase the
minutes, rotating counterclockwise or pressing the down button will
decrease the minutes.
6. Press the OK button to set the alarm time. Then you will be prompted
to select between SET MUS (Music) or SET TONE. Press the OK button to
select.
NOTE: If you choose SET TONE, the alarm will sound a medium priority
tone for 2 minutes before changing to a constant high priority tone.
If you choose SET MUS, the alarm sound will be whatever you were
listening to when you turned off the radio. For example: if you were
listening to FM, the alarm you hear will be the FM station you last listened
to. If that station is no longer available, the alarm will sound a medium
priority tone for 2 minutes before changing to a high priority tone. If you
were listening to an AUX input, a CD or other media and there is no longer
AUX input or CD available, the alarm will turn the radio on instead.
7
.
Press the OK button again to set the volume of the alarm tone or music.
When y
ou press the OK but
ton,
V
OLUME will appear and y
ou will hear the
5
62
L
a reproducción comienza desde la primera pista y continúa en forma
secuencial por todas las pistas. Después de reproducir la última pista de la
última carpeta, la reproducción continúa con la primera pista de la primera
carpeta o del directorio raíz.
Funciones de los botones
SEEK :
presione durante menos de 2 segundos para pasar a la siguiente
pista. Mantenga presionado el botón para adelantar. Cuando suelte el botón, la
pista seguirá reproduciéndose.
SEEK : presione durante menos de 2 segundos para ir al comienzo de la
pista actual. Si se presiona dentro de los 10 segundos de la pista, la radio pasa a
la pista anterior. Vuelva a presionar el botón dentro del primer segundo para ir al
comienzo de la pista anterior. Mantenga presionado el botón para activar el
retroceso rápido. Cuando suelte el botón, la pista seguirá reproduciéndose.
2/PAUSE/PLAY: presione el botón PAUSE/PLAY para pausar una pista. Se
mostrará PAUSE y el audio se silenciará. Vuelva a presionar PAUSE/PLAY para
reanudar la reproducción.
4/RPT: Presione el botón RPT una vez para repetir el archivo actual. Se
mostrarán el icono RPT y REPEAT TRACK en la pantalla. El mismo archivo
continuará reproduciéndose hasta que se vuelva a presionar el botón RPT. Si
presiona RPT por segunda vez, se mostrará REPEAT FOLDER/PLST en la
pantalla y el icono RPT permanecerá activo. La misma carpeta/lista de
reproducción continuará reproduciéndose hasta que vuelva a presionar el botón
RPT. Si presiona RPT por tercera vez, se mostrará REPEAT OFF en la pantalla.
Se apagará la función y se desactiv
ará el icono RPT. Luego, la pantalla regresa a
sus valores predeterminados.
5/RDM: Si presiona el botón RDM, se activa la carpeta/lista de reproducción
aleatoria. El icono RDM que figura en la pantalla indica que esta función está
activa. Para cancelar RANDOM FOLDER/PLAYLIST o RANDOM ALL, vuelva a
presionar el botón RDM hasta llegar a RANDOM OFF.
RANDOM FOLDER/PLAYLIST: presione el botón RDM una vez para reproducir
en forma aleatoria archivos MP3 dentro de una carpeta/lista de reproducción.
RANDOM ALL: presione el botón RDM por segunda vez para reproducir en
forma aleatoria archivos MP3 en un dispositivo de medios.
FOLDER SCAN: presione el botón SCAN/PSCAN durante menos de 2 segundos
para examinar archivos dentro de una carpeta. Después de reproducir 5
segundos del primer archiv
o MP3 en la carpeta actual, la radio pasará al
siguiente archivo. Cuando se hayan examinado todos los archivos dentro de la
carpet
a, se reanuda la reproducción normal con el primer arc
hiv
o examinado.
SCAN FOLDER
S:
presione el botón SCAN/PSCAN durante más de 2 segundos
para examinar todas las carpetas dentro de un dispositivo. Cuando se hayan
e
xaminado todas las carpet
as, se reanuda la reproducción normal con el archivo
MP3 que primero se e
xaminó.

6
actual volume of the tone or music, whichever you have selected. To
increase the volume, rotate the ON/AUDIO knob clockwise. To decrease the
volume, rotate the ON/AUDIO knob counterclockwise.
8. Press the OK button again to finish and return the display to normal
operation. The ALARM icon will appear on the display to indicate that the
alarm is active.
NOTE: If you do not press any button or rotate the knob for 8 seconds
during the alarm set process, alarm clock setup will be cancelled and the
radio will return to normal operation, keeping whatever setting changes have
been made.
Turning the Alarm Off
When the alarm is triggered, press and hold the CLOCK/ALARM button until the
ALARM icon on the display disappears.
If you do not turn the alarm off, it will automatically shut off after 63 minutes. The
radio will return to the mode (on or off) it was in before the alarm went off.
Activating Snooze
To use SNOOZE, press any button for less than 2 seconds when the alarm
sounds. SNOOZE will appear for 3 seconds and the alarm will be postponed for 9
minutes. If you press any button during these 3 seconds, the radio will return to
the mode it was in before the alarm sounded.
Satellite Radio Service (Optional and only for US & Canada)
When the XM
®
or SIRIUS
®
logo or SAT Radio appears above the ON/AUDIO knob
on your radio, it is satellite radio compatible. XM and Sirius are satellite radio
services that offer more than 100 channels of digital quality audio programming
and can be heard uninterrupted across the contiguous United States. A service
fee is required to receive satellite broadcasts. For more information, contact XM
at www.xmradio.com or by phone at 1-800-852-XMXM (9696) or Sirius at
www.sirius.com or by phone at 1-888-539-7474.
Activating Satellite Radio (Optional)
To take advantage of this feature, you must purchase a monthly satellite radio
subscription. If XM appears on your radio, your radio is XM Satellite Radio
compatible and you will need an XM subscription. If Sirius appears on your radio,
your radio is Sirius Satellite Radio compatible and you will need to a Sirius
subscription.
To activate the integrated or external satellite receiver, you must furnish your
satellite radio pro
vider with the satellite receiv
er’s Electronic Serial Number. To
find the electronic serial number complete the instructions that follow.
If y
our satellite radio provider is XM Satellite Radio:
1. With the ignition and the radio ON, press the BAND button and select XM1,
XM2 or XM3.
61
v
elocidad variable o a las siguientes velocidades fijas: 32 kpbs, 40 kpbs, 64
kpbs, 80 kpbs, 96 kpbs, 112 kpbs, 128 kpbs, 160 kpbs, 192 kpbs, 224 kpbs, 256
kpbs y 320 kpbs. Se reproducirán los discos tanto de sesión simple como
múltiple. El título de la canción, el nombre del artista y el álbum están disponibles
cuando se graban los discos utilizando etiquetas ID3, versiones 1 y 2.
Archivos admitidos en los pen drive: MP1, MP2, MP3 (VBR), WMA (ver 9 y VBR)
y ACC (MPEG4 y M4A).
Su reproductor de MP3 puede leer y reproducir un máximo de 50 carpetas y listas
de reproducción. Los archivos grandes, las carpetas o una combinación de ambos
pueden reducir la cantidad de archivos y carpetas que se pueden reproducir. Si
desea reproducir una gran cantidad de ellos, minimice su tamaño. También puede
reproducir un MP3/WMA grabado sin carpetas de archivo. El sistema puede
admitir hasta 11 niveles de anidamiento de carpetas. Si un disco contiene más de
50 carpetas u 11 niveles de carpetas, su reproductor sólo le permitirá acceder y
explorar a la cantidad máxima e ignorará los elementos adicionales.
Directorio raíz
El directorio raíz se trata como una carpeta. Si el directorio raíz ha comprimido
archivos de audio, el directorio se muestra como ROOT. Se accede a todos los
archivos contenidos directamente en el directorio raíz antes que a cualquier
carpeta de dicho directorio.
Directorio o carpeta vacía
Si existiera un directorio raíz o carpeta en la estructura de archivos que contiene
carpetas/subcarpetas vacías, adelante a la siguiente carpeta en la estructura de
archivos que contiene los archivos de audio comprimidos. La carpeta vacía no se
mostrará ni enumerará.
Sin carpeta
Cuando un disco sólo contiene archivos comprimidos, estos se ubican en la
carpeta raíz. Las funciones siguiente y anterior de la carpeta no cumplen
ninguna función en un CD grabado sin carpetas. Cuando se muestra el nombre
de la carpeta, la radio muestra ROOT.
Pantalla de nombre de archivos
Se muestra el título de una canción cuando está contenido en la etiqueta ID3.
Los títulos con más de 8 caracteres se desplazan a una velocidad de 8
caracteres cada 2 segundos, hasta que se muestre el nombre completo.
Reproducción de archivos MP3
Introduzca parte de un disco en la ranura, con la etiqueta hacia arriba. El
reproductor lo introducirá completamente. Se mostrará CD READING, el icono de
CD en la pantalla y el disco comenzará a reproducirse. Se mostrarán el tipo de
archivo, el tiempo transcurrido y el número de pista. La reproducción comienza
desde la primera pista y continúa en forma secuencial por todas las pistas.
Después de reproducir la última pist
a de la última carpet
a, la reproducción
continúa con la primera pista de la primera carpeta o del directorio raíz.
Introduzca completamente un pen drive en la ranura. Se mostrará USB
READING en la pant
alla y el pen drive se comenzará a reproducir. Se mostrarán
el tipo de archivo, el tiempo transcurrido y el número de pista.

7
2. Tune your radio to channel 0 and the 8-digit serial number will appear.
If your satellite radio provider is Sirius Satellite Radio:
1. With the ignition and radio ON, press the BAND button and select SR1,
SR2 or SR3.
2. Tune your radio to channel 0 and the 12-digit serial number will appear.
When the user attempts to tune a channel that is not currently part of the
broadcast channels available from Sirius Satellite Radio, the radio will display
INVALID CHANNEL for 3 seconds and revert to the previous channel.
NOTE: Satellite radio reception may be degraded by satellite signal obstruction.
General Radio Receiver Functions
Your receiver is equipped with:
– Two FM bands with a total of 12 FM presets
– An AM band with 6 AM presets
– Three satellite bands with a total of 18 satellite presets
– One weather band with 6 WX presets
Turning the Power On
With the ignition on, the receiver can be turned on and off by pressing the
button. Pressing the ON/AUDIO knob & BAND button also turns on the
receiver.
Adjusting the Volume
To increase volume, rotate the ON/AUDIO knob clockwise. To decrease volume,
rotate the knob counterclockwise.
One-Hour Timer
With the ignition off, pressing the button or the ON/AUDIO knob will turn on
the receiver and activate the receiver’s one-hour timer. The receiver will turn off
after one hour. Pressing the button or the ON/AUDIO knob again reactivates
the one-hour timer.
Display
The receiver will display the time of day when it is off. Pressing the “i
Title/Menu” button when the receiver is on allows you to toggle between
displays (i.e., information on the current song playing) depending upon the
mode you are in.
Radio Mode Displays
When y
ou are using the radio pressing the
“i
Title/Menu” button will have no
effect.
CD Mode Displays
When y
ou are using the CD pla
yer, press the “i Title/Menu” button to toggle
bet
w
een dif
f
erent displa
y vie
ws:
1. Artist Name
60
2
. Introduzca parte de un disco en la ranura, con la etiqueta hacia arriba. El
reproductor automáticamente introducirá el disco una vez que lo haya
introducido parcialmente.
Se mostrará en la pantalla CD READING y el ícono de CD, seguido del
número de pista y el tiempo transcurrido. Luego, comenzará la reproducción.
3. Si está escuchando radio FM/AM/WX, presione el botón SRC para
reproducir un CD que se haya cargado en el reproductor. Si no se ha
cargado ningún CD, la opción no estará disponible y la radio accederá a la
siguiente fuente disponible. Si no hay ninguna fuente disponible, la radio
permanecerá en REAR AUX. Si ha cargado un CD, el ícono CD permanece
activo hasta que haya sido expulsado. Se mostrará CD READING, seguido
del número de pista y del tiempo transcurrido.
Si se expulsa un CD y no se extrae dentro de los 15 segundos, el CD se volverá
a cargar pero no se comenzará a reproducir hasta que presione el botón SRC.
Funciones de los botones
SEEK :
presione durante menos de 2 segundos para pasar a la siguiente
pista. Mantenga presionado el botón para adelantar. Cuando lo suelte, la pista
seguirá reproduciéndose.
SEEK : presione durante menos de 2 segundos para ir al comienzo de la
pista actual. Si se presiona dentro de los 10 segundos de la pista, la radio pasa a
la pista anterior. Vuelva a presionar el botón dentro del primer segundo para ir al
comienzo de la pista anterior. Mantenga presionado el botón para activar el
retroceso rápido. Cuando lo suelte, el disco comenzará a reproducirse.
2/PAUSE/PLAY: presione el botón PAUSE/PLAY para pausar un CD. Se
mostrará PAUSE y el audio se silenciará. Vuelva a presionar PAUSE/PLAY
para reanudar la reproducción.
4/RPT: presione el botón RPT para repetir la pista que se está reproduciendo.
Cuando la función "Repetir pista" está activada, se activa el ícono RPT y la pista
que está escuchando se repetirá hasta que vuelva a presionar el botón RPT.
5/RDM: presione el botón RDM para activar la selección aleatoria de pistas. El
ícono RDM de la pantalla indica que las pistas en el disco cargado se
reproducirán de forma aleatoria hasta que vuelva a presionar el botón RDM.
TRACK SCAN: presione SCAN/PSCAN durante menos de 2 segundos para
detectar las pistas de un disco. Después de reproducir 8 segundos de la pista
actual, la radio pasará a la siguiente pista. Cuando se hayan detectado todas las
pistas del disco, finaliza la DE
TECCIÓN y comienza la reproducción con la
primera pista de la DETECCIÓN. Vuelva a presionar SCAN para desactivar.
EJECT
:
presione el botón para e
xpulsar un CD
.
Cómo reproducir un disco de MP3/USB
El reproductor de MP3 reproducirá archivos grabados en un CD-R de hasta 700
MB o en un pen driv
e de hasta 1 GB. Los archivos se pueden grabar a una

8
2. Song Name
3. Album Name
CD information, including disc and track title, is shown when a track starts to
play. If there is more information than can appear on the display at one time,
the display will advance every 2 seconds until all of the information has
appeared.
NOTE: When an audio CD is inserted into the CD player, the receiver will
display CD READING until the first track is played. Then the track number,
time elapsed and CD will appear.
If the RPT button is pressed, the radio will display the RPT icon. If it is
pressed again, the display will delete the RPT icon.
If the RDM button is pressed, the radio will display the RDM icon. If it is
pressed again, the display will delete the RDM icon.
If the PAUSE/PLAY button is pressed, the radio will display PAUSE. If pressed
again, it will go back to the previous display and continue playing the CD.
MP3/USB/iPod Mode Displays
When you are playing MP3 or WMA files, press the “i Title/Menu” button to
toggle between different display views:
1. Track Number
2.
Artist Name
3. Song Name
4. Album Name
5. Folder/PLST Name
Information including track title and artist name is shown when a track starts to
play. If no information is available then the radio will show blank fields. If there
is more information than can appear on the display at one time, the display will
advance every 2 seconds until all of the information has been displayed.
NOTE: When an MP3 or WMA disc is inserted into the CD player, it will
display CD READING until the first track is played. When a USB stick or an
iPod is connected into the USB connector, it will display USB READING or
iPod READING until the first track is played. The file type and elapsed time
will appear next. Then the track/file number, artist, song, album &
folder/pla
ylist name will appear on the second row display.
If f
older or f
older are pressed, the radio will displa
y the folder and
track number, then it will begin showing the track/file number, artist, song,
album & f
older/playlist name on the second row display before returning to
the default display.
If RPT is pressed once, REPEA
T
TRA
CK will appear and the RPT icon will t
urn
59
emisora durante 8 segundos y luego continuará examinando. La pantalla mostrará
PSCAN, la frecuencia, el número predeterminado y la banda actual. La detección
predeterminada continuará hasta que presione SCAN/PSCAN nuevamente.
Cómo configurar los valores predeterminados
Los seis botones de comando numerados le permiten predeterminar 6 de sus
emisoras favoritas por banda y regresar a ellas fácilmente con sólo tocar un
botón. Para configurar los valores predeterminados:
1. Encienda el receptor.
2. Seleccione la banda.
3. Sintonice la emisora deseada.
4. Mantenga presionado uno de los 6 botones numerados durante más de 2
segundos para guardar la emisora seleccionada. Durante el tiempo de
configuración de 2 segundos, la radio estará en silencio y se mostrará el
número preestablecido. Cuando se haya configurado la emisora
predeterminada, escuchará un pitido y regresarán el audio y el número
predeterminado seleccionado.
5. Repita los pasos del 1 al 4 para cada botón de comando.
Si presiona un botón predeterminado en el futuro, se sintonizará la radio en la
emisora que configuró en la banda que está escuchando.
Cómo utilizar la banda meteorológica
La radio meteorológica de la NOAA es un servicio del Servicio Meteorológico
Nacional. Proporciona emisiones continuas de la última información meteorológica
directamente del Servicio Meteorológico Nacional. Los mensajes grabados se
repiten cada cuatro a seis minutos y se revisan cada una a tres horas o más a
menudo si fuera necesario. La mayoría de las emisoras funcionan las 24 horas.
El tiempo de su localidad se puede encontrar en una de las 7 emisoras. Cuando se
encuentra en el modo de banda meteorológica, la pantalla mostrará WX y el número
de canal. El canal se puede cambiar utilizando los botones SEEK / . También
puede preestablecer los botones arriba/abajo para los botones de comando.
Las frecuencias asociadas con cada uno de los canales son las siguientes:
1. 162.400 Mhz 5. 162.500 Mhz
2. 162.425 Mhz 6. 162.525 Mhz
3. 162.450 Mhz 7. 162.550 Mhz
4. 162.475 Mhz
El Servicio Meteorológico Nacional opera aproximadamente 372 emisoras.
Alrededor del 90 por ciento de la población nacional se encuentra dentro del
rango de audición de la emisora de la radio meteorológica de la NOAA.
Cómo utilizar el reproductor de disco compacto/USB
El reproductor de CD integrado reproduce discos de CD, MP3 y WMA de
tamaño completo.
Cómo reproducir un disco compacto
1. Encienda el contacto y el receptor.

9
on. Then the display returns to its default, current track playing. In iPod mode,
the display will read REPEAT ONE TRACK.
If RPT is pressed a second time, REPEAT FOLDER/PLST will appear and the
RPT icon will remain turned on. Then the display returns to its default. In iPod
mode, the display will read REPEAT ALL TRACKS.
If RPT is pressed a third time, REPEAT OFF will appear and the RPT icon will
turn off. Then the display returns to its default.
If RDM is pressed once, RANDOM FOLDER/PLST will appear and the RDM
icon will turn on. Then the display returns to its default. In iPod mode, the
display will read SHUFFLE TRACKS.
If RDM is pressed a second time, RANDOM USB will appear and the RDM
icon will remain turned on. Then the display returns to its default. In iPod
mode, the display will read SHUFFLE ALBUMS.
If RDM is pressed a third time, RANDOM OFF will appear and the RDM icon
will turn off. Then the display returns to its default. In iPod mode, the display
will read SHUFFLE OFF.
If the PAUSE/PLAY button is pressed, the radio will display PAUSE (if RPT or
RDM are currently selected the icon will remain on). If pressed again, it will
go back to the previous display and continue playing the CD/USB/iPod.
When a USB stick is connected and DEVICE NOT SUPPORTED appears on the
display, the USB stick is not supported by the receiver and you will need to use
a different USB stick.
AUX Input Displays
When you are using an external device connected through the auxiliary inputs,
pressing the “i Title/Menu” button will have no effect.
When a device is connected via the aux input, the radio will display FRONT AUX
as long as it is kept in this mode. If AUX is selected by pressing the SRC button
and no device is connected, the radio will select the rear auxiliary input, and
display REAR AUX as long as is kept in this mode.
HANDS FREE (Bluetooth)
When a mobile phone has been previously paired with the radio (please see
page 12) and an incoming call is received, the radio will pause/mute and the
displa
y will sho
w the phone name on the first line and the phone number on the
second line. The characters indicate incoming call.
When a mobile phone has been previously paired with the radio (please see
page 1
2) and a call is placed on the mobile phone, the radio will pause/mute and
the displa
y will sho
w the phone name on the first line and the phone number on
the second line. The characters indicate outgoing call.
Cómo utilizar la radio
Cómo encontrar una emisora
BAND/AUTO: presione este botón para cambiar entre FM1, FM2, AM, SAT1,
SAT2, SAT3 y WX.
TUNE: para sintonizar su radio manualmente, presione el botón hacia arriba/abajo una
vez para sintonizar la siguiente emisora anterior o posterior, una frecuencia a la vez.
SEEK: presione el botón o una vez para sintonizar la siguiente emisora
disponible. El modo SEEK termina cuando alcanza una emisora sintonizable.
Si presiona los botones o mientras la radio está buscando una emisora,
el sintonizador se detendrá en la frecuencia sintonizada en el momento en que
usted presiona el botón.
Si SEEK no encuentra una emisora sintonizable, se muestra NO STATION
FOUND. La radio recuerda la emisora que estaba sintonizada cuando se inició
SEEK y regresa a dicha frecuencia si SEEK se cancela. El audio se silencia
durante el proceso SEEK UP/DOWN.
Para cancelar SEEK:
1. Cambie los modos, inclusive: apagado, contacto apagado, cambiar a CD,
radio, MP3, WMA, USB, AUX o iPod
2. Cambie las bandas
3. Presione el botón SCAN/PSCAN
4. Presione cualquier botón preestablecido
5. Desconecte la batería
6. Mantenga presionado el botón SCAN/PSCAN
7. Mantenga presionado el botón BAND/AUTO
AUTO STORE: La función AUTO STORE almacena temporalmente las 6
emisoras más fuertes en los botones de comando 1 a 6. Mantenga presionado
el botón BAND/AUTO durante más de 2 segundos. Escuchará un pitido y se
mostrará AUTO STORE en la pantalla hasta que todos los valores
predeterminados se hayan guardado en la banda. Se mostrará AS mientras esté
activo AUTO STORE. Si presiona BAND/AUTO, no se verán afectadas las otras
bandas. Por ejemplo: si presiona BAND/AUTO mientras escucha FM1, no
cambiarán los valores predeterminados en AM, FM2 y WX. Si mantiene
presionado el botón BAND/AUTO nuevamente, se cancelará AUTO STORE y se
volverán a guardar los valores predeterminados originales.
SCAN: presione SCAN/PSCAN y suelte para detectar todas las emisoras de la
banda que está utilizando. Cuando encuentra una frecuencia lo suficientemente
fuerte, la radio se reproducirá durante 8 segundos antes de continuar
examinando. Para finalizar la detección, presione SCAN/PSCAN nuevamente. La
radio emitirá un pitido y se mostrará SCAN más la frecuencia.
PSCAN: mantenga presionado SCAN/PSCAN durante más de 2 segundos para
examinar los valores predeterminados de la banda que está utilizando. Cuando
encuentra una frecuencia lo suficientemente fuerte, la radio reproducirá dicha
58

Call Transfer: If a call is in progress, press the PAUSE/PLAY button to allow
the system to transfer the call to the mobile phone. The radio will display
CALL TRANSFERRED.
Phone Disconnection: If the mobile phone ends the Bluetooth connection,
turns off or the phone signal weakens, the radio will display PHONE
DISCONNECTED for 3 seconds.
Phone Reconnection: If the previously connected mobile phone re-activates
the connection with the radio, the mobile phone is turned on or the phone re-
establishes signal, the radio will display PHONE CONNECTED for 3 seconds.
CLOCK/ALARM Button
In any mode, if you press the CLOCK/ALARM button the display will show the
time for 3 seconds. If you press and hold the CLOCK/ALARM button, the
display will show the alarm set time for 3 seconds and a beep will be heard.
Front Auxiliary Mode
In front auxiliary mode, you can play an external device such as an iPod or MP3
player via the auxiliary input jack on the front of the receiver.
To use an external device:
– Connect the device via the auxiliary input jack.
Front auxiliary mode will not be available if no device is connected to the
auxiliar
y input jack on the front of the receiver.
Rear Auxiliary Mode
In rear auxiliary mode, you can play an external device that you have connected
via the auxiliary input radio lines.
To enable rear auxiliary mode:
– Press the SRC button until the display shows REAR AUX.
Adjusting the Receiver Audio Settings
To adjust the bass, middle, treble, fade, balance and auto EQ, press and release
the
ON/AUDIO knob. Each time you press the knob you will advance to the
next setting and
BASS, MIDDLE, TREBLE, FADE, BALANCE or AUTO EQ will
appear on the display.
BASS: Rot
ate the ON/AUDIO knob clockwise to increase the bass and
counterclockwise to decrease it. The display will show BASS and its level from
-
6 to
+
6.
MIDDLE: R
otate the ON/AUDIO knob clockwise to increase the middle sound
and counterclockwise to decrease it. The display will show MIDDLE and its
le
v
el from -6 to +6.
10
57
R
DS:
p
resione el botón OK para seleccionar y la radio le permitirá elegir entre AF
y TRAFFIC. Presione el botón OK para encender o apagar cada selección. (Esta
opción sólo está disponible en Europa).
SIRIUS: presione el botón OK para seleccionar y la radio mostrará las siguientes
opciones:
1. CHANNEL LOCK: presione el botón OK para seleccionar. Esto bloqueará
el canal Sirius actual. La radio le solicitará la contraseña durante 8 segundos.
Puede utilizar los botones 2, 3, 4 y 5 para ingresar los cuatro dígitos.
Cuando ingrese la contraseña, presione el botón OK para confirmar y la
radio mostrará CHANNEL XX LOCKED (en donde XX es el canal
seleccionado) y se silenciará el audio. La contraseña predeterminada es
1234. Si la contraseña ingresada no es correcta, la radio mostrará INVALID
PASSWORD. Sólo se pueden bloquear 16 canales; el canal 0 no se puede
bloquear.
2. UNLOCK CHANNEL: presione el botón OK para seleccionar. Esto
desbloqueará el canal Sirius actual. La radio le solicitará la contraseña
durante 8 segundos. Puede utilizar los botones 2, 3, 4 y 5 para ingresar los
cuatro dígitos. Cuando ingrese la contraseña, presione el botón OK para
confirmar y la radio mostrará CHANNEL XX UNLOCKED (en donde XX es el
canal seleccionado) y se reproducirá el audio. La contraseña predeterminada
es 1234. Si la contraseña ingresada no es correcta, la radio mostrará
INVALID PASSWORD.
3. UNLOCK ALL: presione el botón OK para seleccionar. Esto desbloqueará
todos los canales Sirius previamente bloqueados. La radio le solicitará la
contraseña durante 8 segundos. Puede utilizar los botones 2, 3, 4 y 5 para
ingresar los cuatro dígitos. Cuando ingrese la contraseña, presione el botón
OK para confirmar y la radio mostrará ALL CH UNLOCKED durante 3
segundos, y saldrá del menú. La contraseña predeterminada es 1234. Si la
contraseña ingresada no es correcta, la radio mostrará INVALID PASSWORD.
4. PASSWORD: presione el botón OK para seleccionar. Esta opción se utiliza
para cambiar la contraseña. La radio solicitará la contraseña anterior. Si
ingresa la contraseña correcta, la radio solicitará la nueva contraseña. Si la
nueva contraseña no se confirma dentro de los 10 segundos, no se
guardará. Una vez que ingresa la contraseña, la radio mostrará PASSWORD
UPDATED durante 3 segundos.
NOTA: si presiona los valores predeterminados 1 y 4 durante 5 segundos, se
restablecerá la contraseña a su valor de fábrica (1234).
USB: presione el botón OK para seleccionar y la radio mostrará PLAYLIST
MODE. Gire el botón ON/AUDIO en cualquier dirección para alternar entre
ON/OFF
.

11
TREBLE: Rotate the ON/AUDIO knob clockwise to increase the treble sound
and counterclockwise to decrease it. The display will show TREBLE and its level
from -6 to +6.
FADE: Rotate the ON/AUDIO knob clockwise to move the sound to the front
speakers and counterclockwise to move the sound to the rear speakers. The
display will show FADE and the fade level from R15 to F15. Fade is not available
in 2-speaker mode.
BALANCE: Rotate the ON/AUDIO knob clockwise to move the sound to the
right speakers and counterclockwise to move it to the left speakers. The display
will show BALANCE and the balance level from L15 to R15.
AUTO EQ: Rotate the ON/AUDIO knob clockwise and counterclockwise to cycle
through auto EQ options from 1 to 7.
Options are:
1. Pop
2. Rock
3. Country
4. News
5. Jazz
6. Classical
7. Manual
To select the desired option press the ON/AUDIO knob again.
NO
TE:
Three audio configurations can be set (Bluetooth, AUX and the rest of
the sources).
Adjusting the Receiver Menu Settings
To adjust the Clock, Alarm, Advanced (Speakers, Seek Sensitivity & Dimming),
Hands Free, RDS (Europe only), Sirius and USB, press and hold “i Title/Menu”
button until you hear a beep. Rotate the ON/AUDIO knob clockwise and
counterclockwise to cycle through options available, or use the up and down
buttons until the desired feature appears on the display. When you reach the
desired feature press OK button to select. The ESC button will take you back to
previous options or exit menu options.
CLOCK: See page 4 for details.
ALARM: See page 5 for details.
ADVANCED: Rotate the ON/AUDIO knob or press up/down button to select
bet
w
een the f
ollowing options:
– Speakers
–
Seek Sensitivity (Available only in Tuner mode)
– Dimming
56
SPEAKERS: gire el botón ON/AUDIO en cualquier dirección para alternar
entre la funcionalidad de 2 a 4 altavoces. Cuando se selecciona la
funcionalidad de 2 altavoces, sólo se utilizan los altavoces delanteros.
SEEK SENSITIVITY: gire el botón ON/AUDIO sentido horario para
aumentar la sensibilidad de búsqueda y en sentido antihorario para
disminuirla. La pantalla mostrará SEEK SENSITIV y el nivel de búsqueda
de -2 a +2.
DIMMING: gire el botón ON/AUDIO en sentido horario para subir el
brillo de la pantalla y en sentido antihorario para disminuirlo. La pantalla
mostrará DIMMING y el nivel de atenuación de 0 a 30.
HANDS FREE: gire el botón ON/AUDIO o presione el botón hacia arriba/abajo y
seleccione ON para activar Bluetooth. El ícono Estado de Bluetooth se activa.
Hay dos íconos de Bluetooth: Icono de sonido e ícono de estado .
Luego, seleccione una de las siguientes opciones:
1. ADD PHONE: presione el botón OK para seleccionar. La radio mostrará
ADDING PHONE durante 3 segundos y destellará el ícono de estado del
Bluetooth. En el modo descubrible, el ícono de estado del Bluetooth
continuará destellando durante 3 minutos. Si no se agrega ningún
teléfono después de los 3 minutos, la radio mostrará NO PHONE FOUND.
Durante el modo descubrible, configure su teléfono celular para agregar
un dispositivo y buscar el nombre “DEA355 Radio”. Utilice el número de
PIN 0
000 para conectarse con la radio. Cuando se haya agregado
exitosamente el teléfono celular, la radio mostrará PHONE CONNECTED
en la primera línea y el nombre del teléfono con Bluetooth en la segunda
línea durante 3 minutos. La radio puede guardar hasta 16 teléfonos
celulares. Si se han guardado los 16 teléfonos, se deshabilita la opción
ADD PHONE hasta que se elimine un teléfono.
2. EDIT PHONE: presione el botón OK para seleccionar. La radio mostrará la
lista de teléfonos celulares. Para eliminar un teléfono celular de la lista,
seleccione el teléfono celular (la selección está precedida por el carácter
) girando el botón ON/AUDIO o presionando los botones hacia
arriba/abajo. Presione el botón OK para eliminar el teléfono. Al final de la
lista de teléfonos celulares, encontrará la opción DELETE ALL. Si presiona
el botón OK, se eliminarán todos los teléfonos celulares de la lista. Cuando
elimina un teléfono, la radio intentará conectarse con un teléfono diferente
de la lista.
3.
CHANGE PHONE:
presione el botón OK para seleccionar
. La radio
mostrará la lista de teléfonos celulares. Para cambiar a un teléfono celular
dif
erente de la lista, seleccione el teléfono celular (la selección está
precedida por el carácter ) girando el botón ON/AUDIO o presionando
los botones hacia ar
riba/abajo. P
resione el botón OK. La radio selecciona
este teléf
ono celular y regresa a la pant
alla del menú anterior
.

12
SPEAKERS: Rotate the ON/AUDIO knob in either direction to toggle from
2- speaker to 4-speaker functionality. When 2-speaker functionality is
chosen, only front speakers are used.
SEEK SENSITIVITY: Rotate the ON/AUDIO knob clockwise to increase the
seek sensitivity and counterclockwise to decrease it. The display will show
SEEK SENSITIV and the seek level from -2 to +2.
DIMMING: Rotate the ON/AUDIO knob clockwise to increase the
brightness of the display and counterclockwise to decrease the brightness.
The display will show DIMMING and the dim level from 0 to 30.
HANDS FREE: Rotate the ON/AUDIO knob or press up/down button and select
ON to activate Bluetooth. The Bluetooth Status icon is turned on. There are two
Bluetooth icons: Ring icon and Status icon.
Then select one of the following options:
1. ADD PHONE: Press the OK button to select. The radio will display ADDING
PHONE for 3 seconds and the Bluetooth status icon will blink. In this
discoverable mode, the Bluetooth status icon will continue to blink up to 3
minutes. If no phone was added after 3 minutes, the radio will display
NO PHONE FOUND. During the discoverable mode set your mobile phone
to add a device and look for the name “DEA355 Radio”. Use PIN number
0000 to connect to the radio. When the mobile phone has successfully
added, the radio will display PHONE CONNECTED on the first line and the
Bluetooth phone name on the second line f
or 3 seconds. The radio can save
up to 16 mobile phones. If the 16 have been stored the ADD PHONE option
is disabled until a phone is deleted.
2. EDIT PHONE: Press the OK button to select. The radio will display the
mobile phone list. To delete a mobile phone off the list, select the mobile
phone (selection is preceded by the character ) by rotating the
ON/AUDIO knob or pressing the up/down buttons. Press the OK button to
delete the phone. At the end of the mobile phones list, you will find
DELETE ALL option. If the OK button is pressed, all the mobile phones on
the list will be deleted. When a phone is deleted the radio will try to
connect with a different phone on the list.
3. CHANGE PHONE: Press the OK button to select. The radio will display the
mobile phone list. To change to a different mobile phone on the list, select
the mobile phone (selection is preceded by the c
haracter ) by rotating
the ON/AUDIO knob or pressing the up/down buttons. Press the OK button
and the radio selects this mobile phone and ret
urns to pre
vious menu
display.
55
TREBLE: gire el botón ON/AUDIO en sentido horario para aumentar los agudos
y en sentido antihorario para disminuirlos. La pantalla mostrará TREBLE y su
nivel de -6 a +6.
FADE: gire el botón ON/AUDIO en sentido horario para transferir el sonido a los
altavoces delanteros y en sentido antihorario para transferir el sonido a los
altavoces traseros. La pantalla mostrará FADE y el nivel de fundido de R15 a
F15. La función de fundido no está disponible en el modo de 2 altavoces.
BALANCE: gire el botón ON/AUDIO en sentido horario para transferir el sonido
a los altavoces de la derecha y en sentido antihorario para transferir el sonido a
los altavoces de la izquierda. La pantalla mostrará BALANCE y el nivel de
balance de L15 a R15.
AUTO EQ.: gire el botón ON/AUDIO en sentido horario y antihorario para
recorrer las opciones del ecualizador automático del 1 al 7. Las opciones
son:
1. Pop
2. Rock
3. Country
4. News
5. Jazz
6. Classical
7. Manual
Para seleccionar la opción deseada, presione el botón ON/AUDIO nuevamente.
NOTA: Se pueden establecer tres configuraciones de audio (Bluetooth, AUX y el
resto de las fuentes).
Cómo regular la configuración del menú del receptor
Para regular reloj, alarma, avanzado (altavoces, sensibilidad de búsqueda y
atenuación), manos libres, RDS (sólo Europa), Sirius y USB, mantenga
presionado el botón “i Title/Menu” hasta que escuche un pitido. Gire el botón
ON/AUDIO en sentido horario y antihorario para recorrer las opciones
disponibles o utilice los botones hacia arriba y hacia abajo hasta que la función
deseada aparezca en la pantalla. Cuando alcance la función deseada, presione el
botón OK para seleccionar. Con el botón ESC volverá a las opciones anteriores o
saldrá de las opciones del menú.
CLOCK: consulte la página 48 para obtener detalles.
ALARM: consulte la página 49 para obtener detalles.
ADVANCED: Gire el botón ON/AUDIO o presione el botón UP/DOWN para
seleccionar entre las siguientes opciones:
– Altavoces
–
Sensibilidad de búsqueda (disponible sólo en el modo
TUNER)
–
Atenuación

13
R
DS:
P
ress the OK button to select and the radio will let you choose between
AF and TRAFFIC. Press the OK button to turn ON and OFF each selection. (This
option is available in Europe only).
SIRIUS: Press the OK button to select and the radio will display the following
options:
1. CHANNEL LOCK: Press the OK button to select. This will lock the current
Sirius channel. The radio will prompt for the password for 8 seconds.
Buttons 2, 3, 4 & 5 can be used to enter the four digits. When password is
administered, press the OK button to confirm and the radio will display
CHANNEL XX LOCKED (where XX is the channel selected) and the audio
will be muted. The default password is 1234. If the password entered is not
correct the radio will display INVALID PASSWORD. Only 16 channels can be
locked, channel 0 cannot be locked.
2. UNLOCK CHANNEL: Press the OK button to select. This will unlock the
current Sirius channel. The radio will prompt for the password for 8 seconds.
Buttons 2, 3, 4 & 5 can be used to enter the four digits. When password is
administered, press the OK button to confirm and the radio will display
CHANNEL XX UNLOCKED (where XX is the channel selected) and the audio
will be played. The default password is 1234. If the password entered is not
correct, the radio will display INVALID PASSWORD.
3. UNLOCK ALL: Press the OK button to select. This will unlock all Sirius
channels previously locked. The radio will prompt for the password for 8
seconds. Buttons 2, 3, 4 & 5 can be used to enter the four digits. When
password is set, press the OK button to confirm and the radio will display
ALL CH UNLOCKED for 3 seconds and exit the menu. The default password
is 1234. If the password entered is not correct the radio will display INVALID
PASSWORD.
4. PASSWORD: Press the OK button to select. This option is used to change
the password. The radio will ask for the old password. If the password is
entered correctly, the radio will ask for the new password. If the new
password is not confirmed within 10 seconds, the password will not be
saved. Once the password is introduced, the radio will display PASSWORD
UPDATED for 3 seconds.
NOTE: Pressing presets 1 and 4 for 5 seconds will reset the password to its
factory value (1234).
USB: Press the OK button to select and the radio will display PLAYLIST MODE.
Rotate the ON/AUDIO knob in either direction to toggle from ON to OFF.
Transferencia de llamadas: si está llevando a cabo una llamada, presione
el botón PAUSE/PLAY para que el sistema transfiera la llamada al teléfono
celular. La radio mostrará CALL TRANSFERRED.
Desconexión del teléfono: si el teléfono celular finaliza la conexión de
Bluetooth, se apaga o se debilita la señal del teléfono, la radio mostrará
PHONE DISCONNECTED durante 3 segundos.
Reconexión del teléfono: si el teléfono celular conectado previamente
reactiva la conexión con la radio, el teléfono celular se enciende o restablece
la señal, la radio mostrará PHONE CONNECTED durante 3 segundos.
Botón CLOCK/ALARM
En cualquier modo, si presiona el botón CLOCK/ALARM, la pantalla mostrará la
hora durante 3 segundos. Si mantiene presionado el botón CLOCK/ALARM, la
pantalla mostrará la hora configurada de la alarma durante 3 segundos y se
escuchará un pitido.
Modo auxiliar frontal
En el modo auxiliar frontal, puede reproducir un dispositivo externo como un
reproductor de MP3 o iPod mediante el conector de entrada auxiliar que se
encuentra en la parte frontal del receptor.
Para utilizar un dispositivo externo:
– Conecte el dispositivo mediante el conector de entrada auxiliar.
El modo auxiliar frontal no estará disponible si no se conecta un dispositivo al
conector de entrada auxiliar que se encuentra en la parte frontal del receptor.
Modo auxiliar posterior
En el modo auxiliar posterior, puede reproducir un dispositivo externo que haya
conectado mediante las líneas de radio de entrada auxiliar.
Para habilitar el modo auxiliar posterior:
– Presione el botón SRC hasta que la pantalla muestre REAR AUX.
Cómo regular la configuración de audio del receptor
Para regular los graves, medios, agudos, fundido, balance y ecualizador
automático, presione y suelte el botón
ON/AUDIO. Cada vez que presiona el
botón, pasará a la siguiente configuración y en la pantalla aparecerán
BASS,
MIDDLE, TREBLE, FADE, BALANCE
o AUTO EQ.
BASS: gire el botón ON/AUDIO en sentido horario para aumentar los graves y
en sentido antihorario para disminuirlos. La pantalla mostrará BASS y su nivel
de -6 a +6.
MIDDLE: gire el botón ON/A
UDIO en sentido horario para aument
ar el sonido
medio y en sentido antihorario para disminuirlo. La pantalla mostrará MIDDLE y
su nivel de -6 a +6.
54

Using the Radio
Finding a Station
BAND/AUTO:
Press this button to switch between FM1, FM2, AM, SAT1,
SAT2, SAT3 and WX.
TUNE: To tune your radio manually, press the up/down button once to tune to
the next higher or lower station, one frequency at a time.
SEEK: Press the or button once to tune to the next available station. The
SEEK mode ends when you reach a tunable station.
If you push either the or button while the radio is finding a station, the
tuner will stop at the frequency tuned at the time you pressed the button.
If SEEK doesn’t find a tunable station, it displays NO STATION FOUND. The radio
remembers the station that was tuned when SEEK was initiated and goes back
to that frequency if SEEK is cancelled. The audio mutes during the SEEK
UP/DOWN process.
To cancel SEEK:
1. Switch modes including: power off, ignition off, switch to CD, Radio, MP3,
WMA, USB, AUX or iPod
2. Change bands
3. Press SCAN/PSCAN button
4. Press any preset button
5. Disconnect battery
6. Press and hold SCAN/PSCAN button
7. Press and hold BAND/AUTO button
AUTO STORE: AUTO STORE temporarily stores the 6 strongest stations onto
pushbuttons 1-6. Press and hold the BAND/AUTO button for more than 2
seconds. You will hear a beep and AUTO STORE will appear on the display until
all of the presets have been saved in the band. AS will be displayed while AUTO
STORE is active. Pressing BAND/AUTO will not affect the other bands. For
example: if you press BAND/AUTO while listening to FM1, the presets on AM,
FM2, and WX will not change. Pressing and holding BAND/AUTO again will
cancel AUTO STORE, and the original presets will be restored.
SCAN: Press SCAN/PSCAN and release to scan all stations on the band you are
using. When a strong enough frequency is found, the radio will play for 8
seconds before continuing to scan. To end the scan, press SCAN/PSCAN again.
The radio will beep and display SCAN plus the frequency.
PSCAN: Press and hold SCAN/PSCAN for more than 2 seconds to scan the
presets on the band you are using. When a strong enough frequency is found,
the radio will play that station for 8 seconds and then continue scanning. The
displa
y will sho
w PSCN, the frequency
, preset number and the current band.
Preset scan will continue until you press SCAN/PSCAN again.
14
53
Luego, la pantalla regresa a su reproducción de la pista actual predeterminada.
En el modo iPod, la pantalla mostrará REPEAT ONE TRACK.
Si presiona RPT por segunda vez, se mostrará REPEAT FOLDER/PLST y el
icono RPT permanecerá activo. Luego, la pantalla regresa a sus valores
predeterminados. En el modo iPod, la pantalla mostrará REPEAT ALL TRACKS.
Si presiona RPT por tercera vez, se mostrará REPEAT OFF y el ícono RPT se
desactivará. Luego, la pantalla regresa a sus valores predeterminados.
Si presiona RDM una vez, se mostrará RANDOM FOLDER/PLST y se activará
el ícono RDM. Luego, la pantalla regresa a sus valores predeterminados. En el
modo iPod, la pantalla mostrará SHUFFLE TRACKS.
Si presiona RDM por segunda vez, se mostrará RANDOM USB y el ícono
RDM permanecerá activo. Luego, la pantalla regresa a sus valores
predeterminados. En el modo iPod, la pantalla mostrará SHUFFLE ALBUMS.
Si presiona RDM por tercera vez, se mostrará RANDOM OFF y el ícono RDM
se desactivará. Luego, la pantalla regresa a sus valores predeterminados. En
el modo iPod, la pantalla mostrará SHUFFLE OFF.
Si presiona el botón PAUSE/PLAY, la radio mostrará PAUSE (si actualmente
están seleccionados RPT o RDM, el ícono permanecerá activo). Si vuelve a
presionar este botón, regresará a la pantalla anterior y continuará
reproduciendo el CD/USB/iP
od.
Cuando conecta un pen drive y se muestra DEVICE NOT SUPPORTED en la pantalla,
el receptor no lo admite y usted tendrá que utilizar un pen drive diferente.
Pantallas de entr
adas AUX
Cuando utiliza un dispositivo externo conectado mediante las entradas
auxiliares, si presiona el botón “i Title/Menu” no tendrá efecto.
Cuando conecta un dispositivo mediante la entrada auxiliar, la radio mostrará FRONT
AUX siempre que se mantenga en este modo. Si selecciona AUX al presionar el
botón SRC y no conecta ningún dispositivo, la radio seleccionará la entrada auxiliar
posterior y mostrará REAR AUX siempre que se mantenga en este modo.
MANOS LIBRES (Bluetooth)
Cuando un teléfono celular se ha apareado previamente con la radio (consulte la
página 12) y se recibe una llamada entrante, la radio se pausará/silenciará y la
pantalla mostrará el nombre del teléfono en la primera línea y el número del
teléf
ono en la segunda línea. L
os caracteres indican una llamada entrante.
Cuando un teléf
ono celular se ha apareado pre
viamente con la radio (consulte
la página 1
2) y se realiza una llamada con el teléf
ono celular
, la radio se
pausará/silenciará y la pantalla mostrará el nombre del teléfono en la primera línea
y el número del teléfono en la segunda línea. Los caracteres indican una
llamada
saliente.

15
S
etting the Presets
The six numbered pushbuttons allow you to preset 6 of your favorite stations
per band and easily return to them with the touch of a button. To set the
presets:
1. Turn the receiver on.
2. Select the band.
3. Tune to the desired station.
4. Press and hold one of the 6 numbered buttons for more than 2 seconds to
store the selected station. During the 2-second set time, the radio will be
muted and the preset number will be displayed. When the preset station
has been set, you will hear a beep, then the audio and selected preset
number will return.
5. Repeat steps 1-4 for each pushbutton.
Pressing a preset button in the future will tune the radio to the station you set
on the band to which you are listening.
Using the Weatherband
NOAA Weather Radio is a service of the U.S. National Weather Service. It
provides continuous broadcasts of the latest weather information directly from
the National Weather Service. Taped weather messages are repeated every four
to six minutes and are revised every one to three hours or more frequently if
needed. Most stations operate 24 hours a day.
The weather for your location can be found on one of 7 stations. When in
Weatherband mode, the display will show WX and the channel number. The
channel can be changed using the SEEK / buttons; the up/down buttons
can also be preset to the pushbuttons.
The frequencies associated with each channel are as follows:
1. 162.400 Mhz 5. 162.500 Mhz
2. 162.425 Mhz 6. 162.525 Mhz
3. 162.450 Mhz 7. 162.550 Mhz
4. 162.475 Mhz
The National Weather Service operates approximately 372 stations. Nearly 90
percent of the nation’s population is within listening range of an NOAA Weather
Radio broadcast.
Using the Compact Disc Player/USB
The integrated CD player plays full size CDs, MP3 and WMA discs.
Playing a Compact Disc
1. Turn the ignition and receiver on.
2.
Insert a disc part
w
a
y into the slot, label-side up.
The player will
automatically pull the disc in once it has been partially inserted.
52
2. Nombre de la canción
3. Nombre del álbum
La información sobre el CD, incluidos los títulos de la pista y del disco, se
muestra cuando se comienza a reproducir una pista. Si existe más información
de la que puede aparecer en la pantalla al mismo tiempo, la pantalla avanzará
cada 2 segundos hasta que se haya mostrado toda la información.
NOTA: Cuando se inserta un CD de audio en el reproductor de CD, el receptor
mostrará CD READING hasta que se reproduzca la primera pista. Luego, se
mostrará el número de pista, el tiempo transcurrido y el CD.
Si presiona el botón RPT, la radio mostrará el ícono RPT. Si vuelve a
presionarlo, la pantalla eliminará el ícono RPT.
Si presiona el botón RDM, la radio mostrará el ícono RDM. Si vuelve a
presionarlo, la pantalla eliminará el ícono RDM.
Si presiona el botón PAUSE/PLAY, la radio mostrará PAUSE. Si vuelve a
presionarlo, regresará a la pantalla anterior y continuará reproduciendo el CD.
Pantallas de modo MP3/USB/iP
od
Cuando reproduce archivos MP3 o WMA, presione el botón “I Title/Menu” para
alternar entre diferentes vistas de pantalla:
1. Número de pista
2. Nombre del artista
3. Nombre de la canción
4. Nombre del álbum
5. Nombre de PLST/carpeta
La información, incluidos el título de la pista y el nombre del artista, se muestra
cuando se comienza a reproducir una pista. Si no existe información disponible,
entonces la radio mostrará campos en blanco. Si existe más información de la
que puede mostrarse en la pantalla al mismo tiempo, la pantalla avanzará cada
2 segundos hasta que se haya mostrado toda la información.
NOTA: Cuando se inserta un disco de MP3 o WMA en el reproductor de CD,
se mostrará CD READING hasta que se reproduzca la primera pista. Cuando
se conecta un pen drive o un iPod en el conector USB, se mostrará USB
READING o iPod READING hasta que se reproduzca la primera pista. Luego,
aparecerán el tipo de archivo y el tiempo transcurrido. Posteriormente, el
número de archivo/pista, artista, canción, nombre de lista de
reproducción/carpeta y álbum aparecerán en la segunda fila de la pantalla.
Si se presionan las carpetas o la radio mostrará la carpeta y el
número de pist
a. Luego, comenzará a mostrar el número de pist
a/arc
hiv
o,
artista, canción, nombre de lista de reproducción/carpeta y álbum en la
segunda fila de la pantalla antes de regresar a la pantalla predeterminada.
Si presiona RPT una vez, se mostrará REPEAT TRACK y el icono RPT se activará.

16
C
D READING and the CD icon will appear on the display followed by the
track number and elapsed time. Then, the disc will begin to play.
3. If you are listening to FM/AM/WX radio, press the SRC button to play a CD
that has been loaded into the player. If no CD has been loaded, the option
will not be available and the radio will access the next available source. If no
sources are available, the radio will remain on REAR AUX. If a CD has been
loaded, the CD icon remains on until the CD has been ejected. CD
READING will appear followed by the track number and the elapsed time.
If a CD is ejected and not removed within 15 seconds, the CD will reload but
will not start playing until the SRC button is pressed.
Button Functions
SEEK :
Press for less than 2 seconds to forward to the next track. Press
and hold the button to fast forward. When you release the button, the track will
continue to play.
SEEK : Press for less than 2 seconds to go to the beginning of the current
track. If pressed within the first 10 seconds of the track, the radio goes to the
previous track. Press the button again within the first second to go to the
beginning of the previous track. Press and hold the button to fast reverse. When
you release the button, the disc will begin to play.
2/PAUSE/PLAY: Press the PAUSE/PLAY button to pause a CD. PAUSE will be
displayed and the audio will be muted. Press PAUSE/PLAY again to resume
playing.
4/RPT: Press the RPT button to repeat the track you are playing. When “Track
Repeat” is on, the RPT icon will be on, and the track you are playing will be
repeated until you press the RPT button again.
5/RDM: Press the RDM button to activate random track selection. RDM icon on
the display indicates that tracks on the loaded disc will be played randomly until
the RDM button is pushed again.
TRACK SCAN: Press SCAN/PSCAN for less than 2 seconds to scan the tracks
on a disc. After playing 8 seconds of the current track, the radio will go to the
next track. When all tracks on the disc have been scanned, the SCAN ends and
playback begins with the first track in the SCAN. Press SCAN again to
deactivate.
EJECT: Press the button to eject a CD.
Playing an MP3 Disc/USB
The MP3 player will play files recorded on a CD-R up to 700 MB or on a USB
stic
k of up to 1 GB
. Files can be recorded at a v
ariable bit rate or the f
ollo
wing
51
2. Sintonice su radio en el canal 0 y aparecerá el número de serie de 8 dígitos.
Si su proveedor de radio satelital es Radio satelital Sirius:
1. Con la radio y el contacto encendidos, presione el botón BAND y
seleccione SR1, SR2 o SR3.
2. Sintonice su radio en el canal 0 y aparecerá el número de serie de 12 dígitos.
Cuando el usuario intenta sintonizar un canal que actualmente no forma parte
de los canales de emisión disponibles de la Radio satelital Sirius, la radio
mostrará INVALID CHANNEL durante 3 segundos y volverá al canal anterior.
NOTA: Es posible que la recepción de la radio satelital disminuya debido a la
obstrucción de la señal satelital.
Funciones del receptor de radio general
Su equipo está equipado con:
– Dos bandas de FM con un total de 12 FM predeterminadas
– Una banda de AM con 6 AM predeterminadas
– Tres bandas satelitales con un total de 18 satélites predeterminados
– Una banda meteorológica con 6 WX predeterminadas
Cómo encender el equipo
Con el contacto encendido, el receptor se puede encender y apagar
presionando el botón . Si presiona los botones ON/AUDIO y BAND también
enciende el receptor.
Cómo regular el volumen
Para subir el volumen, gire el botón ON/AUDIO en sentido horario. Para bajar el
volumen, gire el botón en sentido antihorario.
Temporizador de una hora
Con el contacto apagado, si presiona el botón u ON/AUDIO, el receptor se
encenderá y se activará el temporizador de una hora. El receptor se apagará
después de una hora. Si presiona el botón u ON/AUDIO nuevamente, se
reactiva el temporizador de una hora.
Pantalla
El receptor mostrará la hora del día cuando esté apagado. Si presiona el botón
“i Title/Menu” cuando el receptor está encendido, puede alternar entre
pantallas (es decir, información sobre la reproducción de la canción actual),
dependiendo del modo en el que se encuentre.
P
antallas de modo de radio
Cuando utiliza la radio, presionar el botón “i Title/Menu” no tendrá ningún efecto.
Pantallas de modo de CD
Cuando utiliza el reproductor de CD
, presione el botón
“i Title/Menu” para
alternar entre dif
erentes vist
as de pant
alla:
1. Nombre del artista

17
fixed-bit rates: 32 kpbs, 40 kpbs, 64 kpbs, 80 kpbs, 96 kpbs, 112 kpbs, 128
kpbs, 160 kpbs, 192 kpbs, 224 kpbs, 256 kpbs, and 320 kpbs. Both single and
multi-session discs will play. Song title, artist name and album are available
when discs are recorded using ID3 tags, versions 1 and 2.
Files supported on USB sticks: MP1, MP2, MP3 (VBR) , WMA (ver 9 and VBR)
and ACC (MPEG4 and M4A).
Your MP3 player is able to read and play a maximum of 50 folders and playlists.
Long files, folders or a combination can reduce the number of files and folders
that can be played. If you want to play a large number of files or folders,
minimize the length of the files and folders. You can also play an MP3/WMA
recorded without file folders. The system can support up to 11 levels of folder
nesting. If a disc contains more than 50 folders or 11 folder levels, your player
will only let you access and navigate the maximum number and will ignore
additional items.
Root Directory
The root directory is treated as a folder. If the root directory has compressed
audio files, the directory is displayed as ROOT. All files contained directly under
the root directory are accessed prior to any root directory folders.
Empty Directory or Folder
If there is a root directory or folder in the file structure that contains empty
folders/subfolders, play advances to the next folder in the file structure that
contains compressed audio files. The empty folder will not be displayed or
numbered.
No Folder
When a disc contains only compressed files, the files are located under the root
folder. The next and previous folder functions have no function on a CD recorded
without folders. When displaying the name of the folder, the radio displays
ROOT.
File Name Display
A song title is displayed when contained in the ID3 tag. Titles longer than 8
characters scroll at a rate of 8 characters every 2 seconds until the entire name
is shown.
Playing MP3 Files
Insert a disc partway into the slot, label-side up. The player will pull it in, CD
READING and the CD icon will appear on the display and the CD will begin
playing. The type of file, elapsed time and the track number will be displayed.
Play begins from the first track and continues sequentially through all tracks.
After playing the last track of the last folder, play continues at the first track of
the first folder or root directory.
Insert a USB stick fully into the slot. USB READING will appear on the display,
and the USB will begin playing. The type of file, elapsed time and the track
50
Para subir el volumen, gire el botón ON/AUDIO en sentido horario.
Para bajar el volumen, gire el botón ON/AUDIO en sentido antihorario.
8. Presione el botón OK nuevamente para finalizar y regresar la pantalla al
funcionamiento normal. El ícono de ALARM aparecerá en la pantalla para
indicar que la alarma está activa.
NOTA: Si no presiona ni gira ningún botón dentro de los 8 segundos durante el
proceso de configuración de la alarma, se cancelará la configuración del reloj de
alarma y la radio regresará a su funcionamiento normal, conservando todos los
cambios de configuración que se hayan realizado.
Cómo apagar la alarma
Cuando se activa la alarma, mantenga presionado el botón CLOCK/ALARM hasta
que desaparezca el ícono de ALARM de la pantalla.
Si no apaga la alarma, se apagará automáticamente después de 63 minutos. La
radio regresará al modo (encendido o apagado) en que estaba antes de que se
apagara la alarma.
Cómo activar la repetición de alarma
Para utilizar la función SNOOZE, presione cualquier botón durante menos de 2
segundos cuando suene la alarma. Se mostrará SNOOZE durante 3 segundos y
la alarma se postergará durante 9 minutos. Si presiona cualquier botón durante
estos 3 segundos, la radio regresará al modo en que estaba antes de que sonara
la alarma.
Servicio de radio satelital (opcional y sólo para los EE. UU. y Canadá)
Cuando aparece el logotipo XM
®
, SIRIUS
®
o radio SAT sobre el botón ON/AUDIO
de su radio, significa que su equipo es compatible con radio satelital. XM y Sirius
son servicios de radio satelital que ofrecen más de 100 canales de programación
de audio de calidad digital y se pueden escuchar sin interrupciones por todos los
Estados Unidos contiguos. Se requiere un costo por el servicio para recibir
emisiones satelitales. Para obtener más información, comuníquese con XM en
www.xmradio.com o por teléfono al 1-800-852-XMXM (9696) o con Sirius en
www.sirius.com o por teléfono al 1-888-539-7474.
Cómo activar la radio satelital (Opcional)
Para aprovechar esta función, debe comprar una suscripción mensual de radio
satelital. Si aparece XM en su radio, ésta es compatible con la Radio satelital XM
y necesitará una suscripción a XM. Si aparece Sirius en su radio, ésta es
compatible con la Radio satelital Sirius y necesitará una suscripción a Sirius.
Para activar el receptor satelital externo o integrado, debe proporcionarle a su
proveedor de radio satelital el número de serie electrónico del receptor satelital.
P
ara encontrar el número de serie electrónico, complete las siguientes
instrucciones.
Si su proveedor de radio satelital es Radio satelital XM:
1. Con la radio y el contacto encendidos, presione el botón BAND y seleccione
XM1, XM2 or XM3.

1
8
n
umber will be displayed. Play begins from the first track and continues
sequentially through all tracks. After playing the last track of the last folder, play
continues at the first track of the first folder or root directory.
Button Functions
SEEK :
Press for less than 2 seconds to forward to the next track. Press
and hold the button to fast forward. When you release the button, the track will
continue to play.
SEEK : Press for less than 2 seconds to go to the beginning of the
current track. If pressed within the first 10 seconds of the track, the radio goes
to the previous track. Press the button again within the first second to go to the
beginning of previous track. Press and hold the button to fast reverse. When you
release the button, the track will continue to play.
2/PAUSE/PLAY: Press the PAUSE/PLAY button to pause a track. PAUSE will be
displayed and the audio will be muted. Press PAUSE/PLAY again to resume
playing the track.
4/RPT: Press the RPT button once to repeat the current file. The RPT icon &
REPEAT TRACK will appear on the display. The same file will continue to play
until the RPT button is pressed again. If RPT is pressed a second time REPEAT
FOLDER/PLST will appear on the display and the RPT icon will remain turned
on. The same folder/playlist will continue to play until the RPT button is pressed
again. If RPT is pressed a third time, REPEAT OFF will appear on the display.
The function will be off and the RPT icon will turn off. Then the display returns to
its default.
5/RDM: Pressing the RDM button activates random folder/playlist. The RDM
icon on the display indicates that this feature is on. To cancel RANDOM
FOLDER/PLAYLIST or RANDOM ALL, press the RDM button again to reach
RANDOM OFF.
RANDOM FOLDER/PLAYLIST: Press the RDM button once to play MP3 files
within a folder/playlist randomly.
RANDOM ALL: Press the RDM button a second time to play MP3 files on a
media device randomly.
FOLDER SCAN: Press the SCAN/PSCAN button for less than 2 seconds to scan
files within a folder. After playing 5 seconds of the first MP3 file in the current
folder, the radio will go to the next file. When all of the files within the folder
have been scanned, normal play resumes with the first file scanned.
SCAN FOLDERS: Press the SCAN/PSCAN button for more than 2 seconds to
scan all the folders on a device. When all folders have been scanned, normal
pla
y resumes with the MP3 file that w
as scanned first.
se configura en la hora que ha seleccionado. El reloj se muestra cuando el
contacto está encendido y la radio está apagada. Cuando la radio y el contacto
están apagados, la pantalla está en blanco.
Cómo utilizar la alarma
La alarma activa la radio a una hora determinada. Si presiona el botón
CLOCK/ALARM durante más de 2 segundos, se mostrará la hora configurada de
la alarma durante 3 segundos.
Cómo configurar la alarma
1. Con la radio encendida, mantenga presionado el botón “i Title/Menu”
durante más de 2 segundos hasta que aparezca el menú. Esto indica que
se encuentra en el modo de menú.
2. Gire el botón ON/AUDIO o presione los botones UP/DOWN para cambiar a
SET ALARM. Presione el botón OK para ingresar al submenú de la alarma.
3. Presione el botón OK para encender o apagar a alarma. El ícono de la
alarma se encenderá cuando se active la alarma. Gire el botón ON/AUDIO
o presione los botones UP/DOWN para cambiar a SET TIME y presione el
botón OK. Los dígitos de la hora para la alarma comenzarán a destellar. El
formato será el mismo que configuró para el reloj (modo de 12 ó 24 horas).
4. Gire el botón ON/AUDIO o presione los botones UP/DOWN para cambiar
la hora. Si gira el botón hacia la derecha o presiona el botón UP, la hora
aumentará. Si gira el botón hacia la izquierda o presiona el botón DOWN,
la hora disminuirá.
5. Presione el botón OK para que los dígitos de minutos destellen. Gire el
botón ON/AUDIO o presione los botones UP/DOWN para cambiar los
minutos. Si gira el botón hacia la derecha o presiona el botón UP, los
minutos aumentarán. Si gira el botón hacia la izquierda o presiona el botón
DOWN, los minutos disminuirán.
6. Presione el botón OK para configurar la hora de la alarma. Luego, se le
solicitará que seleccione entre SET MUS (Música) o SET TONE. Presione el
botón OK para seleccionar.
NOTA: Si selecciona SET TONE, la alarma sonará en un tono de prioridad medio
durante 2 minutos antes de cambiar a un tono de prioridad alta constante.
Si selecciona SET MUS, el sonido de la alarma será lo que estaba escuchando
cuando apagó la radio. Por ejemplo: si estaba escuchando FM, la alarma que
escuche será la emisora de FM que escuchó la última vez. Si dicha emisora ya
no está disponible, la alarma sonará en un tono de prioridad medio durante 2
minutos antes de cambiar a un tono de prioridad alta. Si estaba escuchando una
entrada AUX, un CD u otro medio y ya no está disponible la entrada AUX o el
CD, la alarma encenderá la radio en su lugar.
7
.
Presione el botón OK nuevamente para configurar el volumen de la música
o el tono de la alarma. Cuando presiona el botón OK, aparecerá VOLUME y
escuc
hará el v
olumen real del tono o la música, lo que ha
y
a seleccionado.
49

1
9
::Press the button for less than 2 seconds while playing an MP3 file to
find the previous folder on the disc.
Home Jump: Press the button for more than 2 seconds while playing an
MP3 file to start playback at the first file in the first folder.
::Press the button for less than 2 seconds while playing an MP3 file to
find the next folder on the disc.
End Jump: Press the button for more than 2 seconds while playing an MP3
file to start playback at the first file in the last folder.
EJECT: Press the button to eject a disc.
To remove a USB device simply pull the device out of the USB port. The radio
will return to its previous mode/source.
Using an iPod
®
The radio is capable of controlling and playing music from an iPod. We
recommend not connecting the 3G iPhone or iPod Touch to the radio.
Playing an iPod
Insert the iPod USB cable connector to the radio USB connector (the other end
connected to your iPod). iPod READING will appear on the display. Insert the
3.5mm audio cable connector to the radio aux input jack connector (the other
end connected to your iPod 3.5mm audio jack connector). If the audio cable is
not connected the radio will display FRONT AUX JACK UNPLUGGED. After all
the connections have been made and the radio has finished reading the iPod,
the iPod will begin playing. The elapsed time and the track number will be
displayed. Play begins from current track played on iPod and continues
sequentially through all tracks from the iPod’s last selected mode. After playing
the last track of the iPod’s last selected mode, play stops and the radio will
display the iPod Menu.
Button Functions
SEEK : :
Press for less than 2 seconds to forward to the next track. Press
and hold the same button to fast forward. When you release the button, the
track will continue to play.
SEEK : : Press for less than 2 seconds to go to the beginning of the current
track, if pressed within the first 10 seconds of the track, the radio goes to the
previous track. Press the button again within the first second to go to the
beginning of previous track. Press and hold the same button to fast reverse.
When y
ou release the but
ton, the trac
k will continue to pla
y
.
ADVERTENCIA DE DAÑO VEHICULAR
En el presente manual, encontrará los siguientes avisos:
En el área de AVISO, se le informa de algo que puede dañar su vehículo. Es
posible que muchas veces este daño no esté cubierto por su garantía y podría
ser costoso. El aviso le indicará qué hacer para evitar los daños.
NOTA: Es posible que otros manuales utilicen la sección AVISO de forma diferente.
INSTRUCCIONES DE FUNCIONAMIENTO
Para sacar el máximo provecho de su receptor Delphi, lea todas las
instrucciones a continuación.
Cómo utilizar el reloj
El reloj puede funcionar en modo de 12 ó 24 horas. El modo de 12 horas
distingue entre a.m. y p.m. El modo de 24 horas funciona como la hora militar.
Cómo configurar el reloj
1. Encienda el contacto del vehículo.
2. Mantenga presionado el botón “i Title/Menu” durante más de 2 segundos
hasta que aparezca el menú. Esto indica que se encuentra en el modo de
menú.
3. Presione el botón OK para ingresar al submenú del reloj.
4. Presione el botón ON/AUDIO o los botones UP/DOWN para cambiar a
SET TIME. Presione el botón OK para ingresar al modo de configuración.
5. Gire el botón ON/AUDIO o presione los botones UP/DOWN para cambiar
entre el formato de 12 ó 24 horas. Presione el botón OK para seleccionar
uno.
6. La pantalla cambia a configuración del reloj, con lo cual los dígitos de la
hora destellan. Gire el botón ON/AUDIO o presione los botones UP/DOWN
para cambiar la hora. Si gira el botón hacia la derecha o presiona el botón
UP, la hora aumentará. Si gira el botón hacia la izquierda o presiona el botón
DOWN, la hora disminuirá.
7. Presione el botón OK para que los dígitos de minutos destellen. Gire el
botón ON/AUDIO o presione los botones UP/DOWN para cambiar los
minutos. Si gira el botón hacia la derecha o presiona el botón UP, los
minutos aumentarán. Si gira el botón hacia la izquierda o presiona el
botón DOWN, los minutos disminuirán.
Si en cualquier momento del proceso no presiona ni gira un botón dentro de los
8 segundos, se cancelará el modo de configuración de la hora, la radio regresará
a su funcionamiento normal y conser
v
ará todos los cambios de configuración
que se hayan realizado. Si presiona los botones de encendido o banda, el reloj
AVISO:
Esto significa que hay algo que podría dañar su vehículo.
48
La page est en cours de chargement...
La page est en cours de chargement...
La page est en cours de chargement...
La page est en cours de chargement...
La page est en cours de chargement...
La page est en cours de chargement...
La page est en cours de chargement...
La page est en cours de chargement...
La page est en cours de chargement...
La page est en cours de chargement...
La page est en cours de chargement...
La page est en cours de chargement...
La page est en cours de chargement...
La page est en cours de chargement...
La page est en cours de chargement...
La page est en cours de chargement...
-
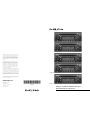 1
1
-
 2
2
-
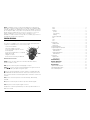 3
3
-
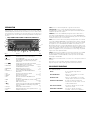 4
4
-
 5
5
-
 6
6
-
 7
7
-
 8
8
-
 9
9
-
 10
10
-
 11
11
-
 12
12
-
 13
13
-
 14
14
-
 15
15
-
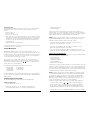 16
16
-
 17
17
-
 18
18
-
 19
19
-
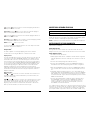 20
20
-
 21
21
-
 22
22
-
 23
23
-
 24
24
-
 25
25
-
 26
26
-
 27
27
-
 28
28
-
 29
29
-
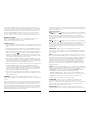 30
30
-
 31
31
-
 32
32
-
 33
33
-
 34
34
-
 35
35
-
 36
36


Delphi DEA355 Le manuel du propriétaire
- Catégorie
- Lecteur CD
- Taper
- Le manuel du propriétaire
dans d''autres langues
- English: Delphi DEA355 Owner's manual
- español: Delphi DEA355 El manual del propietario
Documents connexes

Autres documents
-
iLuv SmartShaker Guide de démarrage rapide
-
Sangean WR-3 Mode d'emploi
-
 ASA Electronics 4341228 Le manuel du propriétaire
-
-
Jensen VOYAGER VM9022 Le manuel du propriétaire
-
Clarion M303 Le manuel du propriétaire
-
Clarion M508 Guide d'installation
-
-
Clarion CMD8 Manuel utilisateur
-
