Ansmann Racing xBase 2.0 Deluxe Manuel utilisateur
- Catégorie
- Chargeurs de batterie de voiture
- Taper
- Manuel utilisateur

www.ansmann-racing.com
Intelligent Digital Balance
Charger xBase 2.0 Deluxe
Instruction Manual
Bedienungsanleitung
Mode d’emploi
ANSMANN AG
Division Racing
Thomas-Mann-Straße 63
D-90471 Nürnberg • Germany
Service Kontakt:
ANSMANN AG
Service
Industriestraße 10
D-97959 Assamstadt • Germany
Tel. +49 (0) 62 94 / 42 04-34

Instruction Manual2
Intelligent Digital Balance Charger
xBase 2.0 Deluxe
Instruction Manual
1. Special features ................................................2
2. Performance parameter ......................................2
3. Exterior and accessories ......................................3
4. Key features .....................................................3
5. Operating instructions ........................................3
6. Warning and error messages .............................. 11
7. Safety messages ............................................. 12
8. After-sale service and guarantee.......................... 12
1.1 This charger employs an advanced charging calculation and
design, which allow multilayer error to be compatible.It can
create a safe charging condition and maximum reduce the
danger caused by negligence or setting error of user.
1.2 This item adopt prevalent synchronous buck & boost converter
technology ,this makes conversion efficiency up to 90%.
1.3 Accept all types of R/C batteries:
Lipo, LiIo, LiFe, NiMH, NiCd, Pb.
1.4 Simple and efficient user interface makes operation easy, with
powerful function and abundant content. Real-time shows you
the battery voltage, charge current, temperature of batteries,
capacity of charge/discharge, elapsed time, input voltage etc.
Therefore, you can inquire the present state and establish
various safety-limited parameters conveniently.
1.5 This charger uses an individual-cell-voltage balancer to
maintain your pack in balance while charging/discharging.
During the process,it can monitor and balance each cell of the
pack individually (Tolerance ± 0.01 V).
1.6 Accepts individual battery charging/discharging, so you can
extend the scope of application of the charger. That is equally
useful for the DIY battery.
1.7 Various of charging modes to meet different demands:
charging-auto/balance charging/fast charging/storage and
cyclic charging etc.
1.8 For users convenience it can store and load maximum five
data of different batteries. You can establish the data contains
program setting of the battery to charge or discharge
continually. These data can be called out at any time you need
and the process can be executed without program setting.
1.9 Perform 1 - 5 cycles of charge>discharge or discharge>charge
continually for NiMH/NiCd refreshing.
2.1 Input voltage range DC: 11∼18.0 V
AC: 100∼240 V
2.2 Charge current range 0.1∼6.0 A
2.3 Discharge current range 0.1∼2.0 A
2.4 Charge power limited max.80 W
2.5 Discharge power limited max.10 W
2.6 Balance current max. 300 mA
2.7 Balance tolerance +0.01 V
2.8 NiCd/NiMH battery cell count 1∼18 cells
2.9 Lithium battery types Lipo, Li-ion,LiFe
2.10 Lithium battery cell count 1 - 6 series
2.11 Pb battery voltage 2 - 24 V
2.12 Weight 640 g
2.13 Dimensions 145 x 145 x 56 mm
1.10 You can connect a high-precision digital temperature sensor to
protect the charger works in a safety temperature.
Once a battery reaches the maximum temperature you set
during charge/discharge, the process will be terminated to
protect the battery. This is very important for NiMH/NiCd
(separately purchased temperature sensor).
1.11 For technical experts, this charger offers a PC based program,
that can analyse the characteristics of the battery by USB port.
It shows a graph of voltage, current, capacity and temperature
curves. And it also shows the individual voltage of each cell in
the Lithium battery pack.
*Separately purchased program kit.
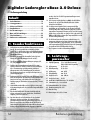
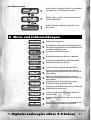
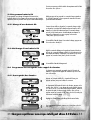
1. Special features
2. Performance
parameter
Content

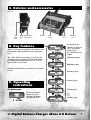
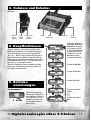
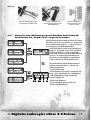
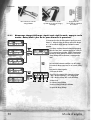
3. Exterior and accessories
a
ccessor
i
e
s
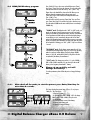
Digital Balance Charger xBase 2.0 Deluxe
3
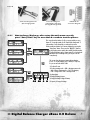
“Mode/Esc” Mode selection/stop/back button. Press this key to select
in the mainmenu or back to the mainmenu, and to stop during the
process.
“Dec. </INC >” Reduce and increase button, you can browse other
concerning informations by this button during the charge/discharge
process.When you are setting parameters, press “Dec. <” key for
reduce, and “INC >” key for increase.
“Enter/Start”
Select/enter button, to start work by press it more than
2 seconds.
DC
input
port
USB
port
Button Output
port
LCD
screen
Balance
port
Temperature
server port
This shows you the type of
charger for 2 sec, press
“Enter/Start” into the main
menu after self-check OK.
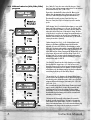
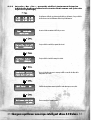
4. Key features
5. Operating
instructions
User set program, press
“Mode/Esc” key down, and
“DEC <”
key upward for
circulatory choose.
Press “Enter/Start”
key into
submenu.
Lithium battery program.
NiMH battery program.
NiCd battery program.
Pb battery program.
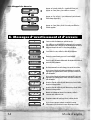
Picture A
Save data program.
Load data program.
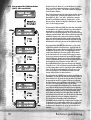
5.1 Main menu

Instruction Manual4
Tips: Please set up correctly in the “user set“ menu before you go into
the job for the first time you use it.
Press “Enter/Start”
key to the first screen on the left, then press
“Mode/Esc” key to enter the into the parameter setting menu.
You can switched at the same level menu by “Dec. </INC >” key.
Please refer to the detailed flow chart on the left.
When you are willing to alter the parameter value in the program,
press “Enter/Start”
key to make it blink, then change the value with
“Dec. </INC >” key.
The value will be stored by press “Enter/Start”
key once.
This charger can accept three types of Lithium batteries: LiPo/LiIo/
LiFe; you have to check the battery carefully and set it up cor-
rectly, or it will cause an explosion! (Please refer to the chart A).
This charger can recognise the cell count of Lithium battery
automatically at the beginning of the charge or discharge process
to avoid from erroneous settings by the user. But deeply discharged
batteries can be perceived incorrectly. To prevent the error, you can
set the time term to verify the cell count by the processor. (See the
screen
A0
).
Normally, 10 minutes are enough to perceive it correctly. For the
battery of larger capacity, you may extend the time term, and for the
battery of smaller capacity, you may reduce the term or use with the
default value.
A1 A2
Show the trigger voltage for automatic charge termination
of NiMH and NiCd battery (V), the effective value ranges from 5 to
20 mV per cell. If V is set higher, there is a danger of overcharging
the battery; if it is set lower, there is a possibility of premature
termination. Please refer to technical specifications of the battery.
(NiCd: 12 mV, NiMH: 7 mV).
Tips: If the voltage of the charging battery is lower than
2.5 V, V may can not be perceived, this will cause a danger
of discharge.You can connect a temperature sensor or use the
charger current above 1C to avoid it.
There is a 3-pin port on the left side of the unit. It can be used as
a temperature sensor port or USB port. If the port is assigned as a
temp. port, you can use an optional temperature probe to contact
the surface of battery (see the screen
A3
), and you can set the
maximum temperature at which the danger should allow the battery
to reach during charge, once a battery reaches this value the process
will be terminated to protect the battery. When it is selected as an
USB port, you can connect the charger to your PC with an optional
USB cable. This can utilize the optional software that can show you
the charge process at PC (see the screen
A4
).
5.2 Initial parameter set up

Digital Balance Charger xBase 2.0 Deluxe
5
When NiMH or NiCd battery is on the cyclic process of charge/
discharge, it can often become warm. The program insert a time
delay to occur after each charge and discharge process to allow the
battery adequate time to cool down before being subjected to the
next process (see the screen
A5
) the value ranges from 1 to 60
minutes. If you are not sure,you can set it over 10 minutes.
The charger will automatically supply the trickle function to achieve
the full charge with out overheating the battery after fast charge has
been teminated. You can alter the trickle value when the charger
shows you the screen
A6
.
When you start a charge process, the integral safety timer automati-
cally starts running at the same time. This is programmed to prevent
overcharge the battery if it proves to be faulty, or if the termination
circuit cannot detect the battery full
A7
. Shows you this program
can be on or off, and you can set the maximum safety time, the
value ranges from 10 to 720 min. As the same principle,there is a
maximum-capacity-limited function. See
A8
, the value ranges from
10 to 20000 mAh.
At the screen
A9
you can set the audible sounds to be on or off by
this program.
When you use the car battery to supply power for charger, screen
A10
shows you this program monitors the voltage of input DC battery.
If the voltage drops below the value you set the operation forcibly
terminated to protect the input battery.
You can adjust the brightness of LCD screen at the charger(see
A11
).
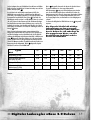
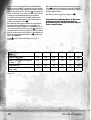
Please refer the information below
(chart A), and select the correct
parameter for each battery, or it will
cause a serious result!
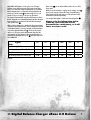
Types
Item
Lipo Lilo LiF e NiMH NiCD Pb
Standard voltage (V/cell) 3.70 3.60 3.30 1.20 1.20 2.00
Max. charge voltage cut off level (V/cell) 4.20 4.10 3.60 1.60 1.60 2.45
Allowable fast current <1C <1C <4C <2C <2C <0.4C
Min. discharge voltage cut off level (V/cell) >3.00 3.00 2.00 1.00 0.85 1.75
Chart A

Instruction Manual6
5.3 Lithium batteries (Lilo/LiPo/LiFe)
program
Press “Mode/Esc”
key to the screen on the left, then press “Enter/
Start”
key to enter into the parameter setting menu. You can switch at
the same level menu by “Dec. </INC >” key.
Please refer to the detailed flow chart on the left. When you are
willing to alter the parameter value in the program, press “Enter/
Start”
key to make it blink, then change the value with the key.
The value will be stored by pressing “Enter/Start”
key once.
Then press “Enter/Start”
key for more than 2 seconds to start the
process.
“AUTO charging“ this is for individual Lithium battery or some special
battery pack without balance port or cell count. The left side of the
first line shows the type of battery you select at the user setting. The
right side of the first line shows you the mode of charge. The value
on the left side of second line sets a charge current and the value on
the right side of second line sets the cells count of the battery. The
definition of the following screens are all the same. (To know how to
connect, plesase refer to picture B).
“Balance charging” this is for 2 - 6 cells of Lithium battery with
balance port, the battery pack being charged should have the
individual cell connect, and connect it to the individual port at the
right side of the charger with a suitable connection cable that fits with
your battery pack (see picture B). In this mode, the charging process
will be different from ordinary charging mode. The internal processor
of the charger will monitor and control the voltage of each cell of
the battery pack. This can improve the discharging performance of
the battery! EV charger use the optimised calculation to control the
tolerance in the range of ± 0.01 V!
“Fast Charging” select this mode to finish charging process earlier.
Principle: When the current down to 1/5 of the current you set
during the CV term, it will stop the process and eliminate the forcible
requirement of the balance precision. (Whether it is been connected
to the balance port), the charging capacity may be a bit smaller than
normal charging but the process time will be reduced.
“Storage mode” this is for charging or discharging Lithium battery
not to be used for the time being. In order to reduce the wastage, you
can select this mode to remain the power to 40% to store. The final
voltage are different from the type of the battery, LiIo: 3.75 V; LiPo:
3.85 V; LiFe: 3.3 V.
This is an intellective program. If the voltage of battery at its initial
stage is over the voltage level to storage, the program will start
to discharge,and if it is lower, the program will start to charge
automatically. In order to ensure each battery meets the demand,
the individual plug of the battery pack should be connected to the
individual port of the charger.
“Discharge mode” theoretically, Lithium battery do not need to
discharge, especially deep-discharge. This feature is to ensure the
power wastage of the Lithium battery over 90%, to avoid the over-
charge of the individual battery. You should connect the balance plug
of the battery to the charger, and the current may not exceed 1C.

Digital Balance Charger xBase 2.0 Deluxe
7
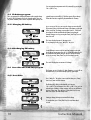
5.3.1 Start to charge/discharge: after set up the mode menu correctly,
press “Enter/Start” key for more than 2 seconds to start the process.
Picture B
This screen shows the number of cells you set up and the processor
detects.“R“ shows the number of cells found by the charger and “S“
is the number of cells selected by you at the previous menu.
If both number are identical you can start charging by pressing the
“Enter/Start”
button. If not, press the “Mode/Esc”
button to
go back to the previous menu, then carefully check the number
of cells of the battery pack to charge again. If you had selected
the AUTO mode or discharge mode, you can pass over this
screen directly.
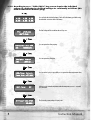
This screen shows the present situation during charging
process. To stop the charging, press “Modus/Esc“ key once;
As you can see in the sketch on left.
① for the cell count
② for the operating mode •CHG = charging at auto mode
• BAL = balance charging mode • FAS = fast charging
• STO = storage mode • DSC = discharge mode
③ elapsed time
④ charge/discharge current
⑤ charge/discharge voltage of battery
⑥ capacity of charge/discharge.
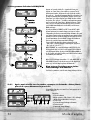
Connection diagram in the
Auto charging mode
Connection diagram
in the balance charging
/storage/discharge mode
Individual cell
connection diagram

Instruction Manual8
5.3.2 According to press “ DEC </INC >” key you can inquire the individual
voltage of each batteries and final voltage etc. continually as follows (this
need to connect the balance plug).
You can check the individual voltages of each cell in the battery pack while using
the individual connection cable to the battery.
The final voltage will be reached at the end of process.
You can inquire the safety capacity.
You can inquire the safety time.
You can use the 3-pin port as an USB port or inquire the safety temperature value.
It shows you the external temperature when the temperature sensor is connected,
you can inquire.
This shows the present voltage of input power.

Digital Balance Charger xBase 2.0 Deluxe
9
5.4 NiMH/NiCd battery program
5.4.1 After check all the mode, to start the process press Enter/Start key for
more than 2 seconds.
Press “Mode/Esc” key to the screen on the left,then press “Enter/
Start”
key to “Enter/Start” into the submenu. You can switch at the
same the level menu to select the mode by “Dec. </INC >” key.
Please refer to the detailed flow chart on the left. When you are
willing to alter the parameter value in the program, press
“Enter/Start” key to make it blink, then change the value with
“Dec. </INC >”
key.
The value will be stored by pressing “Enter/Start” key once. Then
press “Enter/Start” key for more than 2 seconds to start the process.
Since the menu of NiMH are the same as NiCd, there is an example
of NiMH only.
“CHARGE“ mode: The default mode is “AUT”. In “AUT“ mode, you
need to set the upper limit of charge current to avoid from higher
feeding current that may damage the battery. Because some batteries
of low impedance and small capacity can lead to the higher charge
current by the processor at automatic charge mode. But in “Man“
mode, it will charge the battery with the charge current you set at the
display. Each mode can be switched by pressing start/enter key, when
the current field is blinking, press “Dec. </INC >” key for more than
1 second.
“DISCHARGE” mode: The discharge current ranges from 0.1 A to
5.0 A and the final voltage ranges from 0.1 to 25.0 V. The operating
method is similar as Lithium battery. The final voltage of NiMH
battery is 1.0 V/cell, and the NiCd is 0.85 V/cell, please refer the
recommend by the battery of manufacturer.
“CYCLE” mode: This charger can perform 1 - 5 cycles of DCHG >
CHG or CHG > DCHG continually. You can select it for the new NI**
battery or the long-term placement NI** battery.
Please set up carefully, or it will
damage the battery!
To set the parameters please follow the previous charge/discharge
menu.
The screen displays the present state of process. To stop it press
“Mode/Esc.” key. Description:
① the type of battery •
② operating mode: CHG = charge •DSC = discharge •
DCHG > CHG or CHG > DCHG = the cycle mode
③ elapsed time
④ charge/discharge current of the battery
⑤ voltage of the battery pack
⑥ capacity of charge/discharge

Instruction Manual10
You can inquire the temperature and V continually by pressing the
“Dec. </INC >”
key.
5.5 Pb battery program
5.5.1 Charging Pb battery
5.6 Save data and load data program
5.6.1 Save data
5.5.2 Discharging Pb battery
This is programmed for charging Pb batteries with nominal voltage
from 2 to 24 V. Pb batteries can not be charged rapidly. They can
only deliver relatively lower current compared to their capacity. The
optimal charge current will be 1/10 of the capacity. Please always
follow the instructions supplied by the manufacturer of battery.
As you can see on left, you can set up the charge current on the left.
The nominal of the second line and voltage of the battery on the right
of the second line. The charge current ranges from 0.1 - 10.0 A and
the voltage should be matched with the battery being charged.
Start the charge process by pressing the “Enter/Start” key for more
than 2 seconds.
The screen displays the state of charging process.
To stop charging forcibly, press “Mode/Esc” key once.
Set the discharge current on the left and final voltage on the right,
the discharge current ranges from 0.1 - 5.0 A and the voltage should
be matched with the battery being di charged. Start the discharge
process by pressing “Enter/Start” key for more than 2 seconds.
The screen displays the current state of discharge.
This charger can store/load up to 5 data of batteries, you can call out
the data for the process without setting up the program again.
Press “Mode/Esc.” key to the screen on the left, then press “Enter/
Start”
key to enter into the submenu.
The blinking (01) shows you the data NO, you can press
“Dec. </INC >” key to change it. Press “Dec. </INC >”
key, you can
select the type of battery, voltage, capacity, and you can set them by
pressing “Enter/Start”
key, then press “Enter/Start”
key for more
than 2 seconds to select the charge mode.
Setting up charge/discharge current and final voltage.
To save the data, press “Enter/Start” key for more Enter than 2
seconds.

Digital Balance Charger xBase 2.0 Deluxe
11
5.6.2 Load data
Press “Mode/Esc” key to the screen on the left, then press “Enter/
Start” key to enter the submenu.
You can press “Dec. </INC >” key to select the data number when
the (01) field is blinking.
Press “Enter/Start” key for more than 2 seconds,it will shows you the
left screen, loading the data.
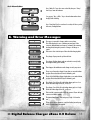
6. Warning and Error Messages
The output is connected to a battery with incorrect polarity.
This will be displayed in case of detecting an interruption of the
connection between battery and output or voluntarily disconnecting
the charge lead during the operation of charge or discharge on
output.
There was a short-circuit at output. Please check the charging leads.
The voltage of input power drops below the limit.
The voltage of Lithium battery pack was selected incorrectly. Verify
the voltage of battery pack carefully.
There happens the malfunction at the charger circuit by any reason.
The processor detects the voltage is lower than you set at the Lithium
program. Please check the cell count of the battery pack.
The processor detects the voltage is higher than you set at the Lithium
program. Please check the cell count of the battery pack.
The voltage of one of the cell in the Lithium battery pack is too low.
Please check the voltage of the cell, one by one.
The voltage of one of the cell in the Lithium battery pack is too high.
Please check the voltage of the cell, one by one.
There are bad connection at the individual connector. Please check the
connector and cables carefully.
The internal temperature of the unit goes too high. Cool down the
unit.
The processor can not continue to control the feeding current by any
reason.The unit needs to be repaired.

Instruction Manual12
7. Safety Message
8. After-sale service
and guarantee
Although the charger is designed to work in a stable environment to
play a role, but in use, you still need careful maintenance, as long as
these important tips to follow, that is easy and effective use of your
charger!
1. When you start the process, especially the discharge process,
the unit will become warm, please keep clear of the heat area
and do not cover it by anything when using.
2. Do not keep it in a environment below 5 °C or above 50 °C.
3. Use it carefully, do not use it in a wet or corrosive
environment.
4. Keep all the inflammable volatile materials well away from
operating area.
5. Please don’t let the charger get hurt through falling, bumping,
stiking, shaking, heavy press etc.
6. Do not attempt the voltage higher than the requirement by
manufactures.
7. Ensure the type of battery and the voltage of the battery pack
is selected correctly. Do not use the different types or different
capacities synchronously.
8. The standard accessories can only support one battery pack.
When you are willing to use multi-packs, please separately
purchase the special accessories, never do a disassembly or
alteration to the charger.
9. Do not attempt to charge/discharge the non-rechargable
battery or damaged battery.
10. Keep the charger away from children and pet at all time!
Never leave the charger unsupervised, when it is connected to
its power supply.
Thank you for purchasing the this balance charger, ANSMANN-RACING
will do its best to provide you with a comprehensive after-sale service
and protect your rights and interests. Since you purchase the unit, you
can enjoy the lifelong guarantee service.
We warrant this product for a period of one year from the date of
purchase, if it has a quality problem itself, all guarantee will be free;
In case customers can not provide an effective certificate of purchase,
we will refer the date of machine’s internal.
If it is over one year since the purchase date, an appropriate cost will
be charged, users need to bear the transportation cost back and forth.
User disassembly, alteration, or damage caused by improper use,
they should bear the maintenance and transport costs.
After-sale procedure:
When you can not use the product normally, please contact the local
franchiser or the after-sale service person. After products have been
confirmed damaged or unable to confirm the causes, you can sent it
to the company directly or through the franchiser.
We will normally repair completed and sent it to customers within five
working days after having received it.
All rights revised by ANSMANN-RACING to commit modifications.
www.ansmann-racing.com

Digital Balance Charger xBase 2.0 Deluxe
13

Bedienungsanleitung14
Digitaler Laderegler xBase 2.0 Deluxe
Bedienungsanleitung
1.1 Verfügt über eine moderne Ladeberechnung und ein modernes
Design, das eine Kompatibilität von Multilayer-Fehlern
ermöglicht. Es schafft sichere Lade- und Entladebedingungen
und beschränkt durch Fahrlässigkeit oder Anwendungsfehler
entstehende Gefahren.
1.2 Verwendet gängige Tief-Hochsetzsteller-Technologie und
ermöglicht so einen Wirkungsgrad von bis zu 90 %.
1.3 Für alle im Modellbau gängigen Akkutypen geeignet: LiPo,
Lilo, LiFe, NiMH, NiCd und Pb.
1.4 Einfache und effiziente Benutzerschnittstelle für einen
einfachen Gebrauch. Effektive Funktionen und ausführliche
Infos. Echtzeitanzeige von Akkuspannung, Ladestrom,
Akkutemperatur, Lade-/Entladekapazität, verstrichener
Zeit, Eingangsspannung usw. ermöglicht das Anpassen von
Sicherheitsparametern.
1.5 Spannungsregler für einzelne Zellen eines Akkusatzes ermög-
lichen das Ausgleichen des Satzes beim Laden/Entladen. Das
Gerät ist in der Lage, jede einzelne Zelle beim Lade- bzw.
Entladevorgang zu überwachen und auszugleichen (Toleranz:
+0,01 V).
1.6 Lädt/entlädt einzelne Akkus und ermöglicht so einen erwei-
terten Anwendungsbereich, der auch selbst hergestellte Akkus
einschließt.
1.7 Verschiedene Betriebsmodi für unterschiedliche Anforde-
rungen: automatisches Laden, Ausgleichen, Schnellladen,
Lagerung, zyklisches Laden usw.
1.8 Das Gerät kann bis zu fünf Datensätze für verschiedene
Akkutypen speichern und laden. Sie können in den Pro-
grammeinstellungen Daten für jeden Akkutyp speichern. So
haben Sie zum Laden oder Entladen direkt Zugriff auf die
entsprechenden Informationen für einen Akkutyp. Diese Daten
können jederzeit abgerufen und der Vorgang durchgeführt
2.1 Eingangsspannung 11 bis 18,0 V Gleichspannung
100 bis 240 V Wechselspannung
2.2 Ladespannung 0,1 bis 6,0 A
2.3 Entladespannung 0,1 bis 2,0 A
2.4 Ladeleistung max. 80 W
2.5 Entladeleistung max. 10 W
2.6 Ausgleichsstrom max. 300 mA
2.7 Ausgleichstoleranz +0,01 V
2.8 Anzahl NiCd-/NiMH-Akkuzellen 1 bis 18 Zellen
2.9 Lithiumakkus LiPo, Li-Ion und LiFe
2.10 Lithiumakkuzellen 1 bis 6 Serien
2.11 Bleiakkuspannung 2 bis 24 V
2.12 Gewicht 640 g
2.13 Abmessungen 145 x 145 x 56 mm
werden, ohne dass Sie alle Programmeinstellungen erneut
eingeben müssen.
1.9 Zum Erneuern und Ausgleichen von NiMH- oder NiCd-Akkus
können Sie bis zu fünf Lade-Entladezyklen oder Entlade-
Ladezyklen durchführen.
1.10 Sie können einen digitalen Präzisionstemperaturfühler
anschließen, um zu überprüfen, ob das Gerät zu heiß läuft.
Sobald ein Akku beim Lade-/Entladevorgang den von Ihnen
eingestellten Temperaturhöchstwert erreicht, wird der Vorgang
abgebrochen, um den Akku zu schützen. Dies ist besonders für
NiMH- und NiCd-Akkus relevant (der Temperaturfühler ist nicht
im Lieferumfang enthalten).
1.11 Für Fachleute bietet dieses Gerät ein rechnerbasiertes Pro-
gramm zum Analysieren der Eigenschaften eines Akkus über
die USB-Schnittstelle. Es zeigt Spannung-, Strom-, Kapazitäts-
und Temperaturkurven an. Zusätzlich zeigt es die Spannungen
der einzelnen Zellen im Lithiumakku-Satz an.
*Das Programm ist nicht im Lieferumfang enthalten.
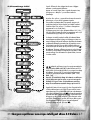
1. Sonderfunktionen
2. Leistungs-
parameter
Inhalt
1. Sonderfunktionen ............................................ 14
2. Leistungsparameter ......................................... 14
3. Gehäuse und Zubehör ...................................... 15
4. Hauptfunktionen ............................................. 15
5. Betriebsanweisungen ....................................... 15
6. Warn- und Fehlermeldungen ............................... 23
7. Sicherheitshinweise .........................................24
8. Kundenservice und Garantie ...............................24

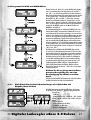
3. Gehäuse und Zubehör
Z
u
b
e
hör
Digitaler Laderegler xBase 2.0 Deluxe 15
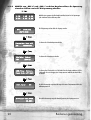
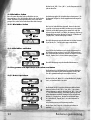
„Mode/Esc“: Modus/Esc, Taste für Modusauswahl/Stop/Zurück.
Mithilfe dieser Taste blättern Sie durch das Hauptmenü, gelangen
zurück zum Hauptmenü oder können einen Vorgang abbrechen.
„Dec </Inc >“: DEC/INC, Tasten zum Erhöhen oder Verringern von
Werten. Zudem können Sie mithilfe dieser Tasten beim Lade- oder
Entladevorgang durch Zusatzinformationen blättern. Beim Festlegen
von Parametern verwenden Sie „Dec <“, um einen Wert zu verrin-
gern, und „Inc >“, um einen Wert zu erhöhen.
„Enter/Start“: Eingabe/Start, Taste zum Auswählen oder Starten
eines Vorgangs. Sie starten hiermit einen Vorgang, indem Sie die
Taste länger als 2 Sekunden drücken.
Diese Bildschirmanzeige zeigt
Ihnen den Typ des Ladegeräts für
etwa 2 Sekunden an. Drücken Sie
auf „Eingabe/Start“, um in das
Hauptmenü zu wechseln, nach-
dem der Selbsttest erfolgreich
abgeschlossen ist.
4. Hauptfunktionen
5. Betriebs-
anweisungen
Drücken Sie in den Benutze-
reinstellungen (USER SET PRO-
GRAM) abwärts auf „Modus/
Esc“ und aufwärts auf „DEC
<“, um durch das Hauptmenü
zu blättern. Drücken Sie auf
„Eingabe/Start“, um in das
Untermenü zu wechseln.
Programm für Lithiumakkus
Programm für NiMH-Akkus
Programm für NiCd-Akkus
Programm für Bleiakkus
Gleich-
strom-
eingang
USB-
Schnitt-
stelle
Temperatur-
fühler-
anschluss
Abbildung A
Programm zum Speichern
von Daten
Programm zum Laden von
Daten
5.1 Hauptmenü
Taste AusgangLCD-
Bildschirm
Regel-
anschluss

Bedienungsanleitung16
Tipp: Richten Sie erst die Benutzereinstellungen ein, bevor Sie das
Gerät das erste Mal zum Laden bzw. Entladen verwenden.
Drücken Sie in der ersten Bildschirmanzeige auf „Eingabe/Start“ und
anschließend auf „Modus/Esc“, um in das Menü zum Einrichten der
Parameter zu wechseln.
Drücken Sie auf „INC >“ bzw. „DEC <“, um wie links dargestellt
durch das Menü zu blättern.
Wenn Sie den Parameterwert im Programm ändern möchten, drücken
Sie auf „Eingabe/Start“. Sobald die Taste blinkt, können Sie den
Wert mithilfe von „DEC <“ und „INC >“ erhöhen bzw. verringern.
Drücken Sie anschließend einmalig auf „Eingabe/Start“, um den
Wert zu speichern.
Dieses Gerät kann drei Typen von Lithiumakkus laden bzw. entladen:
LiLo-, LiPo- und LiFe-Akkus. Prüfen Sie die Akkus vor dem Laden und
Entladen sorgfältig und richten Sie die entsprechenden Werte richtig
ein, um zu verhindern, dass ein Akku explodiert! Weitere Informati-
onen hierzu finden Sie in Tabelle A.
Das Gerät erkennt die Anzahl der Zellen des Lithiumakkus auto-
matisch zu Beginn des Lade- oder Entladevorgangs, wodurch eine
Fehleingabe durch den Benutzer vermieden wird. Tiefentladene Akkus
können allerdings falsch erkannt werden. Um dies zu vermeiden,
können Sie eine Zeitspanne festlegen, innerhalb der die Anzahl der
Zellen vom Prozessor erkannt werden soll (siehe Bildschirmanzeige
A0
).
Meist reichen zehn Minuten aus, damit die Anzahl der Zellen
richtig erkannt wird. Für Akkus größerer Kapazität können Sie die
Zeitspanne verlängern. Für Akkus geringerer Kapazität können Sie
die Zeitspanne verringern oder den Standardwert verwenden.
A1
und
A2
zeigen die Auslösespannung für das automatische
Abschalten des Ladevorgangs für NiMH- und NiCd-Akkus (V) an. Der
Effektivwert liegt zwischen 5 und 20 mV pro Zelle. Wenn V höher
eingestellt ist, besteht die Gefahr einer Überladung. Ist die Auslöse-
spannung niedriger eingestellt, besteht die Gefahr eines frühzeitigen
Abbruchs. Weitere Informationen hierzu finden Sie in der technischen
Spezifikation des Akkus (NiCd 12 mV, NiMH 7 mV).
Tipp: Wenn die Ladespannung für den Akku unter 2,0 V
liegt, kann V möglicherweise nicht mehr erkannt werden.
Dadurch entsteht die Gefahr einer Überladung des Akkus.
Schließen Sie einen Temperaturfühler an oder verwenden Sie
einen Strom über 1 C, um dies zu vermeiden.
Sie können den 3-Pin-Anschluss auf der linken Seite des Geräts
verwenden. Dieser kann wahlweise als USB-Schnittstelle oder als
Anschluss für einen Temperaturfühler verwenden werden. Wenn der
Anschluss als Temperaturanschluss festgelegt wird, können Sie einen
Temperaturfühler anschließen und die Oberflächentemperatur des
Akkus messen (siehe
A3
). Zudem können Sie die Höchsttemperatur
festlegen, die die Akkus während des Ladevorgangs maximal
erreichen dürfen. Sobald ein Akku den eingestellten Temperaturwert
erreicht, wird der Vorgang abgebrochen, um den Akku zu schützen.
Wenn der Anschluss als USB-Schnittstelle verwendet wird, können
5.2 Ersteinrichtung der Parameter

Digitaler Laderegler xBase 2.0 Deluxe 17
Sie das Ladegerät über ein USB-Kabel an Ihren Rechner anschließen.
Dadurch können Sie mithilfe der Software den Ladeprozess auf dem
Rechner anzeigen (siehe
A4
).
Im zyklischen Lade- und Entladevorgang kann ein NiCd- oder
NiMH-Akku warm werden. Das Programm kann dem Akku nach
einem Lade- oder Entladevorgang und vor dem nächsten Zyklus eine
bestimmte Zeit lang abkühlen lassen (siehe
A5
). Die Dauer der
Abkühlphase variiert zwischen 1 und 60 Minuten. Wenn Sie sich unsi-
cher sind, können Sie den Zeitraum auf über 10 Minuten festlegen.
Das Gerät liefert automatisch einen Erhaltungsstrom, um die volle
Ladestufe zu erreichen, ohne den Akku nach Abschluss des Schnell-
ladevorgangs zu überhitzen. Sie können den Erhaltungsstromwert in
Anzeige
A6
ändern.
Wenn Sie einen Ladevorgang starten, startet automatisch der
integrierte Sicherheits-Timer. Dies ist für den Fall vorgesehen, dass
der Akku beschädigt ist und zu überladen droht oder die Abbruch-
schaltung den Akkustatus nicht erkennen kann. Wie in Bildschirman-
zeige
A7
dargestellt, kann diese Funktion ein- oder ausgeschaltet
werden. Zudem können Sie den gewünschten Höchstwert zwischen
10 und 270 Minuten einstellen. Zusätzlich besteht eine Funktion zur
Begrenzung der Höchstkapazität. Wie in
A8
dargestellt, liegt der
Wert hierfür zwischen 10 und 20000 mAh.
Wie in
A9
dargestellt, kann auch das akustische Signal in diesem
Programm wahlweise ein- oder ausgeschaltet werden.
Bildschirmanzeige
A10
zeigt, wie die Beschädigung einer Autobat-
terie, die als Gleichstromgeber dient, verhindert wird, indem die
Batteriespannung durch dieses Programm stets überwacht wird. Wenn
die Spannung unter den von Ihnen eingestellten Wert sinkt, wird
der Vorgang abgebrochen, um Ihre Batterie vor Beschädigungen zu
schützen.
Sie können die Helligkeit des LCD-Bildschirms wie in
A11
dargestellt
anpassen.
Die folgende Tabelle hält wichtige
Informationen zu den zu verwen-
denden Parametern jedes Akkutyps
bereit. Halten Sie sich unbedingt an
die angegebenen Werte, um eine
Beschädigung der Akkus und des
Geräts zu vermeiden!
Typen
Wert
Lipo Lilo LiF e NiMH NiCD Pb
Nennspannung (V/Zelle) 3.70 3.60 3.30 1.20 1.20 2.00
Höchstspannung für Abbruch des
Ladevorgangs (V/Zelle)
4.20 4.10 3.60 1.60 1.60 2.45
Zulässiger Schnellladestrom <1C <1C <4C <2C <2C <0.4C
Mindestspannung für Abbruch des
Entladevorgangs (V/Zelle)
>3.00 3.00 2.00 1.00 0.85 1.75
Chart A

Bedienungsanleitung18
5.3 Programm für Lithiumakkus
(LiLo, LiPo und LiFe)
Drücken Sie links auf „Modus/Esc“ und anschließend auf „Eingabe/
Start“, um zu den Parametereinstellungen zu wechseln. Drücken
Sie auf „DEC <“ bzw. „INC >“, um wie links detaillierter dargestellt
durch das Menü zu blättern.
Wenn Sie den Parameterwert im Programm ändern möchten, drücken
Sie auf „Eingabe/Start“. Sobald die Taste blinkt, können Sie den
Wert mithilfe von „DEC <“ und „INC >“ erhöhen bzw. verringern.
Drücken Sie anschließend einmalig auf „Eingabe/Start“, um den
Wert zu speichern. Drücken Sie länger als 2 Sekunden auf „Eingabe/
Start“, um den Vorgang zu starten.
Der automatische Ladebetrieb (AUTO) dient dem Laden oder Entladen
von Lithiumakkus oder speziellen Akkusätzen ohne Verwendung des
Regelanschlusses oder Zählung der einzelnen Zellen. Links in der
oberen Zeile wird der Akkutyp angezeigt, den Sie in den Benutzerein-
stellungen ausgewählt haben. Rechts oben wird Ihnen der eingestellte
Ladebetrieb angezeigt. Links unten wird der Ladestrom festgelegt;
rechts unten wird die Anzahl der Zellen im Akkusatz festgelegt. Die
Definitionen der folgenden Bildschirmanzeigen sind identisch (siehe
Abbildung B für weitere Informationen zum Anschließen der Kabel).
Das Ausgleichsladen (BALANCE) dient dem Laden von 2 bis 6 Lithi-
umakku-Zellen mithilfe des Regelanschlusses, wobei die Zellen des
zu ladenden Akkus einzeln verbunden und mithilfe eines geeigneten
Ladekabels an den Anschluss rechts am Ladegerät angeschlossen
werden (siehe Abbildung B). Der Ladevorgang in diesem Betriebs-
modus unterscheidet sich vom normalen Ladevorgang. Der interne
Prozessor des Ladegeräts überwacht die Spannungen der einzelnen
Zellen des Akkusatzes. Dadurch wird die Entladeleistung des Akkus
verbessert! EV-Ladegeräte gleichen die Spannung mithilfe optimierter
Berechnungen um einen Toleranzwert zwischen 0,01 V aus!
Der Schnellladebetrieb (FAST) dient einer Verkürzung der Ladezeit.
Sobald der Strom 1/5 des im CV-Betrieb eingestellten Werts erreicht,
wird der Vorgang abgebrochen. Die Spannungen werden unabhängig
davon, ob der Akku an den Regelanschluss angeschlossen ist oder
nicht, nicht ausgeglichen. Die Ladekapazität ist dann zwar etwas
geringer, dafür wird aber die Ladezeit verkürzt.
Der Lagerungsbetrieb (STORAGE) dient dem Laden oder Entladen von
Lithiumakkus, die vorläufig nicht mehr gebraucht werden. Wählen Sie
diesen Betriebsmodus aus, um die Leistung des Akkus für die Dauer
der Lagerung auf etwa 40 % zu halten und Verluste zu reduzieren.
Die Zielspannungen sind je nach Akkutyp unterschiedlich: 3,75 V für
LiLo-Akkus, 3,85 V für LiPo-Akkus und 3,3 V für LiFe-Akkus.
Das Programm reagiert dabei intelligent auf die vorhandene Span-
nung: Wenn die Anfangsspannung eines Akkus über der Lagerungs-
spannung liegt, startet das Programm den Entladevorgang. Liegt die
Anfangsspannung dagegen unter der Lagerungsspannung, startet
das Programm automatisch den Ladevorgang. Damit der Akku den
Anforderungen entsprechen kann, muss der Anschluss des Akkusatzes
mit dem separaten Anschluss des Ladegeräts verbunden sein.
Theoretisch müssen Lithiumakkus nicht im Entladebetrieb
(DISCHARGE) entladen werden. Diese Funktion dient einzig dazu, den
Leistungsverbrauch von Lithiumakkus auf über 90 % zu regeln. Um
ein Überladen zu verhindern, schließen Sie erst den Regelanschluss
des Akkus an das Ladegerät an. Der Strom darf nicht mehr als 1 C
betragen.

Digitaler Laderegler xBase 2.0 Deluxe 19
5.3.1 Starten des Lade-/Entladevorgangs nach Einrichten der Betriebsmodi
durch Drücken von „Eingabe/Start“ länger als 2 Sekunden.
Abbildung
B
Diese Bildschirmanzeige zeigt die Anzahl der Zellen an, die Sie einge-
stellt haben bzw. die der Prozessor erkannt hat. „R:“ zeigt die Anzahl
der vom Ladegerät erkannten Zellen an, „S:“ zeigt die von Ihnen in
der vorherigen Anzeige ausgewählte Anzahl Zellen an.
Sind die Zahlen identisch, können Sie den Ladevorgang durch
Drücken von „Start/Eingabe“ starten. Sind sie nicht identisch,
drücken Sie auf „Modus/Esc“, um zum vorherigen Menü
zurückzukehren. Prüfen Sie die Anzahl der Zellen im Akkusatz
erneut, bevor Sie den Ladevorgang starten. Wenn Sie den
automatischen oder den Entladebetrieb ausgewählt haben,
können Sie direkt zu dieser Bildschirmanzeige wechseln.
Diese Bildschirmanzeige zeigt den aktuellen Ladestatus an.
Drücken Sie einmalig auf „Modus/Esc“. Wie links in der
Abbildung dargestellt, steht
① für die Anzahl der Zellen
② für den Betriebsmodus (wobei CHG = automatischer Lade-
betrieb • BAL = Ausgleichsbetrieb, FAS = Schnellladebetrieb
• STO = Lagerungsbetrieb und DSC = Entladebetrieb
③ für die verstrichene Zeit
④ für den Lade-/Entladestrom
⑤ für die Lade-/Entladespannung des Akkus und
⑥ für die Lade-/Entladekapazität.
Anschlussdiagramm für den
automatischen Ladebetrieb
Anschlussdiagramm für
den Ausgleichs-/Lagerungs-/
Entladebetrieb
Anschlussdiagramm
für den Anschluss der
einzelnen Zellen

Bedienungsanleitung20
5.3.2 Mithilfe von „DEC <“ und „INC >“ und dem Regelanschluss die Spannung
einzelner Zellen sowie die Zielspannung abrufen
Mithilfe eines separaten Anschlusskabels am Akku können Sie die Spannungen
jeder einzelnen Zelle im Akkusatz prüfen.
Die Zielspannung wird am Ende des Vorgangs erreicht.
Sie können die Sicherheitskapazität abrufen.
Sie können die Sicherheitszeit abrufen.
Sie können den 3-Pin-Anschluss auf der linken Seite des Geräts wahlweise als USB-
Schnittstelle oder zum Anzeigen eines Temperaturwerts mithilfe eines Messfühlers
verwenden.
Die Bildschirmanzeige zeigt Ihnen bei angeschlossenem Temperaturmessfühler die
Außentemperatur an.
Diese Bildschirmanzeige zeigt die aktuelle Spannung des Eingangsstroms an.
La page est en cours de chargement...
La page est en cours de chargement...
La page est en cours de chargement...
La page est en cours de chargement...
La page est en cours de chargement...
La page est en cours de chargement...
La page est en cours de chargement...
La page est en cours de chargement...
La page est en cours de chargement...
La page est en cours de chargement...
La page est en cours de chargement...
La page est en cours de chargement...
La page est en cours de chargement...
La page est en cours de chargement...
La page est en cours de chargement...
La page est en cours de chargement...
-
 1
1
-
 2
2
-
 3
3
-
 4
4
-
 5
5
-
 6
6
-
 7
7
-
 8
8
-
 9
9
-
 10
10
-
 11
11
-
 12
12
-
 13
13
-
 14
14
-
 15
15
-
 16
16
-
 17
17
-
 18
18
-
 19
19
-
 20
20
-
 21
21
-
 22
22
-
 23
23
-
 24
24
-
 25
25
-
 26
26
-
 27
27
-
 28
28
-
 29
29
-
 30
30
-
 31
31
-
 32
32
-
 33
33
-
 34
34
-
 35
35
-
 36
36


Ansmann Racing xBase 2.0 Deluxe Manuel utilisateur
- Catégorie
- Chargeurs de batterie de voiture
- Taper
- Manuel utilisateur
dans d''autres langues
Autres documents
-
ANSMANN xBase Deluxe Manuel utilisateur
-
VENOM MEDION DUAL AMP Le manuel du propriétaire
-
-
Sharp CP-LSBP1 Le manuel du propriétaire
-
HiTEC Multicharger X2 700 Le manuel du propriétaire
-
-
MULTIPLEX Power Peak Twin EQ-BID 1000W Le manuel du propriétaire
-
VOLTCRAFT Ultimate 1000 W Operating Instructions Manual
-
-