
(FBS4
GSPOUJFSDMBTTJD
b
g
a
c
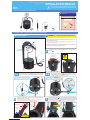
Strap buckle Gear S3
Screw
(Silver)
Caution on the
assembling direction
g
c
Position of screws
to be removed
Gear S3
Caution on the
assembling direction
Array the Charging & security cable( ) into the cable guide of the cradle
properly, insert it into the hole on the table in the direction to the rear side of
the cradle and attach it on the proper position firmly.
Insert the Charging & security cable( ) into the hole on the smart table
while facing downward, and attach the cradle over the hole on the table.
A - Installing on the smart table
1.After removing the protective film from the double-sided adhesive tape, preserve the
tape so that it doesn't get dirty.
If touching the tape with a hand or foreign materials get on it, its adhesive strength
can be significantly deteriorated.
2.The adhesive tape will have full adhesive strength after the 24 hours from its placement.
Please do not use the products right after its placement.
- Cautions when attaching the double-sided tape.
Gear S3 frontier/Gear S3 classic
Normal Security Set
INSTALLATION MANUAL
G022_EN1610_R02
Please, read carefully the installation manual before installing it, and install it
according to the manual. Please, keep the manual for a future reference.
Before installing, Please check up the parts.
Maintenance kit
m1
Maintenance kit
Use if the product needs to be reinstalled.
m2
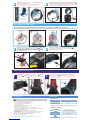
Installation Guide - Gear S3 frontier/classic Normal Security Set
2-A 2-B
Assembling flow
cd e fg
a
a
a
a
a
b
Hole on the
smart table
Loosen the screw (silver) in the direction where the strap buckle side using the
screw driver included in the package.
Make sure that the screw in the direction where the buckle side be loose.
Keep the screw (silver) separated from Gear S3 carefully.
3
Assemble the Security sensor( ) along Gear S3 while paying attention to the assembling
direction. After assembling the Security sensor correctly, fix the Gear S3 and the Security
sensor firmly using the black screw( ) for fixing the Security sensor included in the package.
Before assembling the product, make sure to check the screw color(black).
4g
c
Hole on the
normal table
a
a
Remove the protective film from all double-sided tapes on the bottom surface of
the cradle( ).
1
b
b
Remove the
protective film Refer to
Caution A.
B - Installing on a normal table
CAUTION A.

.BHOFUJD-PDBUJPO
The first hole of
Gear S3 strap
Built-in Wireless
Charging Pad
Buckle
Gear S3
Screw
(Silver)
g
c
Check the LED lighting
on the Security sensor
c
Cradle
head
Cable
direction Cable
direction
Protective
film Remove
a
e
f
Cutting
a
Control box
Control box
Safety warning
How to separate the Security sensor
Information
The specifications and design of the product may be modified without prior
notice for the improvement of product performance.
Do not expose the product to fire or other electric heaters!
- There is a danger of fire or damage to the product.
Do not disassemble, repair, or remodel the product!
- There is a danger of injury.
- Please call the service center when repair is necessary.
Do not forcefully bend or pull the wire!
- There is a danger of damage to the product or injury to the user.
When the wire is disconnected or breaks away, do not touch the wire with bare hands,
but always wear protective hand gloves!
- The disconnected part of the wire is sharp, thus, may cause injury.
Do not use the wire for purposes other than as a security alarm device, and do not allow
access to children!
- Winding the wire around your neck or body may result in death or serious injury.
Do not touch the wire when there is lightning and thunder!
- There is a danger of electric shock.
Warning: To prevent the injury of the user or other people and property damage,
the following instructions must be followed.
*In case of user’s fault during the warranty period it is not free of charge.
Warranty Period Item
One-year
Manufacturer
KUMOH Electronics Co.,Ltd
Address
35, Gilju-ro 444beon-gil, Wonmi-gu,
Bucheon-si, Gyeonggi-do (Seoul 14556 Korea)
82-32-662-9312
82-32-662-2000
Limited warranty
Manufacturer Information
Tel
Fax
E-mail
Gear S3 frontier/classic
Normal Security Set
Turn off the Control box, separate the security cable connector( ), and loosen
the black screw( ) assembled to the Security sensor.
If you separate the connector( ) without turning off the Control box, an alarm
will occur.
1
Separate the Security sensor( ) and assemble the screw(silver) for Gear S3.
Make sure to use the screw(silver) separated from Gear S3 before installing the
Security sensor. If the screw(black) for installing the Security sensor is used,
it will not be assembled normally.
2
Before separating the Security sensor, make sure to turn off the Control box.
6
When mounting Gear S3 on the cradle head, check if the cable of the Security sensor( )
is installed correctly to direction of the rear side of the cradle as shown in the figure below.
If the Security sensor is installed in the wrong direction, install it again by checking
the assembling direction in of the installation guide.
Install the buckle in the first hole of Gear S3 strap as below figure, and put the
device on the center of cradle head.
Make sure that the buckle should be installed in the first hole of strap.
The wireless charger and the magnet are built in cradle head.
5
g
c
a
a
a
The coil for wireless charging function and magnetic to places the Gear S3 in right charging point are built in head of security cradle.
When put the Gear S3 onto cradle, the magnetic power guides the device to center of cradle. If it is set apart from center, the charging will not Working.
3
Auto adjustment head by magnet
8
Assemble the security cable( ) temporarily using the cable tie( ) and the cable
tie mount( ). Remove the protective film from the double-sided table on the
bottom surface of the cable tie mount, attach the cable tie mount( ) firmly on
the proper position on the table, pull and tighten up the table tie( ) completely
and cut off any excess part.
After finishing the installation, connect the security cable connector( ) to the
Control box and turn on the power. If the power supply is connected normally,
LED on the Security sensor will turn on.
7ae
e
f
f
a
a
c
Press and hold evenly
for 30 seconds or more!
Magnetic power
set the Gear S3
to locate the
charging point.

FCC Warning Statement
FCC Part 15.19
This device complies with part 15 of the FCC Rules. Operation is subject to the following two conditions: (1) this device may not cause harmful interference,
and (2) this device must accept any interference received, including interference that may cause undesired operation.
FCC Part 15.21
Any changes or modifications (including the antennas) to this device that are not expressly approved by the manufacturer may void the user’s authority to
operate the equipment.
FCC Radiation Exposure Statement
This equipment complies with FCC Radiation exposure limits set forth for an uncontrolled environment. This device and its antenna must not be co-located
or operating in conjunction with any other antenna or transmitter.
This equipment should be installed and operated with a minimum distance of 10cm between the radiator and your body.
IC Warning Statement
This device complies with Industry Canada licence-exempt RSS standard(s).
Operation is subject to the following two conditions: (1) this device may not cause interference, and (2) this device must accept any interference, including
interference that may cause undesired operation of the device.
Le présent appareil est conforme aux CNR d'Industrie Canada applicables aux appareils radio exempts de licence. L'exploitation est autorisée aux deux
conditions suivantes : (1) L'appareil ne doit pas produire de brouillage, et (2) L'utilisateur de l'appareil doit accepter tout brouillage radioélectrique subi, même
si le brouillage est susceptible d'en compromettre le fonctionnement.
IC Radiation Exposure Statement
This equipment complies with IC RF Radiation exposure limits set forth for an uncontrolled environment. This device and its antenna must not be co-located
or operating in conjunction with any other antenna or transmitter.
This equipment should be installed and operated with a minimum distance of 10cm between the radiator and your body.
Cet équipement est conforme aux limites établies par Industrie Canada en matière d'exposition aux radiofréquences dans un environnement non
contrôlé. Cet appareil et son antenne ne doivent pas être colocalisés ou fonctionner en conjonction avec tout autre antenne ou émetteur.
Cet équipement doit être installé et utilisé avec une distance minimale de 10cm entre le radiateur et votre corps.
-
 1
1
-
 2
2
-
 3
3


dans d''autres langues
- English: Kumoh Gear S2 Installation guide
Autres documents
-
Panasonic UT-MB5 Mode d'emploi
-
 Clover Flex C401U Manuel utilisateur
-
Fujitsu Stylistic M532 Manuel utilisateur
-
Yale Assure Lock SL Key Free Touchscreen Deadbolt YRD256 Mode d'emploi
-
 Winmate M101P-ME Manuel utilisateur
-
Sony SSE-TN1W Guide de référence
-
Panasonic FZ-G1 Windows 8 Mode d'emploi
-
 Winmate M900P Guide de démarrage rapide
-
Ingenico XKB-IPP3V4 Manuel utilisateur


