PROPOINT 8843856 Le manuel du propriétaire
- Catégorie
- Clés à chocs électriques
- Taper
- Le manuel du propriétaire

V1.0 8843856
Please read and understand all instructions before use. Retain this manual for future
reference.
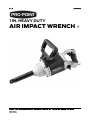
AIR IMPACT WRENCH
1 IN. HEAVY DUTY

8843856 1 in. Heavy Duty Air Impact Wrench V1.0
2 For technical questions call 1-800-665-8685
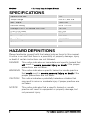
SPECIFICATIONS
Square Drive Size 1 in.
Torque Range 200 to 1,500 ft-lb
Max. Torque 1,800 ft-lb
Pressure Rating 90 to 115 PSI
Average CFM @ 15 Second Run Time 15 CFM
CFM @ Full Load 60 CFM
Max. Bolt Capacity 1-7/16 in.
Blows per Minute 750 BPM
Speed Rating 4,500 RPM
Air Inlet 1/2 in.
Min. Hose Size 1/2 in.
HAZARD DEFINITIONS
Please familiarize yourself with the hazard notices found in this manual.
A notice is an alert that there is a possibility of property damage, injury
or death if certain instructions are not followed.
DANGER! This notice indicates an immediate and specific hazard that
will result in severe personal injury or death if the proper
precautions are not taken.
WARNING! This notice indicates a specific hazard or unsafe practice
that could result in severe personal injury or death if the
proper precautions are not taken.
CAUTION! This notice indicates a potentially hazardous situation that
may result in minor or moderate injury if proper practices are
not taken.
NOTICE! This notice indicates that a specific hazard or unsafe
practice will result in equipment or property damage, but
not personal injury.

V1.0 1 in. Heavy Duty Air Impact Wrench 8843856
Visit www.princessauto.com for more information 3
INTRODUCTION
The 1 in. Heavy Duty Air Impact Wrench is a high-power tool that delivers
high torque output performance. The wrench has a 6 in. extension anvil, a
forward/reverse switch and a second handgrip for firm control during
operation.
SAFETY
WARNING! Read and understand all instructions before using this
tool. The operator must follow basic precautions to reduce the
risk of personal injury and/or damage to the equipment.
Keep this manual for safety warnings, precautions, operating or
inspection and maintenance instructions.
WORK AREA
1. Operate in a safe work environment. Keep your work area clean,
well-lit and free of distractions. Place lights so you are not working
in a shadow.
2. Keep anyone not wearing the appropriate safety equipment away
from the work area.
3. Store tools properly in a safe and dry location. Keep tools out of
the reach of children.
4. Do not install or use in the presence of flammable gases, dust or
liquids.
PERSONAL SAFETY
WARNING! Wear personal protective equipment approved by the
Canadian Standards Association (CSA) or American National
Standards Institute (ANSI).
PERSONAL PROTECTIVE EQUIPMENT
1. Always wear impact safety goggles that provide front and side
protection for the eyes. Eye protection equipment should comply
with CSA Z94.3-07 or ANSI Z87.1 standards based on the type of
work performed.
2. Wear the appropriate type of full-face shield in addition to safety
googles, as the work can create chips, abrasive or particulate
matter.

8843856 1 in. Heavy Duty Air Impact Wrench V1.0
4 For technical questions call 1-800-665-8685
3. Wear gloves that provide protection based on the work materials or
to reduce the effects of tool vibration.
3.1 Do not wear gloves when operating a tool that can snag the
material and pull the hand into the tool.
4. Wear protective clothing designed for the work environment and
tool.
5. Non-skid footwear is recommended to maintain footing and
balance in the work environment.
6. This tool can cause hearing damage. Wear hearing protection gear
with an appropriate Noise Reduction Rating to withstand the
decibel levels.
7. The tool may contain high pressure. Use safety glasses and gloves
for protection during operation. Keep hands clear of the exposed
rubber portions of the hose.
PERSONAL PRECAUTIONS
Control the tool, personal movement and the work environment to avoid
personal injury or damage to the tool.
1. Do not operate any tool when tired or under the influence of drugs,
alcohol or medications.
2. Avoid wearing clothes or jewelry that can become entangled with
the moving parts of a tool. Keep long hair covered or bound.
3. Do not overreach when operating a tool. Proper footing and
balance enables better control in unexpected situations.
4. Keep your fingers away from the trigger/switch while carrying the
tool, attaching an air hose or an accessory. Lock the trigger/switch
safety if available.
5. Avoid unintentional starts. Be sure that the regulator/throttle switch
is in the neutral or OFF position when not in use and before
connecting it to any air source.
6. Never point the air stream or tool at any point of your body, other
people or animals. Debris and dust ejected at high speed can
cause an injury.
7. Serious injury or death may occur from inhaling compressed air. The air
stream may contain carbon monoxide, toxic vapors or solid particles.
Never inhale compressed air directly from the pump or air tool.

V1.0 1 in. Heavy Duty Air Impact Wrench 8843856
Visit www.princessauto.com for more information 5
8. Securely hold this tool using both hands. Using a tool with only one
hand can result in loss of control.
SPECIFIC SAFETY PRECAUTIONS
WARNING! DO NOT let comfort or familiarity with product (gained
from repeated use) replace strict adherence to the tool safety
rules. If you use this tool unsafely or incorrectly, you can suffer
serious personal injury.
1. Use the correct tool for the job. This tool was designed for a
specific function. Do not modify or alter this tool or use it for an
unintended purpose.
2. Do not use the tool if any parts are damage broken or misplaced.
Repair or replace the parts.
3. Do not use any power tool with a malfunctioning power switch or
control. A power tool that fails to respond to the controls is dangerous
and can cause an injury. A qualified technician must repair and verify
the power tool is operating correctly before it can be used.
4. Never use a tool with a cracked or worn tool accessory. Change
the tool accessory before using it.
5. Never operate the tool when the safety guard is removed or
broken. Never clamp or tie the guard into the open position.
6. Do not cover the air vents.
7. Only use accessories that are specifically designed for use with the
tool. Ensure the accessory is tightly installed.
8. Only use an accessory that exceeds the speed rating (see
Specifications).
9. Disconnect the power source before installing or servicing the tool.
10. Remove adjusting keys and wrenches before using the tool. The
tool may eject an attached wrench or a key and cause an injury to
you or a bystander.
11. Before using the tool on a workpiece, test the tool by running it at
the highest speed rating for at least 30 seconds in a safe position.
Stop immediately if there is any abnormal vibration or wobbling.
Check the tool to determine the cause.
12. Never force the tool. Excessive pressure could break the tool,
resulting in damage to your workpiece or serious personal injury.

8843856 1 in. Heavy Duty Air Impact Wrench V1.0
6 For technical questions call 1-800-665-8685
Excessive pressure is the cause if your tool runs smoothly under no
load, but roughly under load.
13. Keep hands and fingers away from the work area. Any part of the
body contacting the tool’s working parts could result in an injury.
14. Never touch the tool accessory or workpiece during or immediately
after use. They may be hot and could inflict a burn injury.
15. Never hold the drive, socket, drive extension or accessories during
impacting. Doing so increases the risk of cuts, burns or vibration
injuries.
16. Hold the tool correctly; be ready to counteract normal or sudden
movements and have both hands available.
17. Use a suspension arm whenever possible.
18. Do not use in confined spaces and beware of crushing your hands
between the tool and workpiece, especially when unscrewing.
19. The tool is not insulated against contact with live electrical conduits
or sources.
20. Do not over-tighten nuts. They could shatter and cause damage to
the tool or workpiece or cause serious injury. Use a torque wrench to
torque the nut after using the impact wrench.
21. Do not use any additional force upon the wrench in order to
remove a nut.
22. Do not allow the tool to run without load for an extended period of
time, as this will shorten its life.
23. Avoid unintentional starting. Ensure the switch is off when connecting
to the power source.
AIR TOOL PRECAUTIONS
1. Use only clean and dry compressed air as a power source.
Contaminated or moist air will gradually damage the tool.
2. Discontinue tool use if it does not work properly or air is leaking.
Tag or mark the tool as ‘defective’ or ‘out of service’ until repaired.
3. Check the manufacturer’s maximum pressure rating for air tools
and accessories. Compressor outlet pressure must be regulated to
never exceed the maximum pressure rating of the tool (see
Specifications). Exceeding the maximum PSI rating can create a
bursting hazard, causing injury and property damage.

V1.0 1 in. Heavy Duty Air Impact Wrench 8843856
Visit www.princessauto.com for more information 7
4. Attach all accessories properly to the tool before connecting the air
supply. A loose accessory may detach or break during operation.
5. Never use oxygen, combustible gas or any other bottled gas as a
power source. Any power source other than an air compressor
could cause an explosion and serious personal injury.
6. Turn OFF the valve and discharge any remaining air pressure after
each use or before adjusting the tool.
7. Do not leave the air tool unattended with its compressed air supply
on. Turn off the compressed air supply and bleed the air tool of any
remaining compressed air before leaving the air tool unattended.
8. Serious injury may occur from loose debris being propelled at high
speeds from the compressed air stream. Always wear OSHA
approved safety glasses to protect the eyes during operation of the
air compressor.
9. Always turn off the air compressor and drain tank pressure
completely before attempting maintenance or attaching air tools.
Release pressure slowly from the system.
AIR HOSE PRECAUTIONS
1. Inspect the tool's air hose for cracks, fraying or other faults before
each use. Discontinue use if the air hose is damaged or hissing is
heard from the air hose or couplers. Replace the defective air hose.
2. Do not allow people, mobile equipment or vehicles to pass over the
unprotected air hose. Position the air hose away from high traffic
areas, in a reinforced conduit or place planks on both sides of the
air hose to create a protective trench.
3. Prevent damage to the air hose by observing the following:
3.1 Never carry the tool by the air hose.
3.2 Keep the air hose behind the tool and out of the tool's work
path.
3.3 Keep the air hose away from heat, oil, sharp edges or moving
parts.
3.4 Do not wrap the air hose around the tool as sharp edges may
pierce or crack the air hose. Gently coil the hose and either
hang on a hook or fasten with a device to keep hose together
when storing.

8843856 1 in. Heavy Duty Air Impact Wrench V1.0
8 For technical questions call 1-800-665-8685
4. A damaged or disconnected air hose under pressure may whip
around and inflict personal injury or damage the work area. Secure
the compressor's air hose to a fixed or permanent structure with
clamps or cable ties.
5. Install an in-line shutoff valve or regulator to allow immediate
control over the air supply in an emergency, even if a hose is
ruptured.
6. Never direct air at yourself or anyone else.
VIBRATION PRECAUTIONS
1. This tool vibrates during use. Repeated or long-term exposure to
vibration may cause temporary or permanent physical injury. Take
frequent breaks when using the tool.
2. If you feel any medical symptoms related to vibrations (such as
tingling, numbness, and white or blue fingers), seek medical
attention as soon as possible.
3. Wear suitable gloves to reduce the effects of vibration.
4. DO NOT use this tool before consulting a physician if one of the
following applies:
a. Pregnant
b. Impaired blood circulation to
the hands
c. Past hand injuries
d. Nervous system disorders
e. Diabetes
f. Raynaud's Disease
5. Do not smoke while operating the tool. Nicotine reduces the blood
flow to the hands and fingers, increasing the risk of vibration-related
injury.
6. Use the tool with the least amount of vibration, when there is a
choice between different processes.
7. Do not use for extended periods. Take frequent breaks when using
this tool.
8. Let the tool do the work. Grip the tool as lightly as possible (while
still keeping safe control of it).
9. To reduce vibrations, maintain the tool as explained in this manual.
If abnormal vibrations occur, stop using this tool immediately.

V1.0 1 in. Heavy Duty Air Impact Wrench 8843856
Visit www.princessauto.com for more information 9
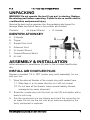
UNPACKING
WARNING! Do not operate the tool if any part is missing. Replace
the missing part before operating. Failure to do so could result in
a malfunction and personal injury.
Remove the parts and accessories from the packaging and inspect for
damage. Make sure that all items in the contents are included.
Contents: • Air Impact Wrench • D- Handle
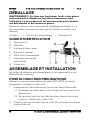
IDENTIFICATION KEY
A D-Handle
B Trigger
C Square Drive Anvil
D Extension Anvil
E Air Impact Wrench
F Forward/Reverse Switch
G Air Inlet
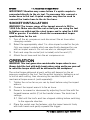
ASSEMBLY & INSTALLATION
Letter references in parenthesis (A) refer to the included Identification
Key.
INSTALL AIR COUPLER PLUG
Prepare a standard 1/4 in. NPT coupler plug (sold separately) for use
with your tool.
1. Wrap the external threads of the coupler plug with sealant tape.
1.1 Wrap tape in a clockwise direction so it will not unravel.
1.2 Do not tape all the threads. Leave several leading threads
unwrapped for easier alignment.
2. Screw the coupler plug into the tool's air inlet (G) and tighten with a
wrench until snug.
3. Run the compressor at a low volume and check the connection for
air leaks. Do not use the tool until all air leaks are repaired or the
faulty component is replaced.

8843856 1 in. Heavy Duty Air Impact Wrench V1.0
10 For technical questions call 1-800-665-8685
IMPORTANT! Vibration may cause failure if a quick coupler is
connected directly to the air tool. To overcome this, connect a
leader hose to the tool. A quick coupler may then be used to
connect the leader hose to the air line hose.
SOCKET INSTALLATION
WARNING! The torque range of the impact wrench is 200 to
1,500 ft-lb. Make sure that the nut or bolt you are using the tool
to tighten can withstand the rated torque and is rated for 4,500
RPM or greater. If available, check the recommended torque
specifications for the nut.
1. Turn off the air compressor and disconnect the air hose when
changing sockets.
2. Select the appropriately sized 1 in. drive impact socket for the job.
Only use impact sockets which are specifically designed for use
with an impact wrench. Do not use worn or damaged sockets.
3. Push and snap the socket (not included) onto the anvil (C).
4. Attach the air hose and turn the air compressor on.
OPERATION
WARNING! This tool generates considerable torque when in use.
Always hold the tool with both hands when using and brace yourself
to resist the torque which will be delivered to the workpiece.
The actual torque delivered at each setting will depend on the air
pressure supplied to the tool. Test the actual torque by tightening a nut
or bolt at each setting, then observing the resultant torque with a
mechanical torque wrench (sold separately).
1. Tighten the nut as far as you can by hand before using the impact
wrench.
2. Connect the impact wrench to the air hose.
3. Power is increased or decreased by adjusting the air flow with the
forward/reverse switch (F) at the handle’s base. The knob has 3
settings.
3.1 Wait until the tool's anvil has stopped rotating before switching
to the opposite direction.
4. Place the socket over the fastener, grip the impact wrench firmly
with both hands and gently squeeze the trigger.

V1.0 1 in. Heavy Duty Air Impact Wrench 8843856
Visit www.princessauto.com for more information 11
4.1 If the tool stalls while tightening, do not raise the output
pressure of the air compressor above 115 PSI. Pressure
above 115 PSI will strip the workpiece and damage the tool,
potentially causing tool failure and serious injury. Use other
appropriate methods and tools to tighten the nut.
5. This tool will stop operation/rotation a few seconds after the trigger
is released.
6. When the fastener is tightened, release the trigger and remove the
tool and socket.
7. Use a mechanical torque wrench to check the fastener torque.
8. When finished with the tool, turn off the air compressor, disconnect
the air hose and discharge any residual air remaining in the tool.
Put the impact wrench away in a safe storage area.
PRESSURE DROP
Apply the air consumption and pressure rate numbers to the tool’s air
inlet, not the compressor’s outlet. Calculate the pressure drop for your
air supply set-up and increase the compressor outlet pressure to
compensate. Make sure you do not exceed the maximum pressure for
any part of your air supply system.
Installing a pressure gauge at the tool inlet is the best way to measure
the air pressure and adjust the compressor’s output.
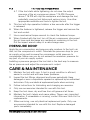
CARE & MAINTENANCE
1. Maintain the tool with care. A tool in good condition is efficient,
easier to control and will have fewer problems.
2. Inspect the tool fittings, alignment and hoses periodically. Have
damaged or worn components repaired or replaced by an authorized
technician. Only use identical replacement parts when servicing.
3. Follow instructions for lubricating and changing accessories.
4. Only use accessories intended for use with this tool.
5. Keep the tool clean, dry and free from oil/grease at all times.
6. Maintain the tool’s labels and name plates. These carry important
information. If unreadable or missing, contact Princess Auto Ltd. for
replacements.
7. When servicing, use only identical replacement parts. Only use
accessories intended for use with this tool. Replace damaged
parts immediately.

8843856 1 in. Heavy Duty Air Impact Wrench V1.0
12 For technical questions call 1-800-665-8685
WARNING! Only qualified service personnel should repair the
tool. An improperly repaired tool may present a hazard to the
user and/or others.
AIR TOOL LUBRICATION
NOTICE! Only use air tool oil to lubricate the tool. Other
lubricants are not suitable and will damage the tool or cause a
malfunction during use.
NOTICE! Never use a penetrating oil to lubricate an air tool.
Penetrating oil acts as a solvent that will dissolve the tool’s
grease packing and may damage the o-rings, causing the tool to
seize or malfunction.
1. All air tools have an internal coating of grease to prevent corrosion
during shipping and storage. Remove this grease by adding a
generous amount of air tool oil in the air inlet and then run the tool
under no load until the exhaust is clear.
2. Manually add a drop or two of air tool oil into the tool’s coupler
plug before each use and after every hour of continuous use. The
tool will not work properly without lubrication and parts will wear
prematurely.
3. Avoid adding too much air tool oil as this can cause premature
power loss and eventual tool failure. A qualified technician will need
to take the tool apart and clean out the excess oil.
4. Apply a generous amount of air tool oil to the tool before storing it
for an extended period of time (overnight, weekend, etc.). Run the
tool for approximately 30 seconds to ensure the oil is evenly
distributed throughout the tool. Store it in a clean and dry location.
TROUBLESHOOTING
Visit a Princess Auto Ltd. location for a solution if the tool does not
function properly or parts are missing. If unable to do so, have a
qualified technician service the tool.

V1.0 1 in. Heavy Duty Air Impact Wrench 8843856
Visit www.princessauto.com for more information 13
PROBLEM(S) POSSIBLE CAUSE(S) SUGGESTED SOLUTION(S)
Tool runs at normal
speed, but loses
power under load.
Motor parts worn. 1. Have a qualified technician
service the tool.
2. Replace tool or parts.
Tool runs slowly. Air
flows slightly from
exhaust.
Motor parts jammed with
dirt particles.
OR
Airflow blocked by dirt.
1. Check air inlet filter for
blockage.
2. Pour air tool lubricating oil
into air inlet as per
lubrication instructions for
clearing shipping grease.
3. Operate tool in short bursts
to clear debris.
4. If tool still jammed,
clean tool
and lubricate per lubrication
instructions.
Tool runs slowly. Air
flows slightly from
exhaust.
1. Air regulator in
closed position.
2.
Damage or excessive
wearing of internal
parts.
1. Open the air regulator to
desired airflow.
2a. Have a
qualified technician
service the tool.
2b. Replace tool or parts.
Tools will not run.
Air flows freely from
exhaust.
Damage or excessive
wearing of internal parts.
1. Have a qualified technician
service the tool.
2. Replace tool or parts.
Tool will not shut off.
1. Throttle valve o-ring
dislodged from inlet
valve seat.
2. Trigger mechanism
jammed or dirty.
1. Replace throttle valve
o-rings.
2. Clean trigger mechanism
and lubricate.
Loss of power or
erratic performance.
1. Excessive drain on
the air hose
. Incorrect
size or type of hose
connectors.
2. Moi
sture or restriction
in the air hose/tank
3. Air compressor has
insufficient flow.
1. Check the air hose and
confirm the hose fitting is
correct for the inlet bushing.
2. Depressurize system and
drain tank and air hose of
water.
3. Ensure tool is connected to
a compressor with a rate
flow that matches the tool.

8843856 1 in. Heavy Duty Air Impact Wrench V1.0
14 For technical questions call 1-800-665-8685
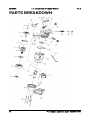
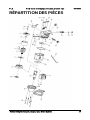
PARTS BREAKDOWN

V1.0 1 in. Heavy Duty Air Impact Wrench 8843856
Visit www.princessauto.com for more information 15
PARTS LIST
# DESCRIPTION QTY
1 Cylinder Assembly 1
2 Rear End Plate Assembly 1
4 Rotor Blade 6
5 Washer 1
9 Washer 1
10 Cap Screw 1
11 Rotor 1
13 Front End Plate Assembly 1
14 Bushing 1
16 Anvil Assembly 1
17 Hammer Cage Assembly 1
20 O-Ring 1
22 Screw 4
25 Handle Assembly 1
26 Gasket 1
27 Gasket 1
28 O-Ring 1
31 Valve Plug 4
32 Screw 4
33 Cylinder Housing 1
34 Front Cover sub assembly
1
35 Washer 1
36 End Cap 1
41 Trigger 1
42 Air Inlet Bushing
Assembly
1
43 Intake plugs 1
44 Handle (L) 1
45 Handle (R) 1
46 Reverse Valve 1
47 Reverse Switch Assembly 1
53 Closure seat 1
54 Hex Key 1
55 Trigger Cover 1
56 Screw 2
57 O-Ring 2

8843856 1 in. Heavy Duty Air Impact Wrench V1.0
16 For technical questions call 1-800-665-8685

V1.0 1 in. Heavy Duty Air Impact Wrench 8843856
Visit www.princessauto.com for more information 17

8843856 1 in. Heavy Duty Air Impact Wrench V1.0
18 For technical questions call 1-800-665-8685

V1,0 8843856
Vous devez lire et comprendre toutes les instructions avant d'utiliser l'appareil. Conservez ce
manuel afin de pouvoir le consulter plus tard.
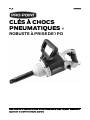
CLÉS À CHOCS
PNEUMATIQUES
ROBUSTE À PRISE DE 1 PO

8843856 Clé à chocs pneumatique robuste à prise de 1 po V1,0
2 En cas de questions techniques, appelez le 1-800-665-8685
SPÉCIFICATIONS
Format de prise carrée 1 po
Plage de couple 200 à 1 500 pi-lb
Couple max. 1 800 pi-lb
Pression nominale 90 à 115 lb/po carré
Débit moyen à un temps de fonctionnement de
15 secondes
15 pi cubes/min
Débit à pleine charge 60 pi cubes/min
Capacité max. de boulon 1-7/16 po
Coups par minute 750 coups/min
Vitesse nominale
4 500 tr/min
Entrée d’air 1/2 po
Diamètre min. de tuyau 1/2 ipo
DÉFINITIONS DE DANGER
Veuillez-vous familiariser avec les avis de danger qui sont présentés dans
ce manuel. Un avis est une alerte indiquant qu'il existe un risque de
dommage à la propriété, de blessure ou de décès si on ne respecte pas
certaines instructions.
DANGER ! Cet avis indique un risque immédiat et particulier qui
entraînera des blessures corporelles graves ou
même la mort si on omet de prendre les précautions
nécessaires.
AVERTISSEMENT ! Cet avis indique un risque particulier ou une pratique
non sécuritaire qui pourrait entraîner des blessures
corporelles graves ou même la mort si on omet de
prendre les précautions nécessaires.
ATTENTION ! Cet avis indique une situation possiblement
dangereuse qui peut entraîner des blessures
mineures ou modérées si on ne procède pas de la
façon recommandée.
AVIS ! Cet avis indique un risque particulier ou une pratique
non sécuritaire qui entraînera des dommages au
niveau de l'équipement ou des biens, mais non des
blessures corporelles.
La page est en cours de chargement...
La page est en cours de chargement...
La page est en cours de chargement...
La page est en cours de chargement...
La page est en cours de chargement...
La page est en cours de chargement...
La page est en cours de chargement...
La page est en cours de chargement...
La page est en cours de chargement...
La page est en cours de chargement...
La page est en cours de chargement...
La page est en cours de chargement...
La page est en cours de chargement...
La page est en cours de chargement...
La page est en cours de chargement...
La page est en cours de chargement...
-
 1
1
-
 2
2
-
 3
3
-
 4
4
-
 5
5
-
 6
6
-
 7
7
-
 8
8
-
 9
9
-
 10
10
-
 11
11
-
 12
12
-
 13
13
-
 14
14
-
 15
15
-
 16
16
-
 17
17
-
 18
18
-
 19
19
-
 20
20
-
 21
21
-
 22
22
-
 23
23
-
 24
24
-
 25
25
-
 26
26
-
 27
27
-
 28
28
-
 29
29
-
 30
30
-
 31
31
-
 32
32
-
 33
33
-
 34
34
-
 35
35
-
 36
36


PROPOINT 8843856 Le manuel du propriétaire
- Catégorie
- Clés à chocs électriques
- Taper
- Le manuel du propriétaire
dans d''autres langues
- English: PROPOINT 8843856 Owner's manual
Documents connexes
Autres documents
-
Powerfist 8844045 Le manuel du propriétaire
-
Power Fist 8583544 Le manuel du propriétaire
-
-
-
-
-
-