Tripp Lite WEBCARDLX Le manuel du propriétaire
- Taper
- Le manuel du propriétaire

1
Owner’s Manual
SNMP/Web Management Accessory Card
Models: WEBCARDLX (AG-040A),
WEBCARDLXE (AG-06E5), WEBCARDLXMINI
1111 W. 35th Street, Chicago, IL 60609 USA • tripplite.com/support
Copyright © 2022 Tripp Lite. All rights reserved.
Read this manual carefully before installation. A separate downloadable
User’s Guide can be found by going to tripplite.com/support and typing
WEBCARDLX in the search field. Refer to the User's Guide for additional
information about configuration and operation.
WARRANTY REGISTRATION
Register your product today and be
automatically entered to win an ISOBAR®
surge protector in our monthly drawing!
tripplite.com/warranty
Español 9 • Français 17 • Русский 25

2
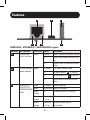
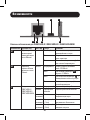
A Ethernet Port: RJ45 jack connects the WEBCARDLX, WEBCARDLXE or
WEBCARDLXMINI to the network using a standard Ethernet patch cable. The Link
LED A1 and Status LED A2 indicate the operating conditions, as shown in the
table on page 3.
B Micro-USB Port: Use this port to directly connect with a computer running a
terminal emulation program. A cable (part number 73156A) is included with the
WEBCARDLX, WEBCARDLXE or WEBCARDLXMINI. If you need to order a
replacement cable, contact Tripp Lite Customer Support at 773.869.1234.
C Type-A USB Port: Use this port to connect a Tripp Lite ENVIROSENSE 2 module
(E2MT, E2MTDO, E2MTDI, E2MTHDI) for a variety of environmental monitoring and
control options. See tripplite.com for more information about these modules.
Note: Do not connect a keyboard or mouse to this port.
D Reset Button: The reset button is recessed, accessible through a small hole
under the RJ45 network port. Use a paper clip or other suitable object to press the
reset button for 3 seconds to reboot the network interface. Rebooting the network
interface will not erase network settings or interrupt AC power. Press and hold the
reset button for 20 seconds to restore the network interface to its factory default
settings. Restoring to the factory default will erase all previously saved data—
including network settings—without interrupting AC power.
E Status LED: Shows WEBCARDLX, WEBCARDLXE or WEBCARDLXMINI status. See
the table on page 3 for a description of LED behavior.
Features
Overview
The WEBCARDLX, WEBCARDLXE or WEBCARDLXMINI allows users to operate any
compatible Tripp Lite UPS System or network-enabled PDU as a managed device on
the network, accessible via Web browser, Network Management Station or telnet/SSH.
This manual refers to installing the card in a UPS system, but the same instructions
apply to installing the card in a compatible PDU.

3
Features
CBA
EA2DA1
WEBCARDLX / WEBCARDLXE / WEBCARDLXMINI Legend
Identifier LED Function LED Color Status Description
A1 Ethernet Link/
Activity Indicator
Green Flashing There is network activity on the port
Off There is no network activity on the
port
Off Perform reset via interface or reset
button
A2 Ethernet Network
Speed Indicator
Yellow On steady 100 Mbps network speed
Off 10 Mbps speed if A1 is flashing
Off
No network activity if
A1
is also off
Off
Perform reset via interface or reset
button
EWEBCARDLX /
WEBCARDLXE /
WEBCARDLXMINI
Status
Green On steady Normal operation
Green Single flash Power up indicator
Green/
Orange
Off No power or card is initializing
Green/
Orange
Alternating
(~1/sec.)
Software update in progress
Green/
Orange
Alternating
(~2/sec.)
Restoring factory default
configuration

4
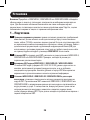
Warning: When handling the WEBCARDLX, WEBCARDLXE or WEBCARDLXMINI, follow
standard ESD (electrostatic discharge) precautions to avoid damaging the card. For
your safety, you should also read the documentation that came with your UPS system
or PDU to familiarize yourself with precautions against electric shock.
Installation
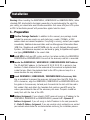
1 - Preparation
1-1
Confirm Package Contents: In addition to this manual, your package should
include the accessory card in an anti-static bag, a cable (73156A), a MAC
address label and several faceplates. If anything is missing, contact your supplier
immediately. Additional documentation and two Management Information Base
(MIB) files (Tripplite.mib and RFC1628.mib) for use with Network Management
Systems (not otherwise required) can be found by going to tripplite.com/support
and typing WEBCARDLX in the search field.
1-2
Install UPS: Install your UPS system and turn it on before installing the WEBCARDLX,
WEBCARDLXE or WEBCARDLXMINI. Ensure that the accessory card slot is accessible.
1-3
Locate the WEBCARDLX / WEBCARDLXE / WEBCARDLXMINI MAC Address:
The 12-digit MAC address (in the format XX XX XX XX XX XX) is printed in two
locations: a label attached to the underside of the card and a duplicate label
inside the box. Attach the duplicate label to the UPS system or keep it in a
secure location for easy reference.
1-4
Insert WEBCARDLX / WEBCARDLXE / WEBCARDLXMINI in Accessory Slot:
Use a screwdriver to remove the accessory slot cover from the UPS. While the
UPS is turned on, align the WEBCARDLX, WEBCARDLXE or WEBCARDLXMINI with
the guides in the accessory slot and push the card into the slot until the card is
fully seated. Align and attach the faceplate that matches your UPS using the
screws you removed to take off the accessory slot cover. The ports should be
nearly flush with the face of the UPS.
1-5
Address Assignment: If your network's DHCP server will assign an IP address to the
WEBCARDLX, WEBCARDLXE or WEBCARDLXMINI, proceed to 2 - Dynamic IP
Address Assignment. If you will assign a static IP address to the card, proceed to
3 - Static IP Address Assignment. If you are uncertain which method to use, contact
your network administrator for assistance before continuing the installation process.

5
Installation
2 - Dynamic IP Address Assignment
2-1
Connect WEBCARDLX / WEBCARDLXE / WEBCARDLXMINI to Network:
Connect a standard Ethernet patch cable to your network using the RJ45
Ethernet port on your WEBCARDLX, WEBCARDLXE or WEBCARDLXMINI.
Note: This port does not support PoE (Power over Ethernet) applications.
The card will attempt to obtain an IP address via DHCP. This may take as long as
several minutes, depending on your network environment.
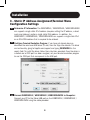
2-2
Determine IP Address: To identify the IP address assigned to the WEBCARDLX,
WEBCARDLXE or WEBCARDLXMINI, contact your network administrator and
provide the MAC address of the WEBCARDLX, WEBCARDLXE or WEBCARDLXMINI.
You can also determine the IP address locally at the card. If you do not already
have the serial over USB driver installed on your PC, you can download it from
tripplite.com/support by typing WEBCARDLX in the search field. Select the driver
named “TL-cdc”. To install it, follow the instructions provided with the driver.
Once the driver is installed and the COM port has been assigned, start a
terminal emulation program, such as Tera Term Pro. Configure it to use the
assigned COM port and use the following serial port settings: 115.2Kbps, 8,
NONE, 1. Connect the USB cable to the PC and the Micro-USB end to the
Micro-USB port on the WEBCARDLX, WEBCARDLXE or WEBCARDLXMINI. When
the login prompt appears, login as localadmin / localadmin. When the Menu
appears, navigate to "3- Network Configuration", then to "1- IP Configuration".
The assigned IP address will be displayed. After you have determined the IP
address, proceed to 4 - Test and Configure.
Note: You may wish to request a long-term lease period for the IP address, depending on
your application.
Note: PowerAlert® Device Manager and the WEBCARDLX, WEBCARDLXE or
WEBCARDLXMINI support both IPv4 and IPv6. The card is set up by default to receive a
DHCP address for IPv4, IPv6 or both. Receiving both addresses allows connection to the
card via either the IPv4 or IPv6 address.

6
Installation
3 - Static IP Address Assignment/Terminal Menu
Configuration Settings
3-1
Determine IP Information: The WEBCARDLX / WEBCARDLXE / WEBCARDLXMINI
can support a single static IPv4 address (requires setting the IP address, subnet
mask and gateway) and/or a single static IPv6 address. In addition, the
WEBCARDLX / WEBCARDLXE / WEBCARDLXMINI can support a single static IPv4
or an IPv6 DNS address that is required to be entered.
3-2
Configure Terminal Emulation Program: If you have not already done so,
download the serial over USB driver (TL-cdc) from the Tripp Lite website. The driver
can be found by going to tripplite.com/support and typing WEBCARDLX in the
search field. To install the driver, follow the instructions provided. Once the driver is
installed and a COM port has been assigned, set your terminal emulation program
to use the COM port that corresponds to the USB port.
3-3
Connect WEBCARDLX / WEBCARDLXE / WEBCARDLXMINI to Computer:
Connect your PC to the Micro-USB port on the WEBCARDLX / WEBCARDLXE /
WEBCARDLXMINI using the cable provided.

7
Installation
4 - Test and Configure
4-1
Test Network Connection: After an IP address has been assigned to the card,
try to access it with a Web browser. Open Firefox or Chrome on a computer
connected to the network and enter http:// or https:// followed by the IP address.
The login screen for PowerAlert Device Manager will display. The default user
name is localadmin and the password is localadmin. After you enter the user
name and password, the PowerAlert Status page will appear in the browser
window. For more information about configuration and operation of the managed
device, refer to the WEBCARDLX / WEBCARDLXE / WEBCARDLXMINI User's Guide
located in the support section of the WEBCARDLX / WEBCARDLXE /
WEBCARDLXMINI product web page.
Technical Support
Technical Support can be found at: tripplite.com/support
3-4
The card will display a Linux-style login after boot up. Login as
localadmin / localadmin to get the standard menu.
Note: User names and passwords are case sensitive.
3-5
From the main menu:
a. Select Option 3: Network Configuration
b. Select Option 1: IP Configuration
c. Select Option 3: IPv4 setting on Option 4: IPv6 settings
d. Select Option 1: Method
e. Select Option 2: Static
Assign the address, subnet mask, gateway, etc. Save your settings by selecting
"A" (apply). Choose “y” to restart PowerAlert now. Close your terminal session.
3-6
Remove Cable: Remove the cable and proceed to 4 - Test and Configure.

8
Warranty and Product Registration
LIMITED WARRANTY
Seller warrants this product, if used in accordance with all applicable instructions, to be free from original defects in material and workmanship for a
period of 2 years (except internal UPS system batteries outside USA and Canada, 1 year) from the date of initial purchase. If the product should prove
defective in material or workmanship within that period, Seller will repair or replace the product, in its sole discretion. Service under this Warranty can
only be obtained by your delivering or shipping the product (with all shipping or delivery charges prepaid) to: Tripp Lite, 1111 W. 35th Street, Chicago, IL
60609, USA. Seller will pay return shipping charges. Visit tripplite.com/support before sending any equipment back for repair.
THIS WARRANTY DOES NOT APPLY TO NORMAL WEAR OR TO DAMAGE RESULTING FROM ACCIDENT, MISUSE, ABUSE OR NEGLECT.
SELLER MAKES NO EXPRESS WARRANTIES OTHER THAN THE WARRANTY EXPRESSLY SET FORTH HEREIN. EXCEPT TO THE EXTENT
PROHIBITED BY APPLICABLE LAW, ALL IMPLIED WARRANTIES, INCLUDING ALL WARRANTIES OF MERCHANTABILITY OR FITNESS, ARE
LIMITED IN DURATION TO THE WARRANTY PERIOD SET FORTH ABOVE; AND THIS WARRANTY EXPRESSLY EXCLUDES ALL INCIDENTAL
AND CONSEQUENTIAL DAMAGES. (Some states do not allow limitations on how long an implied warranty lasts, and some states do not allow the
exclusion or limitation of incidental or consequential damages, so the above limitations or exclusions may not apply to you. This Warranty gives you
specific legal rights, and you may have other rights which vary from jurisdiction to jurisdiction).
WARNING: The individual user should take care to determine prior to use whether this device is suitable, adequate or safe for the use intended. Since
individual applications are subject to great variation, the manufacturer makes no representation or warranty as to the suitability or fitness of these
devices for any specific application.
Not compatible with PoE (Power over Ethernet) applications.
PRODUCT REGISTRATION
Visit tripplite.com/warranty today to register your new Tripp Lite product. You'll be automatically entered into a drawing for a chance to win a FREE
Tripp Lite product!*
* No purchase necessary. Void where prohibited. Some restrictions apply. See website for details.
FCC Notice
This device complies with part 15 of the FCC Rules. Operation is subject to the following two conditions: (1) This device may not cause harmful
interference, and (2) this device must accept any interference received, including interference that may cause undesired operation.
This equipment has been tested and found to comply with the limits for a Class A digital device, pursuant to part 15 of the FCC Rules. These limits
are designed to provide reasonable protection against harmful interference when the equipment is operated in a commercial environment. This
equipment generates, uses, and can radiate radio frequency energy and, if not installed and used in accordance with the instruction manual, may
cause harmful interference to radio communications. Operation of this equipment in a residential area is likely to cause harmful interference in which
case the user will be required to correct the interference at his own expense. The user must use shielded cables and connectors with this product.
Any changes or modifications to this product not expressly approved by the party responsible for compliance could void the user's authority to
operate the equipment.
Regulatory Compliance Identification Numbers
For the purpose of regulatory compliance certifications and identification, your Tripp Lite product has been assigned a unique series number. The
series number can be found on the product nameplate label, along with all required approval markings and information. When requesting compliance
information for this product, always refer to the series number. The series number should not be confused with the marketing name or model number
of the product.
Warning
Use of this equipment in life support applications where failure of this equipment can reasonably be expected to cause the failure of the life support
equipment or to significantly affect its safety or effectiveness is not recommended.
Tripp Lite has a policy of continuous improvement. Product specifications are subject to change without notice. Photos and illustrations may differ
slightly from actual products.
1111 W. 35th Street, Chicago, IL 60609 USA • tripplite.com/support
22-01-370 9335A5_RevE

9
Manual del Propietario
Tarjeta Para Administración SNMP/Web
Modelos: WEBCARDLX (AG-040A),
WEBCARDLXE (AG-06E5), WEBCARDLXMINI
English 1 • Français 17 • Русский 25
1111 W. 35th Street, Chicago, IL 60609 USA • tripplite.com/support
Copyright © 2022 Tripp Lite. Todos los derechos reservados.
Antes de la instalación, lea cuidadosamente este manual. Puede conseguir
una Guía de Usuario descargándola de tripplite.com/support escribiendo
WEBCARDLX en el campo de búsqueda. Para información adicional acerca
de la configuración y operación, consulte la Guía de Usuario.

10
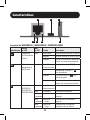
A Puerto Ethernet: El enchufe RJ45 conecta la WEBCARDLX, WEBCARDLXE o
WEBCARDLXMINI a la red usando un cable patch estándar de Ethernet. El LED de
Liga A1 y el LED de Estado A2 indican las condiciones de operación, como se
muestra en la Tabla de Leyendas de WEBCARDLX / WEBCARDLXMINI.
B
Puerto Micro-USB: Use este puerto para conectar directamente con una
computadora que opere un programa de emulación de terminal. Con la
WEBCARDLX, WEBCARDLXE o WEBCARDLXMINI se incluye un cable (número de
parte 73156A). Si necesita ordenar un cable de repuesto, póngase en contacto
con Soporte al Usuario de Tripp Lite al +1.773.869.1234.
C Puerto USB Type-A: Use este puerto para conectar un módulo ENVIROSENSE 2
de Tripp Lite (E2MT, E2MTDO, E2MTDI, E2MTHDI) para una variedad de opciones
de monitoreo y control ambiental. Para información adicional acerca de estos
módulos, vea tripplite.com.
Nota: No conecte un teclado o mouse a este puerto.
D
Botón de Restaurar: El botón de restauración está empotrado, es accesible a través de
un pequeño orificio debajo el puerto de red RJ45. Use un clip para papel u otro objeto
adecuado para oprimir el botón de restauración durante 3 segundos para reiniciar la
interfaz de red. El reinicio de la interfaz de red no borrará los parámetros de red ni
interrumpirá la alimentación de CA. Presione y sostenga por 20 segundos el botón de
restauración para restablecer la interfaz de red a sus parámetros predeterminados de
fábrica. La restauración a los valores predeterminados de fábrica borrará todos los datos
previamente guardados, incluidos los ajustes de red, sin interrumpir la alimentación de CA.
E
LED de Estado: Muestra el estado de la WEBCARDLX, WEBCARDLXE o WEBCARDLXMINI.
Vea la tabla siguiente para una descripción del comportamiento de los LEDs.
Vista General
La WEBCARDLX, WEBCARDLXE o WEBCARDLXMINI permite a los usuarios operar
cualquier sistema UPS de Tripp Lite compatible o PDU habilitado para red como un
dispositivo administrado en la red, accesible mediante navegador de red, estación de
administración de red o telnet/SSH. Este manual hace referencia a la instalación de
la tarjeta en un sistema UPS, pero las mismas instrucciones se aplican a la
instalación de cualquier dispositivo compatible de Tripp Lite.
Características

11
Características
CBA
EA2DA1
Leyendas de WEBCARDLX / WEBCARDLXE / WEBCARDLXMINI
Identificador
Función
del LED
Color
del LED Estado Descripción
A1 Indicador de
Liga/Actividad de
Ethernet
Verde Destellando
Existe actividad de red en el puerto
Apagado
No existe actividad de red en el puerto
Apagado
Efectúe la restauración mediante la
interfaz o el botón de restauración
A2 Indicador de
Velocidad de la
Red Ethernet
Amarillo Encendido
permanentemente
Velocidad de red de 100 Mbps
Apagado Velocidad de 10 Mbps si
A1
está destellando
Apagado
Sin actividad de red si
A1
está
también apagado
Apagado
Efectúe la restauración mediante la
interfaz o el botón de restauración
EEstado de la
WEBCARDLX /
WEBCARDLXE /
WEBCARDLXMINI
Verde Encendido
permanentemente
Operación normal
Verde Un destello Indicador de encendido
Verde/
Anaranjado
Apagado Sin energía o la tarjeta se está
iniciando
Verde/
Anaranjado
Alternando
(~1/seg.)
Actualización de software en
progreso
Verde/
Anaranjado
Alternando
(~2/seg.)
Restableciendo configuración
predeterminada de fábrica

12
Advertencia: Al manejar la WEBCARDLX, WEBCARDLXE o WEBCARDLXMINI, siga las
precauciones estándar de ESD (descarga electrostática) para evitar dañar la tarjeta.
Por su seguridad, debe leer también la documentación que acompaña a su dispositivo
Tripp Lite para familiarizarse con las precauciones contra descargas eléctricas.
Instalación
1 - Preparación
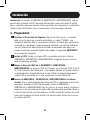
1-1
Confirme el Contenido del Paquete: Además de este manual, su paquete
debe incluir la tarjeta en una bolsa antiestática, un cable (73156A), una
etiqueta de dirección MAC y varias placas frontales. Si faltara algo, contacte de
inmediato a su proveedor. La documentación adicional y los archivos MIB para
uso con Sistemas de Administración de Red (no requeridos para algo más)
pueden encontrarse visitando tripplite.com/support e ingresando WEBCARDLX
en el campo de búsqueda.
1-2
Instale el UPS: Instale su sistema UPS y enciéndalo antes de instalar la
WEBCARDLX, WEBCARDLXE o WEBCARDLXMINI. Asegúrese de que la ranura
para la tarjeta sea accesible.
1-3
Ubique la dirección MAC de la WEBCARDLX / WEBCARDLXE /
WEBCARDLXMINI: La dirección MAC de 12 dígitos (en el formato XX XX XX XX XX
XX) está impresa en dos ubicaciones: una etiqueta adherida en la parte inferior y
un duplicado de la etiqueta dentro de la caja. Adhiera la etiqueta duplicada al
sistema UPS o consérvela en un sitio seguro para una fácil referencia.
1-4
Inserte la WEBCARDLX / WEBCARDLXE / WEBCARDLXMINIen la Ranura
Auxiliar: Use un desatornillador para retirar del UPS la cubierta de la ranura de
accesorios. Mientras el UPS está encendido, alinee la WEBCARDLX,
WEBCARDLXE o WEBCARDLXMINI con las guías en la ranura auxiliar y empuje la
tarjeta en la ranura hasta que la tarjeta esté completamente asentada. Alinee e
instale la placa frontal que concuerde con su UPS usando los tornillos que retiró
para sacar la tapa de la ranura auxiliar. Los puertos deben estar casi al ras con
la carátula del UPS.

13
Instalación
2 - Asignación de Dirección IP Dinámica
2-1
Conecte la WEBCARDLX / WEBCARDLXE / WEBCARDLXMINI a la Red:
Conecte un cable patch estándar para Ethernet a su red usando el puerto RJ45
Ethernet en su WEBCARDLX, WEBCARDLXE o WEBCARDLXMINI.
Nota: Este puerto no admite aplicaciones de PoE (Energía sobre la Ethernet).
La tarjeta intentará obtener una dirección IP mediante DHCP. Esto puede tomar
unos minutos, dependiendo de su entorno de red.
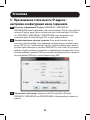
2-2
Determine la Dirección IP: Para identificar la dirección IP asignada a la WEBCARDLX,
WEBCARDLXE o WEBCARDLXMINI, póngase en contacto con su administrador de red y
proporcione la dirección MAC de la WEBCARDLX / WEBCARDLXE / WEBCARDLXMINI.
Puede también determinar la dirección IP localmente en la tarjeta.
Una vez que el controlador esté instalado y el puerto COM haya sido asignado,
inicie un programa de emulación de terminal, como Tera Term Pro. Configúrelo
para usar el puerto COM asignado y use los siguientes parámetros de puerto
serial: 115.2Kbps, 8, NONE, 1. Conecte el cable USB a la PC y el extremo
Micro-USB al puerto Micro-USB en la WEBCARDLX, WEBCARDLXE o
WEBCARDLXMINI. Cuando aparezca la indicación de inicio de sesión, inicie
sesión con el usuario / contraseña de administrador localadmin / localadmin.
Cuando aparezca el Menú, navegue a "3- Configuración de Red", entonces a
"1- Configuración de IP". Se desplegará la dirección IP asignada. Después de
que haya determinado la dirección IP, proceda a 4 - Pruebe y Configure.
Nota: Puede desear solicitar un período de concesión a largo plazo para la dirección IP,
dependiendo de su aplicación.
Nota: El Administrador de Dispositivos PowerAlert® y la WEBCARDLX / WEBCARDLXE /
WEBCARDLXMINI soportan IPv4 y IPv6. La tarjeta está predeterminada para recibir una
dirección DHCP para IPv4, IPv6 o ambas. Al recibir ambas direcciones permite la conexión a
la tarjeta mediante cualquier dirección IPv4 o IPv6.
1-5
Asignación de la Dirección: Si el servidor DHCP de su red asignará automáticamente
una dirección IP a la WEBCARDLX, WEBCARDLXE o WEBCARDLXMINI, proceda a 2 -
Asignación de Dirección IP Dinámica. Si usted asignará una dirección IP estática a
la WEBCARDLX, proceda a 3 - Asignación de Dirección IP Estática. Si no está
seguro de cuál método usar, póngase en contacto con su administrador de red para
asistencia antes de continuar el proceso de instalación.

14
Instalación
3 - Parámetros de configuración de Menú de
Asignación/Terminal de la Dirección IP Estática
3-1
Determine la Información IP: La WEBCARDLX / WEBCARDLXE /
WEBCARDLXMINI puede soportar una sola dirección IPv4 estática (requiere
configurar la dirección IP, la máscara de subred y el portal) y/o una sola dirección
IPv6 estática. Además la WEBCARDLX / WEBCARDLXE / WEBCARDLXMINI puede
soportar una sola dirección DNS IPv4 o IPv6 estática que se requiere ingresar.
3-2
Configure el Programa de Emulación de Terminal: Si aún no lo ha hecho,
descargue el controlador serial sobre USB (TL-cdc) desde el sitio web de
Tripp Lite. El controlador puede encontrarse visitando tripplite.com/support e
ingresando a WEBCARDLX en el campo de búsqueda. Para instalar el
controlador, siga las instrucciones suministradas. Una vez instalado el
controlador y que se haya asignado el puerto COM, configure su programa de
emulación de terminal para usar el puerto COM que corresponda al puerto USB.
3-3
Conecte WEBCARDLX / WEBCARDLXE / WEBCARDLXMINI a la
Computadora: Conecte su PC al puerto Micro-USB en la WEBCARDLX,
WEBCARDLXE o WEBCARDLXMINI usando el cable suministrado.

15
Instalación
4 - Pruebe y Configure
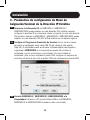
4-1
Pruebe la Conexión de Red: Después que se ha asignado una dirección IP a la
tarjeta, intente acceder a ella usando un navegador de Web. Abra Firefox o
Chrome en una computadora conectada a la red e ingrese http:// o https://
seguido por la dirección IP. Se mostrará la pantalla de inicio de sesión para el
Administrador de Dispositivos PowerAlert. El nombre de usuario predeterminado
es localadmin y la contraseña es localadmin. Después de ingresar el nombre de
usuario y contraseña, aparecerá la página de estado de PowerAlert en la ventana
del navegador. Para obtener más información sobre la configuración y operación
del dispositivo administrado, consulte la Guía del Usuario de WEBCARDLX /
WEBCARDLXE / WEBCARDLXMINI localizada en la sección de soporte de la página
web del producto WEBCARDLX, WEBCARDLXE o WEBCARDLXMINI.
Soporte Técnico
El Soporte Técnico puede localizarse en: tripplite.com/support
3-4
La tarjeta mostrará un inicio de sesión de estilo Linux después del arranque.
Inicie sesión con el usuario / contraseña de administrador localadmin /
localadmin para obtener el menú estándar.
Nota: Los nombres y contraseñas de usuario son sensibles a las mayúsculas y minúsculas.
3-5
Desde el menú principal:
a. Seleccione la Opción 3: Configuración de Red
b. Seleccione la Opción 1: Configuración de IP
c. Seleccione la Opción 3:
Configuración de IPv4 en la Opción 4: parámetros de IPv6
d. Seleccione la Opción 1: Método
e. Seleccione la Opción 2: Estática
Asigne la dirección, máscara de subred, portal, etc. Guarde sus parámetros
seleccionando "A" (aplique). Elija “y” para reiniciar PowerAlert ahora. Elija su
sesión de terminal.
3-6
Retire el Cable: Retire el cable y proceda a 4 - Pruebe y Configure.

16
Garantía
GARANTÍA LIMITADA
El vendedor garantiza este producto, si se usa de acuerdo con todas las instrucciones aplicables, de que está libre de defectos
en material y mano de obra por un período de 2 años (excepto baterías internas del sistema UPS fuera de EE.UU. y Canadá: 1
año) desde la fecha de compra inicial. Si el producto prueba ser defectuoso en material o mano de obra dentro de ese período, el
vendedor reparará o reemplazará el producto a su entera discreción. El servicio bajo esta garantía sólo puede obtenerse enviando
o embarcando el producto (con todos los cargos de envío o embarque prepagados) a: Tripp Lite, 1111 W. 35th Street, Chicago, IL
60609, USA. El vendedor reembolsará los cargos de embarque. Antes de devolver cualquier equipo para reparación, visite
tripplite.com/support.
ESTA GARANTÍA NO APLICA AL DESGASTE NORMAL O A DAÑOS RESULTANTES DE ACCIDENTES, MAL USO, ABUSO
O NEGLIGENCIA. EL VENDEDOR NO OTORGA GARANTÍAS EXPRESAS DISTINTAS DE LA ESTIPULADA AQUÍ. EXCEPTO
A LA EXTENSIÓN PROHIBIDA POR LA LEY APLICABLE, TODAS LAS GARANTÍAS IMPLÍCITAS, INCLUYENDO TODAS LAS
GARANTÍAS DE COMERCIALIZACIÓN O IDONEIDAD, ESTÁN LIMITADAS EN DURACIÓN AL PERÍODO DE GARANTÍA
ESTABLECIDO; Y ESTA GARANTÍA EXCLUYE EXPRESAMENTE TODOS LOS DAÑOS INCIDENTALES Y CONSECUENCIALES.
(Algunos estados no permiten limitaciones en cuanto dura una garantía y algunos estados no permiten la exclusión de limitación de
daños incidentales o consecuenciales, de modo que las limitaciones anteriores pueden no aplicar para usted. Esta garantía le otorga
derechos legales específicos y usted puede tener otros derechos que pueden variar de una jurisdicción a otra).
ADVERTENCIA: Antes de usarlo, cada usuario debe debe tener cuidado al determinar si este dispositivo es adecuado o seguro para
el uso previsto. Ya que las aplicaciones individuales están sujetas a gran variación, el fabricante no garantiza la adecuación de estos
dispositivos para alguna aplicación específica.
No compatible con aplicaciones de PoE (Energía sobre la Ethernet).
Cumplimiento de las normas de los números de identificación
Para fines de identificación y certificación del cumplimiento de las normas, su producto Tripp Lite tiene asignado un número de
serie único. Puede encontrar el número de serie en la etiqueta de la placa de identificación del producto, junto con los símbolos
de aprobación e información requeridos. Al solicitar información sobre el cumplimiento de las normas para este producto, siempre
mencione el número de serie. El número de serie no debe ser confundido con el nombre de identificación ni con el número de modelo
del producto.
Advertencia
El uso de este equipo en aplicaciones de soporte de vida en donde la falla de este equipo pueda razonablemente hacer suponer que
causará fallas en el equipo de soporte de vida o afecte significativamente su seguridad o efectividad, no está recomendado.
Tripp Lite tiene una política de mejora continua. Las especificaciones están sujetas a cambio sin previo aviso. Las fotografías e
ilustraciones pueden diferir ligeramente de los productos reales.
1111 W. 35th Street, Chicago, IL 60609 USA • tripplite.com/support
22-01-370 93-35A5_RevE

17
Manuel de l'utilisateur
Carte auxiliaire de gestion SNMP/Web
Modèles : WEBCARDLX (AG-040A),
WEBCARDLXE (AG-06E5), WEBCARDLXMINI
English 1 • Español 9 • Русский 25
1111 W. 35th Street, Chicago, IL 60609 USA • tripplite.com/support
Droits d'auteur © 2022 Tripp Lite. Tous droits réservés.
Lire attentivement ce manuel avant l’installation. Un guide de l'utilisateur
indépendant téléchargeable est disponible en visitant tripplite.com/support
et en inscrivant WEBCARDLX dans le champ de recherche. Consulter le guide
de l’utilisateur pour des renseignements supplémentaires au sujet de la
configuration et du fonctionnement.

18
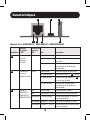
A Port Ethernet : Utiliser cette prise RJ45 pour connecter la WEBCARDLX, WEBCARDLXE
ou WEBCARDLXMINI au réseau avec un cordon de raccordement Ethernet standard. Le
voyant à DEL Link (lien) A1 et le voyant à DEL Status (état) A2 indiquent plusieurs
conditions de fonctionnement comme indiquées dans le tableau Légende de la
WEBCARDLX / WEBCARDLXMINI.
B
Port Micro-USB : Utiliser ce port pour fournir un raccordement terminal direct à un
ordinateur avec un émulateur de terminal. Un câble (numéro de pièce 73156A) est inclus
avec la WEBCARDLX, WEBCARDLXE ou WEBCARDLXMINI. Pour commander un câble de
remplacement, contacter le service à la clientèle de Tripp Lite au 773 869-1234.
C Port USB de type A : Utiliser ce port pour connecter un module ENVIROSENSE 2 de
Tripp Lite (E2MT, E2MTDO, E2MTDI, E2MTHDI) pour une variété d'options de
surveillance environnementale et de contrôle. Visitez tripplite.com pour des informations
supplémentaires sur ces modules.
Remarque : Ne pas brancher un clavier ou une souris à ce port.
D Bouton de réinitialisation : Le bouton de réinitialisation est encastré et est accessible
au moyen d'un petit trou sous le port de réseau RJ45. À l'aide d'un trombone ou d'un
autre objet similaire, appuyer sur le bouton de réinitialisation pendant 3 secondes pour
redémarrer l'interface du réseau. Le fait de redémarrer l'interface du réseau n'effacera
pas les paramètres de configuration du réseau, et ne coupera pas non plus
l'alimentation secteur. Appuyer sur le bouton de réinitialisation et le maintenir enfoncé
pendant 20 secondes pour rétablir les paramètres d'usine par défaut de l'interface du
réseau. Rétablir la configuration d'usine par défaut effacera toutes les données
précédemment sauvegardées, y compris les paramètres réseau, sans couper
l'alimentation secteur.
E Voyant à DEL Status (état) : Indique l'état de la WEBCARDLX, WEBCARDLXE ou
WEBCARDLXMINI. Voir le tableau ci-dessous pour une description des voyants à DEL.
Caractéristiques
Aperçu
La WEBCARDLX, WEBCARDLXE ou WEBCARDLXMINI permet aux utilisateurs d'utiliser tout
onduleur compatible Tripp Lite ou toute unité de distribution d'alimentation (PDU) pris(e) en
charge par le réseau comme un dispositif géré sur le réseau, accessible au moyen d'un
navigateur Web, une station de gestion de réseau ou telnet/SSH. Ce manuel fournit des
instructions concernant l'installation de la carte dans un onduleur, mais les mêmes
instructions s'appliquent pour installer la carte dans d'autres appareils compatibles Tripp Lite.

19
Caractéristiques
CBA
EA2DA1
Légende de la WEBCARDLX / WEBCARDLXE / WEBCARDLXMINI
Identifiant
Fonction
du voyant
à DEL
Couleur du
voyant à
DEL État Description
A1 Lien
Ethernet/
Indicateur
d'activité
Vert Clignotant
Activité du réseau présente sur le port
Off (hors tension) Aucune activité du réseau présente
sur le port
Off (hors tension) Effectuer une réinitialisation
via l'interface ou le bouton de
réinitialisation
A2 Indicateur de
vitesse du
réseau Ethernet
Jaune Allumé solide
Vitesse du réseau de 100 Mbps
Off (hors tension)
Vitesse de 10 Mbps si
A1
clignote
Off (hors tension) Aucune activité du réseau si A1
est aussi hors tension
Off (hors tension) Effectuer une réinitialisation
via l'interface ou le bouton de
réinitialisation
EÉtat de la
WEBCARDLX /
WEBCARDLXE /
WEBCARDLXMINI
Vert Allumé solide Fonctionnement normal
Vert
Clignotement unique
Indicateur de mise sous tension
Vert/orange Off (hors tension) Aucune alimentation ou carte en
cours d'initialisation
Vert/orange Alternatif (~1/sec.) Mise à jour du logiciel en cours
Vert/orange Alternatif (~2/sec.) Rétablissement de la configuration
d'usine par défaut

20
Avertissement : Lors de la manutention de la WEBCARDLX, WEBCARDLXE ou
WEBCARDLXMINI, respecter les précautions standard pour les DES (décharges
électrostatiques) afin d'éviter d'endommager la carte. Pour votre sécurité, il est également
recommandé de lire la documentation qui accompagne le produit Tripp Lite afin de vous
familiariser avec les précautions à prendre pour éviter les décharges électriques.
Installation
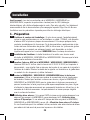
1 - Préparation
1-1
Confirmer le contenu de l'emballage : En plus de ce manuel, l'emballage devrait
inclure la carte auxiliaire dans un sac antistatique, un câble (73156A), une étiquette
d’adresse MAC et plusieurs plaques de recouvrement. S'il manque quelque chose,
contacter immédiatement le fournisseur. De la documentation supplémentaire et des
fichiers de base d'information de gestion (MIB) à utiliser avec les systèmes de gestion
de réseau (qui ne seraient pas autrement requis) sont disponibles en visitant
tripplite.com/support et en inscrivant WEBCARDLX dans le champ de recherche.
1-2
Installation de l'onduleur : Installer l'onduleur et le mettre sous tension avant
d'installer la WEBCARDLX, WEBCARDLXE ou WEBCARDLXMINI. S'assurer que la fente
pour la carte auxiliaire est accessible.
1-3
Localiser l'adresse MAC de la WEBCARDLX / WEBCARDLXE / WEBCARDLXMINI :
L'adresse MAC de 12 chiffres (dont le format est XX XX XX XX XX XX) est imprimée à
deux endroits : une vignette fixée en dessous de la carte et une copie de la vignette à
l'intérieur de la boîte. Attacher le double de la vignette sur l'onduleur ou la garder dans
un endroit sûr afin de pouvoir s'y référer facilement.
1-4
Insérer la WEBCARDLX / WEBCARDLXE / WEBCARDLXMINI dans la fente pour
accessoires : Utiliser un tournevis pour enlever le couvercle de la fente à accessoires
de l'onduleur. Pendant que l'onduleur se trouve sous tension, aligner la WEBCARDLX,
WEBCARDLXE ou WEBCARDLXMINI avec les guides dans la fente pour accessoires et
pousser la carte dans la fente jusqu'à ce qu'elle repose complètement en place. Aligner
et attacher la plaque de recouvrement qui correspond à l'onduleur en utilisant les vis du
couvercle de la fente à accessoires. Les ports devraient se trouver presque à égalité
avec la surface de l'onduleur.
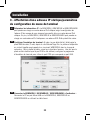
1-5
Attribution d'une adresse : Si le serveur DHCP du réseau assigne automatiquement une
adresse IP dynamique à la WEBCARDLX, passer directement à 2 - Attribution d'une
adresse IP dynamique. Si une adresse IP statique doit être assignée à la WEBCARDLX,
WEBCARDLXE ou WEBCARDLXMINI, passer à 3 - Affectation d'une adresse IP statique.
En cas d'incertitude quant à la méthode à utiliser, contacter votre administrateur de réseau
pour obtenir de l'aide avant de poursuivre le processus d'installation.
La page est en cours de chargement...
La page est en cours de chargement...
La page est en cours de chargement...
La page est en cours de chargement...
La page est en cours de chargement...
La page est en cours de chargement...
La page est en cours de chargement...
La page est en cours de chargement...
La page est en cours de chargement...
La page est en cours de chargement...
La page est en cours de chargement...
La page est en cours de chargement...
-
 1
1
-
 2
2
-
 3
3
-
 4
4
-
 5
5
-
 6
6
-
 7
7
-
 8
8
-
 9
9
-
 10
10
-
 11
11
-
 12
12
-
 13
13
-
 14
14
-
 15
15
-
 16
16
-
 17
17
-
 18
18
-
 19
19
-
 20
20
-
 21
21
-
 22
22
-
 23
23
-
 24
24
-
 25
25
-
 26
26
-
 27
27
-
 28
28
-
 29
29
-
 30
30
-
 31
31
-
 32
32


Tripp Lite WEBCARDLX Le manuel du propriétaire
- Taper
- Le manuel du propriétaire
dans d''autres langues
Documents connexes
-
Tripp Lite WEBCARDLX Le manuel du propriétaire
-
Tripp Lite EnviroSense2 Le manuel du propriétaire
-
-
-
-
-
-
Tripp Lite TRIPP-LITE PDUMNV20HVLX Monitored Rack PDU Le manuel du propriétaire
-
-