
Instruction Manual
for
Remote Control -
Model 1999
For Essick Humidifier Models
EP9 500 / EP9R 500
1B72058 9/10 Printed in China
In English;
En Español,
En Français

2
Note: Changes or modifications not expressly approved by the
party responsible for compliance could void the user’s authority
to operate the equipment.
This equipment has been tested and found to comply with the
limits for a Class B digital device, pursuant to part 15 of the FCC
Rules. These limits are designed to provide reasonable protection
against harmful interference in a residential installation. This
equipment generates, uses and can radiate radio frequency
energy and, if not in-stalled and used in accordance with the
instructions, may cause harmful interference to radio
communications. However, there is no guarantee that
interference will not occur in a particular installation. If this
equipment does cause harmful interference to radio or television
reception, which can be determined by turning the equipment off
and on, the user is encouraged to try to correct the interference by
one or more of the following measures:
• Reorient or relocate the receiving antenna.
• Increase the separation between the equipment and receiver.
• Connect the equipment into an outlet on a circuit different from
that to which the receiver is connected.
• Consult the dealer or an experienced radio/ TV technician for help.
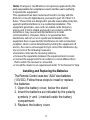
Installing and Replacing the Batteries
The Remote Control uses two “AAA” size batteries
(1.5V DC). Follow these steps to install or replace
the batteries:
1. Open the battery cover, below the stand.
2. Insert the batteries as indicated by the polarity
symbols (+ and -) marked inside the battery
compartment.
3. Replace the battery cover

3
1999 Remote Control
FEATURES
Turns EP9 500/EP9R 500 humidifier on and off.
Remotely controls the fan speed and humidity
settings on the Essick EP9 500/EP9R 500
whole house humidifier.
Reads relative humidity and air temperature
from across the room.
Displays temperature in °Fahrenheit or
°Celsius.
DESCRIPTION
The 1999 Remote Control is a self- contained unit that
can control the operation of the EP9 500 / EP9R 500
humidifier.
When utilized on its own, the 1999 can act as a
hygrometer to measure indoor relative humidity. This
unit is not recommended for outdoor use.
The remote is effective within 20 feet of the humidifier.
It does not have to be pointed at the unit when making
changes to the setting.
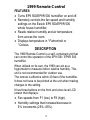
It has three buttons on the front and a two level LCD
screen that displays:
Fan speeds from F1 (low) to F9 (high).
Humidity settings that increase/decrease in
5% increments (25%- 65%).

4
Temperature measuring range: (+14°F to
+122
°F) ( -10
°C to +50°C) with 0.1°F/ °F
resolution.
Humidity measuring range: 10 - 99% with 1%
resolution.
BASIC DISPLAYS

5
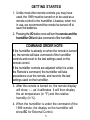
GETTING STARTED
1. Unlike most other remote controls you may have
used, the 1999 must be turned on to be used as a
remote control to the humidifier. Likewise, when not
in use, we recommend the remote be turned off to
save the batteries.
2. Pressing the I/O button once will turn the remote and the
humidifier ON and take command of the humidifier.
3. After the remote is turned on, the remote display
will show - - as it calibrates. It will then display
the air temperature (in °F) and the relative
humidity (in %).
4. When the humidifier is under the command of the
1999 remote, the display on the humidifier will
show EC for External Control.
COMMAND ORDER NOTE:
If the humidifier is already on when the remote is turned
on, the remote will take command of the humidifier
controls and revert to the last settings used on the
remote control.
If the humidifier controls are adjusted while it is under
the Remote’s command, the humidifier will take
precedence over the remote, and revert to the last
settings used on the humidifier.

6
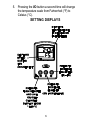
5. Pressing the I/O button a second time will change
the temperature scale from Fahrenheit (°F) to
Celsius (°C).
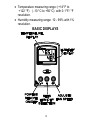
SETTING DISPLAYS

7
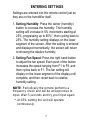
ENTERING SETTINGS
Settings are entered into the remote control just as
they are on the humidifier itself.
1. Setting Humidity: Press the center (humidity)
button to increase the humidity. The humidity
setting will increase in 5% increments starting at
25%, progressing up to 65%*, then cycling back to
25%. The humidity setting displays on the lower
segment of the screen. After the setting is entered
and displayed momentarily, the screen will return
to showing the relative humidity.
2. Setting Fan Speed: Press the right hand button
to adjust the fan speed. Each push of the button
increases the speed ranging from F1 to F9, and
then cycles back to F1. The fan setting will
display on the lower segment of the display until
complete, and then revert back to relative
humidity setting.
NOTE: Periodically the remote performs a
frequency check and will be unresponsive to
input. Wait 5 seconds and try your input again.
* At 65% setting the unit will operate
continuously.

8
Humidifier Remote Control
Warranty Policy – Effective: JULY 16, 2010:
This product is warranted against defects in workmanship
and materials for ninety (90) days from the date of
consumer purchase.
This warranty does not apply to damage from accident,
misuse, alterations, unauthorized repairs, unauthorized
use, mishandling, unreasonable use or abuse.
Within the limitations of this warranty, purchaser with
inoperative units should contact customer service @
800-547-3888 for paperwork and instructions on the
return of the unit for repair. A copy of the sales receipt
is required before authorization to return a unit for repair
can be approved.
This warranty will be null & void if purchaser attempts
to repair or replace any parts.
SALES RECEIPT REQUIRED AS PROOF OF
PURCHASE FOR ALL WARRANTY CLAIMS.

9
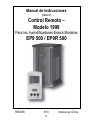
Manual de instrucciones
para el
Control Remoto –
Modelo 1999
Para los humidificadores Essick Modelos
EP9 500 / EP9R 500
1B72058 9/10 Impreso en China

10
Nota: Los cambios o modificaciones sin aprobar expresamente
por la parte responsable de conformidad podrían anular la
autoridad del usuario de operar el equipo.
Este equipo ha sido probado y se encontró que cumple con los
límites para un dispositivo digital Clase B, según la Sección 15 de
las Reglas FCC. Estos límites están diseñados para proporcionar
protección razonable contra interferencia nociva en
instalaciones residenciales. Este equipo genera, utiliza y puede
radiar energía por frecuencias de radio y, si no se instala y utiliza
de acuerdo a las instrucciones, puede causar interferencia
nociva ante comunicaciones de radio. Sin embargo, no se
garantiza que no haya interferencia en una instalación
específica. Si este equipo llegase a causar interferencia nociva
ante recepciones de radio o televisión, la cual puede
determinarse encendiendo y apagando el equipo, el usuario
puede intentar corregir la interferencia por medio de una o más
acciones siguientes:
—Reorientar o reubicar la antena de recepción.
—Incrementar la distancia entre el equipo y el receptor.
—Conectar el equipo dentro de un tomacorriente en un circuito
diferente al cual está conectado el receptor.
—Consultar el distribuidor o un técnico de TV/radio calificado
para obtener ayuda.
Instalación y reemplazo de las baterías
El control remoto usa dos baterías “AAA” (1.5 V CC).
Realice los siguientes pasos para instalar o
reemplazar las baterías:
1. Abra la tapa de las baterías, debajo del soporte.
2. Introduzca las baterías tal como lo indican las marcas
con los símbolos de polaridad (+ y -) dentro del
compartimento de las baterías.
3. Vuelva a colocar la tapa de las baterías.

11
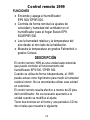
Control remoto 1999
FUNCIONES
Enciende y apaga el humidificador
EP9 500/ EP9R 500.
Controla de forma remota los ajustes de
velocidad y humedad del ventilador en el
humidificador para el hogar Essick EP9
500/EP9R 500.
Lee la humedad relativa y la temperatura del
aire desde el otro lado de la habitación.
Muestra la temperatura en grados Fahrenheit o
grados Celsius.
DESCRIPCIÓN
El control remoto 1999 es una unidad autocontenida
que puede controlar el funcionamiento del
humidificador EP9 500 / EP9R 500.
Cuando se utiliza de forma independiente, el 1999
puede actuar como higrómetro para medir la humedad
relativa interior. No se recomienda utilizar esta unidad
en exteriores.
El control remoto resulta efectivo a menos de 20 pies
del humidificador. No es necesario apuntarlo a la
unidad cuando se modifica el ajuste.
Tiene tres botones en el frente y una pantalla LCD de
dos niveles que muestra lo siguiente:

12
Las velocidades del ventilador de F1 (baja) a F9 (alta).
El ajuste de la humedad que aumenta/ disminuye en
incrementos del 5% (25%-65%).
Rango de medición de temperatura: (+14 °F a +122
°F)
( -10
°C a +50 °C) con resolución de 0.1 °F/°F.
Rango de medición de humedad: 10 - 99% con
resolución del 1%.
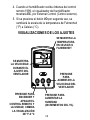
VISUALIZACIONES BÁSICAS
VISUALIZACIÓN DE
TEMPERATURA
VISUALIZACIÓN
DE HUMEDAD
ENCENDIDO/
APAGADO
DEL
CONTROL
CONFIGURACIÓN
DE SELECCIÓN
DE HUMEDAD
AJUSTE DE
VELOCIDAD
DEL
VENTILADOR

13
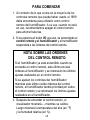
PARA COMENZAR
1. Al contrario de lo que ocurre en la mayoría de los
controles remotos que puede haber usado, el 1999
debe encenderse para utilizarlo como control
remoto del humidificador. A su vez, cuando no está
en uso, recomendamos apagar el control remoto
para ahorrar baterías.
2. Si se presiona el botón I/O una vez, se encenderán el
control remoto y el humidificador y el humidificador
responderá a las órdenes del control remoto.
NOTA SOBRE LAS ÓRDENES
DEL CONTROL REMOTO:
Si el humidificador ya está encendido cuando se
enciende el control remoto, este último enviará
órdenes al humidificador y se retomarán los últimos
ajustes realizados en el control remoto.
Si se ajustan los controles del humidificador
mientras este último recibe órdenes del control
remoto, el humidificador tendrá prioridad por sobre
el control remoto y se retomarán los últimos ajustes
realizados en el humidificador.
3. Después de encender el control remoto, el
visualizador mostrará - - mientras se calibra.
Luego mostrará la temperatura del aire (en °F)
y la humedad relativa (en %).

14
4. Cuando el humidificador recibe órdenes del control
remoto 1999, el visualizador del humidificador
mostrará EC, por External Control (Control externo).
5. Si se presiona el botón I/O por segunda vez, se
cambiará la escala de la temperatura de Fahrenheit
(°F) a Celsius (°C).
VISUALIZACIONES DE LOS AJUSTES
SE MUESTRA LA
TEMPERATURA
EN CELSIUS O
FAHRENHEIT
PRESIONE
PARA
AUMENTAR LA
VELOCIDAD DEL
VENTILADOR
(F1 – F9)
PRESIONE PARA
AUMENTAR LA
HUMEDAD
(INCREMENTOS DEL 5%)
PRESIONE PARA
ENCENDER Y
APAGAR EL
CONTROL REMOTO Y
LA UNIDAD; CAMBIA
LA VISUALIZACIÓN
DE ºF A ºC
SE MUESTRA
LA VELOCIDAD
DURANTE EL
AJUSTE DEL
VENTILADOR

15
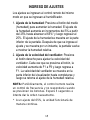
INGRESO DE AJUSTES
Los ajustes se ingresan al control remoto del mismo
modo en que se ingresan al humidificador.
1. Ajuste de la humedad: Presione el botón del medio
(humedad) para aumentar la humedad. El ajuste de
la humedad aumenta en incrementos del 5% a partir
del 25% hasta alcanzar el 65%* y luego regresar al
25%. El ajuste de la humedad se muestra en la parte
inferior de la pantalla. Después de que se ingresa el
ajuste y se muestra por un instante, la pantalla vuelve
a mostrar la humedad relativa.
2. Ajuste de la velocidad del ventilador: Presione
el botón derecho para ajustar la velocidad del
ventilador. Cada vez que se presiona el botón, la
velocidad aumenta de F1 a F9 y luego regresa a
F1. La velocidad del ventilador se muestra en la
parte inferior del visualizador hasta completarse y
luego se retoma el ajuste de la humedad relativa.
NOTA: Periódicamente, el control remoto realiza
un control de frecuencia y no responderá cuando
se presionen los botones. Espere 5 segundos e
intente dar la orden nuevamente.
* A un ajuste del 65%, la unidad funcionará de
manera continua.

16
Garantía del Control Remoto de
Humidificador.
En vigencia al 16th de Julio de 2010:
Este producto se encuentra garantizado contra defectos
en la mano de obra y materiales por un término noventa
(90) días a partir de la fecha de compra del consumidor.
La presente garantía no se aplica a daños como
consecuencia de accidentes, mal uso, alteraciones,
reparaciones no autorizadas, uso no autorizado, mal
manejo, uso no razonable o abuso.
Dentro de las limitaciones de la presente garantía, el
comprador que tenga unidades fuera de
funcionamiento debe comunicarse con el servicio de
atención al cliente al 800-547-3888 para los trámites e
instrucciones relacionados con el envío de la unidad
para su reparación. Una copia del recibo de compra es
necesaria antes de la autorización para enviar una unidad
para su reparación puede ser aprobada.
La presente garantía será considerada nula en caso
que el comprador intente reparar o reemplazar
cualquier pieza.
Se requiere el recibo de venta como prueba de la
compra para todos los reclamos de garantía.

17
Mode d'emploi
pour
Télécommande –
Modèle 1999
Pour Modèles d'humidificateurs Essick
EP9 500 / EP9R 500
1B72058 9/10 Imprimé en Chine

18
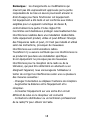
Remarque : les changements ou modifications qui
n'auront pas été expressément approuvés par la partie
responsable de la mise en œuvre pourraient annuler le
droit d'usage pour faire fonctionner cet équipement.
Cet équipement a été testé et est conforme aux limites
exigibles pour un appareil numérique de classe B,
conformément à la partie 15 des règles FCC.
Ces limites sont destinées à protéger raisonnablement des
interférences nuisibles dans une installation résidentielle.
Cette équipement produit, utilise et peut diffuser l'énergie
des fréquences radio et peut, s'il n'est pas installé et utilisé
selon les instructions, provoquer de mauvaises
interférences aux communications radios.
Toutefois il n'y a aucune certitude que ces interférences ne
se produiront pas dans une installation spécifique.
Si cet équipement ne provoque pas de mauvaises
interférences pour la réception de la radio ou de la
télévision, qui peut être déterminé en allumant ou en
éteignant l'appareil, nous encourageons l'utilisateur à
tenter de corriger les interférences selon une ou plusieurs
des mesures suivantes :
- Changez l'orientation ou déplacer l'antenne de réception.
- Augmentez la distance entre l'équipement et le
récepteur.
- Connectez l'équipement sur une sortie d'un circuit
différent de celui où le récepteur est connecté
- Contactez le distributeur ou un technicien professionnel
de la radio/TV pour obtenir de l'aide.

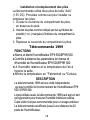
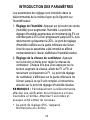
19
Installation et remplacement des piles
La télécommande utilise deux piles de taille “AAA”
(1.5V DC). Procédez comme suit pour installer ou
remplacer les piles :
1. Ouvrez le couvercle du compartiment de piles,
en dessous du pied.
2. Insérez les piles comme indiqué par les symboles de
polarité (+ et -) marqués à l'intérieur du compartiment à
piles.
3. Replacez le couvercle du compartiment à piles.
Télécommande 1999
FONCTIONS
Allume et éteint l'humidificateur EP9 500/EP9R 500
Contrôle à distance les paramètres de vitesse et
d'humidité de l'humidificateur EP9 500/EP9R 500.
Lit l'humidité relative et la température de l'air à
travers la salle.
Affiche la température en °Fahrenheit ou ºCelsius.
DESCRIPTION
La télécommande 1999 est une unité indépendante
qui peut contrôler le fonctionnement de l'humidificateur EP9
500 / EP9R 500.
Lorsqu'utilisée seule, la télécommande 1999 peut agir en tant
qu'hygromètre pour mesurer l'humidité intérieure relative.
Cette unité n'est pas recommandée pour un usage extérieur.
La télécommande est efficace jusqu'à une distance de 20
pieds de l'humidificateur.

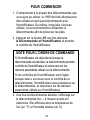
20
Elle ne doit pas être dirigée vers l'unité au moment
d'effectuer des modifications aux paramètres.
Elle possède trois boutons sur le devant et un écran LCD de
deux niveaux qui affiche :
Les vitesses du ventilateur de F1 (basse) à F9 haute).
Les paramètres d'humidité qui augmentent/ baissent
en incréments de 5% (25%- 65%).
Gamme de mesure de la température : (+14°F à
+122
°F) ( -10
°C à +50°C) avec une résolution de
0.1ºF/ º F.
Gamme de mesure de l'humidité : 10 - 99% avec une
résolution de 1%.
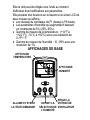
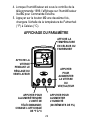
AFFICHAGES DE BASE
AFFICHAGE
TEMPERATURE
AFFICHAGE
HUMIDITÉ
ALLUME ET ÉTEINT
LA TÉLÉCOMMANDE
DÉFINIT LA
SÉLECTION DE
L'HUMIDITÉ
RÈGLE LA
VITESSE DE
VENTILATEUR
La page charge ...
La page charge ...
La page charge ...
La page charge ...
-
 1
1
-
 2
2
-
 3
3
-
 4
4
-
 5
5
-
 6
6
-
 7
7
-
 8
8
-
 9
9
-
 10
10
-
 11
11
-
 12
12
-
 13
13
-
 14
14
-
 15
15
-
 16
16
-
 17
17
-
 18
18
-
 19
19
-
 20
20
-
 21
21
-
 22
22
-
 23
23
-
 24
24


dans d''autres langues
- English: Essick 1999 User manual
- español: Essick 1999 Manual de usuario


