
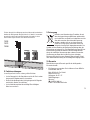
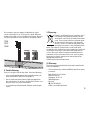
Lichtsignale
74371
74380 74391

2
NL
F
GB
D
1. Bestimmungsgemäße Verwendung 4
2. Sicherheitshinweise 4
3. Lieferumfang 4
4. Symbole und Bedeutung 4
5. Funktion 5
6. Vorbereitungen 5
7.
Signalmast am Gleis befestigen und Schaltpult anschließen
7
8. Funktionsstörungen 9
9. Entsorgung 9
10. Garantie 9
11. Aufkleber anbringen 52
1. Using the Product as Intended 10
2. Safety Notes 10
3. Contents 10
4. Symbols and Their Meaning 10
5. Function 11
6. Preparations 11
7. Mounting the Signal Mast on the Track and
Connecting the Control Box. 13
8. Trouble Running 15
9. Disposing 15
10. Warranty 15
11. Attach decals 52
1. Utilisation conforme à sa destination 16
2. Remarques sur la sécurité 16
3. Matériel fourni 16
4. Symboles et signifi cation 16
5. Fonctionnement 17
6. Préparatifs 17
7. Fixer le mât de signalisation sur la voie et raccorder
le pupitre de commande. 19
8. Dysfonctionnements 21
9. Elimination 21
10. Garantie 21
11. Fixez les autocollants 52
1. Verantwoord gebruiken 22
2. Veiligheidsvoorschriften 22
3. Leveringsomvang 22
4. Symbolen en hun betekenis 22
5. Functie 23
6. Voorbereidingen 23
7. Seinmast aan de rail bevestigen en aan het schakelkastje 25
8. Storingen 27
9. Afdanken 27
10. Garantie 27
11. Bevestig stickers 52

3
DK
S
1. Uso correcto 28
2. Aviso de seguridad 28
3. Alcance de suministro 28
4. Símbolos y su signifi cado 28
5. Función 29
6. Preparativos 29
7. Sujetar el poste de la señal a la vía y conectar la señal al
pupitre de conmutación de señales. 31
8. Anomalías funcionales 33
9. Eliminación 33
10. Garantía 33
11. Allega decalcomanie 52
1. Impiego commisurato alla destinazione 34
2. Avvertenze per la sicurezza 34
3. Corredo di fornitura 34
4. Simboli e signifi cato 34
5. Funzionamento 35
6. Preparativi 35
7. Fissaggio del palo del segnale al binario e collegamento
del quadro di commutazione 37
8. Difetti nel funzionamento 39
9. Smaltimento 39
10. Garanzia 39
11. Coloque las calcomanías 52
1. Användning av produkten 40
2. Säkerhetsanvisningar 40
3. Innehåll 40
4. Symboler och vad de betyder 40
5. Funktion 41
6. Förberedelser 41
7. Montage av signalmasten på rälsen samt anslutning
av ställpulten 43
8. Funktionsstörningar 45
9. Hantering som avfall 45
10. Garanti 45
11. Bifoga dekaler 52
1. Hensigtsmæssig anvendelse 46
2. Sikkerhedshenvisninger 46
3. Leverancens omfang 46
4. Symboler og betydning 46
5. Funktion 47
6. Forberedelser 47
7. Signalmasten fastgøres på sporet og tilsluttes
til skiftepulten. 49
8. Funktionsstörningar 51
9. Bortskafning 51
10. Garanti 51
11. Vedhæft decal 52

4
1. Bestimmungsgemäße Verwendung
Die Signale 74371, 74380 und 74391 sind nur für den
Anschluss an das Stellpult 72751 und
für die Montage am
C-Gleis geeignet.
2. Sicherheitshinweise
Lesen Sie die Bedienungsanleitung vor der ersten Inbe-
triebnahme aufmerksam durch.
• ACHTUNG! Nicht geeignet für Kinder unter 3 Jahren.
Funktionsbedingte scharfe Kanten und Spitzen. Ersti-
ckungsgefahr wegen abbrech- und verschluckbarer
Kleinteile. Missbrauch des Netzteils kann zu einem
elektrischen Schlag führen.
• DasProduktdarfnuringeschlossenenRäumenverwen-
det werden.
• LagernSiedasProduktnichtunterdirekterSonnenein-
strahlung, starken Temperaturschwankungen oder hoher
Luftfeuchtigkeit.
• ÜberprüfenSieoptischinregelmäßigenAbständen(je
nach Häufigkeit des Spielbetriebes) wenigstens 1 x pro
Woche das Schaltnetzteil und seine Anschlussleitung im
vom Haushaltsstromnetz getrennten Zustand auf Beschä-
digung. Beim geringsten Verdacht einer Beschädigung
darf das Schaltnetzteil erst nach der Reparatur durch den
Märklin-Reparatur-Service weiter verwendet werden.
• VerbauteLED`sentsprechenderLaserklasse1nach
Norm EN 60825-1.
2.1 Wichtige Hinweise
• DieBedienungsanleitungistBestandteildesProduktes
und muss deshalb aufbewahrt sowie bei Weitergabe des
Produktes mitgegeben werden.
• DasProduktdarfnurinVerbindungmitdemSchaltnetzteil
66360/66367, der Basisstation 194548 und dem Signal-
Schaltpult 72751 verwendet werden.
• DasSchaltnetzteil66360/66367istkeinSpielzeug.
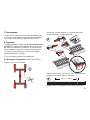
3. Lieferumfang
1 x Signal
1xÜberbrückungskabelrot(nurbei74371und74391)
1 x Beutel Kleinteile
2 x Unterlegkeile
1 x Schraube
4xIsolierungen(nurbei74371und74391)
1xBogenAufkleber(nurbei74391)
1 x Bedienungsanleitung
1 x Garantieurkunde
4. Symbole und Bedeutung
zeigt die Einhaltung aller grundlegenden Sicher-
heits- und Gesundheitsanforderungen an.
Transformator-Spielzeug
max.
22 V ~
Bemessungsspannung

5
5. Funktion
Die Signale 74371 und 74391 bieten die Möglichkeit der
Zugbeeinflussung. Der Einbau des Vorsignals 74380 macht
nur Sinn parallel zum Hauptsignal 74391.
6. Vorbereitungen
Der Aufbau darf nur unter Aufsicht Erwachsener erfolgen.
Um Beschädigungen während des Aufbaus zu vermeiden,
das Schaltnetzteil vom Haushaltsstromnetz trennen. Erst
nach Fertigstellung aller Verkabelungen das Schaltnetzteil
wieder in die Steckdose stecken.
!Das beiliegende Kabel darf nicht verändert werden.
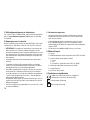
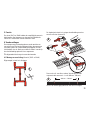
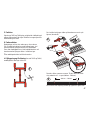
6.1 Aufbau und Anschluss (nur bei 74371 und 74391)
Beiliegende Isolierungen abtrennen.
Die abgetrennten Isolierungen gemäß Skizze auf die Kon-
takteamGleisstecken(KontaktB).
B
B B
Danach die Gleise zusammenstecken. Für die isolierte Stre-
ckeempfehlenwir2-3Gleise(360mm-540mm).
360 mm — 540 mm
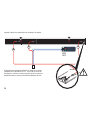
SchließenSiejetztdasÜberbrückungskabelunddasSignal
1
2
3
B
0
2a
2b
2a
2b

6
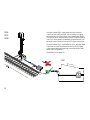
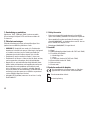
gemäß der nachfolgenden Skizze an das Gleis.
B
B
B
B
B
B
B
rot
Es ist darauf zu achten, dass die roten Kabel mit dem
Kontakt „B“ verbunden werden. Beim falschen Anschluss
gibteseinenKurzschluss,welcherdenÜberlastschutzdes
Netzteiles auslöst.
74371
74391
4
4
4

7
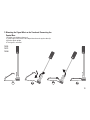
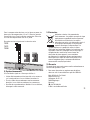
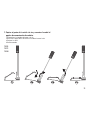
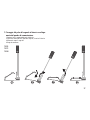
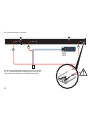
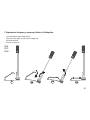
7. Signalmast am Gleis befestigen und Schaltpult anschließen.
1. Masthalter am Gleis einhängen
2. Signalmast zur Seite kippen, Gleis einlegen
3. Signal aufstellen
4. Signal montiert
5 5a
5b
5c
74371
74391
74380

8
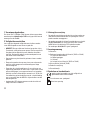
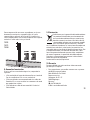
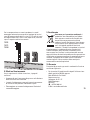
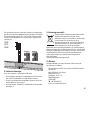
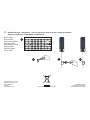
72751
Signale 74371 bzw. 74391 mit der Buchse an der Rückseite
des Signal-Schaltpultes auf den 3-poligen Steckkontakt
stecken. Achten Sie darauf , dass die Kabel an der Buchse
nach unten schauen. Weitere Anschlussarbeiten
entnehmen
Sie der Bedienungsanleitung des Signal-Schaltpultes 72751.
Signal 74380 mit der Buchse an der Rückseite des Signal-Schalt-
pultes auf den 2-poligen Steckkontakt neben dem Steckplatz des
dazugehörigen Hauptsignales 74391 stecken.
Aufkleberanbringen(sieheSeite52).
6
74371
74391
74380
7

9
8. Funktionsstörungen
Ist am Signal kein Licht zu sehen, prüfen Sie bitte:
• IstdasNetzgerätindieSteckdoseundindieBasisstation
eingesteckt? Gegebenenfalls einstecken.
• SindalleVerbindungskabelrichtigeingesteckt?Gegebe-
nenfalls die Stecker fest drücken.
• IsteinVerbindungskabelbeschädigt?Beschädigtes
Kabel austauschen.
9. Entsorgung
Hinweise zum Umweltschutz: Produkte, die mit
dem durchgestrichenen Mülleimer gekennzeich-
net sind, dürfen am Ende ihrer Lebensdauer nicht
über den normalen Haushaltsabfall entsorgt
werden, sondern müssen an einem Sammel-
punkt für das Recycling von elektrischen und
elektronischen Geräten abgegeben werden. Das
Symbol auf dem Produkt, der Bedienungsanleitung oder der
Verpackung weist darauf hin. Die Werkstoffe sind gemäß ihrer
Kennzeichnung wiederverwertbar. Mit der Wiederverwen-
dung, der stofflichen Verwertung oder anderen Formen der
Verwertung von Altgeräten leisten Sie einen wichtigen
Beitrag zum Schutze unserer Umwelt. Bitte erfragen Sie bei
Ihrer Gemeindeverwaltung die zuständige Entsorgungsstelle.
10. Garantie
Gewährleistung und Garantie gemäß der beiliegenden
Garantieurkunde.
• FürReparaturenwendenSiesichbitteanIhrenMärklin-
Fachhändler oder an
Gebr. Märklin & Cie. GmbH
Reparaturservice
Stuttgarter Str. 55 - 57
73033 Göppingen
Germany
+49 07161 608 222
E-Mail: [email protected]
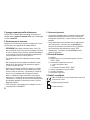
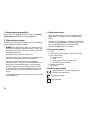
Für den Ausgleich an Neigungsstrecken können bei stationärem
Aufbau die beiliegenden Ausgleichskeile 3% bzw 5% verwendet
werden. Ausgleichskeile mit beiliegender Schraube sichern.
Danach das Signal mit Gleis und Sockel aufstecken.
74371
74391
74380

10
1. Using the Product as Intended
The 74371, 74380, and 74391 signals are designed only for
connection to the 72751 control box and for installation on
C Track.
2. Safety Notes
Make sure you read the following safety notes before using
this Märklin product for the first time.
•
IMPORTANT! Not suitable for children under 3 years. Sharp
edges and points required for operation. Danger of choking
due to detachable small parts that may be swallowed. Misuse
of the switched mode power pack can cause an electrical
shock.
• Thisproductmayonlybeusedindoors.
• Donotstorethisproductindirectsunlightorareaswith
extreme swings in temperature or high humidity.
• Visuallyexaminetheswitchedmodepowerpackandits
powercordatregularintervals(dependingonthefrequen-
cy with which you use it to run the trains), at least once a
week, to make sure it is not damaged. Do this examination
with the power pack unplugged from the household
current. If you have the least suspicion of damage, do not
use the power pack again until it has been repaired by the
Märklin Repair Department.
• TheLEDsinthisitemcorrespondtoLaserClass1accor-
ding to Standard EN 60825-1.
2.1 Important Notes
• Theinstructionsforuseareacomponentpartofthe
signal control box and must therefore be kept in a safe
place as well as transferred along with the signal control
box to third parties.
• Thisproductmayonlybeusedinconjunctionwiththe
66360/66367 switched mode power pack, he 194548 feeder
track with the IR base station., and the 72751 signal control
box.
• The66360/66367switchedmodepowerpackisnotatoy.
3. Contents
1 x Signal
1xRedbridgewire(onlywith74371and74391)
1 x Bag of small parts
2 x Wedges
1 x Screw
4xInsulators(onlywith74371and74391)
1xsheetoflabels(onlywith74391)
1 x Set of instructions
1 x Warranty card
4. Symbols and Their Meaning
indicates adherence to all basic safety and health
requirements.
Toy for use with a transformer
Rated voltage
max.
22 V ~

11
5. Function
The 74371 and 74391 signals offer the possibility of train con-
trol. The installation of the 74380 distant signal only makes
sense when it is done parallel to the 74391 home signal.
6. Preparations
Setup may be done only under the supervision of adults.
Unplug the switched mode power pack from the household
current in order to prevent damage during setup. Do not plug
the switched mode power pack in the wall outlet again until
you are finished with all of the wiring.
!The cable included with this product may not be changed.
6.1 Setup and Connections (onlywith74371and74391)
Separate the insulators included with the product.
Slide the separated insulators on to the contacts on the
trackasshowninthedrawing(ContactB).
B
B B
After that, assemble the track sections. We recommend 2 – 3
sectionsoftrack(360mm–540mm/14-3/16“–21-1/4“)for
the insulated length of track.
360 mm — 540 mm
Now, connect the bridge wire and the signal to the track as
1
2
B
0
2a
2b
2a
2b
3

12
shown in the following drawing.
B
B
B
B
B
B
B
red
Make sure that the red wire is connected to the red contact
“B”. An incorrect connection will cause a short circuit,
which will trigger the overload protection in the switched
mode power pack.
74371
74391
4
4
4

13
7. Mounting the Signal Mast on the Track and Connecting the
Control Box.
1. Clip the mast holder to the track
2. Tip the signal mast to the side and position the track against the clip
3. Set the signal upright
4. The signal is mounted
74371
74391
74380
5a
5b
5c
5

14
72751
Usingthesocket(Fig.1)attachedtothewiresfromthe
signals plug the 74371 or 74391 signals into the 3-pin plug
contactontherear(Fig.3)ofthesignalcontrolbox.Make
sure that the wires attached to the socket are pointing down
(seeFig.2).Descriptionsofadditionalconnectionworkcan
be found in the instructions for the 72751 signal control box.
Usingthesocket(Fig.1)attachedtoitswires,plugthe74380
signalintothe2-pinplugcontactontherear(Fig.3)ofthe
signal control box next to the plug-in location for the 74391
home signal assigned to it.
Attachdecals(seepage52).
74371
74391
74380
6
7

15
8.
Trouble Running
If there is no light visible on the signal, check the following:
• Istheswitchedmodepowerpackpluggedintothewall
outlet and the Base Station? If not, plug it in.
• Arealloftheconnectingcablesproperlypluggedinto
their connections? If not, press on the plugs to make sure
they are all the way in the connections.
• Isaconnectingcabledamaged?Replaceanydamaged
cables.
9. Disposing
Products marked with a trash container with a
line through it may not be disposed of at the
end of their useful life in the normal household
trash. They must be taken to a collection point
for the recycling of electrical and electronic
devices. There is a symbol on the product, the
operating instructions, or the packaging to this
effect. The materials in these items can be used again
according to this marking. By reusing old devices, materially
recycling, or recycling in some other form of old devices
such as these you make an important contribution to the
protection of our environment. Please ask your city, town,
community, or county authorities for the location of the
appropriate disposal site.
www.maerklin.com/en/imprint.html
10. Warranty
The warranty card included with this product specifies the
warranty conditions.
• PleasecontactyourauthorizedMärklindealerforrepairs
or contact:
Gebr. Märklin & Cie. GmbH
Reparaturservice
Stuttgarter Str. 55 - 57
73033 Göppingen
Germany
+49 7161 608 222
E-Mail: [email protected]
On a stationary setup, the wedges included with the signals
can be used to adjust 3% or 5% for track on a grade. Mount the
wedges in place with a screw included for the purpose. After that,
set up the signal with the track and base as already
described.
74371
74391
74380

16
1. Utilisation conforme à sa destination
Les signaux 74371, 74380 et 74391 sont seulement appropriés
pour le raccordement au pupitre 72751 et pour le montage
à la voie C.
2. Remarques sur la sécurité
Avant la première utilisation d’un produit Märklin, lisez impé-
rativement les indications relatives à la sécurité suivantes.
• ATTENTION ! Ce produit ne convient pas aux enfants de
moins de trois ans. Pointes et bords coupants lors du
fonctionnement du produit. Danger d’étouffement à cause
des petites pièces cassables et avalables. Une utilisation
non conforme de l’alimentation électrique risque de vous
électrocuter.
• Leproduitdoitêtreutiliséuniquementdansdespièces
fermées.
• Leproduitnedoitpasêtreentreposédansunendroit
soumis à un ensoleillement direct, à de fortes variations
de température ou à une humidité importante.
• Procédezrégulièrement(aumoinsunefoisparsemaine
en fonction de la fréquence d’utilisation) à un contrôle
visuel du convertisseur et de son câble de raccordement
– après l’avoir débranché du secteur - afin de détecter
d’éventuelles détériorations.
Au moindre doute quant à l’état du convertisseur, celui-ci
nedevraêtreréutiliséqu’aprèsréparationparleservice
Märklin compétent.
• LesDELinstalléescorrespondentàlaclasselaser1selon
la norme EN 60825-1.
2.1 Information importante
• Lanoticed‘utilisationfaitpartieintégranteduproduit;
elledoitdoncêtreconservéeet,lecaséchéant,trans-
mise avec le produit.
• Leproduitdoitêtreutiliséuniquementavecleconver-
tisseur 66360ou 66367, la voie de raccordement avec
station de base IR 194548 et le pupitre de commande pour
signaux 72751.
• Leconvertisseur66360ou66367n’estpasunjouet.
3. Matériel fourni
1 x signal
1xcâbledepontagerouge(seulementavec74371et74391)
1 x sachet contenant de petites pièces
2 x cales
1 x vis
4xisolations(seulementavec74371et74391)
1 x
feuilledeautocollant(seulementavec74391
)
1 x mode d’emploi
1 x certificat de garantie.
4. Symboles et signification
Indique le respect de toutes les exigences
élémentaires sanitaires et de sécurité.
Transformator-Spielzeug
max.
22 V ~
Bemessungsspannung

17
5. Fonctionnement
Lessignaux74371et74391permettentl‘inuencesurla
marche des trains. Le montage du signal avertisseur 74380
n‘adesensqu‘enparallèleaveclesignalprincipal74391.
6. Préparatifs
L’installation doit se faire impérativement sous la surveil-
lance d’un adulte. Afin d’éviter toute détérioration durant
l’installation, débranchez le convertisseur du secteur. Ne
branchez le convertisseur qu’une fois le câblage terminé.
!Lecâblejointnedoitpasêtremodié.
6.1 Montage et raccordement (seulementpour74371et
74391)
Détacher les isolations jointes.
Raccorder les isolations détachées aux contacts sur la voie
(contactB)commeindiquésurleschéma.
B
B B
Ensuite, assembler les voies. Pour le trajet isolé, nous
recommandonsd’utiliser2à3voies(360mm–540mm).
360 mm — 540 mm
Raccorder ensuite le câble de pontage et le signal à la voie,
1
2
B
0
2a
2b
2a
2b
3

18
conformément au schéma ci-dessous.
B
B
B
B
B
B
B
rouge
Veiller à ce que les câbles rouges soient reliés avec le
contact « B ». Tout raccordement erroné entraînera un
court-circuit qui déclenchera la valve relais de coupure en
cas de surcharge du bloc d’alimentation.
74371
74391
4
4
4

19
7. Fixer le mât de signalisation sur la voie et raccorder le pupi-
tre de commande.
1. Accrocher le support de mât sur la voie
2. Basculer le mât de signalisation sur le côté, insérer la voie
3. Redresser le mât
4. Le signal est monté
74371
74391
74380
5a
5b
5c
5

20
72751
Raccorderlessignaux74371et74391avecladouille(ill.1)
audos(ill.3)dupupitredecommandepoursignauxsurle
contact à fi ches 3 pôles. Veiller à ce que les câbles à la douil-
lesoientorientésverslebas(cf.ill.2).Pourtouslesautres
travaux de raccordement, prière de se reporter au mode
d’emploi du pupitre de commande pour signaux 72751.
Raccorderlesignal74380avecladouille(ill.1)audos(ill.3)du
pupitre de commande pour signaux sur le contact à fi ches 2
pôles à côté de l’emplacement du signal principal correspon-
dant 74391.
Fixezlesautocollants(voirpage52).
74371
74391
74380
6
7
La page est en cours de chargement...
La page est en cours de chargement...
La page est en cours de chargement...
La page est en cours de chargement...
La page est en cours de chargement...
La page est en cours de chargement...
La page est en cours de chargement...
La page est en cours de chargement...
La page est en cours de chargement...
La page est en cours de chargement...
La page est en cours de chargement...
La page est en cours de chargement...
La page est en cours de chargement...
La page est en cours de chargement...
La page est en cours de chargement...
La page est en cours de chargement...
La page est en cours de chargement...
La page est en cours de chargement...
La page est en cours de chargement...
La page est en cours de chargement...
La page est en cours de chargement...
La page est en cours de chargement...
La page est en cours de chargement...
La page est en cours de chargement...
La page est en cours de chargement...
La page est en cours de chargement...
La page est en cours de chargement...
La page est en cours de chargement...
La page est en cours de chargement...
La page est en cours de chargement...
La page est en cours de chargement...
La page est en cours de chargement...
-
 1
1
-
 2
2
-
 3
3
-
 4
4
-
 5
5
-
 6
6
-
 7
7
-
 8
8
-
 9
9
-
 10
10
-
 11
11
-
 12
12
-
 13
13
-
 14
14
-
 15
15
-
 16
16
-
 17
17
-
 18
18
-
 19
19
-
 20
20
-
 21
21
-
 22
22
-
 23
23
-
 24
24
-
 25
25
-
 26
26
-
 27
27
-
 28
28
-
 29
29
-
 30
30
-
 31
31
-
 32
32
-
 33
33
-
 34
34
-
 35
35
-
 36
36
-
 37
37
-
 38
38
-
 39
39
-
 40
40
-
 41
41
-
 42
42
-
 43
43
-
 44
44
-
 45
45
-
 46
46
-
 47
47
-
 48
48
-
 49
49
-
 50
50
-
 51
51
-
 52
52


Märklin 74380 Manuel utilisateur
- Taper
- Manuel utilisateur
dans d''autres langues
- italiano: Märklin 74380 Manuale utente
- English: Märklin 74380 User manual
- español: Märklin 74380 Manual de usuario
- Deutsch: Märklin 74380 Benutzerhandbuch
- Nederlands: Märklin 74380 Handleiding
- dansk: Märklin 74380 Brugermanual
- svenska: Märklin 74380 Användarmanual
Documents connexes
-
Märklin 72751 Manuel utilisateur
-
-
-
-
-
-
-
-
Märklin 36632 Manuel utilisateur
-

