
1.
Your
Andr
o
The
A
frien
d
you
f
2.
1 S
e
2 H
e
3 E
a
4 P
o
5 N
o
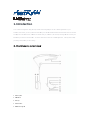
Introd
u
U-Wake is des
o
id™/IOS devi
c
A
pps can also
m
d
that you sele
c
f
alling asleep w
h
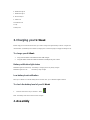
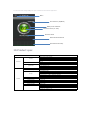
Hard
w
e
nsor plate
e
adband
a
r Clip
o
wer button
o
tification light
A
u
ction
igned to help y
o
c
e, you can syn
c
m
ake noise / vi
b
c
t via social-me
d
h
en you were d
w
are o
v
A
o
u keep awake
c
hronise data
w
b
ration in order
t
d
ia . To wear U
-
riving. .
v
ervie
w
from driving fat
i
w
ith your U-Wak
e
t
o alert you , b
e
-
Wake device a
w
i
gue. Via the U
-
e
headband to
s
e
sides , the call-
nd use U-Wak
e
-
Wake applicati
o
s
ee the brainwa
help message
w
e
application , it
o
n on your
a
ve status in re
a
w
ill also send t
o
will try best to
k
l time.
o
your
k
eep

6 Notification light B
7 Notification light C
8 Micro USB port
9 Reset hole
10Insulation hole
11Clip
12Strap hole
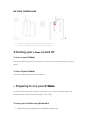
3. Charging your U-Weak
Before using your U-Weak for the first time, you need to charge it for approximately 12 Hours. Chargers are
recommended. (Low battery Red is flashed / Charging red is continuously light / Charging full red light is off)
To charge your U-Weak
1. Plug one end of the USB cable into the USB charger.
2.
Plug the other end of the cable into the Micro USB port of your U-Weak
Battery notification light status
Notification light red continuously : The battery is charging and is not yet fully charged
Notification light red is off : The battery is fully charged
Low battery level notification
When your U-Weak is on and the battery level is less than 10%, your U-Weak Red light is flashed.
To check the battery level of your U-Weak
1. From the Home screen of your Android™ device
Note : The battery of this device cannot not be changed
4. Assembly

1.
2.
To hold th
e
contact yo
u
Clip the ea
r
e
U-Wake in h
o
u
r forehead s
o
r
sensor onto
o
rizontal posi
t
o
closely
your ear lobe
.
1
t
ion, slide the
3
.
device back
w
w
ards so that t
h
h
e sensor ca
n
4
2
n
4
.

FIX YOUR CONTROL BOX
1 2
1. To fix the control box in any place of cloth that you prefer .
2.
To Push the power key over 1 second to turn the power on .
5.Turning your U-Weak on and off
To turn on your U-Weak
Press and hold down the power key until your When your U-Weak is on (Green light continuously on, Blue light is
flashes).
To turn off your U-Weak
Press and hold down the power key until all LED light is off
6.
Preparing to use your U-Wake
For your U-Wake to work it must be connected to your Android™ / IOS™ device and the latest versions of the
following applications must be installed on the Android™ / IOS
™ device.
To set up your U-Wake using Bluetooth®
1. Make sure that your U-Wake has been charged for at least 3 hours.

2. Android™/ IOS™device: Make sure you have installed or updated the U-Wake application to the
latest version from Google Play™ / Apple Store™.
3.
Turn on your U-Wake (Press the power key over 3~5 second). After U-Wake is power on. (Green
light continuously on, Blue light is flashes
, Blue light is Bluetooth status indication).
4.
Wearing your U-Wake. Headband on the forehead head and main box can be clipped anywhere
that you preferred.
5.
Please make sure headband sensor and ear clip is contacted closely to your forehead / ear.
6.
Android™ /IOS device: Turn on the Bluetooth® function.
7.
Run the U-Wake application , then scan for Bluetooth® devices and select U-Wake in the list
8. When Bluetooth is connection Blue light is continued on
PS: When Bluetooth connection 3 minute Green light will be turn off / Blue light is always on.
7.Resetting your U-Wake
Reset your U-Wake if it behaves unexpectedly.
To reset your U-Wake
1. If it behaves unexpectedly U-weak can’t turn on, please press the needle button 1~2 sec for reset
8.Troubleshooting
1. If press and hold down the power key but can’t turn onÎ (1) Please charge again (2)Use needle
to press the reset key in order to do the hardware reset .
2. If LED light work abnormal Î Please use needle to press the reset key then turn on again.
3. If brainwave signal is poor,Î a. Please clean up your headband sensor & ear clip sensor
b. Please make sure headband sensor and ear clip is contacted
closely to your forehead / ear.
c. Please don’t use the U-Wake when U-Wake device is in charge
9.UsingtheU‐Wakeapplication

You can view and change settings for your U-Wake from the U-Wake application .
10.Productspec
U‐WakeUW‐011
•Di rectconnecttodryelectrode
•OneEEGchannel+Reference+Ground
•Extremelylow‐levelsignaldetection
•Advancedfilterwithhighnois eimmunity
•Fatigue
•LowAttention
•256Hzsa mplingrate
•3‐25Hzfrequencyrange
•MaxPowerConsumption:45mA@3.3V•Operatingvoltage
3.0V~4.2V(TBD)
WearingStyle •Headband
Transmissiontype •BLE(Supportaboveandroid4.3&IOS)
•IC compatibleforBLE
•Output Bluetoothpower0.5mW
•TransmissionDis tance ~30feet
•FrequencyRange 2.4GHz(2.4000GHz‐2.4835GHz)
•Interface GATTprofile
BatterySpec •4.2V/600mA
Batteryaverageoperatingtime ~20hours
Contactpressure ~7
N(±0,3N)
Button PowerKey
I/Ointerface •MicroUSB;BrainwaveSensor;EarClip
Charginginterface •ByMicroUSB
Dimension:164.3mm(L)*165mm (W)*25mm(H)
CartonSize:12pcs/Ctn,1147(D)*162(W)*210(H)mm
NetWeight:210g
ContainerLoad:4,200pcs/20"
Specification
ModelName
Headset
BTSpec
Brainwave
Features
BrainwavePatterns
Menu
Zoneselection(50/60Hz)
Batterystatusindication
DrowsinessScore(0~100)
DetectionStatus
Realtimebrainwaveform
Brainwaveformhistory

11.SafetyLabelInformation
FEDERALCOMMUNICATIONSCOMMISSION
INTERFERENCESTATEMENT
This equipment has been tested and found to comply with the limits for a
Class B digitaldevice, pursuant to Part 15 of the FCC Rules. These limits are
designed to provide reasonable protection against harmful interference in a
residentialinstallation.Thisequipmentgenerates,usesandcan radiateradio
frequency energy and, if not installed and used in accordance with the
instructions, may cause harmful interference to radio communications.
However,thereisnoguaranteethatinterferencewillnotoccurinaparticular
installation. If this equipment does cause harmful interference to radio or
television reception,
which can be determinedby turning the equipment off
and on, the user is encouraged to try to correct the interference by one or
moreofthefollowingmeasures:
‐‐Reorientorrelocatethereceivingantenna.
‐‐Increasetheseparationbetweentheequipmentandreceiver.
‐‐Connectthe equipment intoan outlet
on a circuit differentfromthatto
whichthereceiverisconnected.
‐‐Consultthedealeroranexperiencedradio/TVtechnicianforhelp.

CAUTION:
ToassurecontinuedFCCcompliance:
Anychangesormodificationsnotexpresslyapprovedbythegranteeofthis
devicecouldvoidtheuser'sauthoritytooperatetheequipment.
ThisdevicecomplieswithPart15oftheFCCRules.Operationissubjecttothe
followingtwoconditions:
(1)thisdevicemaynotcauseharmfulinterference,and
(2)thisdevicemustacceptany interferencereceived,includinginterferencethatmay
causeundesiredoperation.
ThisequipmentcomplieswithFCCradiationexposurelimitssetforthforan
uncontrolledenvironment.Thistransmittermustnotbeco‐locatedoroperatingin
conjunctionwithanyotherantennaortransmitter.
IC
ThisdevicecomplieswithIndustryCanadalicense‐exemptRSSstandard(s).
Operationissubjecttothefollowingtwoconditions:(1)thisdevicemaynot
causeinterference,and(2)thisdevicemustacceptanyinterference,including
interferencethatmaycauseundesiredoperationofthedevice.
ThisequipmentcomplieswithICradiationexposurelimitssetforthforan
uncontrolledenvironment.Thistransmittermustnotbeco‐locatedor
operatinginconjunctionwithanyotherantennaortransmitter.
CetappareilradioestconformeauCNR‐210d’IndustrieCanada.L’utilisation
decedispositifestautoriséeseulementauxdeuxconditionssuivantes:(1)il
nedoitpasproduiredebrouillage,et(2)l’utilisateurdudispositifdoitêtre
prêtàacceptertoutbrouillageradioélectriquereçu,mêmesicebrouillageest
susceptibledecompromettrelefonctionnementdudispositif.
Cetéquipementestconformeauxlimitesd’expositionauxrayonnementsICétablies
pourunenvironnementnoncontrôlé.Cetémetteurnedoitpasêtreco‐localiséesou
opérantenconjonctionavectoutautreantenneoutransmetteur.
-
 1
1
-
 2
2
-
 3
3
-
 4
4
-
 5
5
-
 6
6
-
 7
7
-
 8
8


Amtran MDZUW-011 Manuel utilisateur
- Taper
- Manuel utilisateur
- Ce manuel convient également à
dans d''autres langues
- English: Amtran MDZUW-011 User manual
Autres documents
-
Huffy 00688HL Mode d'emploi
-
Philips HH1600/03 Manuel utilisateur
-
 Oregon Scientific RM661 Le manuel du propriétaire
-
iLuv Smart Shaker 3 Manuel utilisateur
-
 NOUJ9 - pallet ordering HF3670/60 Manuel utilisateur
-
 Winmate E430RM4L Series Manuel utilisateur
-
Samsung n100sp Manuel utilisateur
-
SportsArt V886 Le manuel du propriétaire
-
Eufy AK-T2190121 Manuel utilisateur


