Landice 90 Series L10 Le manuel du propriétaire
- Catégorie
- Tapis de course
- Taper
- Le manuel du propriétaire

Part Number: 73209-5
L10 Treadmill
90 Series
Owner’s Manual

Important Safety Instructions
2
Important Safety Instructions
Read all instructions before using the treadmill.
Save these instructions.
Veuillez lire toutes les instructions avant d'utiliser le tapis roulant.
VEUILLEZ CONSERVER CES INSTRUCTIONS.
WARNING
Keep Children under the age of 13 away
from machine.
AVERTISSEMENT
Garder les enfants de moins de 13 ans loin
de la machine.
WARNING
Heart rate monitoring systems may be
inaccurate. Over exercising may result in
serious injury or death. If you feel faint stop
exercising immediately.
AVERTISSEMENT
Les systèmes de surveillance de la
fréquence cardiaque peuvent être inexacts.
L'exercice excessif peut entraîner des
blessures graves ou la mort. Si vous vous
sentez faible, arrêtez de vous entraîner
immédiatement.

Important Safety Instructions
3
DANGER
To reduce the risk of electric shock: always
unplug the treadmill from the electrical outlet
immediately after using and before cleaning.
WARNING
To reduce the risk of burns, fire, electric shock or
injury to persons:
• An appliance should never be left unattended when
plugged in. Unplug from outlet when not in use, and
before putting on or taking off parts.
• Close supervision is necessary when the treadmill is
used by or near children or persons with disabilities.
• Use the treadmill only for its intended use as described
in this manual. Do not use attachments not
recommended by Landice.
• Never operate treadmill if it has a damaged cord or
plug, if it is not working properly, or if it has been
damaged. Call your dealer or certified service provider
immediately for examination and repair.
• Keep the power cord away from heated surfaces. Be
sure the cord has plenty of slack and cannot be
pinched under the treadmill when it elevates and de-
elevates.
• Never operate the treadmill with the motor cover air
openings blocked. Keep the air openings free of lint,
hair, dust, or debris.
• Do not drop or insert objects into any opening on the
treadmill. Be sure no objects are near or beneath the
treadbelt when you are using the treadmill.
• Do not use treadmill outdoors.
• Do not operate treadmill where aerosol (spray)
products are being used or where oxygen is being
administered.
• To disconnect, press STOP twice, pull the emergency
stop safety lanyard out, then remove plug from outlet.

Important Safety Instructions
4
DANGER
Pour réduire le risque d'électrocution :
toujours débrancher le tapis roulant de la
prise électrique immédiatement après son
utilisation et avant de le nettoyer.
AVERTISSEMENT
Pour réduire le risque de brûlure, d'incendie,
d'électrocution ou de blessure corporelle.
• Un appareil électrique ne doit jamais être laissé sans
surveillance lorsqu'il est branché. Débranchez-le
lorsque vous ne l'utilisez pas et avant d'y installer ou
d'en retirer des éléments.
• Une surveillance étroite est nécessaire lorsque le
tapis roulant est utilisé par des enfants, des
personnes invalides ou handicapées ou à leur
proximité.
• N'utilisez le tapis roulant que dans le cadre prévu et
décrit dans ce manuel. N'utilisez aucune pièce
supplémentaire non recommandée par Landice.
• N'utilisez jamais le tapis roulant si son câble ou sa
fiche électrique est abîmé(e), ne fonctionne pas
correctement ou a été endommagé(e). Appelez
immédiatement votre distributeur ou prestataire de
services certifié pour qu'il l'examine et le répare.
• Tenez le câble électrique éloigné des surfaces
chauffées. Assurez-vous que le câble ait
suffisamment de mou et ne puisse pas se coincer
sous le tapis roulant lorsqu'il s'élève ou s'abaisse.
• N'utilisez jamais le tapis roulant si les ouvertures
d'aération du capot de moteur sont obstruées. Ne
laissez pas de peluches, cheveux, poussières ou
débris bloquer les ouvertures d'aération.
• Ne faites pas tomber et n'insérez pas d'objet dans
une quelconque ouverture du tapis roulant. Assurez-
vous qu'aucun objet ne se trouve à proximité ou sous
la courroie lorsque vous utilisez le tapis roulant.
• N'utilisez pas le tapis roulant en extérieur.
• N'utilisez pas le tapis roulant lorsque des produits
aérosols (sprays) sont utilisés ou lorsque de
l'oxygène est administré.
• Pour déconnecter, appuyez deux fois sur STOP,
retirez la clé d'arrêt d'urgence puis débranchez la
prise du secteur.

Important Safety Instructions
5
WARNING
Failure to observe the following warning
statements can result in serious injury!
• Do not use this product without first consulting your
doctor if you suffer from any illness, condition, or
disability that affects your ability to run, walk or
exercise.
• Do not use this product without supervision present if
you are suffering from any illness, condition, or
disability which affects your ability to run, walk or
exercise. Failure to do so can result in serious injury
should you fall while the treadbelt is moving.
• Failure to leave ample clearance around the treadmill
could cause you to be trapped between the treadmill
and a wall if you fall, resulting in burns or other serious
injury from the moving treadbelt. Allow a minimum
clearance of 24 inches (61 cm) on each side of the
treadmill. Allow a minimum clearance of 6 feet (183
cm) at the rear of the treadmill, and 12 inches
(30 cm) from the wall/front of the unit.
• Never stand on the treadbelt when starting the
treadmill. A sudden start could cause you to lose your
balance. Always begin by placing your feet on the side
straddle covers, straddling the treadbelt, before turning
the treadmill on.
• Always wear the safety lanyard clip securely on your
clothing while exercising. Failure to do so can result in
severe injuries should you accidentally fall while
exercising.
• Test the emergency stop safety lanyard regularly by
pulling on the cord and ensuring that the treadbelt
comes to a complete stop when key is pulled.
• Familiarize yourself with this manual. Be sure you
understand operation of the treadmill before use.
• Always follow basic safety precautions when using an
electrical appliance.

Important Safety Instructions
6
AVERTISSEMENT
Le non-respect des avertissements qui
suivent peut entraîner de graves blessures !
• N'utilisez pas ce produit avant d'avoir consulté votre
médecin si vous souffrez de tout problème de santé,
maladie ou handicap pouvant affecter votre capacité
à courir, marcher ou faire de l'exercice.
• N'utilisez pas ce produit sans surveillance si vous
souffrez de tout problème de santé, maladie ou
handicap pouvant affecter votre capacité à courir,
marcher ou faire de l'exercice. Le non-respect de ces
recommandations peut entraîner des blessures
graves si vous chutez lorsque le tapis roulant est en
mouvement.
• Le fait de ne pas laisser suffisamment d'espace
dégagé autour du tapis roulant peut avoir comme
conséquence, en cas de chute, que vous soyez
immobilisé entre le tapis roulant et un mur, la courroie
en mouvement pouvant causer des brûlures ou
autres blessures. Laissez un espace dégagé d'au
minimum 61 cm de chaque côté du tapis roulant.
Laissez un espace dégagé d'au minimum 183 cm
à l'arrière du tapis roulant, et 130 cm du mur /
devant de l'unité.
• Ne vous tenez jamais debout sur le tapis roulant
lorsque vous le démarrez. Un démarrage brutal
pourrait vous faire perdre l'équilibre. Commencez
toujours par placer vos pieds sur les couvre-cheval
latérales entourant la courroie du tapis avant de
mettre en marche le tapis roulant.
• Veillez toujours à ce que le clip de la lanière de
sécurité soit attaché à vos vêtements lorsque vous
faites de l'exercice. Le non-respect de cette
recommandation peut entraîner de graves blessures
en cas de chute lorsque vous faites de l'exercice.
• Testez la lanière d'arrêt de sécurité régulièrement en
tirant sur le câble et en vérifiant que la courroie est à
l'arrêt complet lorsque la clé est retirée.
• Prenez connaissance du présent manuel. Veillez à
bien comprendre le fonctionnement du tableau de
commandes de votre tapis roulant avant de l'utiliser.
• Prenez toujours les précautions de sécurité de base
lorsque vous utilisez un appareil électrique.

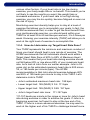
Grounding Instructions
7
Grounding Instructions
This product must be grounded. If it should malfunction or break down,
grounding provides a path of least resistance for electric current to
reduce the risk of electric shock. The treadmill is equipped with a cord
having an equipment grounding conductor and a grounding plug. The
plug must be plugged into an appropriate outlet that is properly
installed and grounded in accordance with all local codes and
ordinances.
120-Volt Treadmills
Treadmills marked 120 VAC are intended for use with a grounding plug
in a nominal 120-volt circuit. Ensure the treadmill power cord is
connected to an outlet having the same configuration as the plug. No
adapter should be used with 120 VAC treadmills.
WARNING
Connect treadmill to a properly grounded,
dedicated electrical outlet only. See the
following Grounding Instructions.
AVERTISSEMENT
Ne branchez le tapis roulant que sur une
prise électrique raccordée à la terre et
exclusivement dédiée au tapis roulant. Voir
les instructions de mise à la terre qui
suivent.
WARNING
This product contains chemicals known to
the state of California to cause cancer and
birth defects or other reproductive harm.
AVERTISSEMENT
Ce produit contient des produits chimiques
reconnus par l’état de Californie comme
pouvant causer le cancer, des anomalies
congénitales ou d’autres troubles de la
reproduction.
DANGER
Improper connection of the grounding connector
can result in a risk of electric shock. Check with a
qualified electrician/service technician if you are
in doubt as to whether the treadmill is properly
grounded. Do not modify the plug provided with
the treadmill–if it will not fit the outlet, have a
proper outlet installed by a qualified electrician.

Grounding Instructions
8
220-Volt Treadmills
Treadmills marked 200 – 240V AC are intended for use on a circuit
having a nominal rating greater than 220V and are factory-equipped
with a specific power cord and plug to permit connection to a proper
electrical circuit. Ensure the treadmill power cord is connected to an
outlet having the same configuration as the plug. No adapter should be
used with 200 – 240 VAC treadmills.
If the treadmill must be configured for use on a different type of
electrical circuit, qualified service personnel should make the proper
connection.
Instructions de mise à la terre
Ce produit doit être mis à la terre. En cas de dysfonctionnement ou de
panne, la mise à la terre offre une voie de moindre résistance au
courant électrique, ce qui réduit de risque d'électrocution. Le tapis
roulant est équipé d'un câble électrique muni d'un fil conducteur de
mise à la terre et d'une fiche de mise à la terre. Cette fiche doit être
branchée sur une prise adaptée, correctement installée et raccordée à
la terre conformément à tous les codes et règlements locaux.
Tapis de course 120 VCA
Les tapis roulants marqués 120 VCA sont conçus pour être utilisés
avec une prise de terre dans un circuit nominal de 120 volts. Assurez-
vous que le cordon d’alimentation du tapis de course est branché sur
une prise ayant la même configuration que la prise. Aucun adaptateur
ne doit être utilisé avec les tapis roulants 120 VAC.
DANGER
Un mauvais raccordement à l'équipement de mise
à la terre vous expose à un risque d'électrocution.
Renseignez-vous auprès d'un électricien/
technicien de service qualifié en cas de doute sur
la mise à la terre correcte du tapis roulant. Ne
modifiez pas la fiche fournie avec le tapis roulant:
si elle ne convient pas à la prise, faites installer
une prise adaptée par un électricien qualifié.

Grounding Instructions
9
Tapis de course 220 VCA
Les tapis roulant sur lesquels est inscrit 200-240 CA (VAC) sont
destinés à une utilisation à une tension nominale supérieure à 220 V et
équipés en série d'un câble électrique et d'une fiche spécifiques pour
permettre le branchement sur une prise adaptée. Assurez-vous que le
cordon d’alimentation du tapis de course est branché sur une prise
ayant la même configuration que la prise. Aucun adaptateur ne doit
être utilisé avec les tapis roulants 200 - 240 VAC.
Si le tapis roulant doit être configuré pour une utilisation sur un type de
circuit électrique différent, il convient de faire appel à du personnel de
service qualifié pour installer le bon raccordement.

Treadmill Quick Start Guide
10
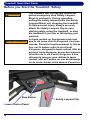
Treadmill Quick Start Guide
Before you Start the Treadmill: Safety
WARNING
The treadmill will not operate unless the
yellow emergency stop Safety Lanyard
Block is pushed in. During operation,
pulling the safety lanyard pulls the Safety
Lanyard Block out, stopping the treadmill.
To help prevent injury, always securely
attach the Safety Lanyard Clip to your
clothing while using the treadmill, to stop
the treadmill if you slip or fall during your
workout.
AVERTISSEMENT
Le tapis roulant ne fonctionnera pas tant
que la clé jaune d'arrêt d'urgence n'est pas
insérée. Durant le fonctionnement, le fait de
tirer sur la lanière retire la clé d'arrêt
d'urgence, éteignant le tapis roulant. Afin de
prévenir toute blessure, accrochez toujours
la lanière de la clé d'arrêt d'urgence à vos
vêtements lorsque vous utilisez le tapis
roulant, afin de l'arrêter en cas de dérapage
ou de chute durant votre séance d'exercice.
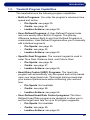
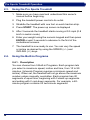
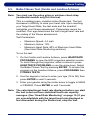
Lower Control Panel
Safety Lanyard Clip
Stop Button

Treadmill Quick Start Guide
11
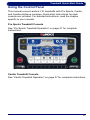
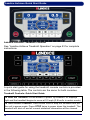
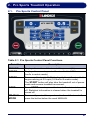
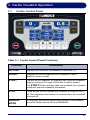
Using the Control Panel
This manual covers Landice L10 treadmills with Pro Sports, Cardio,
and Landice Achieve consoles. Quick start instructions for each
console are included. For detailed instructions, read the chapter
specific to your console.
Pro Sports Treadmill Console
See “Pro Sports Treadmill Operation” on page 27 for complete
instructions.
Cardio Treadmill Console
See “Cardio Treadmill Operation” on page 37 for complete instructions.

Landice Achieve Quick Start Guide
12
Landice Achieve Quick Start Guide
Landice Achieve Treadmill Console
See “Landice Achieve Treadmill Operation” on page 53 for complete
instructions.
A quick start guide for using the treadmill console controls is provided
in the following table. The controls are the same for both consoles.
Treadmill Controls: Quick Start Guide
To Start the Treadmill: Press START to power up treadmill. All displays
light and the treadbelt begins to move at 0.5 mph (0.8 km/hr in metric mode).
To Turn Off the Treadmill: Press STOP once to stop the treadbelt and put
the unit in pause mode. Press STOP twice to power down the treadmill. The
treadmill will shut off and all current statistical information will be cleared.

Landice Achieve Quick Start Guide
13
To Restart the Treadmill: Press START to power up the treadmill from
pause mode. All displays light and the treadbelt begins to move at 0.5 mph
(0.8 km/hr in metric mode). If you are in a program it will restart at the
paused speed.
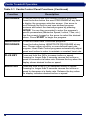
To Change Treadbelt Speed:
Press and hold SPEED (+) to increase speed. Pressing for more than 2
seconds increases speed faster. Release (+) key when desired speed is
shown on SPEED display.
Press and hold SPEED (–) key to slow speed. Pressing for more than 2
seconds reduces speed more quickly. Release (–) key when desired speed
is shown on the SPEED display.
To Change Treadbelt Incline:
Press and hold INCLINE (+) key to increase incline. Pressing for more than
2 seconds raises incline faster. Release key when desired incline is shown
on INCLINE display.
Press and hold INCLINE (–) key to lower incline. Pressing for more than 2
seconds lowers incline faster. Release key when desired incline is shown on
INCLINE display.
Left and Right Arrows:
The left and right arrows move between the motivational screens.
EXPRESS KEYS:
Using the EXPRESS keys causes rapid changes in speed and incline.
Press EXPRESS (1) INCLINE to see the incline shortcut screen, which lets
you rapidly change incline level.
Press EXPRESS (2) SPEED to view the speed shortcut screen, which lets
you rapidly change to a different speed.
Treadmill Controls: Quick Start Guide (Continued)

Landice Achieve Quick Start Guide
14
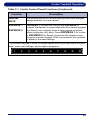
Switching English/Metric Display Units
The treadmill display shows English units (mph for speed, lb for
weight) by default. To change to metric units (kilometers per hour for
speed and kilograms for weight):
• Ensure the treadmill is plugged in and powered off.
• Pro Sports and Cardio: press and hold 3, 9 and START
simultaneously while the treadmill is off, then release all. Use
the + or – keys to move up and down the list and select
Toggle Units. Then press the START button to select setting.
Press STOP to save and exit.
• Landice Achieve: press START then hold 3 and 9
simultaneously during the boot-up screen, then release all. Use
the + or – keys to move up and down the list and select
Toggle Units. Then press START to select the setting. Press
STOP to save and exit.
Repeat the same steps to return the display to English units if desired.

Contents
15
Contents
Before you Start the Treadmill: Safety................................................10
Using the Control Panel .......................................................................11
Switching English/Metric Display Units..............................................14
1. Introduction ..........................................................................................17
1.1. Before You Begin ......................................................................... 17
1.2. Heart Rate Monitoring .................................................................. 21
1.2.1. What is exercise intensity?.............................................. 21
1.2.2. What is maximum heart rate? ......................................... 21
1.2.3. Why should I monitor exercise intensity? ........................ 22
1.2.4. How do I determine my Target Heart Rate Zone? .......... 23
1.2.5. Contact Heart Rate Monitoring System........................... 24
1.3. Treadmill Program Capabilities .................................................... 25
2. Pro Sports Treadmill Operation .........................................................27
2.1. Pro Sports Control Panel.............................................................. 27
2.2. Display Features .......................................................................... 29
2.3. Using the Pro Sports Treadmill .................................................... 30
2.4. Using the Built-in Programs.......................................................... 30
2.4.1. Description ...................................................................... 30
2.4.2. Running a Built-In Program ............................................. 32
2.5. Pro Sports User Programs ........................................................... 33
2.5.1. Learn Mode ..................................................................... 34
2.6. Specific Goal Programs................................................................ 34
3. Cardio Treadmill Operation .................................................................37
3.1. Cardio Control Panel .................................................................... 37
3.2. Display Features .......................................................................... 40
3.3. Using the Cardio Treadmill........................................................... 42
3.4. Using the Built-in Programs.......................................................... 42
3.4.1. Description ...................................................................... 42
3.4.2. Running a Built-In Program ............................................. 44
3.5. Cardio User Programs.................................................................. 45
3.5.1. Learn Mode ..................................................................... 46
3.6. Specific Goal Programs................................................................ 47
3.7. Heart Rate Control Programs....................................................... 48
3.7.1. Built-in HRC Programs .................................................... 49
3.7.2. User-Defined Heart Rate Programs ................................ 50
4. Landice Achieve Treadmill Operation ................................................53
4.1. Landice Achieve Control Panel .................................................... 53
4.2. Display Features .......................................................................... 56
4.3. Using the Landice Achieve Treadmill ........................................... 58
4.4. Using the Built-in Programs.......................................................... 58
4.4.1. Description ...................................................................... 58

Contents
16
4.4.2. Running a Built-In Program ............................................ 60
4.5. Landice Achieve User Programs ................................................. 61
4.5.1. Learn Mode..................................................................... 63
4.6. Specific Goal Programs ............................................................... 64
4.7. Heart Rate Control Programs ...................................................... 65
4.7.1. Built-in HRC Programs ................................................... 66
4.7.2. User-Defined Heart Rate Programs................................ 67
5. Fitness Testing .................................................................................... 69
5.1. Introduction .................................................................................. 69
5.2. Army 2 Mile Fitness Test (Cardio, Landice Achieve)................... 69
5.3. Balke Fitness Test (Cardio and Landice Achieve)....................... 71
5.4. Firefighter (Gerkin) Fitness Test (Cardio and Landice Achieve).. 74
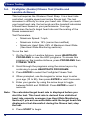
6. Maintenance and Troubleshooting .................................................... 77
6.1. Cleaning....................................................................................... 77
6.2. Lubrication ................................................................................... 78
6.3. Contact Landice........................................................................... 78
6.4. Hidden Menus.............................................................................. 79

17
1. Introduction
Landice has placed over 100,000 treadmills, ellipticals and
bikes in the harshest commercial environments around the
world, where our fitness equipment has proven its strength and
durability. Landice products are designed by a world-class
development team whose innovation defines the leading edge
of high-end fitness.
1.1. Before You Begin
Please do the following before you start to exercise on your
treadmill:
•
Register your treadmill. Landice backs your treadmill with a
strong warranty. For the factory to respond if your treadmill
has a problem, we need your warranty information on file.
Register online at the link below.
http://www.landice.com/support/product-registration
• Ensure that a suitable electrical outlet is available:
• 110VAC/15 amp dedicated circuit
• 220 – 240VAC/15 amp dedicated circuit
• Select the proper location. The treadmill should be installed in
a climate-controlled room.
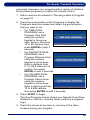
• Familiarize yourself with the features of the treadmill, shown
in the figure on page 19.
• Ensure that the location of your treadmill provides free space
of at least 79" (201 cm) immediately behind the treadmill for
its full width and at least 24" (61 cm) on each side of the
treadmill. See page 18. If the treadmill is used adjacent to
other treadmills then the side areas can be shared.

Introduction
18
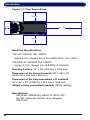
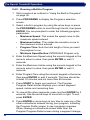
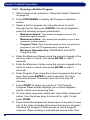
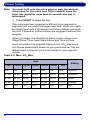
Figure 1-1. Free Space Areas
Electrical Specifications:
110V AC 50/60Hz 18A 1980W
* Incline 0-15%, Speed: 0.5 to 12.5 MPH (0.80 - 20.1 KPH)
220-240V AC 50/60Hz 15A 3300W
• Incline: 0-15%, Speed: 0.5-15.5 MPH (1-25 KPH)
Running Surface: 22'' x 60'' (559 mm x 1524 mm)
Dimension of the boxed treadmill: 88" x 38" x 26"
(2235 mm x 965 mm x 660 mm)
Dimension of the fully-assembled L10 treadmill:
83" x 34" x 64" (2108 mm x 864 mm x 1626 mm)
Weight of fully assembled treadmill: 500 lb (226kg)
Manufacturer:
IMPULSE (QINGDAO) HEALTH TECH LTD.
No.369, Huashan 2 Road, Jimo, Qingdao,
P.R.China.
24” (0.6m)
24” (0.6m)
79” (2m)
12”
(0.3m)

Introduction
19
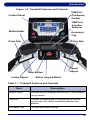
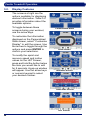
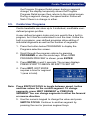
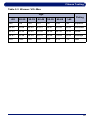
Figure 1-2. Treadmill Features and Controls
Safety Lanyard Block
Speed
Adjust
Incline Adjust
Pulse GripPulse Grip
Accessory
Tray
Bottle Holder
Control Panel
Stop Button
USB Port
(ProSports,
Cardio)
USB Port
(Landice
Achieve)
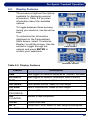
Table 1-1 Treadmill Features and Controls
Item Description
Control Panel Provides workout displays and controls. Control panels
vary by model.
USB Port Provides a charging port for devices up to 600mA.
Service use only: allows treadmill software to be
updated.
Accessory Tray Provides accessory storage.

Introduction
20
Bottle Holder
Holds bottles/cups.
Pulse Grips (2) Detects pulse when hands are placed on the grips,
allowing treadmill to calculate and display heart rate.
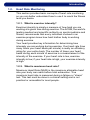
Lower Control Panel Controls
The lower control panel is located between the pulse grips. This area
provides easy-to-reach controls for stopping, resuming or changing speed or
incline during your workout.
Speed Adjustment Increases/decreases treadbelt speed when pressed
up/down. Performs the same function as the SPEED
(+/–) keys on the control panel.
STOP Button Press STOP once to pause the treadmill or twice to
turn it off. Statistical information is cleared when
treadmill is turned off.
Safety Lanyard
Block
Provides the connection for the safety lanyard. The
treadbelt will not move unless the safety lanyard block
is pushed in.
Incline Adjustment Raises/lowers the front of the treadbelt when pressed
up/down. Performs the same function as the INCLINE
(+/–) keys on the control panel.
Table 1-1 Treadmill Features and Controls (Continued)
Item Description
Table 1-2 Treadmill Connectors
Connector Description
HDMI For service use only
Coaxial OPTIONAL: Allows connection of an analog television
La page est en cours de chargement...
La page est en cours de chargement...
La page est en cours de chargement...
La page est en cours de chargement...
La page est en cours de chargement...
La page est en cours de chargement...
La page est en cours de chargement...
La page est en cours de chargement...
La page est en cours de chargement...
La page est en cours de chargement...
La page est en cours de chargement...
La page est en cours de chargement...
La page est en cours de chargement...
La page est en cours de chargement...
La page est en cours de chargement...
La page est en cours de chargement...
La page est en cours de chargement...
La page est en cours de chargement...
La page est en cours de chargement...
La page est en cours de chargement...
La page est en cours de chargement...
La page est en cours de chargement...
La page est en cours de chargement...
La page est en cours de chargement...
La page est en cours de chargement...
La page est en cours de chargement...
La page est en cours de chargement...
La page est en cours de chargement...
La page est en cours de chargement...
La page est en cours de chargement...
La page est en cours de chargement...
La page est en cours de chargement...
La page est en cours de chargement...
La page est en cours de chargement...
La page est en cours de chargement...
La page est en cours de chargement...
La page est en cours de chargement...
La page est en cours de chargement...
La page est en cours de chargement...
La page est en cours de chargement...
La page est en cours de chargement...
La page est en cours de chargement...
La page est en cours de chargement...
La page est en cours de chargement...
La page est en cours de chargement...
La page est en cours de chargement...
La page est en cours de chargement...
La page est en cours de chargement...
La page est en cours de chargement...
La page est en cours de chargement...
La page est en cours de chargement...
La page est en cours de chargement...
La page est en cours de chargement...
La page est en cours de chargement...
La page est en cours de chargement...
La page est en cours de chargement...
La page est en cours de chargement...
La page est en cours de chargement...
La page est en cours de chargement...
La page est en cours de chargement...
-
 1
1
-
 2
2
-
 3
3
-
 4
4
-
 5
5
-
 6
6
-
 7
7
-
 8
8
-
 9
9
-
 10
10
-
 11
11
-
 12
12
-
 13
13
-
 14
14
-
 15
15
-
 16
16
-
 17
17
-
 18
18
-
 19
19
-
 20
20
-
 21
21
-
 22
22
-
 23
23
-
 24
24
-
 25
25
-
 26
26
-
 27
27
-
 28
28
-
 29
29
-
 30
30
-
 31
31
-
 32
32
-
 33
33
-
 34
34
-
 35
35
-
 36
36
-
 37
37
-
 38
38
-
 39
39
-
 40
40
-
 41
41
-
 42
42
-
 43
43
-
 44
44
-
 45
45
-
 46
46
-
 47
47
-
 48
48
-
 49
49
-
 50
50
-
 51
51
-
 52
52
-
 53
53
-
 54
54
-
 55
55
-
 56
56
-
 57
57
-
 58
58
-
 59
59
-
 60
60
-
 61
61
-
 62
62
-
 63
63
-
 64
64
-
 65
65
-
 66
66
-
 67
67
-
 68
68
-
 69
69
-
 70
70
-
 71
71
-
 72
72
-
 73
73
-
 74
74
-
 75
75
-
 76
76
-
 77
77
-
 78
78
-
 79
79
-
 80
80


Landice 90 Series L10 Le manuel du propriétaire
- Catégorie
- Tapis de course
- Taper
- Le manuel du propriétaire
dans d''autres langues
- English: Landice 90 Series L10 Owner's manual
Documents connexes
Autres documents
-
Tunturi Pure Treadmill 3.1 Manuel utilisateur
-
Infiniti MA100 Treadmill Manuel utilisateur
-
-
-
-
-
-
Lifefitness 95Ti Mode d'emploi
-
Life Fitness 93T Manuel utilisateur
-