Roland MICRO CUBE BASS RX Le manuel du propriétaire
- Catégorie
- Amplificateur d'instruments de musique
- Taper
- Le manuel du propriétaire

Español Italiano Français Deutsch EnglishPortuguêsNederlands
Owner’s Manual
Bedienungsanleitung
Guide d’utilisation
Manuale dell'utente
Manual del usuario
Manual do proprietário
Gebruikershandleiding
Thank you, and congratulations on your choice of the Roland MICRO CUBE BASS RX Amplifier.
Before using this unit, carefully read the sections entitled: “USING THE UNIT SAFELY” and “IMPORTANT NOTES” (p. 2; p. 4).
These sections provide important information concerning the proper operation of the unit. Additionally, in order to feel assured that you have gained
a good grasp of every feature provided by your new unit, Owner’s manual should be read in its entirety. The manual should be saved and kept on hand
as a convenient reference.
Main Features
A compact, high-performance bass amplifier ideal for practising at home
Equipped with four newly developed 10-cm (4-inch) speakers, this compact but powerful 5-watt stereo power amp (2.5 watt + 2.5 watt) delivers a clear
bass sound.
Dual power operation with alkaline batteries (6 x AA) or AC adaptor (p. 5)
Dual power operation allows the amplifier to be used anywhere.
Wide range of tone variation provided by eight different COSM amp types (p. 6)
Adds the original amps SUPER FLAT and OCTAVE BASS to the standard 5-type bass amp modeling. Combined with the three-band equalizer, enables
finely textured sound creation. Can also be used as a simple PA system using the MIC.
Three internal effect systems (six types) optimized for bass (p. 7)
In addition to the COMPRESSOR indispensable for bass sound, the amp is also equipped with an EFX system (CHORUS, FLANGER, and T-WAH)
and DELAY/REVERB.
RHYTHM GUIDE function makes practical rhythm training easy (p. 9)
Contains preset rhythms from 11 genres (33 patterns) such as ROCK, JAZZ, LATIN and METRONOME. The optional footswitch allows you to operate
the START/STOP and TAP TEMPO controls with your feet while playing.
Tuner function supports six-string bass tunings (p. 9)
The amp is equipped with a bass tuner function that supports six-string bass tunings.
AUX IN allows stereo playback (p. 8)
You can connect a CD/MP3 player to the AUX IN jack and play the music in stereo.
Stereo headphone output supported (p. 8)
The amplifier has a stereo PHONES jack that can also be used as a REC OUT jack.
COSM (Composite Object Sound Modeling) is proprietary Roland modeling technology, which analyzes the way in which sound is affected by
elements such as electronic circuitry, structure, and materials, and combines these elements to reconstruct the desired sound.
Copyright © 2008 ROLAND CORPORATION All rights reserved.
No part of this publication may be reproduced in any form without the written permission of ROLAND CORPORATION.
MCB-RX_r_e.book Page 1 Wednesday, December 19, 2007 12:03 PM

2
USING THE UNIT SAFELY
• Do not attempt to repair the
unit, or replace parts within
it (except when this manual
provides specific instructions
directing you to do so). Refer all
servicing to your retailer, the nearest
Roland Service Center, or an autho-
rized Roland distributor, as listed on
the “Information” page.
........................................................................
• Never use or store the unit in
places that are:
• Subject to temperature
extremes (e.g., direct
sunlight in an enclosed
vehicle, near a heating duct, on top
of heat-generating equipment);
or are
• Damp (e.g., baths, washrooms,
on wet floors); or are
• Humid; or are
• Exposed to rain; or are
• Dusty; or are
• Subject to high levels of vibration.
........................................................................
• Make sure you always have
the unit placed so it is level
and sure to remain stable.
Never place it on stands that could
wobble, or on inclined surfaces.
........................................................................
• Be sure to use only the AC
adaptor supplied with the
unit. Also, make sure the line
voltage at the installation matches the
input voltage specified on the AC
adaptor’s body. Other AC adaptors
may use a different polarity, or be
designed for a different voltage,
so their use could result in damage,
malfunction, or electric shock.
........................................................................
• Use only the attached power-
supply cord. Also, the
supplied power cord must not
be used with any other device.
........................................................................
• Do not excessively twist or
bend the power cord, nor
place heavy objects on it.
Doing so can damage the cord,
producing severed elements and short
circuits. Damaged cords are fire and
shock hazards!
........................................................................
• This unit, either alone or in
combination with an amplifier
and headphones or speakers,
may be capable of producing sound
levels that could cause permanent
hearing loss. Do not operate for a long
period of time at a high volume level,
or at a level that is uncomfortable.
If you experience any hearing loss
or ringing in the ears, you should
immediately stop using the unit,
and consult an audiologist.
........................................................................
• Do not allow any objects
(e.g., flammable material,
coins, pins); or liquids of any
kind (water, soft drinks, etc.)
to penetrate the unit.
........................................................................
• Immediately turn the power
off, remove the AC adaptor
from the outlet, and request
servicing by your retailer, the nearest
Roland Service Center, or an autho-
rized Roland distributor, as listed on
the “Information” page when:
• The AC adaptor, the power-supply
cord, or the plug has been
damaged; or
• If smoke or unusual odor occurs
• Objects have fallen into, or liquid
has been spilled onto the unit; or
• The unit has been exposed to rain
(or otherwise has become wet); or
• The unit does not appear to operate
normally or exhibits a marked
change in performance.
........................................................................
• In households with small
children, an adult should
provide supervision until the
child is capable of following all the
rules essential for the safe operation
of the unit.
........................................................................
• Protect the unit from strong
impact.
(Do not drop it!)
........................................................................
Used for instructions intended to alert
the user to the risk of injury or material
damage should the unit be used
improperly.
* Material damage refers to damage or
other adverse effects caused with
respect to the home and all its
furnishings, as well to domestic
animals or pets.
Used for instructions intended to alert
the user to the risk of death or severe
injury should the unit be used
improperly.
The ● symbol alerts the user to things that must be
carried out. The specific thing that must be done is
indicated by the design contained within the circle. In
the case of the symbol at left, it means that the power-
cord plug must be unplugged from the outlet.
The symbol alerts the user to important instructions
or warnings.The specific meaning of the symbol is
determined by the design contained within the
triangle. In the case of the symbol at left, it is used for
general cautions, warnings, or alerts to danger.
The symbol alerts the user to items that must never
be carried out (are forbidden). The specific thing that
must not be done is indicated by the design contained
within the circle. In the case of the symbol at left, it
means that the unit must never be disassembled.
MCB-RX_r_e.book Page 2 Wednesday, December 19, 2007 12:03 PM

3
• Do not force the unit’s power-
supply cord to share an outlet
with an unreasonable number
of other devices. Be especially careful
when using extension cords—the total
power used by all devices you have
connected to the extension cord’s
outlet must never exceed the power
rating (watts/amperes) for the
extension cord. Excessive loads can
cause the insulation on the cord to
heat up and eventually melt through.
........................................................................
• Before using the unit in
a foreign country, consult
with your retailer, the nearest
Roland Service Center, or an autho-
rized Roland distributor, as listed on
the “Information” page.
........................................................................
• Batteries must never be
recharged, heated, taken apart,
or thrown into fire or water.
........................................................................
• Never expose Battery to
excessive heat such as
sunshine, fire or the like.
........................................................................
• The unit and the AC adaptor
should be located so their
location or position does not
interfere with their proper ventilation.
........................................................................
• Always grasp only the plug on
the AC adaptor cord when
plugging into, or unplugging
from, an outlet or this unit.
........................................................................
• At regular intervals, you
should unplug the AC adaptor
and clean it by using a dry
cloth to wipe all dust and other
accumulations away from its prongs.
Also, disconnect the power plug from
the power outlet whenever the unit is
to remain unused for an extended
period of time. Any accumulation of
dust between the power plug and the
power outlet can result in poor
insulation and lead to fire.
........................................................................
• Try to prevent cords and
cables from becoming
entangled. Also, all cords and
cables should be placed so they
are out of the reach of children.
........................................................................
• Never climb on top of, nor
place heavy objects on the
unit.
........................................................................
• Never handle the AC adaptor
or its plugs with wet hands
when plugging into, or
unplugging from, an outlet
or this unit.
........................................................................
• Before moving the unit,
disconnect the AC adaptor
and all cords coming from
external devices.
........................................................................
• Before cleaning the unit, turn
off the power and unplug the
AC adaptor from the outlet
(p. **).
........................................................................
• Whenever you suspect the
possibility of lightning in your
area, disconnect the AC
adaptor from the outlet.
........................................................................
• If used improperly, batteries
may explode or leak and
cause damage or injury. In the
interest of safety, please read
and observe the following
precautions (p. **).
• Carefully follow the instal-
lation instructions for batteries, and
make sure you observe the correct
polarity.
• Avoid using new batteries together
with used ones. In addition, avoid
mixing different types of batteries.
• Remove the batteries whenever the
unit is to remain unused for an
extended period of time.
• If a battery has leaked, use a soft
piece of cloth or paper towel to
wipe all remnants of the discharge
from the battery compartment.
Then install new batteries. To avoid
inflammation of the skin, make
sure that none of the battery
discharge gets onto your hands or
skin. Exercise the utmost caution so
that none of the discharge gets near
your eyes. Immediately rinse the
affected area with running water
if any of the discharge has entered
the eyes.
• Never keep batteries together with
metallic objects such as ballpoint
pens, necklaces, hairpins, etc.
........................................................................
• Used batteries must be
disposed of in compliance
with whatever regulations for
their safe disposal that may be
observed in the region in which you
live.
........................................................................
• Should you remove screws,
keep them in a safe place out
of children’s reach, so there is
no chance of them being swallowed
accidentally.
........................................................................
• Do not remove the speaker
grille and speaker by any
means. Speaker not user
replaceable. Shock hazardous
voltages and currents are present
inside the enclosure.
MCB-RX_r_e.book Page 3 Wednesday, December 19, 2007 12:03 PM

4
IMPORTANT NOTES
Power Supply: Use of Batteries
• Do not connect this unit to same electrical outlet that is
being used by an electrical appliance that is controlled
by an inverter (such as a refrigerator, washing machine,
microwave oven, or air conditioner), or that contains
a motor. Depending on the way in which the electrical
appliance is used, power supply noise may cause this unit
to malfunction or may produce audible noise. If it is
not practical to use a separate electrical outlet, connect
a power supply noise filter between this unit and the
electrical outlet.
• The AC adaptor will begin to generate heat after long
hours of consecutive use. This is normal, and is not
a cause for concern.
• The use of an AC adaptor is recommended as the unit’s
power consumption is relatively high. Should you prefer
to use batteries, please use the alkaline type.
• When installing or replacing batteries, always turn off the
power on this unit and disconnect any other devices you
may have connected. This way, you can prevent
malfunction and/or damage to speakers or other devices.
• Before connecting this unit to other devices, turn off the
power to all units. This will help prevent malfunctions
and/or damage to speakers or other devices.
Placement
• Using the unit near power amplifiers (or other equipment
containing large power transformers) may induce hum.
To alleviate the problem, change the orientation of this
unit; or move it farther away from the source of inter-
ference.
• This device may interfere with radio and television
reception. Do not use this device in the vicinity of such
receivers.
• Noise may be produced if wireless communications
devices, such as cell phones, are operated in the vicinity of
this unit. Such noise could occur when receiving or initi-
ating a call, or while conversing. Should you experience
such problems, you should relocate such wireless devices
so they are at a greater distance from this unit, or switch
them off.
• Do not expose the unit to direct sunlight, place it near
devices that radiate heat, leave it inside an enclosed
vehicle, or otherwise subject it to temperature extremes.
Also, do not allow lighting devices that normally are used
while their light source is very close to the unit (such as
a piano light), or powerful spotlights to shine upon the
same area of the unit for extended periods of time.
Excessive heat can deform or discolor the unit.
• When moved from one location to another where the
temperature and/or humidity is very different, water
droplets (condensation) may form inside the unit. Damage
or malfunction may result if you attempt to use the unit in
this condition. Therefore, before using the unit, you must
allow it to stand for several hours, until the condensation
has completely evaporated.
• Do not allow rubber, vinyl, or similar materials to remain
on the unit for long periods of time. Such objects can
discolor or otherwise harmfully affect the finish.
• Do not paste stickers, decals, or the like to this instrument.
Peeling such matter off the instrument may damage the
exterior finish.
• Depending on the material and temperature of the surface
on which you place the unit, its rubber feet may discolor
or mar the surface.
You can place a piece of felt or cloth under the rubber feet
to prevent this from happening. If you do so, please make
sure that the unit will not slip or move accidentally.
Maintenance
• For everyday cleaning wipe the unit with a soft, dry cloth
or one that has been slightly dampened with water.
To remove stubborn dirt, use a cloth impregnated with
a mild, non-abrasive detergent. Afterwards, be sure to
wipe the unit thoroughly with a soft, dry cloth.
• Never use benzine, thinners, alcohol or solvents of any
kind, to avoid the possibility of discoloration and/or
deformation.
Additional Precautions
• Use a reasonable amount of care when using the unit’s
buttons, sliders, or other controls; and when using its jacks
and connectors. Rough handling can lead to malfunctions.
• When connecting/disconnecting all cables, grasp the
connector itself—never pull on the cable. This way you
will avoid causing shorts, or damage to the cable’s internal
elements.
• When you need to transport the unit, package it in the box
(including padding) that it came in, if possible. Otherwise,
you will need to use equivalent packaging materials.
• Some connection cables contain resistors. Do not use
cables that incorporate resistors for connecting to this unit.
The use of such cables can cause the sound level to be
extremely low, or impossible to hear. For information on
cable specifications, contact the manufacturer of the cable.
http://www.kensington.com/
MCB-RX_r_e.book Page 4 Wednesday, December 19, 2007 12:03 PM

Español Italiano Français Deutsch EnglishPortuguêsNederlands
5
Power Supply
Remove the lid of the battery
compartment and insert 6 AA
batteries, making sure that they
are correctly oriented.
* To avoid malfunction and/or
damage to speakers or other
devices, always turn off
the power on this unit and
disconnect any other devices when installing or replacing batteries.
* When closing the lid of the battery compartment, first insert
the catches on the lid into the matching cavities, then push
the lid down firmly until you hear a click.
Using Batteries
Please note the following points.
• If there are batteries in the unit while an AC adaptor is being used,
normal operation will continue should the supply of current
be interrupted (power outage or power cord disconnection).
•
Use only alkaline batteries (LR6). You cannot use any other type of battery.
• Battery Life
Used continuously at maximum power: approx. ?? hours
Normal use: approx. ?? hours
(These figures will vary depending on the actual conditions of use)
•
When operating on battery power only, the unit's power indicator (p.6)
will become dim when battery power gets too low. Replace the batteries
as soon as possible.
• Sounds may distort easily or may cut off when played at high
volume as the battery power begins to fade, but this is normal
and does not indicate a malfunction. Either replace the batteries
or use the AC adaptor included with the unit.
1. Insert the DC plug of the supplied AC adaptor into the unit's AC
adaptor jack.
By anchoring the AC adaptor cord using the
cord hook, as shown in the illustration, you
can prevent situations such as the adaptor
becoming unplugged or unreasonable
pressure being exerted on the AC adaptor
jack.
* To avoid faulty operation or damage to the
speakers, you should disconnect the unit from other devices and
switch off its power when connecting the AC adaptor.
2. Connect the supplied power cord to the AC adaptor, and plug
it into an AC outlet.
Place the AC adaptor so the side with the indicator (see illustration)
faces upwards.
* The indicator will light when you plug the AC adaptor into an AC outlet.
Using the Unit With the AC Adaptor
Please note the following points.
•
Although the unit can operate on batteries alone, connecting the AC
adaptor to the unit while it has batteries inserted ensures that power
is supplied from the AC adaptor, reducing battery consumption.
•
Use only the AC adaptor included with the MICRO CUBE BASS RX.
Use of other AC adaptors may damage the amp or result in other problems.
Once the connections have been completed, turn on power to your various
devices in the order specified. By turning on devices in the wrong order, you
risk causing malfunction and/or damage to speakers and other devices.
1. Make sure that all volume controls on the MICRO CUBE BASS RX
and connected devices are set to 0.
2. Turn on all the devices connected to the MICRO CUBE BASS RX's
INPUT jack and AUX IN jack.
3. Turn on the MICRO CUBE BASS RX.
4. Adjust the volume levels for the devices.
5. Before switching off the power, lower the volume on each of the
devices in your system, and then turn off the devices in the reverse
of the order followed when switching them on.
NOTE
Due to a circuitry protection feature, this unit requires a few moments
after power up before it is ready for normal operation. To avoid
sudden, high-volume sound, always make sure to have the volume
level turned down before switching on power.
NOTE
Even with the volume all the way down, you may still hear some
sound when the power is switched on and off, but this is normal,
and does not indicate a malfunction.
Attach the supplied strap to
the strap pin as shown in the
illustration.
NOTE
Attach the strap securely so that it does not easily become
detached. If the strap is loose, and you use it that way when
carrying the MICRO CUBE BASS RX, the amp could be dropped,
possibly resulting in damage or injury.
NOTE
Use only the provided strap. The included strap is meant for
exclusive use with the MICRO CUBE BASS RX. Do not use this strap
for other products.
NOTE
Do not spin or swing the MICRO CUBE BASS RX while holding it by
the strap. This is extremely dangerous, as it may cause the strap to
become detached; or, if the motion is repeated enough, may even
break the strap.
Inserting Batteries
Connecting the AC Adaptor
Indicator
AC Outlet
AC Adaptor
Power Cord
Switching the Power On
and Off
Attaching the Strap
MCB-RX_r_e.book Page 5 Wednesday, December 19, 2007 12:03 PM

6
Panel Descriptions
fig.01-01
1. INPUT Jack
Connect your bass guitar or microphone here.
2. COMP (COMPRESSOR) Button
Pressing the COMP button switches on the COMPRESSOR function.
This allows you to compress high level signals without distorting
the original sound. It also suppresses the attack portions and delivers
a smooth, consistent sound.
3. TUNER
The tuner function supports six-string bass tunings.
In addition to manual tuning, in which strings are specified, you can
also use it as a chromatic tuner.
→ Using the Tuner Function (p. 9)
4. AMP TYPE Knob
You can select from eight COSM amp types. When the TUNER
function is on, you can specify a string (note name).
* The product names mentioned in this document are trademarks
or registered trademarks of their respective owners, and are not
related to Roland Corporation. In this manual, these names are
used because it is the most practical way of describing the sounds
that are simulated using COSM technology.
OCTAVE BASS
This original amp type creates sounds one octave below the input
sounds and layers them together to create a fatter bass sound.
* This function does not work properly when playing chords.
Mute the other strings and play a single note.
SUPER FLAT
An original amp featuring a wide-range frequency response.
This amp type provides faithful reproduction of the connected bass's
own sound. This is a great type for all kinds of connected instruments.
It is ideal for reproduction of an electric upright bass.
FLIP TOP
Models the Ampeg B-15 (1 x 15"). This amp provided the
underpinning for many of the most famous Motown hits.
It features a fat sound, while the amp's compact cabinet produces
a distinct contour.
B MAN
Models the Fender Bassman 100 (4 x 12"). This amp has been
a favorite since the inception of electric basses.
It features the sonic characteristics of tube amps, whereby increasing
the distortion yields a slightly fatter sound.
BASS 360
Models the acoustic 360 (1 x 18"). This amp was used in the '70s not
only by famous jazz bassists, but by funk and hard rock players as well.
It is characterized by a warm low end, and a contoured midrange.
SESSION
Models the SWR SM-400 + Goliath (4 x 10") + Big Ben (1 x 18").
This tweeter-equipped amp is representative of the "L.A. Sound" that
emerged in the '80s. It features a wide-range tone that balances
presence in the low end with a clear, open sound.
CONCERT 810
Models the Ampeg SVT + 810E (8 x 10"). This amp typifies the rock
sound that relied heavily on combinations of high-output, tube amp
sections and large-sized cabinets. The characteristic sound is one
of overwhelming low-frequency sound pressure.
MIC
Select this when a microphone is connected.
* Please note the following points when using a microphone.
• Feedback could be produced depending on the location of
microphones relative to the unit. This can be remedied by:
1. Changing the orientation of the microphone(s).
2. Relocating microphone(s) at a greater distance
from the unit.
3. Lowering volume levels.
• The sound will be distorted if you turn the GAIN knob up
too high. Set the GAIN knob to as high a value as possible
before the sound distorts to get the best signal-to-noise ratio.
• Use a dynamic microphone.
You cannot use a condenser microphone or a plug-in
powered microphone that requires a power supply.
Control Panel
Bass Guitar
Dynamic Mic
Standard
Mono Cable
MCB-RX_r_e.book Page 6 Wednesday, December 19, 2007 12:03 PM

Español Italiano Français Deutsch EnglishPortuguêsNederlands
7
Panel Descriptions
5. GAIN Knob
Adjusts the input level. Adjust the input level to suit the signal level
of musical instruments connected to the INPUT jack.
TIP
Using a high GAIN setting allows you to get an overdrive sound.
TIP
Set the GAIN knob to as high a value as possible before the sound
distorts to get the clearest sound.
6. VOLUME Knob
Adjusts the volume of the bass guitar (microphone).
7. Power Indicator
This indicator lights when the unit is turned on.
* When operating on battery power only, the unit's indicator
will become dim during play when battery power gets too low.
Replace the batteries as soon as possible.
8. POWER Switch
Turns the power on and off.
→ Switching the Power On and Off (p. 5)
9. EQUALIZER
This is a three-band equalizer. Three knobs allow you to adjust the
tone of the bass guitar.
BASS Knob: Adjusts the tone quality of the lower range.
MIDDLE Knob: Adjusts the tone quality of the midrange.
TREBLE Knob: Adjusts the tone quality of the upper range.
10. EFX (Effects) Knob
Turn this knob to chorus, flanger, or T-Wah to select the
corresponding effect. You can also adjust the amount of effect
applied by turning the knob to the desired position.
* Graduations for CHORUS, FLANGER and T-WAH on the panel are
for reference. Be sure to check the sound as you adjust the effects.
CHORUS (spacially synthesized chorus)
This is a spacially synthesized chorus.
With spacially synthesized chorus,
a method available only in stereo, the
chorus effect is created by taking the
sound from the right speaker (from which
the effect sound is output), and the sound
from the left speaker (which outputs the direct sound),
and then mixing them in the actual space. This creates a greater
lateral spread than that produced when the sounds are mixed
electronically, providing a more natural sense of breadth.
* The chorus effects are designed so they exhibit the greatest
effectiveness when you use the unit's built-in speakers.
Effectiveness may differ when REC OUT/PHONE are used
instead of the built-in speakers.
FLANGER
This creates a flanging effect that creates
a sort of spinning sensation with the sound.
This effect is characterized by a cool,
metallic spinning sensation.
T-WAH
The filter responds to the volume level of
the connected instrument. This creates
a distinctive effect whereby the filter
responds to the performance.
11. DELAY/REVERB Knob
Turn this knob to DELAY or REVERB
to switch to that effect. You can also adjust the amount of effect
applied by turning the knob to the desired position.
* Graduations for DELAY and REVERB on the panel are for
reference. Be sure to check the sound as you adjust the effects.
DELAY
Turn the knob to adjust the delay effect.
REVERB (Stereo reverb)
Turn the knob to adjust the reverb effect.
12. RHYTHM GUIDE
The unit is equipped with drum/percussion-based rhythm patterns
that are useful for solo practicing. In addition to practicing with your
desired beat, you can also use it as a metronome.
→ Using the RHYTHM GUIDE (p. 9)
PATTERN Knob
Selects the genre of rhythm pattern.
START/STOP Button
Starts/stops the RHYTHM GUIDE. When you start the RHYTHM
GUIDE, its indicator flashes in tempo with the music.
TAP TEMPO Button
Sets the tempo of the RHYTHM GUIDE. Tap this button two or more times
at the desired tempo and the RHYTHM GUIDE will play at that tempo.
VARIATION Button
Selects the variation of the rhythm pattern. Each genre contains three
types of rhythm variations. Pressing the VARIATION button cycles you
through the available variations; the VARIATION indicator will be unlit,
will light green, or will light red to indicate the change in variation.
VOLUME Knob
Adjusts the volume of the RHYTHM GUIDE.
MCB-RX_r_e.book Page 7 Wednesday, December 19, 2007 12:03 PM

8
Panel Descriptions
1. Cord Hook
Hook the AC adaptor cord here.
→ Connecting the AC Adaptor (p. 5)
2. AC Adaptor Jack
Connect the included AC adaptor to this jack.
Use only the AC adaptor included with the MICRO CUBE BASS RX. Use
of other AC adaptors may damage the amp or result in other problems.
→ Connecting the AC Adaptor (p. 5)
3. FOOT SW (Footswitch) Jack
If you connect a footswitch (the optional BOSS FS-5U or FS-6), you can
operate the RHYTHM GUIDE function (START/STOP and TAP TEMPO).
4. REC OUT/PHONES Jack
Connect stereo headphones or a recording device to this jack.
It supports stereo output.
* No sound is played through the unit's speaker while the
REC OUT/PHONES jack is in use.
5. AUX IN Jack
You can connect devices such as a CD player, digital audio player or
electronic musical instrument, and have it play along with your bass guitar.
Offers two types of jacks for external input; a mono 1/4" phone jack
and a stereo-mini jack. Use the appropriate cable (optional) for the
device that you are connecting.
* Determine the volume level by adjusting the volume control of
the connected device.
6. Ground Terminal
Depending on the circumstances of a particular setup, you may
experience a discomforting sensation, or perceive that the surface feels
gritty to the touch when you touch this device, microphones connected
to it, or the metal portions of other objects, such as guitars. This is due to
an infinitesimal electrical charge, which is absolutely harmless. However,
if you are concerned about this, connect the ground terminal with an
external ground. When the unit is grounded, a slight hum may occur,
depending on the particulars of your installation. If you are unsure
of the connection method, contact the nearest Roland Service Center,
or an authorized Roland distributor, as listed on the "Information" page.
Unsuitable places for connection
• Water pipes (may result in electrical shock)
• Gas pipes (may result in fire or explosion)
• Telephone-line ground or lightning rod (may be dangerous
in the event of lightning)
7. Battery Compartment
Insert 6 AA batteries. Use only alkaline batteries (LR6).
You cannot use any other type of battery.
→ Inserting Batteries (p. 5)
8. Security Lock ( )
You can connect commercially available anti-theft security cables
and other security devices to the unit.
http://www.kensington.com/
Rear Panel
White Red
PCS-33
PCS-31
RecorderStereo HeadphonesMixer
Digital
Audio
Player
BOSS FS-6
BOSS FS-5U
Electronic Musical
Instruments, etc.
White (L ch) Red (R ch)
PCS-31
AB
Set the switches as shown below.
Start/Stop
Tap Tempo
Set the polarity
switch as shown
below.
Start/Stop
Tap Tempo
Standard
Stereo Cable
Stereo Mini
Cable
Standard Mono
Cable
MCB-RX_r_e.book Page 8 Wednesday, December 19, 2007 12:03 PM

Español Italiano Français Deutsch EnglishPortuguêsNederlands
9
Useful Functions
The MICRO CUBE BASS RX is equipped with a tuner function that supports
six-string bass tunings. In addition to manual tuning, in which individual
strings are specified, you can also use it as a chromatic tuner.
* Use manual tuning when the strings are substantially out of tune
(such as after changing strings).
Manual Tuning
1. Press the TUNER button.
The unit enters Tuner mode, and the TUNER button lights. When
the unit is in Tuner mode, no sound is played through the speakers
or the REC OUT/PHONES jack.
2. Use the AMP TYPE
knob to select the
string that you
want to tune.
3. Play a single note on the open string that you want to tune.
Tune the string until the green indicator lights.
* The red indicator flashes if the pitch is substantially out of tune.
4. When you have finished tuning, press the TUNER button once again.
* The reference pitch is A = 440 Hz. This cannot be changed.
Chromatic Tuning
If you press the TUNER button for one second or more, you can also use
the unit as a "chromatic tuner", which automatically determines the closest
note name to the one played.
As with manual tuning, chromatic tuning allows you to play a single note on
the string that you want to tune. Tune the string until the green indicator lights.
The MICRO CUBE BASS RX is equipped with drum/percussion-based
rhythm patterns that are useful for solo practicing. In addition to practicing
with your desired beat, you can also use it as a metronome.
1. Select the rhythm genre using the PATTERN knob.
METRONOME ROCK1 ROCK2 BLUES
COUNTRY R&B BALLAD JAZZ
FUNK LATIN DANCE
2. Press the START/STOP button to start the RHYTHM GUIDE.
When the RHYTHM GUIDE is started, the RHYTHM GUIDE indicator
lights.
3. Adjust the RHYTHM GUIDE volume using the RHYTHM GUIDE
VOLUME knob.
4. Select a rhythm variation by pressing the VARIATION button.
Each genre contains three types of rhythm variations. Pressing
the VARIATION button cycles you through the available variations;
the VARIATION indicator will be unlit, will light green, or will light
red to indicate the change in variation.
5. Adjust the variation to the tempo that you want to play to.
Press the TAP TEMPO button two or more times at the desired tempo
to get the RHYTHM GUIDE to play at that tempo.
Using the Tuner Function
Knob
Position
String (Note Name)
5B
Open fifth string of a five-string bass guitar with
an additional low string (B)
4E
Open
fourth
string of a
four
-
string bass guitar
(E)
3A Open third string of a four-string bass guitar
(A)
2D Open second string of a four-string bass guitar
(D)
1G Open first string of a four-string bass guitar
(A)
1C
Open first string of a five-string bass guitar with
an additional high string, or the open first string
of a six-string bass guitar (C)
A
b
Open third string of a four-string bass guitar
(semitone down)
(A
b
)
A
bb
Open third string of a four-string bass guitar
(whole tone down)
(G)
Pitch is correct
Flat Sharp
Lights greenLights red Lights red
Using the RHYTHM GUIDE
MCB-RX_r_e.book Page 9 Wednesday, December 19, 2007 12:03 PM

10
ALL ROUND (SUPER FLAT)
An amp sound featuring a wide-range frequency response.
This amp type enables clear reproduction of your instrument's sound.
This also makes it perfect when connecting bass modeling processors
or using sound modules like bass synth.
If you are using an electric upright bass, you should try lowering TREBLE.
FINGER & FRETLESS
A bass sound that was popular in the seventies.
This is suited for a Jazz Bass with a rear pickup used. You can get
a distinctive fat sound when the bass is fingered near the rear pickup.
In addition, using this setting while playing harmonics in combination with
a chorus and a delay enables sounds featuring exquisite reverberation.
SLAP BASS
This setting is suitable for a great slap bass sound. You can get a sticky
sound by switching on the COMPRESSOR (COMP). If you apply some
reverb, you can create a more sumptuous sound.
To obtain the attacking sound used in rock music, raise the BASS
and TREBLE settings to produce a sound with greater power.
You can add to this effect by reducing the MIDDLE setting.
FUNK WAH (SUPER FLAT/SESSION)
This setting employs the T-WAH feature for a funky sound that responds
to the bass touch. The WAH effect becomes even more prominent with
the SUPER FLAT or SESSION amp types, which feature response up to
the high-frequency range. Use the T-WAH knob to adjust the sensitivity.
Adjust the WAH effect with the knob settings according to the output of the
connected bass. You can get a different sound for each different playing
style, such as slap, muted or glissando.
You can get a light WAH sound by switching the COMPRESSOR (COMP)
on in the slap playing style.
OCTAVE IMAGE (OCTAVE BASS)
This is a thicker bass sound created by mixing input sounds with sounds
one octave below them.
This is effective in solo performances that use high positions.
You can create some impressive sounds by applying effects like
T-WAH or combining them with DELAY.
MEMO
Adjust the VOLUME knob to an appropriate volume level.
Sample Settings
COMP Switch OFF
COMP Switch OFF
COMP Switch:
ON or OFF
COMP Switch:
ON or OFF
COMP Switch OFF
MCB-RX_r_e.book Page 10 Wednesday, December 19, 2007 12:03 PM

Español Italiano Français Deutsch EnglishPortuguêsNederlands
11
Stromversorgung
Nehmen Sie den Deckel des
Batteriefachs ab und setzen Sie 6 AA-
Batterien ein. Achten Sie dabei auf
die richtige Ausrichtung der Pole.
* Um Fehlfunktionen und/oder
Schäden an Lautsprechern
oder anderen Geräten zu
vermeiden, schalten Sie immer
dieses Gerät aus und trennen
Sie die Verbindung zu anderen Geräten, bevor Sie Batterien
einlegen oder ersetzen.
* Führen Sie, wenn Sie den Batteriefachdeckel schließen, als erstes
die Zapfen am Deckel in die entsprechenden Aussparungen ein,
und drücken Sie dann den Deckel fest zu, bis sie ihn einrasten hören.
Batteriebetrieb
Beachten Sie bitte die folgenden Punkte:
• Wenn der Netzadapter verwendet wird, sich aber Batterien im Gerät
befinden, wird im Fall einer Unterbrechung der Stromversorgung
(durch Stromausfall oder Abziehen des Netzkabels) der normale
Betrieb fortgesetzt.
• Verwenden Sie ausschließlich Alkali-Batterien (LR6).
Andere Batterietypen können nicht verwendet werden.
• Lebensdauer der Batterien
Bei Dauerbetrieb mit maximaler Leistung: etwa ?? Stunden
Normaler Betrieb: etwa ?? Stunden
(Diese Werte variieren je nach den tatsächlichen Betriebsbedingungen.)
• Bei ausschließlichem Batteriebetrieb wird die Spannungsanzeige
(S. 12) des Geräts während des Spielens zunehmend dunkler,
sobald die Batteriespannung zu sehr absinkt. Ersetzen Sie
die Batterien so bald wie möglich.
•
Die Sounds verzerren früher oder werden abgeschnitten, wenn Sie bei
abnehmender Batteriespannung mit hoher Lautstärke spielen. Dies ist
jedoch normal und nicht als Fehlfunktion zu werten. Ersetzen Sie entweder
die Batterien oder verwenden Sie den mitgelieferten Netzadapter.
1. Stecken Sie den Klinkenstecker des mitgelieferten Netzadapters
in die Netzadapterbuchse des Geräts.
Indem Sie den Netzadapter wie in der
Abbildung gezeigt mit Hilfe der
Kabelklemme festhaken, können Sie
vermeiden, dass sich Adapterstecker aus
der Buchse löst oder übermäßiger Druck
auf die Adapterbuchse ausgeübt wird.
* Um Betriebsfehler oder Schäden an den
Lautsprechern zu vermeiden, sollten Sie das
Gerät von anderen Geräten trennen und es ausschalten, wenn Sie den
Netzadapter anschließen.
2. Schließen Sie das mitgelieferte Stromkabel an den Netzadapter
an, und stecken Sie dessen Stecker in eine Netzsteckdose.
Platzieren Sie den Netzadapter so, dass die Seite mit der Anzeige
(siehe Abbildung) nach oben weist.
* Die Anzeige leuchtet, sobald Sie den Netzadapter in eine
funktionierende Netzsteckdose einstecken.
Verwendung des Geräts mit dem Netzadapter
Beachten Sie bitte die folgenden Punkte:
• Das Gerät kann zwar allein mit Batterien betrieben werden, doch
durch Anschließen des Netzadapters bei eingelegten Batterien
wird sichergestellt, dass das Gerät über den Netzadapter mit
Spannung versorgt wird, was den Batterieverbrauch verringert.
• Verwenden Sie ausschließlich den mit dem MICRO CUBE BASS RX
mitgelieferten Netzadapter.
Die Verwendung anderer Netzadapter kann den Verstärker
beschädigen oder andere Probleme verursachen.
Sobald Sie alle Anschlüsse vorgenommen haben, schalten Sie alle beteiligten
Geräte in der angegebenen Reihenfolge ein. Wenn Sie die Geräte in der
falschen Reihenfolge einschalten, kann es zu Fehlfunktionen und/oder
Schäden an Lautsprechern oder anderen Geräten kommen.
1. Achten Sie darauf, dass alle Lautstärkeregler am MICRO CUBE
BASS RX und an angeschlossenen Geräten auf 0 eingestellt sind.
2. Schalten Sie alle Geräte ein, die an der INPUT- und der AUXI-IN-
Buchse des MICRO CUBE BASS RX angeschlossen sind.
3. Schalten Sie den MICRO CUBE BASS RX ein.
4. Stellen Sie die Lautstärken der Geräte ein.
5. Regeln Sie vor dem Ausschalten die Lautstärken aller Geräte
in Ihrem System herunter, und schalten Sie dann die Geräte
in umgekehrter Reihenfolge aus.
HINWEIS
Aufgrund einer Schaltungsschutzfunktion dauert es nach dem Einschalten
einen Moment, bis dieses Gerät für den normalen Betrieb bereit ist.
Um plötzliche, laute Impulse zu vermeiden, achten Sie immer darauf,
die Lautstärke herunterzuregeln, bevor Sie das Gerät einschalten.
HINWEIS
Auch bei vollständig heruntergeregelter Lautstärke hören Sie beim
Ein- und Ausschalten möglicherweise ein Geräusch, aber das ist
normal und stellt keine Fehlfunktion dar.
Befestigen Sie den
mitgelieferten Tragegurt wie
in der Abbildung gezeigt am
Gurtstift.
HINWEIS
Befestigen Sie den Gurt so, dass er sich nicht versehentlich lösen
kann. Falls der Gurt locker ist, während Sie den MICRO CUBE
BASS RX am Gurt tragen, könnte der Verstärker zu Boden fallen,
was Schäden oder Verletzungen verursachen kann.
HINWEIS
Verwenden Sie nur den mitgelieferten Gurt. Der mitgelieferte Gurt
ist ausschließlich zur Verwendung mit dem MICRO CUBE BASS RX
vorgesehen. Verwenden Sie diesen Gurt nicht für andere Produkte.
HINWEIS
Machen Sie keine Dreh- oder Schwingbewegungen mit dem
MICRO CUBE BASS RX, während Sie ihn am Gurt halten.
Dies ist äußerst gefährlich, da sich dadurch der Gurt lösen oder,
wenn die Bewegung zu oft wiederholt wird, sogar reißen kann.
Einlegen der Batterien
Anschließen des Netzadapters
Anzeige
Netzsteckdose
Netzadapter
Stromkabel
Ein- und Ausschalten
Anbringen des Tragegurts
MCB-RX_r_e.book Page 11 Wednesday, December 19, 2007 12:03 PM

12
Beschreibungen zum Bedienfeld
Abb. 01-01
1. Buchse INPUT (Eingang)
Schließen Sie hier Ihren Bass oder Ihr Mikrofon an.
2. Taste COMP (COMPRESSOR)
Durch Drücken der COMP-Taste schalten Sie die COMPRESSOR-
Funktion ein. Diese ermöglicht Ihnen, laute Signale zu komprimieren,
ohne den ursprünglichen Klang zu verzerren. Außerdem unterdrückt
sie die Anschlagsgeräusche und erzeugt einen ruhigen,
gleichmäßigen Klang.
3. TUNER (Stimmfunktion)
Die Tuner-Funktion unterstützt das Stimmen sechssaitiger Bässe.
Zusätzlich zum manuellen Stimmen, wo die Tonhöhe der Saiten angegeben
wird, können Sie sie auch als chromatisches Stimmgerät nutzen.
→ Verwendung der Tuner-Funktion (S. 15)
4. Typ-Regler
Sie können unter acht COSM-Verstärkertypen wählen.
Bei eingeschalteter TUNER-Funktion können Sie eine Saite
(einen Notennamen) angeben.
* Die in diesem Dokument erwähnten Produktbezeichnungen sind
Warenzeichen oder eingetragene Warenzeichen der jeweiligen
Eigentümer und haben nichts mit der Roland Corporation zu tun.
In dieser Anleitung werden diese Bezeichnungen in einer Weise
verwendet, die geeignet ist, die mit der COSM-Technologie
simulierten Sounds zu beschreiben.
OCTAVE BASS
Dieser spezielle Verstärkertyp erzeugt einen Ton eine Oktave
unterhalb des Originalklangs und legt beide übereinander, um einen
fetteren Bass-Sound zu erzeugen.
* Beim Spielen von Akkorden arbeitet diese Funktion nicht richtig.
Dämpfen Sie die anderen Saiten ab und spielen Sie einzelne Töne.
SUPER FLAT
Ein spezieller Verstärker mit einem breiten Frequenzgang.
Dieser Verstärkertyp reproduziert originalgetreu den Sound des
angeschlossenen Basses. Er eignet sich sehr gut für alle Arten von
angeschlossenen Instrumenten.
Ideal ist er zum Reproduzieren eines elektrischen Kontrabasses.
FLIP TOP
Ein Modell des Ampeg B-15 (1 x 15"). Dieser Verstärker lieferte den
Unterbau für viele der bekanntesten Motown-Hits.
Er hat einen fetten Klang, während das kompakte Verstärkergehäuse
eine klare Kontur erzeugt.
B MAN
Ein Modell des Fender Bassman 100 (4 x 12"). Dieser Verstärker
ist von Anfang an ein Favorit unter den E-Bässen gewesen.
Er hat die Klangeigenschaften von Röhrenverstärkern, wobei eine
größere Verzerrung einen etwas fetteren Sound ergibt.
BASS 360
Ein Modell des akustischen 360 (1 x 18"). Dieser Verstärker wurde in
den 70er Jahren nicht nur von berühmten Jazz-Bassisten, sondern auch
von Funk- und Hardrock-Musikern verwendet. Er zeichnet sich durch
einen warmen unteren Klangbereich und eine konturierte Mitte aus.
SESSION
Ein Modell des SWR SM-400 + Goliath (4 x 10") + Big Ben (1 x 18").
Dieser Verstärker mit Hochtöner ist typisch für den in den ’80ern
aufgekommenen „L.A.-Sound“. Er hat ein breites
Klangfarbenspektrum, das seine Präsenz im unteren Bereich
ausgewogen mit einem klaren, offenen Sound kombiniert.
CONCERT 810
Ein Modell des Ampeg SVT + 810E (8 x 10"). Dieser Verstärker
kennzeichnet den Rock-Sound, der sich besonders auf Kombination
von Hochleistungs-Röhrenverstärkern und großen Gehäusen stützte.
Der charakteristische Sound zeichnet sich durch einen
überwältigenden Bassschalldruck aus.
MIC
Wählen Sie diesen Typ, wenn ein Mikrofon angeschlossen ist.
* Bitte beachten Sie, wenn Sie ein Mikrofon verwenden,
die folgenden Punkte.
• Je nach dem Aufstellort von Mikrofonen im Verhältnis zum
Gerät könnten Rückkopplungen erzeugt werden. Dies lässt
sich lösen durch:
1. Ändern der Ausrichtung des Mikrofons bzw. der Mikrofone.
2. Aufstellung des Mikrofons bzw. der Mikrofone
in größerem Abstand vom Gerät.
3. Verringern der Lautstärke(n).
• Wenn Sie den GAIN-Regler zu hoch einstellen, wird der
Klang verzerrt. Stellen Sie den GAIN-Regler auf einen so
hohen Wert wie möglich ein, bevor eine Verzerrung eintritt,
um das beste Signal-Rausch-Verhältnis zu erhalten.
• Verwenden Sie ein dynamisches Mikrofon.
Sie können kein Kondensatormikrofon oder ein aktives
Mikrofon verwenden, das eine Stromversorgung benötigt.
Bedienfeld
Bass
Dynamisches Mikrofon
Standard-
Mono-Kabel
MCB-RX_r_e.book Page 12 Wednesday, December 19, 2007 12:03 PM

Español Italiano Français Deutsch EnglishPortuguêsNederlands
13
Beschreibungen zum Bedienfeld
5. Regler GAIN (Verstärkung)
Stellt den Eingangspegel ein. Stellen Sie den Eingangspegel passend
zum Signalpegel der an der INPUT-Buchse angeschlossenen
Musikinstrumente an.
TIPP
Mit einer hohen GAIN-Einstellung können Sie einen übersteuerten
Sound erzielen.
TIPP
Stellen Sie den GAIN-Regler auf einen so hohen Wert wie möglich
ein, bevor die Soundverzerrung einsetzt, um einen möglichst klaren
Sound zu erhalten.
6. Regler VOLUME (Lautstärke)
Reguliert die Lautstärke des Basses (Mikrofons).
7. Netzanzeige
Diese Anzeige leuchtet, wenn das Gerät eingeschaltet ist.
* Bei ausschließlichem Batteriebetrieb wird die Anzeige
zunehmend dunkler, sobald die Batteriespannung zu sehr
absinkt. Ersetzen Sie die Batterien so bald wie möglich.
8. Netzschalter POWER
Schaltet das Gerät ein und aus.
→ Ein- und Ausschalten (S. 11)
9. EQUALIZER (Klangregelung)
Dies ist ein 3-Band-Equalizer. Sie können die Klangfarbe des Basses
mit drei Reglern einstellen.
Regler BASS (Bässe): Regelt den Pegel des unteren Frequenzbereichs.
Regler MIDDLE (Mitten): Regelt den Pegel des mittleren Frequenzbereichs.
Regler TREBLE (Höhen): Regelt den Pegel des oberen Frequenzbereichs.
10. Regler EFX (Effekte)
Stellen Sie diesen Regler auf Chorus, Flanger oder T-Wah, um
den betreffenden Effekt auszuwählen. Außerdem können Sie die
Intensität des angewendeten Effekts einstellen, indem Sie den Regler
in die gewünschte Stellung bringen.
* Die Einteilungen auf dem Bedienfeld für CHORUS, FLANGER
und T-WAH dienen zum Ablesen. Hören Sie beim Einstellen der
Effekte vor allem auf den Klang.
CHORUS (räumlich synthetisierter
Chorus-Effekt)
Dies ist ein räumlich synthetisierter Chorus-
Effekt. Beim räumlich synthetisierten Chorus,
einer nur in Stereo verfügbaren Methode,
wird der Effekt erzeugt, indem der Klang vom
rechten Lautsprecher (von dem der
Effektklang ausgegeben wird) und der Klang vom linken Lautsprecher
(der den direkten Klang ausgibt) genommen und dann im Raum selbst
gemischt werden. Dadurch entsteht eine größere seitliche Streuung, als
wenn die Klänge elektronisch gemischt werden, was einen natürlicheren
Eindruck von Breite hervorruft.
* Die Chorus-Effekte sind so konzipiert, dass sie die größte Wirkung
zeigen, wenn Sie die eingebauten Lautsprecher des Geräts
verwenden. Die Wirkung kann abweichen, wenn REC OUT/
PHONE anstelle der eingebauten Lautsprecher verwendet werden.
FLANGER
Dies erzeugt den Flanging-Effekt, der
den Eindruck eines sich drehenden Klangs
bewirkt. Dieser Effekt ist durch einen kühlen,
metallischen Eindruck einer akustischen
Drehbewegung gekennzeichnet.
T-WAH
Das Filter reagiert auf den Lautstärkepegel
des angeschlossenen Instruments. Dies
erzeugt einen charakteristischen Effekt,
bei dem das Filter auf das Spiel reagiert.
11. Regler DELAY/REVERB (Hall/Echo)
Stellen Sie diesen Regler auf DELAY oder
REVERB, um auf den betreffenden Effekt zu schalten.
Außerdem können Sie die Intensität des angewendeten Effekts
einstellen, indem Sie den Regler in die gewünschte Stellung bringen.
* Die Einteilungen auf dem Bedienfeld für DELAY und REVERB
dienen zum Ablesen. Hören Sie beim Einstellen der Effekte vor
allem auf den Klang.
DELAY
Drehen Sie den Regler, um den
Verzögerungseffekt einzustellen.
REVERB (Stereo-Reverb)
Drehen Sie den Regler, um den Halleffekt
einzustellen.
12. RHYTHM GUIDE
Das Gerät ist mit Rhythmus-Patterns auf Drum/Percussion-Basis
ausgestattet, die nützlich sind, wenn man allein üben möchte.
Zusätzlich zum Üben mit Ihrem gewünschten Groove können
Sie es auch als Metronom nutzen.
→ Verwendung des RHYTHM GUIDE (S. 15)
Regler PATTERN
Wählt das Genre des Rhythmus-Patterns aus.
Taste START/STOP
Startet/stoppt den RHYTHM GUIDE. Wenn Sie den RHYTHM
GUIDE starten, blinkt seine Anzeige synchron zur Musik.
Taste TAP TEMPO
Stellt das Tempo für den RHYTHM GUIDE ein. Tippen Sie zwei oder
mehrere Male im gewünschten Tempo auf diese Taste, und der
RHYTHM GUIDE spielt im entsprechenden Tempo.
Taste VARIATION
Wählt die Variation des Rhythmus-Patterns aus. Jedes Genre enthält
drei Typen von Rhythmusvariationen. Wenn Sie die VARIATION-Taste
drücken, durchläuft das Gerät die verfügbaren Variationen; die
VARIATION-Anzeige ist entweder unbeleuchtet, grün oder rot,
um den Wechsel der Variationen anzuzeigen.
Regler VOLUME (Lautstärke)
Stellt die Lautstärke für den RHYTHM GUIDE ein.
MCB-RX_r_e.book Page 13 Wednesday, December 19, 2007 12:03 PM

14
Beschreibungen zum Bedienfeld
1. Kabelklemme
Haken Sie hier das Netzkabel ein.
→ Anschließen des Netzadapters (S. 11)
2. Netzadapterbuchse
Schließen Sie hier den mitgelieferten Netzadapter an.
Verwenden Sie ausschließlich den mit dem MICRO CUBE BASS RX
gelieferten Netzadapter. Die Verwendung anderer Netzadapter kann
den Verstärker beschädigen oder andere Probleme verursachen.
→ Anschließen des Netzadapters (S. 11)
3. Buchse FOOT SW (Fußschalter)
Wenn Sie einen Fußschalter anschließen (den als Zubehör
erhältlichen BOSS FS-5U oder FS-6), können Sie mit ihm die
RHYTHM-GUIDE-Funktion steuern (START/STOP und TAP TEMPO).
4. Buchse REC OUT/PHONES (Aufnahme/Kopfhörer)
Schließen Sie an dieser Buchse einen Stereokopfhörer oder ein
Aufnahmegerät an. Sie unterstützt die Stereoausgabe.
* Es erfolgt keine Tonausgabe aus dem Lautsprecher des Geräts,
so lange die Buchse REC OUT/PHONES belegt ist.
5. Buchse AUX IN
Sie können Geräte wie einen CD-Player, ein digitales
Wiedergabegerät oder ein elektronisches Musikinstrument
anschließen und mit Ihrem Bass dazu spielen.
Hier können zwei Arten von Steckern angeschlossen werden:
ein 6,3-mm-Mono-Klinkenstecker und eine Stereo-Mini-Stecker.
Verwenden Sie ein für das anzuschließende Gerät geeignetes
Kabel (als Zubehör erhältlich).
* Stellen Sie die Lautstärke am Lautstärkeregler des
angeschlossenen Audiogerätes ein.
6. Erdungsanschluss
Je nach den Umständen von Aufstellung und Anschluss kann es
vorkommen, dass Sie beim Berühren von Metalloberflächen dieses Geräts
oder angeschlossener Mikrofone oder Gitarren ein etwas unangenehmes
„Stromgefühl“ wahrnehmen. Dies entsteht durch eine minimale elektrische
Ladung, die vollkommen harmlos ist. Falls es Sie trotzdem beunruhigt,
verbinden Sie den Erdungsanschluss mit einer externen Masse. Wenn das
Gerät geerdet ist, kann je nach den Umständen von Aufstellung und
Anschluss ein leichtes Brummen auftreten. Wenn Sie sich bezüglich
der Anschlussmethode nicht sicher sind, wenden Sie sich an ein Roland
Service Center in Ihrer Nähe oder an einen der autorisierten Roland-
Vertriebspartner, die auf der Seite „Information“ aufgelistet sind.
Nicht für den Anschluss geeignete Stellen
•
Wasserleitungen (kann einen elektrischen Schlag zur Folge haben)
• Gasleitungen (kann zu einem Brand oder einer Explosion führen)
• Masseleiter von Telefonleitungen oder Blitzableiter
(kann bei Blitzschlag eine Gefahr darstellen)
7. Batteriefach
Setzen Sie 6 AA-Batterien ein. Verwenden Sie ausschließlich Alkali-
Batterien (LR6). Andere Batterietypen können nicht verwendet werden.
→ Einlegen der Batterien (S. 11)
8. Security Lock ( )
Sie können im Handel erhältliche Diebstahlsicherungskabel sowie
andere Sicherheitsvorrichtungen an das Gerät anschließen.
http://www.kensington.com/
Rückseite
Weiß Rot
PCS-33
PCS-31
Aufnahmeeinheit (Rekorder)StereokopfhörerMischpult
Digitaler
Audioplayer
BOSS FS-6
BOSS FS-5U
Elektronische
Musikinstrumente usw.
Weiß
(linker Kanal)
Rot
(rechter Kanal)
PCS-31
AB
Stellen Sie die Schalter wie nachstehend gezeigt ein.
START/STOP
TAP TEMPO
Stellen Sie den
Polaritätsschalter wie
nachstehend gezeigt ein.
START/STOP
TAP TEMPO
Standard-
Stereo-Kabel
Stereo-
Mini-Kabel
Standard-
Mono-Kabel
MCB-RX_r_e.book Page 14 Wednesday, December 19, 2007 12:03 PM

Español Italiano Français Deutsch EnglishPortuguêsNederlands
15
Nützliche Funktionen
Der MICRO CUBE BASS RX ist mit einer Tuner-Funktion ausgestattet, die
das Stimmen sechssaitiger Bässe unterstützt. Zusätzlich zum manuellen
Stimmen, wo die Tonhöhe der einzelnen Saiten angegeben wird, können
Sie ihn auch als chromatisches Stimmgerät nutzen.
* Stimmen Sie das Instrument manuell, wenn die Saiten stark
verstimmt sind (zum Beispiel nach dem Aufziehen neuer Saiten).
Manuelles Stimmen
1. Drücken Sie die TUNER-Taste.
Das Gerät wechselt in den Tuner-Modus, und die TUNER-Taste leuchtet.
Wenn das Gerät im Tuner-Modus ist, erfolgt keine Tonausgabe aus den
Lautsprechern oder der Buchse REC OUT/PHONES.
2. Wählen Sie mit dem
Typ-Regler die zu
stimmende Saite
aus.
3. Spielen Sie eine einzelne Note auf der offenen Saite, die Sie
stimmen möchten.
Stimmen Sie die Saite, bis die grüne Anzeige aufleuchtet.
* Die rote Anzeige leuchtet, wenn die Saite stark verstimmt ist.
4. Wenn Sie mit dem Stimmen fertig sind, drücken Sie noch einmal
die TUNER-Taste.
* Die Bezugstonhöhe ist A = 440 Hz. Dies kann nicht geändert werden.
Chromatisches Stimmen
Wenn Sie die TUNER-Taste eine Sekunde lang oder länger drücken,
können Sie das Gerät auch als ein „chromatisches Stimmgerät“
verwenden, das automatisch die Note bestimmt, die der gespielten am
nächsten ist.
Wie beim manuellen Stimmen können Sie beim chromatischen Stimmen auf
der zu stimmenden Saite eine einzelne Note spielen. Stimmen Sie die Saite,
bis die grüne Anzeige aufleuchtet.
Der MICRO CUBE BASS RX ist mit Rhythmus-Patterns mit Schlagzeug/
Percussion ausgestattet, die nützlich sind, wenn man allein üben möchte.
Zusätzlich zum Üben mit Ihrem gewünschten Groove können Sie ihn auch
als Metronom nutzen.
1. Wählen Sie mit dem PATTERN-Regler das Rhythmus-Genre aus.
METRONOME ROCK1 ROCK2 BLUES
COUNTRY R&B BALLAD JAZZ
FUNK LATIN DANCE
2.
Drücken Sie die START/STOP-Taste, um den RHYTHM GUIDE zu starten.
Wenn der RHYTHM GUIDE gestartet wurde, leuchtet die RHYTHM-
GUIDE-Anzeige.
3. Stellen Sie mit dem Regler RHYTHM GUIDE VOLUME die
Lautstärke für den RHYTHM GUIDE ein.
4. Wählen Sie mit der VARIATION-Taste eine Rhythmusvariation aus.
Jedes Genre enthält drei Typen von Rhythmusvariationen. Wenn Sie
die VARIATION-Taste drücken, durchläuft das Gerät die verfügbaren
Variationen; die VARIATION-Anzeige ist entweder unbeleuchtet,
grün oder rot, um den Wechsel der Variationen anzuzeigen.
5. Stellen Sie die Variation auf das Tempo ein, zu dem Sie spielen
möchten.
Drücken Sie zwei oder mehrere Male im gewünschten Tempo die
TAP-TEMPO-Taste, damit der RHYTHM GUIDE in dem betreffenden
Tempo spielt.
Verwendung der Tuner-
Funktion
Reglerste
llung
Saite (Notenname)
5B
Offene fünfte Saite eines fünfsaitigen Basses
mit einer zusätzlichen tiefen Saite (deutsche
Tonbezeichnung: H)
4E
Offene
vierte
Saite eines
viersaitigen Basses
(E)
3A Offene dritte Saite eines vierseitigen Basses
(A)
2D Offene zweite Saite eines viersaitigen Basses
(D)
1G Offene erste Saite eines viersaitigen Basses
(A)
1C
Offene erste Saite eines fünfsaitigen Basses
mit einer zusätzlichen hohen Saite, oder die offene
erste Saite eines sechssaitigen Basses (C)
A
b
Offene dritte Saite eines viersaitigen Basses
(ein Halbton tiefer)
(A
b
)
A
bb
Offene dritte Saite eines viersaitigen Basses
(ein Ganzton tiefer)
(G)
Richtige Tonhöhe
Zu tief Zu hoch
Leuchtet
g
rünLeuchtet rot Leuchtet rot
Verwendung des RHYTHM
GUIDE
MCB-RX_r_e.book Page 15 Wednesday, December 19, 2007 12:03 PM

16
ALL ROUND (SUPER FLAT)
Ein Verstärkersound mit einem breiten Frequenzgang.
Dieser Verstärkertyp ermöglicht die klare Reproduktion des
Instrumentenklangs. Dadurch eignet er sich perfekt für angeschlossene
Bass-Modeling-Prozessoren oder zum Verwenden von Soundmodulen
wie Bass-Synthesizern.
Falls Sie einen elektrischen Kontrabass verwenden, sollten Sie es damit
versuchen, die Höhen (TREBLE) zu reduzieren.
FINGER & FRETLESS
Ein in den Siebziger Jahren beliebter Bass-Sound.
Er eignet sich für einen Jazz Bass, bei den ein hinterer Tonabnehmer
verwendet wird. Sie können einen charakteristischen fetten Sound erhalten,
wenn der Bass in der Nähe des hinteren Tonabnehmers gegriffen wird.
Außerdem ermöglicht diese Einstellung beim Spielen von Harmonien
in Verbindung mit Chorus- und Delay-Effekt die Erzeugung von Sounds
mit außerordentlich schönem Hall.
SLAP BASS
Diese Einstellung eignet sich zum Erzeugen großartiger Slap-Bass-Sounds.
Einen kompakten Sound erhalten Sie, wenn Sie den COMPRESSOR
(COMP) einschalten. Durch Hinzufügen von etwas Hall können Sie einen
üppigeren Klang erzeugen.
Um den in der Rockmusik eingesetzten markanten Saitenanschlag
zu erhalten, erhöhen Sie den BASS- und den TREBLE-Pegel, um den
Sound kraftvoller zu machen. Sie können diesen Effekt noch verstärken,
wenn Sie den MIDDLE-Pegel herunterregeln.
FUNK WAH (SUPER FLAT/SESSION)
Diese Einstellung verwendet die T-WAH-Funktion, um einen funkigen
Sound zu erhalten, der auf den Saitenanschlag reagiert. Der WAH-Effekt
wird noch ausgeprägter mit den Verstärkertypen SUPER FLAT oder
SESSION, die bis in den hochfrequenten Bereich hinein reagieren.
Stellen Sie mit dem T-WAH-Regler die Empfindlichkeit ein. Regulieren
Sie den WAH-Effekt mit den Reglern entsprechend dem
Ausgang angeschlossenen Basses. Sie können für jeden einzelnen
Spielstil wie zum Beispiel Slap, abgedämpft oder glissando,
einen anderen Sound erhalten.
Einen dezenten WAH-Sound erzielen Sie, indem Sie, während Sie
im Slap-Stil spielen, den COMPRESSOR (COMP) einschalten.
OCTAVE IMAGE (OCTAVE BASS)
Dies ist ein dichterer Bass-Sound, der durch das Mischen der
Eingangsklänge mit eine Oktave tieferen Klängen erzeugt wird.
Dies ist effektiv bei Solodarbietungen, die hohe Tonbereiche verwenden.
Sie können einige eindrucksvolle Klänge erzeugen, indem Sie Effekte
wie-WAH anwenden oder sie mit DELAY kombinieren.
NOTIZ
Stellen Sie den VOLUME-Regler auf einen geeigneten
Lautstärkepegel ein.
Mustereinstellungen
COMP-Schalter: OFF
COMP-Schalter: OFF
COMP-Schalter:
ON oder OFF
COMP-Schalter:
ON oder OFF
COMP-Schalter: OFF
MCB-RX_r_e.book Page 16 Wednesday, December 19, 2007 12:03 PM

Español Italiano Français Deutsch EnglishPortuguêsNederlands
17
Alimentation électrique
Retirez le couvercle du compartiment
de piles et insérez des piles 6 AA
après avoir vérifié qu’elles
sont orientées correctement.
*Pour éviter tout
dysfonctionnement et / ou
dommages au niveau des haut-
parleurs ou d’autres appareils,
commencez toujours par
diminuer le volume, puis mettez hors tension tous les autres appareils
avant d’installer ou de remplacer les piles.
* Avant de fermer le couvercle du compartiment de piles, commencez
par insérer les encoches du couvercle dans les cavités
correspondantes, puis poussez fermement le couvercle
vers le bas jusqu’à ce qu’un déclic se produise.
Utilisation des piles
Notez les points suivants.
• Si des piles se trouvent dans l’appareil alors que l’adaptateur
secteur est utilisé, l’appareil continuera de fonctionner normalement
en cas de coupure de courant (panne électrique ou déconnexion
du cordon d’alimentation).
• N’utilisez que des piles alcalines (LR6). Vous ne pouvez pas utiliser
un autre type de pile.
• Durée de vie
En cas d’utilisation à puissance maximale : environ ?? heures
Pour une utilisation normale : environ ?? heures
(Ces chiffres varient en fonction des conditions réelles d’utilisation)
•
Lorsque l’amplificateur fonctionne sur piles uniquement, l’intensité
lumineuse du voyant (p. 18) diminue lorsque le niveau de charge des
piles devient insuffisant. Remplacez les piles dès que possible.
•
Les sons peuvent facilement être déformés ou coupés à volume élevé
lorsque le niveau de charge des piles diminue. Ce phénomène est
normal et n’indique pas de dysfonctionnement particulier. Remplacez les
piles ou utilisez l’adaptateur secteur fourni avec l’amplificateur.
1. Insérez la fiche DC de l’adaptateur secteur fourni dans la prise
de l’adaptateur secteur de l’appareil.
Fixez le cordon de l’adaptateur secteur à l’aide
du crochet, comme l’indique l’illustration, pour
empêcher que l’adaptateur ne se débranche
ou pour protéger la prise de l’adaptateur
secteur contre toute tension excessive.
* Pour éviter tout dysfonctionnement ou
dommages au niveau des haut-parleurs,
déconnectez l’appareil des autres appareils
et mettez-le hors tension avant de connecter l’adaptateur secteur.
2. Reliez le cordon d’alimentation fourni à l’adaptateur secteur
et branchez-le à une prise de courant.
Placez l’adaptateur secteur de sorte que le côté pourvu du voyant
(voir illustration) soit dirigé vers le haut.
* Le voyant s’allume lorsque vous branchez l’adaptateur secteur
à une prise de courant.
Utilisation de l’appareil avec l’adaptateur secteur
Notez les points suivants.
•
Bien que l’appareil ne fonctionne que sur batteries, si vous branchez
l’adaptateur secteur à celui-ci alors qu’il contient des piles, l’alimentation
électrique est fournie par l’adaptateur secteur et réduit l’utilisation des piles.
• Utilisez uniquement l’adaptateur secteur fourni avec le MICRO
CUBE BASS RX.
L’utilisation d’autres adaptateurs secteur risque d’endommager
l’amplificateur ou de générer d’autres problèmes.
Une fois les connexions établies, mettez les divers appareils sous tension en
suivant l’ordre indiqué. Si vous ne respectez pas l’ordre de mise sous tension
des appareils, vous risquez de provoquer un dysfonctionnement et / ou
d’endommager les haut-parleurs ou d’autres dispositifs.
1. Assurez-vous que les boutons de commande du volume du MICRO
CUBE BASS RX et des appareils qui y sont reliés sont sur la position 0.
2. Mettez sous tension tous les appareils connectés aux prises
d’entrée INPUT et AUX IN.
3. Mettez sous tension le MICRO CUBE BASS RX.
4. Réglez le volume des appareils.
5. Avant de couper l’alimentation, baissez le volume de chaque
appareil sur le système, puis mettez hors tension les appareils
en procédant dans l’ordre inverse de la mise sous tension.
REMARQUE
En raison d’une fonction de protection du circuit, il est nécessaire
d’attendre quelques instants après la mise sous tension de l’appareil
pour pouvoir utiliser ce dernier. Pour éviter l’émission soudaine d’un
bruit fort, assurez-vous toujours que le volume est réglé au minimum
avant de mettre l’amplificateur sous tension.
REMARQUE
Même si le volume est réglé au minimum, il est possible que vous
entendiez un son lors de la mise sous / hors tension de l’appareil.
C’est normal et cela n’indique pas de dysfonctionnement.
Fixez la sangle à son attache
comme indiqué dans
l’illustration.
REMARQUE
Attachez la sangle correctement pour éviter qu’elle ne se détache
facilement. Si vous portez l’amplificateur MICRO CUBE BASS RX
avec une sangle lâche, celui-ci risque de tomber et de provoquer
des dégâts ou des blessures.
REMARQUE
Utilisez uniquement la sangle fournie. Cette sangle est réservée
exclusivement à l’amplificateur MICRO CUBE BASS RX. Ne l’utilisez
pas avec d’autres produits.
REMARQUE
Évitez de faire tourner le MICRO CUBE BASS RX en le tenant par
la sangle ou de le balancer. Cette manipulation est extrêmement
dangereuse car la sangle peut se détacher ou même se casser si
le mouvement est répété suffisamment longtemps.
Insertion des piles
Connexion de l’adaptateur
secteur
Voyant
Prise secteur
Adaptateur secteur
Cordon d'alimentation
Mise sous / hors tension
Fixation de la sangle
MCB-RX_r_e.book Page 17 Wednesday, December 19, 2007 12:03 PM

18
Description du panneau
fig.01-01
1. Prise INPUT
Branchez votre guitare basse ou votre microphone à cette prise.
2. Bouton COMP (COMPRESSOR)
Le bouton COMP sert à activer la fonction COMPRESSOR. Cette
fonction permet de comprimer les signaux de haut niveau sans
déformer le son d’origine. Elle élimine aussi les portions d’attaque
du son et produit un son lisse et homogène.
3. TUNER
La fonction TUNER permet de régler une basse six cordes.
Vous pouvez l’utiliser pour des réglages manuels, qui s’effectuent
en indiquant les cordes, ou bien comme tuner chromatique.
→ Utilisation de la fonction Tuner (p. 21)
4. Bouton AMP TYPE
Vous pouvez choisir entre huit types d’amplificateur COSM. Lorsque
la fonction TUNER est activée, vous pouvez indiquer une corde
(le nom d’une note).
* Les noms de produit mentionnés dans ce document sont des
marques ou des marques déposées de leurs propriétaires respectifs
et ne sont pas liés à Roland Corporation. Dans ce manuel, ces
noms permettent de décrire le plus pratiquement possible les sons
simulés à l’aide de la technologie COSM.
OCTAVE BASS
Ce type d’amplificateur d’origine crée des sons qui se situent une
octave plus bas que les sons produits et les assemblent pour créer
un son de basse plus gras.
* La fonction OCTAVE BASS ne fonctionne pas correctement
lorsque plusieurs cordes sont utilisées. Jouez une seule note
et mettez les autres cordes en mode silencieux.
SUPER FLAT
Amplificateur original présentant une distorsion de fréquence sur
une large bande de fréquences. Ce type d’amplificateur reproduit
fidèlement le propre son d’une basse qui y est connectée. C’est un
type d’amplificateur formidable pour tous les genres d’instruments
qui y sont connectés.
Il est idéal pour reproduire les sons d’une guitare basse montante électrique.
FLIP TOP
Modélise l’Ampeg B-15 (1 x 15"). Cet amplificateur a fourni la base
de bien des succès les plus célèbres de Motown.
Il fournit un son gras et son caisson compact produit un contour distinct.
B MAN
Modélise le Fender Bassman 100 (4 x 12"). C’est un des
amplificateurs préférés depuis la création des basses électriques.
Il présente les caractéristiques de son des amplificateurs à tube.
Il produit un son légèrement plus gras tout en augmentant la
distorsion.
FLIP TOP
Modélise le 360 acoustique (1 x 18"). Cet amplificateur était utilisé dans
les années 70 non seulement par de célèbres bassistes de jazz, mais aussi
par les funk rockers et les hard rockers. Il se caractérise par un son grave
chaud et une bande de moyennes fréquences délimitée.
SESSION
Modélise le SWR SM-400 + Goliath (4 x 10") + Big Ben (1 x 18").
Cet amplificateur équipé d’un haut-parleur d’aigus représente bien le
« L.A. Sound » apparu dans les années 80. Sa sonorité s’étend sur une
large bande de fréquences et combine sons graves et sons clairs et ouverts.
CONCERT 810
Modélise l’Ampeg SVT + 810E (8 x 10"). Cet amplificateur est
caractéritique du son rock qui est largement fondé sur l’association
de fortes sorties, des sections d’amplificateur à tube et de grands
caissons. Il produit un son caractéristique qui constitue l’une
des pressions de son basse fréquence les plus impressionnantes.
MIC
Sélectionnez ce paramètre lorsqu’un microphone est connecté.
* Pour utiliser un microphone, notez les points suivants.
•
Selon l’emplacement des microphones par rapport à l’appareil,
un effet de feedback peut être généré. Pour y remédier :
1. Changez l’orientation du microphone.
2. Éloignez le microphone
de l’appareil.
3. Diminuez le volume.
•
Le son sera déformé si vous tournez le bouton GAIN trop haut.
Réglez le bouton GAIN aussi haut que possible avant que le
son ne se déforme afin d’obtenir le meilleur rapport signal-bruit.
• Utilisez un microphone dynamique.
Vous ne pouvez pas utiliser de microphone électrostatique
ou alimenté secteur qui nécessite une alimentation externe.
Panneau de commande
Guitare basse
Micro dynamique
Câble mono
standard
MCB-RX_r_e.book Page 18 Wednesday, December 19, 2007 12:03 PM

Español Italiano Français Deutsch EnglishPortuguêsNederlands
19
Description du panneau
5. Bouton GAIN
Permet de régler le niveau d’entrée. Réglez le niveau d’entrée pour
l’adapter au niveau de signal des instruments musicaux branchés
àla prise INPUT.
ASTUCE
Si vous utilisez un paramètre GAIN élevé, vous obtenez un son
chargé.
ASTUCE
Réglez le bouton GAIN aussi haut que possible avant que le son
ne se déforme afin d’obtenir le son le plus clair.
6. Bouton VOLUME
Permet de régler le volume de la guitare basse (microphone).
7. Voyant d’alimentation
Le voyant d’alimentation s’allume lorsque l’amplificateur est sous tension.
* Lorsque l’amplificateur fonctionne sur piles uniquement, l’intensité
lumineuse du voyant diminue lorsque le niveau de charge des
piles devient insuffisant. Remplacez les piles dès que possible.
8. Interrupteur POWER
Met sous tension ou hors tension.
→ Mise sous / hors tension (p. 17)
9. EQUALIZER
Il s’agit d’un égaliseur trois bandes. Vous disposez de trois boutons
pour régler le son de la guitare basse.
Bouton BASS : Permet de régler la qualité sonore de la bande
de basses fréquences.
Bouton MIDDLE : Permet de régler la qualité sonore de la bande
de moyennes fréquences.
Bouton TREBLE : Permet de régler la qualité sonore de la bande
de hautes fréquences.
10. Bouton EFX (Effets)
Tournez ce bouton sur la position CHORUS, FLANGER ou T-WAH
pour sélectionner l’effet correspondant. Vous pouvez aussi moduler
l’effet produit en tournant le bouton sur la position voulue.
* Les repères des effets CHORUS, FLANGER et T-WAH figurent
sur le panneau pour référence uniquement. Vérifiez vos
réglages au niveau sonore.
CHORUS (Chorus synthétisé dans l’espace)
Chorus synthétisé dans l’espace. Grâce
à cette méthode disponible en stéréo
uniquement, l’effet de chorus est créé
en prenant le son provenant du haut-
parleur droit et le son provenant du haut-
parleur gauche, puis en les mixant dans
l’espace. On obtient un son plus large et plus naturel que celui
produit en mélangeant les sons électroniquement.
* Les effets de chorus sont conçus de manière optimale pour l’utilisation
des haut-parleurs intégrés. Leur efficacité peut varier si la prise REC
OUT / PHONE est utilisée à la place des haut-parleurs intégrés.
FLANGER
Produit un effet qui génère une sensation de
rotation du son. Cet effet est caractérisé par
une sensation de rotation métallique froide
du son.
T-WAH
Le filtre réagit au niveau de volume de
l’ instrument connecté. Cela crée un
effet distinctif où le filtre répond aux
performances.
11. Bouton DELAY / REVERB
Tournez ce bouton sur DELAY ou REVERB
pour obtenir l’effet voulu. Vous pouvez aussi moduler l’effet produit
en tournant le bouton sur la position voulue.
* Les repères des effets DELAY et REVERB figurent sur le panneau
pour référence uniquement. Vérifiez vos réglages au niveau sonore.
DELAY
Tournez le bouton pour régler l’effet de retard.
REVERB (Stereo reverb)
Tournez le bouton pour régler l’effet
de réverbération.
12. RHYTHM GUIDE
L’appareil est doté de modèles de rythme de type tambour /
percussion, pratiques pour les exercices en solo. Vous pouvez utiliser
le RHYTHM GUIDE pour vous exercer au rythme que vous souhaitez,
ou bien l’employer comme métronome.
→ Utilisation de la fonction RHYTHM GUIDE (p. 21)
Bouton PATTERN
Permet de sélectionner le genre du modèle de rythme.
Bouton START / STOP
Démarre / arrête le RHYTHM GUIDE. Lorsque vous démarrez
le RHYTHM GUIDE, son voyant clignote au même tempo que
la musique.
Bouton TAP TEMPO
Définit le tempo du RHYTHM GUIDE. Appuyez sur ce bouton deux fois
ou plus au tempo voulu et le RHYTHM GUIDE jouera à ce tempo.
Bouton VARIATION
Permet de sélectionner la variation du modèle de rythme. Chaque genre
contient trois types de variations de rythme. Lorsque vous appuyez sur
le bouton VARIATION, les variations disponibles s’affichent tour à tour.
Le voyant VARIATION s’éteint, s’allume en vert ou s’allume en rouge
pour indiquer le changement de variation.
Bouton VOLUME
Permet de régler le volume du RHYTHM GUIDE.
MCB-RX_r_e.book Page 19 Wednesday, December 19, 2007 12:03 PM

20
Description du panneau
1. Crochet pour cordon
Accrochez le cordon de l’adaptateur secteur ici.
→ Connexion de l’adaptateur secteur (p. 17)
2. Prise de l’adaptateur secteur
Connectez à cette prise l’adaptateur secteur fourni.
Utilisez exclusivement l’adaptateur secteur fourni avec l’amplificateur
MICRO CUBE BASS RX. L’utilisation d’un autre adaptateur secteur risque
d’endommager l’amplificateur ou de générer d’autres problèmes.
→ Connexion de l’adaptateur secteur (p. 17)
3. Prise FOOT SW (pédale)
Pour utiliser la fonction RHYTHM GUIDE (START / STOP et TAP TEMPO),
connectez une pédale (la BOSS FS-5U ou FS-6 en option).
4. Prise REC OUT / PHONES
Connectez des casques stéréo ou un enregistreur à cette prise.
Elle accepte les sorties stéréo.
* Aucun son n’est émis via le haut-parleur de l’amplificateur
lorsque la prise REC OUT / PHONES est utilisée.
5. Prise AUX IN
Vous pouvez y connecter des appareils (lecteur CD, lecteur audio
numérique ou instrument musical électronique) et les utiliser conjointement
à votre guitare basse.
Comporte deux types de prises d’entrée externes, une prise de
téléphone 1 / 4" mono et une prise mini-stéréo. Pour connecter
l’appareil, utilisez le câble approprié (en option).
* Pour régler le niveau du volume, utilisez le bouton
de commande du volume de l’appareil connecté.
6. Prise de terre
En fonction de votre installation, il est possible que vous éprouviez
un certain inconfort ou que vous perceviez une rugosité en touchant
la surface de l’amplificateur, des microphones connectés ou des parties
métalliques d’autres objets, tels que les guitares, par exemple.
Ce phénomène est dû à une très petite décharge électrique, absolument
sans danger. Toutefois, si cela vous préoccupe, vous pouvez relier la
prise de terre à une prise de terre extérieure. Lorsque l’appareil est ainsi
connecté, un léger bourdonnement peut se faire entendre, en fonction de
l’installation. Si vous n’êtes pas certain du mode de connexion à établir,
prenez contact avec le centre de maintenance Roland le plus proche,
ou avec un distributeur Roland agréé (voir la page Information).
Endroits non adaptés pour une connexion
• Canalisations d’eau (risque de choc ou d’électrocution)
• Conduites de gaz (risque d’incendie ou d’explosion)
• Masse de ligne téléphonique ou paratonnerre (risque
en cas de foudre)
7. Compartiment de piles
Insérez des piles 6 AA. N’utilisez que des piles alcalines (LR6).
Vous ne pouvez pas utiliser un autre type de pile.
→ Insertion des piles (p. 17)
8. Emplacement Sécurité ( )
Vous pouvez connecter à l’appareil des câbles de sécurité antivol
disponibles dans le commerce et d’autres dispositifs de sécurité.
http://www.kensington.com/
Panneau arrière
Blanc Rouge
PCS-33
PCS-31
EnregistreurCasques stéréoMélangeur
Lecteur
audio
numérique
BOSS FS-6
BOSS FS-5U
Instruments musicaux
électroniques, etc.
Blanc (G ch) Rouge (D ch)
PCS-31
AB
Réglez les interrupteurs comme indiqué ci-dessous.
Marche / arrêt
Tap Tempo
Réglez la polarité
comme indiqué
ci-dessous.
Start / Stop
Tap Tempo
Câble stéréo
standard
Câble
mini stéréo
Câble
mono
standard
MCB-RX_r_e.book Page 20 Wednesday, December 19, 2007 12:03 PM
La page charge ...
La page charge ...
La page charge ...
La page charge ...
La page charge ...
La page charge ...
La page charge ...
La page charge ...
La page charge ...
La page charge ...
La page charge ...
La page charge ...
La page charge ...
La page charge ...
La page charge ...
La page charge ...
La page charge ...
La page charge ...
La page charge ...
La page charge ...
La page charge ...
La page charge ...
La page charge ...
La page charge ...
La page charge ...
La page charge ...
La page charge ...
La page charge ...
La page charge ...
La page charge ...
La page charge ...
La page charge ...
-
 1
1
-
 2
2
-
 3
3
-
 4
4
-
 5
5
-
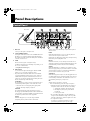 6
6
-
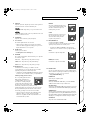 7
7
-
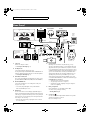 8
8
-
 9
9
-
 10
10
-
 11
11
-
 12
12
-
 13
13
-
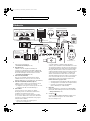 14
14
-
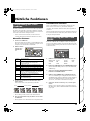 15
15
-
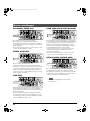 16
16
-
 17
17
-
 18
18
-
 19
19
-
 20
20
-
 21
21
-
 22
22
-
 23
23
-
 24
24
-
 25
25
-
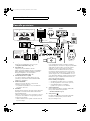 26
26
-
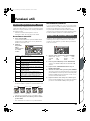 27
27
-
 28
28
-
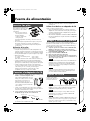 29
29
-
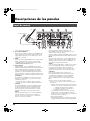 30
30
-
 31
31
-
 32
32
-
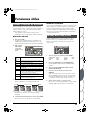 33
33
-
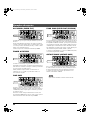 34
34
-
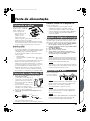 35
35
-
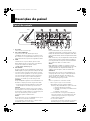 36
36
-
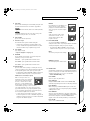 37
37
-
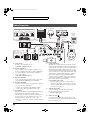 38
38
-
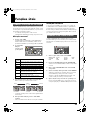 39
39
-
 40
40
-
 41
41
-
 42
42
-
 43
43
-
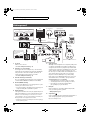 44
44
-
 45
45
-
 46
46
-
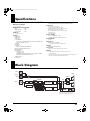 47
47
-
 48
48
-
 49
49
-
 50
50
-
 51
51
-
 52
52


Roland MICRO CUBE BASS RX Le manuel du propriétaire
- Catégorie
- Amplificateur d'instruments de musique
- Taper
- Le manuel du propriétaire
dans d''autres langues
- italiano: Roland MICRO CUBE BASS RX Manuale del proprietario
- English: Roland MICRO CUBE BASS RX Owner's manual
- español: Roland MICRO CUBE BASS RX El manual del propietario
- Deutsch: Roland MICRO CUBE BASS RX Bedienungsanleitung
- Nederlands: Roland MICRO CUBE BASS RX de handleiding
- português: Roland MICRO CUBE BASS RX Manual do proprietário
Documents connexes
-
Roland MICRO CUBE BASS RX Manuel utilisateur
-
-
-
Roland MICRO CUBE GX Le manuel du propriétaire
-
-
-
Roland MOBILE BA Le manuel du propriétaire
-
-
Roland MICRO CUBE RX Le manuel du propriétaire
-
Autres documents
-
Vox MINI5 Rhythm Le manuel du propriétaire
-
Fender Bassman 1200 Le manuel du propriétaire
-
Boss TU-03 Le manuel du propriétaire
-
Ibanez RU10 Le manuel du propriétaire
-
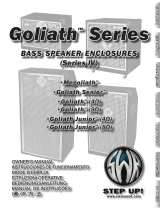 SWRSound Goliath Senior Le manuel du propriétaire
-
Motorola RMN5107 Manuel utilisateur
-
Yamaha PM1X Silent Brass Tuba Pickup Mute Le manuel du propriétaire
