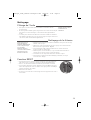
Tefal FR401552 Manuel utilisateur
- Catégorie
- Friteuses
- Taper
- Manuel utilisateur

www.t-fal.com
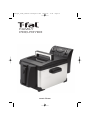
FAMILY
PRO-FRYER
ProFryer_T-FAL_5085305 :ProFryer T-fal 28/07/08 17:54 Page C1

2c
2
6
8
9
1b
1a
1c
1d
1e
3a
3b
5
2a
2d
4
2b
3
7
10
ProFryer_T-FAL_5085305 :ProFryer T-fal 28/07/08 17:54 Page C2

4 5
6
7
10
8
9
11 12
1
2
3
ProFryer_T-FAL_5085305 :ProFryer T-fal 28/07/08 17:54 Page C3

IMPORTANT SAFEGUARDS
When using electrical appliances, basic safety precautions should always be followed,
including the following:
1 Read all instructions before using.
2 Before use, check that the voltage power corresponds to the one shown on the appliance
nameplate.
3 Only connect the appliance to electrical sockets which have a minimum load of 15A. If the sockets
and the plug on the appliance should prove incompatible, get a professionally qualified technician
to replace the socket with a more suitable one.
4 Do not touch hot surfaces. Use handles or knobs.
5 To protect against electric shock do not immerse cord, plug and fryer in water or other liquid.
6 Close supervision is necessary when any appliance is used by or near children.
7 Unplug from outlet when not in use and before cleaning. Allow to cool before putting on or taking
off parts, and before cleaning the appliance.
8 Do not operate any appliance with a damaged cord or plug or after the appliance malfunctions, or
has been damaged in any manner. Return appliance to the nearest authorized service facility for
examination.
9 The use of accessories not recommended by the appliance manufacturer may cause injuries.
10 Do not use outdoors.
11 Do not let cord hang over edge of table or counter, or touch hot surfaces.
12 Do not place on or near a hot gas or electric burner, or a heated oven.
13 Extreme caution must be used when moving fryer containing hot oil or other hot liquids.
14 Always attach plug to appliance first, then plug cord into the wall outlet. To disconnect, turn “off”
any control knob, then remove plug from wall outlet.
15 Do not use appliance for other than intended use.
16 Be sure handles are properly assembled to fryer basket and locked in place.
17 SAVE THESE INSTRUCTIONS.
FOR HOUSEHOLD USE ONLY
18 To ensure safe operation, oversized foods must not be inserted into the appliance.
19 Ensure the lid and tank are completely dry after washing and before use.
20 Do not immerse or drain the fryer basket with lid removed during the fryer working.
21 The oil level must always be between the Min. and Max. markings.
22 Do not overload the basket. For safety reasons never exceed the maximum quantity.
23 Never operate your fryer without any oil or fat.
24 The cooking times are given as guidelines only.
25 The oil must be filtered regularly and changed after 8 to 10 uses.
26 Do not mix different types of fat or oils.
27 If you use solid vegetable shortening, cut it into pieces and melt it over slow heat in a separate pot
beforehand, then slowly pour it into the deep fryer pot. Never pour shortening directly into the deep
fryer pot or basket as this will lead to deterioration of the appliance.
28 If the fryer has a removable pot, never remove it while the deep fryer is on.
29 If you have any problems, contact the authorized after-sales service or the internet address
www.t-fal.com.
Polarization instructions
If this appliance has a polarized plug (one blade is wider than the other) it is to reduce the risk of electric shock.
This plug is intended to fit into a polarized outlet only one way. If the plug does not fit fully into the outlet,
reverse the plug. If it still does not fit, contact a qualified electrician. Do not attempt to modify the plug in any
way.
Short Cord instructions
Do not use with an extension cord ; a short power supply cord is provided to reduce the risks resulting from
being entangled in or tripping over a long cord.
The cord is equipped with a detachable magnetic connector. The magnetic connector should be attached
directly to the fryer. THIS SHOULD BE DONE PRIOR TO PLUGGING THE CORD INTO THE WALL OUTLET.
Protection of the environment
Your appliance contains valuable materials which can be recovered or recycled.
When you decide to replace your appliance, leave it at a local civic waste collection
point.
ProFryer_T-FAL_5085305 :ProFryer T-fal 28/07/08 17:54 Page 2

3
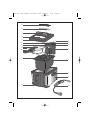
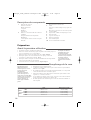
Component description
1. Lid
a. Filter cover
b. Permanent filter
c. Handle
d. Viewing window
e. Lid
2. Removable control unit with heating element
a. Temperature indicator light
b. Timer
c. On/Off switch with indicator light
d. Thermostat control
3. Frying basket
a. Handle unlocking button
b. Basket handle with raising & lowering
positions
4. RESET Function
5. Min. and Max. oil level markings
6. Removable bowl
7. Safety carrying handles
8. Housing
9. Feet
10. Removable power supply cord
Before using for the first time
• The fryer can be completely dismantled.
• Remove the lid and clean it with a damp cloth. Dry thoroughly.
• Lift the basket handle horizontally until you hear a “click” as it locks.
• Remove the basket, the control unit and the bowl - fig.1 and fig.2.
• Clean the frying basket and the bowl with a sponge and soapy water or put
them in the dishwasher - fig.3.
• Clean the control unit and the heating element with a damp cloth.
• Dry all components thoroughly.
• Place the bowl and the heating element in position - fig.4 and fig.5.
Filling the bowl
• Fill the bowl with oil.
• The oil level should always be between the MIN and MAX level of the bowl. Do
not exceed the maximum fill line as boiling oil may overflow during frying and
can cause severe burns - fig.6.
• For best results we recommend vegetable oil.
• If you use solid vegetable shortening, cut it into small pieces and melt it in a
separate pan. Pour the melted shortening into the fryer bowl.
• Never melt the shortening on the heating element or in the frying basket.
Do not immerse the
control unit with the
heating element in water.
Never wash the lid in the
dishwasher.
Make sure that the control
unit is correctly positioned
otherwise the fryer cannot
function.
Never use different types
of oil at the same time as
this may cause the oil to
overflow.
The oil level must always
be kept between the
min/max markers. Check
the level each time before
frying, and add some of
the same type of oil if
necessary.
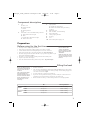
Preparation
Oil Solid vegetable fat
3 Liters
Min. 10 cups / 2.5 l 4.95 lb / 2250g
Max. 12 cups / 3 l 5.95 lb / 2700 g
4 Liters
Min. 14 cups / 3.5 l 6.95 lb / 3150 g
Max. 16 cups / 4 l 7.95 lb / 3600 g
ProFryer_T-FAL_5085305 :ProFryer T-fal 28/07/08 17:54 Page 3

4
Preheating
• After the bowl has been filled with oil, put the lid on the fryer and plug in the
appliance without the frying basket.
• Turn the fryer on by pressing the On/Off switch and adjust the temperature to
the required setting (see the cooking tables p. 5) - fig.7.
• The fryer will begin to heat up the oil and the indicator light will turn to red.
• Note: The temperature indicator light will turn to green when the temperature
has been reached.
Loading the basket
• Remove excess water, ice or frost from food.
• Fill the basket before placing it in the deep fryer. Do not overfill the basket.
Reduce the quantities for frozen foods - fig.8.
• Remove the lid.
• Place the frying basket on the edge of the bowl and leave the handle in the
horizontal position.
• Put the lid back on the fryer.
Cooking
Lowering the basket
• When the oil has reached the correct temperature, the light turns to green.
• Press the handle unlocking button and fold the handle very slowly into its
housing to lower the basket into the oil - fig.9. Plunging the basket too rapidly
in the oil may cause it to overflow.
• Turn timer knob to desired time - fig.10.
• During cooking, it is normal for the temperature light to alternate between red
and green.
At the end of cooking time
Frying is complete when:
• The timer sounds, indicating the cooking time has elapsed.
• The food is of the desired color and texture.
• Lift the handle horizontally to raise the basket until you hear a "click" as it locks.
• Allow excess oil to drain by letting the basket remain on the hook for a
moment.
• Remove the lid.
• Remove the basket.
• Serve the food.
• Put the lid on the fryer when it is not in use.
• To use a second time, correct the oil level if necessary, then turn the timer knob
to the desired time and wait for the temperature indicator light to turn to green
again before lowering food into oil.
Cut food into like-sized
pieces so that they cook
evenly. Avoid using pieces
that are too thick. Shake
frozen food to remove
excess pieces of ice away
from the deep fryer.
For crispier frozen fries,
wash them in cold water
and dry them carefully.
When the fryer is in use,
some parts will be
extremely hot and can
cause severe burns. Steam
coming from the filter is
also extremely hot - fig.11.
Only touch the knobs and
handles of the fryer for your
safety.
For crispy fried food, remove
the lid as soon as you have
finished cooking to prevent
steaming.
Place the fryer:
- on a steady surface
- out of the reach of
children
- away from water or heat
sources.
Never operate your fryer
without any oil or fat in
the bowl.
Regardless of the recipe,
food must be dried
thoroughly before frying.
This will prevent the oil
from splattering and/or
overflowing and will
extend the life of the oil.
ProFryer_T-FAL_5085305 :ProFryer T-fal 28/07/08 17:54 Page 4

5
Switching off the deep fryer
• When you have finished frying, turn the thermostat down to the lowest setting
and turn the switch to the “Off” position.
• Unplug the deep fryer.
• Allow the oil to cool completely in the fryer (approx. 3 hours).
• Move the fryer using the carrying handles.
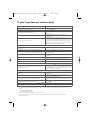
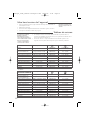
Table of cooking times
• The cooking times are a guide only. They may vary depending on the size of
the food, the amount of food, individual preferences, and the voltage.
• Cooking tip: To prevent food from sticking together, do not use the basket
when cooking battered foods or doughnuts.
* time wil be based on size
Never move the fryer while
the oil or fat is still hot.
For best results and to prevent
overflowing, use the traditional
French method of frying hand
made French fries:
- first cycle at 338°F/170°C
*
- let them rest until they are
slightly cooled
- second cycle at 374°F/190°C
*
.
* in 2 cycles
FRESH FOOD
Quantity
French fries *
(maximum capacity 3 L)
800 g / 10 cups / 1.8 lb
170°C/338°F
190°C/374°F
+/- 8 - 10 min.
+/- 6 - 8 min.
French fries *
(maximum capacity 4 L)
1 kg / 12 cups / 2.2 lb
170°C/338°F
190°C/374°F
+/- 9 - 11 min.
+/- 7 - 9 min.
French fries (optimal quantity 3 L) 4 00 g / 5 cups / 0.9 lb 190°C/374°F +/- 5 - 8 min.
French fries (optimal quantity 4 L) 500 g / 6 cups / 1.1 lb 190°C/374°F +/- 8 - 10 min.
Fried chicken (leg portion) 4 pieces 180°C/356°F +/- 15 - 17 min.
Fried mushrooms 300 g / 3.5 cups / 0.7 lb 150°C/302°F +/- 6 - 8 min.
Onions rings 300 g / 3.5 cups / 0.7 lb 170°C/338°F +/- 4 - 5 min.
Breaded fish fillets 2 pieces 170°C/338°F +/- 6 - 8 min.
Fried calamari 500 g / 6 cups / 1.1 lb 170°C/338°F +/- 5 - 6 min.
Fried shrimp 500 g / 6 cups / 1.1 lb 170°C/338°F +/- 5 - 6 min.
Apple fritters 4 pieces 170°C/338°F +/- 5 - 6 min.
FROZEN FOOD
Quantity
French fries (maximum capacity 3 L) 600 g / 7 cups / 1.3 lb 190°C/374°F +/- 8 - 10 min.
French fries (maximum capacity 4 L) 750 g / 9 cups / 1.65 lb 190°C/374°F +/- 10 - 12 min.
French fries (optimal quantity 3 L) 300 g / 3.5 cups / 0.7 lb 190°C/374°F +/- 5 - 7 min.
French fries (optimal quantity 4 L) 375 g / 4.5 cups / 0.8 lb 190°C/374°F +/- 5 - 7 min.
Fried chicken (leg portion) 4 pieces 190°C/374°F +/- 14 - 15 min.
Chicken nuggets (3L) 1 kg / 12 cups / 2.2 lb 190°C/374°F +/- 6 - 9 min.
Chicken nuggets (4L) 1,2 kg / 14 cups / 2.6 lb 190°C/374°F +/- 6 - 9 min.
Fried mushrooms 300 g / 3.5 cups / 0.7 lb 190°C/374°F +/- 5 - 6 min.
Onions rings 300 g / 3.5 cups / 0.7 lb 190°C/374°F +/- 3 - 5 min.
Battered cod fillets 2 pieces 190°C/374°F +/- 6 - 7 min.
Fish fingers 5 pieces 190°C/374°F +/- 5 - 7 min.
Fried calamari 500 g / 6 cups / 1.1 lb 190°C/374°F +/- 4 - 5 min.
Fried shrimp 500 g / 6 cups / 1.1 lb 190°C/374°F +/- 4 - 5 min.
ProFryer_T-FAL_5085305 :ProFryer T-fal 28/07/08 17:54 Page 5

6
Cleaning
Filtering the oil
• You may store the oil or fat in the fryer, or in a separate airtight container.
• Do not pour used oil into the sink. Leave it to cool, and throw it away with the
household waste – according to the local community regulations.
• Crumbs that break away from food tend to burn and alter the quality of the
oil more rapidly. Over time, this increases the risk of catching fire. For this
reason, filter the oil regularly.
Cleaning the fryer
• Remove the control unit and heating element and clean both parts with a
damp cloth or sponge.
• Clean the lid using a sponge and soapy water. Rinse and dry carefully - fig.12.
• The filter in the lid can be cleaned. Remove the filter cover, then the filter.
• The bowl, the frying basket, the housing and the filter are dishwasher safe or
can be immersed in soapy water.
• Ensure all components are dry before placing them back inside the fryer.
• The lid is fitted with a permanent metallic filter. This filter does not need to be
replaced.
RESET function
• Your appliance is equipped with an overheating safety feature if you use your
fryer without oil.
• If the safety cut-out is activated, the appliance will shut off automatically and
the power-on light will turn off.
• In this case, unplug the appliance and let it cool.
• Then remove the control unit and press the safety cut-out RESET button with a
toothpick or similar non-metallic object after the bowl has been filled with oil.
• Plug in the appliance again.
• If the problem with the safety cut-out persists, please contact our Helpline
(see details on Page 7).
Never immerse the control
unit with the heating
element in water and never
wash it under running
water.
Never wash the lid in the
dishwasher.
Do not store your deep
fryer outside.
We recommend changing
the oil after a maximum of
8 to 10 uses.
ProFryer_T-FAL_5085305 :ProFryer T-fal 28/07/08 17:54 Page 6

7
PROBLEMS AND POSSIBLE CAUSES SOLUTIONS
The fryer is not heating
The appliance is not plugged in. Plug-in the appliance.
The On/Off switch is not set to On.
Set the On/Off switch to “On” and check that the red
light turns on.
The cooking temperature is not indicated.
Set the thermostat control to the required
temperature.
The safety cut-off is activated.
Unplug the appliance and let it cool. Check the oil level,
correct it if necessary. Remove the control unit and press
the RESET button. Plug in the appliance again. If the
problem persists, please contact our Consumer Service
Department. (see contact details below)
Oil overflows
The Max. marker for filling the bowl has been
exceeded.
Check the oil level (Max.), and remove the excess.
The frying basket has been overfilled with food. Check that the basket is not too full.
Food is wet or contains too much water (frozen food).
Remove any ice and dry the food thoroughly. Lower
the basket slowly.
Different types of oil/fat have been mixed.
Empty and clean the bowl. Refill the bowl with one
type of oil.
Emits unpleasant smells
The fat/oil has deteriorated.
Replace the frying oil (after 10 uses max.), more
frequently depending on the oil.
The fat/oil is unsuitable. Use a good quality blended vegetable oil.
Vision through the viewing window is not clear
The window is not cleaned often enough or is not
cleaned the right way.
To ensure good visibility, clean the viewing window by
wiping it with soap and water. Allow the window to dry
at room temperature or dry with a clean cotton cloth.
Clean as often as necessary.
Food does not become golden, and remains soft
Food is moist and contains too much water (frozen
food).
Remove as much ice from the frozen food as possible
before frying.
Pieces are too thick and contain water.
Experiment by lengthening the cooking time or by
slicing food smaller and thinner.
Too much food is being cooked at the same time and
the cooking oil is not at the right temperature.
Fry food in small quantities (especially when frozen).
The temperature of the frying oil may not be high
enough: the temperature is set incorrectly.
Set the thermostat control to the recommended
temperature.
French Fries stick together
Unwashed food immersed in hot oil. Wash potatoes well and dry them thoroughly.
If you have any product problems, please contact our Consumer Service Department for expert help and
advice:
- in the US 1800 395 8325
- in Canada 1800 418 3325
Consult our web site: www.t-fal.com or www.t-fal.ca.
Any repairs must only be carried out by an Approved Service Center with the manufacturer’s own
replacement parts.
If your fryer does not work properly
ProFryer_T-FAL_5085305 :ProFryer T-fal 28/07/08 17:54 Page 7

9
PRÉCAUTIONS IMPORTANTES
Lorsque vous utilisez des appareils électriques, veillez à prendre quelques précautions
élémentaires en matière de sécurité et en particulier les suivantes :
1 Lisez entièrement ce mode d'emploi.
2 Avant l’utilisation, assurez-vous que la tension d’alimentation de votre appareil correspond bien à celle de votre
installation électrique (voir l’étiquette signalétique collée à l’arrière de l’appareil : elle indique sa tension nominale: ex.:
120V).
3 Assurez-vous que l’ampérage indiqué sur votre compteur électrique et sur votre disjoncteur est au minimum de 15
Ampères. Si la prise de l’appareil ne rentre pas dans votre prise de courant, faites appel à un électricien professionnel
afin de remplacer la prise.
4 Ne touchez pas aux surfaces chaudes. Utilisez les poignées.
5 Pour vous protéger d'un choc électrique, n’immergez pas le cordon d’alimentation, les prises de courant ou l’appareil
dans l’eau ni dans aucun autre liquide.
6 Une surveillance étroite est nécessaire lorsque tout l’appareil électrique est utilisé par des enfants ou à leur portée.
7 Débranchez l’appareil après usage et avant de le nettoyer. Laissez-le refroidir avant d’installer, d’enlever les accessoires
ou de le nettoyer.
8 N’utilisez aucun appareil électrique avec un cordon d’alimentation ou une prise endommagés, quand l’appareil
fonctionne mal ou s’il a été endommagé de quelque manière que ce soit. Retournez les appareils défectueux à un
centre de service.
9 L’usage de certains accessoires non recommandés par le fabricant pourrait occasionner des blessures.
10 N’utilisez pas l’appareil à l’extérieur.
11 Ne laissez pas le cordon d’alimentation pendre le long d’une table. Ceci pourrait engendrer de graves accidents. Ne le
laissez pas au contact de surfaces chaudes.
12 Ne placez jamais l’appareil sur ou près d’un brûleur à gaz, d’une plaque électrique ou d’un four chaud.
13 Fixez toujours la prise à l’appareil en premier, puis dans la prise de courant. Pour éteindre, tournez le bouton de
commande à la position arrêt puis débranchez.
14 N’utilisez cet appareil que pour l’usage pour lequel il a été conçu.
15 Soyez très prudent quand vous déplacez une friteuse contenant de l’huile chaude ou autre liquide chaud.
16 Assurez-vous que la poignée est correctement fixée au panier et solidement en place.
17 GARDEZ PRÉCIEUSEMENT CES INSTRUCTIONS.
POUR USAGE DOMESTIQUE SEULEMENT
18 Pour une utilisation en toute sécurité, n’introduisez pas d’aliments trop volumineux dans l’appareil.
19 Après le nettoyage, assurez-vous que le couvercle et la cuve sont complètement secs avant de les utiliser.
20 Lorsque l’appareil est en fonctionnement, n’immergez ou ne relevez jamais le panier si le couvercle n’est pas
positionné sur la friteuse.
21 Respectez les quantités Min. et Max. d’huile.
22 Ne surchargez pas votre panier, respectez les quantités limites sécuritaires.
23 Ne branchez jamais votre friteuse vide (sans matière grasse).
24 Les temps de cuisson sont donnés à titre indicatif.
25 La matière grasse doit être filtrée régulièrement et changée toutes les 8 à 10 utilisations.
26 Ne mélangez pas plusieurs sortes de matières grasses.
27 Si vous utilisez une matière grasse solide, coupez-la en morceaux et faites-la fondre à feux doux dans un récipient à
part, puis versez-la lentement dans la cuve. Ne mettez jamais la matière grasse solide directement dans la cuve ou le
panier, car ceci pourrait abîmer l’appareil.
28 Si votre appareil est doté d’une cuve amovible, ne la retirez jamais lorsque votre friteuse est en fonctionnement.
29 Pour tout problème, contactez notre service après-vente ou allez à l’adresse Internet www.t-fal.com.
Instructions pour la polarisation
Si votre appareil est équipé d’une fiche polarisée (une lame est plus large que l’autre), ceci a pour but de réduire les risques
de chocs électriques. Cette fiche ne se branche que dans un sens. Si la fiche ne rentre pas correctement dans la prise murale,
mettez-la dans l’autre sens. Si elle ne rentre toujours pas, contactez un électricien. Ne modifiez en aucune façon la prise.
Instructions concernant le cordon d’alimentation
N’utilisez pas de rallonge; le produit est fourni avec un cordon d’alimentation court afin d’éviter que celui-ci ne
s’emmêle ou que l’on trébuche dessus.
Le cordon d’alimentation est équipé d'un connecteur magnétique amovible. Ce connecteur doit être relié directement
à la friteuse. CECI DOIT ÊTRE FAIT AVANT DE BRANCHER LE CORDON DANS LA PRISE MURALE.
Protection de l’environnement
L’emballage de votre produit est composé de matériaux recyclables.
Ne le jetez pas dans votre poubelle habituelle, mais apportez-le plutôt dans un centre de
collecte sélective de votre région.
Les centres de services après-vente autorisés vous reprendront votre appareil usagé afin
de procéder à sa destruction dans le respect des règles de l’environnement, sinon
apportez-le au point de collecte spécialisé prévu à cet effet.
ProFryer_T-FAL_5085305 :ProFryer T-fal 28/07/08 17:54 Page 9

10
1. Eléments du couvercle
a. Bouchon de filtre
b. Filtre permanent
c. Poignée
d. Hublot
e. Couvercle
2. Boîtier de contrôle amovible avec élément
chauffant
a. Voyant lumineux de température
b. Minuterie
c. Interrupteur «marche / arrêt» et voyant
lumineux
d. Commande de thermostat
3. Panier
a. Bouton de déverrouillage de la poignée du
panier
b. Poignée pour monter et descendre le panier
4. Fonction RESET
5. Repères Min. et Max. du remplissage de cuve
6. Cuve amovible
7. Poignées de transport
8. Boîtier de la friteuse
9. Pieds antidérapants
10. Cordon d'alimentation amovible
Avant la première utilisation
• La friteuse peut être complètement démontée.
• Enlevez le couvercle. Relevez la poignée du panier à l’horizontale jusqu’à ce
que vous entendiez le “clic” de verrouillage.
• Retirez le panier, le boîtier électrique et la cuve - fig.1 et fig.2.
• Nettoyez le panier et la cuve amovible avec une éponge et de l’eau
savonneuse ou dans un lave-vaisselle - fig.3.
• Nettoyez le boîtier électrique et l’élément chauffant avec un linge humide.
• Séchez soigneusement tous les éléments.
• Positionnez la cuve et le boîtier électrique - fig.4 et fig.5.
Remplissage de la cuve
• Remplissez la cuve de matière grasse.
• Le niveau de matière grasse doit toujours se situer entre les repères MIN et
MAX de la cuve - fig.6.
• Ne remplissez jamais la cuve au-delà du niveau maximum, car cela pourrait
causer un débordement et des brûlures graves.
• Utilisez une matière grasse alimentaire recommandée pour la friture : huile
végétale (ex. : tournesol, arachide...).
• Si vous utilisez une matière grasse solide, coupez-la en morceaux et faites-la
fondre à part pour ensuite la verser dans la cuve.
• Ne faites jamais fondre la matière grasse solide sur l'élément chauffant ou
dans le panier.
Ne plongez jamais le boîtier
électrique et l’élément
chauffant dans l'eau.
Ne mettez jamais le
couvercle au lave-vaisselle.
Assurez-vous que le boîtier
électrique est placé
correctement sinon la
friteuse ne fonctionnera
pas.
Ne mélangez jamais
différentes sortes de
matières grasses, car cela
pourrait causer des
débordements.
Le niveau de matière
grasse doit toujours se
situer entre les repères Min.
et Max. de la cuve. Vérifiez
avant chaque cuisson et
ajoutez, au besoin, le
même type de matière
grasse.
Préparation
Huile Matière grasse solide
3 Litres
Min. 10 tasses / 2.5 l 4.95 lb / 2250g
Max. 12 tasses / 3 l 5.95 lb / 2700 g
4 Litres
Min. 14 tasses / 3.5 l 6.95 lb / 3150 g
Max. 16 tasses / 4 l 7.95 lb / 3600 g
Description des composants
ProFryer_T-FAL_5085305 :ProFryer T-fal 28/07/08 17:54 Page 10

11
Préchauffage
• Après avoir rempli la cuve avec de l'huile, posez le couvercle et branchez votre
friteuse sans le panier.
• Mettez l’interrupteur à la position « On » et tournez le bouton du thermostat à
la température désirée (voir tableaux de cuisson p. 12) - fig.7.
• La friteuse se met à chauffer l’huile et le voyant lumineux de température
devient rouge. Remarque : le voyant de température deviendra vert quand la
température désirée aura été atteinte.
Préparation du panier
• Asséchez les aliments pour enlever l’excès d’eau ou de glace puis remplissez le
panier avant de le placer dans la friteuse. Ne surchargez pas le panier.
Réduisez les quantités pour les surgelés.
• Enlevez le couvercle. Mettez le panier en place sur le bord de la cuve et laissez
la poignée en position horizontale - fig.8.
• Replacez le couvercle sur votre friteuse.
• Notre conseil : Pour obtenir des frites surgelées plus croustillantes, lavez-les
sous l’eau froide et essuyez-les soigneusement.
Cuisson
Immersion du panier
• Lorsque l’huile a atteint la bonne température, le voyant lumineux devient
vert.
• Appuyez sur le bouton de déverrouillage du panier et rabattez lentement et
complètement la poignée dans son logement - fig.9. Le fait de descendre le
panier trop vite pourrait causer des débordements.
• Réglez la minuterie au temps de cuisson désiré - fig.10.
• En cours de cuisson il est normal que le voyant de température passe du rouge
au vert.
À la fin de la cuisson
La cuisson est terminée lorsque la minuterie émet un son indiquant que le temps
de cuisson est écoulé et que les aliments ont atteint la couleur et la texture
désirées.
• Pour remonter le panier, relevez la poignée à l’horizontale jusqu’à ce que vous
entendiez le “clic” de verrouillage. Laissez le panier en position haute un
moment pour égoutter les aliments.
• Retirez le couvercle.
• Servez.
• Refermez le couvercle lorsque la friteuse n’est pas utilisée.
• Pour une 2
e
cuisson, ajoutez de l’huile au besoin, puis enclenchez la minuterie
et attendez que le voyant de température devienne vert avant de plonger de
nouveaux aliments dans l’huile.
Coupez les aliments de la
même taille afin qu’ils
cuisent de façon homogène.
Évitez les morceaux trop
épais.
Secouez bien les aliments
surgelés pour détacher les
morceaux de glace avant de
mettre les aliments dans la
friteuse.
Ne touchez pas l'appareil
pendant son fonctionne-
ment. Certaines parties très
chaudes pourraient causer
de sérieuses brûlures. La
vapeur qui sort du couvercle
est brûlante - fig.11.
Pour obtenir des fritures bien
croustillantes, ouvrez
immédiate-ment le couvercle
à la fin de la cuisson.
Placez la friteuse :
- sur un plan stable,
- hors de portée des enfants,
- éloignée de toutes sources
d’éclaboussures ou de
chaleur.
Ne branchez jamais la
friteuse quand elle est vide
(sans matière grasse).
Pour éviter les déborde-
ments et prolonger la
durée de vie de l'huile,
essuyez soigneusement les
aliments avant de les faire
cuire.
ProFryer_T-FAL_5085305 :ProFryer T-fal 28/07/08 17:54 Page 11

12
Mise hors tension de l’appareil
• Une fois la friture terminée, réglez le thermostat à la position minimale et
l’interrupteur à « Off ».
• Débranchez l’appareil.
• Laissez refroidir complètement la friteuse et la matière grasse (3 heures).
• Pour déplacer la friteuse, utilisez les poignées.
Tableau de cuisson
• Les temps de cuisson sont donnés à titre indicatif. Ils peuvent varier en
fonction des quantités, du goût de chacun, de l’épaisseur des aliments, de la
tension du réseau électrique, etc.
• Conseil de cuisson : Lorsque vous faites frire des aliments panés ou des
beignets, retirez le panier afin d’empêcher que les aliments y adhèrent.
Ne déplacez jamais votre
friteuse lorsque l’huile est
chaude.
Pour obtenir les meilleurs
résultats et éviter les
débordements lors de la
cuisson des frites fraîches, la
cuisson traditionnelle en deux
bains est recommandée :
- premier, à 338 °F/170 °C
- second, à 374 °F/190 °C
* en 2 bains
ALIMENTS FRAIS
Quantité
Frites *
(capacité maximum 3 L)
800 g / 10 tasses / 1.8 lb
170°C/338°F
190°C/374°F
+/- 8 - 10 min.
+/- 6 - 8 min.
Frites *
(capacité maximum 4 L)
1 kg / 12 tasses / 2.2 lb
170°C/338°F
190°C/374°F
+/- 9 - 11 min.
+/- 7 - 9 min.
Frites (quantité optimale 3 L) 4 00 g / 5 tasses / 0.9 lb 190°C/374°F +/- 5 - 8 min.
Frites (quantité optimale 4 L) 500 g / 6 tasses / 1.1 lb 190°C/374°F +/- 8 - 10 min.
Pilons de poulet 4 morceaux 180°C/356°F +/- 15 - 17 min.
Champignons 300 g / 3.5 tasses / 0.7 lb 150°C/302°F +/- 6 - 8 min.
Oignons 300 g / 3.5 tasses / 0.7 lb 170°C/338°F +/- 4 - 5 min.
Filets de poisson panés 2 morceaux 170°C/338°F +/- 6 - 8 min.
Calamars 500 g / 6 tasses / 1.1 lb 170°C/338°F +/- 5 - 6 min.
Crevettes 500 g / 6 tasses / 1.1 lb 170°C/338°F +/- 5 - 6 min.
Pommes 4 morceaux 170°C/338°F +/- 5 - 6 min.
ALIMENTS SURGELÉS
Quantité
Frites
(capacité maximum 3 L)
600 g / 7 tasses / 1.3 lb 190°C/374°F +/- 8 - 10 min.
Frites
(capacité maximum 4 L)
750 g / 9 tasses / 1.65 lb 190°C/374°F +/- 10 - 12 min.
Frites (quantité optimale 3 L) 300 g / 3.5 tasses / 0.7 lb 190°C/374°F +/- 5 - 7 min.
Frites (quantité optimale 4 L) 375 g / 4.5 tasses / 0.8 lb 190°C/374°F +/- 5 - 7 min.
Pilons de poulet 4 morceaux 190°C/374°F +/- 14 - 15 min.
Pépites de poulet (3 L) 1 kg / 12 tasses / 2.2 lb 190°C/374°F +/- 6 - 9 min.
Pépites de poulet (4 L) 1,2 kg / 14 tasses / 2.6 lb 190°C/374°F +/- 6 - 9 min.
Champignons 300 g / 3.5 tasses / 0.7 lb 190°C/374°F +/- 5 - 6 min.
Oignons 300 g / 3.5 tasses / 0.7 lb 190°C/374°F +/- 3 - 5 min.
Filets de poisson panés 2 morceaux 190°C/374°F +/- 6 - 7 min.
Bâtonnets de poisson 5 morceaux 190°C/374°F +/- 5 - 7 min.
Calamars 500 g / 6 tasses / 1.1 lb 190°C/374°F +/- 4 - 5 min.
Crevettes 500 g / 6 tasses / 1.1 lb 190°C/374°F +/- 4 - 5 min.
ProFryer_T-FAL_5085305 :ProFryer T-fal 28/07/08 17:54 Page 12

13
Nettoyage
Filtrage de l’huile
• Vous pouvez conserver l’huile dans votre friteuse ou la mettre dans un
récipient à part.
• Ne versez jamais la matière grasse usagée dans l’évier. Laissez-la refroidir puis
jetez-la avec les ordures ménagères, conformément aux réglementations
locales.
• Les débris qui se détachent des aliments ont tendance à brûler et entraînent
une altération plus rapide du corps gras, et à la longue des risques de feu. Pour
cette raison, l’huile doit être filtrée régulièrement.
Nettoyage de la friteuse
• Enlevez le boîtier électrique et l’élément chauffant et nettoyez-les avec un linge
humide ou une éponge.
• Nettoyez le couvercle de la friteuse avec une éponge et de l’eau savonneuse.
Rincez et séchez soigneusement - fig.12.
• Vous pouvez laver le filtre permanent situé dans le couvercle. Enlevez le
bouchon de filtre et retirez le filtre.
• Mettez le panier, la cuve amovible, le corps et le filtre au lave-vaisselle ou
nettoyez-les avec une éponge et de l’eau savonneuse.
• Séchez bien tous les composants avant de les remettre en place.
• Votre friteuse est équipée d’un filtre métallique permanent, il n’est pas
nécessaire de le changer.
Fonction RESET
• Votre appareil est doté d’une fonction de sécurité en cas de surchauffe sans
huile. Si la fonction se déclenche, l’appareil s’éteindra automatiquement.
• Dans ce cas, débranchez la friteuse et attendez que l’élément soit refroidi.
• Pour remettre l’appareil en marche, appuyez sur le bouton RESET situé sur le
boîtier électrique à l’aide d’un cure-dent ou d'un objet pointu non métallique,
après avoir rempli la cuve d'huile.
• Rebranchez votre friteuse.
• Si la fonction se déclenche à nouveau, rapportez votre appareil à notre service
à la clientèle.
Ne plongez jamais le
boîtier électrique et
l’élément chauffant dans
l’eau, ne les passez pas
sous le robinet.
Ne mettez jamais le
couvercle au lave-vaisselle.
Ne rangez pas votre
friteuse à l’extérieur.
Changez l’huile au moins
toutes les 8 à 10
utilisations.
ProFryer_T-FAL_5085305 :ProFryer T-fal 28/07/08 17:54 Page 13

14
PROBLÈMES ET CAUSES POSSIBLES SOLUTIONS
La friteuse ne chauffe pas
L’appareil n’est pas branché. Branchez l’appareil.
Le bouton Marche/Arrêt n’est pas positionné à
« On ».
Mettez le bouton Marche/Arrêt à « On » et assurez-
vous quele voyant de mise sous tension s’allume.
La température de cuisson n’est pas sélectionnée. Réglez le thermostat à la température souhaitée.
L’arrêt de sécurité est activé.
Débranchez la friteuse et attendez que l’élément soit
refroidi. Vérifiez le niveau d'huile et ajustez-le.
Enlevez le boîtier électrique et appuyez sur le bouton
RESET.
Rebranchez votre friteuse.
Si la fonction se déclenche à nouveau, rapportez votre
appareil à notre service à la clientèle
Le bain de friture déborde
Le repère Max de remplissage de la cuve a été dépassé. Vérifiez le niveau du bain et enlevez le surplus.
Le panier est surchargé. Enlevez le surplus d’aliments.
Les aliments sont humides ou contiennent trop d’eau
(ex. surgelés).
Retirez la glace et séchez bien les aliments.Descendez
très lentement le panier.
Mélange d’huiles et/ou de graisses différentes.
Jetez la matière grasse et nettoyez la cuve. Remplissez
avec une seule nature de matière grasse.
Dégagement de mauvaises odeurs
La matière grasse est dégradée. Renouvelez le bain de friture (après 10 utilisations max.).
La matière grasse n’est pas appropriée.
Utilisez une matière grasse végétale pour une friture
de bonne qualité.
La visibilité à travers le hublot est mauvaise
Trop de cuissons sans nettoyage du hublot ou
nettoyage avec un chiffon non approprié.
Pour assurer une bonne visibilité, nettoyez le hublot en
passant une éponge imbibée de détergent citronné.
Laissez séchez le hublot à l’air ambiant ou essuyez-le
avec un linge propre en coton.
Les aliments ne dorent pas et restent mous
Les aliments sont humides ou contiennent trop d’eau
(surgelés).
Retirez la glace des surgelés et séchez bien les aliments.
Ils sont trop épais et contiennent de l’eau.
À titre d’essai, prolongez le temps de cuisson. Coupez
les aliments plus finement.
Trop d’aliments sont cuits à la fois et le bain de
cuisson n’est pas à la bonne température.
Attendez que le voyant de température devienne vert.
Faites frire les aliments en petites quantités (surtout les
surgelés).
La température du bain de friture peut-être
insuffisante : le thermostat est mal réglé.
Réglez le thermostat à la température conseillée.
Les frites collent
Les frites fraîches n’ont pas été lavées avant d’être
plongées dans l’huile.
Lavez et séchez soigneusement les frites fraîches avant
la cuisson.
Si votre friteuse ne fonctionne pas bien
Si vous avez des problèmes au moment de son utilisation, veuillez, en premier lieu, joindre notre service à la
clientèle pour obtenir de l’aide et des conseils professionnels :
- aux É.-U. 1800 395 8325,
- au Canada 1800 418 3325
Consultez notre site Web à l’adresse : www.t-fal.com ou www.t-fal.ca
Toute intervention doit être effectuée uniquement par le Service à la clientèle avec des pièces détachées
d’origine.
ProFryer_T-FAL_5085305 :ProFryer T-fal 28/07/08 17:54 Page 14

S.A.S. SEB SELONGEY CEDEX
• RC. DIJON B 302 412 226 • REF. 5085305
ProFryer_T-FAL_5085305 :ProFryer T-fal 28/07/08 17:54 Page 16
-
 1
1
-
 2
2
-
 3
3
-
 4
4
-
 5
5
-
 6
6
-
 7
7
-
 8
8
-
 9
9
-
 10
10
-
 11
11
-
 12
12
-
 13
13
-
 14
14
-
 15
15
-
 16
16


Tefal FR401552 Manuel utilisateur
- Catégorie
- Friteuses
- Taper
- Manuel utilisateur
dans d''autres langues
- English: Tefal FR401552 User manual
Documents connexes
-
T-Fal FRY EASY PRO ENAMEL TARGET DI Le manuel du propriétaire
-
-
-
-
T-Fal FR4015002A Manuel utilisateur
-
Groupe SEB USA - T-FAL Fryer Pro-Fryer Manuel utilisateur
-
-
-
T-Fal FF103850 Le manuel du propriétaire
-
