

©
2011
Garmin
Ltd.
or
its
subsidiaries
All
rights
reserved.
Except
as
expressly
provided
herein,
no
part
of
this
manual
may
be
reproduced,
copied,
transmitted,
disseminated,
downloaded
or
stored
in
any
storage
medium,
for
any
purpose
without
the
express
prior
written
consent
of
Garmin.
Garmin
hereby
grants
permission
to
download
a
single
copy
of
this
manual
onto
a
hard
drive
or
other
electronic
storage
medium
to
be
viewed
and
to
print
one
copy
of
this
manual
or
of
any
revision
hereto,
provided
that
such
electronic
or
printed
copy
of
this
manual
must
contain
the
complete
text
of
this
copyright
notice
and
provided
further
that
any
unauthorized
commercial
distribution
of
this
manual
or
any
revision
hereto
is
strictly
prohibited.
Information
in
this
document
is
subject
to
change
without
notice.
Garmin
reserves
the
right
to
change
or
improve
its
products
and
to
make
changes
in
the
content
without
obligation
to
notify
any
person
or
organization
of
such
changes
or
improvements.
Visit
the
Garmin
Web
site
(www.garmin.com)
for
current
updates
and
supplemental
information
concerning
the
use
and
operation
of
this
and
other
Garmin
products.
Garmin®
and
the
Garmin
logo
are
trademarks
of
Garmin
Ltd.
or
its
subsidiaries,
registered
in
the
USA
and
other
countries.
echo
™
is
a
trademark
of
Garmin
Ltd.
or
its
subsidiaries.
These
trademarks
may
not
be
used
without
the
express
permission
of
Garmin.

Introduction
·---·------------------------------
Introduction
See
the
Important
Safety
and
Product
Information
guide
in
the
product
box
f~EE~~~~~!
~~~~~~~
~~~.m~.!.~~~.~~E~!!~
.
~!.!.~f~~~~!.~~~:
..
This
manual
includes
information
for
the
echo
TM
100
and
echo
150
fishfinders.
Manual
Conventions
In
this
manual,
the
term
"select"
is
used
to
describe
these
actions:
•
Highlighting
an
item
in
a
menu
and
pressing
ENTER.
•
Pressing
a
key,
such
as
ENTER
or
MENU.
When
you
are
instructed
to
select
menu
items,
small
arrows
(>)
may
appear
in
the
text.
They
indicate
that
you
should
highlight
a
series
of
items
on
the
screen
using_.
or
T
keys
(page
2),
and
press
the
ENTER
key
after
each
item.
For
example,
if
you
see
"select
MENU
>
Pause,"
you
should
press
MENU,
press_.
or
T
until
Pause
is
highlighted,
and
then
press
ENTER.
Registering
Your
Device
Help
us
better
support
you
by
completing
our
online
registration
today.
•
Go
to
http://my.garmin.com.
•
Keep
the
original
sales
receipt,
or
a
photocopy,
in
a
safe
place.
Contacting
Garmin
Product
Support
Contact
Garmin
Product
Support
if
you
have
any
questions
about
this
product.
•
In
the
USA,
go
to
www.garmin.com/support,
or
contact
Garmin
USA
by
phone
at
(913)
397.8200
or
(800)
800.1020.
•
In
the
UK,
contact
Garmin
(Europe)
Ltd.
by
phone
at
0808
2380000.
•
In
Europe,
go
to
www.garmin.com/support
and
click
Contact
Support
for
in-country
support.

g_~!~i!!t._~~~!!~9---------------------------------------------------------------------------------------------
-
--------------------------------------------------------------------------------------------------------------------------------------------------------
--
Getting
Started
Keys
MENU
Displays
a
list
of
options
or
returns
you
to
your
previous
screen.
ENTER
Selects
a
menu
item.
• T
Scrolls
through
options
or
changes
settings
.
<9
Turns
the
device
on
or
off
and
adjusts
the
backlight.
Turning
On
and
Turning
Off
the
Device
Press
and
hold
<9.
Configuring
the
Initial
Device
Settings
Before
you
can
use
the
device
the
first
time,
you
must
configure
a
series
of
initial
settings.
You
must
also
configure
these
settings
when
restoring
original
factory
settings.
You
can
update
each
of
these
settings
later.
1.
Select
a
language.
2.
Select
the
units
in
which
to
measure
depth.
3.
Select
the
units
in
which
to
measure
temperature.
4.
Select
Done.
Adjusting
the
Contrast
1.
From
the
Sonar
screen,
select
MENU
>
Setup
>
System
> Contrast.
2.
Select
•
or
T .
3.
Select
ENTER.
Adjusting
the
Backlight
1.
Press
and
quickly
release
<9.
2.
Repeat
to
cycle
through
the
brightness
settings.
I f
"t
1 f I l
)f
I'
·
'-
'i • l

Setting
the
Beeper
You
can
set
when
the
device
makes
audible
sounds.
1.
From
the
Sonar
screen,
select
MENU>
Setup> Alarms>
Beeper.
2.
Select
an
option:
•
To
have
the
device
beep
when
you
select
an
item
and
when
an
alarm
is
triggered,
select
On.
•
To
have
the
device
beep
only
when
alarms
are
triggered,
select
Alarms
Only.
Turning
On
the
Device
Automatically
You
can
set
the
device
to
tum
on
when
power
is
applied.
Otherwise,
press
Q)
to
tum
on
the
device.
From
the
Sonar
screen,
select
MENU
>
Setup
>
System
>
Auto
Power
>On.
Menu
Timeout
After
a
menu
appears
for
20
seconds
and
no
keys
are
selected,
the
menu
disappears
and
your
previous
screen
is
displayed.
Using
Quick
Adjust
After
adjusting
a
setting
and
returning
to
the
Sonar
screen,
you
can
quickly
return
to
the
setting
options.
After
returning
to
the
Sonar
screen,
select
A
or
T.
Getting
Started

Using
the
echo
1
00
an~
echo
1_50
__
.
Using
the
echo
100
and
echo
150
Sonar
Screen
The
sonar
screen
shows
a
full-view
graph
of
sonar
readings
from
a
transducer.
The
depth
scale
<D
indicated
on
the
right
of
the
screen
shows
the
screen
depth
as
the
screen
scrolls
from
the
right
to
the
left,
indicating
suspended
targets®.
Bottom
depth®,
water
temperature@
(if a
temperature-capable
transducer
is
connected),
and
transducer
frequency®
are
indicated
on
the
left
side
of
the
screen.
NOTE:
The
echo
100
operates
only
at
200kHz,
so
the
frequency
is
not
displayed
on
the
screen.
®
@
®
®
CD
4
Adjusting
the
Range
of
the
Depth
Scale
You
can
adjust
the
range
of
the
depth
scale
that
appears
on
the
right
side
of
the
screen.
This
setting
determines
how
deep
the
sonar
will
search
for
returns.
1.
From
the
Sonar
screen,
select
MENU
>
Range.
2.
Select
an
option:
•
To
allow
the
device
to
adjust
the
range
automatically
based
on
the
depth,
select
Auto.
•
To
increase
or
decrease
the
range
of
the
depth
scale
manually,
select
Manual,
select_.
or
T
,
then
select
ENTER.
Adjusting
the
Zoom
on
the
Sonar
Screen
Manually
You
can
manually
adjust
the
zoom
of
the
Sonar
screen
by
selecting
the
span
of
the
view
and
selecting
a
fixed
starting
depth.
For
example,
if
you
select
a
span
of
15
feet
and
a
starting
depth
of 5
feet,
the
device
will
display
an
area
from
5
feet
deep
to
20
feet
deep.
1.
From
the
Sonar
screen,
select
MENU
>
Zoom
>
Manual.
2.
Select
the
span
you
would
like
to
show.
3.
Select
the
starting
depth.

Adjusting
the
Zoom
on
the
Sonar
Screen
Automatically
You
can
adjust
the
zoom
of
the
Sonar
screen
by
selecting
the
span
of
the
view
and
locking
the
screen
to
the
contour
of
the
water
bottom.
For
example,
if
you
select
a
span
of
10
meters,
the
device
will
display
an
area
from
the
water
bottom
to
10
meters
above
the
bottom.
1.
From
the
Sonar
screen,
select
MENU
>
Zoom
>
Auto.
2.
Select
the
span
you
would
like
to
show.
Pausing
the
Screen
From
the
Sonar
screen,
select
MENU
>
Pause.
Resuming
the
Screen
After
pausing
the
sonar
screen,
select
MENU
>
Resume.
Setting
the
Gain
Manually
The
gain
setting
controls
the
sensitivity
of
the
sonar
receiver
to
compensate
for
water
depth
and
water
clarity.
To
see
more
detail,
increase
the
gain.
If
the
screen
is
cluttered,
decrease
the
gain.
To
set
the
gain
manually,
increase
the
gain
setting
until
you
begin
to
see
"noise"
in
the
water
portion
of
the
screen,
then
slightly
decrease
the
gain.
1.
From
the
Sonar
screen,
select
MENU>
Gain>
Manual.
2.
Select
A
to
increase
the
gain
setting
until
you
begin
to
see
noise
in
the
water
portion
of
the
screen.
3.
Select
T
to
decrease
the
gain.
1
Using
the
echo
1
00
and
echo
150
Setting
the
Gain
to
Auto
1.
From
the
Sonar
screen,
select
MENU
>
Gain.
2.
Select
an
option:
•
To
display
the
sonar
screen
with
higher
sensitivity
and
to
show
weaker
signals
and
more
noise,
select
Auto-
High.
•
To
display
the
sonar
screen
with
normal
sensitivity,
select
Auto-Med.
•
To
display
the
sonar
screen
with
lower
sensitivity
and
less
noise,
select
Auto-Low.
Setting
the
Shallow
Water
and
Deep
Water
Alarms
You
can
set
an
alarm
to
sound
when
the
depth
is
shallower
or
deeper
than
a
specified
value.
1.
From
the
Sonar
screen,
select
MENU>
Setup>
Alarms.
2.
Select
an
option:
•
To
sound
an
alarm
when
the
depth
is
shallower
than
the
specified
depth,
select
Shallow
>
On.
•
To
sound
an
alarm
when
the
depth
is
deeper
than
the
specified
depth,
select
Deep>
On.
3.
Select
the
depth
that
triggers
the
alarm.
The
alarm
setting
appears
on
the
Alarms
screen.

Using
the
echo
1
00
and
echo
150
----------------
Setting
the
Battery
Voltage
Alarm
You
can
set
an
alarm
to
sound
when
the
battery
reaches
a
specified
low
voltage.
1.
From
the
Sonar
screen,
select
MENU
>
Setup
>Alarms > Battery>
On.
2.
Select
the
low
battery
voltage
that
triggers
the
alarm.
The
alarm
setting
appears
on
the
Alarms
screen.
Setting
Fish
Alarms
You
can
set
an
alarm
to
sound
when
the
device
detects
a
suspended
target.
From
the
Sonar
screen,
select
MENU>
Setup>
Alarms> Fish>
On.
Setting
the
Sonar
Scroll
Speed
You
can
set
the
rate
at
which
the
sonar
scrolls
from
right
to
left.
Use
a
higher
scroll
speed
to
see
more
detail,
especially
while
moving
or
trolling.
Use
a
lower
scroll
speed
to
display
the
sonar
information
on
the
screen
longer.
1.
From
the
Sonar
screen,
select
MENU
>
Setup
>
Sonar
>
Scroll.
2.
Select
a
scroll
speed.
Selecting
a
Frequency
for
the
echo
150
When
using
a
dual-beam
transducer,
you
can
select
a
frequency
of
200
kHz
or
77
kHz
for
the
echo
150.
NOTE:
The
echo
100
operates
only
at
200kHz.
You
can
show
data
from
a
200
kHz
sonar
signal
or
data
from
a
77
kHz
sonar
signal.
The
200
kHz
frequency
shows
better
detail,
has
a
narrower
beam,
and
is
typically
used
in
shallower
waters.
The
77
kHz
frequency
penetrates
deep
water
more
effectively
and
has
a
wider
beam,
so
it
can
be
used
to
cover
a
larger
area.
1.
From
the
Sonar
screen,
select
MENU
>
Setup
>
Sonar>
Frequency.
2.
Select
a
frequency.
Configuring
the
Appearance
of
Suspended
Targets
You
can
set
how
the
sonar
interprets
suspended
targets.
1.
From
the
Sonar
screen,
select
MENU>
Setup>
Sonar>
Fish
ID.
2.
Select
an
option:
•
To
show
suspended
targets
as
symbols,
select
.:
.
•
To
show
suspended
targets
as
symbols
with
target
depth
information,
select
« .
•
To
show
suspended
targets
as
symbols
with
background
sonar
information,
select
~·
•
To
show
suspended
targets
as
symbols
with
backfrround
sonar
information
and
target
depth
information,
Select
~~t
:-.
:
1
()i)
()V/1

-------------------------------------------------------------------------------------------------------------------------------------------------------------------------------------~_p_e~~-~!~
Appendix
Specifications
Specification
Measurement
Display
4
in.
(102
mm)
diagonal,
256
x
160
pixels,
8-level
gray
Temperature
Range
From
5°F
to
158oF
(from
-15oC
to
70oC)
Compass
Safe
10
in.
(250
mm)
Distance
Frequency
echo
1
00:
200
kHz
echo
150:
77
kHz
or
200
kHz
Power
Source
Voltage
10-20
Vdc
Range
Fuse
AGC/3AG
-
3.0
A
Freshwater
Depth*
echo
100:
600ft.
(183m)
echo
150:
1300
ft.
(396m)
Saltwater
Depth*
echo
100:
300ft.
(91
m)
echo
150:
500ft.
(152
m)
*Depth
capacity
is
dependent
on
water
salinity,
bottom
type,
and
other
water
conditions.
Transducer Beam Angles
The
transducer
provided
with
the
echo
100
has
a
beam
angle
of
15
degrees
at
3dB.
The
transducer
provided
with
the
echo
150
has
beam
angles
of
15
and
45
degrees
at
3dB.
However,
when
these
transducers
are
used
with
the
echo
device,
they
can
detect
the
smallest
signals
up
to
60
degrees
for
the
echo
100
and
up
to
60
and
120
degrees
for
the
echo
150.
Shallow
and
deep
water
performance
is
maximized
because
the
echo
series
shows
more
fish
when
shallow,
and
reaches
deep
to
show
structure
and
bottom
contours.
Viewing System Information
Frotn
the
Sonar
screen,
select
MENU >
Setup
>
System
>
System
Information.
Setting the Language
1.
From
the
Sonar
screen,
select
MENU
>
Setup
>
System
>
Language.
2.
Select
the
language.
Cleaning the Outer Casing
NOTICE
Avoid
chemical
cleaners
and
solvents
that
can
damage
plastic
components.
1.
Clean
the
outer
casing
of
the
device
(not
the
screen)
using
a
cloth
dampened
with
a
mild
detergent
solution.
2.
Wipe
the
device
dry.
Cleaning the Screen
Use
a
soft,
clean,
lint-free
cloth.
If
necessary,
use
water,
isopropyl
alcohol,
or
eyeglass
lens
cleaner.
1.
Apply
the
liquid
to
the
cloth.
2.
Gently
wipe
the
screen
with
the
cloth.

Appendix
·----------------------------------
Setting
the
Units
of
Measure
1.
From
any
page,
select
MENU>
Setup>
Units.
2.
Select
an
option:
•
Select
Depth,
and
select
Feet,
Meters,
or
Fathoms.
•
Select
Temp.,
and
select
Fahrenheit
or
Celsius.
Restoring
the
Original
Factory
Settings
NOTE:
This
procedure
deletes
all
settings
information
you
have
entered.
8
From
any
page,
select
MENU
>
Setup
>
System
>
Factory
Settings
>
Yes.
Software
License
Agreement
BY
USING
THE
ECHO
100
OR
ECHO
150,
YOU
AGREE
TO
BE
BOUND
BY
THE
TERMS
AND
CONDITIONS
OF
THE
FOLLOWING
SOFTWARE
LICENSE
AGREEMENT.
PLEASE
READ
THIS
AGREEMENT
CAREFULLY.
Garmin
Ltd.
and
its
subsidiaries
("Garmin")
grant
you
a
limited
license
to
use
the
software
embedded
in
this
device
(the
"Software")
in
binary
executable
form
in
the
normal
operation
of
the
product.
Title,
ownership
rights,
and
intellectual
property
rights
in
and
to
the
Software
remain
in
Garmin
and/or
its
third-party
providers.
You
acknowledge
that
the
Software
is
the
property
of
Garmin
and/or
its
third-
party
providers
and
is
protected
under
the
United
States
of
America
copyright
laws
and
international
copyright
treaties.
You
further
acknowledge
that
the
structure,
organization,
and
code
of
the
Software,
for
which
source
code
is
not
provided,
are
valuable
trade
secrets
of
Garmin
and/or
its
third-party
providers
and
that
the
Software
in
source
code
form
remains
a
valuable
trade
secret
of
Garmin
and/or
its
third-party
providers.
You
agree
not
to
decompile,
disassemble,
modify,
reverse
assemble,
reverse
engineer,
or
reduce
to
human
readable
form
the
Software
or
any
part
thereof
or
create
any
derivative
works
based
on
the
Software.
You
agree
not
to
export
or
re-export
the
Software
to
any
country
in
violation
of
the
export
control
laws
of
the
United
States
of
America
or
the
export
control
laws
of
any
other
applicable
country
.
and
echo
150
tvlanual

March
2011
•
GAR
MIN®
©
2011
Garmin
Ltd.
or
its
subsidiaries
Garmin
International,
Inc.
1200
East
151st
Street,
Olathe,
Kansas
66062,
USA
Garmin
(Europe)
Ltd.
Liberty
House,
Hounsdown
Business
Park,
Southampton,
Hampshire,
S040
9LR
UK
Garmin
Corporation
No.
68,
Zhangshu
2"d
Road,
Xizhi
Dist.,
New
Taipei
City,
221,
Taiwan
(R.O.C.)
www.garmin.com
Part
Number
190-01312-00
Rev.
B
Printed
in
Taiwan

.
•
GARMIN,
Portable
echorM
Kit
Instructions
..........................................................................................................................................
2
Instructions
d'installation
du
kit
portable
echo™
.................................................................................................................
4
lstruzioni
del
kit
portatile
echo
rM
.........................................................................................................................................
6
Tragbares
echorM
Kit-
Anweisungen
.................................................................................................................................
9
lnstrucciones
del
kit
portatil
echorM
...................................................................................................................................
11
lntru~oes-
kit
portatil
echo™
.............................................................................................................................................
14
Vejledning
til
echo
rM
scet
...................................................................................................................................................
16
lnstruksjoner
for
echorM
bcerbart
sett
................................................................................................................................
19
lnstruktioner
for
barbar
echorM
sats
..................................................................................................................................
21
Zestaw
przenosny
echo
rM
-
instrukcje
................................................................................................................
.-
...........
23

Portable
echo
TM
Kit
Instructions
See
the
Important
Safety
and
Product
Information
guide
in
the
GPS
device
product
box
for
product
warnings
and
other
important
information.
--
---
-
Assembling
the
Mount
Before
you
can
assemble
the
mount,
ensure
you
have
a
Phillips
screwdriver
available
to
complete
the
assembly
.
1
Insert
the
handle
CD
into
the
two
openings
on
the
portable
mount
@.
2
Attach
the
handle
to
the
portable
mount
us
i
ng
two
M4xQ.?x4Q
screws
®
and
M4x7
mm
nuts
@.
3
Press
the
M6x1
nut
@
into
the
bottom
of
the
swivel-mount
base
@.
4
Place
the
swivel-mount
base
on
the
portable
mount
,
route
the
echo
device
power
and
transducer
cables
through
the
pass-through
holes
(])
,
and
fasten
the
swivel-mount
base
using
three
M4xQ.?
x
1Q
screws
@.
5
Place
the
swivel
mount
®
on
the
swivel-mount
base.
6
In
sta
ll
the
M6x1.0
s
cr
ew@
through
the
swivel
-
mount
,
and
tighten
to
the
preferred
position
.
7
If
necessary,
pull
out
enough
slack
from
the
power
and
transducer
cables
so
the
mount
can
fully
swivel
to
the
preferred
positions
when
the
cables
are
connected.
2
Transducer
The
transducer
can
be
configured
two
ways.
You
can
configure
the
transducer
with
the
included
suction
cup
mount
for
use
on
the
side
or
bottom
of
your
boat.
You
can
also
configure
the
transducer
with
the
included
float
for
ice-fishing
or
dockside
use
.
Floating
the
Transducer
1
While
holding
the
transducer
arm
in
one
hand,
take
a
length
of
the
transducer
cable
and
make
a
loop
.
2
Insert
the
loop
into
one
end
of
the
float
until
the
loop
extends
out
of
the
opposite
end
of
the
float.
3
Ensure
the
length
of
cable
between
the
float
and
transducer
is
long
enough
so
the
transducer
can
be
suspended
below
the
water
or
ice
.
4
Thread
the
transducer
through
the
loop
at
the
end
of
float
and
pull
tight.
Mounting
the
Transducer
with
the
Suction
Cup
If
you
purchased
the
echo
device
separately
from
the
portable
kit,
before
you
can
mount
the
transducer
on
the
transducer
arm,
you
must
find
the
spacers
and
washers
that
were
packaged
with
the
echo
device
.
1
Attach
the
suction
cup
CD
to
the
transducer
arm
(2)
using
the
1/4-2Qx0.750
screw
®.
CD
@
2
Insert
the
rubber
washer
and
spacer
@
into
the
transducer.
3
Pull
the
transducer
cable
back
and
slide
the
transducer
into
the
transducer
arm
.
You
can
route
the
transducer
cable
through
the
notch
and
opening
in
the
transducer
arm.
4
Place
the
washers
@
on
the
outside
of
the
transducer
arm
.
5
Insert
the
1 0-32x
1.75
sc
rew®
through
th
e
tr
ans
duc
er
arm
,
tr
a
nsducer
,
spacer,
and
washers.
6
Fasten
the
screw
with
the
10-32
wing
nut
(J)
.
7
Attach
the
suction
cup
to
the
side
of
your
boat.
8
Align
the
transducer
parallel
with
the
water
line
.

Connecting
and
Stowing
the
Cables
-~
,
/A
~AUTION
Ensure
that
you
connect
the
correct
connector
to
the
correct
battery
terminal.
Damage
to
the
battery,
device,
or
bodily
harm
may
occur
if
the
dev
i
ce
is
improperly
connected
to
the
battery.
1
Using
the
cables
you
inserted
through
the
pass-through
holes
on
the
portable
mount,
compare
the
divot
on
the
cable
connector
to
the
keying
on
the
echo
device
ports
to
identify
the
correct
port.
2
Push
the
cable
connector
into
the
correct
port
until
the
connector
is
fully
seated.
3
Repeat
steps
1
and
2
until
all
of
the
cables
are
connected
to
the
device.
4
Slide
the
positive
(red)
connector
onto
the
positive
(red)
terminal
on
the
battery.
5
Slide
the
negative
(black)
connector
onto
the
negative
(black)
terminal
on
the
battery
.
6
If
necessary
,
wrap
excess
power
cable
around
the
open
section
on
the
underside
of
the
portable
mount.
7
If
necessary,
wrap
excess
transducer
cable
around
the
hooks
on
the
side
of
the
handle
on
the
portable
mount.
Installing
the
Device
1
Connect
the
power
and
transducer
cables
to
the
device
.
2
With
the
locking
arm
CD
in
the
upward
position
,
place
the
echo
device
@
into
the
swivel
mount
@.
3
Tilt
the
mount
for
the
preferred
viewing
angle
and
press
down
on
the
locking
arm.
Placing
the
Portable
Kit
in
the
Bag
After
you
have
assembled
the
portable
kit
mount,
you
can
place
it
in
the
bag,
which
makes
it
easier
to
carry
and
protects
it
from
the
elements.
The
bag
contains
hooks
that
allow
you
to
tether
the
bag
to
a
seat
on
your
boat.
1
Place
the
battery
in
the
open
space
behind
the
swivel
mount.
2
Slide
two
of
the
included
hook
and
loop
straps
through
the
na
r
row
slots
near
the
batt
e
ry.
3
Pull
the
straps
under
and
around
the
bottom
of
the
portable
mount
,
and
wrap
them
tightly
around
the
battery.
4
Place
the
transducer
into
the
open
space
next
to
the
swivel
mount.
5
Place
the
portab
le
kit
in
the
bag.
6
Wrap
the
flap
of
nylon
found
insid
e
the
bag
around
the
handle
of
the
portable
base
and
secure
it
to
the
opening
flap
.
7
P
ull
th
e
op
e
ning
fl
ap
ov
er
the
ha
ndl
e.
8
Zip
up
the
opening
flap
to
close
the
bag
.
Battery
Information
Battery
Warnings
Your
GPS
device
uses
a
user-replaceable
sealed
lead
acid
battery.
If
these
guidelines
are
not
followed,
the
battery
may
experience
a
shortened
life
span
or
may
present
a
risk
of
damage
to
the
device,
fire,
chemical
burn,
electrolyte
leak,
and/or
bodily
injury
.
•
When
stor
i
ng
the
battery
fo
r
an
extended
time
,
store
within
the
following
temperature
range:
from
5°
F
to
104°F
(from
-15°
C
to
40°
C).
•
Do
not
operate
the
battery
outside
of
the
following
temperature
range:
from
5o
F
to
122°
F
(from
-15°
C
to
50°
C)
.
•
Do
not
place
the
battery
near
objects
that
may
cause
sparks,
flames,
or
heat.
•
Do
not
i
ncinerate
the
battery
.
•
Keep
the
battery
tightly
closed
.
•
Do
not
use
a
sharp
object
to
remove
the
battery.
•
Do
not
disassemble,
puncture,
or
damage
the
battery
.
•
Do
not
swallow,
touch,
or
inhale
the
contents
of
an
open
battery
.
Avoid
contact
with
internal
acid
.
Contact
with
internal
acid
may
cause
irritation
or
severe
burns.
Irritation
may
occur
to
the
eyes
,
respiratory
system
,
and
skin
.
Flush
with
water
at
once
if
contact
is
made
wi
th
acid.
•
Do
not
submerge
the
battery
and
avoid
contact
with
water.
•
Do
not
short
the
battery
terminals
.
•
Do
not
drop
or
throw
the
battery
.
•
Keep
the
battery
away
from
children.
•
Only
replace
the
battery
with
the
correct
replacement
battery.
Using
another
battery
presents
a
risk
of
fire
or
explosion
of
the
device
or
charger.
•
Only
charge
the
battery
with
the
included
charger.
•
Do
not
charge
the
battery
in
an
unventilated
area.
•
Store
in
a
cool
,
dry
,
and
well-ventilated
area
.
•
Do
not
charge
the
battery
in
a
gas-tight
container.
•
Do
not
leave
the
device
exposed
to
a
heat
source
or
in
a
high-temperature
location
,
such
as
in
the
sun
in
an
unattended
vehicle
.
To
prevent
damage
,
remove
the
device
from
the
vehicle
or
store
it
out
of
direct
sunlight.
•
Do
not
use
organic
solvents
or
other
cleaners
other
than
recommended
chemical
cleaners
on
the
battery.
•
Contact
your
local
waste
disposal
department
to
dispose
of
the
battery
in
accordance
with
applicable
local
laws
and
regulations.
Charging
the
Battery
.
&CAUTION
Ensure
that
you
connect
the
correct
connector
to
the
correct
battery
terminal.
Damage
to
the
battery,
device,
or
bod
i
ly
harm
may
occur
if
the
device
is
improperly
connected
to
the
battery
.
Before
you
can
charge
the
battery
using
the
charger
,
you
must
disconnect
the
echo
device
power
cable
from
the
positive
and
negative
terminals
on
the
battery.
The
battery
is
re
chargeable
and
can
be
charg
ed
by
connect
i
ng
the
batt
e
ry
to
a
wall
charger.
1
Connect
the
posit
i
ve
connector
on
the
wall
charger
onto
the
positive
terminal
on
the
battery.
2
Slide
the
negative
connector
on
the
wall
charger
onto
the
negative
terminal
on
the
battery.
3
Conn
e
ct
the
wa
ll
cha
r
ger
to th
e wa
ll
outlet.
Battery
Tips
•
The
life
ex
pectancy
of
a
sealed
lead
acid
battery
can
be
ex
tended
by
recharging
often
and
not
completely
discharging
the
battery
.
•
Sealed
lead
acid
batteries
slowly
lose
their
charge
while
in
storage
.
For
best
results
,
charge
the
battery
pri
or
to
use
.
3

•
When
used
in
cold
temperatures,
sealed
lead
acid
batteries
do
not
hold
the
charge
as
long
as
in
warmer
temperatures.
•
To
avoid
spilling
the
internal
acid,
keep
the
battery
in
the
upright
position.
•
Sealed
lead
acid
batteries
are
completely
recyclable.
Specifications
Battery
type
Sealed
lead
acid
Battery
shelf
life
after
charging
1
month:
92%
3
months:
90%
6
months
:
80%
Battery
operating
temperature
range
From
so
F
to
122°
F
(from
I
-1S°
C
to
soo
C)
Battery
charging
temperature
range
From
so
F
to
104°
F (
from
-1So
C
to
40°
C)
·-·
----
-
Battery
storage
temperature
range
From
so
F
to
104°
F
(from
I
-1S°
C
to
40
°
C)
Physical
size
(assembled
kit
with
device)
L
x
W
x
H:
10.629
in
.
x
10.629
in
.
x
11.02
in.
(270
mm
x
270
mm
x
280
mm)
Weight
(unassembled
kit
with
device)
8.498
lb.
(38SS
g)
Industry
Canada
Compliance
Statement
This
Class
B
digital
apparatus
complies
with
Canadian
ICES-003.
Declaration
of
Conformity
Hereby,
Garmin
®
declares
this
product
is
in
compliance
with
the
essential
requirements
and
other
relevant
provisions
of
Directive
2004/108/EC.
Limited
Warranty
The
Garmin
standard
limited
warranty
applies
to
this
accessory.
For
more
information,
go
to
www.garmin.com/support/warranty.html.
Instructions
d'installation
du
kit
portable
echorM
Consultez
le
guide
Informations
importantes
sur
le
produit
et
Ia
securite
inclus
dans
l'emballage
du
GPS
pour
prendre
connaissance
des
avertissements
et
autres
informations
sur
le
produit.
Assemblage
du
support
de
montage
Pour
pouvoir
fixer
le
support
de
montage,
verifiez
que
vous
disposez
bien
d'un
tournevis
cruciforme.
1
lnserez
Ia
poignee
CD
dans
les
deux
emplacements
situes
sur
le
support
portable
®.
2
Fixez
Ia
poignee
au
support
portable
a
l'aide
de
deux
vis
M4xO,?x40
®
et
de
deux
ecrous
M4x7
mm
@)
.
3
Enfoncez
l'ecrou
M6x1
@
dans
le
fond
de
Ia
base
de
l'etrier
pivotant
@.
4
4
Placez
Ia
base
de
l'etrier
pivotant
sur
le
support
portable
,
faites
passer
les
cables
d'alimentation
et
de
Ia
sonde
de
I'
echo
par
les
trous
de
passage
des
cables
(f),
puis
fixez
Ia
base
de
l'etrier
pivotant
a
l'aide
de
trois
vis
M4x0,7x10
@.
5
Placez
l'etrier
pivotant
®
sur
sa
base.
6
Positionnez
Ia
vis
M6x
1
,0
®!
a
travers
l'etrier
pivotant
,
puis
serrez-la
dans
Ia
position
voulue
.
7
Au
besoin
,
laissez
suffisamment
de
mou
dans
les
cables
d'alimentation
et
de
Ia
sonde
pour
que
l'etrier
puisse
librement
pivoter
dans
toutes
les
positions
lorsque
les
cables
seront
connectes.
Sonde
La
sonde
peut
etre
installee
de
deux
fa9ons.
Vous
pouvez
installer
Ia
sonde
a
I'
aide
du
support
a
ventouse
inclus
pour
Ia
fixer
sur
les
cotes
ou
le
dessous
de
votre
bateau.
Vous
pouvez
egalement
utiliser
Ia
sonde
avec
le
ftotteur
fourni
pour
pecher
sous
Ia
glace
ou
depuis
un
ponton
.
Installation
du
flotteur
de
sonde
1
Tout
en
tenant
Ia
sonde
d'une
main
,
prenez
une
longueur
du
cable
de
Ia
sonde
et
faites
une
boucle.
2
lnserez
Ia
boucle
dans
l'une
des
extremites
du
ftotteur
jusqu
'a
ce
qu'elle
ressorte
par
!'autre
extremite.
3
Verifiez
que
Ia
longueu
r
du
cable
entre
le
ftotteur
et
Ia
sonde
est
suffisante
pour
que
cette
derniere
puisse
etre
suspendue
sous
Ia
surface
de
l'
eau
ou
sous
Ia
glace.
4
Faites
passer
Ia
sonde
a
travers
Ia
boucle
au
bout
du
ftotteur,
puis
tirez
fermement.

Garmin
International,
Inc.
1200
East
151
st
Street
Olathe,
Kansas
66062,
USA
Garmin
(Europe)
Ltd.
Liberty
House,
Hounsdown
Business
Park
Southampton,
Hampshire,
S040
9LR
UK
Garmin
Corporation
No.
68,
Zhangshu
2nd
Road,
Xizhi
Dist.
New
Taipei
City,
221,
Taiwan
(R.O.C.)
September
2012
Garmid~
and
the
Garmin
logo
are
trademarks
of
Garmin
Ltd.
or
its
subsidiaries,
registered
in
the
USA
and
other
countries.
echorM
is
a
trademark
of
Garmin
Ltd.
or
its
subsidiaries.
These
trademarks
may
not
be
used
without
the
express
permission
of
Garmin.
Mno2
CE
190-01312-92_0A
Printed
in
Taiwan

Important
Safety
and
Product
Information
.................................................................................
2
Informations
importantes
relatives
au
produit
eta
Ia
securite
...................................................
3
lnformazioni
importanti
sulla
sicurezza
e
sui
prodotto
...............................................................
S
Wichtige
Sicherheits-
und
Produktinformationen
.......................................................................
7
Informacion
importante
sobre
el
producto
y
tu
seguridad
.........................................................
8
lnformac;oes
importantes
de
seguranc;a
e
do
produto
.............................................................
1
0
Belangrijke
veiligheids-
en
productinformatie
..........................................................................
11
Vigtige
produkt-
og
sikkerhedsinformationer
...........................................................................
13
Tarkeita
turvallisuus-
ja
tuotetietoja
.........................................................................................
14
Viktig
sikkerhets-
og
produktinformasjon
.................................................................................
15
Viktig
sakerhets-
och
produktinformation
................................................................................
16
Waine
informacje
dotyczq_ce
bezpieczeristwa
i
produktu
.......................................................
18
npae~na
rexH~K~
6e3onacHocr~
~
cee.QeH~~
o6
~3.Qen~~
....................................................
19
Vazne
informacije
o
proizvodu
i
sigurnosti
..............................................................................
21
I:~JJOVTIKE~
TTA~pocpopit~
y1a
T~v
acrcpaAtla
Kal
To
npo'i6v
......................................................
22
Onemli
Guvenlik
ve
Orun
Bilgileri
............................................................................................
24

Important
Safety
and
Product
Information
Operation
Warning
Depth
data
from
this
product
should
not
be
used
as
the
primary
means
of
preventing
grounding
or
collision.
Supplement
depth
data
readings
with
information
from
applicable
paper
charts
and
visual
indicators.
Always
operate
the
boat
at
slow
speeds
if
you
suspect
shallow
water
or
submerged
objects.
Failure
to
heed
this
warning
could
lead
to
~oat
damage
or
personal
injury.
Battery
Warnings
Your
device
may
use
an
internal,
non-user-replaceable
battery
for
various
purposes,
such
as
the
real-time
clock.
Do
not
remove
or
attempt
to
remove
the
non-user-
replaceable
battery.
•
When
disposing
of
the
unit,
take
it
to
a
professional
service,
such
as
a
waste
electronics
treatment
facility,
to
have
the
~-~~ttery
r~mo~~~
and
re_~yci~----·--~M-~-~---------~-----------·
Declaration
of
Conformity
Hereby,
Garmin,
declares
that
this
product
is
in
compliance
with
the
essential
requirements
and
other
relevant
provisions
of
Directive
1999/5/EC.
To
view
the
full
Declaration
of
Conformity,
go
to
www.garmin.com/compliance.
Industry
Canada
Compliance
Category
I
radiocommunication
devices
comply
with
Industry
Canada
Standard
RSS-210.
Category
II
radiocommunication
devices
comply
with
Industry
Canada
Standard
RSS-310.
This
device
complies
with
Industry
Canada
license-exempt
RSS
standard(s).
Operation
is
subject
to
the
following
two
conditions:
(1)
this
device
may
not
cause
interference,
and
(2)
this
device
must
accept
any
interference,
including
interference
that
may
cause
undesired
operation
of
the
device.
FCC
Compliance
This
device
complies
with
part
15
of
the
FCC
Rules.
Operation
is
subject
to
the
following
two
conditions:
(1)
this
device
may
not
cause
harmful
interference,
and
(2)
this
device
must
accept
any
interference
received,
including
interference
that
may
cause
undesired
operation.
2
This
equipment
has
been
tested
and
found
to
comply
with
the
limits
for
a
Class
B
digital
device,
pursuant
to
part
15
of
the
FCC
rules.
These
limits
are
designed
to
provide
reasonable
protection
against
harmful
interference
in
a
residential
installation.
This
equipment
generates,
uses,
and
can
radiate
radio
frequency
energy
and
may
cause
harmful
interference
to
radio
communications
if
not
installed
and
used
in
accordance
with
the
instructions.
However,
there
is
no
guarantee
that
interference
will
not
occur
in
a
particular
installation.
If
this
equipment
does
cause
harmful
interference
to
radio
or
television
reception,
which
can
be
determined
by
turning
the
equipment
off
and
on,
the
user
is
encouraged
to
try
to
correct
the
interference
by
one
of
the
following
measures:
•
Reorient
or
relocate
the
receiving
antenna.
•
Increase
the
separation
between
the
equipment
and
the
receiver.
•
Connect
the
equipment
into
an
outlet
that
is
on
a
different
circuit
from
the
GPS
unit.
•
Consult
the
dealer
or
an
experienced
radio/TV
technician
for
help.
This
product
does
not
contain
any
user-serviceable
parts.
Repairs
should
only
be
made
by
an
authorized
service
center.
Unauthorized
repairs
or
modifications
could
result
in
permanent
damage
to
the
equipment,
and
void
your
warranty
and
your
authority
to
operate
this
device
under
Part
15
regulations.
Limited
Warranty
This
Garmin
product
is
warranted
to
be
free
from
defects
in
materials
or
workmanship
for
one
year
from
the
date
of
purchase.
Within
this
period,
Garmin
will,
at
its
sole
option,
repair
or
replace
any
components
that
fail
in
normal
use.
Such
repairs
or
replacement
will
be
made
at
no
charge
to
the
customer
for
parts
or
labor,
provided
that
the
customer
shall
be
responsible
for
any
transportation
cost.
This
warranty
does
not
apply
to:
(i)
cosmetic
damage,
such
as
scratches,
nicks
and
dents;
(ii)
consumable
parts,
such
as
batteries,
unless
product
damage
has
occurred
due
to
a
defect
in
materials
or
workmanship;
(iii)
damage
caused
by
accident,
abuse,
misuse,
water,
flood,
fire,
or
other
acts
of
nature
or
external
causes;
(iv)
damage
caused
by
service
performed
by
anyone
who
is
not
an
authorized
service
provider
of
Garmin;
or
(v)
damage
to
a
product
that
has
been
modified
or
altered

without
the
written
permission
of
Garmin.
In
addition,
Garmin
reserves
the
right
to
refuse
warranty
claims
against
products
or
services
that
are
obtained
and/or
used
in
contravention
of
the
laws
of
any
country.
This
product
is
intended
to
be
used
only
as
a
travel
aid
and
must
not
be
used
for
any
purpose
requiring
precise
measurement
of
direction,
distance,
location
or
topography.
Garrnin
makes
no
warranty
as
to
the
accuracy
or
completeness
of
map
data
in
this
product.
THE
WARRANTIES
AND
REMEDIES
CONTAINED
HEREIN
ARE
EXCLUSIVE
AND
IN
LIEU
OF
ALL
OTHER
WARRANTIES
EXPRESS,
IMPLIED,
OR
STATUTORY,
INCLUDING
ANY
LIABILITY
ARISING
UNDER
ANY
WARRANTY
OF
MERCHANTABILITY
OR
FITNESS
FOR
A
PARTICULAR
PURPOSE,
STATUTORY
OR
OTHERWISE.
THIS
WARRANTY
GIVES
YOU
SPECIFIC
LEGAL
RIGHTS,
WHICH
MAY
VARY
FROM
STATE
TO
STATE.
IN
NO
EVENT
SHALL
GAR
MIN
BE
LIABLE
FOR
ANY
INCIDENTAL,
SPECIAL,
INDIRECT
OR
CONSEQUENTIAL
DAMAGES,
INCLUDING,
WITHOUT
LIMITATION,
DAMAGES
FOR
ANY
TRAFFIC
FINES
OR
CITATIONS,
WHETHER
RESULTING
FROM
THE
USE,
MISUSE
OR
INABILITY
TO
USE
THE
PRODUCT
OR
FROM
DEFECTS
IN
THE
PRODUCT.
SOME
STATES
DO
NOT
ALLOW
THE
EXCLUSION
OF
INCIDENTAL
OR
CONSEQUENTIAL
DAMAGES,
SO
THE
ABOVE
LIMITATIONS
MAY
NOT
APPLY
TO
YOU.
Garrnin
retains
the
exclusive
right
to
repair
or
replace
(with
a
new
or
newly-overhauled
replacement
product)
the
device
or
software
or
offer
a
full
refund
of
the
purchase
price
at
its
sole
discretion.
SUCH
REMEDY
SHALL
BE
YOUR
SOLE
AND
EXCLUSIVE
REMEDY
FOR
ANY
BREACH
OF
WARRANTY.
To
obtain
warranty
service,
contact
your
local
Garrnin
authorized
dealer
or
call
Garrnin
Product
Support
for
shipping
instructions
and
an
RMA
tracking
number.
Securely
pack
the
device
and
a
copy
of
the
original
sales
receipt,
which
is
required
as
the
proof
of
purchase
for
warranty
repairs.
Write
the
tracking
number
clearly
on
the
outside
of
the
package.
Send
the
device,
freight
charges
prepaid,
to
any
Garrnin
verification.
To
obtain
warranty
service,
an
original
or
copy
of
the
sales
receipt
from
the
original
retailer
is
required.
Garmin
will
not
replace
missing
components
from
any
package
purchased
through
an
online
auction.
International
Purchases:
A
separate
warranty
may
be
provided
by
international
distributors
for
devices
purchased
outside
the
United
States
depending
on
the
country.
If
applicable,
this
warranty
is
provided
by
the
local
in-country
distributor
and
this
distributor
provides
local
service
for
your
device.
Distributor
warranties
are
only
valid
in
the
area
of
intended
distribution.
Devices
purchased
in
the
United
States
or
Canada
must
be
returned
to
the
Garrnin
service
center
in
the
United
Kingdom,
the
United
States,
Canada,
or
Taiwan
for
service.
Australian
Purchases:
Our
goods
come
with
guarantees
that
cannot
be
excluded
under
the
Australian
Consumer
Law.
You
are
entitled
to
a
replacement
or
refund
for
a
major
failure
and
for
compensation
for
any
other
reasonably
foreseeable
loss
or
damage.
You
are
also
entitled
to
have
the
goods
repaired
or
replaced
if
the
goods
fail
to
be
of
acceptable
quality
and
the
failure
does
not
amount
to
a
major
failure
..
The
benefits
under
our
Limited
Warranty
are
in
addition
to
other
rights
and
remedies
under
applicable
law
in
relation
to
the
products.
Garrnin
Australasia
Unit
19,
167
Prospect
Highway
Seven
Hills,
NSW,
Australia,
2147
Phone:
1800
822
235
Garmin's
Marine
Warranty
Policy:
Certain
Garmin
Marine
products
in
certain
areas
have
a
longer
warranty
period
and
additional
terms
and
conditions.
Go
to
www.garmin.com/
support/warranty.html
for
more
details
and
to
see
if
your
product
is
covered
under
Garmin's
Marine
Warranty
Policy.
Informations
importantes
relatives
au
produit
et
a
Ia
securite
warranty
service
station.
Avertissements
relatifs
a
I'
utilisation
Online
Auction
Purchases:
Products
purchased
through
Les
donnees
de
profondeur
de
ce
produit
ne
doivent
pas
online
auctions
are
not
eligible
for
warranty
coverage.
etre
utilisees
en
premier
recours
afin
d'eviter
les
risques
.<?.~_l_i_~-~---~~-~~i-~-~--~~~-~'!fl.~~i~~~
~~~--~-~~-~~~-~.P..~~-~-.!~~--~~~r.~.~-tY............
....
-~·-~~~~~~~~-
~-~---~-~--~~l.!_i_~.i~-~.:
...
~~~pl_~~~~--~-~-~-
'!.1~~-~.r.~~---~-~~
........
3

•
GAR
MIN®
©
2010-2011
Garmin
Ltd.
or
its
subsidiaries
Garmin
International,
Inc.
1200
East
151
st
Street,
Olathe,
Kansas
66062,
USA
Garmin
(Europe)
Ltd.
Mno2
Liberty
House,
Hounsdown
Business
Park,
Southampton,
Hampshire,
S040
9LR
UK
Garmin
Corporation
No.
68,
Zangshu
2nd
Road,
Xizhi
Dist.,
New
Taipei
City,
221,
Taiwan
(R.O.C.)
www.garm1n.com
October
2011
190-00720-25
Rev.
D
Printed
in
Taiwan
-
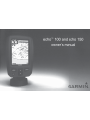 1
1
-
 2
2
-
 3
3
-
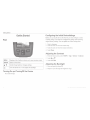 4
4
-
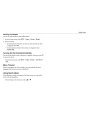 5
5
-
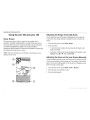 6
6
-
 7
7
-
 8
8
-
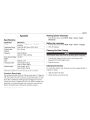 9
9
-
 10
10
-
 11
11
-
 12
12
-
 13
13
-
 14
14
-
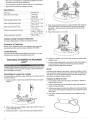 15
15
-
 16
16
-
 17
17
-
 18
18
-
 19
19
-
 20
20


Garmin Echo 150 Le manuel du propriétaire
- Taper
- Le manuel du propriétaire
- Ce manuel convient également à
dans d''autres langues
- English: Garmin Echo 150 Owner's manual
Documents connexes
-
Garmin GTX 45R Le manuel du propriétaire
-
Garmin GHA 15 Manuel utilisateur
-
Garmin Panoptix™ PS22-TR Guide d'installation
-
-
Garmin STRIKER™ 4dv Manuel utilisateur
-
-
Garmin Panoptix PS21-TR Guide d'installation
-
Garmin ECHOMAP™ Plus 95sv without Transducer Guide d'installation
-
-
Garmin 69808IN Manuel utilisateur
