Emerson Copeland XCM25D Replacement Manuallines
- Taper
- Replacement Manuallines

RGL-Unit-LOCU-XCM25D/EGF/Rev00 1/3
Date of last update: Mar-20
Ref: RGL-Unit-LOCU-XCM25D/EGF/Rev00
Application Engineering Europe
XCM25D – REPLACEMENT GUIDELINES
XCM25D – REGLERAUSTAUSCH – KURZANLEITUNG
XCM25D – GUIDE DE REMPLACEMENT
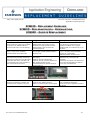
1 Controller replacement
1 Regleraustausch
1 Remplacement du régulateur
This manual describes the working
steps required to replace the XCM25D
controller on an OMTE/CFMTE or
OLTE/CFLTE unit in case of damage.
Diese Kurzanleitung beschreibt die
Arbeitsschritte zum Austausch eines
XCM25D bei Regler-Ausfall an einem
OMTE/CFMTE- oder OLTE/CFLTE-
Verflüssigungssatz.
Ce guide décrit les étapes nécessaires
pour effectuer le remplacement du
régulateur XCM25D sur un groupe
OMTE/CFMTE ou OLTE/CFLTE en cas
de panne.
The spare parts kit contains 3 "Hot
Keys", one for each unit family
(OMTE/CFMTE & OLTE/CFLTE).
Dem Ersatzteilkit liegen 3 “Hot Keys” bei,
einer für jede Familie (OMTE/CFMTE &
OLTE/CFLTE).
Le kit de remplacement inclut 3 « Hot
Keys », une pour chaque famille de
groupes de condensation
(OMTE/CFMTE & OLTE/CFLTE).
Interrupt the power supply of the unit.
Disconnect the protection connectors.
Disconnect all the wires from the upper
and lower parts of the controller and
connect them to the new controller at
the same terminals as before.
Unterbrechen Sie die Spannungs-
versorgung.
Entfernen Sie die Schutzstecker.
Entfernen Sie alle Anschlussdrähte vom
alten Regler. Bringen Sie die
Flachsteckhülsen an gleicher Stelle am
neuen Regler an.
Couper l’alimentation du groupe.
Débrancher les connecteurs de
protection.
Débrancher les câbles et les rebrancher
sur le nouveau régulateur aux mêmes
bornes que précédemment.
Unlock the 4 locks on the controller.
Remove the defective controller and
mount the new controller in its place.
Entsichern der Regler-Halterungen.
Entfernen des defekten Reglers.
Einbau und Fixierung des neuen Reglers.
Dévisser les 4 cales.
Ôter le régulateur défectueux.
Monter le nouveau régulateur à la place
de l’ancien.

RGL-Unit-LOCU-XCM25D/EGF/Rev00 2/3
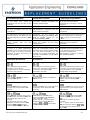
2 Parameter uploading
2 Parameter hochladen
2 Télécharger les paramètres
Choose the right "Hot Key" depending
on unit family, then upload the
parameters from the "Hot Key" to the
controller.
Auswahl des richtigen “Hot Key” passend
zur Familie, Parameter hochladen vom
“Hot Key” auf den Regler.
Sélectionner la « Hot Key » en fonction
du groupe, puis télécharger les
paramètres de la « Hot Key » dans le
régulateur.
Turn the controller off.
Regler ausschalten.
Eteindre le régulateur.
Insert a pre-programmed "Hot Key" into
the 5-pin receptacle and turn the
controller on.
Den vorparametrierten “Hot Key” in die 5-
PIN-Steckbuchse einstecken und den
Regler wieder einschalten.
Insérer la « Hot Key » préprogrammée
dans le réceptacle à 5 broches et allumer
le régulateur.
The parameter list of the "Hot Key" will
be automatically downloaded into the
controller memory. The "doL" message
will blink followed a by a flashing "End"
label.
Die Parameter-Liste des “Hot Key” wird
automatisch auf den Speicher des
XCM25D übertragen. Die Meldung “doL”
blinkt im Display gefolgt von der
blinkenden Mitteilung “End”.
La liste des paramètres de la « Hot Key »
est automatiquement téléchargée dans la
mémoire du régulateur. Le message
« doL » clignote, suivi du message
« End ».
After 10 seconds, the controller will
restart working with the new
parameters.
Nach 10 Sekunden startet das Gerät
erneut und arbeitet mit der neuen
Parametrierung.
Après 10 secondes, le régulateur
redémarre avec les nouveaux
paramètres.
Remove the "Hot Key".
Entfernen des “Hot Key”.
Retirer la « Hot Key ».
NOTE: The message "Err" is displayed
in case of a failed programming
operation. In this case turn the unit off,
then on again if you want to restart the
download, or remove the "Hot Key" to
abort the operation.
HINWEIS: Die Meldung “Err” erscheint,
wenn der Programmier-Vorgang nicht
erfolgreich war. In diesem Fall den Regler
aus- und wieder einschalten, um den
Vorgang neu zu starten. Andernfalls den
“Hot Key” herausziehen um die Aktion
abzubrechen.
NOTE : Le message « Err » s’affiche en
cas d’échec de la programmation. Dans
ce cas éteindre le groupe et ensuite le
rallumer pour redémarrer le
téléchargement, ou retirer la « Hot Key »
pour annuler l’opération.
3 How to program the
parameters (Pr1 and Pr2)
3 Programmierung der Parameter
(Pr1 und Pr2)
4 Programmation des paramètres
(Pr1 et Pr2)
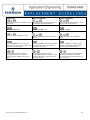
Access pre-program level
Press simultaneously for about 3
seconds to access the pre-
programming level. The message rtC
(real time clock) appears.
Zugriff Vor-Programmier-Ebene
Gleichzeitig für 3 Sekunden gedrückt
halten, um in die erste Programm-Ebene
zu gelangen. Die Mitteilung rtC
(Echtzeituhr) erscheint.
Accès préprogrammation
Appuyer simultanément pendant environ
3 secondes pour accéder au niveau de
préprogrammation. Le message rtC
(horloge temps réel) s’affiche.
Access program level
Press the Up or Down key until the
message PAR appears.
Zugriff Programmier-Ebene
Drücken der Pfeiltasten, bis Mitteilung
PAR erscheint.
Accès programmation
Appuyer sur l’une de ces 2 touches
jusqu’à ce que le message PAR
s’affiche.
Access Pr1
Press the SET button to enter the
program level. First parameter C01
appears.
Zugriff Pr1
Drücken der SET Taste, um in Ebene Pr1
zu gelangen. Erster Parameter C01
erscheint.
Accès à Pr1
Appuyer sur SET pour accéder au mode
programmation. Le premier paramètre
C01 s’affiche.
Access Pr2
Go to t18 label using the arrows. Press
the SET button. The blinking PAS label
will be displayed; wait for a few
seconds.
The display will show "0 - -" with
blinking 0. Insert the password [321]
using the and keys and
confirm every digit with the SET key.
Zugriff Pr2
Mit Pfeiltasten Label t18 suchen.
Drücken der SET Taste. PAS blinkt.
Einige Sekunden warten.
Display zeigt "0 - -" mit blinkender 0.
Eingabe des Passworts [321] über
Pfeiltasten und , jede Eingabe
mit SET bestätigen.
Accès à Pr2
Appuyer sur jusqu’à ce que T18
s’affiche, puis appuyer sur la touche
SET.
PAS clignote : attendre quelques
secondes.
« 0 - - » clignote : taper le mot de passe
[321] au moyen des touches et
et confirmer chaque chiffre avec la
touche SET.

RGL-Unit-LOCU-XCM25D/EGF/Rev00 3/3
Select item
Select the parameter or submenu using
the arrows.
Auswahl Parameter
Auswahl der gewünschten Parameter &
Untermenüs über die Pfeiltasten.
Choisir le paramètre
Sélectionner un paramètre ou un sous-
menu en utilisant les flèches.
Show value
Press the SET button.
Wert anzeigen
Drücken der SET Taste.
Afficher la valeur
Appuyer sur SET.
Modify
Use the arrows to modify the value.
Modifizieren
Nutzen der Pfeiltasten zum ändern von
Werten.
Modifier
Utiliser les flèches pour modifier la
valeur.
Confirm and store
Press the SET button: the value will
blink for 3 seconds, then the display will
show the next parameter.
Bestätigen & Speichern
Drücken der SET Taste: Der Wert blinkt
für 3 Sekunden, dann wird nächster
Parameter angezeigt.
Confirmer et enregistrer
Appuyer sur SET : la valeur clignote
pendant 3 secondes, ensuite l’écran
affichera le paramètre suivant.
EXIT
Press simultaneously to exit the
programming mode, or wait for 30
seconds (MTO) without pressing any
key.
EXIT
Gleichzeitiges Drücken um den
Programmier-Modus zu verlassen, oder
30 Sekunden (MTO) warten ohne eine
Taste zu drücken.
SORTIE
Appuyer simultanément pour quitter le
mode programmation, ou attendre
30 secondes (MTO) sans appuyer sur
aucune touche.
-
 1
1
-
 2
2
-
 3
3


Emerson Copeland XCM25D Replacement Manuallines
- Taper
- Replacement Manuallines
dans d''autres langues
- English: Emerson Copeland XCM25D
- Deutsch: Emerson Copeland XCM25D
Documents connexes
Autres documents
-
 Rami RGL 500 Manuel utilisateur
-
Dometic Frigo Evaporator Guide d'installation
-
 Roger Technology B70/1DCHP control board Manuel utilisateur
-
 Roger Technology H70/200/AC/box Control Unit Manuel utilisateur
-
 Roger Technology CTRL Mode d'emploi
-
Tiptel 272 Le manuel du propriétaire
-
-
-
Schneider Electric altivar 58 telemecanique Manuel utilisateur
-
Gram Compact 410 Le manuel du propriétaire


