Sylvania SP1051-BLACK Mode d'emploi
- Catégorie
- Hauts-parleurs portatifs
- Taper
- Mode d'emploi

BLUETOOTH SPEAKER - FM RADIO
Model : SP1051-BLACK · Bluetooth Version: 5.0
· Output Power: 5W x 2
Technical Specifications
· Battery capacity:1800mAh
· Transmission distance: 10m
· S/N: 85dB
In The Box
Model : SP1051-BLACK
HAUT-PARLEUR BLUETOOTH - RADIO FM
lisez ces instructions soigneusement avant l’utilisation
et les conservez pour la référence dans futur
SYLVANIA est une marque déposée d'OSRAM Sylvania Inc. utilisée sous licence
Déclaration de FCC :
Cet appareil est conforme à la partie 15 des règles de la FCC. Opération est soumise aux
deux conditions suivantes:
(1) Cet appareil ne peut pas causer d'interférences nuisibles, et
(2) Cet appareil doit accepter toute interférence reçue, y compris les interférences
susceptibles qui va provoquer une opération indésirable.
Attention: Les changements ou modifications non expressément approuvés par la partie
responsable de la conformité pourraient annuler l'autorité de l'utilisateur à utiliser l'équipement.
Remarque: TCet équipement a été testé et conformé aux limites d'un appareil numérique de
classe B, conformément à la partie 15 des règles de la FCC. Ces limites sont conçues pour
fournir une protection raisonnable contre les interférences nuisibles dans une installation
résidentielle. Cet équipement génère des utilisations et peut émettre de l'énergie
radiofréquence et, s'il n'est pas installé et utilisé conformément aux instructions, il peut causer
des interférences nuisibles aux communications radio. Cependant, il n'y a aucune garantie
que les interférences ne se produiront pas dans une installation particulière. Si cet
équipement cause une interférence nuisible à la réception radio ou télévision, ce qui peut
être déterminé en éteignant et en rallumant l'équipement,l'utilisateur est encouragé à essayer
de corriger l'interférence par une ou plusieurs des mesures suivantes:
-Réorienter ou déplacer l'antenne de réception.
-Augmenter la distance de séparation entre l'équipement et le récepteur.
-Connecter l'équipement à une prise sur un circuit différent de celui auquel le récepteur est
connecté.
-Consultez votre revendeur ou un technicien expérimenté de radio / TV.
Pour faire une demande de garantie, ne retournez pas ce produit au magasin. Veuillez
envoyer un courriel électronique à [email protected] ou appeler le 1-800-968-9853.
90 jours de garantie
Ce produit est garanti contre tout défaut de matériel et de fabrication pendant une période de
quatre-vingt-dix (90) jours à compter de la date d'achat d'origine. Pendant cette période,
votre seul recours est la réparation ou le remplacement de ce produit ou composant jugé
défectueux, à notre choix; Cependant, vous êtes responsable de tous les coûts associés au
retour du produit. Si le produit ou le composant n'est plus disponible, nous le remplacerons
par un produit similaire de valeur égale ou supérieure. Avant l'envoi d'un produit de
remplacement, le produit doit être rendu inutilisable ou nous être renvoyé.
Cette garantie ne couvre pas le verre, les filtres, l’usure normale, une utilisation non
conforme aux instructions imprimées, ni les dommages matériels résultant d’un accident,
d’une altération, d’une utilisation abusive ou abusive. Cette garantie s’applique uniquement
à l’acheteur initial ou au destinataire du cadeau. Conservez le reçu de vente original, car une
preuve d'achat est nécessaire pour faire une réclamation de garantie. Cette garantie est
annulée si le produit est utilisé pour un usage autre que domestique ou s'il est soumis à une
tension ou une forme d'onde autre que celle indiquée sur l'étiquette (par exemple,
120V ~ 60Hz).
Nous excluons toute réclamation pour des dommages spéciaux, accessoires et consécutifs
causés par une violation de la garantie explicite ou implicite. Toute responsabilité est limitée
au montant du prix d'achat. Toute garantie implicite, y compris toute garantie légale ou
condition de qualité marchande ou d'adéquation à un usage particulier, est refusée sauf
dans la mesure où la loi l'interdit, auquel cas cette garantie ou condition est limitée à la durée
de cette garantie écrite. Cette garantie vous confère des droits légaux spécifique. Vous
pouvez avoir d'autres droits légaux qui varient selon votre lieu de résidence. Certains états
ou provinces n'autorisant pas les limitations de garanties implicites ou de dommages
spéciaux, accessoires ou indirects, les limitations ci-dessus peuvent ne pas vous concerner.
Pour un service plus rapide, trouver le modèle, le type et les numéros de série sur votre
appareil.
For service assistance and product information, please call: 1-800-968-9853.
Curtis International Ltd.
7045 BECKETT DRIVE, UNIT 15, MISSISSAUGA, ON, L5S 2A3
www.curtisint.com
To make a warranty claim, do not return this product to the store. Please email
[email protected] or call 1-800-968-9853
90 day Warranty
This product is warranted to be free from defects in material and workmanship for a
period of ninety (90) days from the date of original purchase. During this period, your
exclusive remedy is repair or replacement of this product or component found to be
defective, at our option; however, you are responsible for all costs associated with
returning the product to us. If the product or component is no longer available, we will
replace with a similar one of equal or greater value. Prior to a replacement being sent,
the product must be rendered inoperable or returned to us.
This warranty does not cover glass, filters, wear from normal use, use not in conformity
with the printed directions., or damage to the product resulting from accident, alteration,
abuse, or misuse. This warranty extends only to the original consumer purchaser or gift
recipient. Keep the original sales receipt, as proof of purchase is required to make a
warranty claim. This warranty is void if the product is used for other than single-family
household use or subjected to any voltage and waveform other than as on the specified
rating on the label (e.g., 120V~60Hz).
We exclude all claims for special, incidental, and consequential damages caused by
breach of express or implied warranty. All liability is limited to the amount of the purchase
price. Every implied warranty, including any statutory warranty or condition of
merchantability or fitness for a particular purpose, is disclaimed except to the extent
prohibited by law, in which case such warranty or condition is limited to the duration of this
written warranty. This warranty gives you specific legal rights. You may have other legal
rights that vary depending on where you live. Some states or provinces do not allow
limitations on implied warranties or special, incidental, or consequential damages, so the
foregoing limitations may not apply to you.
For faster service, locate the model, type, and serial numbers on your appliance.
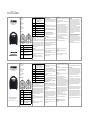
Product Diagram
Portable Bluetooth Speaker
USB Charging Cable
AUX Cable
Instruction Manual
12 3 4 5
6
7
89
10
12
11
13
Pairing and Bluetooth Connection
Turn on the speaker you will hear a tone and it will turn on in the bluetooth pairing mode, the
led indicator light will quickly flash.
Place the speaker and Bluetooth device(phone or music device) so that they are no further
than 30 feet apart; Activate the bluetooth function on your bluetooth device (phone or music
device). Please refer to the manufacturer’s instructions for instructions on enabling bluetooth
on your device.Once you have activated bluetooth on your device, select the pairing name
“ Sylvania SP1051” from the list of available bluetooth devices.Once paired successfully, you
will hear a tone indicating pairing has been succeessful.the LED indicator light will stay on blue.
You can now start to use the portable speaker.
6 Indicator Led light
Bluetooth mode: Ready to connect - blue indicator light flash quickly
Connected: Indicator light steady on blue
FM mode / USB / TF Card mode : Indicator steady on blue
Microphone recording mode: Blue indicator light flash slowly
W hen on recording: Blue indicator light flash quickly
7 Mic Jack Connect the Microphone(not include) and sing
8 Aux in jack Aux in Play music
9 TF Card slot TF Card play music, TF card record microphone voice
10 U disk port U disk play music, U disk record microphone voice
11 USB charging port Used to charge the battery
12 Charing Indicator On charging : indicator red light on
Fully charged: indicator light off
13 Power On/ off Slide the button to turn On / Off the speaker
Charging the speaker
Connect the charging cable to Micro USB jack and insert the other end to the USB port of 5V
charger. A red indicator light will illuminate when charging and will turn off after fully charged.
FM Radio
Turn on the unit and press the Mode button to select the FM radio mode. Must be inserted the
charging cable as an antenna.
A short press the Play/Pause button , FM radio will automatic searching and save
A short press the Volume up & Volume down button to select the desired radio station.
TF Card playback & U disk play music
Turn on the speaker , insert the TF card or U disk to the TF/USB port, it will switch to TF / USB
mode and start playing the music, the bluetooth mode will be disconnected. Long press the
volume to adjust the volume level, short press the volume to adjust the previous track and
next track.
Using AUX-in
Turn on the unit , connect one end of the 3.5mm Aux cable into Aux in jack, the other end of
the cable to connect MP3 / Smartphone to play music. Long press the volume to adjust the
volume level , short press the volume to adjust the previous track and next track.
Note: It can press Mode button to change to other mode after inserting TF card / USB /
AUX cable
Using Microphone(not include) for Karaoke function
Turn on the unit , insert the Microphone(not include) into the Mic jack, you can speak / sing
directly , Connect the bluetooth on your device for Karaoke function.
TF Card Or USB Recording
Turn on the speaker , insert microphone(not include) , insert an empty TF card / U disk to the
TF / USB port.
Short press Mode button swtich to the recording mode you will hear a special tone and the led
indicator light flash slowly, press and hold the play/pause button for 2 seconds you will have a
hear a tone and it’s now start recording , press and hold the play/pause button for 2 seconds
again you will hear twice beep that means it’s stopped recording.
Press Mode button switch to TF card / USB mode to play the recorded voice, press the volume
button to adjust the previous track and next track.
FCC STATEMENT :
This device complies with Part 15 of the FCC Rules. Operation is subject to the following two
conditions:
(1) This device may not cause harmful interference
(2) This device must accept any interference received, including interference that may cause
undesired operation.
Warning: Changes or modifications not expressly approved by the party responsible for
compliance could void the user's authority to operate the equipment.
used in accordance with the instructions, may cause harmful interference to radio
communications. However, there is no guarantee that interference will not occur in a
particular installation. If this equipment does cause harmful interference to radio or television
reception, which can be determined by turning the equipment off and on, the user is
encouraged to try to correct the interference by one or more of the following measures:
Reorient or relocate the receiving antenna.
Increase the separation between the equipment and receiver.
- Connect the equipment into an outlet on a circuit different from that to which the receiver is
connected.
Consult the dealer or an experienced radio/TV technician for help.
NOTE: This equipment has been tested and found to comply with the limits for a Class B
digital device, pursuant to Part 15 of the FCC Rules. These limits are designed to provide
reasonable protection against harmful interference in a residential installation. This
equipment generates uses and can radiate radio frequency energy and, if not installed and
1 Mic Volume adj ust Adj ust the Microphone (not include) volume up and down
2 Mode Switch button Switch sequence: Bluetooth / FM radio / Aux / Recording / USB / TF Card
3Previous track /
Volume down
Short press this button to switch to the previous song
Long press this button to reduce the volume
4Next track / Volume
Up
Short press this button to switch to the next track
Long press this button to increase the volume
5Play / Pause
Start / End Recording
Bluetooth mode: A short press the button to play / pause the music
Microphone recording mode: Press and hold for 2 seconds to start
recording ,press and hold for 2 seconds again to stop recording
Note:
1. It can’t switch to the microphone recording mode without inserting this microphone to this
unit.
2. It can’t start recording during inserted TF card and USB to this unit in the same time. Just
need insert TF card or U disk to this unit for recording.
3. Switch to USB or TF card mode to play what you did recording on the TF card or USB.
4. It can’t record Bluetooth mode, FM mode and AUX in mode. It just can record the
microphone sound to the TF card or U disk.
· Version Bluetooth: 5.0
· Puissance de sortie: 5W x 2
Spécifications techniques
· Capacité de la batterie:1800mAh
· Distance de transmission: 10m
· S/N: 85dB
Dans la boite
Diagramme de produit
Haut-parleur Bluetooth portable
Câble de chargement USB
Câble AUX
Manuel d'instructions
12 3 4 5
6
7
89
10
12
11
13
Couplage et connexion Bluetooth
Allumez le haut-parleur, vous entendrez une tonalité et il s'allumera en mode de couplage
Bluetooth, le voyant lumineux LED clignotera rapidement.
Placez l'enceinte et l'appareil Bluetooth (téléphone ou appareil musical) de manière à ce qu'ils
ne soient plus distants de plus de 30 pieds; Activez la fonction bluetooth sur votre bluetooth
appareil (téléphone ou appareil de musique). Veuillez consulter les instructions du fabricant
pour obtenir des instructions sur l'activation de Bluetooth sur votre appareil.Une fois que vous
avez activé le Bluetooth sur votre appareil, sélectionnez le nom de l'appairage “ Sylvania
SP1051” dans la liste des appareils Bluetooth disponibles.Une fois jumelé avec succès, vous
entendrez une tonalité indiquant que l'appairage a réussi.le voyant LED restera allumé en bleu.
Vous pouvez maintenant commencer à utiliser l'enceinte portable.
Charger l'enceinte
Connectez le câble de charge à la prise Micro USB et insérez l'autre extrémité dans le port
USB de 5V chargeur. Un voyant rouge s'allumera lors de la charge et s'éteindra après une
charge complète.
Radio FM
Allumez l'appareil et appuyez sur le bouton Mode pour sélectionner le mode radio FM.
Doit être inséré le câble de charge comme une antenne.
Lecture de la carte TF & U disque jouer de la musique
Allumez le haut-parleur , insérez la carte TF ou le disque U dans le port TF / USB, il passera à
TF / USB mode et commencez à jouer la musique, le mode bluetooth sera déconnecté.
Appuyez longuement sur le volume pour régler le niveau du volume, appuyez brièvement sur
le volume pour régler la piste précédente et piste suivante.
Utilisation de AUX-in
Allumez le haut-parleur, connectez une extrémité du câble Aux 3,5 mm dans la prise d'entrée
Aux, l'autre extrémité du câble pour connecter MP3 / Smartphone pour lire de la musique.
Appuyez longuement sur le volume pour régler le niveau de volume, appuyez brièvement sur
le volume pour régler la piste précédente et la piste suivante.
Noter: Il peut appuyer sur le bouton Mode pour passer à un autre mode après avoir
inséré la carte TF / USB / Câble AUX
Utilisation du microphone (non inclus) pour la fonction karaoké
Allumez le haut-parleur, insérez le microphone (non inclus) dans la prise micro, tu peux parler
/ chanter directement, Connectez le bluetooth sur votre appareil pour la fonction karaoké.
Carte TF ou enregistrement USB
Allumez le haut-parleur, insérer un microphone (non inclus) , insérez une carte TF / disque U
vide dans le Port TF / USB.
Appuyez brièvement sur le bouton Mode pour passer en mode d'enregistrement, vous
entendrez une tonalité spéciale et la led le voyant lumineux clignote lentement, appuyez sur
le bouton lecture / pause et maintenez-le enfoncé pendant 2 secondes, vous entendrez une
tonalité et il commence maintenant à enregistrer, appuyez et maintenez le bouton lecture /
pause à nouveau pendant 2 secondes vous entendrez deux bips indiquant que
l’enregistrement a été arrêté.
Appuyez sur le bouton Mode pour passer en mode carte TF / USB pour lire la voix enregistrée,
appuyez sur le bouton de volume pour régler la piste précédente et la piste suivante.
Noter:
1. Il ne peut pas passer en mode d'enregistrement du microphone sans insérer ce
microphone dans ce unité.
1Réglage du volume
du micro Ajustez le volume du microphone (non inclus) de haut en bas
2Bouton de
changement de mode
Séquence de commutation:Bluetooth / Radio FM / Aux / Enregistrement /
Carte USB / TF
3Piste précédente /
Baisser le volume
Appuyez brièvement sur ce bouton pour passer à la chanson précédente
Appuyez longuement sur ce bouton pour réduire le volume
4Piste suivante /
Monter le son
Appuyez brièvement sur ce bouton pour passer à la piste suivante
Appuyez longuement sur ce bouton pour augmenter le volume
5
Jouer / Pause
Démarrer / Terminer
l'enregistrement
Mode Bluetooth: Appuyez brièvement sur le bouton pour lire / mettre en
pause la musique
Mode d'enregistrement du microphone:Appuyez et maintenez pendant 2
secondes pour démarrer l'enregistrement, appuyez et maintenez à nouveau
pendant 2 secondes pour arrêter l'enregistrement
6 Voyant LED
Mode Bluetooth: Prêt à se connecter-le voyant bleu clignote rapidement
relier: Le voyant lumineux reste allumé en bleu
Mode FM / mode carte USB / TF : Indicateur fixe sur bleu
Mode d'enregistrement du microphone:Le voyant bleu clignote lentement
Lors de l'enregistrement: Le voyant bleu clignote rapidement
7 Prise micro Connectez le microphone (non inclus) et chantez
8Prise d'entrée
auxiliaire
Aux dans Play Music
9 Fente pour carte TF Carte TF jouer de la musique,Voix de microphone d'enregistrement de carte
TF
10 Port de disque U U disque jouer de la musique, U disque enregistrement microphone voix
11 Port de chargement
USB
Utilisé pour charger la batterie
12 Indicateur de charge En charge :voyant rouge allumé
Complètement chargé:voyant lumineux éteint
13 Marche / arrêt Faites glisser le bouton pour allumer / éteindre le haut-parleur
Appuyez brièvement sur le bouton d'augmentation du volume et de réduction du volume pour
sélectionner la station de radio souhaitée.
2. Il ne peut pas démarrer l'enregistrement pendant l'insertion de la carte TF et de l'USB dans
cet appareil en même temps. Il suffit d'insérer une carte TF ou un disque U dans cet appareil
pour l'enregistrement.
3. Passez en mode carte USB ou TF pour lire ce que vous avez enregistré sur la carte TF ou
USB.
4. Il ne peut pas enregistrer le mode Bluetooth, le mode FM et AUX en mode. Il peut
simplement enregistrer le son du microphone sur la carte TF ou le disque U.
Appuyez brièvement sur le bouton Lecture / Pause , La radio FM recherche et enregistre
automatiquement
Pour obtenir assistance et information appelez: 1-800-968-9853.
Curtis International Ltd.
7045 BECKETT DRIVE, UNIT 15, MISSISSAUGA, ON, L5S 2A3
www.curtisint.com
-
 1
1

Sylvania SP1051-BLACK Mode d'emploi
- Catégorie
- Hauts-parleurs portatifs
- Taper
- Mode d'emploi
dans d''autres langues
- English: Sylvania SP1051-BLACK User guide
Documents connexes
-
Sylvania SP611-B-BLACK Manuel utilisateur
-
Sylvania SP749-BLUE Manuel utilisateur
-
Sylvania SP461 Manuel utilisateur
-
Sylvania SP991 Manuel utilisateur
-
Sylvania SP328-Black Manuel utilisateur
-
Sylvania SP999-BLACK Manuel utilisateur
-
-
-
Autres documents
-
QFX LMS-28 Manuel utilisateur
-
Curtis CSP961 Manuel utilisateur
-
iON Retro Rocker Mode d'emploi
-
 iSymphony V1BLUE Manuel utilisateur
-
Samsung MX-JS8000 Manuel utilisateur
-
QFX SBX-412401BTS Bluetooth Cabinet Portable Speaker Manuel utilisateur
-
Samsung MX-FS8000 Manuel utilisateur
-
ProScan PSP1721 Manuel utilisateur
