Dash Quest Blender Manuel utilisateur
- Catégorie
- Mélangeurs
- Taper
- Manuel utilisateur

DQB100
#DQB150
Quest blender
Instruction Manual | Recipe Guide
Setting Up Your Compact Centrifugal Juicer
r
e
c
i
p
e
s
i
n
s
i
d
e
!

Quest blender
Important Safeguard............................................................................4-7
Parts & Features..........................................................................................8
Control Dial Settings................................................................................10
Before First Use.........................................................................................11
Using Your Quest Blender.................................................................12-17
Removing the Blade............................................................................18-19
Cleaning & Maintenance.........................................................................21
Recipes.................................................................................................23-37
Customer Support..................................................................................38
Warranty....................................................................................................39
t
h
e
d
a
s
h
t
e
a
m
!

∙ 4 ∙ ∙ 5 ∙
important safeguards important safeguards
IMPORTANT SAFEGUARDS: PLEASE READ AND
SAVE THIS INSTRUCTION AND CARE MANUAL.
IMPORTANT SAFEGUARDS: PLEASE READ AND
SAVE THIS INSTRUCTION AND CARE MANUAL.
When using electrical appliances, basic safety precautions should be followed, including:
• • Read all instructions carefully.Read all instructions carefully.
• • Remove all packaging and labels from appliance Remove all packaging and labels from appliance
prior to use.prior to use.
• • To protect against risk of electrical shock, do not To protect against risk of electrical shock, do not
put cord, plugs, or appliance in or near water or put cord, plugs, or appliance in or near water or
other liquids. other liquids.
• • For any maintenance other than cleaning, please For any maintenance other than cleaning, please
contact StoreBound directly at 1-800-898-6970 contact StoreBound directly at 1-800-898-6970
from 9AM – 9PM EST Monday – Friday, or by email from 9AM – 9PM EST Monday – Friday, or by email
• • Keep appliance away from children when in use. Keep appliance away from children when in use.
• • Unplug the appliance from the outlet when not Unplug the appliance from the outlet when not
in use, during assembly, during disassembly, and in use, during assembly, during disassembly, and
before cleaning.before cleaning.
• • Avoid contact with moving parts. Avoid contact with moving parts.
• • Do not operate this appliance with a damaged Do not operate this appliance with a damaged
cord, damaged plug, after the appliance cord, damaged plug, after the appliance
malfunctions, is dropped, or damaged in malfunctions, is dropped, or damaged in
any manner.any manner.
• • Only use attachments that are recommended or Only use attachments that are recommended or
sold by the appliance manufacturer. sold by the appliance manufacturer.
• • Do not use the appliance outdoors.Do not use the appliance outdoors.
• • Do not leave your Dash Quest Blender Do not leave your Dash Quest Blender
unattended while it is operating. unattended while it is operating.
• • Do not let the cord hang over the edge of tables, Do not let the cord hang over the edge of tables,
counters, or touch hot surfaces. counters, or touch hot surfaces.
• • Always make sure that the Always make sure that the PitcherPitcher is locked is locked
securely in place before engaging the motor. securely in place before engaging the motor.
Do not remove the Pitcher before the blender is Do not remove the Pitcher before the blender is
nished operating. nished operating.
• • Make sure that the Dial is in the “0”position Make sure that the Dial is in the “0”position
after each use. Make sure that the motor stops after each use. Make sure that the motor stops
completely before disassembling.completely before disassembling.
• • Do not place your ngers or other foreigDo not place your ngers or other foreign objects n objects
into the appliance while it is operating. If food into the appliance while it is operating. If food
becomes lodged in the blades, turn off and becomes lodged in the blades, turn off and
unplug the appliance before trying to remove unplug the appliance before trying to remove
the ingredients.the ingredients.
• • Do not use the appliance if any of the parts Do not use the appliance if any of the parts
are damaged.are damaged.
• • Do not use without the Lid in place.Do not use without the Lid in place.
• • Keep hands and utensils away from moving Keep hands and utensils away from moving
blades while appliance is engaged to reduce the blades while appliance is engaged to reduce the
risk of severe injury or damage to the Blender.risk of severe injury or damage to the Blender.
• • The blades in the Blender are sharp. Handle The blades in the Blender are sharp. Handle
carefully. Do not touch the blades in the base of carefully. Do not touch the blades in the base of
the Pitcher with bare hands.the Pitcher with bare hands.
• • Do not place the appliance on or near a hot gas Do not place the appliance on or near a hot gas
plate, hot electric burner, or in a heated oven.plate, hot electric burner, or in a heated oven.
• • When cleaning, do not submerge the Motor Base When cleaning, do not submerge the Motor Base
(with electrical parts) in any liquid; instead use a (with electrical parts) in any liquid; instead use a
soft, wet cloth to wipe down. soft, wet cloth to wipe down.
The The Dash Quest BlenderDash Quest Blender Motor Base is NOT Motor Base is NOT
dishwasher safe.dishwasher safe.
• • Do not operate the blender when the Do not operate the blender when the
Pitcher is empty. Pitcher is empty.
• • When blending tough or dry foods for a When blending tough or dry foods for a
prolonged period of time, the temperature prolonged period of time, the temperature
monitoring system may shut down the motor monitoring system may shut down the motor
to prevent overheating. This may occur when to prevent overheating. This may occur when
the Blender is overloaded. Unplug the Blender the Blender is overloaded. Unplug the Blender
and place the Motor Base in a well-ventilated and place the Motor Base in a well-ventilated
area, allowing it to cool down for 45minutes. area, allowing it to cool down for 45minutes.
Try removing some of the ingredients before Try removing some of the ingredients before
continuing to blend. continuing to blend.
• • Make sure the Lid is closed tightly during Make sure the Lid is closed tightly during
blending to prevent liquid from splashing out. blending to prevent liquid from splashing out.
• • Keep hands and utensils out of the Pitcher while Keep hands and utensils out of the Pitcher while
the motor is running to prevent injuries the motor is running to prevent injuries
or damages.or damages.
• • When making sauces, stufng, etc., add 2–3cups When making sauces, stufng, etc., add 2–3cups
of ingredients at a time. Keep the blending of ingredients at a time. Keep the blending
time below 2minutes to prevent the motor time below 2minutes to prevent the motor
from overloading or overheating. If the motor from overloading or overheating. If the motor
stops abruptly, allow the motor temperature to stops abruptly, allow the motor temperature to
decrease before continuing toblend.decrease before continuing toblend.
• • Always place soft or liquid ingredients in the Always place soft or liquid ingredients in the
blender before adding hard ingredients blender before adding hard ingredients
or ice cubes.or ice cubes.
• • Wait until the blades come to a complete Wait until the blades come to a complete
stop before removing the Pitcher. If not done stop before removing the Pitcher. If not done
accordingly, the drive gear may accordingly, the drive gear may
become damaged.become damaged.
• • If a burning odor comes from the Blender, If a burning odor comes from the Blender,
shut the appliance off immediately. This may be shut the appliance off immediately. This may be
caused by abrasion of the rubber feet on the caused by abrasion of the rubber feet on the
Motor Base. Make sure that the rubber feet are Motor Base. Make sure that the rubber feet are
stable and that the appliance is stable and that the appliance is
properly assembled.properly assembled.
• • If the blades become jammed during the If the blades become jammed during the
blending process, use the Tamper to stir the food blending process, use the Tamper to stir the food
in the Pitcher, allowing air to escape. Close the in the Pitcher, allowing air to escape. Close the
Lid tightly and continue to blend. Lid tightly and continue to blend.
• • When blending tough or sticky foods, begin When blending tough or sticky foods, begin
blending at a low speed. If the blender does blending at a low speed. If the blender does
not mix the ingredients to your preference, not mix the ingredients to your preference,
disconnect the appliance and use a spoon disconnect the appliance and use a spoon
or spatula to incorporate the ingredients and or spatula to incorporate the ingredients and
release any captured air in the Pitcher. Close the release any captured air in the Pitcher. Close the
Lid and continue blending.Lid and continue blending.
• • This appliance can be used by persons with This appliance can be used by persons with
reduced physical, sensory or mental capabilities reduced physical, sensory or mental capabilities
or lack of experience of knowledge, if they or lack of experience of knowledge, if they
have been given supervision or instruction have been given supervision or instruction
concerning use of the appliance in a safe way concerning use of the appliance in a safe way
and understand the hazards involved.and understand the hazards involved.
• • This appliance is not a toy. Do not let children This appliance is not a toy. Do not let children
use this appliance. Close supervision is use this appliance. Close supervision is
necessary when any kitchen appliance is used necessary when any kitchen appliance is used
by or near children.by or near children.
• • StoreBound shall not accept liability for damages StoreBound shall not accept liability for damages
caused by improper use of the appliance. caused by improper use of the appliance.
• • This appliance has a polarized plug (one blade This appliance has a polarized plug (one blade
is wider than the other). To reduce the risk of is wider than the other). To reduce the risk of
electric shock, this plug will t in a polarized electric shock, this plug will t in a polarized
outlet only one way. If the plug does not outlet only one way. If the plug does not
completely t in the outlet, reverse the plug. If it completely t in the outlet, reverse the plug. If it
still does not t, contact a qualied electrician. still does not t, contact a qualied electrician.
Do not attempt to modify the plug in any way.Do not attempt to modify the plug in any way.
• • For household use only.For household use only.

∙ 6 ∙ ∙ 7 ∙
GARANTIES IMPORTANTES GARANTIES IMPORTANTES
GARANTIES IMPORTANTES:
VEUILLEZ
LIRE
ATTEN-
TIVEMENT
CE
MANUEL
AVANT
D’UTILISER
L’APPAREIL.
GARANTIES IMPORTANTES:
VEUILLEZ
LIRE
ATTEN-
TIVEMENT
CE
MANUEL
AVANT
D’UTILISER
L’APPAREIL.
Lors de l’utilisation d’appareils électriques, des précautions élémentaires de sécurité doivent être
respectées, notamment:
• • Lisez attentivement toutes les instructions.Lisez attentivement toutes les instructions.
• • Retirez tous les emballages et étiquettes de Retirez tous les emballages et étiquettes de
l'appareil avant de l'utiliser.l'appareil avant de l'utiliser.
• • Pour vous protéger contre les risques de Pour vous protéger contre les risques de
choc électrique, ne placez le cordon, les choc électrique, ne placez le cordon, les
ches ou l'appareil dans ou près de l'eau ches ou l'appareil dans ou près de l'eau
ou d'autres liquides.ou d'autres liquides.
• • Pour toute maintenance autre que le nettoyage, Pour toute maintenance autre que le nettoyage,
veuillez contacter StoreBound directement au veuillez contacter StoreBound directement au
1-800-898-6970 de 7h00 à 19h00 HNP du lundi 1-800-898-6970 de 7h00 à 19h00 HNP du lundi
au vendredi, ou par e-mail à au vendredi, ou par e-mail à
• • Gardez l'appareil hors de portée des enfants lors Gardez l'appareil hors de portée des enfants lors
de son utilisation.de son utilisation.
• • Débranchez l'appareil de la prise de courant Débranchez l'appareil de la prise de courant
lorsqu'il n'est pas utilisé, pendant le montage, le lorsqu'il n'est pas utilisé, pendant le montage, le
démontage et avant le nettoyage.démontage et avant le nettoyage.
• • Evitez tout contact avec les pièces mobiles.Evitez tout contact avec les pièces mobiles.
• • N'utilisez pas cet appareil avec un cordon N'utilisez pas cet appareil avec un cordon
endommagé, une prise endommagée, après un endommagé, une prise endommagée, après un
dysfonctionnement de l'appareil, une chute ou dysfonctionnement de l'appareil, une chute ou
un de toute manière.un de toute manière.
• • Utilisez uniquement des accessoires Utilisez uniquement des accessoires
recommandés ou vendus par le fabricant recommandés ou vendus par le fabricant
de l'appareil.de l'appareil.
• • N'utilisez pas l'appareil à l'extérieur.N'utilisez pas l'appareil à l'extérieur.
• • Ne laissez pas votre Dash Quest Blender sans Ne laissez pas votre Dash Quest Blender sans
surveillance pendant son fonctionnement.surveillance pendant son fonctionnement.
• • Ne laissez pas le cordon pendre sur le bord des Ne laissez pas le cordon pendre sur le bord des
tables, des comptoirs ou toucher tables, des comptoirs ou toucher
des surfaces chaudes.des surfaces chaudes.
• • Assurez-vous toujours que le pichet est bien Assurez-vous toujours que le pichet est bien
verrouillé en place avant d'engager le moteur. verrouillé en place avant d'engager le moteur.
Ne retirez pas le pichet avant que le mélangeur Ne retirez pas le pichet avant que le mélangeur
ait ni de fonctionner.ait ni de fonctionner.
• • Assurez-vous que le cadran est en position «0» Assurez-vous que le cadran est en position «0»
après chaque utilisation. Assurez-vous que le après chaque utilisation. Assurez-vous que le
moteur s'arrête complètement avant moteur s'arrête complètement avant
de le démonter.de le démonter.
• • Ne placez pas vos doigts ou d'autres objets Ne placez pas vos doigts ou d'autres objets
étrangers dans l'appareil pendant son étrangers dans l'appareil pendant son
fonctionnement. Si des aliments se logent dans fonctionnement. Si des aliments se logent dans
les lames, éteignez et débranchez l'appareil avant les lames, éteignez et débranchez l'appareil avant
d'essayer de retirer les ingrédients.d'essayer de retirer les ingrédients.
• • N'utilisez pas l'appareil si l'une des pièces N'utilisez pas l'appareil si l'une des pièces
est endommagée.est endommagée.
• • Ne pas utiliser sans le couvercle en place.Ne pas utiliser sans le couvercle en place.
• • Gardez les mains et les ustensiles éloignés des Gardez les mains et les ustensiles éloignés des
lames en mouvement lorsque l'appareil est lames en mouvement lorsque l'appareil est
engagé pour réduire le risque de blessures engagé pour réduire le risque de blessures
graves ou de dommages au mélangeur.graves ou de dommages au mélangeur.
• • Les lames du mélangeur sont tranchantes. Les lames du mélangeur sont tranchantes.
Manipulez avec soin. Ne touchez pas les lames à Manipulez avec soin. Ne touchez pas les lames à
la base du pichet à mains nues.la base du pichet à mains nues.
• • Ne placez pas l'appareil sur ou près d'une plaque Ne placez pas l'appareil sur ou près d'une plaque
à gaz chaude, d'un brûleur électrique chaud ou à gaz chaude, d'un brûleur électrique chaud ou
dans un four chauffé.dans un four chauffé.
• • Lors du nettoyage, ne plongez pas la base du Lors du nettoyage, ne plongez pas la base du
moteur (avec des pièces électriques) dans un moteur (avec des pièces électriques) dans un
liquide; utilisez plutôt un chiffon doux et humide liquide; utilisez plutôt un chiffon doux et humide
pour essuyer.pour essuyer.
• • La base du moteur du mélangeur Dash Quest La base du moteur du mélangeur Dash Quest
n'est PAS lavable au lave-vaisselle.n'est PAS lavable au lave-vaisselle.
• • N'utilisez pas le mélangeur lorsque le pichet N'utilisez pas le mélangeur lorsque le pichet
est vide.est vide.
• • Lors du mélange d'aliments durs ou secs Lors du mélange d'aliments durs ou secs
pendant une période prolongée, le système de pendant une période prolongée, le système de
surveillance de la température peut arrêter le surveillance de la température peut arrêter le
moteur pour éviter une surchauffe. Cela peut se moteur pour éviter une surchauffe. Cela peut se
produire lorsque le mélangeur est surchargé. produire lorsque le mélangeur est surchargé.
Débranchez le mélangeur et placez la base Débranchez le mélangeur et placez la base
du moteur dans un endroit bien ventilé, lui du moteur dans un endroit bien ventilé, lui
permettant de refroidir pendant 45 minutes. permettant de refroidir pendant 45 minutes.
Essayez de retirer certains des ingrédients avant Essayez de retirer certains des ingrédients avant
de continuer à mélanger.de continuer à mélanger.
• • Assurez-vous que le couvercle est bien fermé Assurez-vous que le couvercle est bien fermé
pendant le mélange pour empêcher les pendant le mélange pour empêcher les
éclaboussures de liquide.éclaboussures de liquide.
• • Gardez les mains et les ustensiles hors du pichet Gardez les mains et les ustensiles hors du pichet
pendant que le moteur tourne pour éviter les pendant que le moteur tourne pour éviter les
blessures ou les dommages.blessures ou les dommages.
• • Lorsque vous préparez des sauces, des farces, Lorsque vous préparez des sauces, des farces,
etc., ajoutez 2 à 3 tasses d'ingrédients à la etc., ajoutez 2 à 3 tasses d'ingrédients à la
fois. Gardez le temps de mélange en dessous fois. Gardez le temps de mélange en dessous
de 2 minutes pour empêcher le moteur de de 2 minutes pour empêcher le moteur de
surcharger ou de surchauffer. Si le moteur s'arrête surcharger ou de surchauffer. Si le moteur s'arrête
brusquement, laissez la température du moteur brusquement, laissez la température du moteur
diminuer avant de continuer à mélanger.diminuer avant de continuer à mélanger.
• • Placez toujours les ingrédients mous ou Placez toujours les ingrédients mous ou
liquides dans le mélangeur avant d'ajouter des liquides dans le mélangeur avant d'ajouter des
ingrédients durs ou des glaçons.ingrédients durs ou des glaçons.
• • Attendez que les lames s'arrêtent complètement Attendez que les lames s'arrêtent complètement
avant de retirer le pichet. Si ce n'est pas fait en avant de retirer le pichet. Si ce n'est pas fait en
conséquence, le pignon d'entraînement peut conséquence, le pignon d'entraînement peut
être endommagé.être endommagé.
• • Si une odeur de brûlé provient du mélangeur, Si une odeur de brûlé provient du mélangeur,
éteignez immédiatement l'appareil. Cela peut éteignez immédiatement l'appareil. Cela peut
être dû à l'abrasion des pieds en caoutchouc sur être dû à l'abrasion des pieds en caoutchouc sur
la base du moteur. Assurez-vous que les pieds la base du moteur. Assurez-vous que les pieds
en caoutchouc sont stables et que l'appareil est en caoutchouc sont stables et que l'appareil est
correctement assemblé.correctement assemblé.
• • Si les lames se coincent pendant le processus Si les lames se coincent pendant le processus
de mélange, utilisez le Tamper pour remuer de mélange, utilisez le Tamper pour remuer
les aliments dans le pichet, permettant à l'air les aliments dans le pichet, permettant à l'air
de s'échapper. Fermez bien le couvercle et de s'échapper. Fermez bien le couvercle et
continuez à mélanger.continuez à mélanger.
• • Lorsque vous mélangez des aliments durs ou Lorsque vous mélangez des aliments durs ou
collants, commencez à mélanger à basse vitesse. collants, commencez à mélanger à basse vitesse.
Si le mélangeur ne mélange pas les ingrédients Si le mélangeur ne mélange pas les ingrédients
selon vos préférences, débranchez l'appareil selon vos préférences, débranchez l'appareil
et utilisez une cuillère ou une spatule pour et utilisez une cuillère ou une spatule pour
incorporer les ingrédients et libérer tout l'air incorporer les ingrédients et libérer tout l'air
capturé dans le pichet. Fermez le couvercle et capturé dans le pichet. Fermez le couvercle et
continuez à mélanger.continuez à mélanger.
• • Cet appareil peut Cet appareil peut être utilisé par des personnes
dont les capacités physiques, sensorielles
ou mentales sont réduites ou qui manquent
d'expérience et de connaissances, à
condition qu'elles aient reçu une supervision
ou des instructions concernant l'utilisation
de l'appareil en toute sécurité et qu'elles
comprennent les risques encourus.
• L'appareil n'est pas un jouet. Ne laissez pas
d'enfants utiliser cet appareil. Une étroite
surveillance est nécessaire lorsqu'un appareil
est utilisé par ou à proximité d'enfants.
• • StoreBound décline toute responsabilité pour les StoreBound décline toute responsabilité pour les
dommages causés par une mauvaise utilisation dommages causés par une mauvaise utilisation
de l'appareil.de l'appareil.
• • Cet appareil a une che polarisée (une lame est Cet appareil a une che polarisée (une lame est
plus large que l'autre). Pour réduire le risque de plus large que l'autre). Pour réduire le risque de
choc électrique, cette che ne peut être insérée choc électrique, cette che ne peut être insérée
dans une prise polarisée que dans un sens. Si dans une prise polarisée que dans un sens. Si
la che ne rentre pas complètement dans la la che ne rentre pas complètement dans la
prise, inversez-la. Si elle ne rentre toujours pas, prise, inversez-la. Si elle ne rentre toujours pas,
contactez un électricien qualié.contactez un électricien qualié.
• • N'essayez en aucun cas de modier la che.N'essayez en aucun cas de modier la che.
• • Pour usage domestique uniquement.Pour usage domestique uniquement.

∙ 8 ∙ ∙ 9 ∙
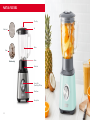
PARTS & FEATURES before first use
Filler Cap
Blade Assembly
Pitcher
Blade Lock
Blade
Blade Seal
Control Dial
(I-Low II-High P-Pulse)
Motor Base
Non-slip Feet
Lid
Blade

∙ 10 ∙ ∙ 11 ∙
control dial settings before first use
SETTING FUNCTION
P - Pulse setting The Blender will only blend on the Pulse
Setting while the Control Dial is held in the
“P” position. This setting is great for chopping
herbs and nuts as well as giving you more
precise control over the blending process.
0 - Off Off
I - Low Speed Use this setting when you want some
texture. Salsas, milkshakes, batters and
chopped veggies turn out great on this
setting.
II - High Speed This setting is perfect for a smooth
consistency or ne texture. Use this
setting for crushing spices, liquefying,
and blending soups.
• Read the entire instruction manual and save it for further use.
• Remove any stickers and packaging before use.
• Use a wet cloth to wipe down the Motor Base.
• Wash the Lid, Filler Cap, and Pitcher with soapy water and a sponge. Use a dish brush to clean the blades.
Do not use your hands.
• WARNING: DO NOT SUBMERGE THE MOTOR BASE IN WATER OR OTHER LIQUIDS.
MAKE SURE THE BLENDER IS UNPLUGGED.

∙ 12 ∙ ∙ 13 ∙
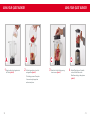
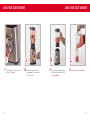
using your quest blender using your quest blender
Add solid ingredients, such as fruits
and vegetables (photo B).
The blending process will be quicker
if items are loosely chopped into
medium-sized pieces.
Begin by adding liquid ingredients to
the Pitcher (photo A).
AB
1 2 Rest the Motor Base on a at, stable
surface. Add the Pitcher to the
Motor Base and plug in the appliance
(photo D).
Attach the Lid to the Pitcher, pressing
down to secure (photo C).
C D
3 4

∙ 14 ∙
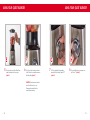
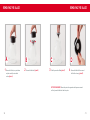
using your quest blender
You will notice the arrow on the base
of the Pitcher line up with the arrow on
the Motor Base (photo F).
WARNING: Keep hands and utensils
out of the Pitcher when in use.
Always make sure that the Lid is
secure before blending.
Once placed on top of the Motor Base,
rotate clockwise to lock into place
(photo E).
E F
5 6
∙ 15 ∙
using your Quest blender
To use the Blender on Low power, turn
the Dial to "I" (photo H).
To Pulse, rotate the dial repeatedly
towards the Pulse Setting, labeled "P"
(photo G).
G H
7 8

∙ 16 ∙
using your Quest blender
Blend until desired consistency is
reached (photo J). Then turn the dial
to "0" to turn it off.
To use the Blender on High power, turn
the Dial to "II" (photo I).
i J
910
∙ 17 ∙
using your quest blender
Remove the Lid and serve (photo L).
Once blending is completed, rotate
the Pitcher counter-clockwise and lift
to remove (photo K).
K L
11 12

∙ 18 ∙
removing the blade
Unscrew the Blade Lock (photo B).
Remove the Pitcher, turn upside down
and place carefully onto a stable
surface (photo A).
AB
1 2
∙ 19 ∙
removing the blade
Remove the Blade Seal from around
the Blade for cleaning (photo D).
Carefully remove the Blade (photo C).
CD
3 4
NOTE FOR REASSEMBLY: Reinsert the parts in the opposite order they were removed
and rmly screw the Blade Lock back into place.

∙ 20 ∙ ∙ 21 ∙
PARTS & FEATURES cleaning & maintenance
• Before cleaning or moving the appliance, make sure to unplug the Blender.
• Remove the Pitcher from the Motor Base.
• Empty any contents from the Pitcher.
• To remove the Blade, turn the Blade Lock clockwise until you can lift the Lock out of place.
Then carefully remove the Blades and Blade Seal (see pages 18-19).
• Hand wash only.
• If you prefer you can wash the Pitcher in the sink with hot, soapy water, using a brush to clean the Blade.
• Dry the base of the Pitcher thoroughly.
• Wipe down the Motor Base with a damp cloth.
• If you removed the Blade Assembly for cleaning, reinsert the parts in the opposite order they were
removed, and rmly screw the Blade Lock counterclockwise back into place.
• When you are storing the Pitcher for an extended period of time, store it upside down, without the Lid,
to allow any residual moisture to evaporate.
• IMPORTANT: DO NOT SUBMERGE THE MOTOR BASE IN WATER OR OTHER LIQUIDS.
b
u
e
r
n
u
t
q
u
a
s
h
s
o
u
p
o
n
p
a
g
e
3
6
!

RECIPE
GUIDE
Follow us!
@bydash | recipes, videos, & inspiration
@unprocessyourfood | veg & vegan-friendly meals

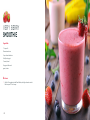
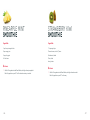
Directions:
1. Add all of the ingredients to the Quest Blender, adding the frozen berries last.
Blend on speed “II” until creamy.
Ingredients:
1 ½ cups milk
8 frozen strawberries
½ cups frozen blueberries
4 tbsp Greek yogurt
1 banana, halved
4 tsp ground ax seeds
agave, to taste
very berry
smoothie
∙ 24 ∙

Directions:
1. Add all of the ingredients to the Quest Blender, adding the frozen banana last.
Blend all ingredients on speed “II” until creamy.
strawberry kiwi
smoothie
Ingredients:
1 ½ cups apple juice
2 frozen bananas, cut into 2” pieces
8 strawberries, halved
2 kiwis, sliced
honey, to taste
∙ 27 ∙
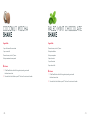
Directions:
1. Add all of the ingredients to the Quest Blender, adding the frozen pineapple last.
Blend all ingredients on speed “I” until the desired consistency is reached.
Ingredients:
1 cup frozen pineapple chunks
2 cups orange juice
½ cup plain yogurt
6-7 mint leaves
pineapple mint
smoothie
∙ 26 ∙

Directions:
1. Add all of the ingredients to the Quest Blender. Blend all ingredients on speed “II”
until consistency is smooth. Serve cold.
Ingredients:
1 cup frozen pineapple chunks
2 cups orange juice
½ cup plain yogurt
6-7 mint leaves
green goodness
smoothie
∙ 28 ∙

Directions:
1. Fill the Quest Blender with all of the ingredients, making sure to add
the frozen bananas last.
2. Cover with the Lid and blend on speed “II” for about 1 minute or until smooth.
Ingredients:
1 cup cold brew coffee concentrate
1 cup coconut milk
2 frozen bananas, cut into 2” pieces
4 tbsp unsweetened cocoa powder
Coconut mocha
shake
∙ 30 ∙
Directions:
1. Fill the Quest Blender with all of the ingredients, making sure to add
the frozen bananas last.
2. Cover with the Lid and blend on speed “II” for about 1 minute or until smooth.
Paleo Mint Chocolate
shake
Ingredients:
2 frozen bananas, cut into 2” pieces
2 tbsp almond butter
4 tbsp cocoa powder
½ tsp mint extract
1 tsp vanilla extract
2 cups almond milk
∙ 31 ∙

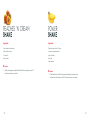
Directions:
1. Add all of the ingredients to the Quest Blender. Blend all ingredients on speed “I”
until desired consistency is reached.
Ingredients:
1 cup canned or fresh peaches
½ cup vanilla ice cream
1 ½ cups milk
honey, to taste
Peaches 'N Cream
shake
∙ 32 ∙
Directions:
1. Fill the Quest Blender with all of the ingredients, adding the frozen banana last.
Cover with the Lid and blend on speed “II” for about a minute or until smooth.
Power
shake
Ingredients:
2 frozen bananas, cut into 2” pieces
1 scoop vanilla protein powder
½ cup rolled oats
2 cups milk
¼ tsp cinnamon
∙ 33 ∙

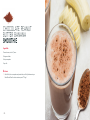
Directions:
1. Add milk rst, then cocoa powder and peanut butter, and nally the bananas to your
Quest Blender. Blend for about a minute on speed “II”. Enjoy!
Ingredients:
2 frozen bananas, cut into 2” pieces
2 tbsp peanut butter
4 tbsp cocoa powder
2 cups milk
Chocolate Peanut
Butter Banana
smoothie
∙ 34 ∙ ∙ 35 ∙

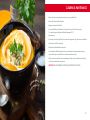
Directions:
1. Melt butter in a large saucepan over medium heat. Add the butternut squash, stirring to coat
the squash in butter. Cook for 3 minutes. Add the chicken stock, water, onion, and spices.
2. Bring to a boil and then reduce heat to low. Cover and simmer for about 20 minutes
or until the squash is tender.
3. Remove from heat and let cool. Once the mixture is near room temperature, transfer to the
Quest Blender and blend on speed “II” until smooth. Pour soup into bowl
and heat in microwave.
4. Garnish with creme fraiche, gorgonzola, and walnuts.
Ingredients:
1 small butternut squash, peeled,
seeded, and cut into ¾” cubes
1 cup chicken stock
1 cup water
½ small onion, diced
1 tbsp butter
Butternut Squash
Soup
∙ 36 ∙
Directions:
1. Fill the Quest Blender with all of the ingredients, adding the frozen mango last.
Blend all ingredients on speed “II” until the desired consistency is reached.
Serve in margarita glasses with salted rims.
mango
margarita
Ingredients:
1 ½ cups frozen mango chunks, thawed
½ cup tequila
¼ cup lime juice
2 ½ tbsp agave
1 ½ cup ice
∙ 37 ∙
½ tsp cinnamon
pinch of nutmeg
crumbled Gorgonzola cheese, to garnish
chopped walnuts, to garnish
creme fraiche or Greek yogurt, to garnish

∙ 38 ∙ ∙ 39 ∙
PARTS & FEATURES before first useCUSTOMER SUPPORT warranty
STOREBOUND, LLC — 1 YEAR LIMITED WARRANTY
Your StoreBound product is warranted to be free from defects in material and workmanship for a period of one
(1) year from the date of the original purchase when utilized for normal and intended household use. Should any
defect covered by the terms of the limited warranty be discovered within one (1) year, StoreBound, LLC will repair
or replace the defective part. To process a warranty claim, contact Customer Support at 1 (800)898-6970 for
further assistance and instruction. A Customer Support agent will assist you by troubleshooting minor problems.
If troubleshooting fails to x the problem, a return authorization will be issued. Proof of purchase indicating the
date and place of purchase is required and should accompany the return. You must also include your full name,
shipping address, and telephone number. We are unable to ship returns to a PO box. StoreBound will not be
responsible for delays or unprocessed claims resulting from a purchaser’s failure to provide any or all of the
necessary information. Freight costs must be prepaid by the purchaser.
Send all inquiries to [email protected].
There are no express warranties except as listed above.
REPAIR OR REPLACEMENT AS PROVIDED UNDER THIS WARRANTY IS THE EXCLUSIVE REMEDY OF THE
CUSTOMER. STOREBOUND SHALL NOT BE LIABLE FOR ANY INCIDENTAL OR CONSEQUENTIAL DAMAGES
OR FOR BREACH OF ANY EXPRESS OR IMPLIED WARRANTY ON THIS PRODUCT EXCEPT TO THE EXTENT
REQUIRED BY APPLICABLE LAW. ANY IMPLIED WARRANTY OF MERCHANTABILITY OR FITNESS FOR A
PARTICULAR PURPOSE ON THIS PRODUCT IS LIMITED IN DURATION TO THE DURATION OF THIS WARRANTY.
Some states do not allow the exclusion or limitation of incidental or consequential damages, or limitations on
how long an implied warranty lasts. Therefore, the above exclusions or limitations may not apply to you. This
warranty gives you specic legal rights and you may also have other rights, which vary from state to state.
Refurbished items or items not purchased through an authorized retailer are not eligible for warranty claims.
REPAIRS
DANGER! Risk of electric shock! The Dash Quest Blender is an electrical appliance.
Do not attempt to repair the appliance yourself under any circumstances.
Contact Customer Support regarding repairs to the appliance.
TECHNICAL SPECIFICATIONS
Voltage 120V ~ 60Hz
Power Rating 600W
Stock#: DQB150_20221025_V6
6am –
6pm
Dash values quality and workmanship and stands behind this
product with our Feel Good Guarantee™. To learn more about
our commitment to quality, visit bydash.com/feelgood.
7am –
7pm 8am –
8pm
9am –
9pm
Hey Hawaii! You can reach our customer service team from 3AM to 3PM.
And also, Alaska, feel free to reach out from 5AM to 5PM.
feel good
guarantee™
Our customer support teams in the US and Canada are at
your service Monday - Friday during the times below.
Contact us at 1 (800) 898-6970 or suppor[email protected]
La page est en cours de chargement...
-
 1
1
-
 2
2
-
 3
3
-
 4
4
-
 5
5
-
 6
6
-
 7
7
-
 8
8
-
 9
9
-
 10
10
-
 11
11
-
 12
12
-
 13
13
-
 14
14
-
 15
15
-
 16
16
-
 17
17
-
 18
18
-
 19
19
-
 20
20
-
 21
21


Dash Quest Blender Manuel utilisateur
- Catégorie
- Mélangeurs
- Taper
- Manuel utilisateur
dans d''autres langues
- English: Dash Quest Blender User manual