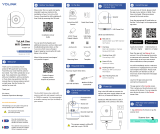
Get to Know Your
Motorized Valve
F
The valve included in this kit is a 12VDC
non-smart motorized valve. Use only
this valve or YoLink-approved valve
control products, such as the Bulldog
Valve Robot. Do not use with non-YoLink
valve products.
Contact Us
K
Power Up, Final
Connections & Testing
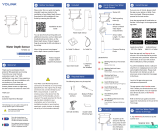
J
6. Wrap each adapter’s threaded end
with thread seal tape, per the tape
manufacturer’s instructions, as shown
below.
7. Install the Smart Motorized Valve on
the adapter fittings, ensuring a secure
connection at each fitting, as shown
below.
8. At the water valve or point of discon-
nection, turn the water on again.
9. Verify there are no leaks and no visible
water on the motorized valve.
Preparing for installation:
Determine where you will install your
Valve Controller 2. Typically, it should be
wall-mounted, no farther away from the
motorized valve than the length of the
cables allow (if you have purchased
optional extension cables, the valve
controller can be installed at a location
separate from the motorized valve).
Note: Use of the 12VDC power adapter is
optional, but in that case, batteries are
required. If the power adapter is used,
batteries are optional.
Determine how you will mount the valve
controller to the wall, and have hardware
and anchors appropriate for the wall
surface on hand.
Mark the valve controller’s three screw
hole locations on the wall first, if desired,
ensuring a level installation.
Hang the valve controller from the
top-most screw, then secure the valve
controller to the wall by inserting the
remaining two screws. Finally, tighten all
three screws, as needed.
1. The Valve Controller will appear offline
until it is turned on and it wirelessly
connects to a YoLink hub. Turn on the
Valve Controller by pressing the SET
button until you see the LED blink (red,
then green, indicates the Valve Controller
2 has connected to the cloud).
2. In the app, verify the Valve Controller
is indicated as online.
3. Connect the valve controller’s valve
control cable to the control cable of the
motorized valve.
4. Connect the valve controller’s valve
status cable to the valve status cable of
the motorized valve.
5. If using the power adapter, and before
plugging in the power adapter to the AC
power outlet, connect the valve control-
ler’s 12VDC input cable to the power
adapter cable. Plug in the power adapter
at the wall outlet.
6. Test the Valve Controller 2 and
motorized valve by pressing the SET
button and listening for the smooth
closing/opening of the valve, and by
checking the water flow at a faucet. The
water should be completely turned off
while the valve is in the shut position.
7. Test the operation of the Valve
Controller 2 from the app. From the
Rooms or Favorite screen, locate your
Valve Controller 2, tap the image, then
tap Close to turn off the water, and tap
Open to turn it on.
3. Cut the water pipe through the mark
using a pipe cutting tool, then remove
the cut section of pipe, as shown below.
4. Sand both ends of cut pipe, removing
any burrs or rough edges. Use care
handling the cut edges, which may be
sharp! Wipe off the cut section of pipe
with a clean cloth.
5. Install your adapter fittings in the pipe
ends, per the manufacturer instructions.
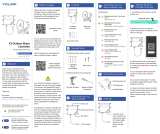
Add Your Valve Controller
2 to the App
G
1. Tap Add Device (if shown) or tap the
scanner icon:
Scanner icon
2. Approve access to your phone’s
camera, if requested. A viewfinder will be
shown on the app.
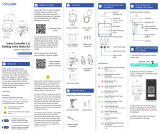
Manual Control
Knob
Lift, then turn either
clockwise to shut
the valve or
counterclockwise
to open the valve
Valve Position
Indicator
Window indicates
the current position
of the valve. “O”
indicates open, “S”
indicates shut
Valve Control
Cable
Valve Status Cable
Install the Valve
Controller 2
H
1. Shut-off the water serving the pipe
where the valve is to be installed. Drain
the water from the pipe, by turning on a
faucet, or by other method as required.
2. Depending on the adapter fitting used,
measure the length of pipe that must be
cut, and mark the cut lines on the pipe,
as shown below.
Install the Motorized
Valve
I
Install the Motorized
Valve Continued
I
We are here for you, if you ever need any
assistance installing, setting up or using
a YoLink app or product!
Need help? For fastest service, please
Or call us at 831-292-4831 (US phone
support hours: Monday - Friday, 9AM to
5PM Pacific)
You can also find additional support and
ways to contact us at:
www.yosmart.com/support-and-service
Or scan the QR code:
Finally, if you have any feedback or
suggestions for us, please email us at
Thank you for trusting YoLink!
Eric Vanzo
Customer Experience Manager
Support
Home Page
15375 Barranca Parkway
Ste. J-107 | Irvine, California 92614
© 2022 YOSMART, INC IRVINE,
CALIFORNIA