Waring Commercial WCM50 Series Manuel utilisateur
- Catégorie
- Accessoires de préparation de café
- Taper
- Manuel utilisateur

POUR-OVER COFFEE BREWER
CAFETERA COMERCIAL DE LLENADO MANUAL
CAFETIÈRE COMMERCIALE
À REMPLISSAGE MANUEL
WCM50 Series
For your safety and continued enjoyment of this product,
always read the instruction book carefully before using.
Para su seguridad y para disfrutar plenamente de este producto,
siempre lea cuidadosamente las instrucciones antes de usarlo.
An que cet appareil vous procure en toute sécurité beaucoup
de satisfaction, lire attentivement le mode d’emploi avant de l’utiliser.

2
TABLE OF CONTENTS
Important Safeguards ........................................................................2
Introduction ........................................................................................4
Grounding Instructions ........................................................................ 4
Short Cord Instructions ...................................................................... 5
Parts ...................................................................................................6
Controls ...............................................................................................7
Unpacking & Installation ......................................................................7
Electrical Hookup ...............................................................................7
Installation ...........................................................................................8
Coffee Brewing .................................................................................... 8
Cleaning & Maintenance .....................................................................9
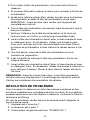
Troubleshooting .................................................................................10
Warranty ........................................................................................... 11
IMPORTANT SAFEGUARDS
When using electrical appliances, especially when children are present,
basic safety precautions should always be taken, including the following:
1.
2. Always unplug from outlet prior to handling or cleaning.
3. Do not touch hot surfaces. Use handles or knobs.
4. Do not move hot water dispenser when it contains hot water.
Completely drain and let the exterior surface cool before moving
5. T his appliance is not intended for use by persons (including
children) with reduced physical, sensory or mental capabilities,
or lack of experience and knowledge, unless they are under
supervision or have been given instruction concerning use of
the appliance by a person responsible for their safety.
6. T o protect against re, electrical hazards, and/or personal injury,
do not immerse cord, plugs or base in water or other liquids.
7. C lose supervision is necessary when any appliance is used
by or near children.
8. Do not operate any appliance with a damaged cord or plug
or after the appliance malfunctions or has been dropped or
damaged in any manner. Return appliance to the nearest
Waring Repair Center for examination, repair, and electrical
or mechanical adjustment.
READ ALL INSTRUCTIONS.
.

3
9. The use of accessory attachments not recommended by Waring
may cause injuries.
10. This appliance is not intended for outdoor use.
11. D o not let cord hang over edge of table or counter or touch
hot surfaces.
12. Do not place on or near a hot gas or electric burner, or in
a heated oven.
13. D o not use appliance for other than its intended use.
14. S calding may occur if the lid is removed during the lling and
heating process.
15. This Pour-Over Coffee Brewer is equipped with a 3-prong
grounding plug and must be plugged into a correctly polarized
3-prong grounding-type wall receptacle.
16. To reduce risk of electric shock, do not remove or open cover.
No user-serviceable parts inside. Repair should be done by
authorized service personnel only.
17. D o not clean with a water jet or use in an area where a water jet
may be used.
18. T o reduce risk of explosion or re, do not use near combustibles.
19. Do not use with an extension cord.
20. F or safe and proper operation, the appliance must be placed
in a stable, vertical position.
21. T o reduce risk of serious burns or scalding, do not place hand
or other body parts under dispenser or container while heating.
22. Always unplug unit from power supply before servicing.
23. Surfaces are hot and can cause burns.
SAVE THESE INSTRUCTIONS
FOR COMMERCIAL USE ONLY

4
INTRODUCTION
Thank you for purchasing this Waring™ Commercial Pour-Over
Coffee Brewer.
Features & Benefits
• 64-ounce portable coffeemaker – no plumbing required!
• High-end industrial design for professional environments
• Solid stainless steel construction, durable and easy to clean
• Guardrails around upper warmer for safe placement of
second decanter
• Separate switches for upper and lower warmers keep two
decanters of coffee at ideal serving temperature
• Ready and Power lights positioned on front of unit for
easy viewing
• Narrow footprint saves space on the counter
GROUNDING INSTRUCTIONS
For your protection, the WaringTM Commercial Pour-Over Coffee
Brewer is equipped with a 3-conductor cord set that has a molded
3-prong grounding-type plug, and should be used in combination
with a properly connected grounding-type outlet, as shown in Figure 1.
If a grounding-type outlet is not available, an adapter, shown in
Figure 2, may be obtained so that a 2-slot wall outlet can be used
with a 3-prong plug. Referring to Figure 3, the adapter must be
grounded by attaching its grounding lug under the screw of the
outlet cover plate.
CAUTION: Before using an adapter, it must be determined that the
outlet cover plate screw is properly grounded. If in doubt, consult a
licensed electrician. Never use an adapter unless you are sure it is
properly grounded.
NOTE: Use of an adapter is not permitted in Canada.

5
SHORT CORD INSTRUCTIONS
A short power-supply cord is provided to reduce the risk resulting
from becoming entangled in or tripping over a longer cord.
If a longer, detachable power-supply cord or extension cord is
used, (1) the marked electrical rating of the extension cord should
be at least as great as the electrical rating of the appliance, and
(2) the longer cord should be arranged so that it will not drape over
the countertop or tabletop where it can be pulled on by children or
tripped over unintentionally.
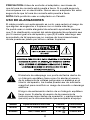
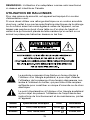
The lightning ash with arrowhead symbol within an
equilateral triangle is intended to alert the user to the
presence of uninsulated, dangerous voltage within the
product’s enclosure that may be of sufcient magnitude
to constitute a risk of re or electric shock to persons.
The exclamation point within an equilateral triangle is
intended to alert the user to the presence of important
operating and maintenance (servicing) instructions in the
literature accompanying the appliance.
Model Electrical Plug Approval
WCM50 120V, 1800W, 60Hz 5-15P TUVus, NSF
WCM50C 120V, 1440W, 60Hz 5-15P cTUVus, NSF

5
1
7
2
3
4
6
9
6
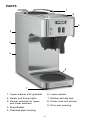
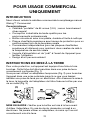
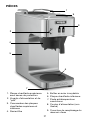
PARTS
1. Upper warmer with guardrail 6. Lower warmer
2. Ready and Power lights 7. Rubber anti-slip feet
3. R ocker switches for upper 8. Power cord (not shown)
and lower warmers 9. Pour-over opening
4. Brew Basket
5. Stainless steel housing

7
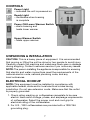
CONTROLS
Power Light
– indicates the unit is powered on
Ready Light
– illuminates when brewing
is complete
Power ON/Lower Warmer Switch
– starts brewing and
heats lower warmer
Upper Warmer Switch
– heats upper warmer
UNPACKING & INSTALLATION
CAUTION: This is a heavy piece of equipment. It is recommended
that moving or lifting the unit be done by two people to avoid injury.
Carefully unpack the machine and make sure there was no damage
during shipping. Contact customer service if you notice any issues.
NOTE: The person installing the appliance is responsible for ensuring
that electric and water connections meet the requirements of the
national electric code, national plumbing code, and any
local ordinances.
ELECTRICAL HOOKUP
NOTE: This equipment must be installed in compliance with
applicable federal, state and/or local electrical codes having
jurisdiction. Do not use extension cords. Make sure that the outlet
is properly grounded.
1. C heck rating marking on coffeemaker nameplate to be sure
electric lines match voltage, phase, and amperage requirements
of coffeemaker. Select the proper cord and cord grip for
electrical rating of the coffeemaker.
2. For U.S., 120V coffeemakers are provided with a 120V/15A
grounding plug.

8
1. INSTALLATION
CAUTION: The brewer must be disconnected from the power source
throughout the initial setup, except when specied in the instructions.
1. Insert an empty brew basket into the rails.
2. Place an empty decanter under the brew basket.
3. Make sure the heater switch (left ROCKER SWITCH) is in the OFF
position (down) and connect the brewer to the power source.
INITIAL START-UP BEFORE BREWING COFFEE
For initial start-up, or if the brewer has not been used for an extended
period of time, please follow the steps below:
1. Place an empty decanter under the brew basket.
2. Make sure the left rocker switch is in the OFF position (down).
3. Pour one 64 oz. carafe of water into the screened pour-over
opening. Make sure water does not pass max ll line.
The water will cycle through the machine. Some water may
ow into the carafe.
4. Turn power ON via the left rocker switch. This will brew out
the water.
5. O nce complete, discard water. Brewer is now ready for use in
accordance with the coffee brewing instructions.
COFFEE BREWING
1. Insert a lter paper into the brew basket.
2. Place appropriate amount of ground coffee into the lter and
level the bed of grounds by gently shaking.
3. Slide the brew basket into the rails.
4. Place an empty decanter beneath the brew basket.
5. P our 64 ounces of tap water into the screened area of the pour-
over opening on top of the brewer.
6. P ress the left rocker switch into the up position to activate the
lower warmer and start the brew cycle. Allow 1 to 2 minutes for
64 ounces of water to heat up. NOTE: Red light in switch
indicates when unit is turned on.
7. U se the right rocker switch to activate the upper warmer
if needed.
8. Hot water will be delivered through the spray head. This
distributes the hot water evenly over the coffee bed within the

9
brew basket. The brewed coffee will drain from the brew basket
into the decanter below.
9. Once brewing is complete, the green Ready light will illuminate.
10. Simply discard the grounds and lter.
11. T URN OFF WARMERS WHEN NOT IN USE. NOTE: When
switches are off, brewing is disabled.
CLEANING & MAINTENANCE
ALWAYS DISCONNECT OR UNPLUG THE COFFEE BREWER
BEFORE CLEANING. Allow the brewer to cool completely before
handling or before cleaning.
1. T he use of a damp cloth rinsed in any mild, nonabrasive liquid
detergent is recommended for cleaning all surfaces on Waring
equipment.
a. DO NOT use any cleaning uids that can be harmful to you,
others around you, or to the environment.
b. DO NOT hose down, immerse or pressure wash any part of
the coffee brewer.
c. N EVER use steel wool or abrasive materials to clean the
coffee brewer.
NOTE: All sanitizing agents in the food zone must comply with U.S.
Food & Drug Administration Code of Federal Regulations Title 21,
Section 178.1010. Sanitize all food-dispensing units periodically. All
parts to be sanitized must be cleaned rst. Cleaning and sanitizing
frequency must follow state and local health department regulations.
NOTE: Do not use cleansers, bleach liquids, powders, or any other
substance containing chlorine. These products promote corrosion
and will pit the stainless steel. USE OF THESE PRODUCTS WILL
VOID THE WARRANTY.
2. Check and clean the spray head underneath the front panel.
The spray-head holes must always remain open.
3. To remove the spray head from the brew head, follow the
instructions below.
4. If brew basket is in place, remove it in order to access the
spray head.
5. Once brew basket has been removed, reach under the brew
head and grab spray head with hand. NOTE: Make sure unit is
completely cooled.

10
6. Gently but rmly pull down on the spray head to unlatch it.
7. W ipe inside of brew head and area around the brew head with
a soft, clean cloth or sponge moistened with clean water.
8. Wash the spray head in a sink using warm water and a mild
detergent. A soft bristle brush may be used to clear clogged
spray holes. Rinse the spray disk with clean water and allow
to air-dry.
9. Once dry, reinstall the spray head under the brew head.
10. I t’s recommended to clean the spray head at the end of every
service week.
11. W ash the brew basket in a sink using warm water and a mild
detergent. A soft bristle brush may be used to clean the inside.
Rinse with clean water and allow to air-dry.
NOTE: In hard-water areas, this may need to be done more
frequently. It will help prevent liming problems in the brewer, and
takes less than a minute to complete.
TROUBLESHOOTING
A troubleshooting guide is provided to suggest probable causes
and remedies for the most likely problems encountered. If the
problem remains after exhausting the troubleshooting steps,
contact the Waring Technical Service Department.
If unit will not brew, check the following before calling for service:
1. Is the unit plugged in?
2. Was water poured into the unit?
3. Is the lower warmer/brew switch in the ON position?
4. Inspection, testing, and repair of electrical equipment should be
performed only by qualied service personnel.
5. M ake certain that all electrical connections are tight and isolated.
If unit will not brew, check the following before calling customer
service.
Water won’t heat.
a. Brewer may be unplugged. Check power supply cord or check
circuit breaker.
b. You may not have enough water or too little water added at
start-up. Be sure to add sufcient water.
Coffee level low.
a. In this case, you may not have poured in enough water. Increase
the amount of water.

11
b. There may be too many coffee grounds in brew basket. Adjust the
amount of grounds.
Brew basket overflows.
a. Too many lter papers or wrong lter paper. Check to make sure
you are using the correct lters.
b. Brew basket hole is plugged. Thoroughly clean the brew basket.
c. T oo much coffee or too ne a grind. Adjust the coffee amount
and grind.
Water spraying from the brew head.
a. Spray head might be improperly installed. Reinstall spray head.
b. Spray head might be plugged. Clean spray head.
Poor coffee quality.
a. Keep brewer and decanters clean. Install a taste and odor lter
in water supply, and replace cartridges regularly. Use a quality
coffee with a consistent roast. Use proper grind and amount of
coffee per brew.
LIMITED ONE-YEAR WARRANTY
(U.S. AND CANADA ONLY)
Waring warrants every new WaringTM Commercial Pour-Over Coffee
Brewer to be free from defects in materials and workmanship
for a period of one year from the date of purchase when used
with foodstuffs, nonabrasive liquids (other than detergents) and
nonabrasive semiliquids, providing it has not been subject to loads in
excess of the indicated rating.
Under this warranty, Waring will repair or replace any part that, upon
our examination, is defective in materials or workmanship, provided
the product is delivered prepaid to the Waring Service Center at
314 Ella T. Grasso Ave., Torrington, CT 06790, or any Factory
Approved Service Center.
This warranty does not: a) apply to any product that has become
worn, defective, damaged or broken due to use or due to repairs
or servicing by other than the Waring Service Center or a Factory
Approved Service Center, or due to abuse, misuse, overloading or
tampering; or b) cover incidental or consequential damages of any
kind. This warranty is void if appliance is used on Direct Current (DC).
WARING COMMERCIAL
314 Ella T. Grasso Ave.
Torrington, CT 06790

12
ÍNDICE
Medidas de seguridad importantes ..................................................12
Introducción ......................................................................................14
Instrucciones de puesta a tierra ........................................................14
Uso de alargadores ........................................................................... 15
Piezas ................................................................................................16
Controles .......................................................................................... 17
Desembalaje e instalación................................................................ 17
Conexión a la red eléctrica ................................................................17
Instalación .........................................................................................18
Preparación ......................................................................................18
Limpieza y mantenimiento ................................................................ 19
Resolución de problemas .................................................................20
Garantía ............................................................................................. 21
MEDIDAS DE SEGURIDAD
IMPORTANTES
Al usar aparatos eléctricos, especialmente en presencia de niños,
siempre debe tomar precauciones básicas de seguridad, entre ellas las
siguientes:
1. LEA TODAS LAS INSTRUCCIONES.
2. S iempre desenchufe el aparato antes de cualquier manipulación
o mantenimiento, y antes de la limpieza.
3. No toque las superficies calientes; use los mangos/asas y los
botones/perillas.
4. No mueva el aparato mientras contenga agua caliente; vacíelo
completamente y espere hasta que la superficie exterior se haya
enfriado antes de moverlo.
5. Lo s niños o las personas que carezcan de la experiencia o
de los conocimientos necesarios para manipular el aparato,
o aquellas cuyas capacidades físicas, sensoriales o mentales
estén limitadas, no deben usar el aparato sin la supervisión o la
dirección de una persona responsable por su seguridad.
6. P ara reducir el riesgo de incendio, descarga eléctrica o lesiones,
no sumerja el cable, el enchufe, ni la base en agua ni en ningún
otro líquido.

13
7. S upervise de cerca el uso de este aparato cuando sea usado
por niños o cerca de ellos.
8. No use este aparato si el cable o el enchufe están dañados,
después de un mal funcionamiento, después de que se haya
caído, o si está dañado; devuélvalo a un centro de servicio
autorizado para su revisión, reparación o ajuste.
9. El uso de accesorios no recomendados por Waring para uso con
este modelo puede causar heridas.
0. Esta unidad no está diseñada para uso en exteriores.
11. N o permita que el cable cuelgue del borde de la encimera o de
la mesa, ni que tenga contacto con superficies calientes.
2. No coloque el aparato sobre o cerca de un quemador a gas o de
un hornillo eléctrico caliente, ni en un horno caliente.
3. N o use el aparato para ningún fin que no sea el indicado.
4. N o quite la tapa durante el llenado o el calentamiento; esto
puede causar quemaduras graves.
5. Este aparato cuenta con un cable de puesta a tierra, con
enchufe de tierra, el cual debe ser enchufado en una toma de
corriente debidamente puesta a tierra.
6. Para reducir el riesgo de descarga eléctrica, no abra/quita la
carcasa. Este aparato no contiene ninguna pieza que pueda ser
reparada/cambiada por el usuario. Las reparaciones deben ser
efectuadas por técnicos autorizados solamente.
17. N o limpie el aparato a presión/con un chorro de agua, y no lo
use en un lugar donde se use un rociador/chorro de agua.
18. P ara reducir el riesgo de explosión o incendio, no lo use cerca
de combustibles.
19. No use un cable alargador/de extensión con este aparato.
20. C oloque siempre la unidad en posición vertical, sobre una
superficie estable, para garantizar un funcionamiento adecuado
y seguro.
21. P ara reducir el riesgo de quemaduras o escaldaduras graves, no
coloque la mano ni ninguna otra parte del cuerpo debajo de la
unidad o del grifo mientras el agua se esté calentando.
22. Siempre desenchufe la unidad antes de realizar cualquier trabajo
de mantenimiento.
23. L as superficies de la unidad se ponen muy calientes y pueden
causar quemaduras.
1
1
1
1
1
1

14
GUARDE ESTAS INSTRUCCIONES
PARA USO COMERCIAL
SOLAMENTE
INTRODUCCIÓN
Gracias por comprar la cafetera comercial de llenado manual
Waring™ Commercial.
Características
• Cafetera “portátil” de 64 onzas (1.9 L). ¡No requiere conexión a
la red de agua!
• Diseño industrial de alta calidad para entornos profesionales
• Resistente carcasa de acero inoxidable, duradera y fácil de
limpiar
• Placa calentadora superior con barras de protección para una
colocación segura de la segunda jarra
• Controles independientes (para las placas calentadores
superior e inferior) para mantener dos jarras de café a la
temperatura de servicio ideal
• Luces de encendido y listo en la parte delantera de la unidad
para mayor comodidad de uso
• Diseño delgado que ahorra espacio
INSTRUCCIONES DE PUESTA A TIERRA
Para su protección, su aparato cuenta con un cable de puesta a
tierra equipado con un enchufe de tierra, el cual debe ser conectado
a una toma de corriente debidamente puesta a tierra (Fig. 1).
Si una toma de corriente con toma de tierra no está disponible, se
podrá usar un adaptador para conectar el aparato a una toma de
corriente sin toma de tierra (Fig. 2). El adaptador debe ser puesto
a tierra mediante un tornillo de metal que conecte la lengüeta del
adaptador a la placa de la toma de corriente (Fig. 3).

15
PRECAUCIÓN: Antes de enchufar el adaptador, cerciórese de
que la toma de corriente está puesta a tierra. Si no está seguro/a,
comuníquese con un electricista. Nunca use un adaptador sin estar
seguro/a de que la toma de corriente esté puesta a tierra.
NOTA: Está prohibido usar un adaptador en Canadá.
USO DE ALARGADORES
El cable provisto con este aparato es corto, para reducir el riesgo de
que alguien se enganche o tropiece con un cable más largo.
Se podrá usar un cable alargador/de extensión aprobada, siempre
que (1) la clasificación nominal del cable alargador/de extensión sea
por lo menos igual a la del aparato y que (2) el cable más largo sea
acomodado de tal manera que no cuelgue de la encimera/mesa,
donde puede ser jalado por niños o causar tropiezos.
Modelo Especificaciones eléctricas Enchufe Certificación
WCM50 120 V, 1800W, 60Hz 5-15P TUVus, NSF
WCM50C 120V, 1440W, 60Hz 5-15P cTUVus, NSF
El símbolo de relámpago con punta de flecha dentro de
un triángulo equilátero tiene como fin alertar al usuario
de la presencia de voltajes peligrosos no aislados en el
interior del aparato, los cuales pueden ser de suficiente
magnitud para constituir un riesgo de incendio o descarga
eléctrica.
El signo de exclamación dentro de un triángulo equilátero
tiene como fin alertar al usuario de la presencia de
instrucciones importantes de operación y mantenimiento
(servicio) en la documentación que acompaña al equipo.

16
5
1
7
2
3
4
6
9
PIEZAS
1. Placa calentadora superior 5. Carcasa de acero inoxidable
con barras de protección 6. Placa calentadora inferior
2. Luces de listo y encendido 7. Pies de goma antideslizantes
3. Controles de las placas 8. Cable (no ilustrado)
calentadoras superior e
inferior 9. B oca de llenado del depósito
4. Portafiltro de agua

17
CONTROLES
Luz de encendido
– indica que la unidad está
encendida
Luz de listo
– se enciende cuando el café está
listo
Interruptor POWER ON/LOWER
WARMER
– inicia el ciclo de preparación y
enciende la placa calentadora
inferior
Interruptor UPPER WARMER
– enciende la placa calentadora
superior
DESEMBALAJE E INSTALACIÓN
PRECAUCIÓN: Este aparato es pesado; es aconsejable moverlo
o levantarlo entre dos personas para evitar lesiones. Desembale la
unidad con cuidado y cerciórese de que no se ha dañado durante el
transporte. En caso de problemas, póngase en contacto con nuestro
servicio de atención al cliente.
NOTA: Es responsabilidad del instalador del aparato asegurarse de
que las conexiones eléctricas y de agua cumplan con los requisitos
del código eléctrico nacional, el código nacional de plomería y
cualquier ordenanza local.
CONEXIÓN A LA RED ELÉCTRICA
NOTA: Este aparato debe instalarse de acuerdo con los códigos
nacionales, regionales y locales aplicables. No use la unidad con un
cable alargador/de extensión. Cerciórese de que la toma de corriente
está correctamente conectada a tierra.
1. C hequee las especificaciones eléctricas del dispositivo,
indicadas en su placa de especificaciones técnicas, y cerciórese
de que la línea eléctrica usada corresponde a la tensión, fase y
amperaje requeridos. Cerciórese de usar el cable y el enchufe
correctos.
2. Lo s modelos de 120V destinados al mercado norteamericano
cuentan con un enchufe de conexión a tierra de 120V/15 A.

18
2. INSTALACIÓN
PRECAUCIÓN: La cafetera debe estar desconectada de la fuente
de alimentación durante la configuración inicial, a menos que las
instrucciones especifiquen el contrario.
1. Deslice el portafiltro vacío en los rieles.
2. Coloque una jarra vacía debajo del portafiltro.
3. Compruebe que el interruptor izquierdo está en la posición
“LOWER WARMER” y enchufe la cafetera en una toma de
corriente.
ANTES DEL PRIMER USO
Antes del primer uso, o si no ha usado la cafetera durante un período
de tiempo prolongado, siga los siguientes pasos:
1. Coloque una jarra vacía debajo del portafiltro.
2. Compruebe que el interruptor izquierdo está en la posición
“LOWER WARMER”.
3. Vierta 64 onzas (1.9 L) de agua en el depósito de agua.
Cerciórese de no pasar la línea “MAX”. El agua circulará a través
de la máquina. Es posible que un poco de agua fluya en la jarra.
4. Encienda la unidad, poniendo el interruptor izquierdo en
“POWER ON”; el ciclo de preparación se iniciará.
5. A l final del ciclo, tire el agua. Ahora, la cafetera está lista.
PREPARACIÓN
1. Coloque un filtro de papel en el portafiltro.
2. Coloque la cantidad deseada de café molido en el filtro y sacuda
suavemente el filtro para nivelar el café.
3. Deslice el portafiltro en los rieles.
4. Coloque una jarra vacía debajo del portafiltro.
5. V ierta 64 onzas (1.9 L) de agua en el depósito de agua.
6. P onga el interruptor izquierdo en la posición “POWER ON”.
Permita que el agua se caliente por 1 a 2 minutos. NOTA: El
indicador luminoso rojo estará encendido.
7. S i desea usar la placa calentadora superior, ponga el interruptor
derecho en la posición “UPPER WARMER”.
8. El agua caliente saldrá del cabezal de pulverización y mojará el
café en el portafiltro. El café preparado se escurrirá en la jarra.

19
9. Al final del ciclo de preparación, la luz de listo verde “READY” se
encenderá para indicar que el café está listo.
10. Simplemente tire los posos de café y el filtro.
11. A PAGUE LAS PLACAS CALENTADORAS CUANDO LA
CAFETERA NO ESTÉ EN USO. NOTA: Para detener el ciclo
de preparación en cualquier momento, ponga el interruptor
izquierdo en la posición “LOWER WARMER”.
LIMPIEZA Y MANTENIMIENTO
SIEMPRE DESENCHUFE LA UNIDAD ANTES DE LA LIMPIEZA.
Permita que el aparato se enfríe completamente antes de manipularlo
o limpiarlo.
1. L impie la carcasa con un paño humedecido con cualquier
detergente suave y no abrasivo.
a. NO use productos de limpieza susceptibles de generar
riesgos para usted, las personas alrededor de usted o el
medio ambiente.
b. NO lave a chorro el aparato ni ninguna de sus piezas, ni los
sumerja.
c. N UNCA use lana de acero u otros materiales abrasivos para
limpiar el aparato.
NOTA: Cualquier agente desinfectante usado en partes que tengan
contacto con el agua debe cumplir con el Código de Regulaciones
Federales “Título 21, Sección 178.1010” de la FDA (Administración de
Alimentos y Medicamentos de los EE.UU.). Desinfecte regularmente
todas las piezas en contacto con el agua, después de lavarlas/
limpiarlas. La frecuencia de limpieza y desinfección debe cumplir con
los reglamentos estatales y locales del departamento de salud.
NOTA: No use productos de limpieza, lejía, polvos abrasivos ni
ninguna otra sustancia que contengan cloro; estos productos
promueven la corrosión y pueden picar el acero inoxidable. USAR
ESTOS PRODUCTOS INVALIDARÁ LA GARANTÍA
2. Chequee y limpie el cabezal de pulverización situado debajo del
panel delantero.
Los orificios del cabezal de pulverización deben estar libres de
obstrucciones.
3. Para retirar el cabezal de pulverización, siga las instrucciones a
continuación.

20
4. Si el portafiltro está en su puesto, retírelo para poder acceder al
cabezal de pulverización.
5. Después de sacar el portafiltro, alcance debajo de la cámara de
preparación y agarre el cabezal de pulverización con una mano.
NOTA: Antes de hacer esto, compruebe que la unidad está
completamente fría.
6. J ale el cabezal de pulverización suave pero firmemente hacia
abajo para quitarlo.
7. L impie el interior del cabezal de pulverización y el área alrededor
del mismo con un paño o una esponja humedecidos con agua.
8. Lave el cabezal de pulverización en el fregadero, usando agua
tibia y un detergente suave. De ser necesario, use un cepillo
de cerdas suaves para limpiar los orificios de pulverización
obstruidos. Enjuague el disco de pulverización con agua limpia y
permita que se seque al aire.
9. Cuando esté seco, vuelva a instalar el cabezal de vaporización
debajo de la cámara de preparación.
10. E s aconsejable limpiar el cabezal de pulverización al final de
cada semana.
11. L ave el portafiltro en el fregadero, usando agua tibia y un
detergente suave. De ser necesario, use un cepillo de cerdas
suaves para limpiar el interior. Enjuague con agua limpia y
permita que se seque al aire.
NOTA: En las zonas de agua dura, puede que sea necesario hacer
esto con más frecuencia. La limpieza es rápida y ayuda a evitar los
problemas de acumulación de cal.
RESOLUCIÓN DE PROBLEMAS
A continuación, se proporciona una lista de causas probables y
soluciones posibles para solucionar los problemas más comunes.
Si el problema persiste después de agotar los pasos a continuación,
póngase en contacto con el Departamento de Servicio Técnico de
Waring.
Si la unidad no funciona, compruebe lo siguiente antes de llamar al
servicio técnico:
1. ¿Está enchufada la unidad?
2. ¿Está lleno el depósito de agua?
3. ¿Está el interruptor izquierdo en la posición “POWER ON”?
4. La inspección y reparación de este equipo debe ser realizada
solo por personal de servicio calificado.
La page est en cours de chargement...
La page est en cours de chargement...
La page est en cours de chargement...
La page est en cours de chargement...
La page est en cours de chargement...
La page est en cours de chargement...
La page est en cours de chargement...
La page est en cours de chargement...
La page est en cours de chargement...
La page est en cours de chargement...
La page est en cours de chargement...
La page est en cours de chargement...
La page est en cours de chargement...
La page est en cours de chargement...
La page est en cours de chargement...
La page est en cours de chargement...
-
 1
1
-
 2
2
-
 3
3
-
 4
4
-
 5
5
-
 6
6
-
 7
7
-
 8
8
-
 9
9
-
 10
10
-
 11
11
-
 12
12
-
 13
13
-
 14
14
-
 15
15
-
 16
16
-
 17
17
-
 18
18
-
 19
19
-
 20
20
-
 21
21
-
 22
22
-
 23
23
-
 24
24
-
 25
25
-
 26
26
-
 27
27
-
 28
28
-
 29
29
-
 30
30
-
 31
31
-
 32
32
-
 33
33
-
 34
34
-
 35
35
-
 36
36


Waring Commercial WCM50 Series Manuel utilisateur
- Catégorie
- Accessoires de préparation de café
- Taper
- Manuel utilisateur